Specifying Which Offerings and Functional Areas to Load

You specify which offerings and functional areas to load by creating a load plan. A load plan is a set of instructions in Configuration Manager that extracts data from a Cloud data source or Cloud Storage Service and loads that data into the OTBI-Enterprise data warehouse. Load plans can be executed once only or scheduled to execute regularly.

Specifying which Offerings and Functional Areas to load:
  1. In Configuration Manager, select the Manage Load Plans link on the Tasks pane.
    Description of GUID-282F7F2F-D95D-41D0-8F59-A5910FD4D917-default.gif follows
    Description of GUID-282F7F2F-D95D-41D0-8F59-A5910FD4D917-default.gif
  2. On the Load Plans toolbar, click the Add icon (Add icon) to display the Define Load Plan dialog.
    Description of GUID-661E0FF2-6E91-4CB9-B0E5-A7C51BCB428B-default.gif follows
    Description of GUID-661E0FF2-6E91-4CB9-B0E5-A7C51BCB428B-default.gif
  3. On the first page of the Define Load Plan series, specify the following information about the load plan:
    • Name — Enter a unique name for the load plan to identify the data being loaded. This name is used in Configuration Manager, and in Health Check email notifications.
    • Description — (Optional) Enter additional information to help manage the load plan.
    • Load Plan Type — Select ‘Source Extract and Load (SDE, SIL and PLP)’.
    • Source Instances — Select the data sources from which the fact groups will be selected. This list displays the data sources that you specified during the task ‘Register FA HCM Cloud Source System’ or ‘Register Taleo Cloud Source System’ during the Initial Configuration stage.
  4. Click Next to display the Select Fact Groups page.
  5. In the Available Selections tab, select the Selected box next to each Offering that you want to include in the load plan.
    Description of GUID-643A0A89-1722-425A-B5E6-2D79726ADE69-default.gif follows
    Description of GUID-643A0A89-1722-425A-B5E6-2D79726ADE69-default.gif
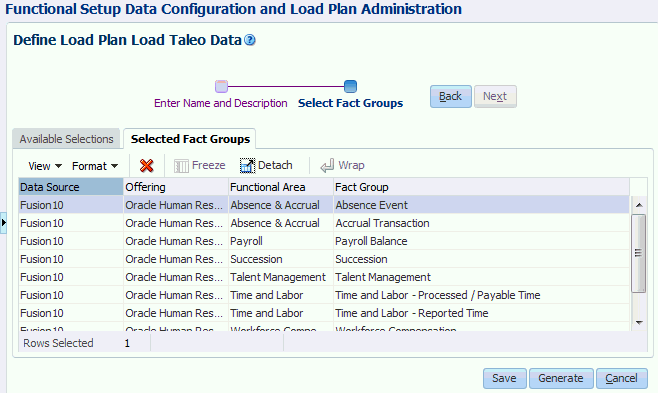
    To verify that you have the correct Fact Groups included in the Load Plan, click the Select Fact Groups tab and verify the list.
    img/GUID-CFD661AE-A6AD-4AF3-A640-5EEE55ABF6D6-default.gif
  6. Click Save, then click Generate.
    When the load plan generation is complete, you can execute the load plan manually or schedule the load plan to execute at a particular time. If the generation fails, then use the Help system in Configuration Manager to find out how to diagnose generation issues and make corrections.