Creating the CSF Key for the Eloqua Cloud and NetSuite Cloud Adapters in Oracle Enterprise Manager Fusion Middleware Control

Specify the following details to create the CSF key for the Oracle Eloqua Cloud adapter and Oracle NetSuite Cloud adapter in Oracle Enterprise Manager Fusion Middleware Control.
  1. Access the Credential Store page by following the steps in Configuring the CSF Map in Oracle Enterprise Manager Fusion Middleware Control.
  2. Click Create Key.
  3. Enter the following details, and click OK. The values you enter must be the same as those you enter when creating the CSF authentication key in the Adapter Configuration Wizard in Oracle JDeveloper.
    Field Description
    Select Map

    Select oracle.wsm.security.

    Key

    Enter a key value (for example, eloqua-key).

    Type (for Oracle Eloqua Cloud adapter)

    Select Generic. Oracle Eloqua Cloud adapter requires an additional property named company. The dialog is refreshed and prompts you to create specific property names and values.

    1. Enter an optional description.

    2. Click Enter map of property name and value pairs.

    3. Click Add Row to add an initial property name and value row.

    4. Enter username in the Property Name column.

    5. Specify values for username in the Value and Confirm Value columns.

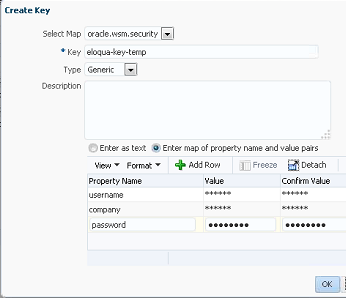
    6. Repeat the previous steps to enter rows for company and password. When complete, the dialog looks as follows for the Oracle Eloqua Cloud adapter:
      Description of GUID-63C65626-DCAC-447D-9AC4-D8E05B2671C2-default.png follows
      Description of the illustration GUID-63C65626-DCAC-447D-9AC4-D8E05B2671C2-default.png

    7. Click OK.

    Type (for Oracle NetSuite Cloud adapter)

    Select Generic. The dialog is refreshed and prompts you to create specific property names and values. The property names must be all lower-case.

    1. Enter an optional description.

    2. Click Enter map of property name and value pairs.

    3. Click Add Row to add an initial property name and value row.

    4. Enter email in the Property Name column.

    5. Specify values for email in the Value and Confirm Value columns.

    6. Repeat the previous steps to enter rows for account (for example, TSTDRV1135946), role (for example, 3), password, and (optionally) description.

    7. Click OK.