| Oracle® Argus Insight Administrator's Guide Release 8.0 E49991-01 |
|

 Previous |
 Next |
This chapter provides information about using the Argus Insight administration tools. You use the tabs on the ADMINISTRATION TOOLS page to configure, maintain, and secure Argus Insight.
This chapter includes the following topics:
Beginning with Argus 5.1, the database was converted to accommodate multibyte characters. The Argus J structure was merged into Argus Safety 5.1, which included Argus field conversion from VARCHAR to CLOB data type.
To ensure compatibility Argus Safety, Argus Insight 5.1 and later supports the following field changes:
Schema creation and validation — Data type changed from VARCHAR to CLOB
Initial ETL and Incremental ETL — Transformation logic changed
Database upgrade — Data type changed from VARCHAR to CLOB
Power Queries — QBEs, filters, and advanced conditions validated and modified
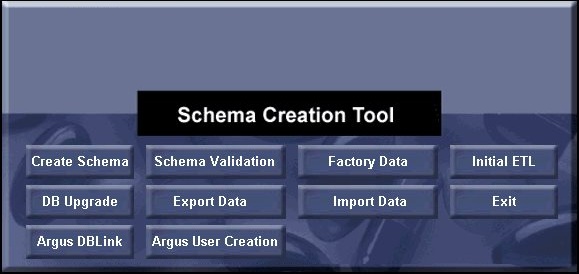
Using the Schema Creation Tool (see Figure 12-1), you create the Argus Insight data mart structure. You create a link between the source Argus Safety database and the new Argus Insight data mart. The Extract Transform and Load (ETL) process uses this link to transfer data from your Argus database to the Argus Insight data mart for reporting purposes.
During the schema creation process, you create four database users: one user for logging in to the Argus Insight application, two other users who are schema owners, and one user for supporting private database links (DB Links).
The Schema Creation Tool provides the following options:
Create Schema — Creates a new database schema for Argus Insight.
Schema Validation — Validates a newly-created database schema.
Factory Data — Loads the factory data into the database.
Initial ETL — Runs the initial process of extracting, transforming, and loading data.
DB Upgrade — Upgrades an existing Argus Insight 7.0.4 database to an Argus Insight 8.0 database.
Export Data — Exports data.
Import Data — Imports data.
Argus DBLink — Creates a link between Argus Insight and Argus Safety.
Argus User Creation — Lets you create Argus Insight users and roles.
Exit — Exits from the Schema Creation Tool.
For detailed information about using the Schema Creation Tool to create the Argus Insight data mart structure, including the database link, users, and roles, see the Oracle Argus Insight Installation Guide.
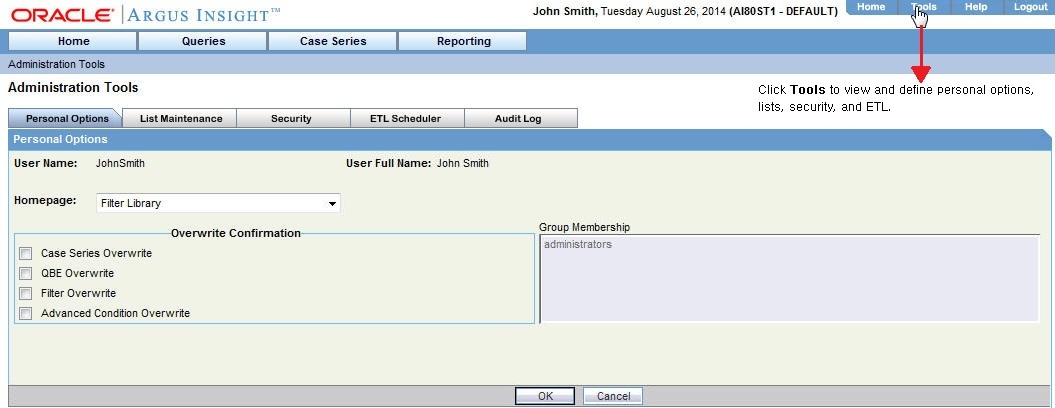
To access the Argus Insight administration tools, click Tools on the global toolbar in the upper-right corner of the page.
The ADMINISTRATION TOOLS page appears wit the Personal Options tab is in focus. See Figure 12-2.
Using the Personal Options tab on the ADMINISTRATION TOOLS page, you can:
Specify the default Home page for Argus Insight
Specify whether the system prompts you for confirmation before overwriting saved case series or queries
View the groups for which you are a member
By default, the Personal Options tab is in focus when you open the ADMINISTRATION TOOLS page.
The Personal Options tab is available to all users. For more information about using the Personal Options tab, see "Setting Your Personal Options".
This section describes the following tasks that you can perform using the List Maintenance tab on the ADMINISTRATION TOOLS page:
|
Note: * This List Maintenance item is available for configuration, if profile switch BO WEB URL is configured, and profile switch LEGACY REPORTS CONFIGURATION is set to 1.Besides, when the Argus Insight Application Data Source profile switch is set to Argus Mart, then in the List Maintenance section, only Profile Switches and Case Series Modification Justification list maintenance items are available. |
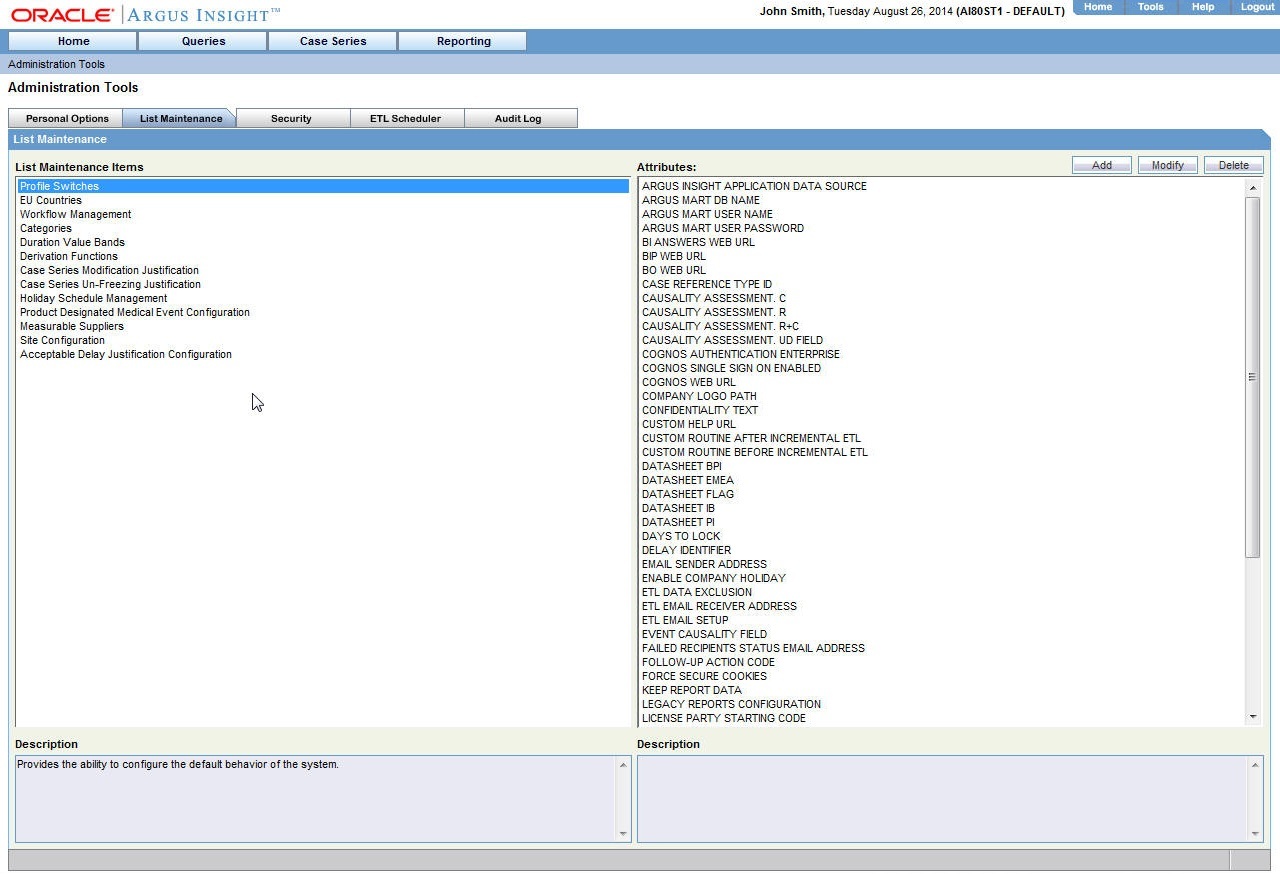
Profile switches are a collection of settings that let you configure the default behavior of Argus Insight. The default value of a profile switch can be predefined or based on user input. All profile switch values are case sensitive.
In general, you use the List Maintenance tab on the ADMINISTRATION TOOLS page (see Figure 12-3) to configure existing profile switches and to add new profile switches.
However, certain profile switches can only be configured through direct SQL statements.
Consult your company's policies and the terminology used before configuring profile switches.
For detailed information about all the profile switches, see the following documents:
Oracle Argus Insight CMN Profile Enterprise Table Guide
Oracle Argus Insight CMN Profile Global Table Guide
In addition, the documents have a sample SQL for inserting profile switches and updating their values in the database.
To access and modify the Argus Insight profile switches:
Click Tools on the global toolbar.
The ADMINISTRATION TOOLS page appears.
Click the List Maintenance tab.
from the List Maintenance Items section, select Profile Switches.
The Attributes section is updated with the profile switches that you can configure.
Select a profile switch, and click Modify.
The Modify Attributes dialog box appears.
Modify the values, and click OK.
The profile switch is updated.
To add a new profile switch:
Click Tools on the global toolbar.
The ADMINISTRATION TOOLS page appears.
Click the List Maintenance tab.
From the List Maintenance Items section, select Profile Switches.
The Attributes section is updated with the current profile switches.
Click Add.
The Add New Attribute dialog box appears.
Enter the profile switch name, key, and description.
Click OK.
Table 12-1 lists the profile switches that you can configure using the options in the List Maintenance tab. For each profile switch, the table specifies the name of the switch, indicates whether the switch is a global-level or an enterprise-level switch, and provides a brief description.
All the global-level switches are displayed, updated, and audit logged in the default enterprise.
When profile switch ARGUS INSIGHT APPLICATION DATA SOURCE is set to Argus Mart, the following profile switched will NOT be available for configuration:
KEEP REPORT DATA
LEGACY REPORT CONFIGURATION (with default value set to 0, so that other reporting switches are no visible)
POPULATE AFFILATE DATA
POPULATE BLOB DATA
POPULATE INTERCHANGE CLOB DATA
POPULATE INTERCHANGE DATA
For more information about viewing and editing profile switches, see "Configuring the Argus Insight Application Profile Switches".
|
Note: *This profile switch is available for configuration only when profile switch LEGACY REPORTS CONFIGURATION is set to 1. |
Table 12-1 Common Profile Switches
| Profile Switch | Switch Level | Description |
|---|---|---|
|
ARUGUS INSIGHT APPLICATION DATA SOURCE |
Enterprise |
Enables you to configure the data source for Argus Insight. You may run your queries for Argus Insight or Argus Mart depending on the value configured in this switch.
|
|
ARGUS MART DB NAME |
Enterprise |
Specify the database instance name for the Argus Mart data mart. This information enables to connect Argus Insight with Argus Mart database. |
|
ARGUS MART USER NAME |
Enterprise |
Specify the schema user created for Argus Insight in Argus Mart database. This user may perform all the background functions from Argus Insight application to Argus Mart database including querying and reporting. |
|
ARGUS MART USER PASSWORD |
Enterprise |
Specify the password of the schema user created for Argus Insight in Argus Mart database that is, the password of user configured in ARGUS MART USER NAME. |
|
BIP ANSWERS WEB URL |
Global |
Specifies the complete BI Answers Web URL for opening up the BI Answers home page. This URL can be for standalone BI Answers server or load balancer URL configured for multiple BI Answers servers. If BI Answers is configured for SSL, please make sure to use https with the URL. |
|
BIP WEB URL |
Enterprise |
Specifies the URL for accessing the BI Publisher Home page. This URL can be for standalone BI Publisher server, or Load Balancer URL configured for multiple BI Publisher servers. If BI Publisher is configured for SSL, you must use https with the URL. |
|
BO WEB URL |
Enterprise |
Specifies the complete BusinessObjects Web URL for opening the BusinessObjects Home page. This URL can be for standalone BusinessObjects server, or Load Balancer URL configured for multiple BusinessObjects servers. If BusinessObjects is configured for SSL, you must use https with the URL. |
|
*CASE REFERENCE TYPE ID |
Enterprise |
Populates the RPT_CASE.FIRST_REF_NO column. |
|
*CAUSALITY ASSESSMENT. C |
Enterprise |
Used in BIP standard reports for Company Defined Causality. |
|
*CAUSALITY ASSESSMENT. R |
Enterprise |
Used in BIP standard reports for Reporter Defined Causality. |
|
*CAUSALITY ASSESSMENT. R+C |
Enterprise |
Used in BIP standard reports for Reporter Defined Causality and Company Defined Causality. |
|
*CAUSALITY ASSESSMENT. UD FIELD |
Enterprise |
Used in BIP standard reports for user-defined field to determine causality. |
|
COGNOS AUTHENTICATION ENTERPRISE |
Global |
Defines the short name of the enterprise from which all users are authenticated for Cognos login. All Argus Insight users must be a member of this template enterprise. On the Cognos Server, Cognos security is enabled only after this switch is configured. |
|
COGNOS SINGLE SIGN ON ENABLED |
Global |
Determines whether Cognos is Single Sign On (SSO) enabled or not. This profile switch has one of the following values:
|
|
COGNOS WEB URL |
Enterprise |
Defines the complete Cognos Web URL for opening the Cognos Home Page. This URL can be Cognos URL for Standalone Cognos Server, or Load Balancer URL configured for multiple Cognos Servers. If Cognos is configured for SSL, you must use https with the URL. Example: http://<server name>/Cognos102 Default Value — Blank |
|
*COMPANY LOGO PATH |
Enterprise |
Defines the location of the company logo on the local server. This logo prints in the report header. |
|
*CONFIDENTIALITY TEXT |
Enterprise |
Defines the confidential text that prints in the running footer on each page in the report. |
|
CUSTOM HELP URL |
Enterprise |
Defines the URL for your customized online help. If the URL is not valid, users receive the following error message:
|
|
CUSTOM ROUTINE AFTER INCREMENTAL ETL |
Global |
Defines the full path of the custom routine (Oracle stored procedure) to be executed after Incremental ETL. If the routine fails or is not found, the administrator receives an email notification. |
|
CUSTOM ROUTINE BEFORE INCREMENTAL ETL |
Global |
Defines the full path of the custom routine (Oracle stored procedure) to be executed before Incremental ETL. If this routine fails or is not found, then the ETL does not run and the administrator receives an email notification. |
|
*DATASHEET BPI |
Enterprise |
Configures the user-defined fields for assessment of BPI Datasheet in the Product tab. |
|
*DATASHEET EMEA |
Enterprise |
Configures the user-defined fields for assessment of EMEA Datasheet in the Product tab. |
|
*DATASHEET FLAG |
Enterprise |
Sets the flag used during Incremental ETL to determine whether to populate the data in the four DATASHEET fields (DATASHEET BPI, DATASHEET EMEA, DATASHEET IB, DATASHEET PI) for all the cases or for only the modified cases. |
|
*DATASHEET IB |
Enterprise |
Configures the user-defined fields for assessment of IB Datasheet in the Product tab. |
|
*DATASHEET PI |
Enterprise |
Configures the user-defined fields for assessment of PI Datasheet in the Product tab. |
|
*DAYS TO LOCK |
Enterprise |
Configures the number of days to lock for a case. |
|
*DELAY IDENTIFIER |
Enterprise |
Defines the delay text that ETL uses to populate the RPT_FOLLOWUP.CORE_DELAY_ROUTING_COMMENT field in the Supplier Performance Report and the Process Performance Report - Workflow. |
|
EMAIL SENDER ADDRESS |
Enterprise |
Defines the email address of the person on whose behalf Argus Insight sends all email messages. If you leave the value blank, then Argus Insight sends no email messages. |
|
ENABLE_AI_PROCESSING |
Enterprise |
Note: Use Argus Safety Console to enable this profile switch. This profile switch must be set to Yes to link Argus Insight database to Argus Mart database.
|
|
*ENABLE COMPANY HOLIDAY |
Enterprise |
Defines company holiday calendar in due date calculation of Data Entry Performance Over Time Report (0 = Disable and 1 = Enable). This profile switch contains one of the following values:
|
|
ETL DATA EXCLUSION |
Global |
Specifies whether to continue or cancel the ETL process if cases with erroneous data are found. |
|
ETL EMAIL RECEIVER ADDRESS |
Global |
Defines the email address of each administrator who will receive email status messages of the ETL process. Use a semi-colon to separate each entry. If you leave the value blank, then Argus Insight sends no email messages. |
|
ETL EMAIL SETUP |
Global |
Defines whether to send an email only after ETL failure, only after ETL success, or in either case. |
|
*EVENT CAUSALITY FIELD |
Enterprise |
Determines which user defined field of the Event tab is to be displayed in the Case Reporter Type Listing. |
|
FAILED RECIPIENTS STATUS EMAIL ADDRESS |
Enterprise |
Defines the email address of the user who will receive information regarding undeliverable email messages due to an invalid email ID or other error. |
|
*FOLLOW-UP ACTION CODE |
Enterprise |
Configures the code that indicates a follow-up action is required. |
|
FORCE SECURE COOKIES |
Global |
Defines whether the user must enter a SSL-enabled URL (HTTPS) to open the Argus Insight application. |
|
KEEP REPORT DATA |
Enterprise |
Represents a flag to determine if the Report Log Tables need to be populated or not.
Default Value — N |
|
LEGACY REPORTS CONFIGURATION |
Global |
Determines if Legacy Report Configuration profile items are visible/invisible. Possible Values are:
Default Value — 0 |
|
*LICENSE PARTY STARTING CODE |
Enterprise |
Configures starting code for a licensing party. Currently, this key is used for Process Performance Report - Notification. |
|
LOG REPORT SQL |
Global |
Identifies if report SQL is to be logged. Possible Values are:
Default Value — 0 |
|
MAXIMUM EMAIL ATTEMPTS |
Global |
Defines the maximum number of times the system attempts to send an email. |
|
POPULATE AFFILIATE DATA |
Enterprise |
Defines whether to bring affiliate data into the data mart. |
|
POPULATE BLOB DATA |
Global |
Defines whether to bring BLOB data into the data mart. |
|
POPULATE CASE/CONFIGURATION DATA |
Global |
This profile switch contains one of the following values:
|
|
*POPULATE DLL SLL REPORTS TABLE DATA |
Enterprise |
Defines whether to populate the RPT_CASE_EVENT_PRODUCT table required for DLL and SLL. |
|
POPULATE INTERCHANGE CLOB DATA |
Global |
Defines whether to bring Interchange CLOB data into the data mart. |
|
POPULATE INTERCHANGE DATA |
Enterprise |
Defines whether to bring Interchange data into the data mart. |
|
*POPULATE NARRATIVE LANGUAGES TABLES |
Enterprise |
This profile switch contains one of the following values:
For more information on Report List, refer to CMN_PROFILE_ENTERPRISE document. |
|
*POPULATE RPT_REG_REPORTS COLUMNS |
Enterprise |
Defines whether to populate the extra columns of the RPT_REG_REPORTS table. |
|
*POPULATE STUDY RECONCILIATION REPORT TABLE DATA |
Enterprise |
Defines whether to populate the FACT_PROD_LICENSE table required for the Study Reconciliation Report. |
|
*PRODUCT LOGO PATH |
Enterprise |
Defines the full URL path to the image file of the product logo that prints in the header of certain reports. |
|
*REPORT FOOTER LOGO PATH |
Enterprise |
Defines the full URL path to the image file of the product logo that prints in the footer of certain reports. |
|
*ROUTING JUSTIFICATION ID |
Enterprise |
Contains LM_JUSTIFICATIONS.FIELD_ID value. This field fetches the List Maintenance values for Acceptable Routing Justification from the table LM_JUSTIFICATIONS. |
|
*SUBMISSION JUSTIFICATION ID |
Enterprise |
Contains LM_JUSTIFICATIONS.FIELD_ID value. This field fetches the List Maintenance values for Acceptable Submission Justification from the table LM_JUSTIFICATIONS. |
|
*SUPPLIER FIELD ID |
Enterprise |
Contains LM_JUSTIFICATIONS.FIELD_ID value. This field fetches the List Maintenance Values for Measurable Suppliers configuration from the table LM_JUSTIFICATIONS. |
|
*UDN COLUMN FOR SUPPLIER NAME |
Enterprise |
Defines the user-defined name (UDN) of the column in the Argus Safety CASE_MASTER table that contains the SUPPLIER NAME value. |
From the List Maintenance tab, you can configure the list of European Union countries for reporting purposes. You can add and remove countries as required.
|
Note: Countries configured as EU Countries are used in the 'Reporting Compliance Listing - Detail' report. EU countries are configured to identify cases for which Country of Incidence is from the list of configured EU countries. All the cases for which Country of Incidence is equal to EU countries appear with a '*' in the report output. |
Table 12-2 lists the countries included in the default European Union list.
Table 12-2 Countries Included in the Default European Union List
|
Austria |
Finland |
Latvia |
Portugal |
|
Belgium |
France |
Liechtenstein |
Romania |
|
Bulgaria |
Germany |
Lithuania |
Slovakia (Slovak Republic) |
|
Cyprus |
Greece |
Luxembourg |
Slovenia |
|
Czech Republic |
Hungary |
Malta |
Spain |
|
Denmark |
Iceland |
Netherlands |
Sweden |
|
Estonia |
Ireland |
Norway |
Switzerland |
|
— |
Italy |
Poland |
United Kingdom |
To add a country to the list of countries in the European Union:
Click Tools on the global toolbar.
The ADMINISTRATION TOOLS page appears.
Click the List Maintenance tab.
From the List Maintenance Items section, select EU Countries.
The Attributes section is updated with the countries currently defined in the European Union list.
Click Add.
The Add EU Countries dialog box appears.
Select one or more countries to add.
To select more than one country, press and hold the CTRL key when you click each country.
To select a range of countries, press and hold the SHIFT key when you click the start and end country in the range.
Click OK.
The specified countries are added to the list of countries in the European Union.
To delete a country from the European Union list:
Click Tools on the global toolbar.
The ADMINISTRATION TOOLS page appears.
Click the List Maintenance tab.
From the List Maintenance Items section, select EU Countries.
The Attributes section is updated with the countries currently defined in the European Union list.
Select the country to delete from the list of European Union countries.
You can delete only one country at a time.
Click Delete.
A confirmation dialog box appears.
Click OK.
Workflow is company-specific and your company may not use all the Workflow states.
You can map all the site-specific workflow states to the following default groups for the purpose of grouping outputs of certain reports:
Archiving States — All workflow states that are considered as archived/closed in Argus.
Data Entry Complete — All workflow states that indicate completion of data entry in Argus.
Assessment Complete — All workflow states that indicate completion of event assessment in Argus.
Approval Complete — All workflow states that indicate that the case is ready for reporting after being locked in Argus.
Although the workflow mappings are preconfigured during the installation of Argus Insight, you can modify them by adding or removing workflow states from a group as required. However, you cannot add more groups or delete existing ones.
To configure workflow management for the Argus Insight application:
Click Tools on the global toolbar.
The ADMINISTRATION TOOLS page appears.
Click the List Maintenance tab.
From the List Maintenance Items section, select Workflow Management.
The Attributes section is updated with the existing workflow groups.
Select a workflow group to change, and click Modify.
The Workflow Metrics - <selected workflow name> dialog box appears.
Modify the mappings.
To add a new workflow state to the group, select a state from the list on the left and click the right arrow (>).
To remove a workflow state from the group, select a state from the list on the right and click the left arrow (<).
Click OK to save the changes.
Argus Insight objects, such as queries, case series, and BIP standard reports, can be grouped into one of the following default categories:
Case Processing
Compliance
Configuration
General
Management
Pharmacovigilance
You cannot modify or delete the default categories. You can, however, add one or more custom categories. Once added, you can modify or delete a custom category.
To add, modify, or delete custom categories:
Click Tools on the global toolbar.
The ADMINISTRATION TOOLS page appears.
Click the List Maintenance tab.
From the List Maintenance Items list, select Categories.
The Attributes list is updated with the existing categories.
Click Add.
The Add New Category dialog box appears.
Enter the category name, and click OK.
A new category is added to Argus Insight.
To change the name of an existing custom category, select the category from the Attributes section, and click Modify.
Change the category name, and click OK.
To delete an existing custom category, select the category from the Attributes section, and click Delete.
A confirmation dialog box appears.
Click OK.
In Argus Insight, you can map the following time values (entered in Argus Safety) to specific ranges called Duration Value Bands:
Time to Onset from First Dose
Time to Onset from Last Dose
You set the value of these fields in Argus Safety by navigating to Product Tab, Drug Duration of Administration, and Events Tab.
By mapping the time values to Duration Value Bands in Argus Insight, you can specify query criteria for the Time to Onset from First Dose field and the Time to Onset from Last Dose field based on ranges instead of specific values.
Using the Duration Value Bands item on the List Maintenance tab, you can configure duration value bands in hours, days, weeks, months, and years. For each band, you can specify multiple ranges by entering minimum and maximum values for each range item. Any value that falls within a configured range will map to that range.
|
Note: Duration Value Band configuration must be done before running the Initial ETL.If Duration Value Bands are modified after Initial ETL, you must rerun the Initial ETL. |
To modify a duration value band:
Click Tools on the global toolbar.
The ADMINISTRATION TOOLS page appears.
Click the List Maintenance tab.
From the List Maintenance Items section, select Duration Value Bands.
The Attributes section is updated with the valid bands (Hours, Days, Weeks, Months, and Years).
You can modify the values of these bands. You cannot, however, add more bands or delete an existing band.
Select the duration value band (Hours, Days, Weeks, Months, Years) to change, and click Modify.
The Duration Value Bands Configuration dialog box appears with the factory-configured ranges.
Note that:
The Label column represents the name of the range.
The Lower Range (>=) and Higher Range (<) columns contain the minimum and maximum values, respectively.
The highest value band includes all values that are greater than the highest range value specified.
Modify the values.
To modify an existing range, edit the values in the Lower Range (>=) and Higher Range (<) fields.
To add a range, scroll to the current highest range and click in the blank Higher Range (<) field. Enter a value greater than the current highest range and press Tab to add a new row.
To delete an existing range, click the Delete icon next to the row. Note that you cannot delete the lowest band.
If you delete an intermediate range, the system converts the highest value of the deleted range to the lowest value in the next range. However, the system does not change the range labels.
Click OK to save the changes.
Argus Insight lets you create a new List Maintenance item and derive specific cases to this item based on case attributes. These attributes are supplied to the system as SQL.
For example, you can create a new List Maintenance item called Report Type 1 and derive to this item all the cases that have the Report Type attribute defined as Spontaneous, Literature, or Compassionate Use. As a result, Report Type 1 appears as an option in the query tool interface corresponding to the Report Type attribute. When you select Report Type 1 from the Report Type list and execute your query, the system returns only those cases that have the Report Type attribute specified as Spontaneous, Literature, or Compassionate Use.
You can specify more than one attribute. For example, you can create a further specialized List Maintenance item called Report Type 1 US and derive to this item all the cases that have the Report Type attribute defined as Spontaneous, Literature, or Compassionate Use, and the Country of Incidence attribute defined as United States.
|
Note: There can be situations where two different List Maintenance items you create contain similar attributes in the SQL criteria. In this case, you can assign a priority level to individual List Maintenance items. The priority level determines which List Maintenance item SQL executes first. |
To open the Derivation Fields dialog box and configure derivation functions:
Click Tools on the global toolbar.
The ADMINISTRATION TOOLS page appears.
Click the List Maintenance tab.
From the List Maintenance Items section, select Derivation Functions.
From the Attributes section, select All Derivations, and click Modify.
The Derivation Fields dialog box appears.
Table 12-3 describes the icons in the Derivation Fields dialog box that you can use to add, delete, and reorder derivation field elements (rows).
Table 12-3 Icons in the Derivation Fields Dialog Box
| Click… | To… |
|---|---|
|
Add a derivation field element (row) above the currently selected row |
|
|
Add a derivation field element (row) below the currently selected row |
|
|
Delete the currently selected derivation field element (row) |
|
|
Move the selected row up |
|
|
Move the selected row down |
Table 12-4 lists the available field mapping derivation rules for Argus Insight.
Table 12-4 Field Mapping Derivation Rules
| Function Category | Function Sub-category | Argus Insight Field |
|---|---|---|
|
ANALYSIS |
BfArM Information |
Causality |
|
ANALYSIS |
Case Assessment |
Case Outcome Case Serious Listedness Determination |
|
EVENTS |
Event Information |
Lack of Efficacy |
|
GENERAL |
General Information |
Derived Pregnancy Report Type |
|
PATIENT |
Patient Information |
Age Group Gender Patient weight BMI desc |
|
PRODUCTS |
Product Drug |
Derived Drug Abuse Derived Drug Interaction Derived Overdose Last Daily Dose |
|
Note: Causality, Report Type, Age Group, and Last Daily Dose are comma-separated derivation rules. See |
This section describes the fields and check boxes in the Derivation Fields dialog box.
The LM Table field is the table name of the selected Argus field (that is, populated).
The Suppress check box is available for fields associated with the list maintenance data. When suppress is enabled for a field, the corresponding list maintenance values that are not present in any case are deleted and thus not available for querying.
|
Note: The Suppress check box is applicable only if the condition specified in the SQL text box covers all the cases having the selected List Maintenance field. |
The Value field captures the value for the new derivation field.
For the following four rules, you must enter the new value for the rule as a comma-separated value:
Causality
Report Type
Age Group
Last Daily Dose
|
Note: Make sure that you enter the values for these rules as defined in the following sections. Unexpected results and/or ETL errors may result if the values are not entered as specified. |
Parameters: VALUE, REPORTABILITY
where:
VALUE = New value for the rule
REPORTABILITY = Lower value of the group
Example: NewCausality,1
Parameters: VALUE, INC_LIT, INC_TRIAL, ABRV
where:
VALUE = New value for the rule
INC_LIT = 1 if Literature Report Type else 0
INC_TRIAL = 1 if Clinical Trial Report Type else 0
ABRV = A 3-letter abbreviation for the Report Type
Example: NewReportType,0,1,NRT
Parameters: VALUE, GROUP_LOW, GROUP_HIGH
where:
VALUE = New value for the rule
GROUP_LOW = Lowest value of the age group
GROUP_HIGH = Highest value of the age group
Example: NewAgeGroup,25,50
If you do not want to specify the High Value, then the comma is mandatory in the end.
Example: Unknown,70,
Parameters: VALUE, DAILY_DOSE_SORTING_ORDER
where:
VALUE = New value for the rule
DAILY_DOSE_SORTING_ORDER = 1 or 2 or 3 and so on to define the sorting order if there is more than 1 rule for the Last Daily Dose field
Examples: 1 -> 0to1,1; 2 -> 2to3,2 3 -> 5to8,3
The Priority field captures the priority for a list of derivation rules applied to a single List Maintenance field. Valid values: 1–255.
|
Note: The priority for derivation rules applicable to a single List Maintenance field must be unique. |
The SQL field specifies the SQL statement to capture the cases for which the derivation rule is applicable.
|
Note: The SQL statement must follow the correct syntax.The system does not validate the length of the new values against the database. Make sure that new values being inserted into the data mart do not exceed the limit defined in the database. |
Guidelines for correct SQL statement syntax:
The SQL query configured against a rule cannot contain the table name. It must contain only the primary key column name(s) of the field in the SELECT clause. For example:
Correct: SELECT CASE_ID FROM RPT_CASE WHERE…
Incorrect: SELECT RPT_CASE.CASE_ID FROM RPT_CASE WHERE…
Make sure that there is only one space after the SELECT clause in the SQL query. For example:
Correct: SELECT CASE_ID, SEQ_NUM FROM RPT_PRODUCT WHERE…
Incorrect: SELECT CASE_ID, SEQ_NUM FROM RPT_PRODUCT WHERE…
Make sure that no Oracle keyword (such as DISTINCT) is used after the SELECT clause in the SQL query. For example:
Correct: SELECT CASE_ID, SEQ_NUM FROM RPT_PRODUCT…
Incorrect: SELECT DISTINCT CASE_ID, SEQ_NUM FROM RPT_PRODUCT…
When you modify a case series either by adding a case to the series or by removing a case from the series, Argus Insight prompts for a justification, or reason, for the action. See Figure 12-4.
In the Justification field, either enter your own reason or select a reason from the list.
Argus Insight does not provide a default list of justifications. However, you can create a set of standard and relevant reasons for Argus Insight to display in the Justification field. Once you create the list of reasons, users can select one of your defined justifications whenever they modify a case series. In addition, users always have the option to type their own justification.
Justifications are important for maintaining the history of a case series.
To create the list of justifications for modifying a case series:
Click Tools on the global toolbar.
The ADMINISTRATION TOOLS page appears.
Click the List Maintenance tab.
From the List Maintenance Items section, select Case Series Modification Justification.
The Attributes list is updated with the existing configured justifications, if any.
Click Add.
Enter the justification text, and click OK to save the justification.
To edit an existing justification, select the justification from the Attributes list, and click Modify.
To delete an existing justification, select the justification from the Attributes list, and click Delete.
When you unfreeze a case series, Argus Insight prompts for a justification, or reason, for this action. In the Justification field, you can either type your own reason or select a reason from the list. For example:
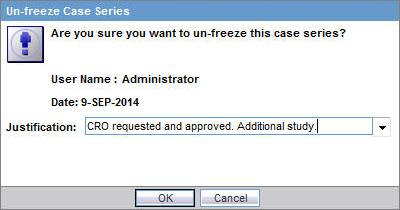
Argus Insight does not provide a default list of justifications. However, you can create a set of standard and relevant reasons for Argus Insight to display in the Justification field. Once you create the list of reasons, users can select one of your defined justifications whenever they unfreeze a case series. In addition, users always have the option to type their own justification.
Justifications are important for maintaining the history of a case series.
To create the list of justifications for unfreezing a case series:
Click Tools on the global toolbar.
The ADMINISTRATION TOOLS page appears.
Click the List Maintenance tab.
From the List Maintenance Items section, select Case Series Un-Freezing Justification.
The Attributes list is updated with the existing configured justification text, if any.
Click Add.

Enter the justification text, and click OK to save the justification.
To edit an existing justification, select the justification from the Attributes list, and click Modify.
To delete an existing justification, select the justification from the Attributes list, and click Delete.
To configure or manage the schedule of a company's holidays or the US federal holidays:
Click Tools on the global toolbar.
The ADMINISTRATION TOOLS page appears.
Click the List Maintenance tab.
From the List Maintenance Items section, select Holiday Schedule Management.
From the Attributes list, select COMPANY or US FEDERAL.
Click Modify.

Make the required holiday selections, additions, and deletions.
Click OK to save the holiday schedule.
To configure or manage Product Designated Medical Event Configurations (PDMEC):
Click Tools on the global toolbar. The ADMINISTRATION TOOLS page opens.
Click the List Maintenance tab.
From the List Maintenance Items section, select Product Designated Medical Event Configuration.
From the Attributes list, select All Configurations.
Click Modify.
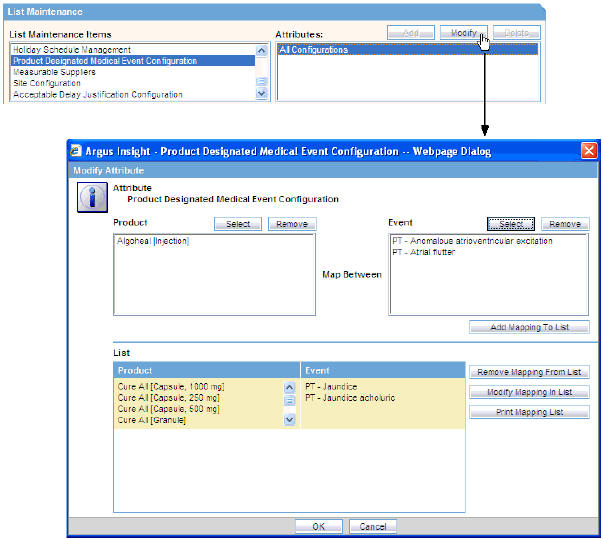
Select the product to map between one or more events, and then add the mapping to the list.
In addition, you can modify an existing mapping in the list, remove a mapping from the list, and print the mapping list.
Click OK to save the configuration.
To configure or manage measurable suppliers:
Click Tools on the global toolbar.
The ADMINISTRATION TOOLS page appears.
Click the List Maintenance tab.
From the List Maintenance Items section, select Measurable Suppliers.
From the Attributes list, select All Configurations.
Click Modify.
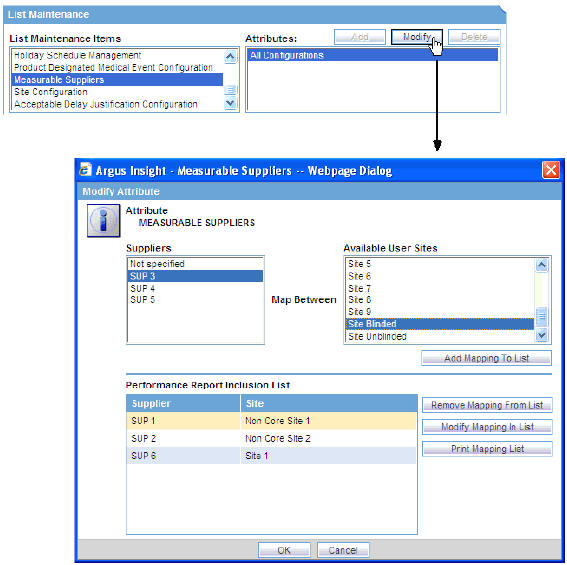
Configure the mapping between suppliers and available user sites, and then add the mapping to the list.
In addition, you can modify an existing mapping in the list, remove a mapping from the list, and print the mapping list.
Click OK to save the changes.
To configure the sites in your installation that are considered non-core sites:
Click Tools on the global toolbar.
The ADMINISTRATION TOOLS page appears.
Click the List Maintenance tab.
From the List Maintenance Items section, select Site Configuration.
From the Attributes list, select Non-Core Site Configuration.
Click Modify.
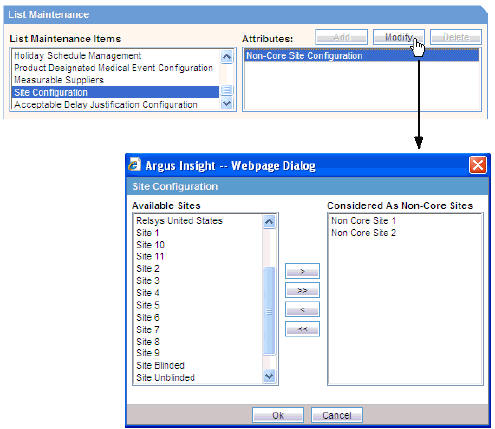
Select sites and use the arrow buttons to move sites between the list of available sites and the list of those sites considered to be non-core sites.
Click OK to save the changes.
To configure the justifications for acceptable delays in submission or routing:
Click Tools on the global toolbar.
The ADMINISTRATION TOOLS page appears.
Click the List Maintenance tab.
From the List Maintenance Items section, select Acceptable Delay Justification Configuration.
From the Attributes list, select one of the following options:
To define the justifications for a routing delay, select Acceptable Routing Delay Justification.
To define the justifications for a submission delay, select Acceptable Submission Delay Justification.
Click Modify.
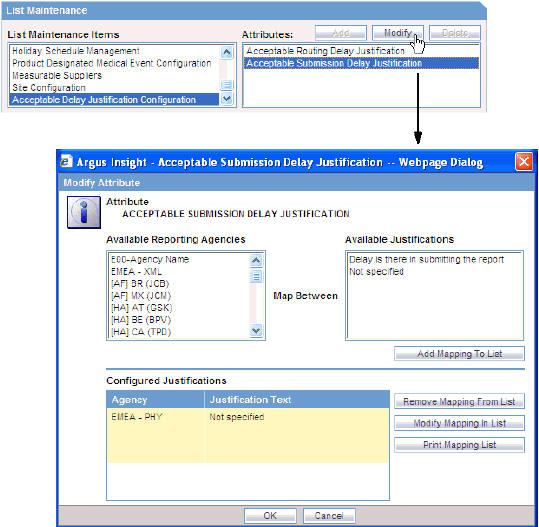
Configure the mapping between available reporting agencies with the available justifications, and then add the mapping to the list.
In addition, you can modify an existing mapping in the list, remove a mapping from the list, and print the mapping list.
Click OK to save the changes.
The Extract, Transform, and Load (ETL) process enables you to move data from your drug safety database, reformat the data, and then load the data into another database (data mart) for querying, drill-down analysis, and report generation.
Beginning with Argus Insight 7.0, ETL Scheduler is a user role defined in the Security tab on the ADMINISTRATION TOOLS page. This role is available across all enterprises at a global level.
The ETL Scheduler screen can be displayed, updated, and audit logged from the default enterprise in a multi-tenant installation. Only those users who have been assigned the ETL Scheduler role can view this screen.
Argus Insight application has been enhanced to run on Argus Mart database now. With changing time, Argus Mart database may be used as a primary database in future for all querying and reporting purpose as it contains useful information related to different case revisions. With this information, you can create and execute point-in-time queries in Argus Insight for a deep dive into historical data.
If you do not wish to use Argus Insight database along with Argus Mart, a new feature has been introduced in ETL process for copying only configuration tables from Insight database. These configuration tables are still required for proper functioning and use of Argus Insight UI with Argus Mart database. Population of Case tables data can be turned off which will help save the Argus Insight ETL time if its data is not used anymore for querying and reporting purpose. For list of case tables, see Appendix: Argus Insight Case Tables.
To turn off Argus Insight case table population, use profile switch POPULATE CASE/CONFIGURATION DATA.
To fetch Argus Insight specific data in Argus Mart, enable profile switch ENABLE_AI_PROCESSING before running Argus Mart ETL.
For more information, see Table 12-1, "Common Profile Switches".
|
Note: The instructions given in this chapter are specific to Argus Insight ETL only and will not populate the Argus Mart database. For instructions on how to run Argus Mart ETL, refer to the Oracle Argus Mart Installation and Administration Guide. |
Argus must complete the following data integrity checks before performing the ETL:
Every case must have at least one suspect product.
Every case must have at least one event where the DESC_REPTD column is not null.
Every case must have one and only one primary event.
Every case must have a State record (CASE_MASTER.STATE_ID).
Every case must have a Report Type record (CASE_MASTER.RPT_TYPE_ID).
Every case must have a Country of Incidence record (CASE_MASTER.COUNTRY_ID).
Every case must have a Study record (CASE_STUDY).
Every case must have an Assessment record (CASE_ASSESS).
Every product in CASE_PRODUCT must have a record in CASE_PROD_DRUGS.
If there are reporters on the case, there must be only one primary reporter
When Argus Insight is installed, the Initial ETL process is run to populate the data mart for the first time. Subsequently, you need to run Incremental ETL processes at specific intervals to update the data mart with the latest data from your drug safety database.
You cannot execute an Initial ETL and an Incremental ETL simultaneously.
|
Note: Do not run an Incremental ETL for more than 30000 cases. If the number of cases exceeds 30000, run the Initial ETL again. See the Oracle Argus Insight Installation Guide for information about running the Initial ETL. |
The ETL Scheduler tab lets you schedule the Incremental ETL process to run and update the data mart.
|
Note: Updating reports table must always be followed by an update to the CASE_MASTER.LAST_UPDATE_TIME. (Updating the CASE_MASTER will result in moving the case along with all the reports to the mart schema.) |
To schedule the ETL:
Click Tools on the global toolbar.
The ADMINISTRATION TOOLS page appears.
Click the ETL Scheduler tab.
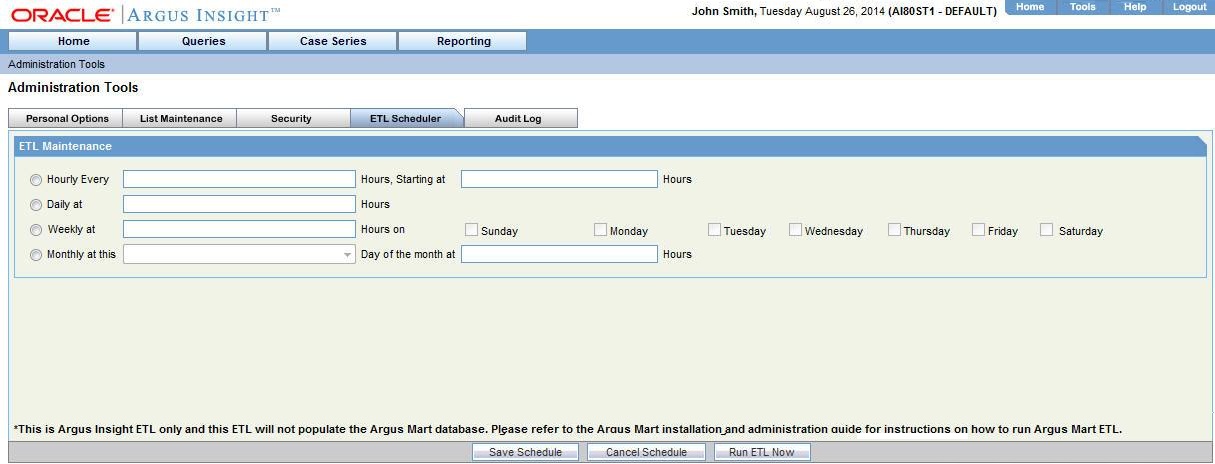
|
Note: This is Argus Insight ETL only and will not populate the Argus Mart database. For instructions on how to run Argus Mart ETL, refer to the Oracle Argus Mart Installation and Administration Guide. |
Define how often you want to run the ETL by selecting one of the following options:
Hourly every so many hours, starting at a specific time
Daily at a specific time
Weekly at a specific time on a set day of the week
Monthly on a set day of the month at a specific time
Specify the other parameters, such as the hour of the day when the ETL will run. Use the 24-hour format (HH:MM:SS) when specifying a time value.
Click Save Schedule to save the settings.
To run the ETL immediately, click Run ETL Now. Running the ETL immediately does not affect the scheduled ETL.
While running the ETL, Argus Insight displays a status bar that shows the progress of Incremental ETL. For example: 
The ETL Scheduler screen is only displayed, updated, and audit logged from the default enterprise to the user who is assigned with the ETL Scheduler role.
Beginning with Argus Insight 7.0, the Incremental ETL Progress status screen also displays the ETL Completed/Total Enterprises field. This field displays the number of enterprises for which the ETL has been completed, out of the total number of active enterprises in the system. For example:
If an error occurs during the ETL execution, the ETL stops and the system displays the error message.
To resume the ETL from the point where the ETL failure occurred, click Resume ETL.
Note that Argus Insight enables the Resume ETL button only when the first commit point is reached, after staging has completed.
Any ETL failure that occurs before the first commit point will start from scratch.
To start the Incremental ETL from the beginning again, click Run ETL Now.
To check the Initial ETL execution, review the balancing log in the database installation folder.
The default user name for the Argus Insight application comes from Argus Safety (admin). Its password is the same as the password of that user in Argus Safety.
Beginning with Argus Insight 7.0, you cannot create a user from Argus Insight. Instead, you create, copy, and delete Argus Insight users from the Argus Safety Console application.
In Argus Insight, however, you can create one or more user groups, and then assign access rights to the group. You can modify an existing user account, assign roles to the user, and add the user as a member of one or more groups.
In addition, all the existing Argus Safety user names and their passwords are replicated in Argus Insight.
|
Note: Any user with access to the custom SQL interface for creating advanced conditions may be able to see any data present in the database. Therefore, restrict the access to this interface to those users who have back-end access or are allowed to see any data from the database. |
To create a new user group:
Click Tools on the global toolbar.
The ADMINISTRATION TOOLS page appears.
Click the Security tab.
In the Groups section, click Add.
The Group Administration dialog box appears.
Click the Group Name field and enter a name for this user group.
Define the users who are members of this group.
To add one or more users to the group, select the user name from the Available Users list, and click Add.
To add all available users to the group, click Add All.
To delete one or more users from the group, select the user name from the Group Members list, and click Remove.
To remove all users from the group, click Remove All.
Define the access rights for all the members of this group.
Click the Access Rights tab.
Click OK to confirm that you want to create the group.
Select the appropriate check boxes depending on the access rights you want to assign to this group of users.
Click OK.
In the Security tab, the list in the Groups section displays the name of the newly created group along with the names of the users who are members of the group.
Once you have created a user group, you can use the Copy functionality to save the existing user group or account by another name while retaining all the access rights, group associations, and user associations. This is useful when you are creating multiple groups or user accounts with similar access rights and associations.
To create a new group or account by copying information from an existing group or account:
Click Tools on the global toolbar.
The ADMINISTRATION TOOLS page appears.
Click the Security tab.
Select a user name or a group name to copy.
In the Groups section, click Copy.
The Group Administration dialog box appears.
In the Group Name field, enter a group name.
Click OK.
Settings from the copied group are carried over to the new group.
To modify the details and members of a group:
Click Tools on the global toolbar.
The ADMINISTRATION TOOLS page appears.
Click the Security tab.
Select a group name to modify.
In the Groups section, click Modify.
The Group Administration dialog box appears.
Modify the settings, and click OK to save the changes.
To delete an existing group:
Click Tools on the global toolbar.
The ADMINISTRATION TOOLS page appears.
Click the Security tab.
Select the group to delete.
Click Delete.
A confirmation dialog box appears.
|
Note: When you delete a user, all the queries and case series that the user saved in Argus Insight are also deleted. |
Click Yes to delete the selected group.
To modify an existing user account:
Click Tools on the global toolbar.
The ADMINISTRATION TOOLS page appears.
Click the Security tab.
Select the user account to modify.
Click Modify.
The User Administration dialog box appears.
The User Full Name field, the User Name field, the Use LDAP Authentication check box, and the Protect from unblinded information check box are read-only in Argus Insight, and are synchronized with their values configured in Argus Console.
Define the roles for this user.
To assign a role to this user, select the role from the Available Roles list, and click Add.
To remove an existing role for this user, select the role from the Selected Roles list, and click Remove.
|
Note: The Copy Configuration role appears under Selected Roles in read-only mode for the users having this role. Those Argus Insight users who have access to the Copy Configuration role in Argus Safety can copy all the configuration data from the enterprise where they have this role to any new enterprise that they create through the Global Enterprise Management portlet.Beginning with Argus Insight 7.0, ETL Scheduler is a user role. This role is only displayed, updated, and audit logged in the default enterprise. |
Assign the user to be a member of one or more groups.
To make this user a member of a group, select the group name from the Available Groups list, and click Add.
To make this user a member of all groups, click Add All.
To revoke this user's membership in a group, select the group name from the Member Groups list, and click Remove.
To revoke this user's membership in all groups, click Remove All.
Click OK to save the modifications to the selected user account.
Users who selected the Argus Insight check box (from Argus Console, User Management, Application Access) for an enterprise can access the application for that enterprise.
From the Audit Log tab, you can view the activities performed by an Argus Insight user or by all users during a particular period.
To view the audit log:
Click Tools on the global toolbar.
The ADMINISTRATION TOOLS page appears.
Click the Audit Log tab.

Enter the criteria to search the audit logs.
In the Category field, select the activity category or select All.
In the User Full Name field, select a user name or select All.
In the Date Range From and To fields, enter the date range.
Click Search.
The Audit Log tab appears with the list of activities based on the specified criteria.
To sort the list of activities, click a column heading.
To print the list of activities, click Print.
To view more details about an activity, click the Audit Log Details icon in the Activity column.
The Audit Log Details dialog box appears with additional information about the activity.
To print the activity details, click Print.

|
 Copyright © 2011, 2015, Oracle and/or its affiliates. All rights reserved. Legal Notices |
|