| Oracle® Argus Insight Extensibility Guide Release 8.0 E49996-01 |
|


 Previous |
 Next |
This chapter provides the information on the following:
Business Intelligence Publisher (BIP/ BI Publisher) report and the report framework. BIP is an additional option to the existing Cognos and BusinessObjects in Argus Insight.
Executing a report on Case Series/Power Queries of Argus Insight using Cognos Reporting tool and BusinessObjects.
The OBIEE Argus Insight RPD architecture and how to use flex bucketing in the RPD. The querying is done on the data from Argus Safety BIP temporary tables that are brought into Argus Mart tables (information about corresponding report configuration and value of report parameters used for report execution).
This chapter comprises the following sections:
This section comprises the following topics:
|
Note: The appearance of the user interface that you see in the application may vary from the figures displayed in the subsequent sections. |
The Business Intelligence Publisher (BI Publisher) extensibility has the following assumptions:
The user has a working knowledge of report creation in BI Publisher.
Argus Insight Release 8.0 (AI 80) supports Oracle BI Publisher - File system catalog type only. Even though BI Publisher is integrated with Oracle Business Intelligence Enterprise Edition (OBIEE), the catalog type should be set to Oracle BI Publisher - File System.
Disclaimer:
OBIEE Presentation catalog is not considered or tested for this release.
Any customer using BI Publisher integrated with OBIEE still needs to select Oracle BI Publisher - File system catalog only.
See Also:
Oracle FMW - Administrator Guide for Oracle Business Intelligence Publisher > Configuring the Catalog
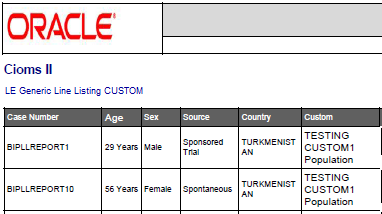
This report is a generic listing of cases with key Pharmacovigilance data elements. This framework can be used for custom reporting.
Global Temporary Tables (GTTs) are the Oracle tables, having data type as private; such that data inserted by a session can be accessed by that session only.
The session-specific rows in a GTT can be preserved for the entire session, as AI report tables are created using ON COMMIT PRESERVE ROWS clause.
The report specific package pkg_rep_linelisting, populates the following report GTTs:
rep_case_tmp
rep_event_tmp
rep_prod_dose_tmp
rep_evt_assess_tmp
rep_case_detail_tmp - The Case Detail GTT is populated with user accessible cases in the generic package after applying user data security.
Extending Global Temporary Tables
The following are the steps to extend GTTs:
Alter the GTT, to add a new column.
Write population logic for the new column in User Exit package. For example, to populate case level table rep_case_tmp the following User Exit package - procedure can be used: pkg_rep_linelisting_user_exit.p_modify_case_tmp
Modify the User Exit package to append case number with ABC, such as:
PROCEDURE p_modify_case_tmp IS
BEGIN
UPDATE REP_CASE_TMP SET CASE_NUM = 'ABC'||CASE_NUM;
END p_modify_case_tmp;
Note: Any DML statement or complex PL/SQL logic can be implemented in the User Exit packages.)
Compile the User Exit package and run the report.
In the report, you will find case number prefixed with ABC.
A package is a namespace that organizes a set of related classes and interfaces.
The types of packages used in BI Publisher report are:
BI Publisher report has pkg_rep_generic as the generic package that will be used to create/modify all future BI Publisher reports.
This package performs the following functions:
User Context is set, so that the user can view data only as per user data access rights.
Global table rep_case_detail_tmp is populated with cases after applying data security.
Log tables population logic is created within the generic package.
This package contains following procedures/functions:
Table 5-1 Generic Package - Procedures and Functions
| S.No. | Procedure/Function Name | Parameter/ Argument Used | Description |
|---|---|---|---|
|
1. |
p_set_user_context |
|
This procedure is used to set user context (for multi-tenancy) and data security variables. Using the package pkg_rls.set_context, user context will be set, by passing enterprise ID, user name and application name to the package. |
|
2. |
p_pop_case_detail |
|
This procedure populates case series in global table rep_case_detail_tmp, used in BI Publisher reports. For p_querytype = C, cases are inserted in global table rep_case_detail_tmp. from the table case_detail. For p_querytype IN ('Q', 'F', 'A'), the global table rep_case_detail_tmp gets populated in the procedure p_caseseries_from_query. |
|
3. |
p_rep_execution_log |
|
This procedure is used to log status of table population and SQL exceptions in table rep_execution_log. Routine Call: PKG_REP_GENERIC.P_REP_EXECUTION_LOG (NULL, 'p_pop_case_tmp', 'Data population for table REP_CASE_TMP started.'); Before populating the table rep_case_tmp, this procedure logs a message that 'data population for table <rep_case_tmp> started'. After successful completion of the process, it logs a message that 'data population for table <rep_case_tmp> completed'. Besides, in each population routine section in the SQL exceptions; this procedure is called to log SQL error messages. See Also: Section 5.1.4.2.3, "Populating Data for Generic Line Listing Report" |
|
4. |
p_rep_sql_log |
|
This procedure logs dynamic SQL queries created in the generic package. The following SQL statements are logged in this package:
For example: pkg_rep_generic.p_rep_sql_log (pi_module_name, lvc_sql); --lvc_sql Once report is executed, you can copy the query from column sql_text of the table rep_sql_log where all queries exist. Execute the desired query in the database. Example Routine Call: pkg_rep_generic.p_rep_sql_log ('p_caseseries_from_query', lclb_sql); where lclb_sql := 'INSERT INTO rep_case_detail_tmp (case_id) ' || lclb_rpt_sql; Besides, lclb_rpt_sql > sql_for_report column value from the table cfg_adv_cond. |
|
5. |
p_keep_report_data |
|
This procedure maintains session data in the report log tables. It is called in the report specific package pkg_rep_linelisting. For example: PKG_REP_GENERIC.P_KEEP_REPORT_DATA ('p_pop_case_tmp', 'REP_CASE_TMP', 'REP_CASE_LOG'); In the above example, if the profile switch KEEP_REPORT_DATA value is yes, then the table rep_case_log will be populated with the session data rep_case_tmp. See Also: Log Audit Tables, explained later in this chapter |
|
6. |
f_get_insert_sql |
|
This internal function generates dynamic SQL to insert data from the report GTT into the report log tables. It also returns the generated SQL. Example Routine Call: pkg_rep_generic.f_get_insert_sql (pi_src_table, pi_tgt_table The data from source table is inserted into the target table. |
|
7. |
p_caseseries_from_query |
|
This procedure inserts cases into the table rep_case_detail_tmp, when the Query/Case parameter is passed a value as Q/F:
This procedure is called in the procedure p_pop_case_detail to populate cases for Query or Filters. |
|
8. |
f_get_query_details |
|
This function populates the Case Series/Query/Advanced Condition/Filter Name as per the user access rights. The parameter pi_id for Case/Query Name prompt, populates with the Case/Query/AC/Filter names based on the selected Enterprise ID. And parameter pi_querytype for Case Series/Query prompt, populates as per the logged-in user. |
The context settings for multi tenancy are described in this section.
The procedure p_set_user_context, sets enterprise, user name (username), and application name (app_name) context for Oracle Virtual Private Database policy (VPD).
See Also:
Oracle Technical Reference documents for more information on Oracle VPD.
The cases in the table rep_case_detail_tmp are populated as follows:
For Case Series/Query Type - C: Cases from the table case_detail are populated.
For Case Series/Query Type - Q or A: Execute the SQL command on the column sql_for_report from the table cfg_adv_cond.
For Case Series/Query Type - F: Execute the SQL command on the column sql_for_report from the table cfg_adv_cond and also join another table filter_valuesets.
The BI Publisher report has pkg_rep_linelisting as a Generic Line Listing Report specific package.In this package the report GTTs are populated.
See Also:
Section 5.1.3, "Global Temporary Tables"
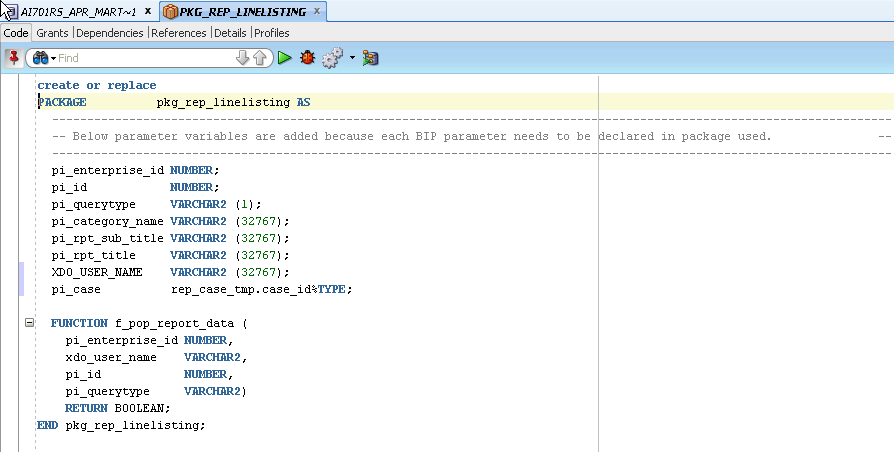
For generic parameters, it is mandatory to declare these parameters in the package that are used in the BI Publisher report. Henceforth, if any new parameter is required to be included in the report then it (new parameter) must be declared in the report specific package.
See Also:
Section 5.1.5.2, "Report Parameters" for more information about the parameter variables usage in data model.
The following report parameters are declared in the report package pkg_rep_linelisting:
Table 5-2 Report Parameters
| S.No. | Parameter Name | Mandatory/ Optional | Description |
|---|---|---|---|
|
1. |
pi_enterprise_id: Enterprise ID |
Mandatory |
A user specific Enterprise ID is passed from BI Publisher to the package, where Enterprise ID is fetched from the table cfg_user_enterprise_apps. |
|
2. |
pi_querytype: Case Series or Query |
Mandatory |
A Case Series (C), Query/QBE (Q), Advanced Condition (A) or Filter (F) is passed from BI Publisher based on the user selection. |
|
3. |
pi_id: CASESERIES_ID/QUERY_ID/AC_ID/Filter_ID to get data for cases |
Mandatory |
A user specific case series ID, query ID or filter ID is passed to the package based on the user selection. But in the report, Case series or Query Name is displayed for the enterprise ID and query type selected. |
|
4. |
pi_category_name: Category Name |
Optional |
This is an optional free text parameter, where a user can enter report category name. |
|
5. |
pi_rpt_sub_title: Report Sub-heading |
Optional |
This is an optional free text parameter, where report sub-title is entered. |
|
6. |
pi_rpt_title: Report Name |
Optional |
This is an optional free text parameter, where report name is entered. |
|
7. |
xdo_user_name |
Optional |
A BI Publisher login user name is passed to this parameter. This is BI Publisher system parameter. See Also: BI Publisher Technical Reference document. |
This section is explained with the help of an example. Let us say, you want to add a new parameter pi_case and restrict the data model based on the Case ID input. To do so, declare the new parameter in the package as shown below:
See Also:
Section 5.1.5.2, "Report Parameters" > Adding New Parameter in Data Model
The list of routines/functions that are used to populate data for the Generic Line Listing Report is as follows:
Table 5-3 List of Routine/Function used for Generic Line Listing Report Data
| S.No. | Routine/Function Name | Parameter Used | Description |
|---|---|---|---|
|
1. |
f_pop_report_data |
pi_enterprise_id, xdo_user_name, pi_id, pi_querytype See Also: Report Parameters Generic Parameters |
In this function, the following procedures are called in the same order as listed:
|
|
2. |
p_pop_case_tmp |
Not applicable |
This Procedure populates data in the GTT rep_case_tmp. Before inserting data in the table rep_case_tmp, log table rep_execution_log is populated with the message as: PKG_REP_GENERIC.P_REP_EXECUTION_LOG (NULL, 'p_pop_case_tmp', 'Data population for table REP_CASE_TMP started.'); See Also: Section 5.1.4.2.1, "Generic Parameters" Once the processing is completed for all the rows in the table rep_case_tmp, log the completion details as: PKG_REP_GENERIC.P_REP_EXECUTION_LOG (NULL, 'p_pop_case_tmp', 'Data population for table REP_CASE_TMP completed successfully. '|| SQL%ROWCOUNT || ' row(s) processed.') Calling User Exit procedure: You can write your own logic to update case data in the User Exit procedure PKG_REP_LINELISTING_USER_EXIT.P_MODIFY_CASE_TMP; Any exception/errors while populating the table rep_case_tmp are handled in WHEN OTHERS exception as: pkg_rep_generic.p_rep_execution_log (SUBSTR (SQLERRM, 1, 300), 'p_pop_case_tmp', 'Error during data population for table REP_CASE_TMP.') |
|
3. |
p_pop_event_tmp |
Not applicable |
This procedure populates data in the GTT rep_event_tmp. Before inserting data in the table rep_event_tmp, log table rep_execution_log is populated with the message as: PKG_REP_GENERIC.P_REP_EXECUTION_LOG (NULL, 'p_pop_event_tmp', 'Data population for table REP_EVENT_TMP started.'); See Also: Section 5.1.4.2.1, "Generic Parameters" Once the processing is completed for all the rows in the table rep_event_tmp, log the completion details as: PKG_REP_GENERIC.P_REP_EXECUTION_LOG (NULL, 'p_pop_event_tmp', 'Data population for table REP_EVENT_TMP completed successfully. ' || SQL%ROWCOUNT || ' row(s) processed.'); Calling User Exit procedure: You can write your own logic to update the event data in the User Exit procedure: PKG_REP_LINELISTING_USER_EXIT.P_MODIFY_EVENT_TMP; Any exception/errors while populating the table rep_event_tmp are handled in WHEN OTHERS exception as pkg_rep_generic.p_rep_execution_log (SUBSTR (SQLERRM, 1, 300), 'p_pop_event_tmp', 'Error during data population for table REP_EVENT_TMP.') |
|
4. |
p_pop_prod_dose_tmp |
Not applicable |
This procedure populates data in the GTT rep_prod_dose_tmp. Before inserting data in the table rep_prod_dose_tmp, log table rep_execution_log is populated with the message as: PKG_REP_GENERIC.P_REP_EXECUTION_LOG (NULL, 'p_pop_prod_dose_tmp', 'Data population for table REP_PROD_DOSE_TMP started.'); See Also: Section 5.1.4.2.1, "Generic Parameters" Once the processing is completed for all the rows in the table rep_prod_dose_tmp, log the completion details as: PKG_REP_GENERIC.P_REP_EXECUTION_LOG (NULL, 'p_pop_prod_dose_tmp', 'Data population for table REP_PROD_DOSE_TMP completed successfully. ' || SQL%ROWCOUNT || ' row(s) processed.'); Calling User Exit procedure: You can write your own logic to update the product related data in the User Exit procedure: PKG_REP_LINELISTING_USER_EXIT.P_MODIFY_PROD_DOSE_TMP; Any exception/errors while populating the table rep_prod_dose_tmp are handled in WHEN OTHERS exception as: pkg_rep_generic.p_rep_execution_log (SUBSTR (SQLERRM, 1, 300), 'p_pop_prod_dose_tmp', 'Error during data population for table REP_PROD_DOSE_TMP.') |
|
5. |
p_pop_evt_assess_tmp |
Not applicable |
This procedure populates data in the GTT rep_evt_assess_tmp. Before inserting data in the table rep_evt_assess_tmp, log table rep_execution_log is populated with the message as: PKG_REP_GENERIC.P_REP_EXECUTION_LOG (NULL, 'p_pop_evt_assess_tmp', 'Data population for table REP_EVT_ASSESS_TMP started.'); See Also: Section 5.1.4.2.1, "Generic Parameters" Once the processing is completed for all the rows in the table rep_evt_assess_tmp, log the completion details as: PKG_REP_GENERIC.P_REP_EXECUTION_LOG (NULL, 'p_pop_evt_assess_tmp', 'Data population for table REP_EVT_ASSESS_TMP completed successfully. ' || SQL%ROWCOUNT || ' row(s) processed.'); Calling User Exit procedure: You can write your own logic to update the event assessment data in the User Exit procedure: PKG_REP_LINELISTING_USER_EXIT.P_MODIFY_EVT_ASSESS_TMP; Any exception/errors while populating the table rep_evt_assess_tmp are handled in WHEN OTHERS exception as: pkg_rep_generic.p_rep_execution_log (SUBSTR (SQLERRM, 1, 300), 'p_pop_evt_assess_tmp', 'Error during data population for table REP_EVT_ASSESS_TMP.'); Any error exception in the function f_pop_report_data, is handled with message as: pkg_rep_generic.p_rep_execution_log (SUBSTR (SQLERRM, 1, 300), 'f_pop_report_data', 'Error during execution of f_pop_report_data for ENTERPRISE ID - ' || pi_enterprise_id || ', USER NAME - ' || xdo_user_name || '.') |
The log tables are divided into three categories as follows:
Session Details - There are four report log tables to hold the session data, namely:
rep_case_log
rep_prod_dose_log
rep_event_log
rep_evt_assess_log
These tables are populated only if the BI Publisher profile switch KEEP_REPORT_DATA is 'Y' that is, populate the report log tables. By default it is set as 'N' that is, do not populate the report log tables. This is an enterprise specific switch.
The profile switch are available in the Argus Insight List Maintenance section, where you can set it to 'Y' or 'N'.
See Also:
Admin Guide > <section - TBD> for the profile switch information.
The procedure p_keep_report_data, in generic package is used to populate data for the Report Log tables.
See Also:
Process Details - The log table rep_execution_log, records the entire report table process details. At each temporary table population procedures the log table will be populated. In all exceptions, this log table is populated with Oracle SQL errors.
See Also:
Dynamic SQL Details - The log table rep_sql_log, is populated with the dynamic SQLs generated in the generic package, only if the database profile switch LOG_REPORT_SQL value is '1' that is, yes. This is a global switch to identify, if report SQL is to be logged or not. The default value of this switch is '0' that is, no.
This database switch is not available in the Argus Insight UI List maintenance section. It is required to be set in the database only.
See Also:
A User Exit is a package, which provides a way to pass control from reports specific package to a User Exit package that performs some function (more appropriately data manipulation function), and then return control to main report specific package.
User Exit is used for data manipulations that need extended procedural capabilities.
In section Populate Data for Generic Line Listing Report, under each report table population, corresponding User Exit tables are mentioned.
See Also:
A Lexical Parameter is a placeholder column containing the actual text to be used in a query. At runtime report query can be modified using lexical parameters.
Modify the Report Package specification to add Lexical Parameters as shown below:
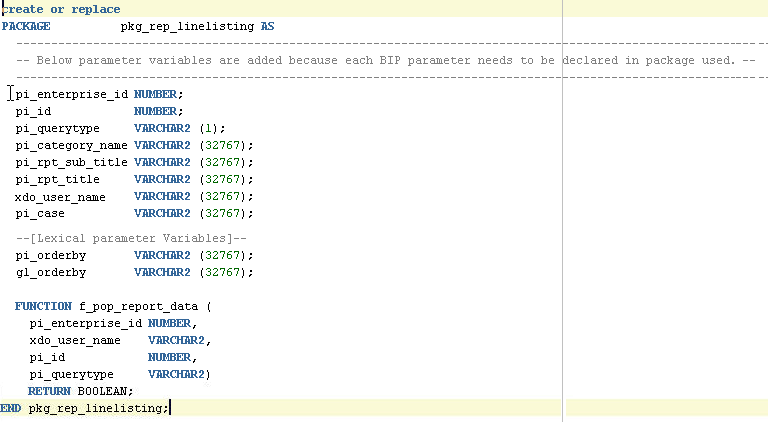
In the above figure, two Lexical Parameters pi_orderby and gl_orderby are added to the Report Package.
pi_orderby is the parameter in the Data Model based on the value selected in this parameter, the parameter gl_orderby will be selected.
Now, add code in the Report Package body that is, in the function f_pop_report_data, the parameter pi_orderby is included as shown below:
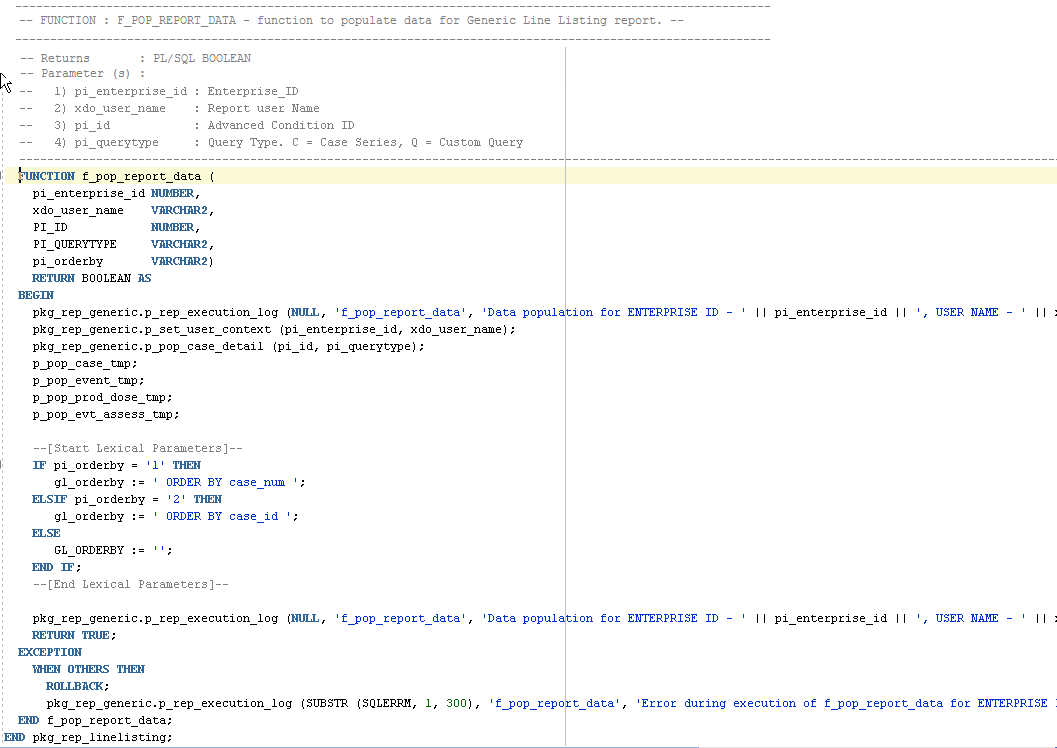
Once the package is compiled without any errors, refer to Section 5.1.5.4, "Adding Lexical Parameter in Data Model", to add the lexical parameters in the BI Publisher.
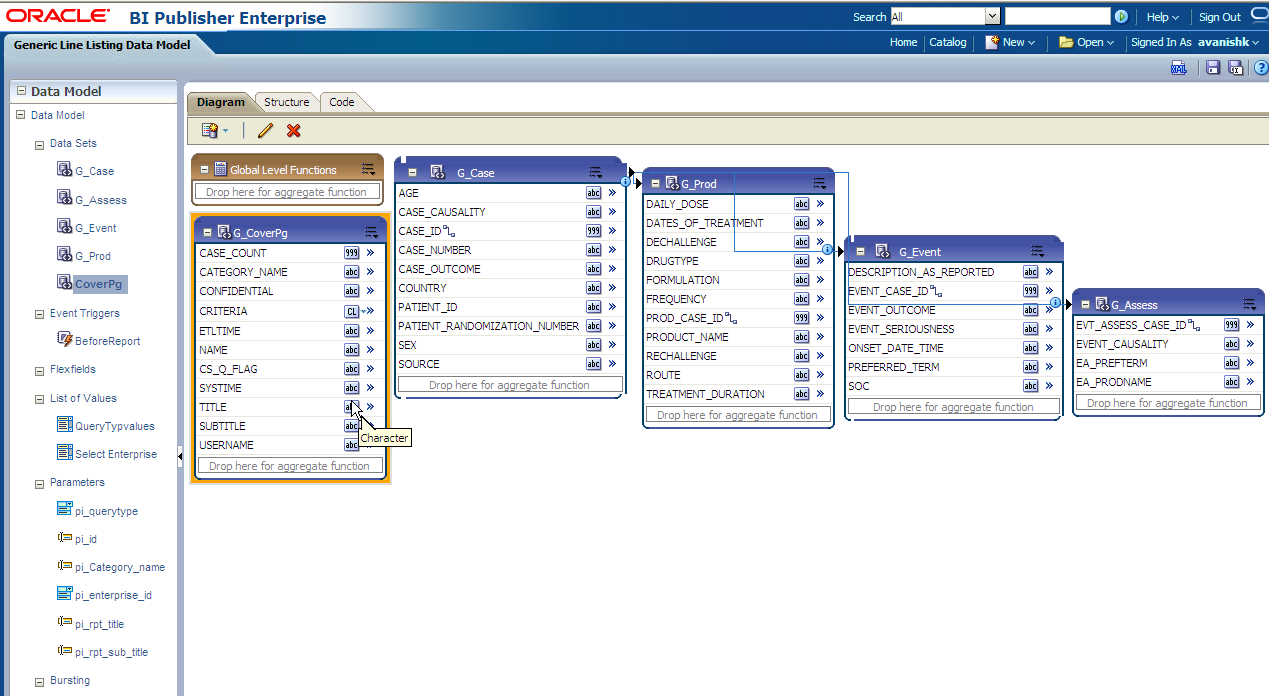
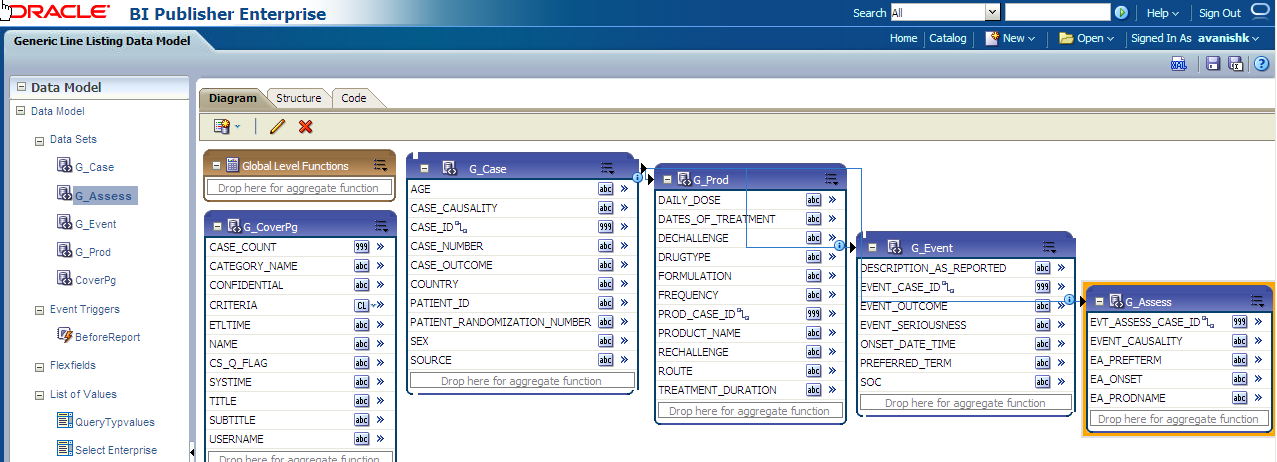
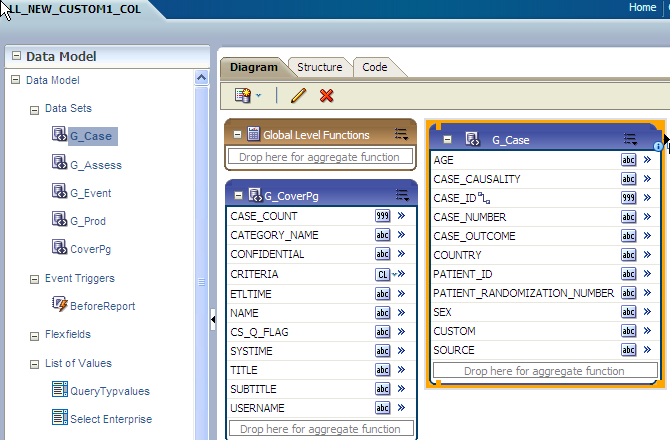
In Argus Insight Generic Line Listing Report, there are five data sets, where G_Case is the master data set from which case_id column is linked to all other data sets, such as G_Prod, G_Event and G_Assess. So, for each case_id all the child data values will be fetched.
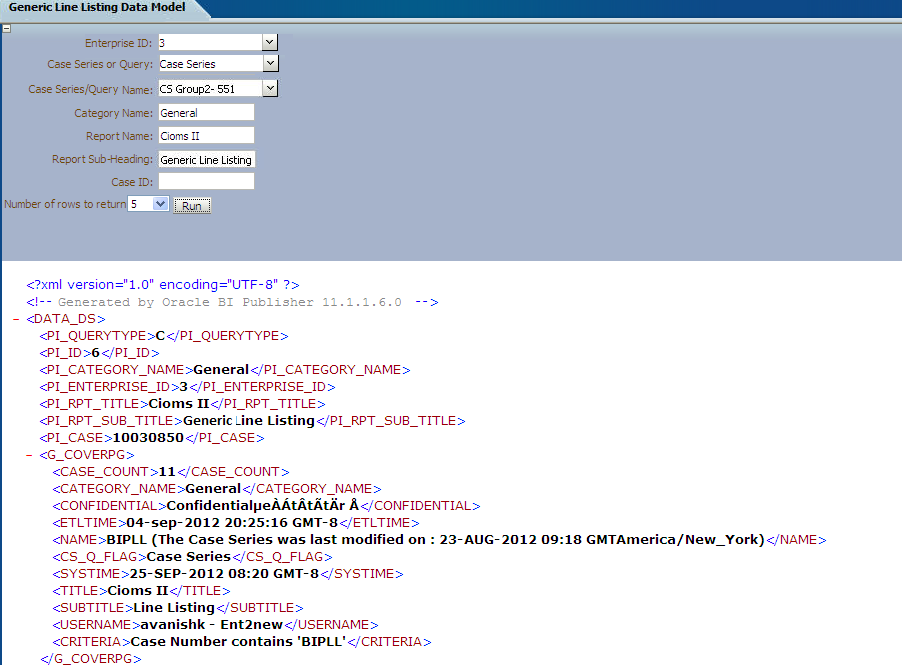
Example 5-1 Generating sample XML Data Structure with our Data Model
<G_CASE>
<CASE_ID>10031422</CASE_ID>
<CASE_NUMBER>BIPLLREPORT2</CASE_NUMBER>

<G_PROD>
<DAILY_DOSE>3.333 ml</DAILY_DOSE>
<DRUGTYPE>S</DRUGTYPE>
<PROD_CASE_ID>10031422</PROD_CASE_ID>
<PRODUCT_NAME>MMR StudyDB Name Comp</PRODUCT_NAME>
</G_PROD>

<G_EVENT>
<DESCRIPTION_AS_REPORTED>yellow fever</DESCRIPTION_AS_REPORTED>
<EVENT_CASE_ID>10031422</EVENT_CASE_ID>
<PREFERRED_TERM>Yellow fever</PREFERRED_TERM>
<SOC>Infections and infestations</SOC>
</G_EVENT>

<G_EVENT>
<DESCRIPTION_AS_REPORTED>rash</DESCRIPTION_AS_REPORTED>
<EVENT_CASE_ID>10031422</EVENT_CASE_ID>
<PREFERRED_TERM>Rash</PREFERRED_TERM>
<SOC>Skin and subcutaneous tissue disorders</SOC>
</G_EVENT>

<G_ASSESS>
...
</G_ASSESS>
</G_CASE>
This section also explains the following topics:
See Also:
Oracle Fusion Middleware - Report Designer Guide > Chapter 9
This section contains the information of the following actions:
The following are the steps to add a new column in a data set:
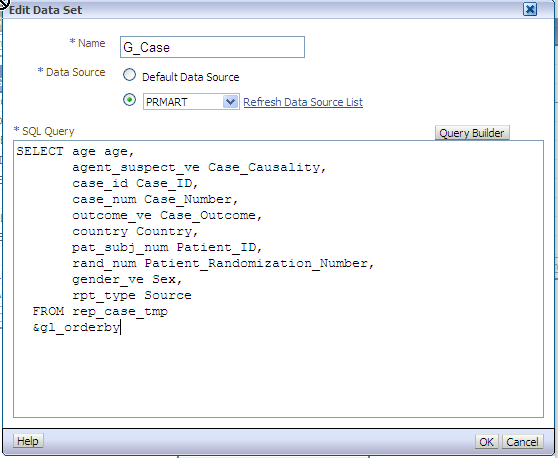
Click on the data set in which you need to add a column and edit using icons below Diagram tab.
Let us edit data set G_Assess. Click on G_Assess and edit the Data Set as shown below:
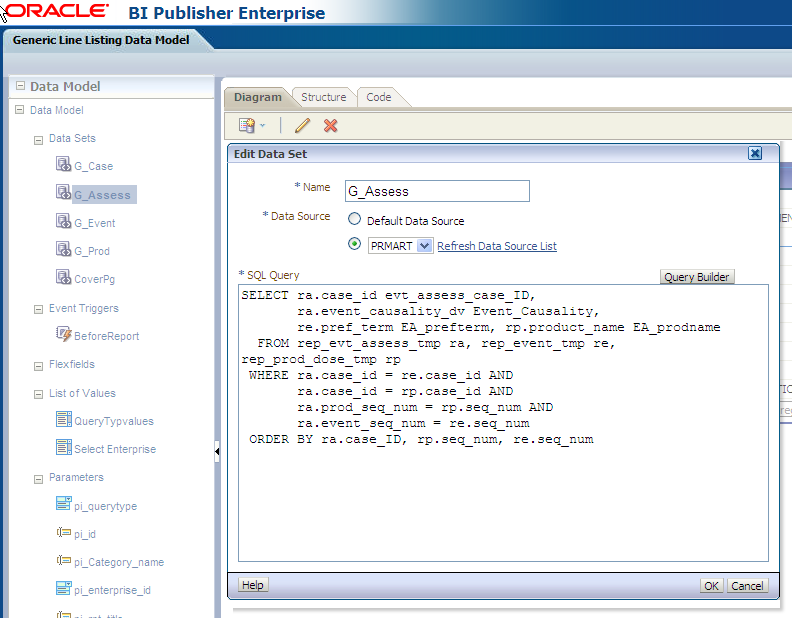
In the SQL Query, add any column from the available tables and click Query Builder. For example, re.onset_ve EA_onset. Once query is built successfully, the column is added to the data set G_Assess.
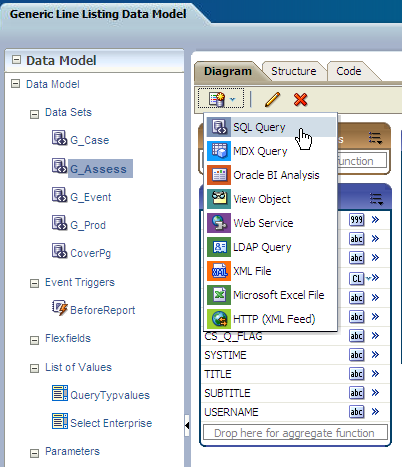
The following are the steps to add a new data set:
Click on New Data Set icon and select SQL Query as shown below:
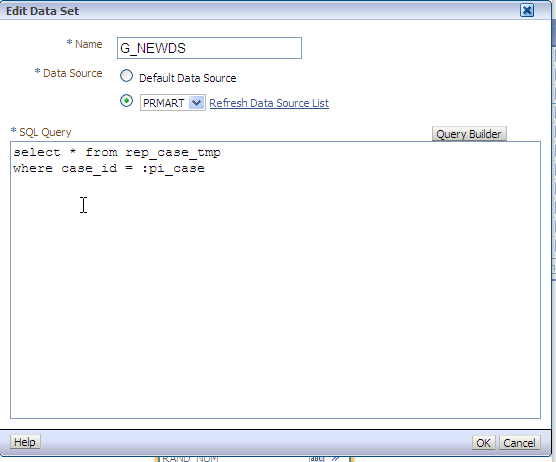
Write a valid SQL statement to fetch values from the report GTTs. Enter a data set name, such as G_NewDS and select proper Data Source from the list box. Click OK.
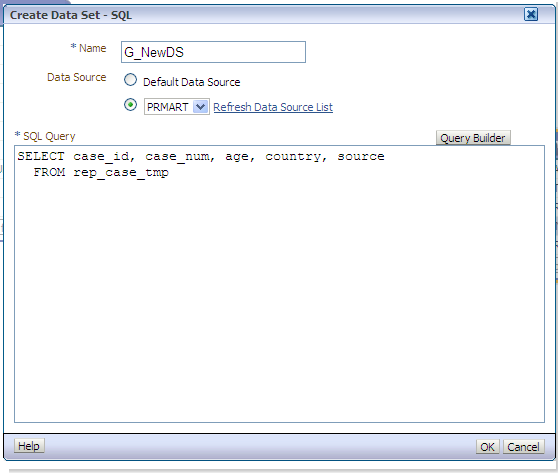
You can see that new data set G_NewDS is created.
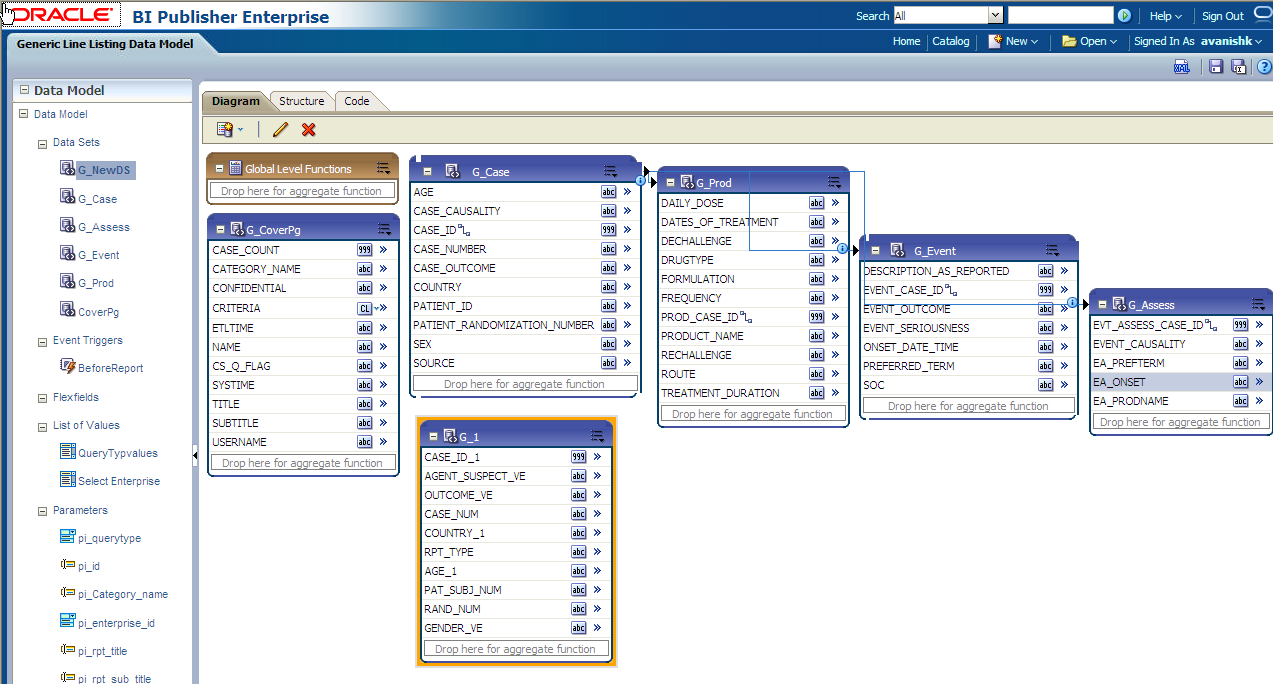
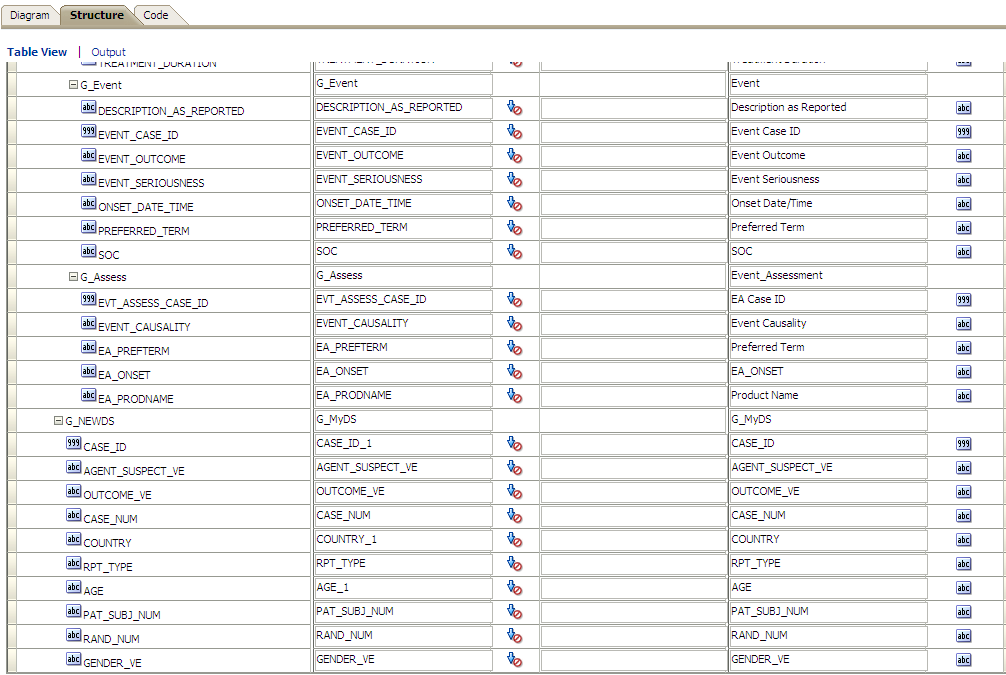
Save the new Data Model and verify that new data set and columns are available in the data model. Click Structure tab to give proper business names for the newly added columns. You can see new data set G_NEWDS is available. Modify the business name to G_MyDS.
Report parameters are used to specify the data to use in a report, connect related reports together, and vary report presentation.
The following report parameters are used in BI Publisher:
|
Note: All the below mentioned parameters, which are used in the report data model must be declared in the report specific package.If any of the parameters are not declared in the package, those parameters cannot be used in the data model. |
Table 5-4 Report Parameters
| S.No. | Parameter Name | Label/ Display Name | Parameter Type | Data Type | Description |
|---|---|---|---|---|---|
|
1. |
pi_enterprise_id |
Enterprise ID |
Drop-down list |
Integer |
This prompt lists the Enterprise ID of all the enterprises as per your login credentials (that is, to which logged in user belongs). You are required to select an enterprise for which you want to run the report. For the menu type, parameter list of values object needs to be selected. The List of Value Select Enterprise is selected for this parameter. In the list of values any valid SQL query can be provided. In this parameter Enterprise ID is listed. |
|
2. |
pi_querytype |
Case Series or Query |
Fixed drop-down list |
String |
Generic Line Listing Report can be run on a Case Series, QBE, Advanced Condition or Filter. This is a drop-down (single select) list that allows user to select one of these type on which you want to run the report. The default value selected for this parameter is Case Series. |
|
3. |
pi_id |
Case Series/Query Name |
Drop-down list |
Integer |
An Enterprise ID is passed to get the correct Case Series/QBE/Advanced Condition/Filter names as per the login credentials. Case series, QBE, Advanced Condition or Filter name will be listed based on the Case Series or Query parameter selected by you. You will be allowed to select any one option from the drop-down list. In the report, Case Series or Query name is shown in the drop-down list, but Case Series ID or Query/Filter ID will be passed to the database packages. |
|
4. |
pi_category_name |
Category Name |
User Input |
String |
This is optional text prompt where you can enter the name of report category (or BI Publisher folder where report is saved). This will be printed in report header box of Cover Page section. |
|
5. |
pi_rpt_title |
Report Name |
User Input |
String |
This is an optional text prompt where you can enter a report title. This will be printed on each page of the report. |
|
6. |
pi_rpt_sub_title |
Report Sub-Heading |
User Input |
String |
This is an optional text prompt where you can enter report sub-heading. This will be printed on each page of the report. |
See Also:
Report Mapping Specification Document > 2.1.6. Report Prompts
Adding New Parameter in Data Model
The following are the steps to add new parameter in the data model:
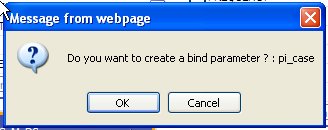
Include the parameter in the data set. For example, you want to see data for a Case ID. Add where condition with a parameter pi_case in the data set G_NEWDS.
Click Query Builder and new parameter is created. Click OK to confirm.
The parameter pi_case is now available in the parameter section of the Data Model.

Add the display label for the new added parameter, which will be shown at the time of report execution.

Declare the parameter pi_case in the Generic Report Line Listing Package pkg_rep_linelisting. It is mandatory to declare the parameter in the report package. If the parameter is not declared, the report will not execute. Execute the report and you will be able to search data based on the newly added parameter Case ID.
See Also:
Section 5.1.4.2.2, "Adding New Parameter in Package"
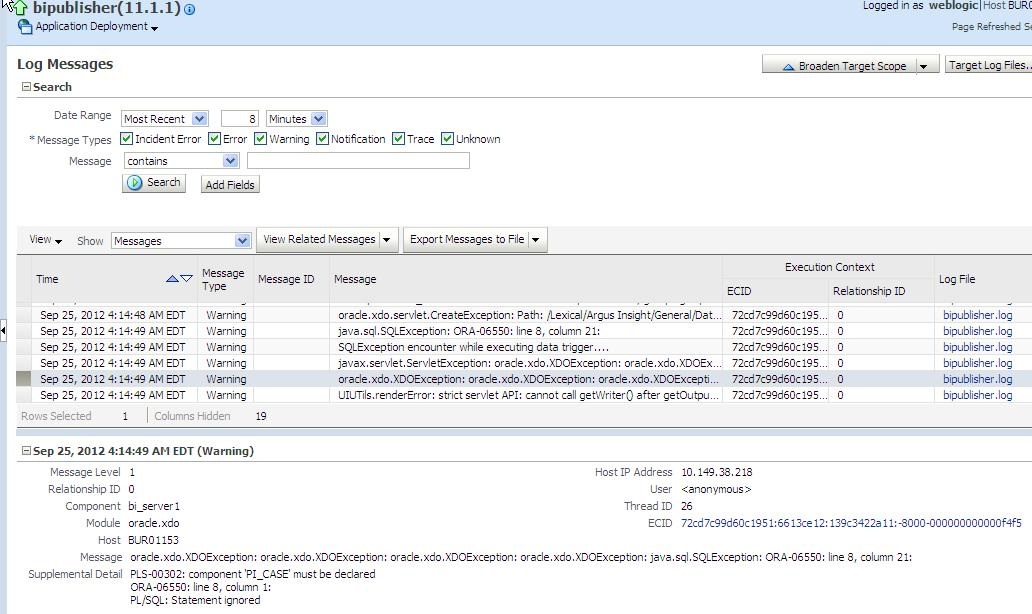
If the parameter is not declared in the package, the error message Component PI_CASE must be declared as shown in the enterprise manager bipublisher logs displays as shown below:
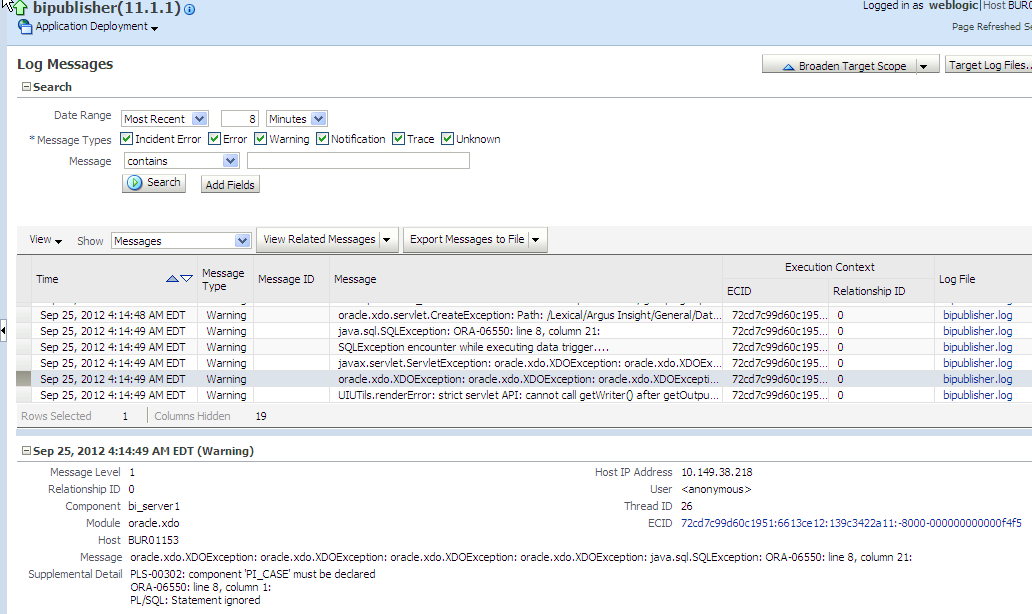
Once the parameter pi_case is declared in the package, the report is executed successfully.
The following are the steps to view event triggers:
In BI Publisher report, there are three different types of event trigger: Before Data, After Data and Schedule.
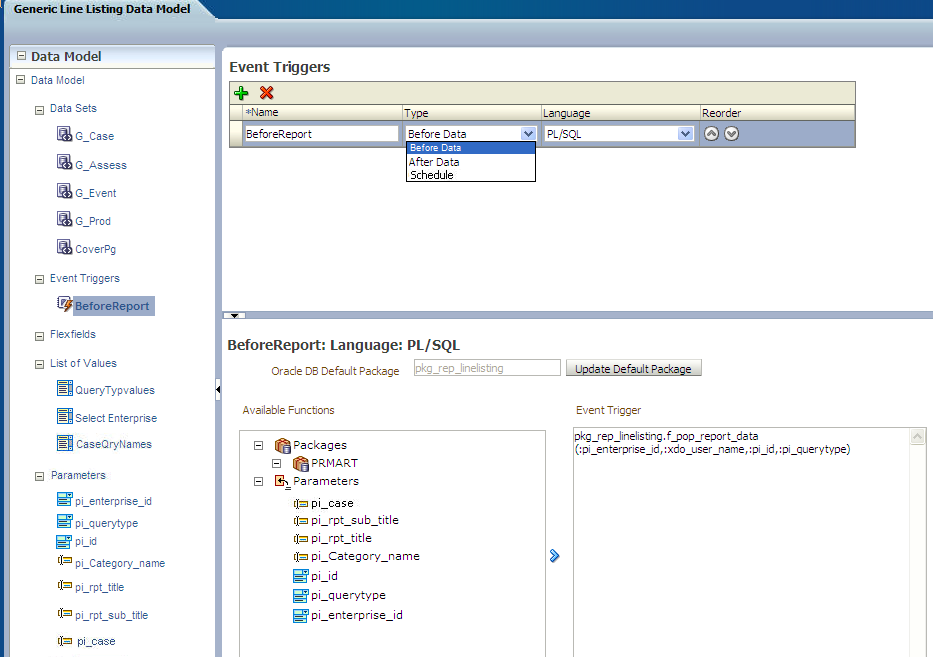
In the Event Triggers, for the Generic Line Listing Report you will create Before Data trigger, which will set the user context before populating all the reporting GTTs. The function called in the Event Trigger as shown in the above picture is:
pkg_rep_linelisting.f_pop_report_data(:pi_enterprise_id,:xdo_user_name,:pi_id,:pi_querytype)
In case, you want to delete some customized tables after data is generated, you can create Event Trigger of type After Data and call package with delete statements.
See Also:
Report Designer's Guide for Oracle Business Intelligence Publisher
The following are the steps to add lexical parameter in the data model:
Edit the data set G_Case. Add Lexical Parameter &gl_orderby, as declared in the package.
See Also:
Section 5.1.4.2.6, "Lexical Parameters"
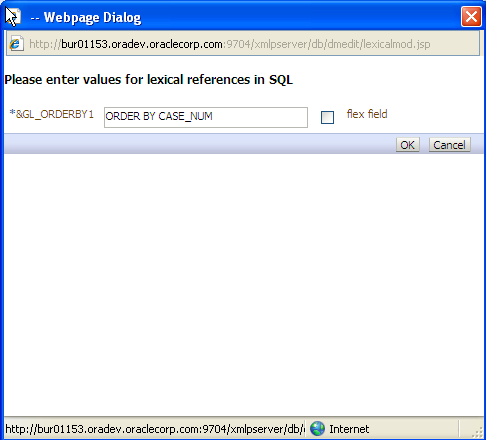
When Lexical Parameters are added for the first time in the Data Model, BI Publisher will ask for lexical references in SQL that is, Default Value for the Lexical Parameter.
Create a List of Values, Order By as shown below: 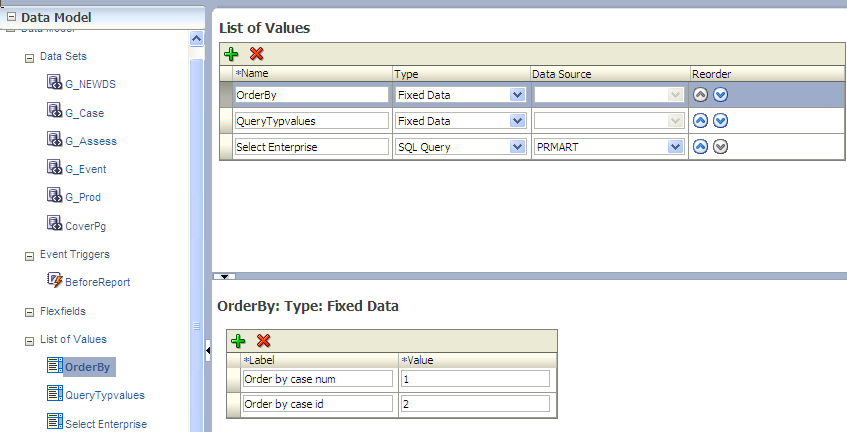
Create the parameter pi_orderby in the Data Model and assign the LOV-OrderBy as shown below:

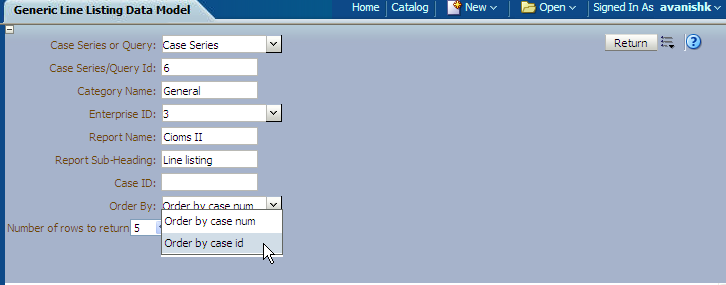
View the Report by selecting the parameter OrderBy.
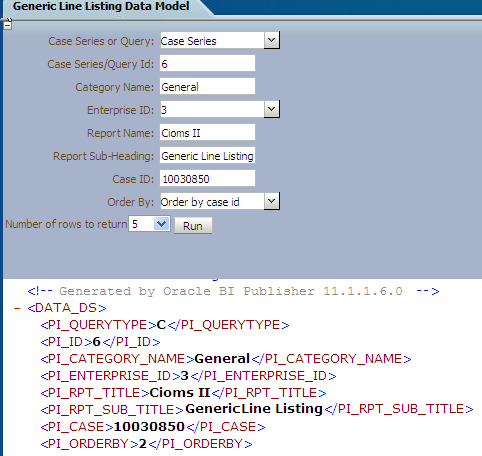
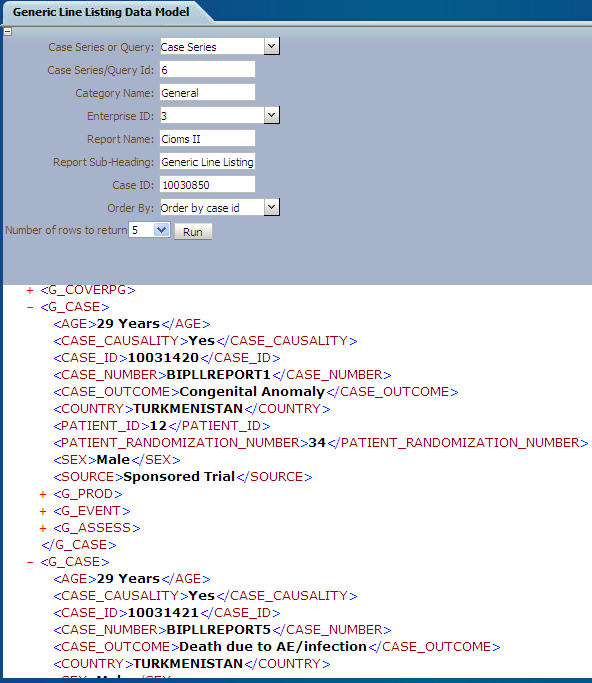
Execute the Report and verify that data is in order by Case ID as per the selected option. You can find that the XML value of pi_orderby is '2'. In the package pi_orderby value '2' means Order By case_id.
See Also:
Section 5.1.4.2.6, "Lexical Parameters"
Check the case data for the order of cases by case_id: 10031420 and 10031421 in figure shown below:
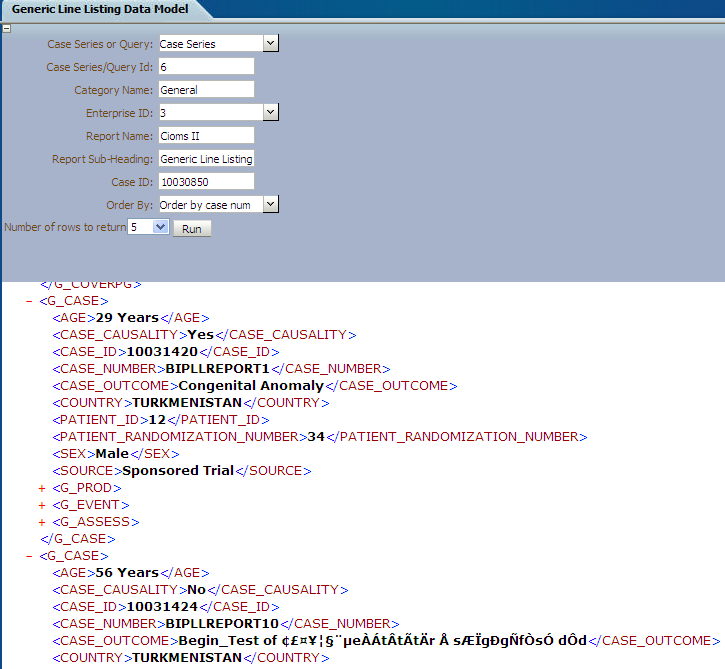
Now, select the Order By case_num option in the Data Model.

Verify the case data for order of cases by case_num: 10031420 and 10031424, in the figure shown below:
This section explains the types of report template used in BI Publisher Report as follows:
To view Event Assessment Data in the reports, you should create Event Assessment as a separate block in both Layout Editor and Rich Text File (RTF) template; Product and Event details should be fetched from the Event Assessment Level only to see Event Assessment Data.
This section also explains:
The following are the steps to edit/modify an existing report layout:
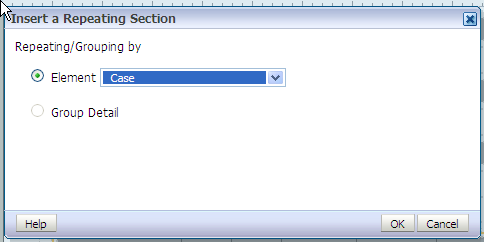
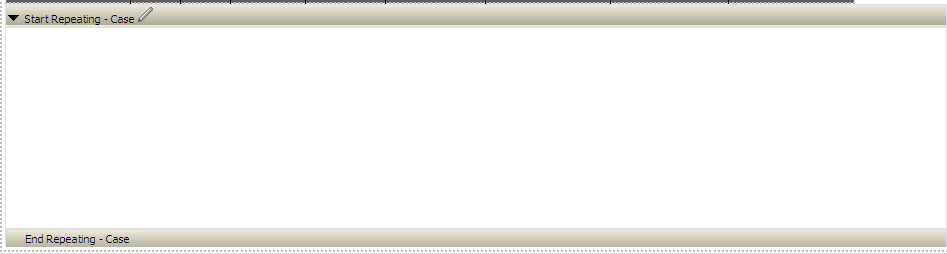
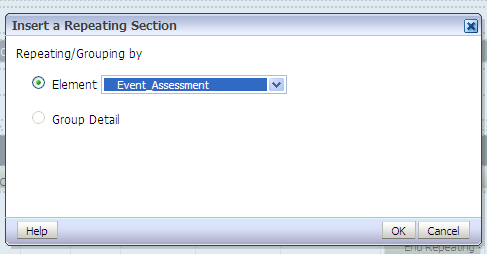
Create a Repeating section as shown below:
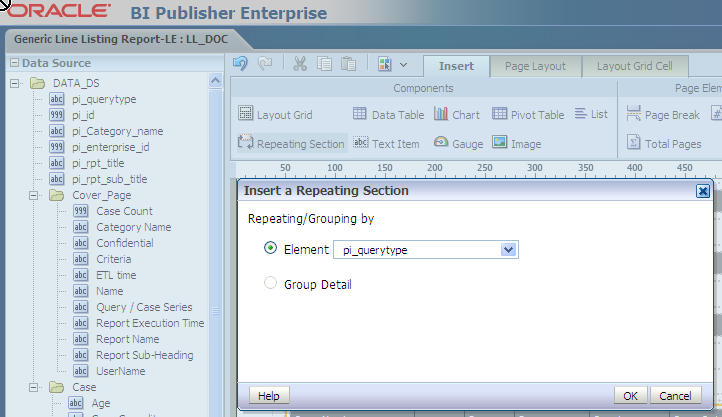
Select a valid Group Name that is, Element from the element drop-down list.
A Repeating section is created, as shown below:
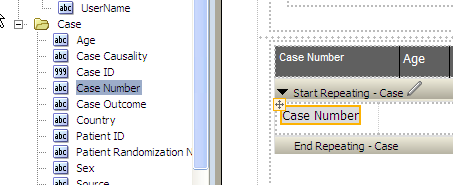
Add columns in the Repeating section. For example, click Case Number and drag it to the Report Layout section.
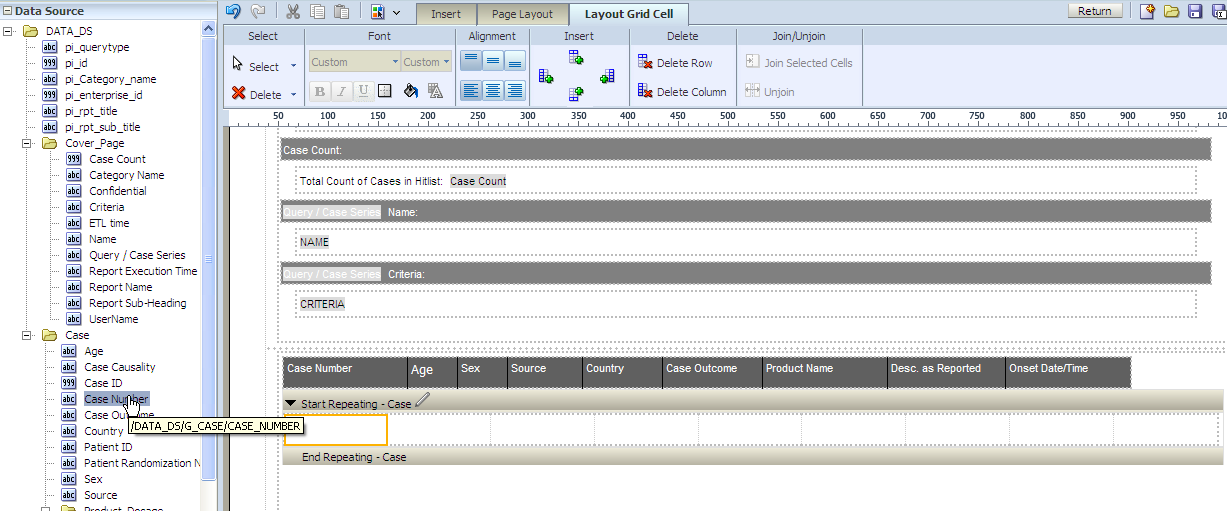
Drag Case Level columns only in the above Repeating section. Columns from other groups, such as Product or Event should not be included here.
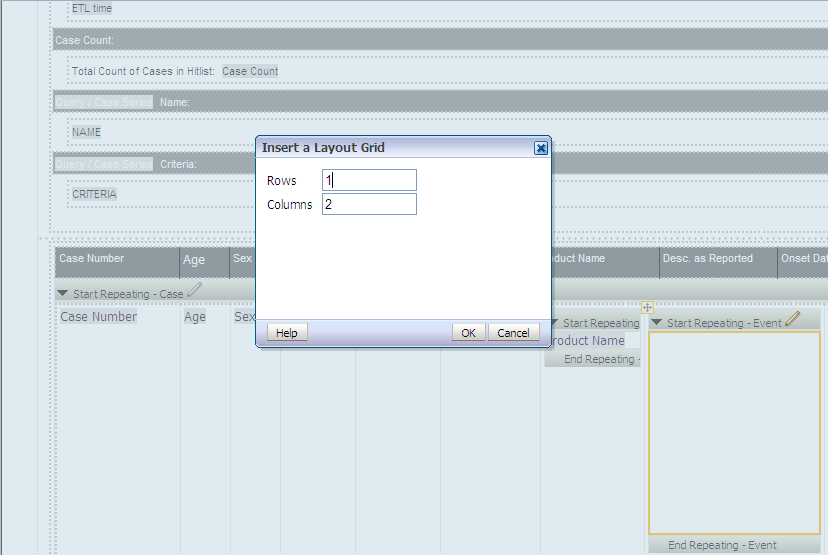
Add a child Repeating section for the Product.

In the Repeating section, you can add Layout Grid with as many required columns as you want to include in the report.
Add Repeating section for child group Event Assessment. Once added, save the report and click Return.
The Report is displayed as shown below:
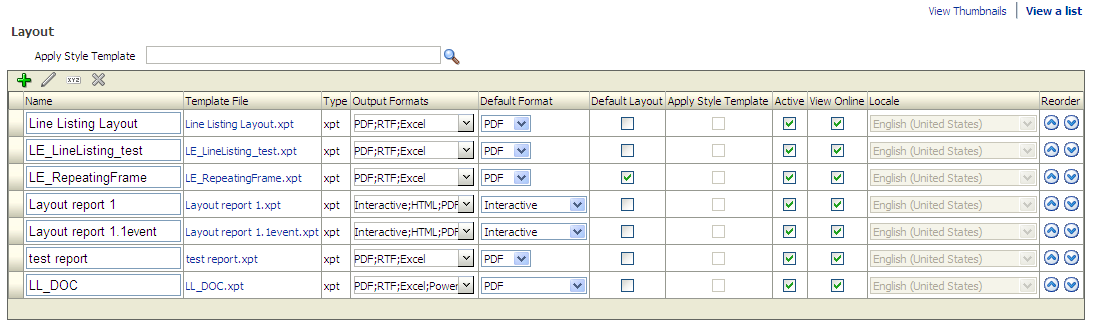
Click View a list to select Default Format, Default Report and etc.
To add more columns in a Repeating section, go to Data Source panel and select the required column from the appropriate group. Drag the selected column into the Repeating section.
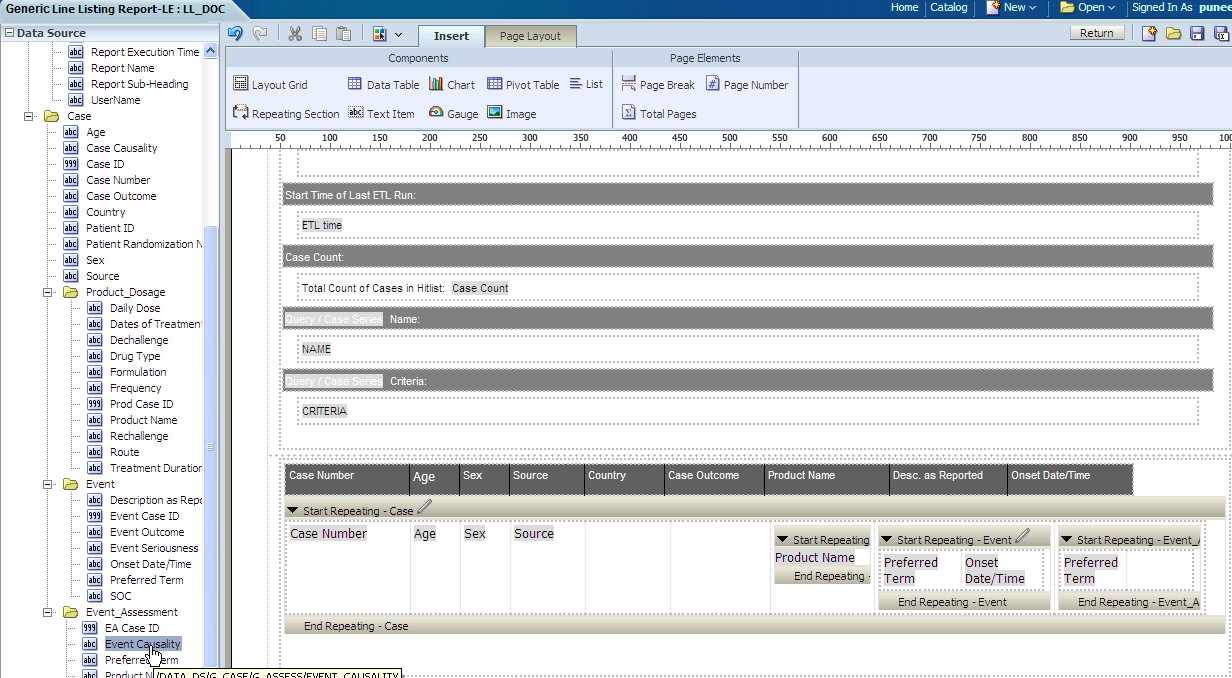
The column Event Causality is added in the Event Assessment section.

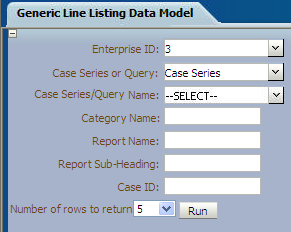
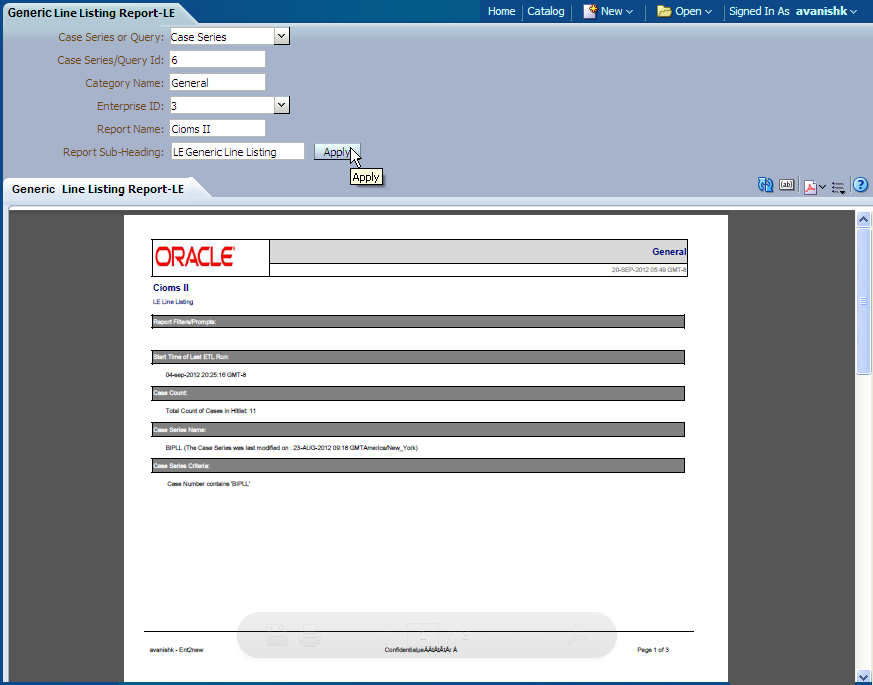
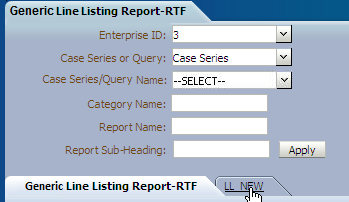
To execute the report, click Report Link or Open the report. The following screen displays:
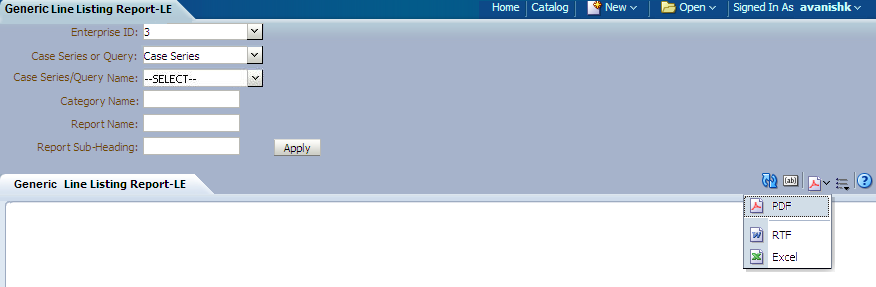
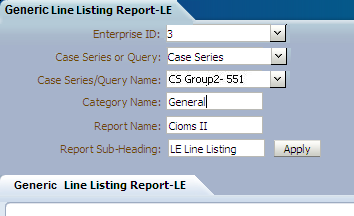
Enter the appropriate parameters.
Select a report output type, like PDF.

The report is generated in PDF format.
The RTF template has a main template and one sub-template. You can use the sub-template in any future reports.
Sub-template: The sub-template cover page details are as shown below:
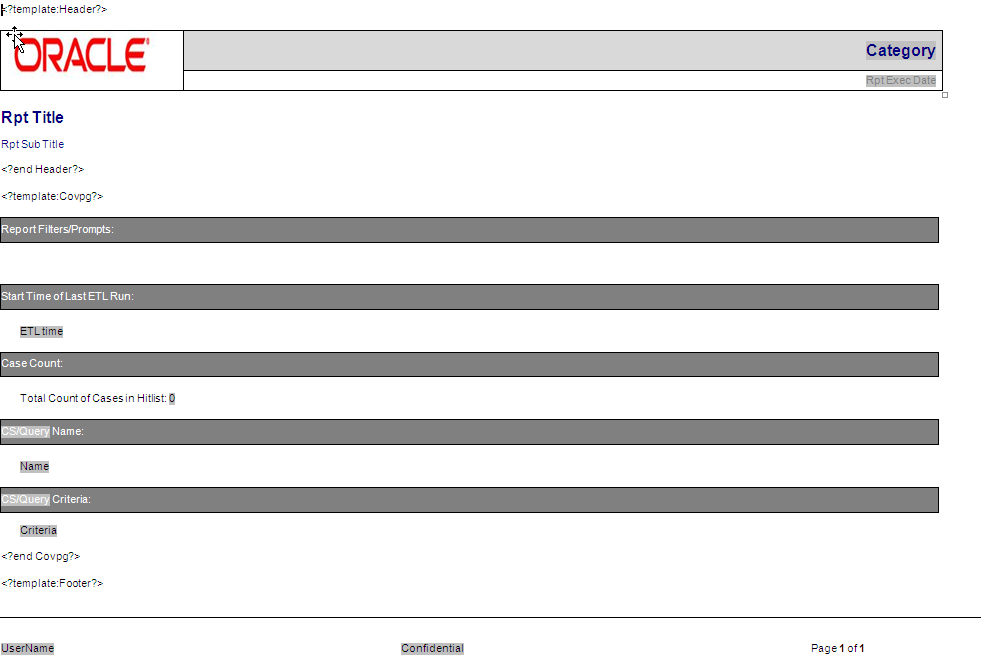
The sub-template is divided into three categories:
Template- Header: It contains Company Logo, Report Run Date, Report Category, Report Title, and Report Sub-heading.
Template- CovPG: It contains Report Prompts, Start ETL Time, Case Count, Query/Case Criteria and Name.
Template- Footer: It contains Login User, Confidentiality and Page Number.
Main Template: In this template the report columns are created in different tables for different groups. Besides, sub-template should be called in the Main Template as shown below:

Adding New Column in RTF
The following are the steps to add a new column in RTF:
Remove any existing column from the specific group, like Product or Event and add a new column from the same group. Or, reduce the width of the column to add a new column without removing an existing column.
To view Event Assessment values, Product and Event information should be fetched from the Event Assessment Level only. You should not compare Event Assessment Data with Product and Event level columns given in the Default Report template.
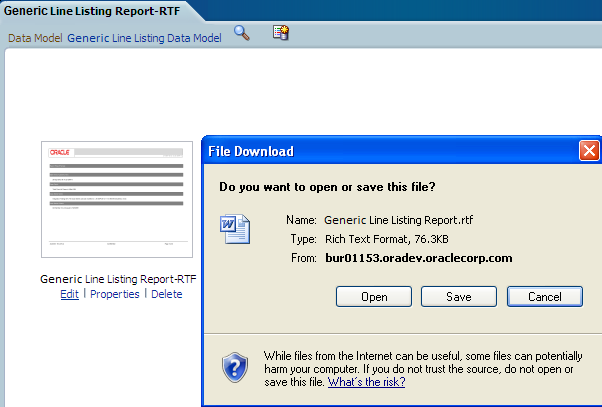
Click Edit in the RTF template report and save the RTF template at your local machine.

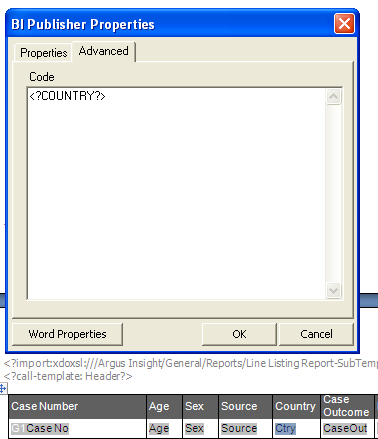
Click Open to display the RTF template document. Double-click on any existing column of BI Publisher. The BI Publisher Properties displays. Enter any valid XML tag for BI Publisher columns.
See Also:
Section 5.1.5.1.2, "Adding New Data Set" for XML tags available under the Data Sets Structure tab.
Modify the column Country to display Patient Random Number column and save the RTF.
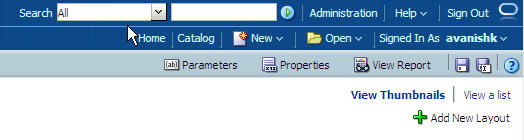
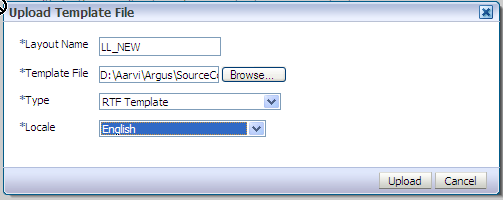
Upload RTF to the report. Click Add New Layout option as shown below:
Click Upload.
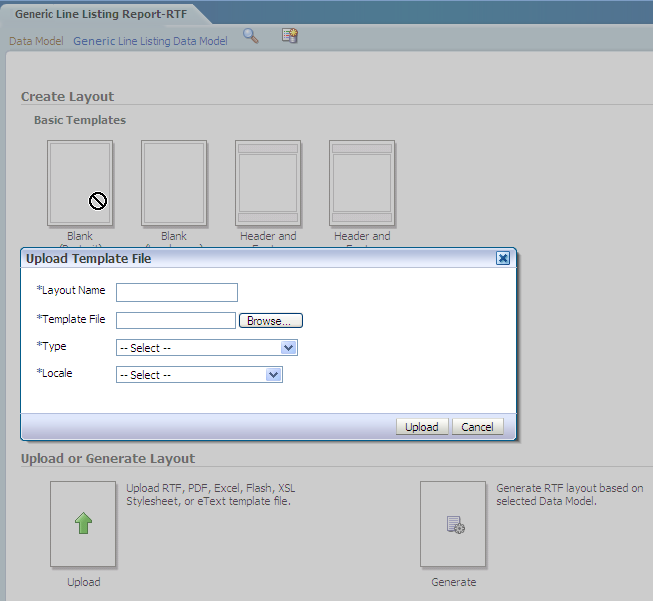
Select the new RTF template.
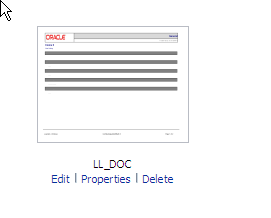
Once uploaded, you can find two layouts in Thumbnail format as shown below:
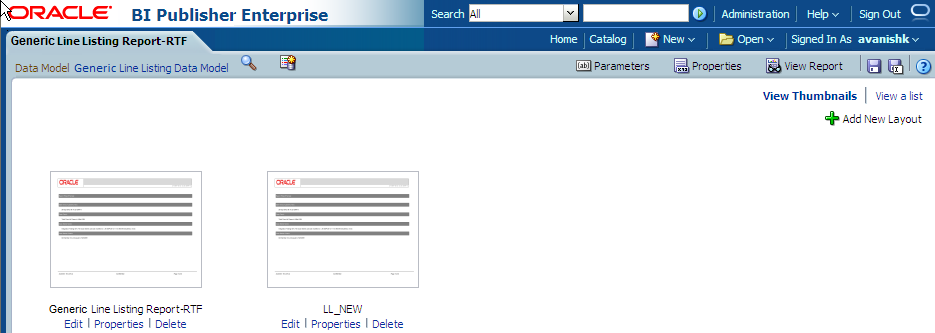
Click View a list option to select Default Report and Output Format options. Once you have saved the changes, click on view report option to execute the report.
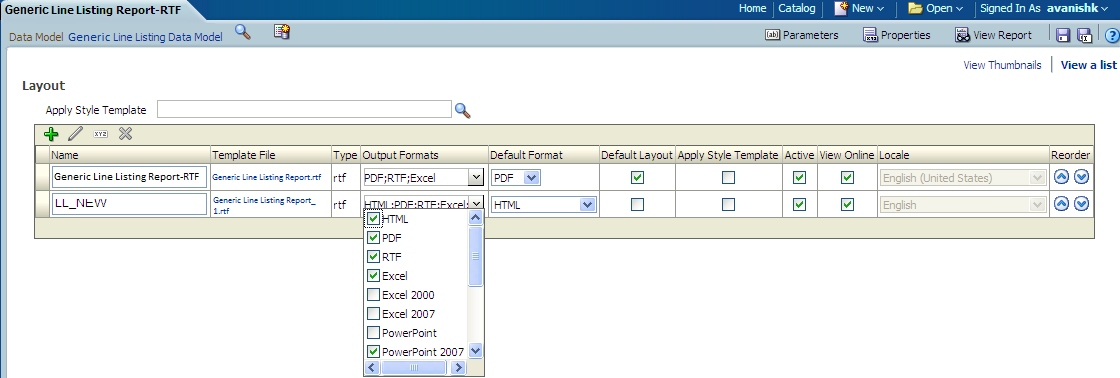
You can find both the Layouts and can view any Report Template Output by selecting the appropriate tab. After passing correct parameters click Apply.
See Also:
Oracle Business Intelligence Publisher Technical Reference Manual > Report Designer's Guide > Oracle Fusion >Creating an RTF template section.
While running BI Publisher report, by passing incorrect/invalid parameters, sometimes you may get the following error messages:
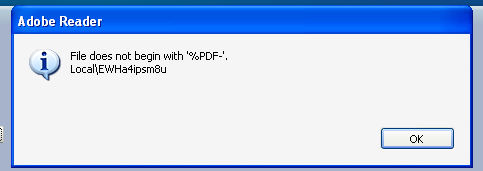
Or,

Verify the BI Publisher logs from the Enterprise Manager.
You can verify the AI log tables or login to enterprise manager to check the BI Publisher server logs.
See Also:
Section 5.1.4.2.4, "Log (Audit) Table"
The following are the steps to check BI Publisher server logs:
Login to Enterprise Manager.
Click Applications > BI Publisher.
Click Clustered Application Deployment > Logs and View Log messages as shown below:

Select the Date Range or Message Type and click Search. The BI Publisher logs displays as the search result.
You can extend our existing report model using the following actions:
The GTTs are created in the MART database.
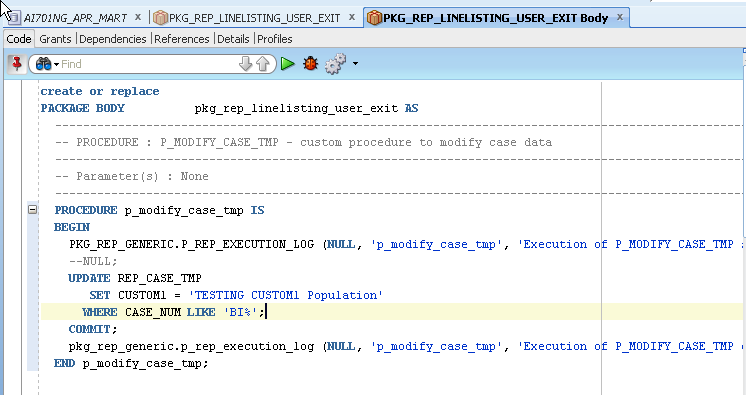
To add new column in a GTT, login to the Mart schema and add a new column CUSTOM in the GTT rep_case_tmp as shown below:
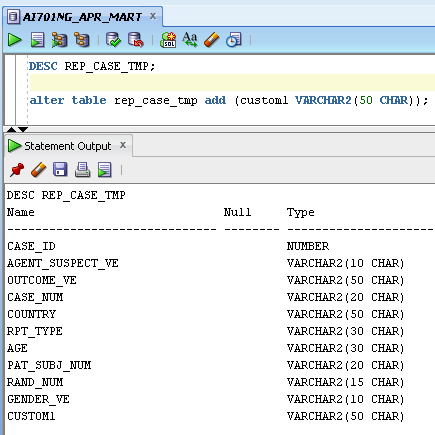
You can populate the column CUSTOM in User Exit package by modifying the package to include your DML statements and compile the package as shown below:
The following are the steps to add a new column in the data set:
Edit the existing Data Model and save the new Data Model with appropriate name, such as LL_NEW_CUSTOM1_COL.

Edit the data set G_Case, include the new column and save the Data Model. The column CUSTOM is added to the data set as shown below:
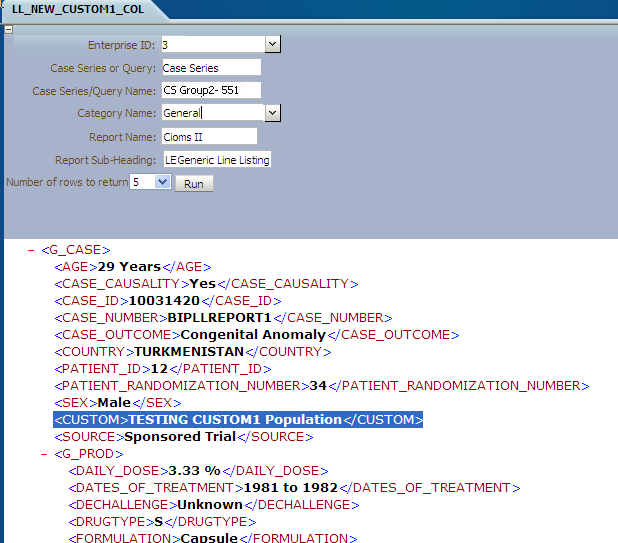
Click Get XML Output to view the XML output of the new data model.

In the above generated XML output, verify the column CUSTOM that is populated with the value as per the logic written in the User Exit package.
The following are the steps to add a new column in the Layout Report:
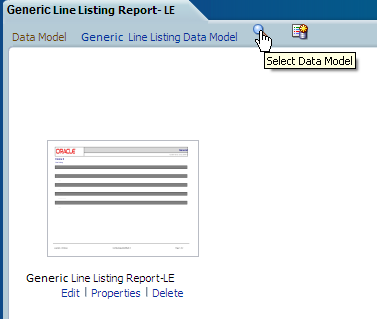
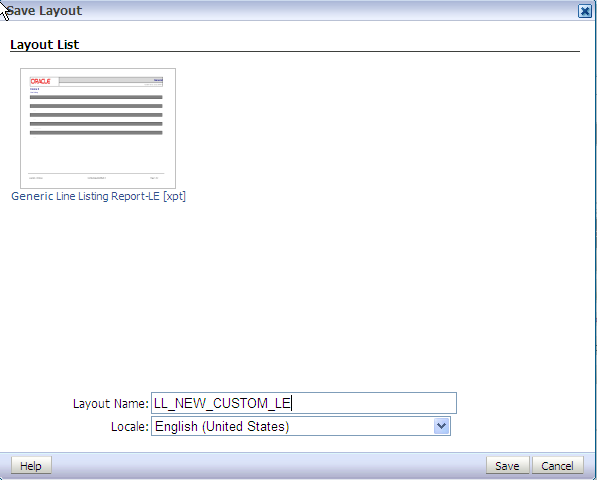
Edit the existing Layout Report and save as LL_NEW_CUSTOM_LE. Check that new data model is selected for the new Layout Report.
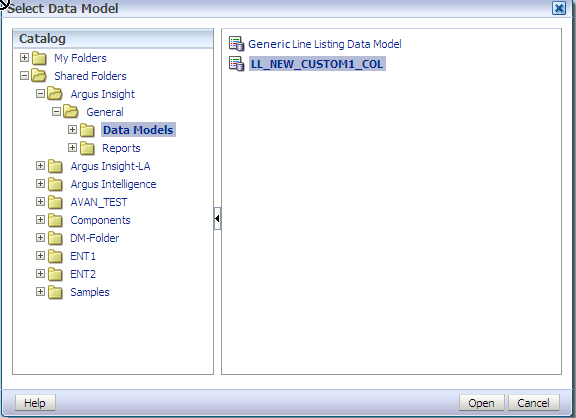
Select the Data Model LL_CUSTOM1_COL
At the top-left corner, you can see the new data model as selected for the Layout Report.

Save the Layout Report as LL_NEW_CUSTOM_LE.
In the Data Source panel you can view the column CUSTOM.
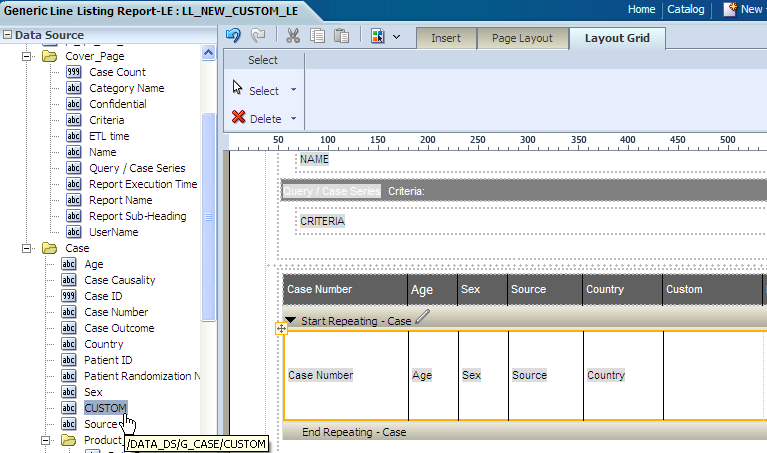
Drag the column and include in the Case Repeating section only. Save the Layout Report. Click Return and then click View Report.

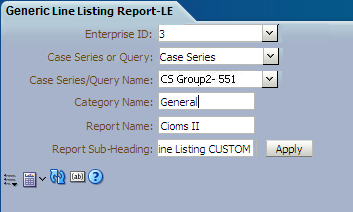
Enter the appropriate values to the Report Parameters and click Apply.
Check that the report is executed successfully with CUSTOM value populated as per the logic.
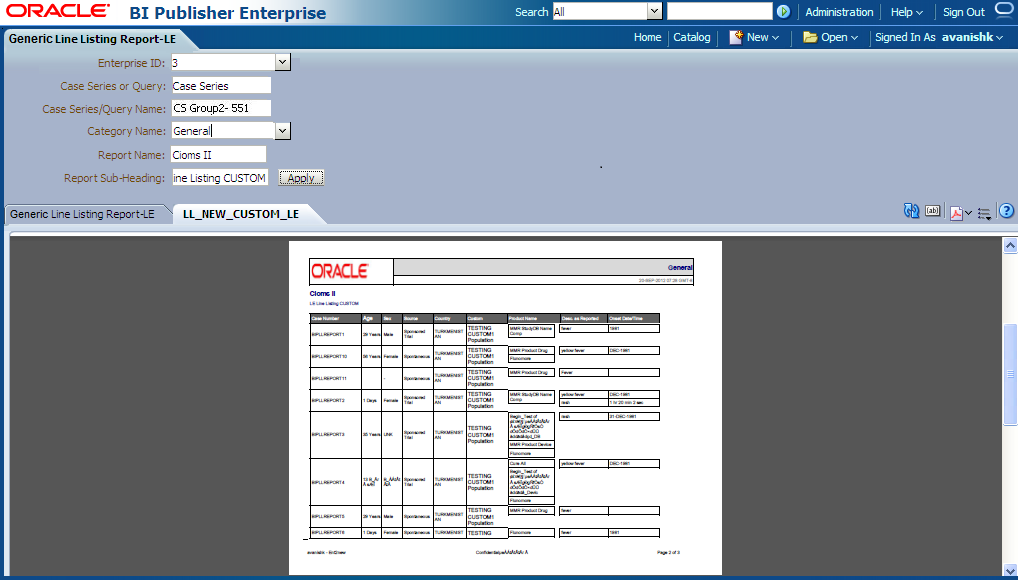
You can see that the column CUSTOM is populated.
This section comprises the following topics:
The BusinessObjects extensibility has the following assumptions:
The user has a working knowledge of report creation in BusinessObjects.
Universe Connection is made using the schema APR_APP.
|
Note: The procedures mentioned in this guide are optional, one or more steps can be omitted based on the valid business scenarios. |
To apply Argus data security for BusinessObjects:
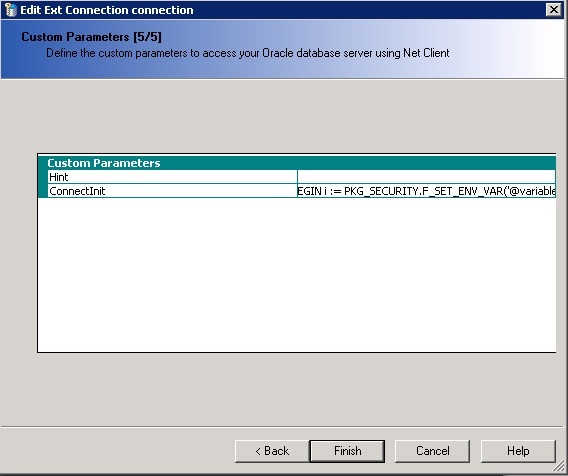
In the ConnectInit parameter of the connection, add the following string:
declare i number; BEGIN i := PKG_SECURITY.F_SET_ENV_VAR('@variable('BOUSER')'); END;
To apply blinded security for BusinessObjects:
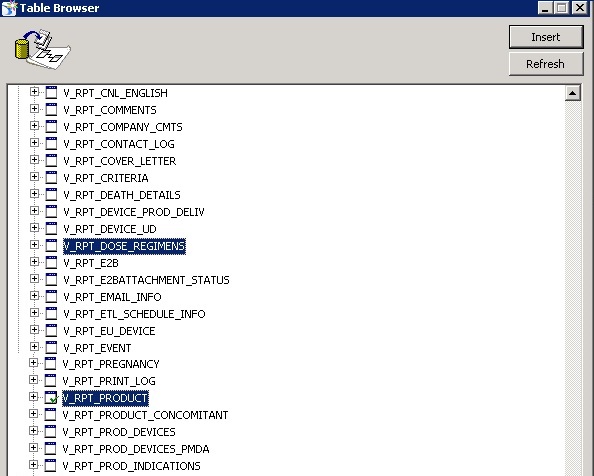
Insert the views V_RPT_PRODUCT and V_RPT_DOSE_REGIMENS from the data source (APR_APP schema) to the BusinessObjects Universe.
|
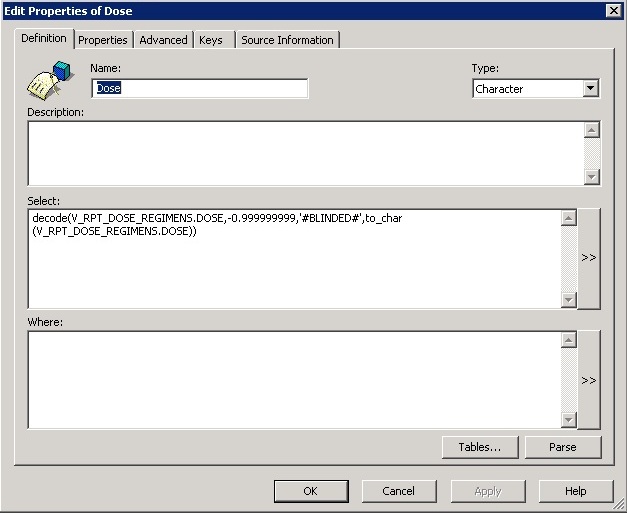
Tip: In case of a Blinded Text field the value is displayed as #BLINDED# in the report to the blinded user , whereas for Blinded ID field the value becomes -0.999999999. In order to change the ID field to also display as #BLINDED# in the report to the blinded user, add the following lines in the Select statement of the Object in the Universe:decode(<Table Name>.<ID Field>, -0.999999999, '#BLINDED#', to_char(<Table Name>.<ID Field)) For example, DOSE is the Blinded ID column in table RPT_DOSE_REGIMENS, then in order to display #BLINDED# for the object DOSE in the report, use the below given statement in the Select statement of the Object in the Universe: decode(V_RPT_DOSE_REGIMENS.DOSE,-0.999999999,'#BLINDED#', to_char(V_RPT_DOSE_REGIMENS.DOSE)) |
This section provides information about the steps to create and run the BusinessObjects Reports on Case Series/Power Queries.
This section comprises the following sub-sections:
The following are the steps to modify the universe:
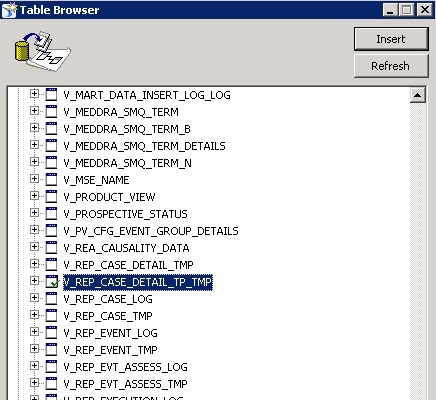
Import the view V_REP_CASE_DETAIL_TP_TMP from the data source schema APR_APP.
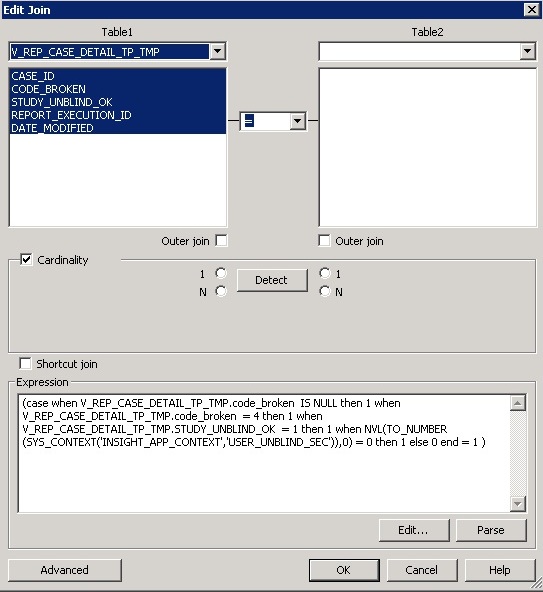
Insert a join for the view V_REP_CASE_DETAIL_TP_TMP as:
(case when V_REP_CASE_DETAIL_TP_TMP.code_broken IS NULL then 1 when V_REP_CASE_DETAIL_TP_TMP.code_broken = 4 then 1 when V_REP_CASE_DETAIL_TP_TMP.STUDY_UNBLIND_OK = 1 then 1 when NVL(TO_NUMBER(SYS_CONTEXT('INSIGHT_APP_CONTEXT','USER_UNBLIND_SEC')),0) = 0 then 1 else 0 end = 1)
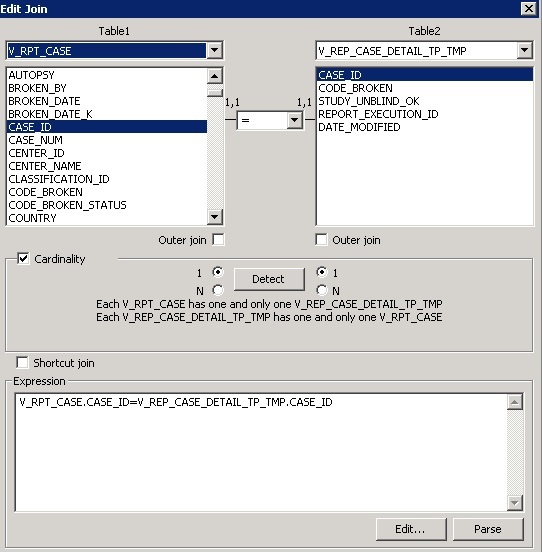
Create joins for the view V_REP_CASE_DETAIL_TP_TMP with view V_RPT_CASE or RPT_CASE. For Example:
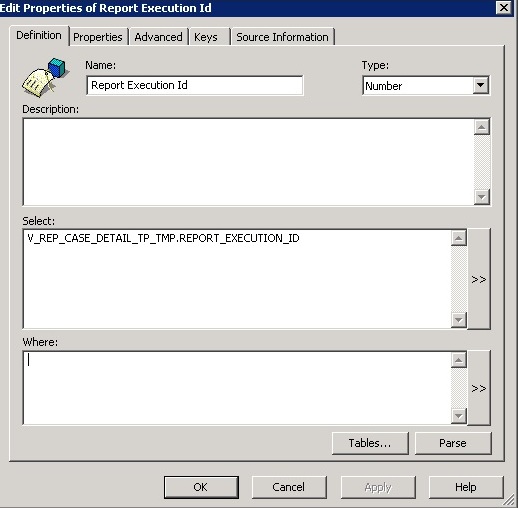
Insert a class in the universe called Query Execution which contains an object called Report Execution ID (V_REP_CASE_DETAIL_TP_TMP.REPORT_EXECUTION_ID)
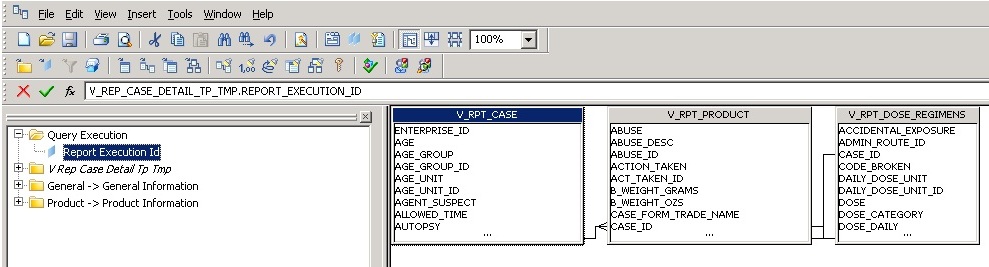
The Report Execution ID object appears in the Query Execution class.
|
Note: Reports can be created once this universe is exported after the changes. |
The following are the steps to modify the BusinessObjects reports:
Copy the universe Query Execution.unv from the below given location to the web server:
<Argus Insight Installation Folder>/Argus Insight/Business Objects/Universes
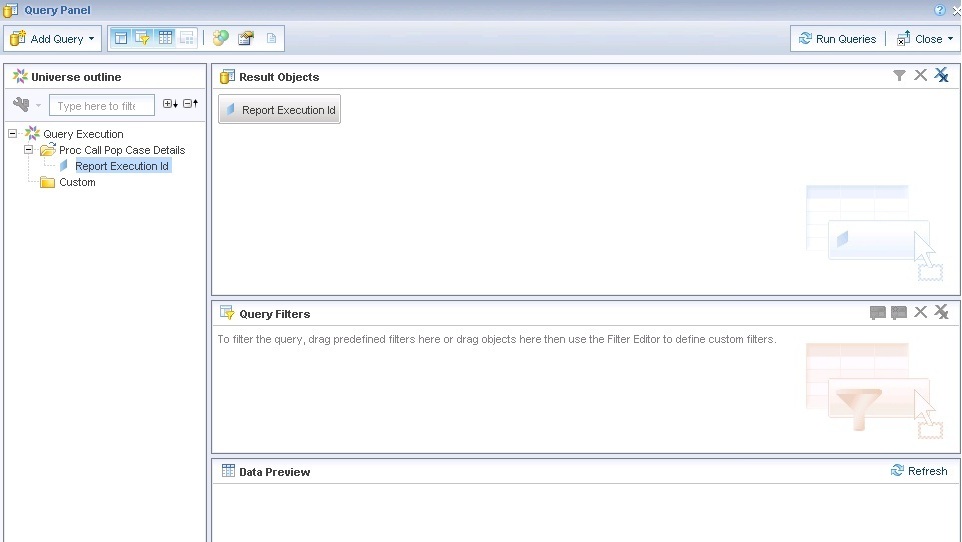
Create a report using the web intelligence with the Query Execution Universe. The Query Execution universe prompts the user to provide values that are used for the execution of the Case Series/Power Queries.
Drag the Report Execution ID in the Query Execution universe as a result objects.
Click on Add Query, and create a query (Query 2) using the universe on which report needs to be executed. Select the required result objects from this universe.
|
Note: The query built on the Query Execution universe should always be the first query in the report. |
Create a filter for the Query 2 by dragging the object Query Execution > Report Execution ID, which takes a value from the result of the first query.
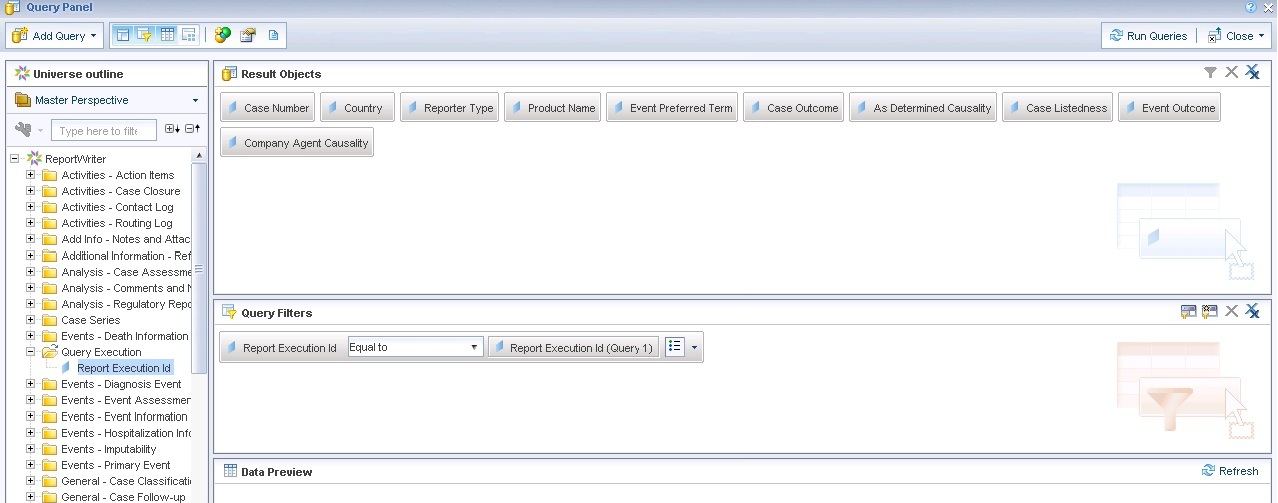
The report once executed after performing the above mentioned steps, will now run on the Case Series/Power Queries.
This section comprises the following topics:
The Cognos extensibility has the following assumptions:
The user has a working knowledge of report creation in Cognos.
A data source (PRMART) is already created as mentioned in the Argus Insight 8.0 Installation Guide
|
Note: The procedures mentioned in this guide are optional, one or more steps can be omitted based on the valid business scenarios. |
The following are the steps to apply Argus Data Security to Cognos:
Go to the Data Source Connection properties.
On the Set the commands - Open connection commands and Set the commands - Open session command page, add the following statement in the XML database commands: field.
i := PKG_SECURITY.F_SET_ENV_VAR(#sq ($account.personalInfo.userName)#);

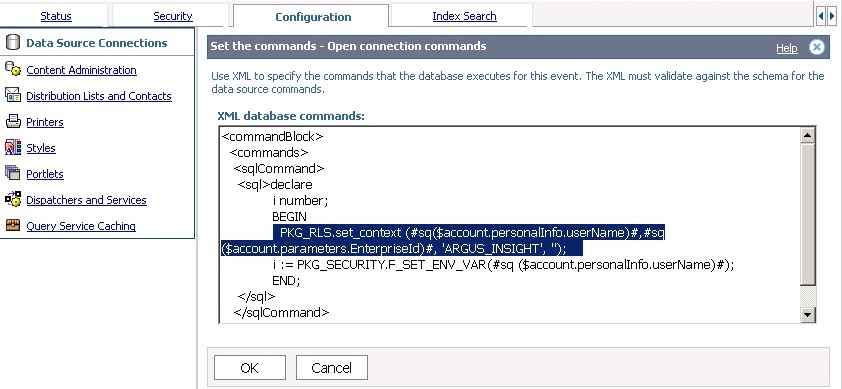
The following are the steps to apply Enterprise Security in the multitenant set-up to Cognos:
Go to the Data Source Connection properties.
On the Set the commands - Open connection commands and Set the commands - Open session command page, add the following statement in the XML database commands: field.
PKG_RLS.set_context (#sq($account.personalInfo.userName)#, #sq($account.parameters.EnterpriseID)#, 'ARGUS_INSIGHT', '');
|
Note: : In the report, a dialog box appears to choose the Enterprise ID. For more information, refer to the Section 5.3.5.2, "Modifying Cognos Reports". |
For Enterprise-specific roles and permissions, refer to Argus Insight 8.0 Installation Guide > Section 6.1.7.
The following are the steps to apply Blinded Security to Cognos:
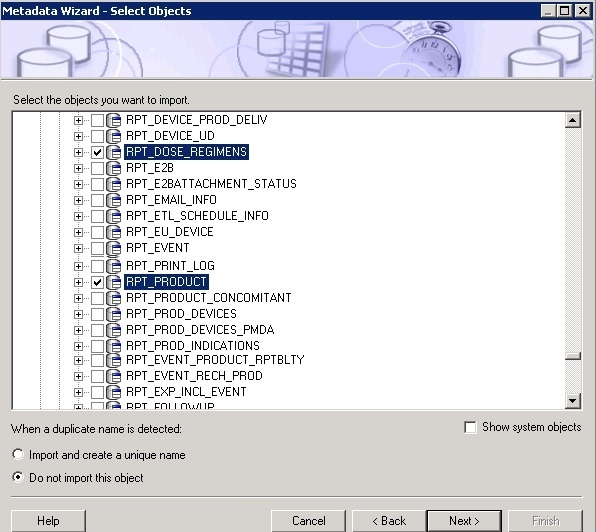
Import the synonyms RPT_PRODUCT and RPT_DOSE_REGIMENS from the Data Source to the Cognos Model.
|
Tip: In case of a Blinded Text field the value is displayed as #BLINDED# in the report to the blinded user , whereas for Blinded ID field the value becomes -0.999999999. In order to change the ID field to also display as #BLINDED# in the report to the blinded user, add the following lines in the SQL of the Query Subject Definition in the Database view:CASE WHEN <ID field> = -0.999999999 THEN '#BLINDED#' ELSE to_char(<ID field>) END as <ID field> For example, DOSE is the Blinded ID column in table RPT_DOSE_REGIMENS, then in order to display #BLINDED# for the object DOSE in the report, use the below given statement in the SQL of Query Subject Definition in the Database view: CASE WHEN DOSE = -0.999999999 THEN '#BLINDED#' ELSE to_char(DOSE) END as DOSE |
This section provides information about the steps to create and run the Cognos Reports on Case Series/Power Queries.
This section comprises the following sub-sections:
This section comprises the following sub-sections:
The following are the steps to modify the database view:
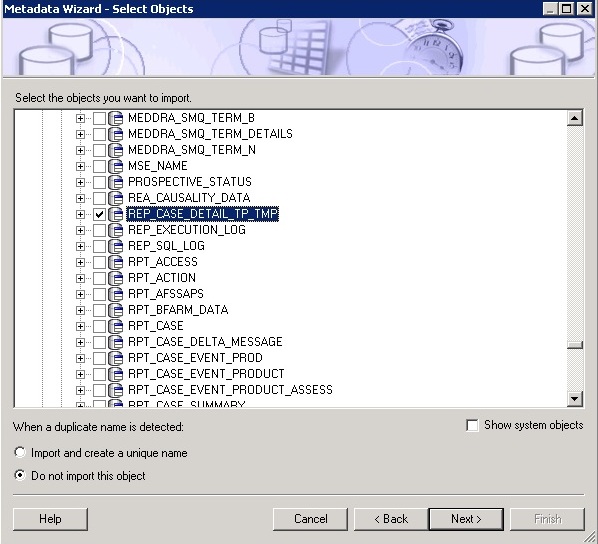
Import the synonym REP_CASE_DETAIL_TP_TMP from the data source.
Add the following filter in the REP_CASE_DETAIL_TP_TMP query subject.
Name - Blinded Security Filter
Expression Definition - ([<model_name> Database View].[REP_CASE_DETAIL_TP_TMP].[CODE_BROKEN] IS NULL OR [<model_name> Database View].[REP_CASE_DETAIL_TP_TMP].[CODE_BROKEN] = 4 OR [<model_name> Database View].[REP_CASE_DETAIL_TP_TMP].[STUDY_UNBLIND_OK] = 1 OR NVL(TO_NUMBER(SYS_CONTEXT('INSIGHT_APP_CONTEXT','USER_UNBLIND_SEC')),0) = 0 )
|
Note: It is mandatory to have REP_CASE_DETAIL_TP_TMP as query subject. |
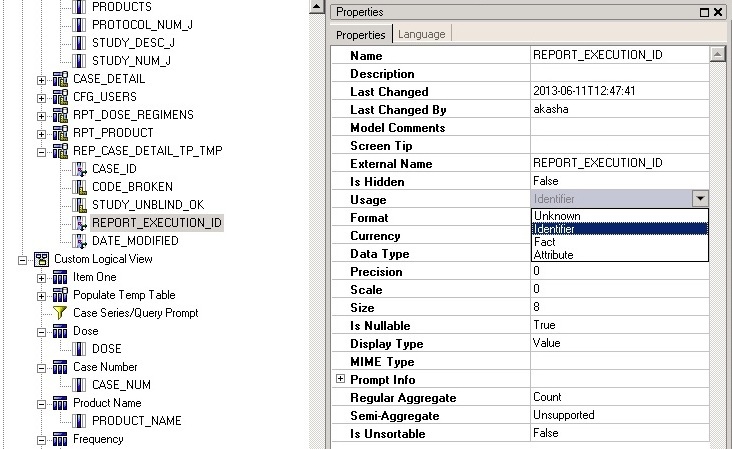
Set Usage of the columns CASE_ID and REPORT_EXECUTION_ID of this query subject as Identifier.
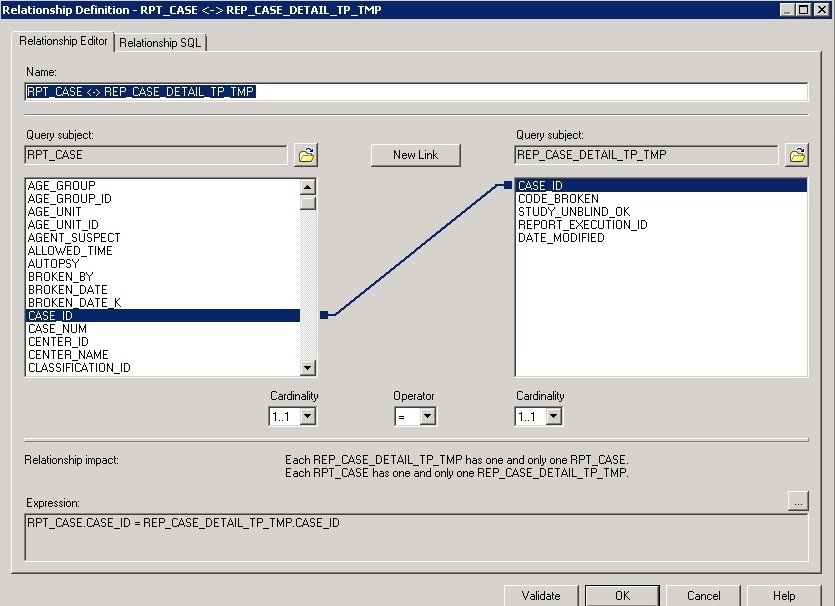
Create joins for the table REP_CASE_DETAIL_TP_TMP.
The following figures display:
Defining the joins for the REP_CASE_DETAIL_TP_TMP query subject.
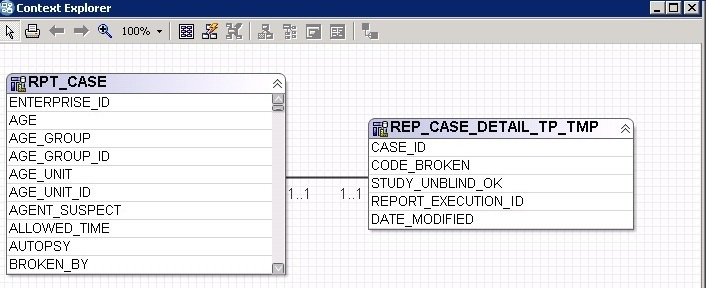
Creating relationship between the tables REP_CASE_DETAIL_TP_TMP and RPT_CASE.
The following are the steps to modify the logical view:
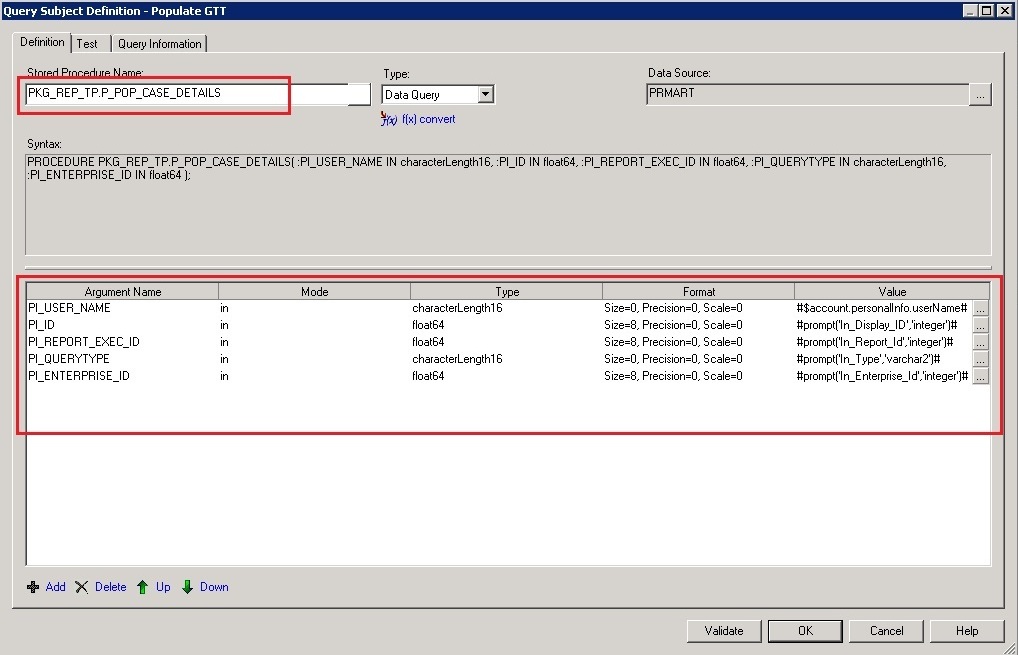
Create a new stored procedure query subject with the table name as Populate Temp. To do so:
Select the data source.
Select the procedure PKG_REP_TP.P_POP_CASE_DETAILS from the schema APR_APP.
Set the values of the Argument Names, as listed in the following table:
Table 5-5 Setting Argument Values
| S# | Argument Name | Value |
|---|---|---|
|
1 |
PI_USER_NAME |
#$account.personalInfo.userName# |
|
2 |
PI_ID |
#prompt('In_Display_Id','integer')# |
|
3 |
PI_REPORT_EXEC_ID |
#prompt('In_Report_Id','integer')# |
|
4 |
PI_QUERYTYPE |
#prompt('In_Type','varchar2')# |
|
5 |
PI_ENTERPRISE_ID |
#prompt('In_Enterprise_Id','integer')# |
Add the stored procedure of the table Populate Temp.
Set the Usage of :B1 to Identifier and Regular Aggregate to Unsupported.
Add a new filter:
Name - Case Series/Query Prompt
Expression Definition - [<model_name> Database View].[REP_CASE_DETAIL_TP_TMP].[REPORT_EXECUTION_ID] = #prompt('In_Report_ID','integer')#
|
Note: The Reports can be created only when the package is published after the changes. |
The following are the steps to modify the Cognos Reports:
Copy the Sample Report.xml file from the below given location to the web server:
< Argus Insight installation folder>/Argus Insight/Cognos/Reports/General/
Copy the entire content of the Sample Report.Xml file.
Launch Report Studio.
Go to Tools > Open Report from Clipboard.
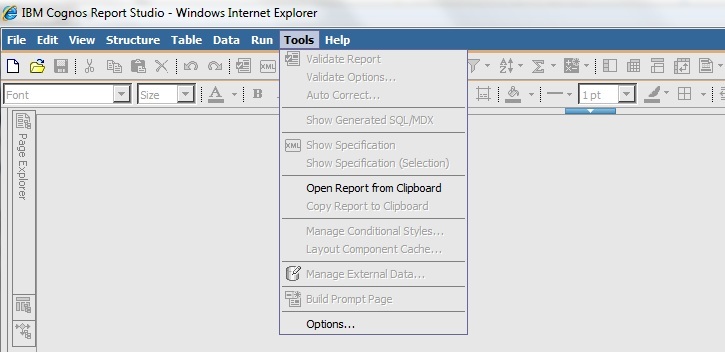
The following screen appears.
Go to the Query Explorer and copy all three queries in your report.
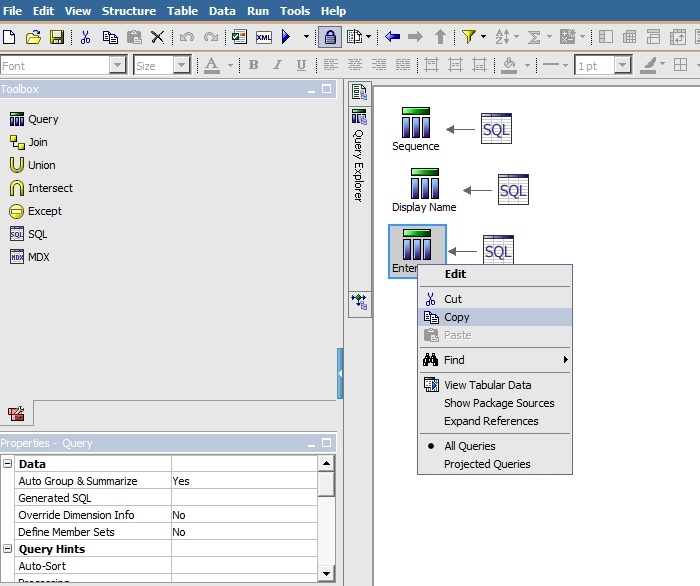
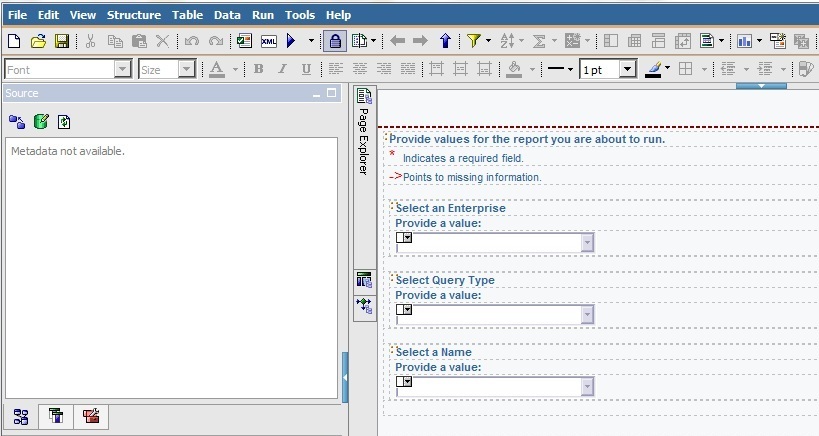
Navigate to Page Explorer > Prompt Pages.
Copy Prompt Page1 and paste in your report.
Open the first page of report (Cover page, if exists) and drag a Singleton in the page as the first item.
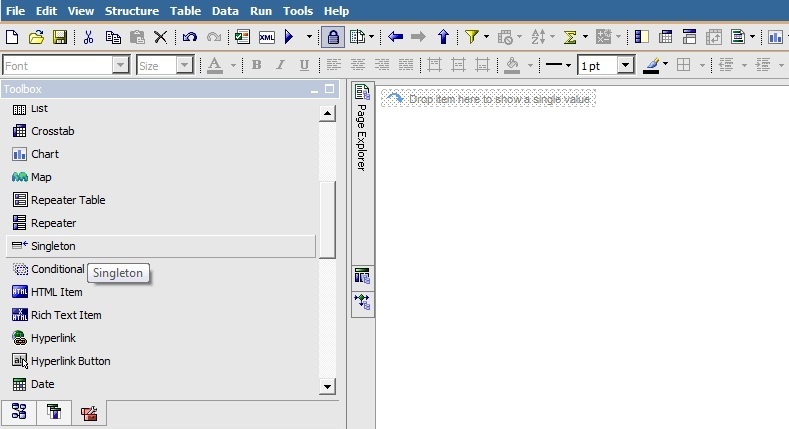
Drag the (Package_name) > Procedures > Populate Temp Table > :B1 in the Singleton mentioned in Step 5.
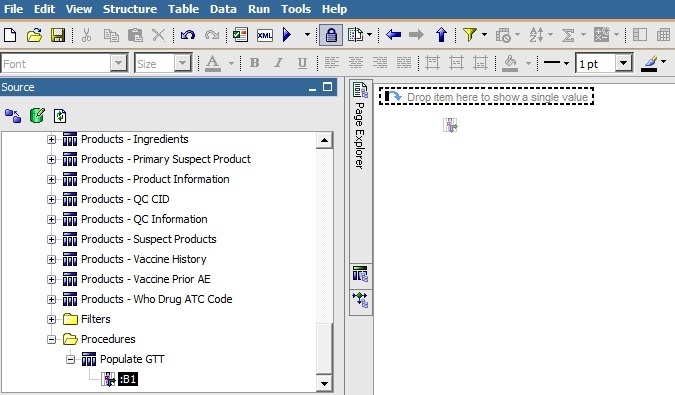
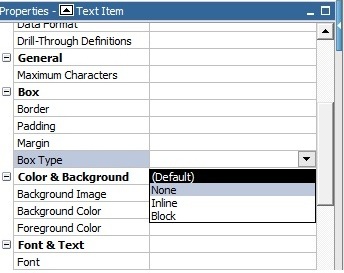
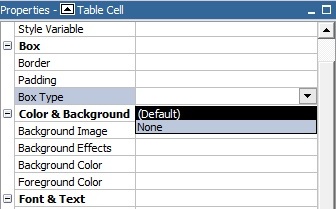
Set the Box Type property of :B1 item to None.
Add the new filter Case Series/Query Prompt to the Main Query of the report.
The report once executed after performing the above mentioned steps, will now run on the Case Series/Power Queries.
If the single-tenant user does not want to see the Enterprise drop-down in their report, execute the following steps:
Open Prompt Page1.
Select the Enterprise drop-down list, and add Default Selections as 1.
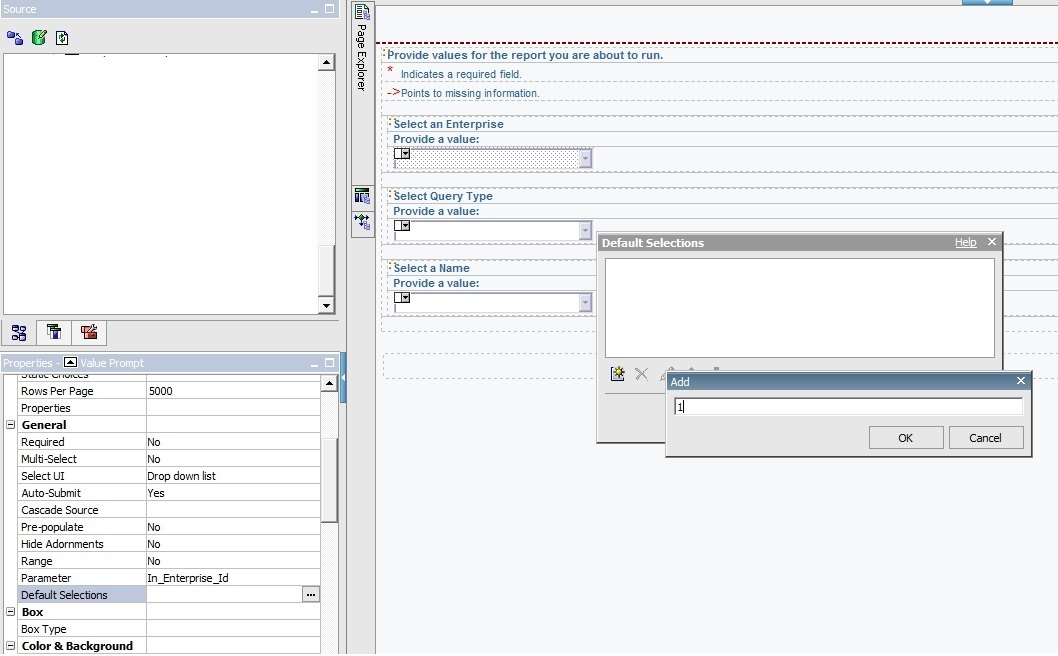
Select the table containing the Enterprise drop-down.
Change the Box Type property to None.
When the above steps are executed, then the Enterprise dialog box does not appears in the report.
Argus Insight provides an out of the box RPD for analyzing the aggregate reporting data which is generated by Argus Safety/BI Publisher. As part of BIP aggregate reporting generation, Argus Safety system populates log tables. These tables are used in the RPD for further analysis by creating OBIEE Answers and Dashboards.
The BIP tables in Argus Mart are populated from Argus Safety (BIP enabled) through Argus Mart Initial/Incremental ETL. The Initial ETL will fetches all the data, whereas the Incremental ETL fetches only the updated data between the last ETL execution time and the current execution time.
Incremental ETL will not fetch the purged data from Argus Safety.
For more details on data purging, refer to Oracle Argus Safety 8.0 BIP Extensibility Guide > Section 4.1.7.
This section comprises the following topics:
The OBIEE extensibility has the following assumptions:
The user has a working knowledge of Dashboard/BI Answers and RPD in OBIEE.
The RPD and Catalog are deployed as per the Oracle Argus Insight 8.0 Installation Guide.
The RPD architecture comprises the following layers:
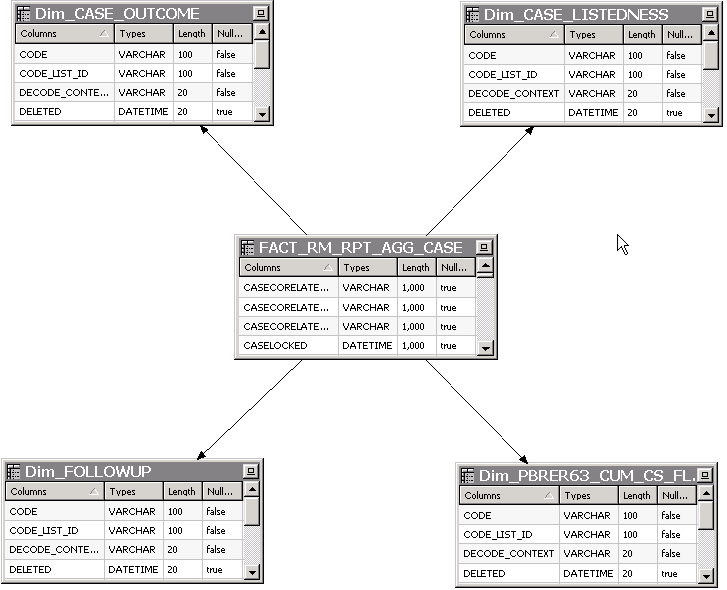
The following tables are fetched into the physical layer of the RPD as Facts:
Case (RM_RPT_AGG_CASE)
Drug (RM_RPT_AGG_DRUG)
Event (RM_RPT_AGG_EVENT)
Event To Drug (RM_RPT_AGG_EV2DRUG)
The various tables used in Physical Layer are:
Code List Discrete Table
Most of the dimensions are based on the Code List Discrete table. It contains all the code list IDs like COUNTRY, DOSE_UNITS etc, and their display value.
Few tables such as Drug names, Event reactions are from the Actual tables.
See Section 5.4.3, "Adding New Dimension Using Flex Bucketing", for details on how the Code List table is used as a Dimension.
In physical layer of the RPD aliases for all the dimensions and facts are available. For the Code List Discrete table multiple aliases for different dimension attributes are available.
For example:
Case Seriousness, Case Listedness, and Event Outcome are from the Code List Discrete table, so for each code list ID an alias and a dimension is made available.
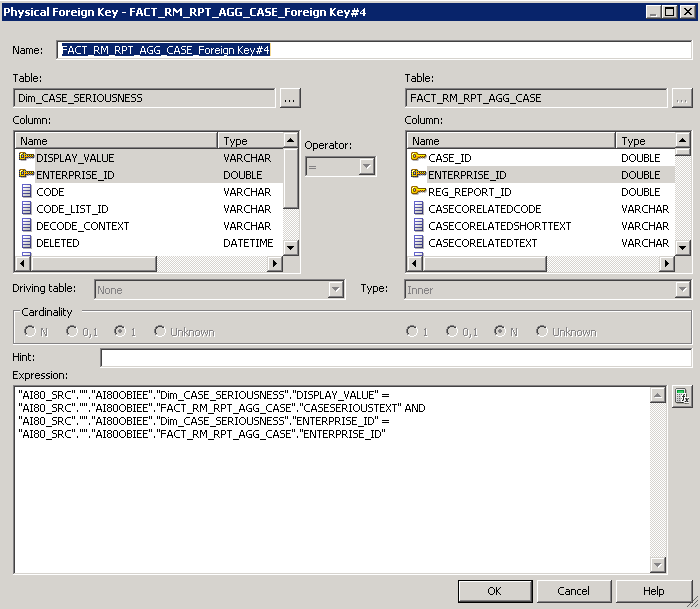
The following screen displays the joins of these dimensions with the respective Fact table:
See Section 5.4.3, "Adding New Dimension Using Flex Bucketing", for details on how the Join conditions are applied.
Dimension Tables
Other Dimension tables are from direct tables such as Drug names and Reactions etc.
Few dimensions are derived from views and select statements. The following views are created:
RM_RPT_AGG_CLINICALDRUGROLE_D
RM_RPT_AGG_DIAG_SYMPT_FLAG_D
RM_RPT_AGG_TREATMENT_LIST_D
RM_RPT_AGG_REACTION_D
Prompts
The Dashboard and Page prompts dimension available are:
Dim_Enterprise_Id
Dim_Report_Form_Id
Dim_Report_Template
Dim_Report_Type
These prompts are created from the following tables:
RM_RPT_AGG_ENTERPRISE_ID_D
RM_RPT_AGG_PROMPTS_D
REPORT_FORM_ID_D
For more information on these dimensions, see Appendix: Dimensions and their Mapping.
Connection Pool
The connection to Argus Mart is established using the AM_BI user, which is a Read-only user created during Argus Mart schema creation.
To display the enterprises along with their data as per the user access rights, set context as 0 (zero) in Connection Pool.
Other security settings are taken care by the User Security table.
User Security Table
A periodic report configuration that is created in Argus Safety can be shared across multiple user groups. The users under these user groups will have access to Modify and Execute the Report Configuration. This information is saved in the security table RM_RPT_AGG_USER_ACCESS_S.
This security table is joined to all the Facts, so that for the logged in user, only those reports information is available which he has access to. Other data security (blinding etc) settings are taken care by BIP tables in Argus Safety.
Event Polling Table
An Event Polling table RM_BI_S_NQ_EPT is created to handle event polling.
Refer to the Oracle OBIEE Guide for more information on Event Polling.
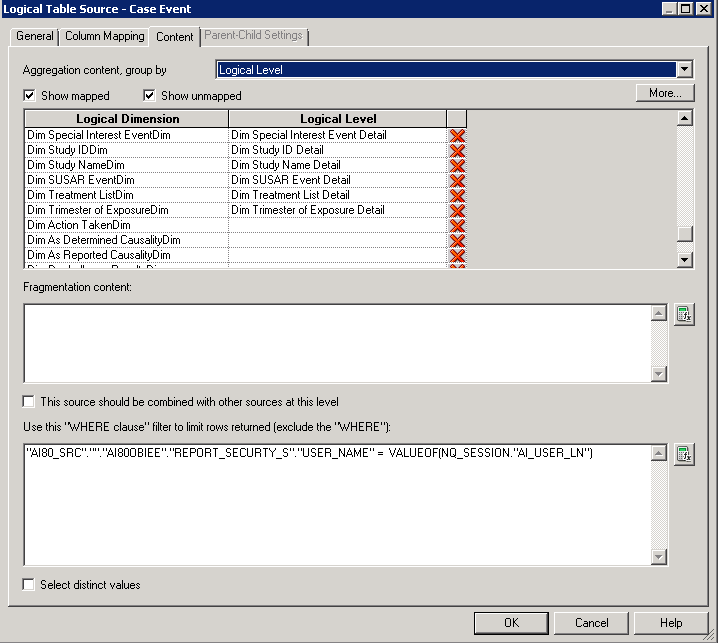
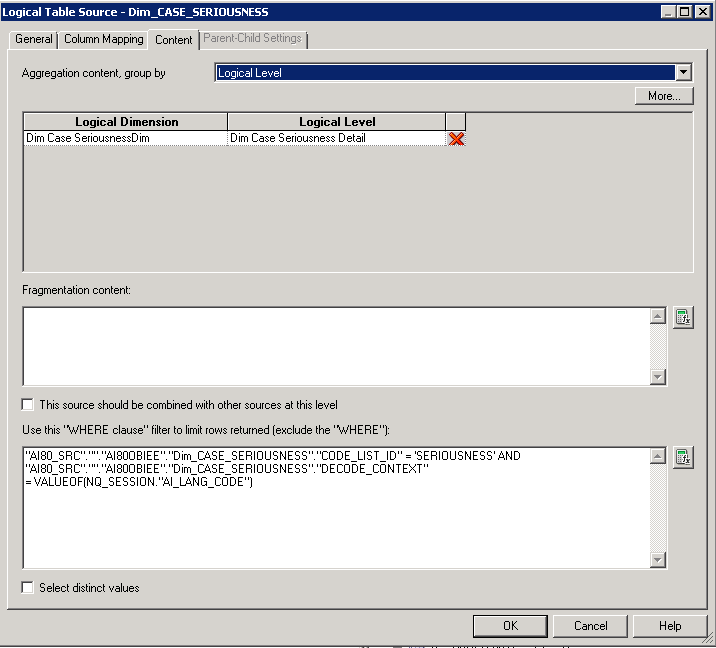
For all the dimensions, logical hierarchies are created at this layer and WHERE clause is added.
See Section 5.4.3, "Adding New Dimension Using Flex Bucketing", for an example of setting the WHERE clause.
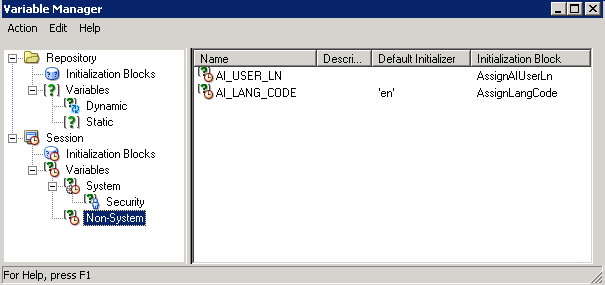
In the Argus Insight RPD, two session variables are created:
AI_USER_LN — Validates the logged in user name.
AI_LANG_CODE — Contains the value en. Avoids hard coding of the value in the WHERE clause in the BMM layer at various places.
For example:
Facts
The following are the logical combination of fact tables that are created in the RPD:
Case Fact
Drug Fact
Event Fact
Event to Drug Fact
Case Event Fact
Case Drug Fact
Case Event to Drug Fact
Consolidated Fact
For example:
Case Fact in physical table is FACT_RM_RPT_AGG_CASE.
Case Event Fact is a combination of tables FACT_RM_RPT_AGG_CASE and FACT_RM_RPT_AGG_EVENT.
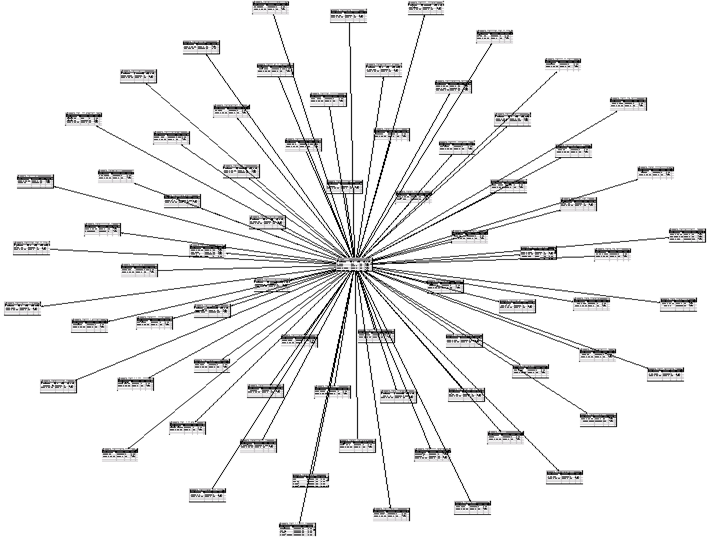
See , for details of RPD including dimensions, Fact tables and their joins.
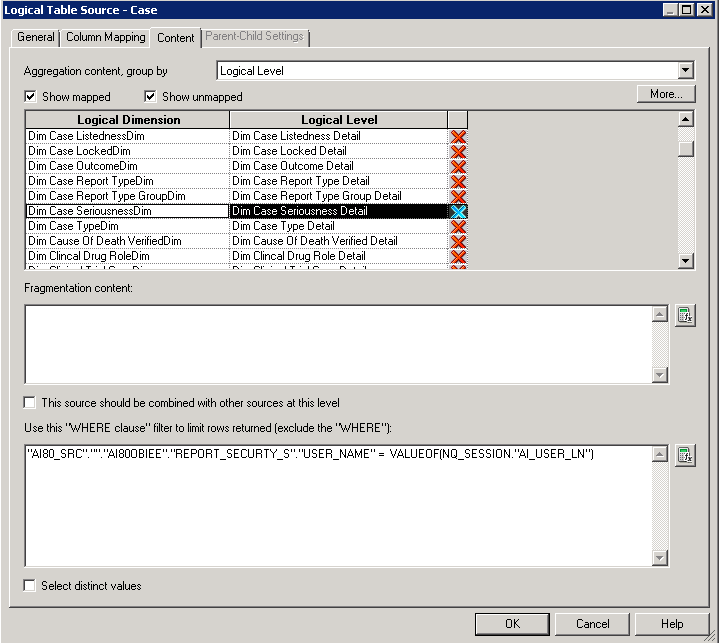
The logical level should be set for each dimension (based on the access of each dimension) for all the logical Facts properly.
For Example:
The logical fact Case Event will have the dimensions that are applicable to Case and Event tables only.
The BMM layer should be a perfect star schema as shown below:
Measure
In the Argus Insight RPD, only one measure Case Count is derived from the Fact tables.
|
Note: In the Argus Safety Aggregate Reporting Data Model, you may update any column value. For more information, refer to Oracle Argus Safety BIP Extensibility Guide > Section 6.2.2 Extending with User Exits.For Example: PROLONGED EXPOSURE column which exists in the OBIEE RPD can be updated in the Aggregate Reporting Data Model and it can be used for analysis in the OBIEE Answers/Dashboards. |
New dimensions can be created on the existing RPD.
The following are the steps of creating a dimension from the source CODE_LIST_DETAIL_DISCRETE, explained with the help of an example:
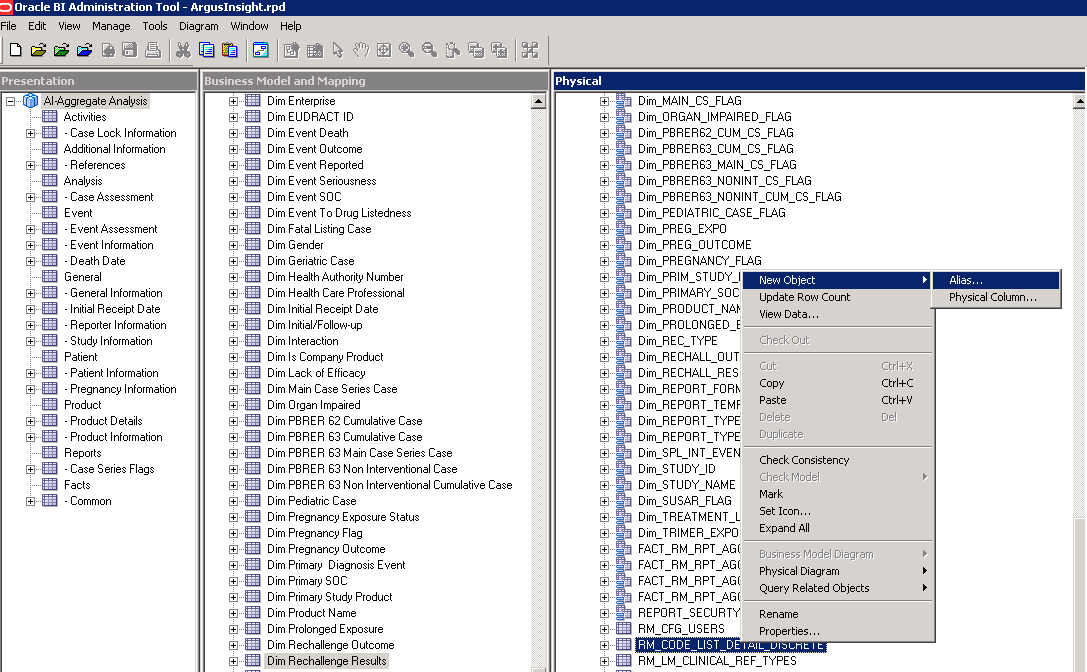
Open the Argus Insight RPD using the default password (insight 123), or the password changed using the steps mentioned in the Oracle Argus Insight Installation Guide.
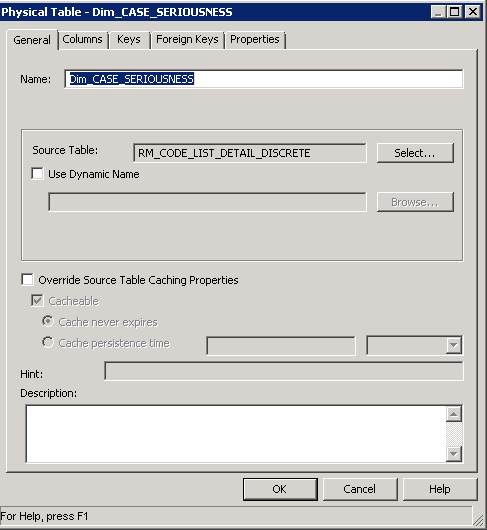
At the Physical Layer, right-click on RM_CODE_LIST_DETAIL_DISCRETE, and create an alias.
Enter the dimension name for the alias.
For example: Dim_CASE_SERIOUSNESS
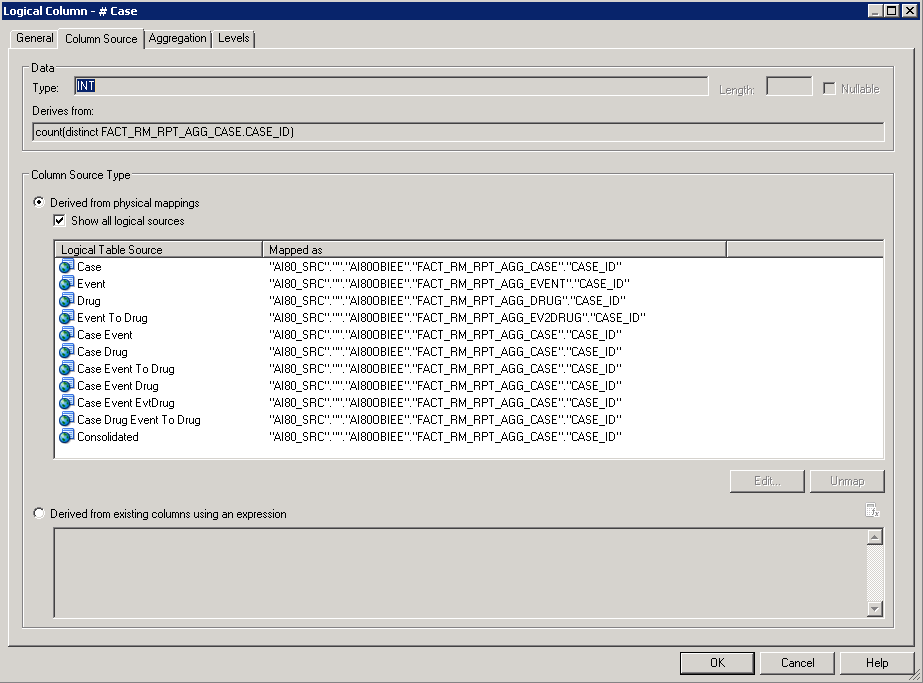
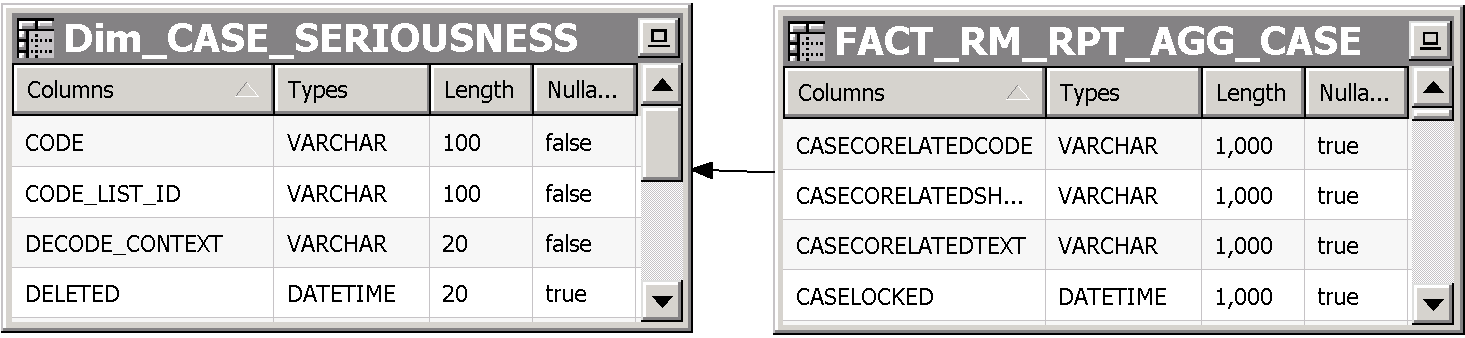
Create join with the corresponding Fact table in this case FACT_RM_RPT_AGG_CASE, as shown below:
Drag this dimension into the Business Layer and set the WHERE clause at the business layer.
Right-click and create a logical dimension.
Go to Facts > Sources, and add the dimension to the corresponding logical table source.
Drag the dimension to the presentation layer in the corresponding tree level.
When the RPD is deployed, the new dimension can be used in the BI Answers/Dashboards.
Refer to Oracle Business Intelligence Enterprise Edition > Fusion Middleware User's Guide, available in Oracle Technology Network.
|
 Copyright © 2015, Oracle and/or its affiliates. All rights reserved. Legal Notices |
|