4 Using Cross-TapePlex Replication in a DR Solution
The "Doing Physical Exports and Imports" chapter explains how to create "export" portable MVCs from a source site so you can physically move these MVCs to a target site and import the MVCs (and the VTVs they contain) into the target site. With Cross-Tapeplex Replication (CTR), you no longer use the PTAM (Pickup Truck Access Method) to move MVCs from one site to another. Instead, you move VTVs electronically from source to target site, that is, from one TapePlex to another, where the VTVs are then migrated to MVCs, which eliminates the PTAM step. As a copy of the VTV moves from the source to the target TapePlex, a copy of the VTV's metadata moves from the source TapePlex's CDS to the target TapePlex's CDS. Note that the source TapePlex continues to "own" and manage the scratching of the CTR VTVs.
Caution:
Note that if you are using CTR, stopping SMC stops VTCS from sending metadata to a CTR TapePlex, which effectively stops data transfer. Therefore, if you are using an HSC feature that uses the SMC communication services, such as CTR, then you should ensure that HSC activity is quiesced or HSC is terminated before stopping SMC.How Does CTR Work?
Take a look at a CTR as shown in Figure 4-1.
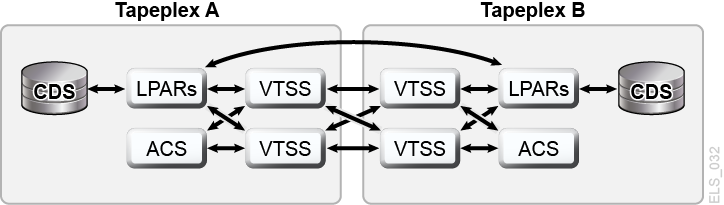
As Figure 4-1 shows:
-
CTR uses the connection between two VTSSs (CLINK) in two separate TapePlexes to send data from one VTSS to another. The connection can be either uni-directional or bi-directional.
-
CTR uses the services of the SMC client/server feature to send metadata from the sending TapePlex to the receiving TapePlex. Note that you do NOT need to use the client/server feature to communicate between SMC and HSC to use CTR, but you must define HTTP and SERVER commands in SMC to allow metadata to be transferred.
-
There are separate (and separately maintained) CDSs at each site, so that loss of connectivity or hardware availability within one site does not directly affect any of the other sites.
-
The configuration and physical connection requirements are simple and straightforward.
-
You can now run concurrent DR tests more simply and without disruption to existing work (without using the CDRT utility).
-
You can now do an automatic switchover of workload from one site to another.
-
The VTV volume ranges for the two TapePlexes are shown Figure 4-2. Note that each TapePlex has its own set of writable volumes and that these are mirrored on the other TapePlex by read-only versions.
-
The configuration shown has both VTSSs at the sending TapePlex connected to both VTSSs at the receiving TapePlex for maximum resilience.
Note:
In both Clustered VTSS and CTR configurations, you must ensure that the first 16 VTDs in each VTSS (0-F) are reserved for replication. These devices must be OFFLINE to MVS, and their paths must be online to each HSC server host. VTCS does not register the first 16 VTDs with SMC/HSC, which prevents mounting VTVs on these VTDs.Figure 4-2 Intra-Site VTV Volume Relationships
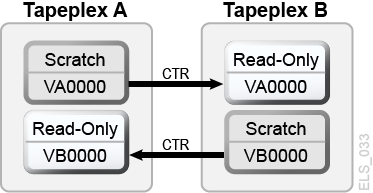
Description of ''Figure 4-2 Intra-Site VTV Volume Relationships''
Read "CTR VTV Read-Only Considerations," then go to "Configuring for CTR."
CTR VTV Read-Only Considerations
When you use CTR, all VTVs replicated from one site to the other are in read-only mode at the remote site. Although these VTVs can be scratched (and their respective volume serial numbers re-used) by the remote TapePlex if an actual disaster occurs, their read-only status cannot be changed as long as the volumes are not in a SCRATCH status. Note that volumes in a POOLPARM EXTERNAL pool can never be set to SCRATCH status.
Therefore, if you elect to use CTR as a business continuance or disaster recovery strategy, you must ensure that your applications do not attempt to update these volumes, either during a DR test or in an actual disaster. The following scenarios should be considered:
-
Applications that use attribute
DISP=MODin JCL or dynamic allocation to append data to an existing data set must implement a checkpoint/restart mechanism and must record a checkpoint before creating anyDISP=MODvolumes. These applications are recovered by restarting at the checkpoint and, if appropriate, must recreate theseDISP=MODvolumes once restarted. Note that the use ofDISP=MODitself is not an issue with cross TapePlex replication. As long as the application has a checkpoint that allows it to back out partial updates, or a design that allows output of new data to begin on a new volume, it should run against read-only VTVs with no issues. -
If VTVs that are replicated to another TapePlex are owned by HSM, the following process allows collection of data to start on a new volume and avoids updating existing HSM VTVs:
-
Mark existing volumes full.
-
Modify
ARCCMDif necessary forUSERUNITTABLE,MIGRATION,BACKUP, andRECYCLE. -
Ensure
RECYCLEDALLOCFREQis set to 1. This allows HSM allocation to allocate a new volume and device when appropriate. -
Depending on your
MGMTCLAS VTVSIZE, setPERCENTFULL:For 800 MB VTVs, set HSM PERCENTFULL to 97.
For 4 GB VTVs, set HSM PERCENTFULL to 450.
For 32 GB VTVs, set HSC PERCENTFULL to 3600.
Applications that stack data sets on an existing volume are subject to the same
DISP=MODrestrictions as above. -
Configuring for CTR
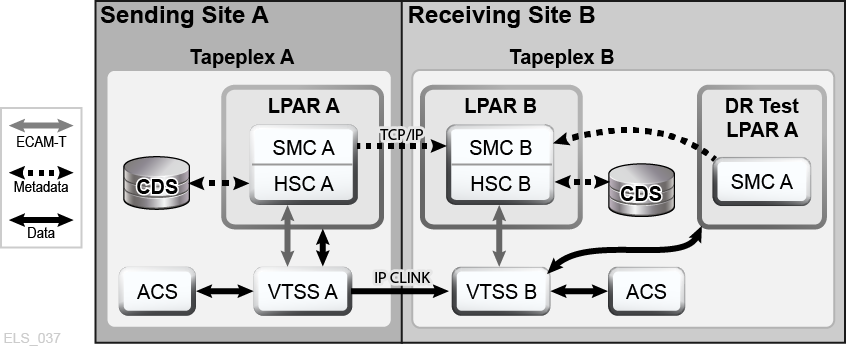
Figure 4-3 shows an example of a CTR Configuration. In this system, VTSS VTSSA resides in TapePlex TAPEPLXA and has "partner" CLINKS to VTSS VTSSB in TapePlex TAPEPLXB. VTVs replicated to VTSSB are now resident in TAPEPLXB's CDS, as are the MVCs to which the VTVs are subsequently migrated. That is, VTVs are replicated across TapePlexes, then migrated locally. VTSSs in the sending TapePlex cannot have connections to RTDs in the receiving TapePlex.
Note:
The following example shows a uni-directional CTR To do a bi-directional CTR, you simply define the configuration and SMC client/server control statements the same way on both TapePlexes. Note that a single TapePlex can also receive VTVs from multiple other TapePlexes. To define a configuration where one TapePlex is receiving data from multiple other TapePlexes, you simply add additional TapePlex names to theCONFIG of TAPEPLXB.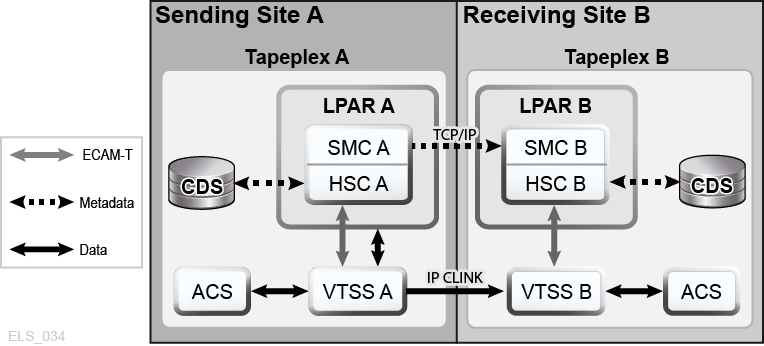
The Setup: Configuring and Starting CTR
To configure and start the example CTR system shown in "Configuring for CTR" do the following:
-
Ensure that your system has the Clustered VTSS requirements described in Installing ELS.
-
Start the HTTP server under the SMC running on host LPARB.
You may want to do this in your SMC CMDS file. For example:
HTTP START PORT(999)
-
Define your TAPEPLEX and SERVER commands on host LPARB.
Again, you may want to do this in your SMC CMDS file. For example
TAPEPLEX NAME(TAPEPLXA) LOCSUB(HSCA)
TAPEPLEX NAME(TAPEPLXB)
SERVER NAME(REMB)TAPEPLEX(TAPEPLXB) HOSTNAME(LPARB) PORT(999)
Note:
In the example configuration, TapePlex TAPEPLXB exists (from the perspective of TapePlex TAPEPLXA) for the sole purpose of maintaining a CDS containing metadata about VTVs that have been replicated from TAPEPLXA. However, if HSC or VTCS definitions in the TapePlexes TAPEPLXA and TAPEPLXB use the same device addresses referencing different physical devices, you must defineSMC UNITATTRcommands to tell SMC which TapePlex defines the devices on its host. Although theUNITATTRmust specify aMODEL, if the specified model does not match the model reported by the TapePlex, the actual model overrides theUNITATTR MODEL. The following is an example of the SMCUNITATTRstatement that would be used if the TapePlexes TAPEPLXA and TAPEPLXB both defined the address range 9000-90FF:UNITATTR ADDR(9000-90FF) TAPEPLEX(TAPEPLXA) MODEL(VIRTUAL)
-
Code a
CONFIGdeck for TapePlex A, as shown in Example 4-1.In this figure, note:
-
The
TAPEPLEXstatement, which defines this TapePlex. -
The
CLINKstatements define the CLINKs that are used for CTR from VTSSA to VTSSB. -
The Conditional Replication setting on the
CONFIG GLOBALstatement isCHANGEDfor TAPEPLXA.
-
-
Code a
CONFIGdeck for TapePlex B, as shown in Example 4-2.In this figure, note:
-
The
TAPEPLEXstatement includes aRECVPLEX=TAPEPLXAparameter to specify that TAPEPLXB can receive VTVs from TAPEPLXA. -
There are no
CLINKstatements, because the CLINKs are defined in theCONFIGdeck for TAPEPLXA.//CREATCFG EXEC PGM=SLUADMIN,PARM='MIXED' //STEPLIB DD DSN=hlq.SEALINK,DISP=SHR //SLSCNTL DD DSN=hlq.TAPEPLXA.DBASEPRM,DISP=SHR //SLSCNTL2 DD DSN=hlq.TAPEPLXA.DBASESEC,DISP=SHR //SLSSTBY DD DSN=hlq.TAPEPLXA.DBASESBY,DISP=SHR //SLSPRINT DD SYSOUT=* //SLSIN DD * CONFIG RESET CDSLEVEL(V62ABOVE) GLOBAL MAXVTV=65000 MVCFREE=60 VTVATTR=SCRATCH RECALWER=YES LOCKSTR=STK_VTCS_LOCKS VTVPAGE=LARGE REPLICAT=CHANGED RECLAIM THRESHLD=70 MAXMVC=30 START=98 CONMVC=1 TAPEPLEX THISPLEX=TAPEPLXA VTSS NAME=VTSSA LOW=71 HIGH=80 MAXMIG=8 MINMIG=1 RETAIN=10 RTD NAME=VSMA1A00 DEVNO=1A00 CHANIF=0C RTD NAME=VSMA1A01 DEVNO=1A01 CHANIF=0D RTD NAME=VSMA1A02 DEVNO=1A02 CHANIF=0K RTD NAME=VSMA1A03 DEVNO=1A03 CHANIF=0L RTD NAME=VSMA2A08 DEVNO=2A08 CHANIF=1C RTD NAME=VSMA2A09 DEVNO=2A09 CHANIF=1D RTD NAME=VSMA2A0A DEVNO=2A0A CHANIF=1K RTD NAME=VSMA2A0B DEVNO=2A0B CHANIF=1L VTD LOW=7900 HIGH=79FF VTD LOW=8900 HIGH=89FF CLINK VTSS=VTSSA CHANIF=0G REMPLEX=TAPEPLXB PARTNER=VTSSB CLINK VTSS=VTSSA CHANIF=0O REMPLEX=TAPEPLXB PARTNER=VTSSB
//CREATCFG EXEC PGM=SLUADMIN,PARM='MIXED'
//STEPLIB  DD DSN=hlq.SEALINK,DISP=SHR
//SLSCNTL  DD DSN=hlq.TAPEPLXB.DBASEPRM,DISP=SHR
//SLSCNTL2 DD DSN=hlq.TAPEPLXB.DBASESEC,DISP=SHR
//SLSSTBY  DD DSN=hlq.TAPEPLXB.DBASESBY,DISP=SHR
//SLSPRINT DD   SYSOUT=*
//SLSIN DD   *
 CONFIG RESET CDSLEVEL(V62ABOVE)
 GLOBAL MAXVTV=65000 MVCFREE=60 VTVATTR=SCRATCH RECALWER=YES
 LOCKSTR=STK_VTCS_LOCKS VTVPAGE=LARGE
 RECLAIM THRESHLD=70 MAXMVC=30 START=98 CONMVC=1
TAPEPLEX THISPLEX=TAPEPLXB RECVPLEX=TAPEPLXA
VTSS NAME=VTSSB LOW=75 HIGH=80 MAXMIG=8 MINMIG=1 RETAIN=10
 RTD  NAME=VSMB3A00 DEVNO=3A00 CHANIF=0C
 RTD  NAME=VSMB3A01 DEVNO=3A01 CHANIF=0D
 RTD  NAME=VSMB3A02 DEVNO=3A02 CHANIF=0K
 RTD  NAME=VSMB3A03 DEVNO=3A03 CHANIF=0L
 RTD  NAME=VSMB4A08 DEVNO=4A08 CHANIF=1C
 RTD  NAME=VSMB4A09 DEVNO=4A09 CHANIF=1D
 RTD  NAME=VSMB4A0A DEVNO=4A0A CHANIF=1K
 RTD  NAME=VSMB4A0B DEVNO=4A0B CHANIF=1L
-
Defining Policies for CTR
See the following procedures to define policies for CTR.
Policies for the Sending TapePlex
To define policies for the sending TapePlex (TAPEPLXA) of the example CTR system shown in Figure 4-3, do the following:
-
Create
MVC POOLPARM/VOLPARMdefinitions for TAPEPLXA:POOLPARM TYPE(MVC) NAME(MVCPLA) INITMVC(YES) MVCFREE(25) - MAXMVC(98) THRESH(85) START(98) VOLPARM VOLSER(AM1000-AM1299) MEDIA(STK1R)
-
Create
VTV POOLPARM/VOLPARMscratch pool definitions for TAPEPLXA:POOLPARM TYPE(SCRATCH) NAME(ASCRPL) VOLPARM VOLSER(AV1000-AV1999) MEDIA(VIRTUAL) REC(VIRTUAL)
-
For TAPEPLXA, create the Storage Classes for the MVCs that contain the locally migrated VTVs and the CTR Storage Classes.
STOR NAME(LOCAL1) ACS(00) MEDIA(STK1R)
STOR NAME(EEPA1) TAPEPLEX(TAPEPLXB)
In the example above, the
STORclasstatements define:-
Storage Class LOCAL1, which is Storage Class for the locally migrated VTVs from each VTSS.
-
Storage Class EEPA1, which is a Storage Class for CTR, and specifies the receiving TapePlex (TAPEPLXB).
-
-
Create the Management Class that points to the Storage Classes in Step 3.
MGMT NAME(LOCEEX1) MIGPOL(LOCAL1) EEXPOL(EEPA1)
-
Create an SMC Policy that specifies virtual media and assigns the Management Class created in Step 4.
POLICY NAME(PPAY) MEDIA(VIRTUAL) MGMT(LOCEEX1)
-
Create a
TAPEREQstatement to route critical data to VSM and assign the corresponding Policy to the data.TAPEREQ DSN(*.PAYROLL.**) POLICY(PPAY)
In the example above, the
TAPEREQstatement specifies to route data sets with HLQ mask *.PAYROLL.** to VSM and assign Policy PPAY.Note:
-
Although you can use SMC policies to direct your CTRs to a specific esoteric, StorageTek recommends using only MGMTCLAS so that the SMC/VTCS allocation influencing can use any VTSS that supports the MGMTCLAS requirements.
-
You can use the EEXPORT command to do manual CTR. For more information, see ELS Command, Control Statement, and Utility Reference.
-
-
Check your SYS1.PARMLIB SMFPRMxx member to ensure that subtype 28 records are enabled.
If enabled, VTSS writes a subtype 28 record that includes the target VTSS name for each CTR event. You know that CTR has succeeded when the VTVs arrive successfully at receiving site's VTSS. Is there a way to confirm this? Yes, use the
DRMONitrutility, as described in Step 8. -
Create JCL to monitor the CTR.
For this, use the
DRMONitrutility to monitor the CTR.DRMONitrcauses the associated MVS job to pause until the CTR completes successfully. For example://MONITOR EXEC PGM=SLUADMIN,PARM='MIXED' //STEPLIB DD DSN=hlq.SEALINK,DISP=SHR //* If HSC IS NOT OR MAY NOT BE ACTIVE, INCLUDE THE //* FOLLOWING: //SLSCNTL DD DSN=primary.cds.name,DISP=SHR //SLSCNTL2 DD DSN=secondary.cds.name,DISP=SHR //SLSSTBY DD DSN=standby.cds.name,DISP=SHR //SLSPARMP DD DSN=hlq.PARMLIB(BKPCNTL),DISP=SHR //SLSPARMS DD DSN=hlq.PARMLIB(BKPCNTL2),DISP=SHR //SLSPARMB DD DSN=hlq.PARMLIB(BKPSTBY),DISP=SHR //SYSIN DD UNIT=SYSDA,SPACE=(TRK,1) //* THE FOLLOWING IS USED BY THE SNAPSHOT UTILITY: //SYSPRINT DD SYSOUT=* //SLSPRINT DD SYSOUT=* //SLSPRINT DD SYSOUT=* DRMON MGMT(LOCEEX1) STOR(EEPA1) MAXAGE(24) TIMEOUT(120)
In this example, the
DRMONutility monitors the migrates for Storage Class EEPA1, which is the CTR Storage Class specified by Management Class LOCEEX1 in Step 4. Additionally, monitor only VTVs that have been updated in the last 24 hours, and time outDRMONafter 120 minutes.
Policies for the Receiving TapePlex
To define policies for the receiving TapePlex (TAPEPLXB) of the example CTR system shown in "Configuring for CTR," do the following:
-
Create MVC POOLPARM/VOLPARM definitions for MVC Pool defined for TapePlex TAPEPLXB to hold CTR VTVs from TAPEPLXA:
POOLPARM TYPE(MVC) NAME(AMVCCTR) INITMVC(YES) MVCFREE(25) -
MAXMVC(98) THRESH(85) START(98)
VOLPARM VOLSER(BM1000-BM1099) MEDIA(STK1R)
Note:
StorageTek strongly recommends that you use the POOLPARM/VOLPARM feature to ensure that volume ranges are reserved for CTR-replicated volumes at the remote site. -
Create an External VTV Pool for TAPEPLXA exported VTVs:
POOLPARM TYPE(EXTERNAL) NAME(AEXTBPL) OWNRPLEX(TAPEPLXA)
VOLPARM VOLSER(AV1000-AV1999) MEDIA(VIRTUAL) REC(VIRTUAL)
Note:
This example does not define any pools for production work on TAPEPLXB, only pools used by TAPEPLXA. If production work is to be run on TAPEPLXB, then additional POOLPARM and VOLPARM definitions are needed for the scratch and MVC pools for TAPEPLXB work. -
Create a VTV Scratch Pool for TapePlex TAPEPLXB use for TAPEPLXA work:
POOLPARM TYPE(SCRATCH) NAME(ASCRPL)
VOLPARM VOLSER(BV1000-BV1999) MEDIA(VIRTUAL) REC(VIRTUAL)
-
Create an MVC Pool for TapePlex TAPEPLXB to hold VTVs from TAPEPLXA DR test or production (in a disaster):
POOLPARM TYPE(MVC) NAME(AMVCDR) INITMVC(YES) MVCFREE(25) -
MAXMVC(98) THRESH(85) START(98)
VOLPARM VOLSER(BM2000-BM2099) MEDIA(STK1R)
-
For TAPEPLXB, create the Storage Classes for local migration.
STOR NAME(TPEPLXA1) MVCPOOL(AMVCCTR)
STOR NAME(TPEPLXA2) MVCPOOL(AMVCDR)
In this example, the STORclas statements define Storage Classes TPEPLXA1 and TPEPLXA2 for local migration. The Storage Class names allow us to segregate this work from the TAPEPLXB local work.
-
Create the Management Classes that point to the Storage Classes in Step 5.
MGMT NAME(LOCEEX1) MIGPOL(TPEPLXA1)
MGMT NAME(LOCPLXA) MIGPOL(TPEPLXA2)
Note that the name LOCEEX1 matches the Management Class name that is used on TAPEPLXA (this Management Class is specified in the VTV metadata that is sent from the VTSS on TAPEPLXA), but the example references the Storage Class for local migration. The definitions of the Management and Storage Classes on TAPEPLXB can use any parameters including EEXPOL to replicate to a third TapePlex. In addition, you create another MGMTCLAS, LOCPLXA, to be used for migration during a DR test of TAPEPLXA's workload.
Using CTR When the Remote Site Has No LPARs
In some environments only one site has LPARs doing tape activity, while a second site contains only library and VTSS hardware but no MVS LPARs. It is possible to set up this environment so that CTR can be used as a DR and DR test mechanism.
To do this, you must:
-
Run the SMC client/server feature on your production environment so that you have at least one production LPAR that is not running HSC/VTCS.
Alternatively, you can run the DR TapePlex on the same LPAR as the production TapePlex using the MULT mode feature. See Configuring HSC and VTCS for more information on using this capability.
The production TapePlex in this example is TAPEPLXA.
-
Create a new CDS defining the hardware (libraries and VTSSs) in your remote site.
-
Start an HSC/VTCS using the new CDS on an LPAR (MVSX) that is not currently running production HSC/VTCS, or on the LPAR where you have decided to run multiple copies of HSC/VTCS using the MULT mode feature.
Note:
For reliability, it is recommended that you may want to run two instances of HSC/VTCS pointing to TAPEPLXB on two different LPARs, so that if one instance is unavailable, metadata for the Cross-TapePlex replicated VTVs can be sent to the second instance.This system is TapePlex TAPEPLXB.
-
Define parameters for the SMC system on MVSX defining both the TAPEPLXA and TAPEPLXB TapePlexes.
Each SMC system in the complex must define both TapePlex TAPEPLXA (the production TapePlex) and TAPEPLXB, the DR TapePlex. To support continuing to replicate VTVs during a DR test, you must define a server for TapePlex TAPEPLXB that points to the host at the remote site. For example:
TAPEPLEX NAME(TAPEPLXA) LOCSUB(HSCA)
TAPEPLEX NAME(TAPEPLXB)
SERVER NAME(TPLXBPR) TAPEPLEX(TAPEPLXB) HOST(MVSX) PORT(999)
SERVER NAME(TPLXBDR) TAPEPLEX(TAPEPLXB) HOST(MVSXDR) PORT(1234)
Note:
This example assumes that although the LPAR names (MVSX) may be identical between the production and DR site, the two sites have unique TCP/IP host names. -
Define your VTCS policies on TAPEPLXA to allow CTR to TAPEPLXB.
-
Using your disk replication solution, maintain a copy of the contents of the CDS for TAPEPLXB at your remote location.
Alternatively, if reliable connectivity exists, you may want to maintain the primary (and other) copies of the HSC CDS at the DR site, using FICON connections to access the CDS from the production site.
Figure 4-4 shows a CDS copy with no LPARs at the remote site.
Figure 4-4 CDS Copy - No LPARs at Remote Site
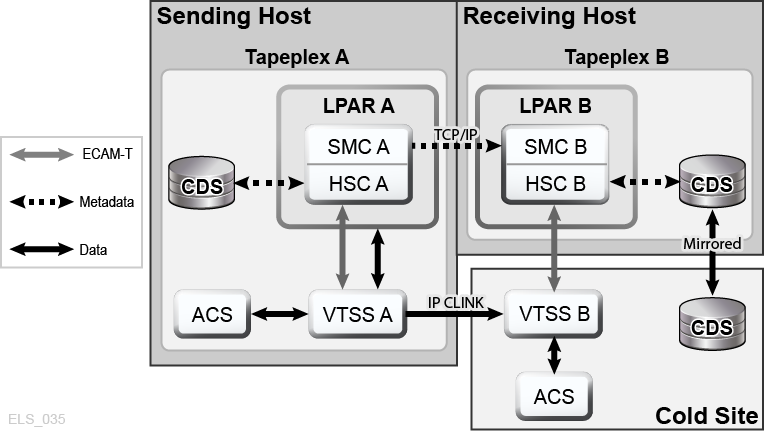
Description of ''Figure 4-4 CDS Copy - No LPARs at Remote Site''
Using CTR as a DR Solution
A DR solution always lets you do three things:
-
Set up and start the solution as described in "The Setup: Configuring and Starting CTR."
-
If a disaster occurs, use the solution to continue doing business at the remote site, as described in "Using CTR for Business Continuance."
-
Use the solution to resume doing business at the local site after it is up and running again as described in "Using CTR for Business Resumption."
Using CTR for Business Continuance
If site TAPEPLXA has an outage, you can to continue doing business at site TAPEPLXB simply by running the workload using TAPEPLXB's TapePlex. To protect the data, the VTVs that were replicated from the TAPEPLXA remain in a read-only state (see "CTR VTV Read-Only Considerations"). However, once you have successfully reestablished the TAPEPLXA workload, you may want to scratch some VTVs that were replicated from TAPEPLXA. Note that you should be careful before you perform this step to ensure that your production work for both TAPEPLXA and TAPEPLXB is stable. Also, at some future point you will probably want to re-create a separate TapePlex environment for TAPEPLXA to return to your original configuration.
To use CTR for Business Continuance:
-
Change the
POOLPARM/VOLPARMdefinitions in the TAPEPLXB TapePlex CDS for the pool named (AEXTBPL) fromTYPE(EXTERNAL)toTYPE(SCRATCH):POOLPARM TYPE(SCRATCH) NAME(AEXTBPL) VOLPARM VOLSER(AV1000-AV1999) MEDIA(VIRTUAL)
Note that the VOLPARM VOLSER range remains unchanged.
-
You can now run a scratch synchronization job under TAPEPLXB to scratch VTVs in the AV1000-AV1999 range based on the scratch status in the TMS, either to return to a checkpoint or to perform normal scratch update processing.
You may want to allow some time to pass between starting production processing and allowing the VTV volume serial numbers in the range AV1000-AV1999 to be re-used as scratch volumes. The use of the
POOLPARM/VOLPARMfeature ensures that these volumes cannot be selected as scratch unless a policy specifically requestsSUBPOOL(AEXTBPL).During this period you will use volumes in the TAPEPLXB scratch subpool ASCRPL (volser range BV1000-BV1999) for TAPEPLXA production work.
Once your disaster recovery environment is stabilized, you can again change your
POOLPARM/VOLPARMdefinitions to allow scratch volumes to be selected from the AV1000-AV1999 range:POOLPARM TYPE(SCRATCH) NAME(ASCRPL) VOLPARM VOLSER(AV1000-AV1999) MEDIA(VIRTUAL) VOLPARM VOLSER(BV1000-BV1999) MEDIA(VIRTUAL)
Figure 4-5 shows an example of CTR using business continuance.
Figure 4-5 System During Business Continuance
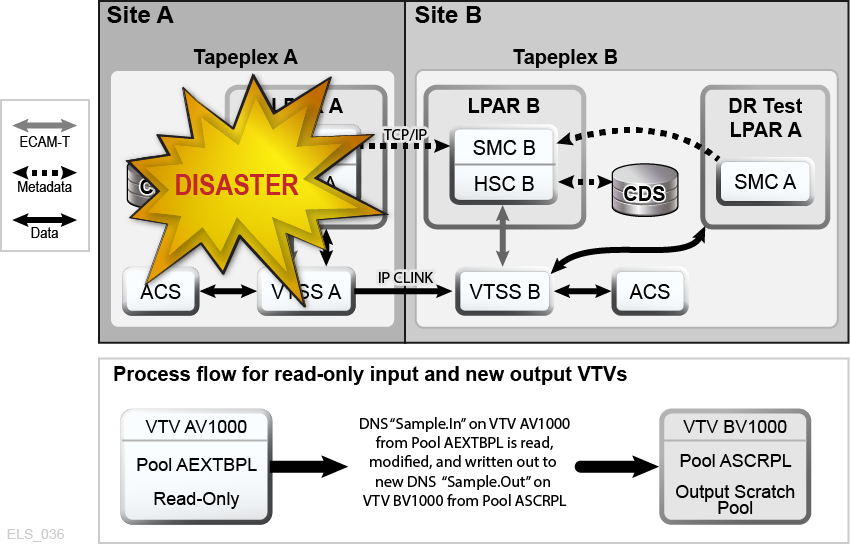
Description of ''Figure 4-5 System During Business Continuance''
Using CTR for Business Resumption
The local site experienced an outage, you continued doing business at the remote site, now the local site is up and running again, so how do you resume doing business at the local site? Essentially, your business resumption depends on what happened during and following the outage. Assume that all of your original local data was lost, and you have a brand-new empty VTSS at the local site.
To resume business after losing all data at the local site:
-
Create a new CDS and run an HSC audit to determine the contents of the physical libraries.
You then need to "reverse replicate" the data and the metadata to the local site from the remote site.
-
Set up your CONFIG deck for the remote site so it can send data to the local site.
-
Reverse replicate using EEXPORT.
For example:
EEXPORT MGMTCLAS(LOCEEX1,LOCEEX2) TOPLEX(TAPEPLXA)
Disaster Recovery Testing Using Cross-Tapeplex Replication
To continue with an example, there are two sites, TAPEPLXA and TAPEPLXB, each defined as its own TapePlex (HSC CDS), and that you have used the Cross-TapePlex Replication feature to replicate your critical VTVs from TAPEPLXA to TAPEPLXB. Figure 4-6 shows DR testing using CTR.
Figure 4-6 Disaster Recovery Testing Using Cross-Tapeplex Replication
Description of ''Figure 4-6 Disaster Recovery Testing Using Cross-Tapeplex Replication''
To perform a DR test at TAPEPLXB for TAPEPLXA's work, the following procedure is recommended:
-
Ensure that the TAPEPLXB CDS contains one or more scratch subpools for TAPEPLXA output data which are separate from scratch subpools used for TAPEPLXB work.
For examples, see "Policies for the Receiving TapePlex."
-
Ensure that catalog and tape management data from TAPEPLXA is available.
-
Bring up SMC on your TAPEPLXA test LPAR, defining its TapePlex as TAPEPLXB, specifying
SERVERcommands for one or more HSC hosts in TAPEPLXB. -
Begin executing your test workload.
Your SMC will automatically have access to VTVs that existed either before or after the start of the test, because these are continuing to be replicated from TAPEPLXA. Ensure that the VTVs that your DR test will use are not scratched or altered by the TAPEPLXA TapePlex.
-
When the test is complete, scratch all VTVs in the DR test subpool(s) used by the test.
When using this approach, no special CDS is required, and no special rules are needed to ensure that two separate HSC systems can share hardware resources. However, this method requires that the DR test be executed using current data, or at least data that is currently available. Note that your DR test output and your TAPEPLXA replicated VTVs will use TAPEPLXB VTSS buffer space.
Because the data that was replicated from the TAPEPLXA TapePlex is read-only, any attempts by the DR test to modify the data will result in message SMC0247, "Mount failed for write-protected VTV vvvvvv on drive dddd from SMC indicating that the VTV cannot be mounted." The occurrence of this message may indicate that your DR process does not have clearly defined application checkpoints (see "CTR VTV Read-Only Considerations"). If this is the case, the use of CTR for your DR strategy may not be a good choice.
Note:
If you use Cross-TapePlex replication to create copies of your VTVs at a remote site, it is recommended that you do not use CDRT for your DR testing, as the use of CDRT will not permit the read-only VTVs to be updated, even in a separate CDRT environment.
DR Testing When the DR Site Has No LPARs
When you manage the CTR hardware at the DR site using a TapePlex executing at the production site, there are a few additional considerations for a DR test. This example uses TAPEPLXA for the production TapePlex and TAPEPLXB for the TapePlex that normally runs at the production site but runs at the DR site during a DR test.
-
You must stop the DR TapePlex TAPEPLXB at the production site before the test.
During the DR test, the TAPEPLXB will be executing at the DR site on a copy of the TAPEPLXB CDS.
-
Production VTVs will continue to be sent to TAPEPLXB and reflected in the CDS at the DR site.
During this time the TAPEPLXB CDS at the production site becomes outdated, as it no longer reflects VTVs that are being replicated during the DR test. The TAPEPLEX and SERVER statements on the production LPARs ensure that data replication continues during the DR test:
TAPEPLEX NAME(TAPEPLXB)
SERVER NAME(TPLXBPR) TAPEPLEX(TAPEPLXB) HOSTNAME(MVSX) PORT(999)
SERVER NAME(TPLXBDR) TAPEPLEX(TAPEPLXB) HOST(MVSXDR) PORT(1234)
-
When you start the HSC/VTCS for TapePlex TAPEPLXB at the DR site, you must be sure to start the HTTP server on SMC:
HTTP START PORT(1234)
The port number (1234) matches what was defined in the
TAPEPLXBDR SERVERstatement. -
At the conclusion of the test, scratch all VTVs that were created by the test.
You do not have to determine what VTVs were actually created by the test; you can simply scratch all volumes in the subpool(s). For example:
SCRATCH VOL(BV1000-BV2999)
-
Stop the HSC/VTCS for TAPEPLXB at the DR site.
-
You must now ensure that the TAPEPLXB CDS at the DR site is sent back to the production site.
Ideally this can be done by mirroring the TAPEPLXB CDS back to the production site during the DR test. If this is not possible, you can use FTP or other mechanism of your choice to copy the CDS from the current version at the DR site back to the production site.
-
Restart TAPEPLXB on the LPAR(s) at the production site.
While there is no active copy of TAPEPLXB, VTVs scheduled for CTR to TAPEPLXB will remain in the VTSS buffer. When TAPEPLXB is active again at the production site, these VTVs will be replicated to the VTSS at the DR site.
Managing VTVs Replicated Using Cross-TapePlex Replication (CTR)
You can use VTVMAINT to change the status of VTVs replicated by CTR as follows:
-
Use
VTVMAINT DELEXpotto remove the name of a TapePlex that references a VTV. For example, if you replicate a VTV from TAPEPLXA to TAPEPLXB, then delete the copy on TAPEPLXA, you can useVTVMAINT DELEXpotto remove TAPEPLXA's reference to the VTV. -
Use
VTVMAINT ADDEXpotto add the name of a TapePlex that references a VTV as described in "Using CTR for Business Continuance." -
Use the
VTVMAINTutility to change the ownership of a VTV that was received through CTR, but the VTV must be currently in scratch status. For example,VTVMAINT OWNRPLEX(TAPEPLXB)will change the ownership of a VTV sent from TAPEPLXA to be owned by the TapePlex where it currently resides.