| Oracle® Retail Xstore Point of Service Manager's Guide Release 18.0 F12255-02 |
|

 Previous |
 Next |
| Oracle® Retail Xstore Point of Service Manager's Guide Release 18.0 F12255-02 |
|
Previous |
Next |
This chapter describes the Oracle Retail Xstore Point-of-Service Back Office screen and documentation conventions and provides brief descriptions and examples of the methods used in Oracle Retail Xstore Point-of-Service's Back Office features.
Refer to the Documentation Conventions Overview section for a description of the documentation conventions used throughout this Manager's Guide.
Refer to the Back Office Screen Conventions section for a description of the Oracle Retail Xstore Point-of-Service application features.
Refer to the Oracle Retail Xstore Point-of-Service Shipping, Receiving & Inventory Guide for step-by-step instructions on shipping and receiving functions, as well as the procedures required for counting and managing inventory through Xstore.
Refer to the Oracle Retail Xstore Point-of-Service User Guide for Register Conventions and touch-screen navigation.
The following explains the conventions used in the Oracle Retail Xstore Point-of-Service Manager's Guide.
Table 1-1 Documentation Conventions in the User Guide
| When you see... | Then... |
|---|---|
|
Select xxxxx |
This refers to a menu button or list option displayed on the Oracle Retail Xstore Point-of-Service application screen. The bold text is the button or menu option text. Since all menu text is configurable, the text you see on your screen may be different from the text used in the procedure. |
|
Press xxx |
This refers to a key on the keyboard. The text is the name of the key. |
|
Blue, underlined text |
This indicates the tagged text is a link to another area of the user document. Click on the link to jump to related information. This feature is used when viewing the document online. For printed documents, a page number has also been provided. |
|
Note: This information is provided to improve your understanding, simplify a task, or point out special circumstances. |
|
Important: This information is important for the user to be aware of. For example, information that can help prevent the loss of data. |
|
Tip: This information is related to the task at hand, but not required to perform the task. For example, this information may include best practices or practical information that can help the user in the performance of the task. |
A variety of guides provide you with complete information about the Oracle Retail Xstore Point-of-Service POS system.
The Oracle Retail Xstore Point-of-Service User Guide provides detailed information for entering sale, refund, and miscellaneous transactions, and is designed to provide training assistance for cashier-level employees. It also provides detailed basic navigation information such as touch-screen components.
The Oracle Retail Xstore Point-of-Service Reports Guide contains a description of each report, step-by-step instructions on how to run each report, an explanation of the criteria selection options, and a report sample.
The Oracle Retail Xstore Point-of-Service Shipping, Receiving, & Inventory Guide provides step-by-step instructions for shipping and receiving functions, as well as the procedures required for counting and managing inventory through Oracle Retail Xstore Point-of-Service.
Xstore uses multi-touch gesture navigation throughout to allow for full touch-screen transactions.
|
Important: Touch-screen navigation is configurable by your corporate office; all features may not be activated on your system. |
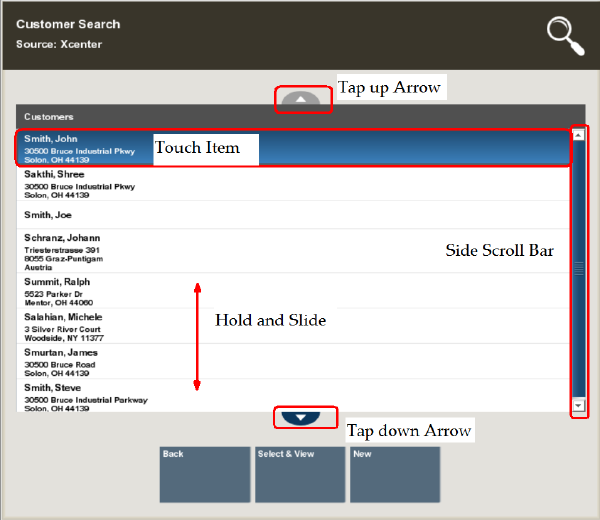
The following figure illustrates list navigation options for touch-screen users. The up/down arrows and side-scroll bar will only display if there is a large list.
Table 1-2 Touch-Screen Navigation
| Touch-Screen Component | Description |
|---|---|
|
Touch item |
Selects and enter the item. Depending on the screen, you may need to select OK to enter the item. |
|
Hold and slide |
Moves the list up or down without changing your selection. |
|
Side scroll bar |
Scrolls list up or down. |
|
Tap up arrow |
Moves the list up. |
|
Tap down arrow |
Moves the list down |
|
Note: For more information regarding touch-screen and virtual keyboard navigation see the Oracle Retail Xstore Point-of-Service User Guide. |
Use the following guidelines to navigate through the Oracle Retail Xstore Point-of-Service system using a keyboard:
Table 1-3 Active Keyboard Keys
| Key | Description |
|---|---|
|
arrows |
Use the up and down arrow keys to browse through list boxes. |
|
Enter |
Press Enter to select OK at any prompt that includes OK (Enter) as an option. Also, press Enter in active list boxes to select the highlighted option. |
|
Esc |
Press Esc to exit any prompt that has Back or Cancel as an option. You can also press Esc to exit the current menu and return to the previous menu. In either case, if changes were made that were not saved, you must verify that you want to exit without saving your changes. |
|
Function keys |
On each Oracle Retail Xstore Point-of-Service window, the F1 through F12 function keys correspond to the menu options. Press the function key that corresponds to the option to choose it. See Function Keys. |
|
Home/End |
Use these keys to jump to the top (Home) or bottom (End) of the current page of a report that you are viewing. |
|
Plus (+)/Minus(-) |
Use these two keys to increase (+) or decrease (-) the on-screen magnification level of a report that you are viewing. |
|
Shift-Tab |
Press Shift-Tab to move to the previous list box on an Oracle Retail Xstore Point-of-Service window. When the first list box is reached, press Shift-Tab to activate the last list box on the window. |
|
Tab |
Press Tab to move from the first list box to the next list box on the window. When the last list box is reached, press Tab to activate the first list box on the window. |
|
Spacebar |
Press the spacebar to select items in multiple-select lists. |
|
Ctrl-Tab |
Press Ctrl-Tab to access the Information, Task, Message, and Sales Goals tabs and move one tab forward on the Register Login screen and the Back Office Login screen. |
|
Ctrl-Shift-Tab |
Press Ctrl-Shift-Tab to access the Information, Task, Message, and Sales Goals tabs and move one tab backward on the Register Login screen and the Back Office screen. |
Most Manager tasks are performed using Xstore's Back Office features. To review the screen convention for the register see the Oracle Retail Xstore Point-of-Service User Guide.
|
Note: The Register can be accessed from the Back Office by selecting the Register Menu Button. |
The bread crumbs keep track of your steps throughout the Back Office menus. When you first enter the Back Office menu, the bread crumb area contains Main Menu.
|
Tip: Touch-screen users, tap one of the bread crumbs in a Back Office menu header to return to the menu selected in the bread crumb. |
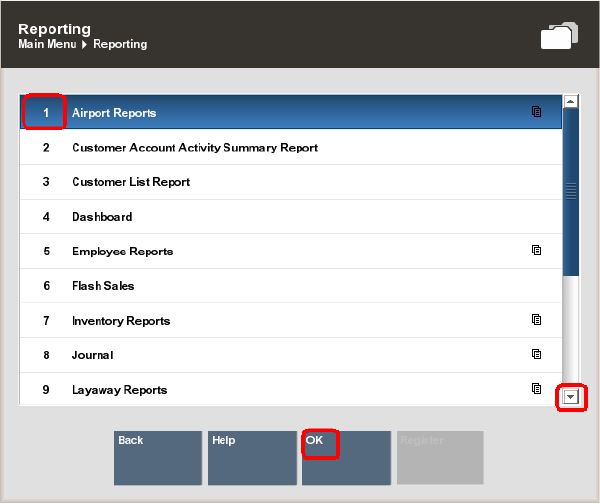
The Back Office functions are available from the Main Menu that is displayed when you log in to the Back Office. Some functions on the list may not be available to all employees. Individual access is based on menu configuration. Security may be different for each employee, employee group, or register group.
The Back Office menu has been restructured into seven options:
Associate
Till
Customer
Employee
Hardware
Inventory
Reporting
There are several ways to select a menu item:
Type the corresponding number from your keyboard or virtual keyboard.
TOUCH-SCREEN Tap the menu option.
If there is a long list of options, up and down arrow keys display. Touch-screen users press these arrows to navigate the list. Keyboard users press the keyboard arrows to move the menu list.
The number to the left of a menu option represents the keyboard number that executes this option. For example, pressing the number 3 on the keyboard launches the Customer List Report option as shown in Figure 1-2 above.
 This symbol to the right of a menu option indicates that there are additional sub- menus for this option. If you select a menu option with submenus, Oracle Retail Xstore Point-of-Service displays additional functions that are available for that option.
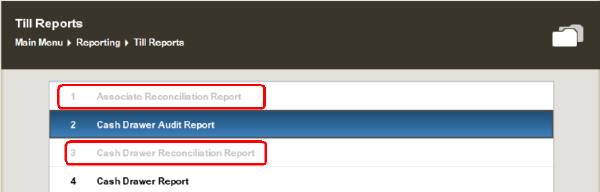
If an option is grayed out, the option is not available to the current user. This is configurable by security level. Other menu options may not be available when the register or store is closed.
A menu option with a key icon indicates that a security ID is required.
For more information about these Back Office screen areas, refer to:
Screen Title (Changes per function)
Menu Buttons (availability determined by function and the user's security). See Menu Buttons
To open tab screens:
Select the Previous tab or Next tab menu button.
Touch-screen users, can tap the desired tab.
The menu button options can be found on the bottom of most menus and forms. If you are using a keyboard, you can press the associated function key. Menu buttons with the following icons denote additional functions:
Table 1-4 Icons
| Icons | Description |
|---|---|
 |
This icon indicates there are more sub-menu choices associated with this option. Selecting an option displaying this icon opens another menu with additional options. |
 |
This icon indicates this function is not available to the user currently signed on to Oracle Retail Xstore Point-of-Service, without manager override. This function is based on security levels. |
 |
The ellipsis (...) after the word ”More” indicates that there are additional menu options available at this screen. Selecting the ”More...” option displays another set of menu buttons. |
|
Note: Touch-screen users do not use function keys. Instead, tap the menu option to select. |
The Xstore menu buttons show the functions that are available for each Xstore window. Each menu button has a function key (F1 - F12) assigned to it. Because each Xstore menu is configurable, the button functions on your system may appear in a different order or have different text than shown throughout this manual.
Some of the functions on a menu may not be available to some employees. Availability of a function depends on menu security, and it may be different for each employee, employee group, or register group.
|
Note: Due to the flexibility of the system, menu options in this guide are not identified by a function key number F2, F3, and so on. Instead, the procedures and processes that follow use the name of the button. |
|
Note: Touch-screen users: When your virtual keyboard is visible, you can still access the menu buttons. Tap the desired button above the keyboard. |
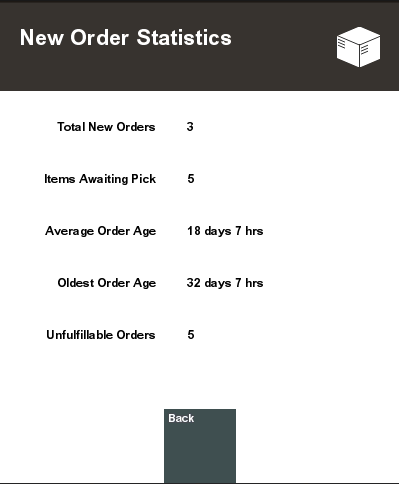
The message bar is located above the status bar and indicates if there are any new orders. The yellow portions fade in and out when messages are available.
|
Note: To view the message bar information here, you must have a touch-screen or a mouse. This additional information is view-only. |
Select the message to view information.
Total New Orders - The total number of new orders.
Ship Orders - The number of orders waiting to be shipped from this store.
Customer Pick Up Orders - The number of orders for pick up in this store.
Items Awaiting Pick - The number of items to set aside for the orders.
Average Order Age - The average age of the orders awaiting fulfillment, in days and hours, or minutes.
Oldest Order Age - The age of the oldest order awaiting fulfillment, in days and hours, or minutes.
Unfulfillable Orders -The number of orders that cannot be filled. When an order is rejected and cannot be filled at another location, the status becomes unfulfillable.
The Status Bar is a screen component that displays several sections containing store- related information. It is located immediately below the message bar and is always visible from every Register screen and Back Office screen.
Urgency levels - Stoplight-like color indicators convey urgency:
Red = High Urgency
Yellow = Medium Urgency
Green = Low Urgency (Informational conditions)
Table 1-5 Status Bar Components
| Component | Description |
|---|---|
|
1. Keyboard icon |
For touch screen monitors, this icon opens the keyboard. |
|
2. Area Locator |
Indicates where you are within the system (that is, Back Office). |
|
3. Signed-In User Identifier |
Identifies the user that is currently signed into Xstore. |
|
4. Database Status Indicator |
Green indicates the Datasources are online. Yellow indicates at least one WAN Datasource is offline. The system is using the local Datasource. Red indicates at least one LAN datasource is offline. Touch-screen users tap the indicator to view the Datasource Status. 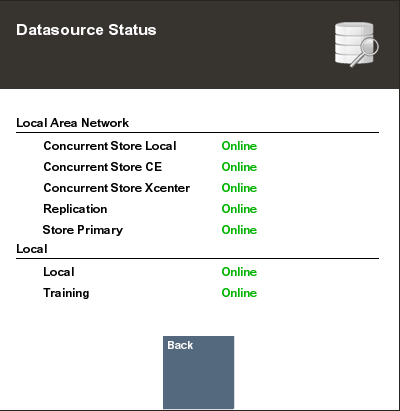 |
|
5. Store Identifier |
Identifies your store name and store number. |
|
6. Register Identifier |
Identifies the register number. |
|
7. Date |
Displays the current register date. |
|
8. Time |
Displays the current register time. Touch-screen users swipe the clock area to clock-in/clock-out. |
|
9. F1 |
This icon is available from all screens. Clicking or touching this icon opens the Xstore's help feature. Note: The F1 key is a configurable key. It is not automatically assigned to the Help option. If the help option is enabled and available for the function, pressing the F1 key displays a context-sensitive HTML page. |
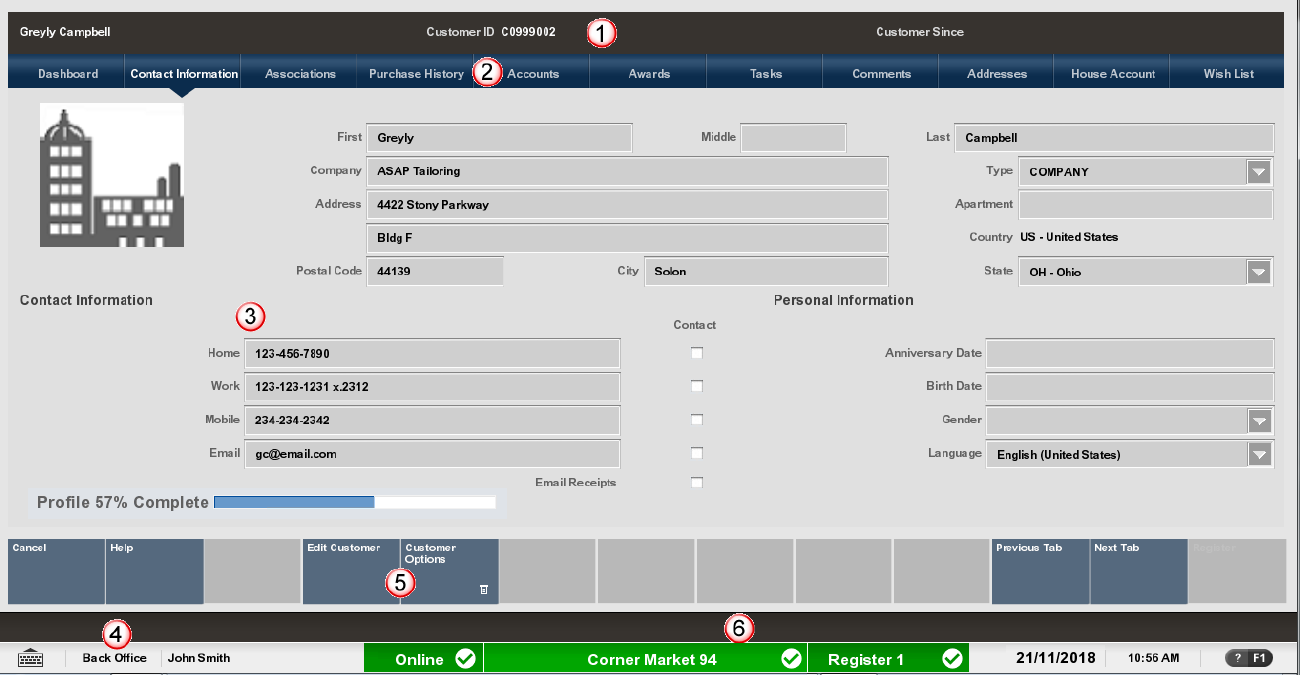
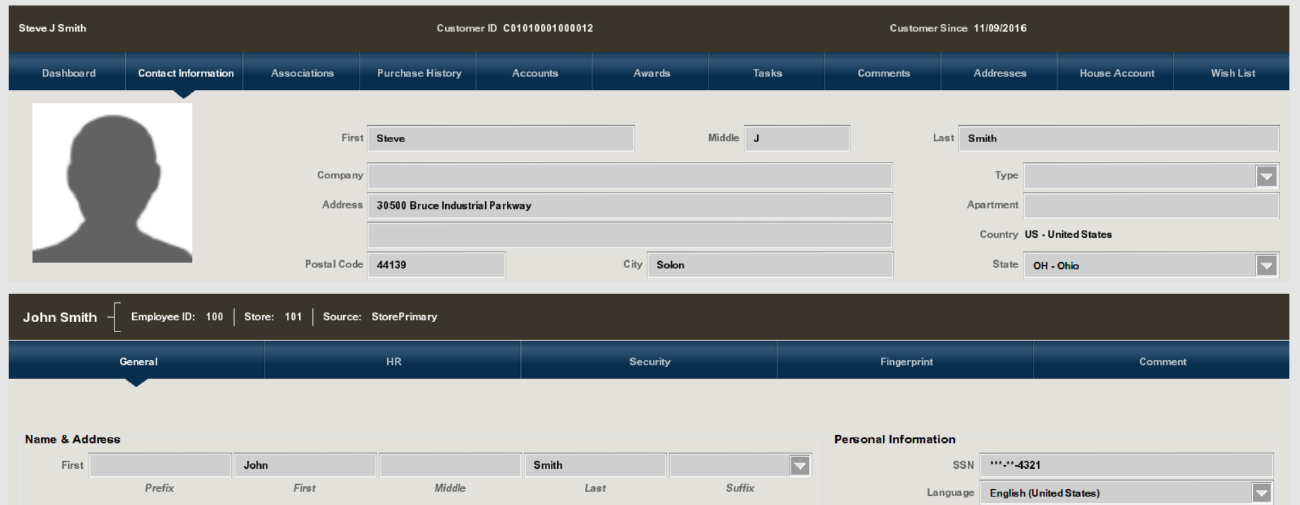
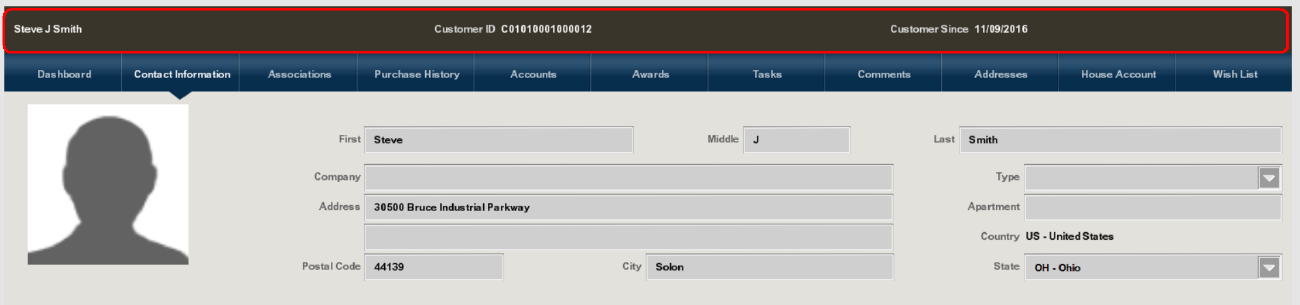
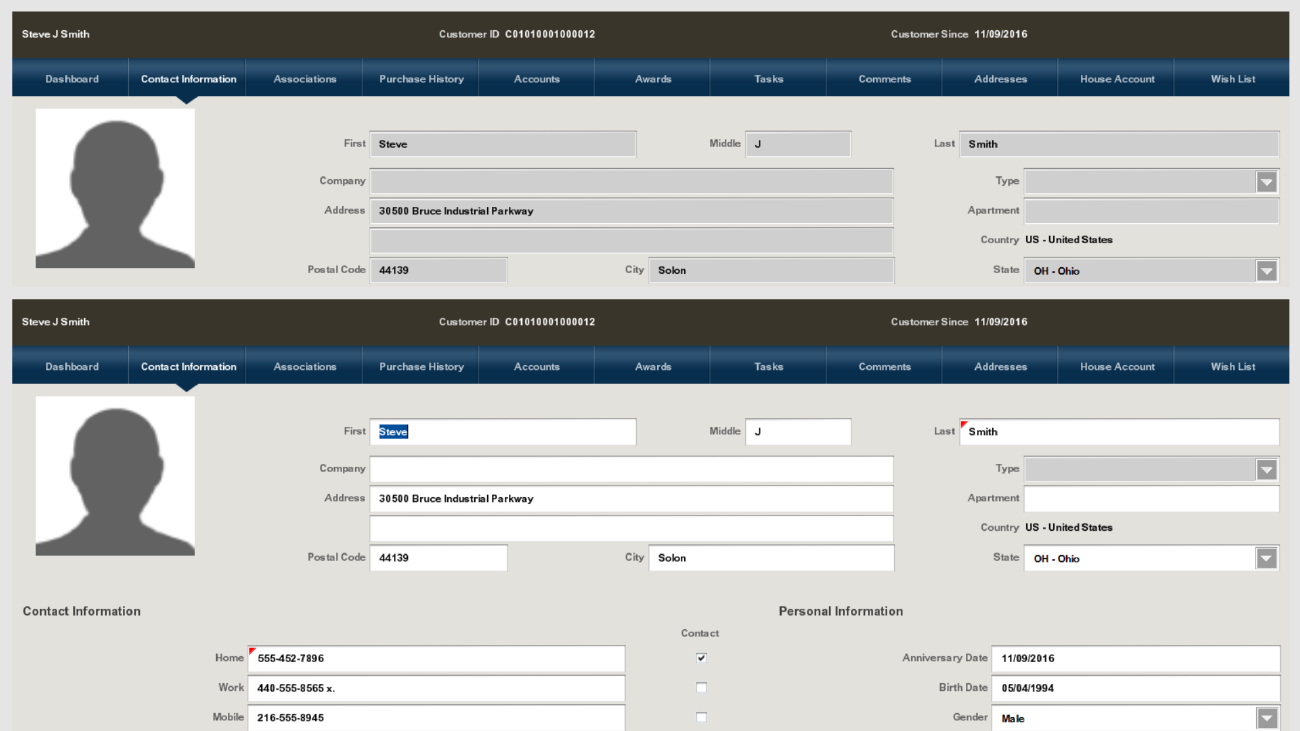
The Static Information Area of a record is located in a horizontal bar across the top of the record. The information displayed here is usually some basic identifying information about the current record such as a customer name, an employee ID, or other important information. When viewing a record, the information in the Static Information Area does not change, regardless of which tab is selected for the current record.
The information shown depends upon the kind of record being viewed. If the data originates from another system, the Static Information Area displays the data source where the current record is located. The source varies depending on your system's configuration.
When viewing a customer transaction in the Electronic Journal, the Static Information area displays information about a particular customer transaction.
When viewing a customer record in the Customer Maintenance screen, the Static Information area displays the customer name, customer account number, enrollment date, and loyalty points (if applicable).
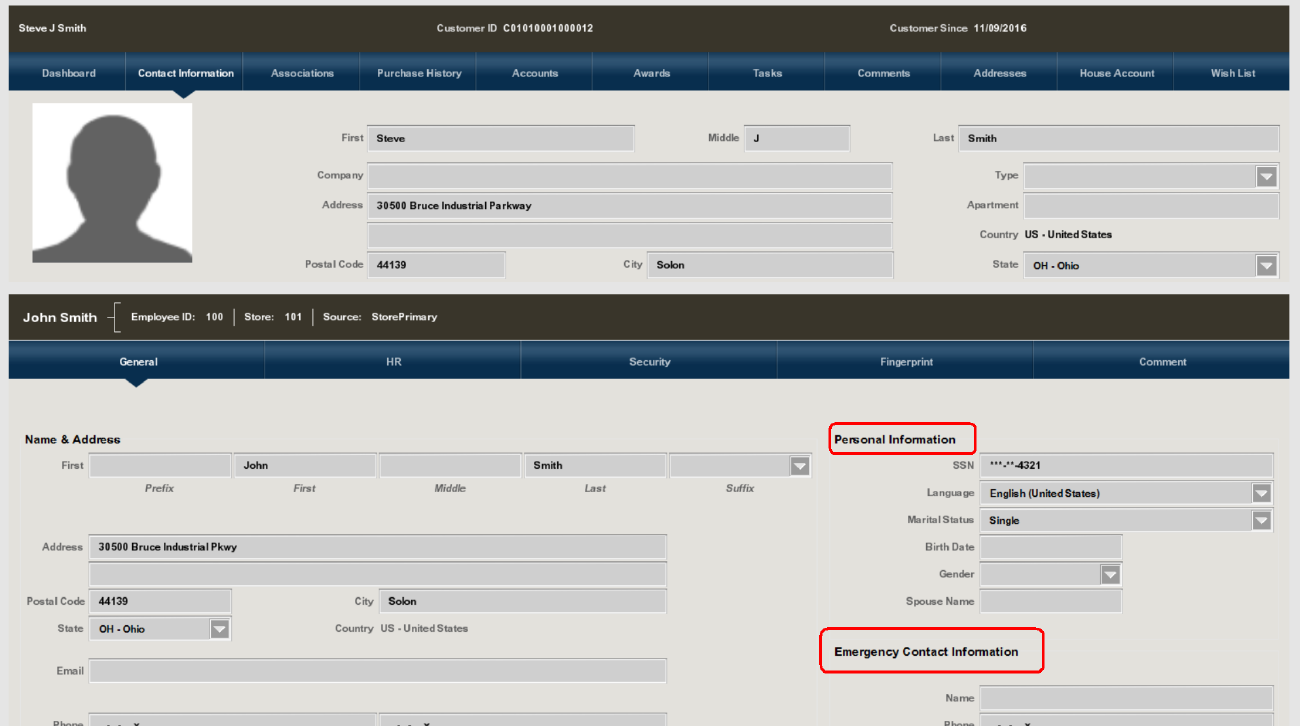
The Information Areas on the screen display information that varies depending on which tab is selected on a record. In that way, the Information Area of a screen is different from the Static Information area at the top of the screen. In the Static Information area, the same set of data displays, regardless of which tab is selected.
An information area is a way of grouping related bits of information that are pertinent to the specific tab currently being displayed.
There may be several different Information Areas on a screen, each one containing related information, and visually contained within a boxed area. For example, the customer record may show both Contact Information (such as address and phone information) and Personal information on the Contact Information tab.
Data can usually be entered and edited in an Information Area when you are working in an Edit mode.
During various system operations, you may be prompted to confirm that a process may continue, select from a list of options, acknowledge a system action, enter/select information, and so on. Oracle Retail Xstore Point-of-Service provides several different types of prompts and forms to help you complete a task.
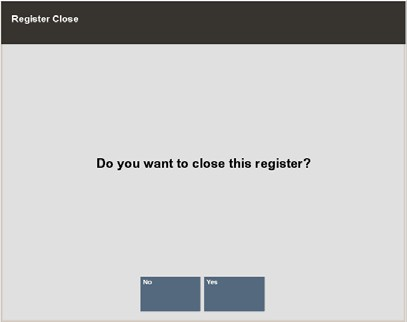
During a Back Office process, you may be required to confirm an action. For example, in Figure 1-14, below, press Y (Yes) to confirm that you want to close the register or press N (No) to remove the prompt and return to the transaction.
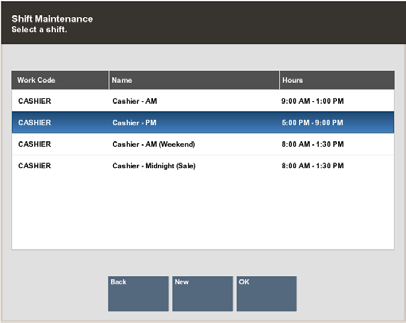
During a Back Office process, you may be required to select from a list of options. For example, in Figure 1-15 below, you would select a shift from the list. Keyboard users can use the up and down arrow keys to select from the list. To continue with the process, press Enter to choose OK. To exit without making a selection, press Esc.
|
Note: Touch-screen users tap to select an option and then tapOK. See Back Office Touch-Screen Navigation. |
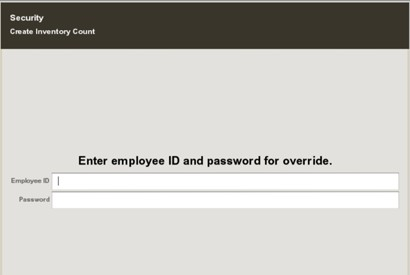
During a Back Office process, you may be required to enter a value before continuing. For example, in Figure 1-16 below, you are prompted to enter your employee ID number and password to continue. To continue with the process, enter your employee ID number and password and select Process to continue. To return to the previous screen, press Esc or select Back.
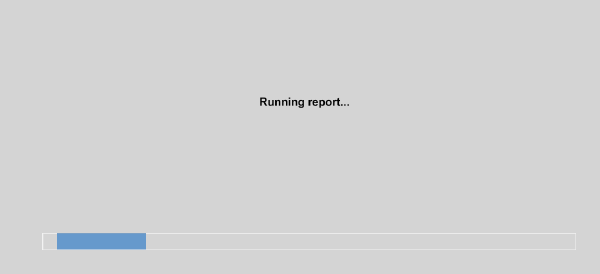
Throughout Oracle Retail Xstore Point-of-Service, the system displays prompts and messages to indicate that it is processing a request or a transaction, or to provide additional information about a process or error. For example, the following system message displays when running a report.
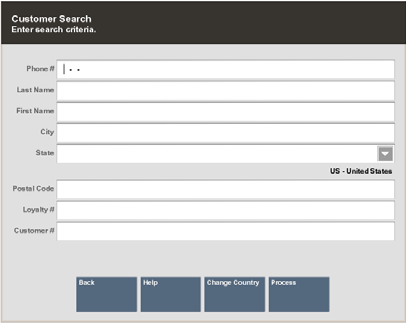
In a search form, you enter parameters, or criteria, to initiate a database search. Oracle Retail Xstore Point-of-Service displays a search form automatically when you must retrieve specific information.
Some forms (but not all of them) require that you enter at least one letter or one number into a field, the minimum requirement to initiate a search.
|
Note: For example, the Employee Lookup form in the Back Office Employee Maintenance function may not require any criteria to be entered. If you select Process without entering criteria, all employee names are retrieved. |
The more parameters you enter, the narrower the scope of the search becomes, and fewer records are listed. When one of the parameters is not matched, the system uses the remaining parameters to conduct a broader search. If the system cannot find any matches, Oracle Retail Xstore Point-of-Service displays a message indicating no match was found.
When applicable, the Change Country menu option provides the ability to search for customers from countries other than the country where the store is located. For example, if you change the country to Canada, the State form field lists Canadian provinces, and if Mexico is selected as the country, then the State form field lists Mexican states.
Because each Oracle Retail Xstore Point-of-Service search form is configurable, the search parameters on your system may appear in a different order or have different field names than the search forms shown in this guide.
![]() An arrow on the right side of a field indicates the information for this field must be selected from a drop-down list of options rather than typed into a free-text field.
An arrow on the right side of a field indicates the information for this field must be selected from a drop-down list of options rather than typed into a free-text field.
A data entry form is used to capture information that is transferred to the database. For example, the figure below shows a Customer Maintenance form where you can enter various kinds of information about a customer. The same form may be used to display information (read-only) and to update, or edit, information. Usually, you must select an Edit option from the menu before the current information may be changed.
Table 1-6 Icons of the Data Entry Form
| Icons | Description |
|---|---|
|
An arrow on the right side of a field indicates the information for this field must be selected from a drop-down list of options rather than typed into a free-text field. |
|
 |
A red triangle in the upper left corner of a field indicates that information must be entered. |
 |
A grayed out field indicates the field is non-editable. In some cases, select the Edit menu option to modify the field. |
Enter the information into the form as required and select Save Changes to continue, or press Esc to return to the previous screen without saving the data. If you select Save Changes before completing all the required fields, Oracle Retail Xstore Point-of-Service displays a message explaining the error.