| Oracle® Retail Xstore Point of Service Mobile User Guide Release 20.0 F35714-03 |
|

 Previous |
 Next |
| Oracle® Retail Xstore Point of Service Mobile User Guide Release 20.0 F35714-03 |
|
Previous |
Next |
The electronic journal is an electronically-captured record of all transactions. The search capabilities allow you to quickly locate any transaction and to view the detailed information on the receipt associated with a specific transaction. You may also print gift receipts, reprint receipts, tax free invoices and post void transactions from the Electronic Journal if you have the proper security permissions. A Journal Report showing detailed transaction information is also available.
The following topics are described in this chapter:
The Reporting menu provides options to view the Electronic Journal and to run the Journal Report.
After logging in, select Reporting from the Main Menu. See Figure 1-5.
From the Reporting menu, either:
Select Electronic Journal to view the Electronic Journal records or,
Select Sales Reports, then select Journal from the Sales Reports menu to run the Journal report. Refer to Journal Report for more information.
At the Reporting menu, select Electronic Journal.
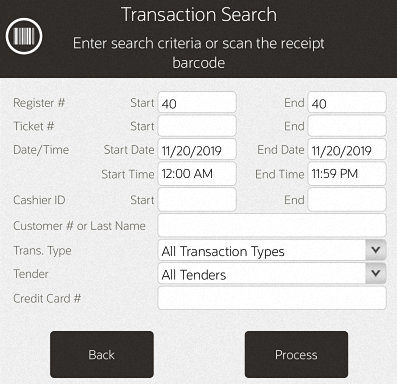
The system displays the Transaction Search form. Enter your search criteria and select Process.
|
Note: Depending on your store's configuration, a Check Account Number search field displays as well as a Read Check from MICR button. |
The following search parameters are available:
Register Number: Enter the identifier for a specific register, a range of registers, or leave these fields blank to view information for all registers.
Ticket Number: Enter a transaction identifier for a specific transaction, a range of transactions, or leave these fields blank to view information for all transactions.
Date/Time: Enter a start date and time, an end date and time, or accept the default for today.
Cashier ID: Enter the identifier for a specific associate, a range of associates, or leave these fields blank to view information for all associates.
Customer: Enter a customer name or number to view information about a specific customer.
Transaction Type: Select a transaction type from the list or select ALL to view all transaction types. Transaction types include options such as TIME CLOCK, NO SALE, RETAIL SALE, POST VOID, and so on.
Tender: Select a tender type from the list or select ALL to view all tender types. Tender types include options such as Store Credit, Cash, Check, and so on.
Credit Card Number: Enter the credit card number used for a transaction.
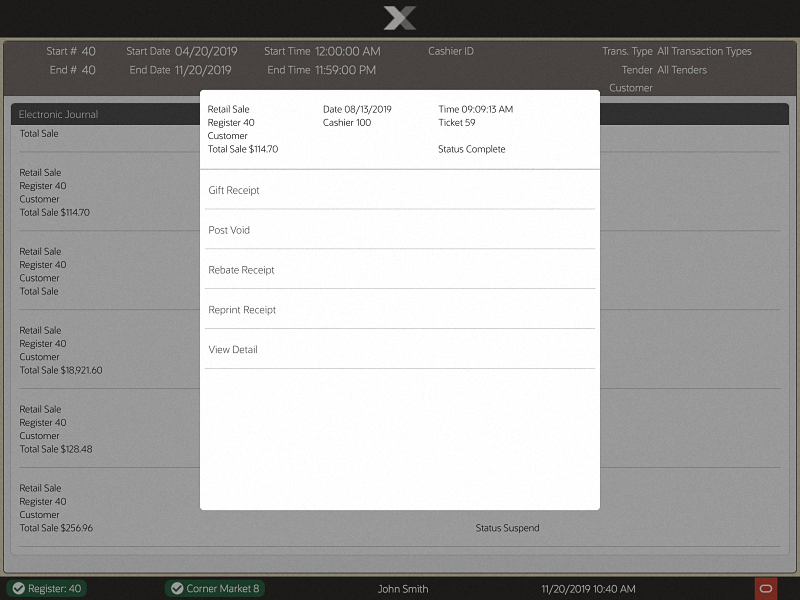
Oracle Retail Xstore Mobile POS displays the Electronic Journal screen.
Selecting a row from the electronic journal report presents you with a popup menu of options (gift receipt, post void, rebate receipt, reprint receipt, view detail).
The following options are available at this screen:
Gift Receipt: Select this option to print a gift receipt for the selected transaction. Refer to Printing a Gift Receipt for more information.
Invoice Functions: Select this option to issue or reprint a tax free invoice. Refer to Issuing a Tax Free Invoice from the Electronic Journal and Reprinting a Tax Free Invoice from the Electronic Journal for more information.
Post Void: Select this option to post void the selected transaction. Refer to Post Voiding a Transaction for more information.
Rebate Receipt: Select this option to print a Rebate Authorization receipt. Refer to Printing a Rebate Receipt for more information.
Reprint Receipt: Select this option to reprint a receipt for the selected transaction. The receipt is clearly labeled as a reprint. Refer to Reprinting a Receipt for more information.
View Detail: Select this option to view additional information about the selected transaction. Refer to Viewing Transaction Detail for more information.
If you select a row from the electronic journal that is not a sales transaction, for example, Attach Till, and then select Gift Receipts - you get a validation prompt that states - Gift Receipts cannot be printed for Session Control transactions.
|
Note: The detail information shown is specific to each transaction type. For example a Time Clock journal includes the Employee number and name, Clock In or Clock Out, and the time. A Post Void journal includes the Original Transaction Location ID, Register ID, and Business Date. |
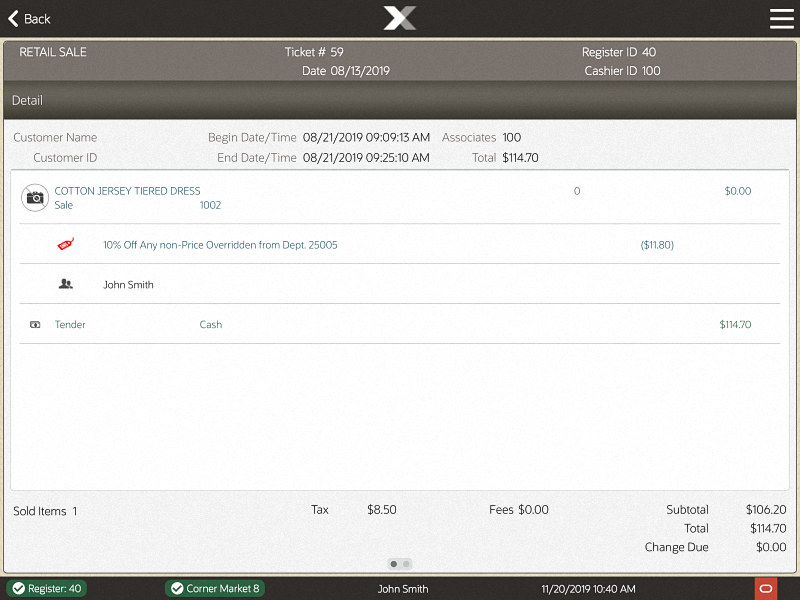
With the transaction record selected, select View Detail from the Electronic Journal Options menu. See Figure 37-4.
Oracle Retail Xstore Mobile POS displays the Electronic Journal transaction detail screen for the selected record.
The detail information for a RETAIL SALE transaction, (sale, return, send sale, special order, layaway, order, and so on) includes the following data:
Item Detail: Quantity, item ID, description, discounts, price, and the extended price for each item
Tender Detail: Tender types and amount of each type
Totals: Subtotal, fees, tax, and totals as shown on the original receipt
|
Note: Some transaction types, such as Assign Till transaction type and Workstation Open transaction type, do not show any detailed information. |
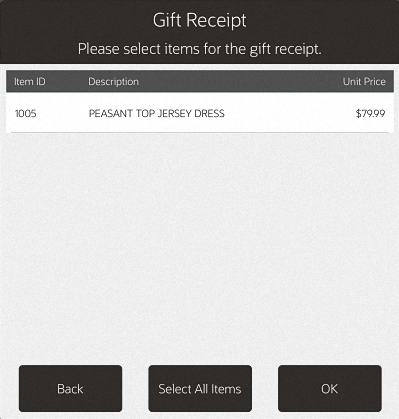
With the transaction record selected, select Gift Receipt from the Electronic Journal Options menu. See Figure 37-4.
Oracle Retail Xstore Mobile POS displays a list of items in the transaction that are eligible for a gift receipt. Select an item to mark it for a gift receipt. You may use the Select All option to print gift receipts for all of the listed items.
|
Note: If there are multiple items that have been labeled as requiring a gift receipt, you may be prompted whether or not the items should be grouped on separate gift receipts. For example, 2 items on one receipt, and 3 items on another receipt. |
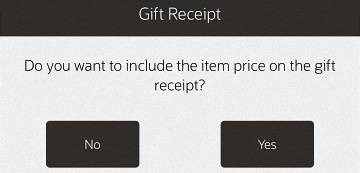
Select OK to continue.
Select Yes or No to include the item price on the gift receipt.
Oracle Retail Xstore Mobile POS prints the gift receipt(s) for the selected item(s).
The items that you issued a gift receipt for are now labeled with the Gift icon.
|
Note: If gift receipts are not permitted for the transaction type you selected, Oracle Retail Xstore Mobile POS prompts with a message indicating that gift receipts are not allowed. You must press OK to acknowledge the message to return to the Electronic Journal screen. |
If prompted whether or not you want to group the gift receipt items, you have the following options:
To group the items, select Yes, and continue with To Group Gift Items below.
If you do not want to group the items, select No and continue with To Continue without Grouping Gift Items.
After selecting Yes at the Multiple Gift Receipts prompt, the system displays the list of items requiring gift receipts. Select the gift items for the first gift receipt, then select one of the following options:
Select Finish and Print to print a gift receipt with the grouped items you selected.
If there are at least two or more gift items still available after setting up the grouping, you are prompted whether or not you want to print a separate gift receipt for each remaining gift item:
When prompted, select Yes to print a separate gift receipt for each remaining gift item.
<OR>
Select No to print the remaining gift items on a single gift receipt.
If only one gift item is still available after setting up the grouping, the system automatically prints that gift item on a separate gift receipt.
Select Add Grouping to create multiple grouped gift receipts, beginning with the first group of gift items you selected.
The system then displays the gift item list again showing only the items that are still available for grouping. Select the next gift receipt items.
You can continue grouping the items using the Add Grouping option as long as there are at least 2 remaining items in the list.
When only 1 item remains in the list, the Add Grouping option no longer is available. Select Finish and Print to create a gift receipt for the remaining gift item.
After selecting No at the Multiple Gift Receipts prompt, the system prompts whether or not you want to print a separate gift receipt for each gift item. Select one the following options:
Select Yes to print one gift receipt per gift item.
Select No to print a single gift receipt with all gift items.
|
Important: Only transactions for the current date can be post voided. If you try to post void a transaction from a previous day, the system displays a message and you are not permitted to post void the transaction. |
This function may also be available at the Register Login screen.
With the transaction record selected, select Post Void from the Electronic Journal Options menu. See Figure 37-4.
Oracle Retail Xstore Mobile POS prompts to confirm that you want to post void this transaction. Select Yes to post void the transaction.
Oracle Retail Xstore Mobile POS prompts for the reason you are post voiding this transaction, if required by your store policy. Select a reason from the list.
Oracle Retail Xstore Mobile POS may prompt for a comment for this post void transaction. If prompted, type a comment.
Oracle Retail Xstore Mobile POS post voids the transaction and prints a post void receipt. The printed receipts are clearly identified as voided.
The journal record status is updated to Void.
|
Note: If post voids are not supported for the transaction type you selected, Oracle Retail Xstore Mobile POS prompts with a message indicating that it is not allowed. You must press OK to acknowledge the message to return to the Electronic Journal screen.If the transaction is an extended transaction type such as a layaway or a work order, Oracle Retail Xstore Mobile POS displays a message and prompts you to respond. An extended transaction includes other activities after the initial transaction is completed. Post voiding an extended transaction impacts the other activities that follow the initial transaction. If you want to continue with the post void, select Yes to void the transaction; otherwise, select No. |
Rebate receipts may be offered to customers so they can retain the original receipt for a purchase, and use this Rebate Authorization receipt to mail in as proof of purchase.
With the transaction record selected, select Rebate Receipt from the Electronic Journal Options menu. See Figure 37-4.
Oracle Retail Xstore Mobile POS prints the rebate authorization receipt if an item is eligible for a rebate.
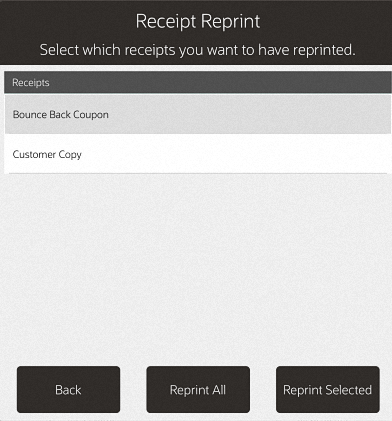
With the transaction record selected, select Reprint Receipt from the Electronic Journal Options menu. See Figure 37-4.
Click the correct document.
Select Reprint Selected or Reprint All.
Xstore Mobile POS reprints the document on the report printer.
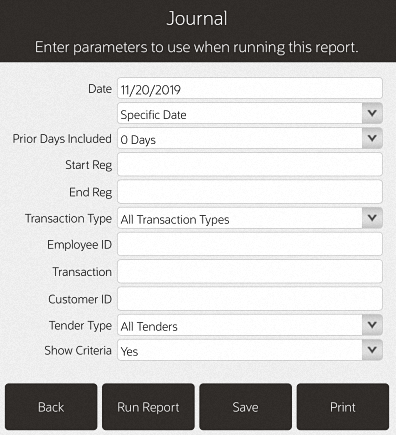
To run the Journal report:
After logging in, select Reporting from the Main Menu. See Figure 1-5.
Select Sales Reports from the reporting menu.
Select Journal from the Sales Reports menu.
Enter parameters required and select one of the options:
Run Report
Save
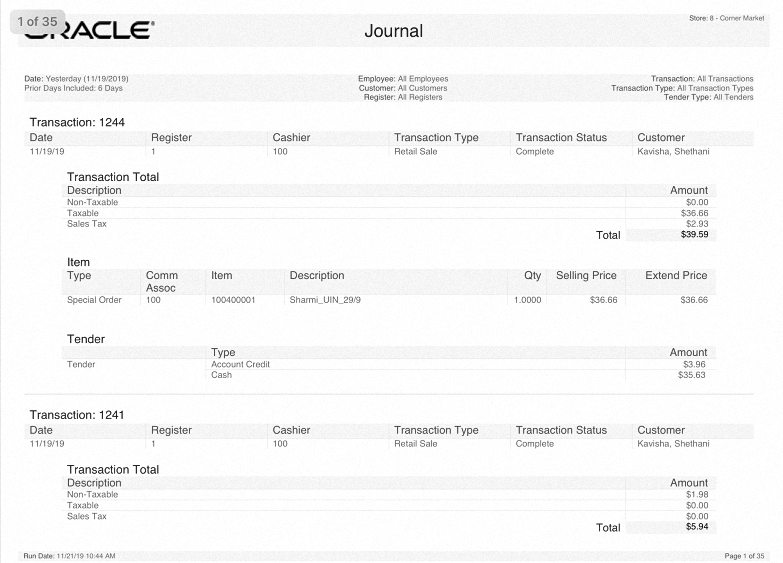
The Journal Report shows detailed transaction information exactly as it was rung. Data can be displayed for an individual employee or for all employees, or for transaction codes, transaction line codes, and tender codes. Transactions are sorted by date, register number, and transaction number.
This report includes the following information:
Transaction Type
Register ID
Business Date
Total
Cashier
Transaction ID
Customer Name
Status
Item section: Commissioned Emp ID, Item ID, Description, Quantity, Unit Price, and Ext Price
Tender section: Taxable Amount, Non Taxable Amount, Sales Tax, Total, and Tender Type
|
Note: Refer to the Oracle Retail Xstore Point of Service Reports Guide for details about this report. |