| Oracle® Retail Xstore Point of Service User Guide Release 20.0 F35716-05 |
|

 Previous |
 Next |
Customer Maintenance includes activities that relate to entering new customers into the customer database, updating customer information and preferences, viewing or printing customer information, and deleting a customer record.
Customer Maintenance is typically required when an associate discovers that a customer's name is not in the database and must be entered for the first time. Other common situations that trigger customer maintenance occur when incorrect customer information is found and must be revised, and when information is lacking and must be entered.
These screens can also be accessed through the back office Customer Maintenance menu options.
|
Note: Customer maintenance activities are controlled by user security. You must have privileges in the system to perform any customer maintenance activities. |
This chapter describes the following sections:
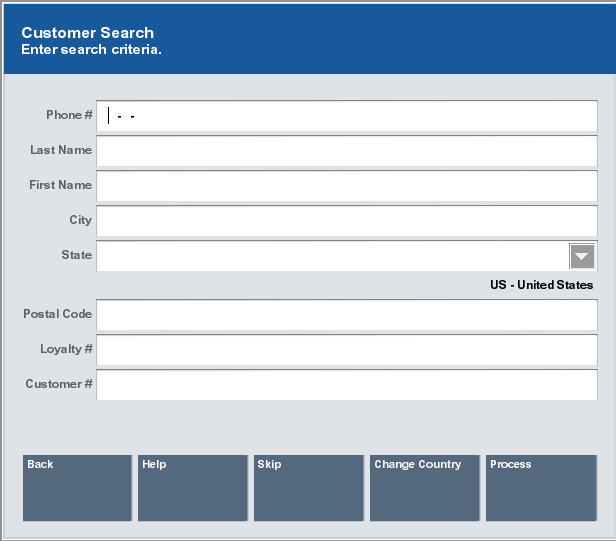
To search for a customer record from the Customer Search window:
Enter the customer search criteria:
|
Note: Enter as much information as possible to limit the number of customer records returned. |
Phone # - Phone number associated with the customer.
Last Name - Customer last name.
First Name - Customer first name.
City - City in the customer's address.
State - State in the customer's address.
Postal Code - Postal or zip code.
Loyalty # - Customer loyalty number.
Customer # - Customer ID number.
Click Process.
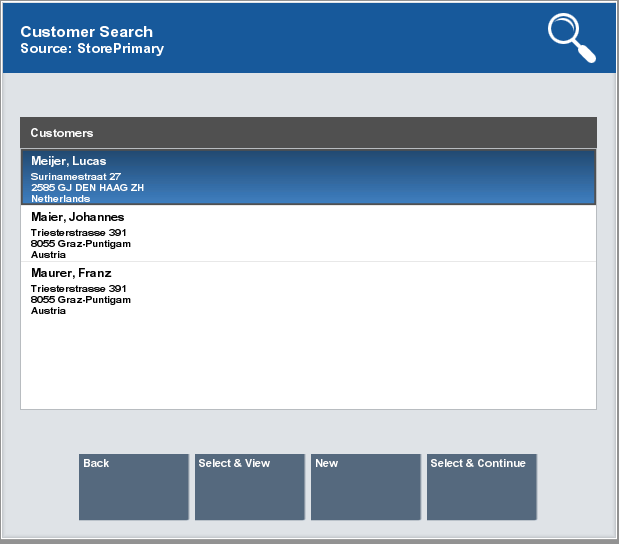
Xstore Point of Service displays a list of customers matching the search criteria.
|
Note: If no customer record matches the criteria, Xstore Point of Service displays a message indicating that no customer records have been found. Click New to Add a Customer Record, or click Back to return to Step 1. |
If necessary, select the correct customer from the list:
|
Note: If only one customer matches the search criteria, Xstore Point of Service may open the selected customer record for viewing, editing, or printing. Continue with Step 5. |
Click the customer.
Use the up and down arrows to highlight the correct customer, then press the Spacebar.
Click the proper button:
Back – Return to the Customer Search form (Step 1) Select this option if the correct customer is not listed and you want to change the search criteria.
Select & Continue – Assign the selected name to the transaction. Continue the transaction.
Select & View – Open the selected customer record for viewing, editing, or printing. Continue with Step 5.
New – Display a form for adding a new customer record to the customer database. Select this option if the customer is not in the database. See Add a Customer Record.
Click the proper button:
Back – Returns to the Customer Search form (Step 1).
Assign and Continue - Associates the customer with transaction. Continue the transaction.
Edit Customer - Allows you to change information in the customer record. See Edit a Customer Record.
Customer Options – Displays a list of customer options. See Additional Customer Options.
Previous Tab and Next Tab - Navigate through the tabs.
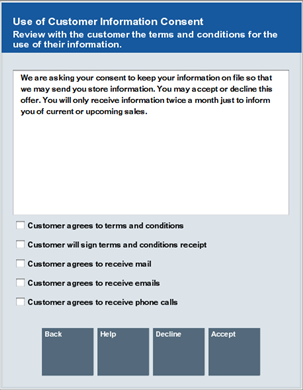
Xstore allows retailers to capture a customer's consent for collecting their personal information.
If this functionality is enabled, when creating a new customer record or by accessing the customer record in the transaction, you are automatically prompted with a Consent Preferences pop up. If the customer has already given consent and the terms and conditions are current, then they will not be prompted again. However, if the terms and conditions have been updated, the customer will be prompted to update their consent preferences.
The terms and conditions are provided by the retailer. Xstore provides the ability to configure multiple consent check boxes for the customer to select.
Once the customer has agreed to the terms and conditions and the consent boxes have been checked, select the Accept button.
If the customer declines consent, the consent captured date is cleared and it may impact the ability to perform some specific transaction types depending on the retailer's configurations.
After selecting the Accept button, the terms and conditions may be reviewed, printed on a receipt, and signed by the customer.
Customers and employees may ask the retailer to remove their personal information by anonymizing or deleting it from their records. If a customer or employee requests to remove their data, a check is made to ensure that the customer or employee is eligible to be removed from the application. For example, customers with any open transactions would not be eligible for data removal. Open transactions include open orders, a house account balance, or open layaway transactions, and so on.
To create a new customer record:
Click New at a customer prompt.
If customer information consent functionality is not enabled, continue at step 5.
If customer information consent functionality is enabled, a terms and conditions screen opens showing consent preferences and requesting that the customer accepts or declines to the terms and conditions listed. See Customer Information Consent for more information.
Select the relevant check boxes if the customer agrees to accept the terms and conditions, and consent preferences.
To refuse consent, select Decline to return to the previous screen.
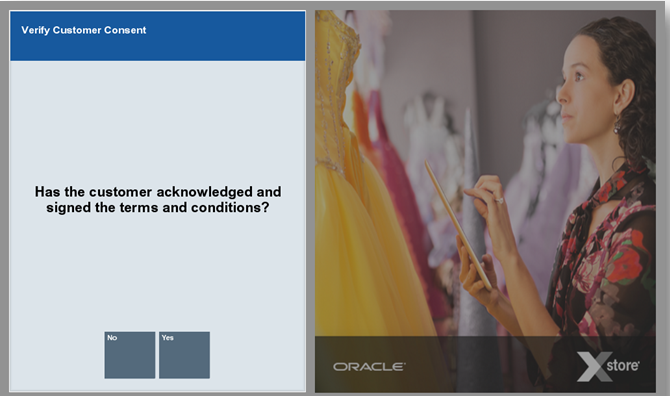
Select Accept. The terms and conditions print on the receipt for the customer to sign manually and a prompt is displayed to confirm the customer acknowledges the terms and conditions. Ask the customer to sign the receipt.
Select Yes to confirm the customer has acknowledged the terms and conditions, and signed the receipt. The customer's acceptance is associated to the customer record.
A confirmation screen is displayed indicating that the customer's consent selections have been updated in the system. Select OK to continue. The customer maintenance screen opens with editable fields.
If No is selected on the consent confirmation screen, the customer's refusal of consent is recorded.
|
Note: If you provided consent as part of Customer Search rather than Add New Customer, Xstore Point of Service automatically populates the new customer fields with the information from the customer search. |
Enter the information into the customer maintenance fields.
See Customer Maintenance Fields for a description of the organization of the Customer Maintenance screen and the information in each field.
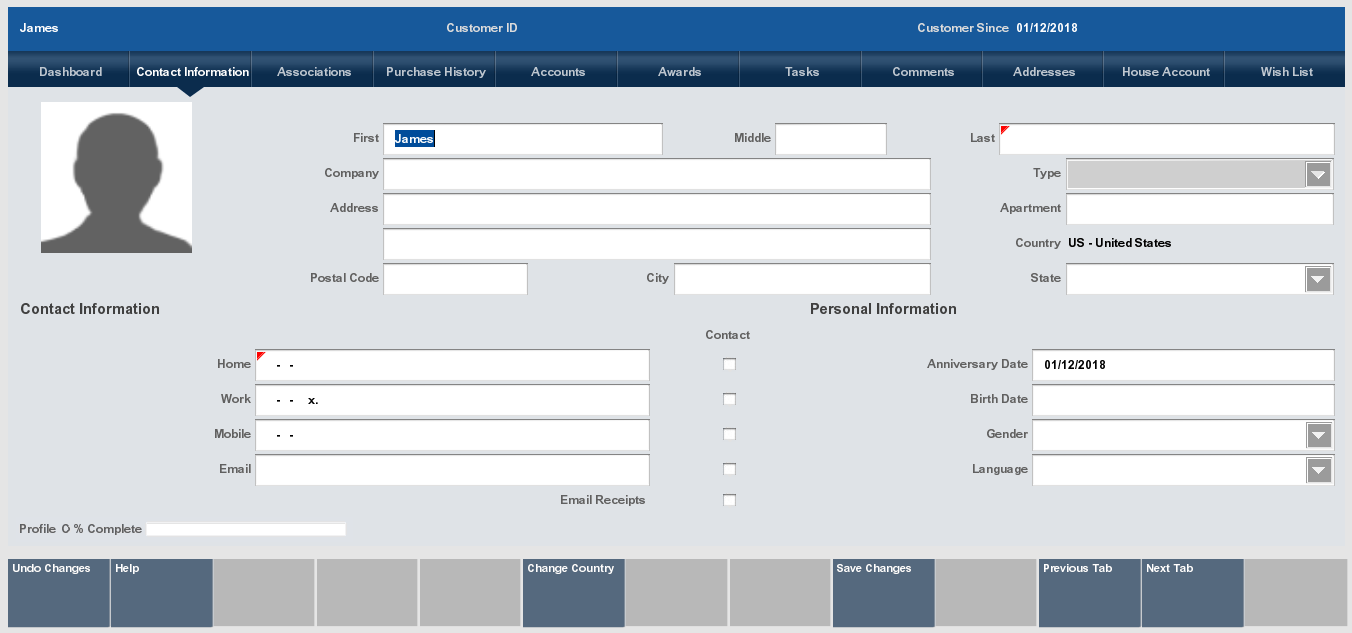
Required fields are marked with a red triangle  in the upper-left corner.
Fields with a selectable list of options are labeled with a down arrow button in the right side of the field.
If your system is configured to provide Address Lookup functionality, an Address Lookup button will be available to allow you to quickly look up customer addresses using minimal information.
|
Note: When you enter a valid postal code for the customer, the system automatically enters the city and state information. |
Click Save Changes when all information has been added to the customer record.
If necessary, indicate whether to add the customer to the loyalty program:
Scan or enter the card number, the click Process to add the customer to the loyalty program (card-centric programs).
Click Yes to add the customer to the loyalty program (non-card-centric programs).
Click Not Now to not add the customer to the loyalty program, but open the prompt the next time the customer performs a transaction.
Click Never to not add the customer to the loyalty program and never ask the customer again.
If necessary, click Assign Customer To Tran to add the customer to the transaction and return to the sale.
To edit a customer record in the Customer Maintenance screen:
Click Edit Customer.
Select the tab in which to change the customer information.
Click the field to change.
Enter or select the new information.
|
Note: If necessary, click Undo Changes to discard the changes and exit customer editing. |
Click Save Changes to save the changes and exit customer editing.
Address Lookup allows users to quickly locate accurate addresses using minimal information, instead of manually keying the entire address. When enabled, this function is available in most Xstore Point of Service address capture screens, including handheld and tablet.
|
Note: The Address Lookup function may not be available for all countries. |
To use address lookup:
Select the Address Lookup function.
The Address Lookup window opens.
Enter the first line of the address, followed by the postal code.
|
Note: The search terms used in some countries can be different, and a number of different search terms can be used within a country. For example, instead of a postal code, some countries can search using a city or town and a state or province. Or, in some countries, the postal code can be replaced by just a city or town. |
Click Address Lookup.
If necessary, refine the address:
Enter the street number or apartment number as requested and then click Refine Address.
Select the correct address:
Click the address.
Use the up and down arrows to highlight the correct address, then press the Spacebar.
Indicate whether the address is correct:
Click Yes to continue with the address.
Click No to return to the Address Lookup window. Return to Step 2.
Click Cancel to exit Address Lookup without selecting an address.
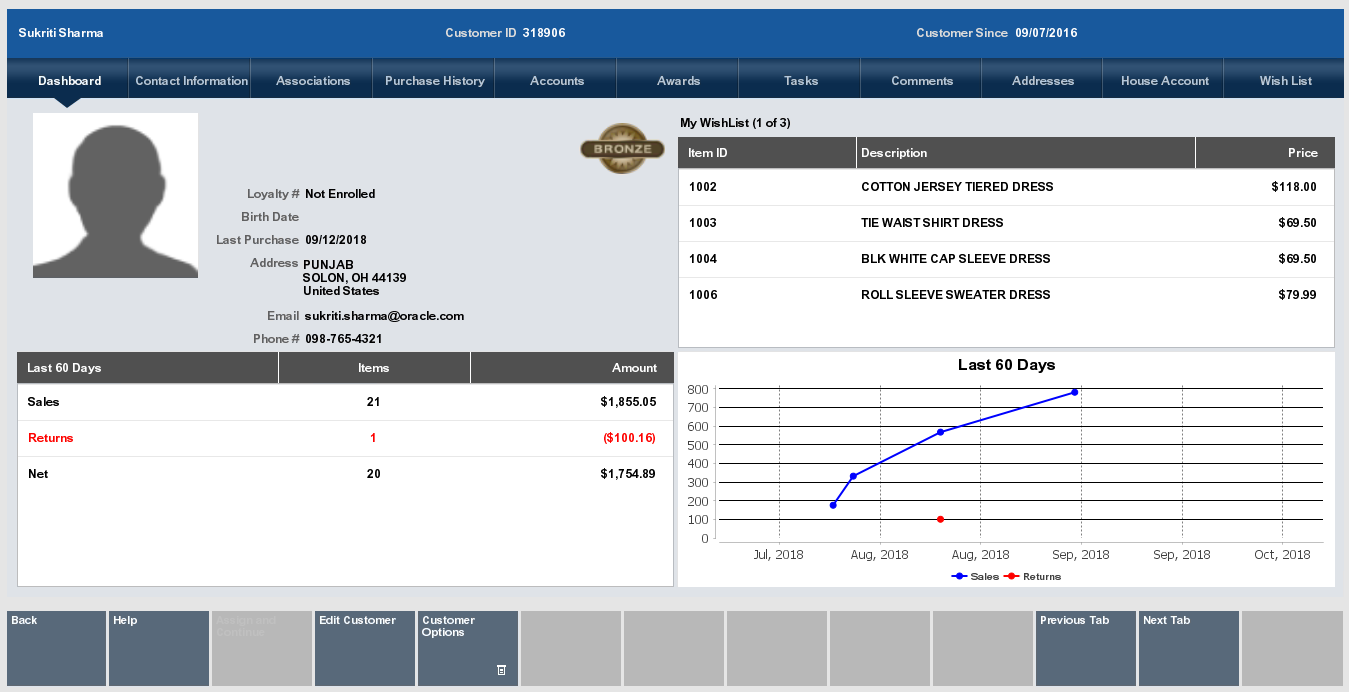
The Customer Maintenance screen is divided into several tabs containing information about the customer.
This tab shows the customer's loyalty information, and recent purchase information.
The Dashboard tab displays the following information:
Loyalty # - Loyalty number.
Birth Date - Date of birth.
Last Purchase - Last purchase date.
Address - Primary address.
Email - Primary e-mail address.
Phone # - Primary phone number.
Summary of the transactions in the last year. See Transaction Summary.
Wish List - Items in the customer's wish list.
Last xx Days - Graph of the transactions in a set number of days.
The transaction summary table displays the following columns:
Last xx Days - Types of transactions performed in a set number of days.
Items - Total number of items in the transaction type.
Amount - Total amount in each transaction type.
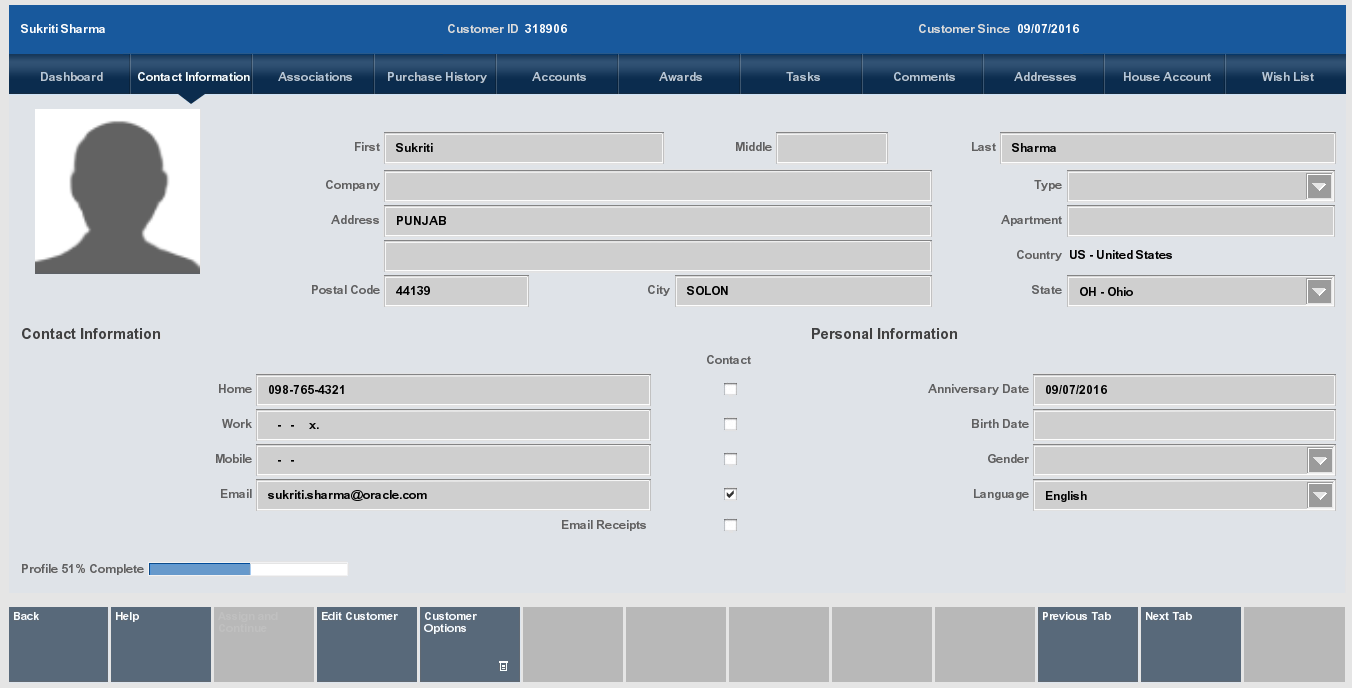
This tab shows the customer name, address, phone and email information, contact preferences, and profile completeness progress bar. Your store may be configured to display anniversary, birthday, and language options.
The Contact Information tab contains the following fields:
First - First name.
Middle - Middle name or middle initial.
Last - Last name.
Company - Company or organization associated with the customer.
Type - Type of company or organization.
Address - Primary street address.
Apartment - Primary address apartment.
Country - Country of primary address.
Postal Code - Postal or zip code.
City - City of the primary address.
State - State or province of the primary address.
Home - Home telephone number.
Work - Work telephone number.
Mobile - Mobile telephone number.
Email - Primary e-mail address.
Contact - Indicates whether the customer permits the store to contact them through the associated telephone number or e-mail address.
Email Receipts - Indicates whether the customer allows the store to send e-mail receipts to the primary e-mail address.
Anniversary Date - Date on which the customer was added to the system.
Birth Date - Customer birthdate.
Gender - Customer gender.
Language - Primary language for the customer.
Profile x% Complete - Percentage of customer record completion.
If Customer Information Consent functionality is enabled, the consent preferences are accessible via the Review Customer Consent option within the Customer Options menu.
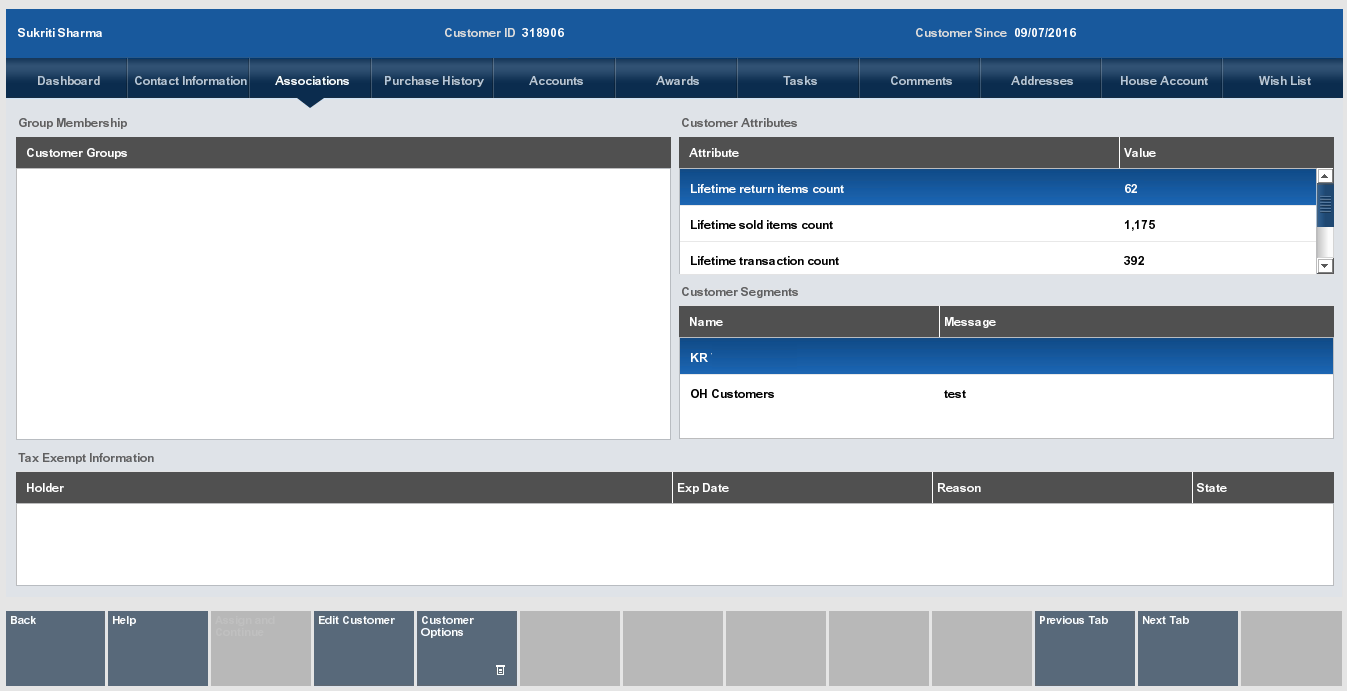
This tab lists any company-defined groups to which the customer belongs, and additional personal identifying information (customer attributes, tax exemption information, and so on.)
The Associations tab contains the following fields:
Group Membership - The group to which the customer belongs. Groups are defined by the store or home office. A customer may be associated with one or more groups. If groups are not defined, no customer groups are listed in this section.
Customer Attributes - Attributes for the customer. Attribute categories are defined by the home office and provide additional information about the customer.
Customer Segments - Segments to which the customer belongs. Segments are groupings that share common criteria. This information is provided by Customer Engagement. Identifying a customer with a segment may be helpful in customer analysis and in sale promotions.
|
Note: This field cannot be edited. Segments are provided by Oracle Retail Customer Engagement. |
Tax Exempt Information - Tax exemptions associated with the customer. A customer may have one or more exemptions.
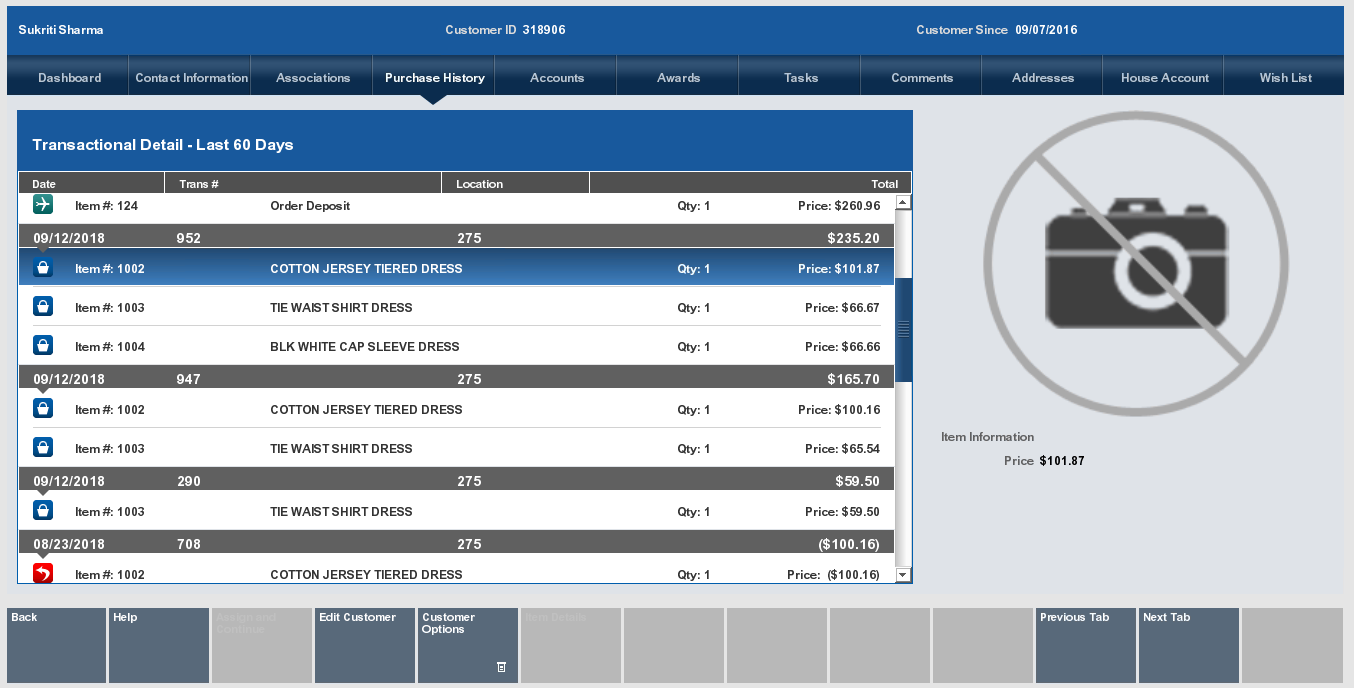
This tab shows a detailed sales transaction listing for the customer for a set number of days. If available, a picture displays with item details in the Information tab.
This tab shows detailed information about sales transactions for the customer within the last xx days. This tab displays the following rows:
Transaction Row - Displays information about a transaction.
Item Row - Displays information about an item within a transaction.
Item Information - Displays information about a selected item.
|
Note: The information in this tab cannot be edited. |
Transaction rows display the following information:
Date - Date of the transaction.
Trans # - ID number of the transaction.
Location - Location ID.
Total - Total amount of the transaction.
Item rows display the following information:
Item # - ID number of the item.
Description - Description of the item.
Qty - Quantity of the item.
Price - Price of the item.
Your system's configuration determines the information displayed on this tab.
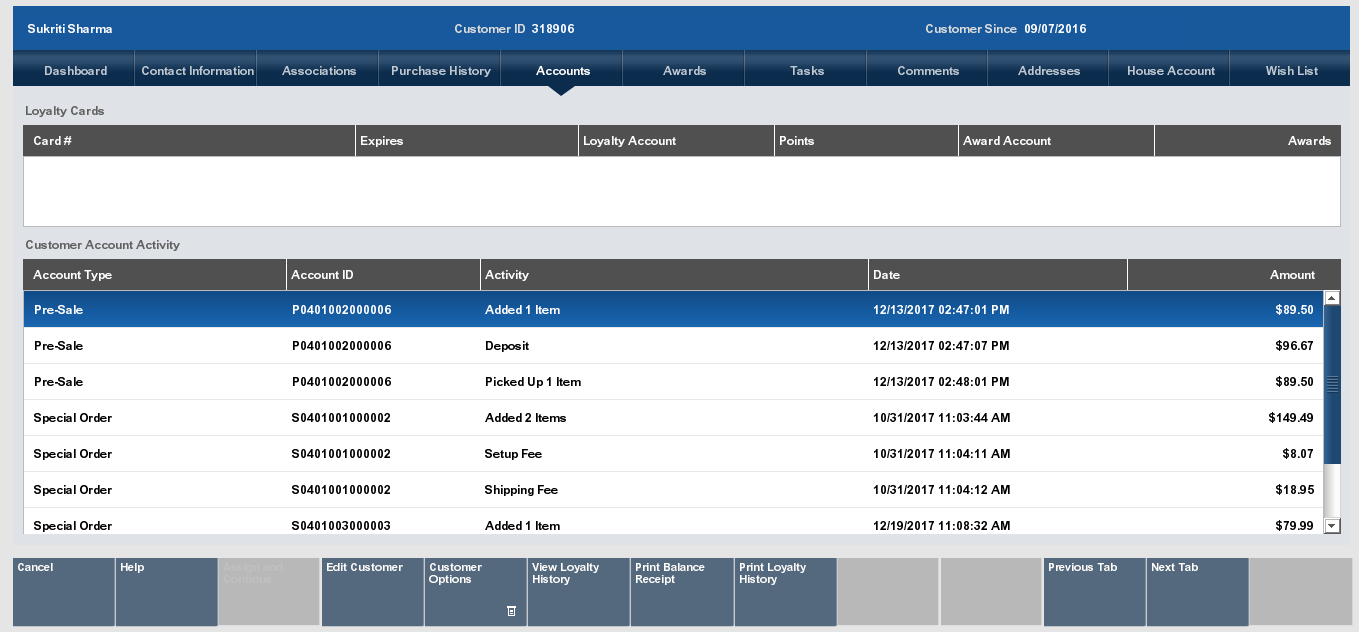
If your system is configured for a loyalty program, this tab lists the customer's loyalty program information.
If your system is not configured for a loyalty program, this tab lists any of the customer's special accounts such as work order accounts, layaway accounts, pre-sale accounts, hold accounts, and send sale accounts.
|
Note: The information in this tab cannot be edited. |
If loyalty is configured on your system, the Accounts tab will display the following information:
Loyalty Cards - Information about the loyalty cards associated with the customer.
Customer Account Activity - Loyalty activity for the customer.
This section displays the following information for each loyalty card:
Card # - Card number.
Expires - Card expiration date.
Loyalty Account - Loyalty account ID.
Points - Number of points accumulated in the loyalty account.
Award Account - Award account ID.
Awards - Awards in the awards account.
This section displays the following information about the customer's account activity:
|
Note: Activity rows that have been voided show a line through the entire row. |
Account Type - Type of customer account.
Account ID - ID of the account.
Activity - Type of activity.
Date - Date of the activity.
Amount - Amount associated with the activity.
The Customer Account tab includes the following Menu Buttons specific to this tab:
View Loyalty History - Displays the loyalty history for the customer.
Print Balance Receipt - Prints a receipt showing loyalty account balance information.
Print Account History - Prints a Loyalty Account History report on the report printer. The information in this report includes the information shown in the Customer Account History section of the Customer Account tab. See the Oracle Retail Xstore Point of Service Reports Guide for more information about this report.
If loyalty programs are not used by your system, the Accounts tab will display the Customer Account Detail information.
The Customer Account Detail lists special accounts that are owned by the customer. The account status (such as OPEN or CLOSED) is noted along with a date and current amount due on the account if applicable.
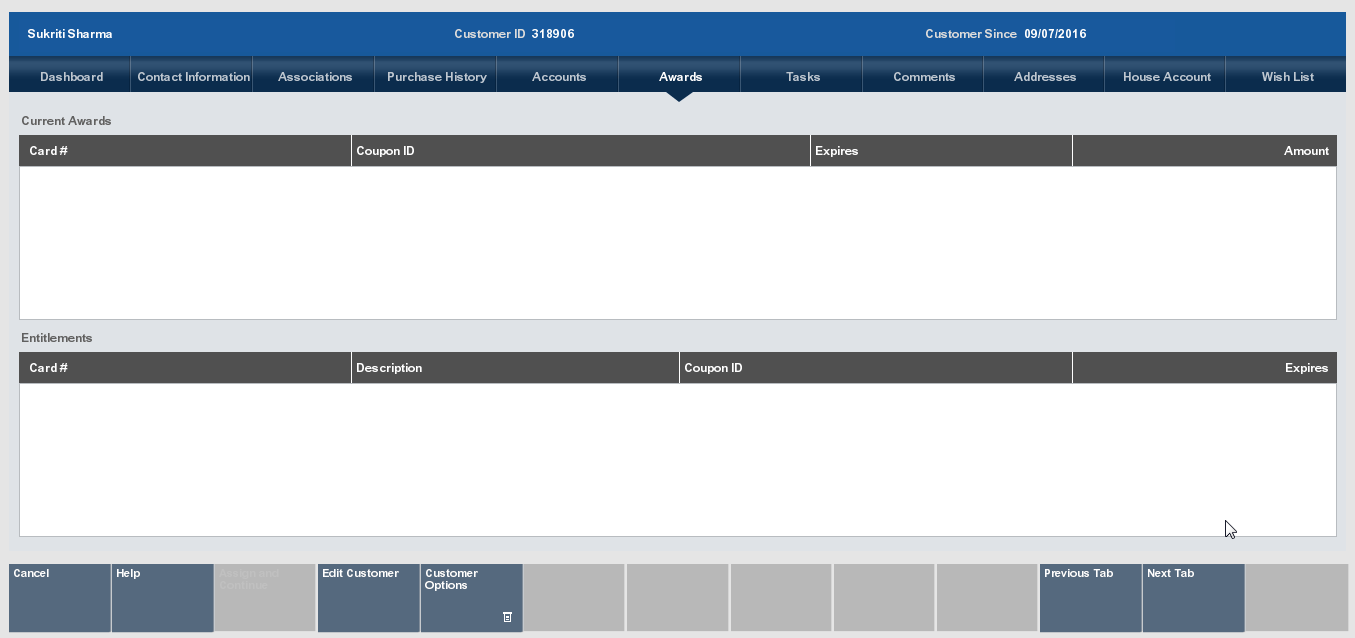
The Awards tab is for viewing the customer's current awards and entitlements information in separate sections. You can edit the customer and loyalty information within customer maintenance but the award and entitlement information is for viewing only. You cannot apply the awards or entitlements to the transaction from this screen.
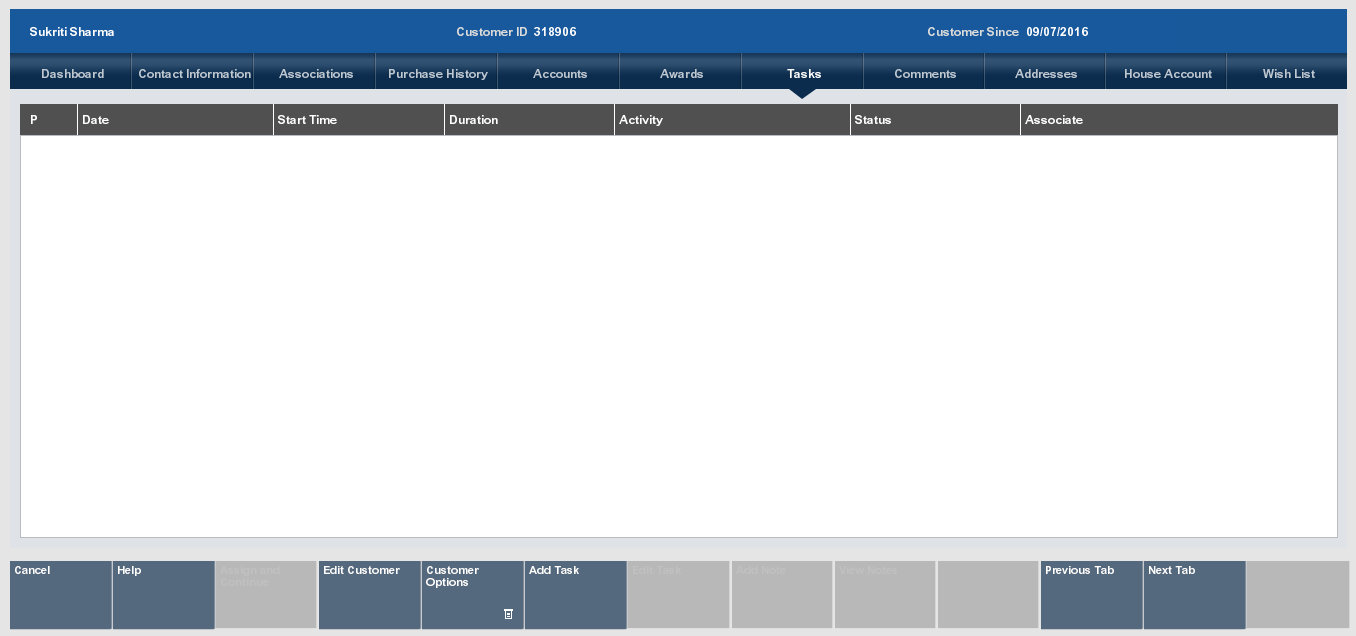
The Tasks tab displays all tasks associated with the customer.
This tab displays the following information for each task:
Priority - Importance of the task: high, medium, or low.
Date - Date the task should begin.
Start Time - Time the task should begin.
Duration - Length of time designated for the task.
Activity - Type of task.
Status - Indicates the progress of the task.
Associate - The employee or employee group responsible for completing the task.
The status field can have one of the following values for a task:
Open - The task is open, but not started.
In Progress - The task has been started, but not completed.
Cancelled - The task has been cancelled and cannot be reopened or edited.
Closed - The task has been completed and cannot be reopened or edited.
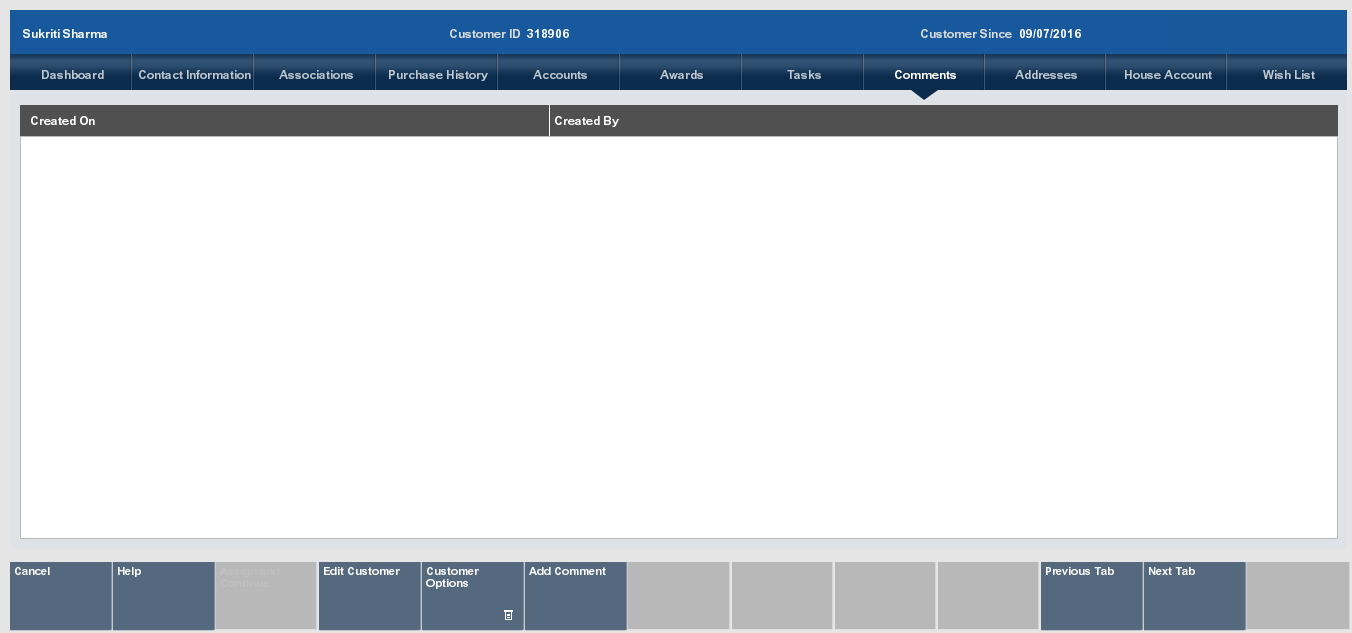
The Comments tab shows any comments associated with this customer.
This tab displays the following information for each comment:
Created on - Information about when the comment was created, and the comment itself.
Created by - ID of the employee who entered the comment.
To add a comment:
If necessary, click Save Changes to save the customer record.
|
Note: When creating a new customer, comments cannot be added until the information for the new customer has been saved. |
Click Add Comment.
An Add Comment window opens.
Enter the comment.
Click OK.
The comment is saved and added to the customer record.
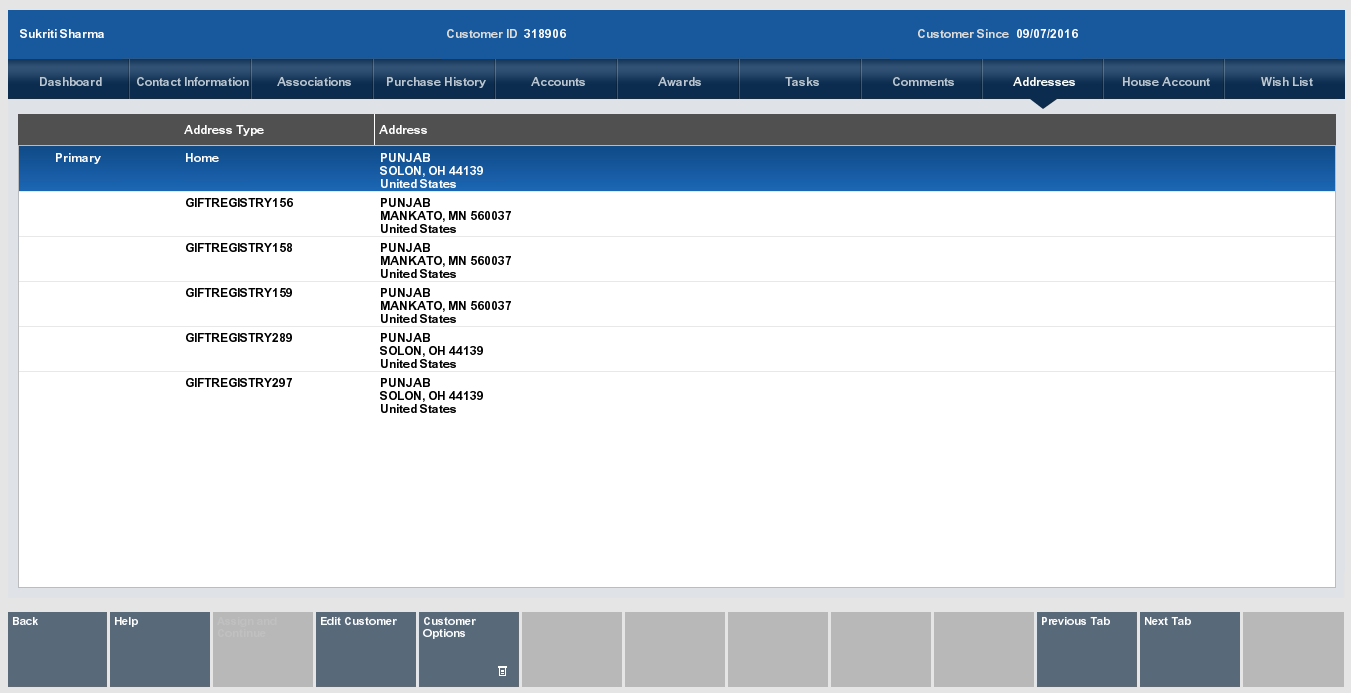
The Addresses tab shows all the addresses associated with the customer, and provides the ability to add new addresses as needed; for example, a work location or vacation home address.
This tab displays the following information for each customer address:
Address Type - Type of address. For example, Home, Work, or Primary.
Address - The address.
To make changes to the addresses for a customer, perform the appropriate procedure:
Add an Address - Add an address to a customer record.
Edit an Address - Edit an address assigned to a customer record.
Designate a Primary Address - Change the primary address for a customer.
Delete an Address - Remove an address from a customer record.
To add an address for a customer:
Click Add Address.
An Add Customer Address window opens.
If necessary, change the country for the address. Change Country.
If it is available, use Address Lookup to find the address.
If necessary, enter the address information:
|
Note: Required fields are marked with a red triangle in the upper-left corner. |
Address - The first and second lines of the address.
Zip - Postal or zip code for the address.
State - State or province for the address.
City - City for the address.
Apartment - Apartment for the address.
Country - Country of the address. Click the Change Country button to change this value. See Change Country.
Type - Type of address (for example, Home, Work, or Vacation).
Click Process.
The address is added to the list of customer addresses.
To edit an address for a customer:
Select the address to edit in the list of addresses:
Click the address.
Use the up and down arrows to highlight the correct address, then press the Spacebar.
Click Edit Address.
An Edit Customer Address window opens.
If it is available, use Address Lookup to find the address.
If necessary, make changes to the address information:
|
Note: Required fields are marked with a red triangle in the upper-left corner. |
Address - The first and second lines of the address.
Zip - Postal or zip code for the address.
State - State or province for the address.
City - City for the address.
Apartment - Apartment for the address.
Country - Country of the address. Click Change Country to change this value. See Change Country.
Type - Type of address (for example, Home, Work, or Vacation).
Click Process.
The address is added to the list of customer addresses.
To change the primary address for a customer:
Select the address to set as the primary address in the list of addresses:
Click the address.
Use the up and down arrows to highlight the correct address, then press the Spacebar.
Click Set Primary Address.
Xstore Point of Service opens a confirmation prompt.
Click Yes in the confirmation prompt.
|
Note: Click No if it is the incorrect address. Xstore Point of Service returns to the Addresses tab. |
The address is set as the primary address for the customer. The new primary address is displayed on the top of the list of customer addresses.
To delete an address from a customer record:
Select the address to delete in the list of addresses:
|
Note: You cannot delete the primary address for the customer. |
Click the address.
Use the up and down arrows to highlight the correct address, then press the Spacebar.
Click Delete Address.
Xstore Point of Service opens a confirmation prompt.
Click Yes in the confirmation prompt to delete the address.
|
Note: Click No to return to the Addresses tab without deleting an address. |
The address is deleted from the customer record.
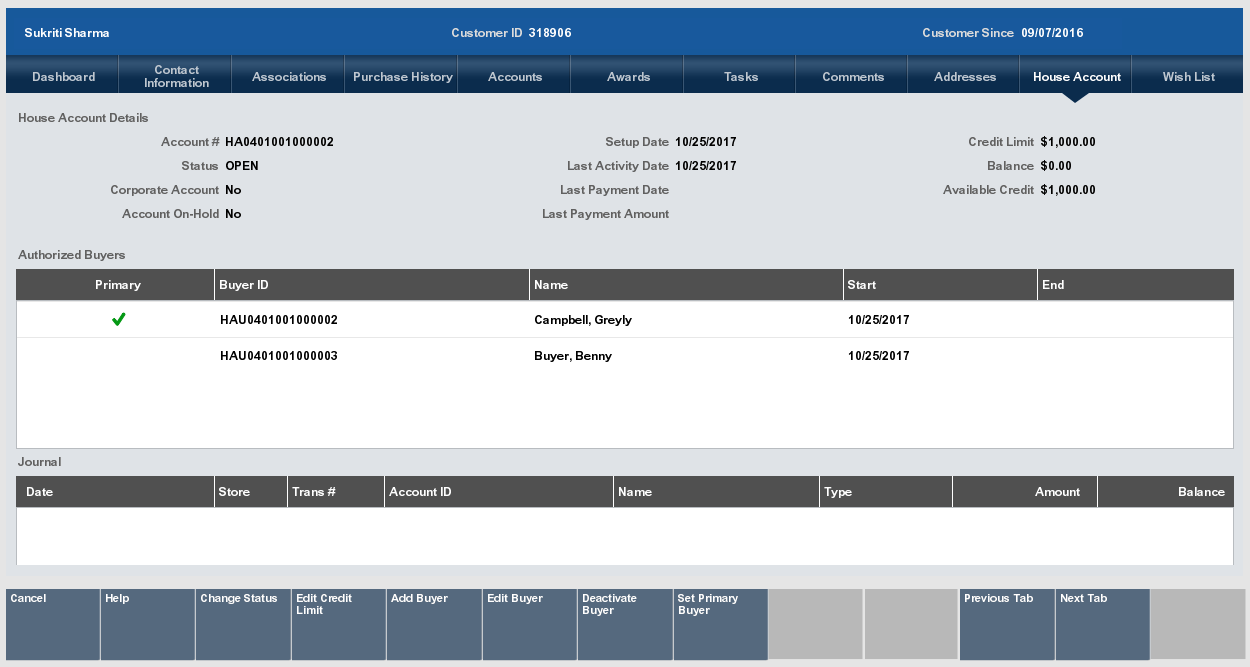
The House Account tab displays the following types of information about the customer's house account:
House Account Details - Details about the house account.
Authorized Buyers - Information about each buyer authorized to use the house account.
Journal - Information about each activity performed on the house account.
|
Note: This information is only available for customers who have set up a valid house account. |
To make changes to the information in the House Account tab:
Change House Account Status - Change the status of a house account.
Change House Account Limit - Change the credit limit for a house account.
Change Authorized Buyers - Make changes to the authorized buyers associated with a house account.
This section displays the following information about the house account:
Account # - ID number for the house account.
Status - Status of the account: OPEN, HOLD, or CLOSED.
Corporate Account - If Yes, this is a corporate House Account and cannot be changed.
Account On-Hold - If Yes this account cannot be used for purchases; however, payments can be made on the account.
Setup Date - Date the account was created.
Last Activity Date - Date of the most-recent activity on the account.
Last Payment Date - Date of the most-recent payment on the account.
Last Payment Amount - Most-recent payment amount on the account.
Credit Limit - Credit limit on the account.
Balance - Balance amount on the account.
Available Credit - Difference between the credit limit and the outstanding balance on the account that is available for purchases.
This section displays the following information about the people authorized to use the house account:
Primary - A green check mark is displayed in this column for the primary authorized buyer for the account.
Buyer ID - House account ID of the buyer.
Name - Name of the buyer.
Start - Date on which the buyer is first permitted to use the account.
End - Date on which the buyer is no longer permitted to use the account.
This section displays the following information for each activity performed on the account:
Date - Date of the activity.
Store - ID of the store where the activity took place.
Trans # - ID number for the transaction in which the activity took place.
Account ID - ID of the house account.
Name - Name of the customer.
Type - Type of activity performed.
Amount - Amount of the activity.
Balance - Balance of the account following the activity.
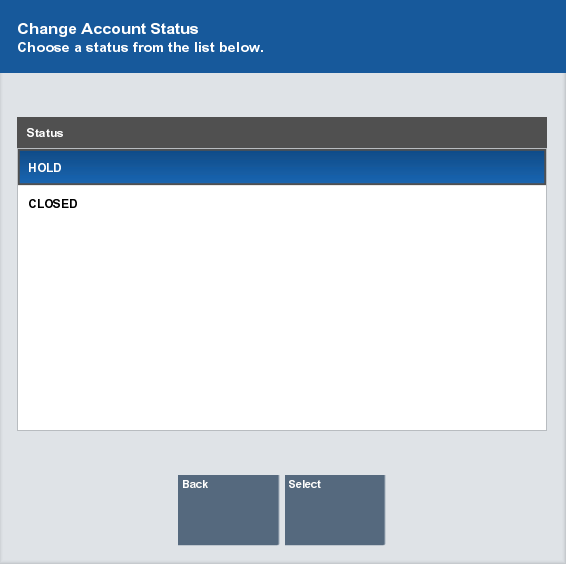
To make changes to a customer's house account:
Select Change Status.
A Change Account Status window opens.
Select the new status for the account:
HOLD - The authorized buyer cannot use the account for new purchases, but can make payments on the account. The edit options for account limit and authorized buyer options are not available for accounts that are on hold.
CLOSE - The house account is no longer available for any activity.
REINSTATE - An account with a status of HOLD can be activated again by selecting this option.
OPEN - An account with a status of CLOSED can be activated again by selecting this option.
Click Select.
The status of the house account is changed.
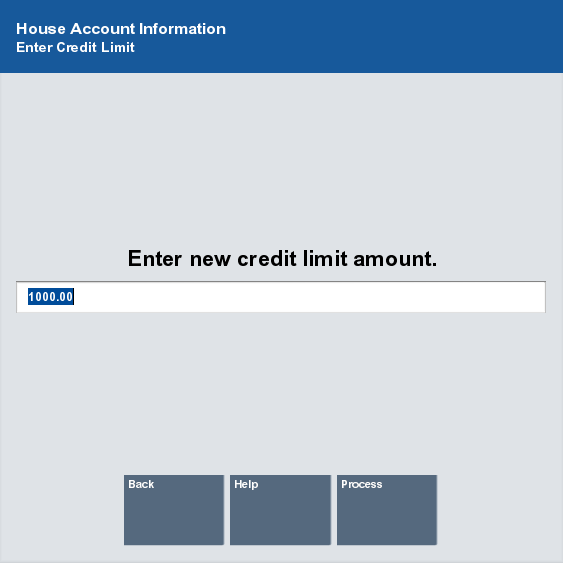
To change the credit limit for a house account:
Click Edit Credit Limit.
A House Account Information window opens with the current credit limit for the account.
Enter the new credit limit for the house account.
Click Process.
The credit limit for the house account is changed to the new value.
A house account can have more than one buyer associated with it. To make changes to the authorized buyers for a house account, use the appropriate procedure:
Add an Authorized Buyer - Add an authorized buyer to a house account.
Edit an Authorized Buyer - Edit information for an authorized buyer.
Deactivate an Authorized Buyer - Deactivate an authorized buyer.
Designate a Primary Buyer - Change the primary buyer to another person.
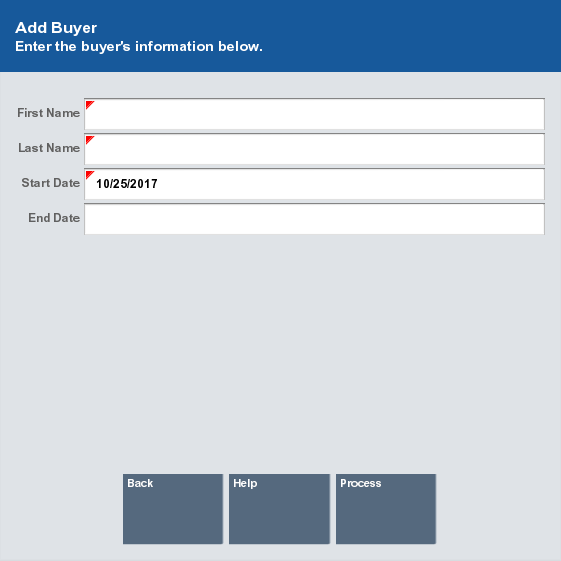
To add an authorized buyer to a house account:
Click Add Buyer.
An Add Buyer window opens.
Enter the information for the buyer:
|
Note: Required fields are marked with a red triangle in the upper-left corner of the field. |
First Name - First name of the new buyer.
Last Name - Last name of the new buyer.
Start Date - Date on which the buyer will first be permitted to use the house account.
End Date - Date on which the buyer will no longer be permitted to use the house account.
Click Process.
The name of the new authorized buyer is listed in the Authorized Buyers section of the House Account tab.
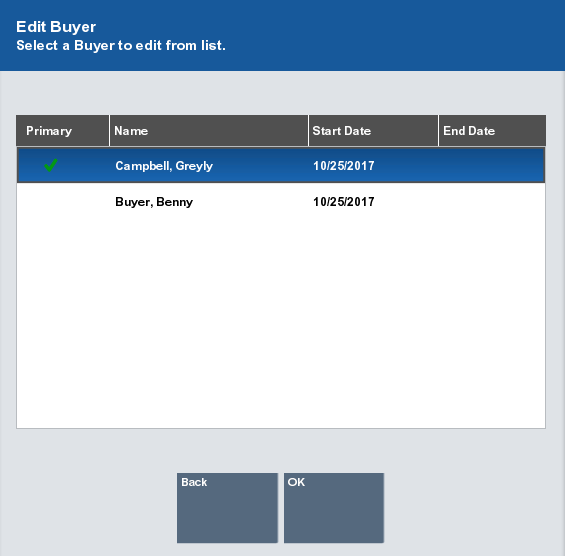
To edit an authorized buyer associated with a house account:
Click Edit Buyer.
An Edit Buyer window opens.
Select the buyer to edit:
Click the buyer.
Use the up and down arrows to highlight the correct buyer, then press the Spacebar.
Select OK.
Enter the updates for the buyer:
|
Note: Required fields are marked with a red triangle in the upper-left corner of the field. |
First Name - First name of the buyer.
Last Name - Last name of the buyer.
Start Date - Date on which the buyer will first be permitted to use the house account.
End Date - Date on which the buyer will no longer be permitted to use the house account.
Click Process.
The information for the buyer is updated in Xstore Point of Service.
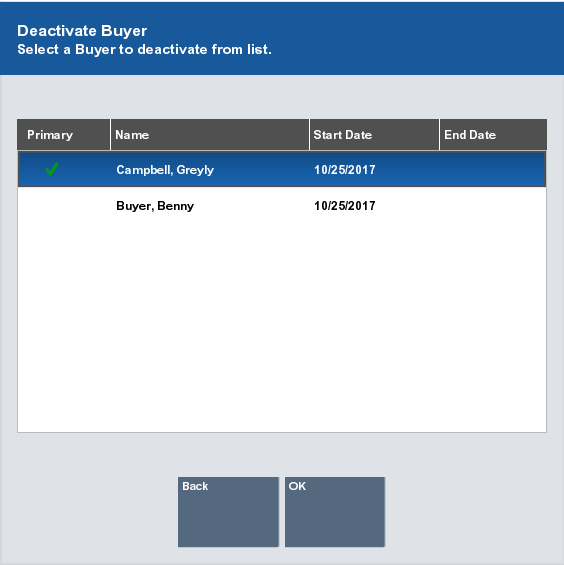
To deactivate an authorized buyer associated with a house account:
Click Deactivate Buyer.
A Deactivate Buyer window opens.
Select the buyer to deactivate:
Click the buyer.
Use the up and down arrows to highlight the correct buyer, then press the Spacebar.
Select OK.
The End Date for the selected buyer is set to today's date.
To change the primary buyer for a house account:
Click Set Primary Buyer.
A Set Primary Buyer window opens.
Select the buyer to designate as the primary buyer:
Select the buyer.
Use the up and down arrows to highlight the correct buyer, then press the Spacebar.
Select OK.
The selected buyer is designated as the primary buyer and moved to the top of the Authorized Buyers list, with a green check mark next to their name. The list is sorted alphabetically below the primary buyer's name.
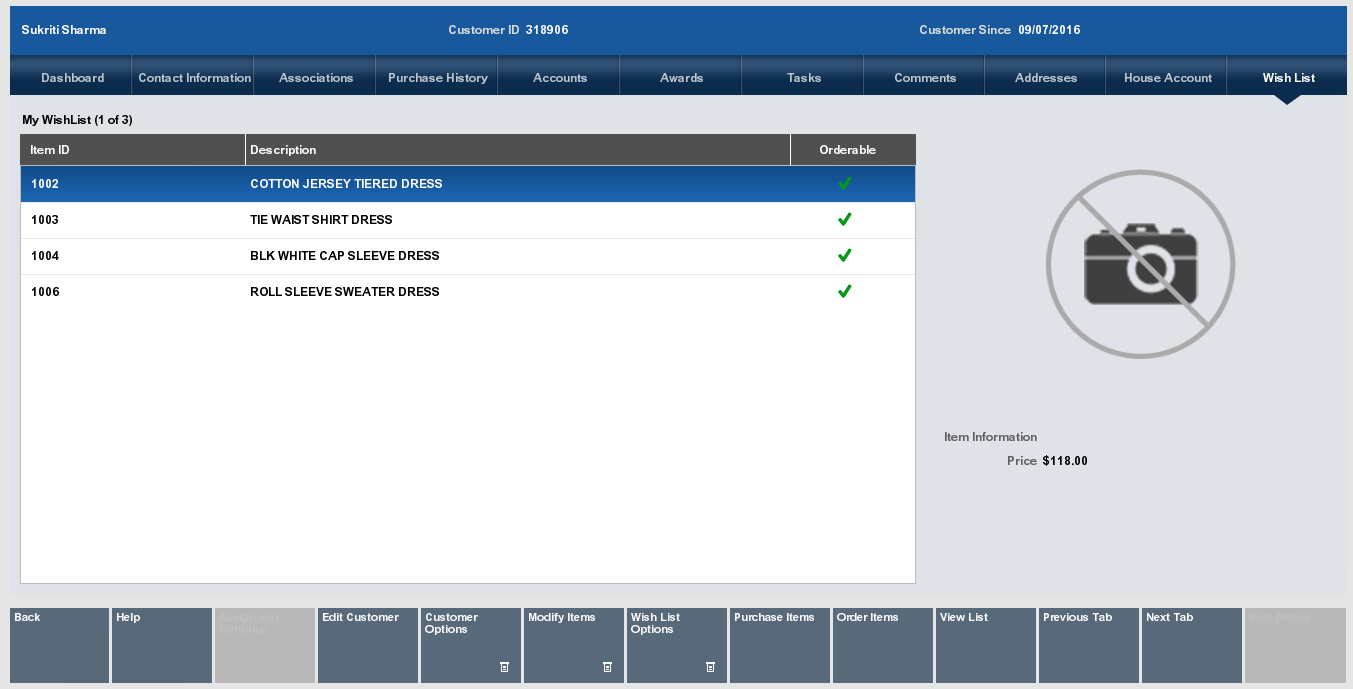
If Xstore Point of Service is integrated with Oracle Retail Customer Engagement, this tab displays any items in the customer's personal wish list. A customer account may have multiple wish lists associated with it, but only one wish list can be viewed at a time. To view another wish list, select the Wish List Options button then select Another Wish List option.
This tab displays the following information for each wish list item:
Item ID - ID of the item.
Description - Description of the item.
Date Added - Date the item was added to the wish list.
Orderable - Indicates whether the item can be ordered.
Image - A picture of the item (if available).
The following functions can be performed in the Wish List tab:
View Additional Item Information - View more detailed information about an item.
Add a Wish List Item - Scan an Item - Add an item to the wish list by scanning the item.
Add a Wish List Item - Search for an Item - Add an item to the wish list by searching for the item.
Remove Wish List Items - Remove items from the wish list.
Print a Wish List - Print a list of the items in the wish list.
To view additional information about an item:
Select an item in the list:
Click Item Info.
To add an item to a wish list:
If necessary, click Save Changes.
|
Note: When creating a new customer, wish list items cannot be added until the information for the new customer has been saved. |
Scan the item.
Verify the added item displays on the wish list. The newly added item appears at the top of the list.
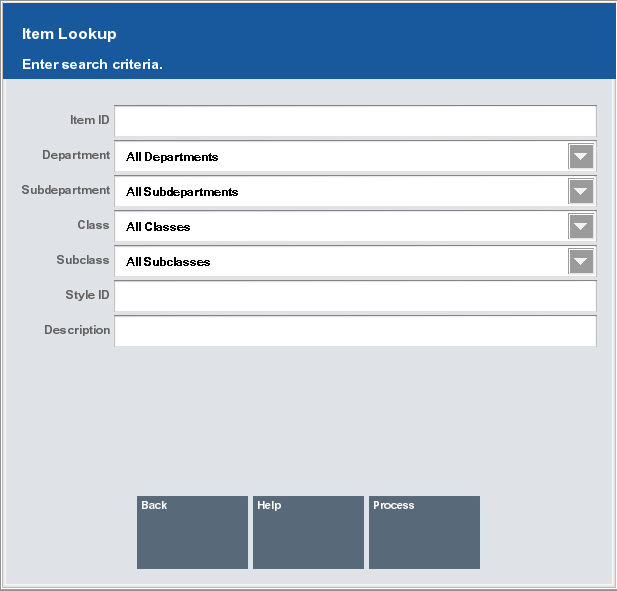
To add items to a wish list:
If necessary, click Save Changes.
|
Note: When creating a new customer, wish list items cannot be added until the information for the new customer has been saved. |
Click Add Items.
Enter the search criteria:
Item ID - ID of the item.
Department - Department to which the item belongs.
Subdepartment - Subdepartment to which the item belongs.
Class - Class to which the item belongs.
Subclass - Subclass to which the item belongs.
Style ID - ID of a style for the item.
Description - Content within the description of the item.
Click Process.
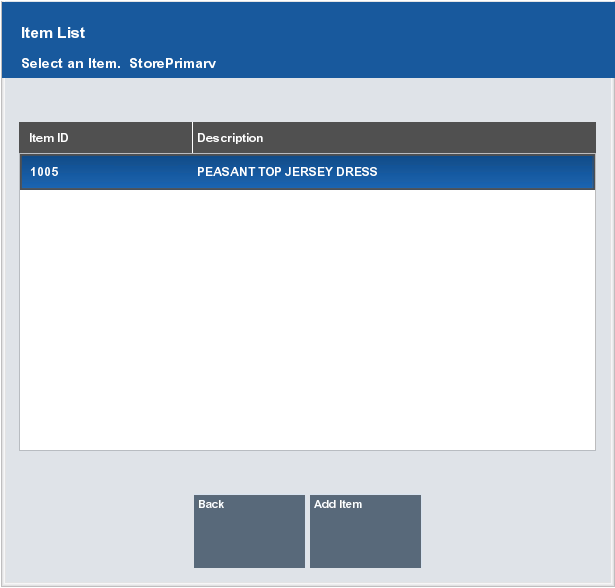
Select an item in the list:
Click the item.
Use the up and down arrows to highlight the correct item, then press the Spacebar.
Click Add Item.
Verify the added item displays on the wish list. The newly added item appears at the top of the list.
To remove items from the wish list:
Click Remove Items.
Xstore Point of Service opens a list of items in the wish list.
Select the items in the list:
Click the item.
Use the up and down arrows to highlight the correct item, then press the Spacebar.
Click Select All to select all items in the list.
Click Remove Items.
Xstore Point of Service opens a confirmation prompt.
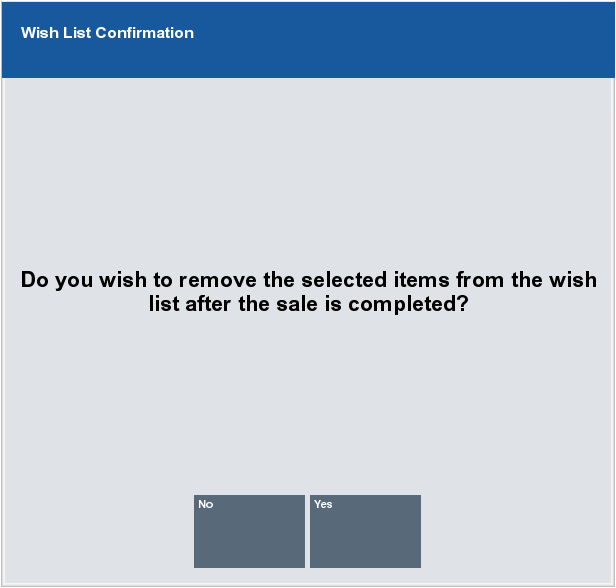
Select whether to remove the items:
Click Yes to remove the items and return to the Wish List tab.
Click No to return to the Wish List tab without removing items.
If Xstore Point of Service uses Retail Extension Module (RXM), this tab displays any items the customer has in their digital shopping cart. The Digital Cart tab includes the following information:
Item List - Items in the customer's digital cart.
Item Information - Information about a selected item.
To remove items from the digital cart, see Remove Digital Cart Items.
The item list displays the following information for each item in the list:
Item ID - ID of the item.
Description - Description of the item.
Quantity - Quantity of the item.
In Stock - Number of items in stock.
Orderable - A green check mark in an item row indicates that the item can be ordered.
The Item Information section displays the following information about the item selected in the Item List:
Picture of the item (if available).
Price - Price of the item.
Style - ID of the item style (if available).
Item dimensions (if available).
To remove items from the digital cart:
Click Remove Items.
Xstore Point of Service opens a list of items in the digital cart.
Select the items in the list:
Click the item.
Use the up and down arrows to highlight the correct item, then press the Spacebar.
Click Select All to select all items in the list.
Click Remove Items.
Xstore Point of Service opens a confirmation prompt.
Select whether to remove the items:
Click Yes to remove the items and return to the Digital Cart tab.
Click No to return to the Digital Cart tab without removing items.
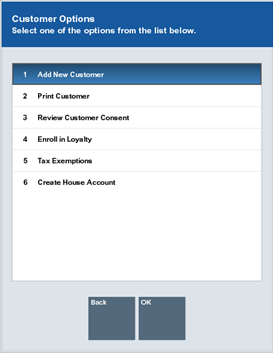
Click Customer Options to perform the actions in this section.
This includes the following options:
To add a new customer:
Click Add New Customer in the Customer Options window.
Follow the steps in Add a Customer Record.
This option is only shown when (UNKNOWN STEP NUMBER) Customer Information Consent functionality is enabled.
To access the consent preferences:
Select Review Customer Consent in the Customer Options window. See Figure 5-3.
Update the relevant check boxes as required.
Select Accept. The terms and conditions print on the receipt for the customer to sign manually and a prompt is displayed to confirm the customer acknowledges the terms and conditions. Ask the customer to sign the receipt. See Figure 5-4.
Select Yes to confirm the customer has acknowledged the terms and conditions, and signed the receipt. The customer's acceptance is associated to the customer record.
A confirmation screen is displayed indicating that the customer's consent selections have been updated in the system. Select OK to continue.
Many stores offer Loyalty Programs to their customers. A Loyalty Program typically offers benefits (such as savings) to the customer and provides the store with information about customer shopping preferences.
The store may offer various levels of programs that are available to customers.
To enroll a customer in a loyalty program:
Click Enroll in Loyalty in the Customer Options window.
Xstore Point of Service prompts whether to add the customer to a loyalty program. See Figure 2-8.
Select whether to add the customer to a loyalty program:
Scan or enter the card number, the click Process to add the customer to the loyalty program (card-centric programs).
Click Yes to add the customer to the loyalty program (non-card-centric programs).
Click Not Now to not add the customer to the loyalty program, but open the prompt the next time the customer performs a transaction.
Click Never to not add the customer to the loyalty program and never ask the customer again.
Click Save Changes to save the new loyalty configuration for the customer.
Loyalty values are accumulated according to the rules for each individual program. Rules for assigning points and awards are defined in Oracle Retail Customer Engagement. Swiping or entering a loyalty card number during a transaction records the customer's participation in the program so that the loyalty values may be adjusted in the system.
To manage customer tax exemptions in Xstore Point of Service, perform the proper procedure:
To add a tax exemption to a customer record:
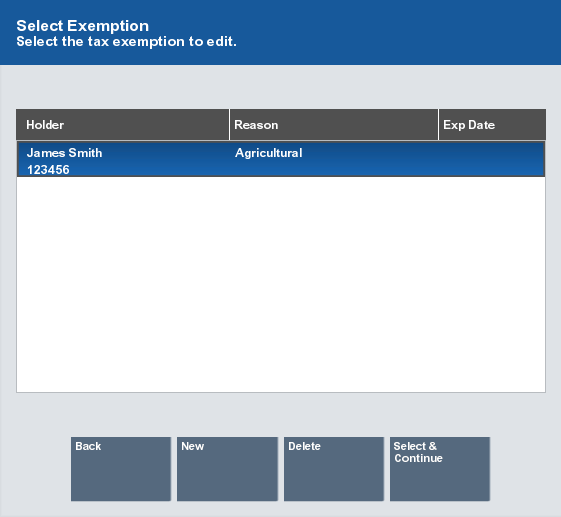
Click Tax Exemptions in the Customer Options window.
The Select Exemption window opens.
Select New.
A blank Customer Tax Exempt window opens.
Enter the information for the tax exemption:
|
Note: Required fields are marked with a red triangle in the upper-left corner. |
Certificate # - ID number for the certificate.
Certificate Holder - Name of the entity to whom the certificate belongs.
State - If applicable, the state or province to which the certificate belongs.
Expiration Date - Expiration date of the certificate.
Select Save Changes.
A Reason Code window opens.
Select the reason for adding the tax exemption:
Click the reason.
Use the up and down arrows to highlight the correct reason, then press the Spacebar.
Select OK.
The Tax Exemption is added to the system and associated with the customer.
To edit an existing tax exemption:
Click Tax Exemptions in the Customer Options window.
The Select Exemption window opens. See Figure 5-28.
Select the tax exemption:
Click the tax exemption.
Use the up and down arrows to highlight the correct tax exemption, then press the Spacebar.
Click Select & Continue.
The tax exemption opens in a Customer Tax Exempt window.
Make any necessary changes to the tax exemption:
|
Note: Required fields are marked with a red triangle in the upper-left corner. |
Certificate # - ID number for the certificate.
Certificate Holder - Name of the entity to whom the certificate belongs.
State - If applicable, the state or province to which the certificate belongs.
Expiration Date - Expiration date of the certificate.
Select Save Changes.
A Reason Code window opens.
Select the reason for the changes to the tax exemption:
Select the reason.
Use the up and down arrows to highlight the correct reason, then press the Spacebar.
Click OK.
The changes to the Tax Exemption saved in the system.
To delete a tax exemption:
Click Tax Exemptions in the Customer Options window.
The Select Exemption window opens. See Figure 5-28.
Select the tax exemption:
Click the tax exemption.
Use the up and down arrows to highlight the correct tax exemption, then press the Spacebar.
Click Delete.
|
Caution: There is no confirmation prompt after clicking Delete. Double-check that you have selected the correct tax exemption before deleting it. |
The tax exemption is deleted from the system.
To create a house account for a customer:
Click Create House Account in the Customer Options window.
The House Account Credit Limit window opens with the default initial credit limit for a house account.
If necessary, change the initial credit limit for the house account.
Click Process.
The house account is created with the customer as the primary buyer.