| Oracle® Retail Xstore Point of Service User Guide Release 20.0 F35716-05 |
|

 Previous |
 Next |
During a transaction you may need to make changes to a transaction or the items in it. This includes the following procedures:
Add Non-merchandise Items to a Sale - Add non-merchandise items to a sale, such as gift cards, item alterations, or having an item gift wrapped.
Remove a Customer - Remove the customer assigned to a transaction.
Modify a Line Item - Make changes to a line item in a transaction.
Suspend a Transaction - Suspend a transaction to be resumed later.
Resume a Transaction - Resume a suspended transaction.
Cancel a Transaction - Cancel a transaction.
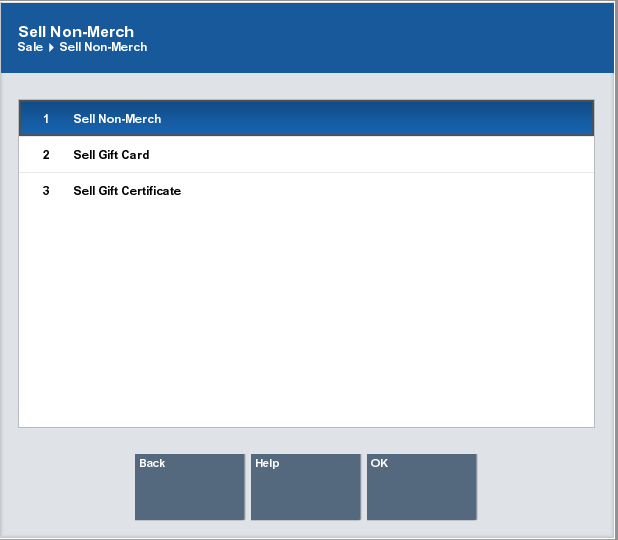
To add non-merchandise items to a sale transaction (for example, a gift card, alteration, or gift wrapping service):
Click Sell Non-Merch in the Register Sale screen.
The Sell Non-Merch window opens.
Select the type of non-merchandise item to sell:
Click the type of non-merchandise item.
Use the up and down arrows to highlight the correct type of non-merchandise item, then press the Spacebar.
Enter the number associated with the type of non-merchandise item.
Click OK.
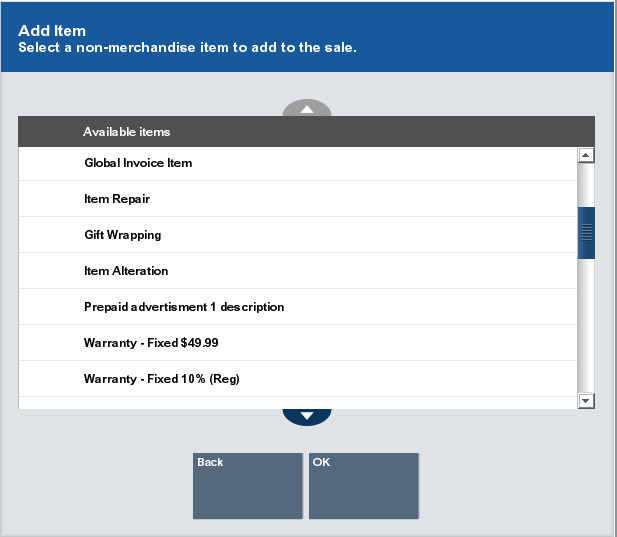
If necessary, select the item in the list:
Click the non-merchandise item.
Use the up and down arrows to highlight the correct non-merchandise item, then press the Spacebar.
Enter the number associated with the non-merchandise item.
Click OK.
If necessary, enter the amount of the item.
Press Enter.
The item is added to the View Port. Continue the transaction.
The procedure for removing a customer from a transaction depends upon whether the system is on a touchscreen system or a non-touchscreen system:
To remove a customer from a transaction:
Swipe from left to right in the Customer Loyalty banner.
An Unassign button appears.
Tap Unassign to remove the customer.
The customer is removed from the transaction.
|
Note: Tap anywhere other than the Unassign button to cancel the operation. |
To modify a line item in a sale:
Click Change Item in the Register Sale screen.
Perform the appropriate procedure:
Change Item Quantity - Change the quantity of the item.
Change Item Price - Change the price of an item.
Void an Item - Remove an item from the transaction.
Change the Commissioned Associate - Change the commissioned associate for the transaction.
Add a Line Item Comment - Add a comment to a line item.
Edit a Line Item Comment - Edit the comment for a line item.
Change the Tax for an Item - Change the tax associated with an item.
Click Change Quantity.
If necessary, select the item for which to change the quantity:
|
Note: If there is only one item in the transaction, Oracle Retail Xstore Point of Service will immediately prompt for the new quantity (go to Step 4). |
Press Enter.
Xstore Point of Service prompts for the new quantity.
Enter the new quantity.
Press Enter.
The item quantity is changed. Continue the transaction.
To change the price of an item:
Click Change Price.
If necessary, select the item for which to change the price:
|
Note: If there is only one item in the transaction, Oracle Retail Xstore Point of Service will immediately prompt for the new price (go to Step 4). |
Press Enter.
Xstore Point of Service prompts for the new price.
Enter the new price.
Press Enter.
The item price is changed. Continue the transaction.
The method for voiding an item depends upon whether the system is a touchscreen system or a non-touchscreen system.
To void an item:
Swipe from left to right on the item to void.
A Void button opens.
Tap Void to remove the item.
|
Note: To cancel the void, either tap anywhere else on the screen, or wait a few seconds for the button to disappear. |
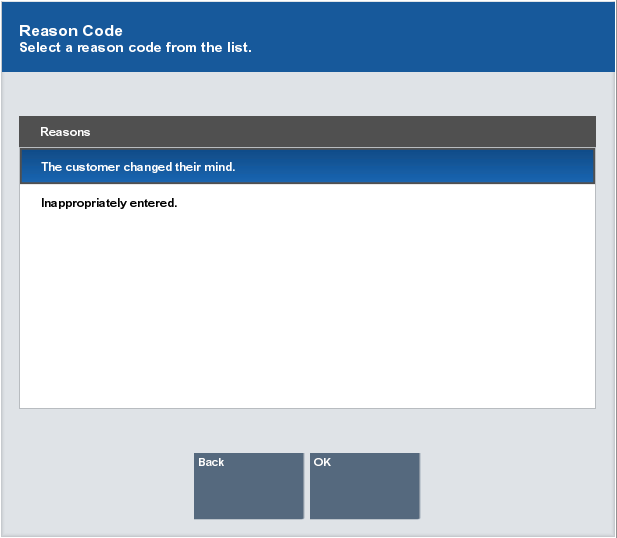
If necessary, tap the reason for the void to select it.
Tap OK.
The item is voided from the transaction.
To void an item:
Click Void Item.
If necessary, select the item for which to change the quantity:
|
Note: If there is only one item in the transaction, Oracle Retail Xstore Point of Service will immediately void that item (go to Step 4 or continue the transaction). |
Press Enter.
If necessary, select the reason for the void:
Click the reason.
Use the up and down arrows to highlight the reason then press the Spacebar.
Click OK.
The item quantity is changed. Continue the transaction.
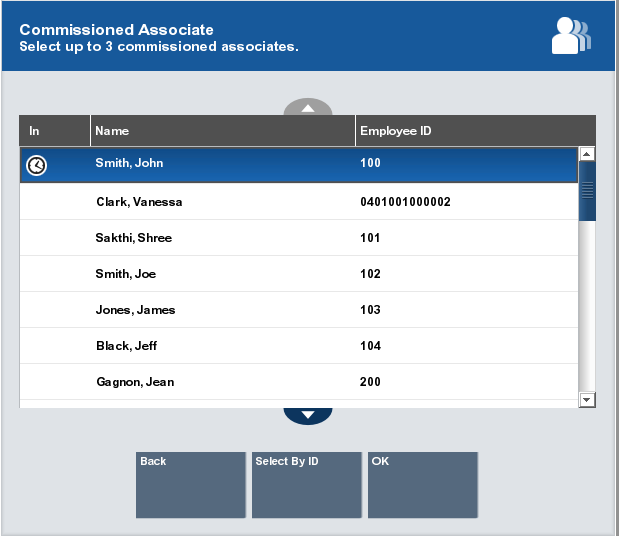
To change the commissioned associate for an item:
Click Change Associates.
If necessary, select the item for which to change the commissioned associate:
|
Note: If there is only one item in the transaction, Oracle Retail Xstore Point of Service will immediately select that item (go to Step 4). |
Press Enter.
Xstore Point of Service opens a list of associates.
Select the new commissioned associate from the list:
|
Note: Depending upon the configuration of your system, you may be able to assign more than one commissioned associate to an item. |
Click the associate. Continue with Step 5.
The commissioned associate for the item is updated.
Use the up and down arrows to highlight the associate then press the Spacebar. Continue with Step 5.
The commissioned associate for the item is updated.
Click Select By Associate ID and continue with Step 6.
Click OK.
The commissioned associate for the item is updated. Continue the transaction.
If you clicked Select By Associate ID in Step 4, enter the ID of the associate:
Enter the associate ID in the Commissioned Associate prompt.
Press Enter.
The commissioned associate for the item is updated. Continue the transaction.
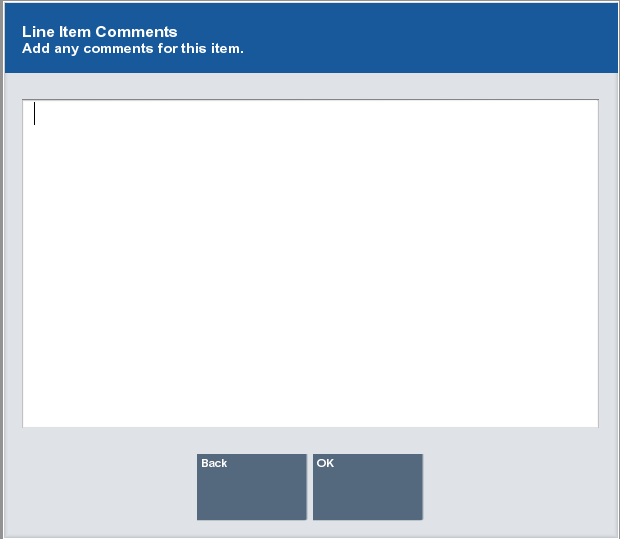
To add a line item comment.
Click Add/Edit Line Item Comments.
If necessary, select the item for which to add the comment:
|
Note: If there is only one item in the transaction, Oracle Retail Xstore Point of Service will immediately select that item (go to Step 3). |
Xstore Point of Service prompts for the comment.
Enter the comment.
Click OK.
The comment is added to the line item. Continue the transaction.
To edit a line item comment.
Click Add/Edit Line Item Comments.
Select the comment to edit:
Click the comment in the View Port.
Use the up and down arrows to highlight the comment in the View Port.
Xstore Point of Service opens a prompt with the existing comment.
Edit the text of the comment.
Click OK.
The comment is updated for the line item. Continue the transaction.
To change the tax for an item:
|
Note: The item tax cannot be changed on an item in an Order Broker order. |
Click Change Item Tax.
Select the type of tax change, then follow the appropriate procedure:
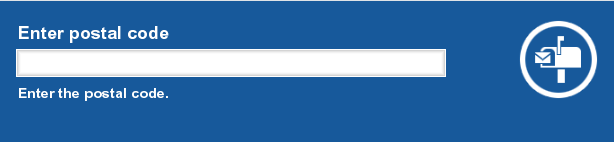
To change the tax location for an item:
Click Change Item Tax Location.
If necessary, select the item for which to change the tax location:
|
Note: If there is only one item in the transaction, Oracle Retail Xstore Point of Service will immediately select that item (go to Step 3). |
Press Enter.
Xstore Point of Service prompts for the postal code of the tax location.
Enter the postal code for the new tax location.
Press Enter.
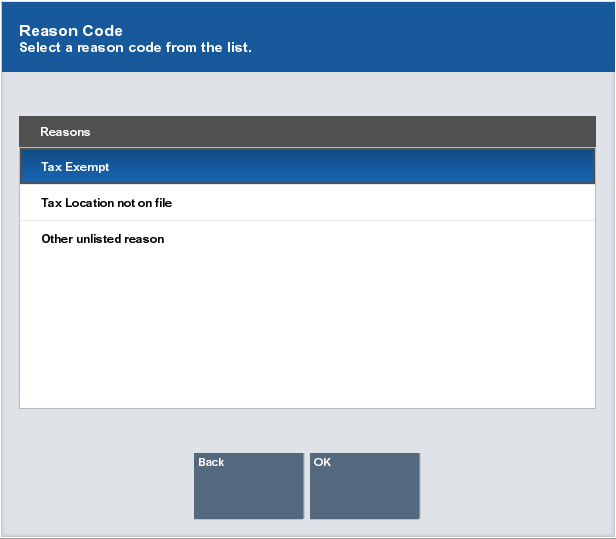
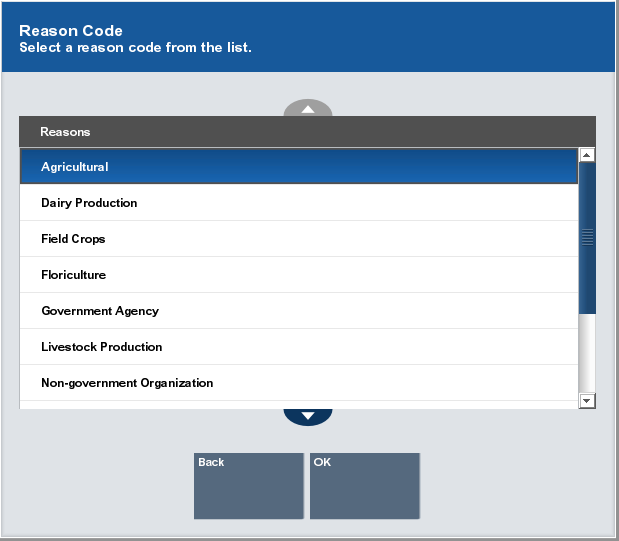
If necessary, select the reason for the tax location change:
Click the reason.
Use the up and down arrows to highlight the reason then press the Spacebar.
Click OK.
The tax location is changed and the tax amount is changed to the tax for the new location. Continue the transaction.
To change the tax amount for an item:
Click Change Item Tax $.
If necessary, select the item for which to change the tax amount:
|
Note: If there is only one item in the transaction, Oracle Retail Xstore Point of Service will immediately select that item (go to Step 3). |
Press Enter.
Xstore Point of Service prompts for the new tax amount.
Enter the new amount of tax for the item.
Press Enter.
If necessary, select the reason for the tax amount change:
Click the reason.
Use the up and down arrows to highlight the reason then press the Spacebar.
Click OK.
The tax amount for the item is changed. Continue the transaction.
To change the tax percentage for an item:
Click Change Item Tax %.
If necessary, select the item for which to change the tax percentage:
|
Note: If there is only one item in the transaction, Oracle Retail Xstore Point of Service will immediately select that item (go to Step 3). |
Press Enter.
Xstore Point of Service prompts for the new tax percentage:
Enter the new percentage of tax for the item.
Press Enter. Continue with Step 8.
Select the new tax group:
Click the tax group.
Use the up and down arrows to highlight the tax group.
Click OK.
If necessary, select the reason for the tax percentage change:
Click the reason.
Use the up and down arrows to highlight the reason then press the Spacebar.
Click OK.
The tax percentage for the item is changed. Continue the transaction.
To set an item as tax exempt:
Click Exempt Item Tax.
If necessary, select the item to exempt from tax:
|
Note: If there is only one item in the transaction, Oracle Retail Xstore Point of Service will immediately select that item (go to Step 3). |
If necessary, pick the tax to exempt from a list of taxes:
Click the tax.
Use the up and down arrows to highlight the tax.
If you selected a tax to exempt, click OK.
Perform the appropriate next step:
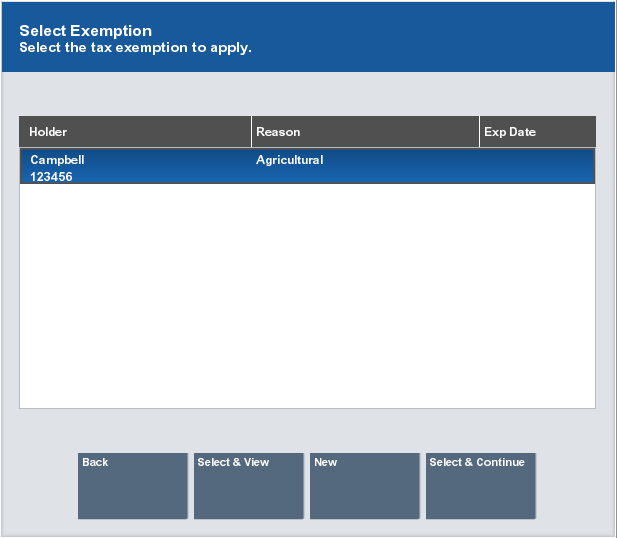
If necessary select the tax exemption certificate to apply to the transaction:
Click the tax exemption certificate.
Use the up and down arrows to highlight the tax exemption certificate.
Select the appropriate option:
Click Select & Continue to apply the selected tax exemption certificate to the item and continue the transaction. An ”E” appears next to the item in the View Port.
Click Select & View to view the selected tax exemption certificate and, if necessary, make changes (see Step 10).
Click New to enter a new tax exemption certificate. Continue with Step 8.
If necessary, select the reason for the tax percentage change:
Click the reason.
Use the up and down arrows to highlight the reason then press the Spacebar.
Click OK.
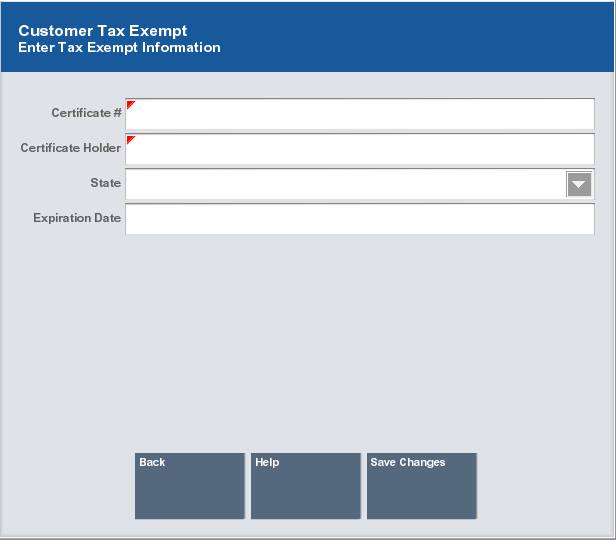
Enter the tax exemption information:
|
Note: Depending on the configuration of your system, the fields in the tax exemption entry form may be different that those listed.A red triangle appears in the upper-left corner of required fields. |
Certificate #: ID number for the tax exemption certificate.
Certificate Holder: Entity that owns the tax exemption certificate.
State: State or province where the certificate is valid.
Expiration Date: Certificate expiration date.
Click Save Changes.
The tax exemption is applied to the item. Continue the transaction. An ”E” appears next to the item in the View Port.
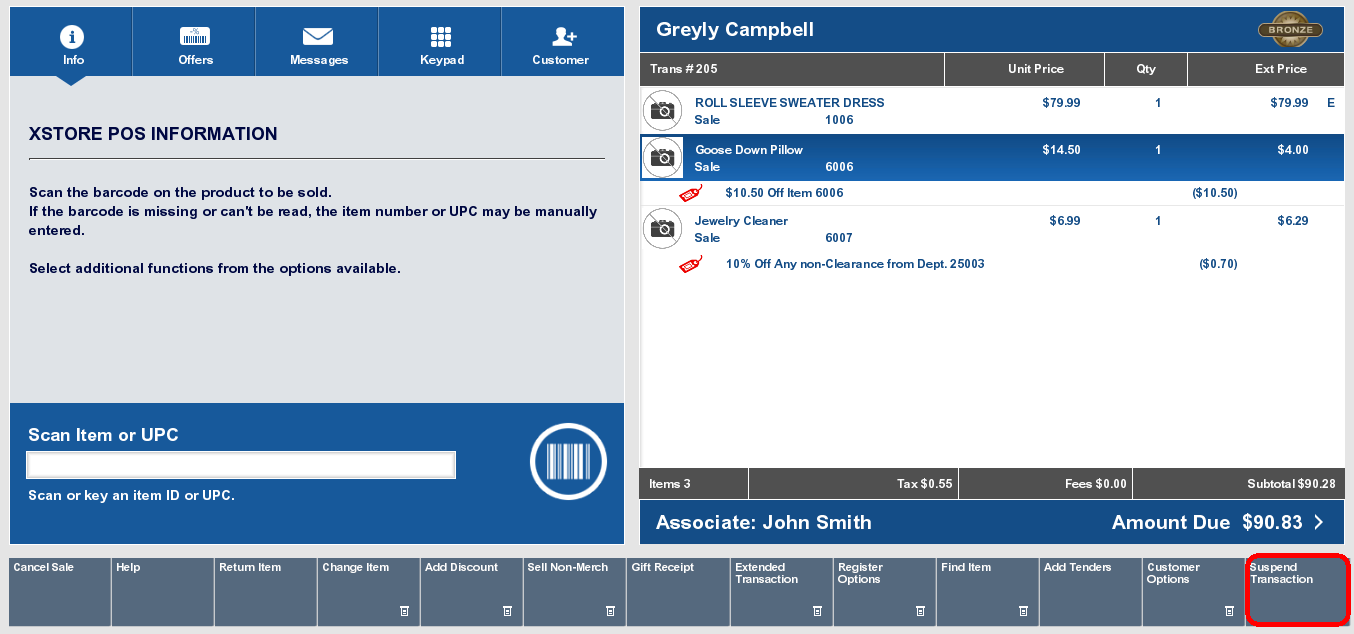
Click Suspend Transaction to suspend a transaction so that it can be resumed later.
The system may print a receipt for the suspended transaction. It can be used by the customer to resume their transaction when they return.
Xstore Point of Service returns to the Register screen.
Click Resume Transaction.
Xstore Point of Service opens a list of suspended transactions.
Select the transaction to resume:
Click OK.
If the system is an airside location, scan the customer's boarding pass.
The transaction resumes. Continue the transaction.
To cancel a transaction:
At any point in a transaction, press Esc until you return to the initial sale screen.
Cancel the sale:
Click Cancel Sale.
Press Esc.
If there are items in the sale, Xstore Point of Service prompts whether to cancel the sale.
Click Yes.
If necessary, select the reason for cancelling the sale:
Click the reason.
Use the up and down arrows to highlight the reason then press the Spacebar.
Click OK.
The transaction is cancelled.