12 Always-On Monitoring
The Enterprise Manager Always-On Monitoring provides the ability to monitor critical target status and metric alerts. The service continuously monitors critical targets through the Enterprise Manager Agent and can be easily configured to send email notifications for these events to administrators.
Always-On Monitoring can be configured to send notifications at any time, but is particularly useful when experiencing downtime of your central Enterprise Manager site for maintenance operations such as upgrade and patching.
The Always-On Monitoring is synchronized with Enterprise Manager to reuse the configuration of monitored targets as well as requisite notification data such as notification contacts and email gateway configuration. Once properly configured and synchronized, the service will receive alerts from Enterprise Manager Agents and send email notifications to the appropriate administrators.
This chapter covers the following topics:
12.1 Best Practices
Oracle recommends keeping an Always-On Monitoring instance running at all times regardless of whether Enterprise Manager is up or down. By telling the Always-On Monitoring to turn off notifications, you can have it run in the background while Enterprise Manager is up. During Enterprise Manager downtime, whether planned or unplanned, you can issue an emsctl command to tell Always-On Monitoring to restart notifications. The primary advantage to having Always-On Monitoring running at all times is that it will stay up to date with any changes made to your Enterprise Manager installation. Always-On Monitoring keeps itself in sync with Enterprise Manager by periodically running a synchronization job. This job runs every 24 hours by default, however the job execution time can be changed to meet the needs of your monitored environment.
You may also run Always-On Monitoring only when needed instead of having it run constantly in the background. However, doing so will require Always-On Monitoring to synchronize with the Enterprise Manager OMS. Depending on the size of your Enterprise Manager deployment, synchronization may take 10-15 minutes in order to obtain current information on all Enterprise Manager targets and metrics.
IMPORTANT:
Always-On Monitoring and Enterprise Manager must be in SYNC before Enterprise Manager goes down.12.2 Installing Always-On Monitoring
Prior to the installation of Always-On Monitoring, the following steps must be taken:
-
Install or identify an Oracle Database instance to hold the Always-On Monitoring repository
-
Create the user in the Always-On Monitoring repository
-
Save the EM key to the Enterprise Manager repository
Java Requirements
-
Ensure JAVA version 1.7 has been installed
-
JDK7 must be installed in the environment where the user will run Always-On Monitoring (including emsca). The JAVA_HOME environment variable must point to the JDK7 location.
12.2.1 Installing the Always-On Monitoring Repository Database
You must install and configure an Oracle database instance to house the Always-On Monitoring repository. Because you must create the schema for the repository separately, it is critical to have an idea of the space that needs to be allocated to the schema, and how the space is broken down.
Because the purpose of Always-On Monitoring is to continuously monitor and send notifications when Enterprise Manager is down, the Always-On Monitoring Repository database should be installed as a separate instance of Oracle with the Always-On Monitoring Schema on another machine so that Always-On Monitoring continues to run when the Enterprise Manager Repository is either being upgraded or unexpectedly goes down.
As is the case with the Enterprise Manager Repository, the Always-On Monitoring Repository needs to be installed on an Oracle 12.1.0.2.0 database with Bundle Patch 10 if Always-On Monitoring is on a separate instance or machine.
For multitenant environments, when creating a user in a multitenant container database (CDB) and not in one of its constituent pluggable databases (PDB), then the user has to be prefixed by "C##".
12.2.1.1 Database Sizing
The factors to consider when sizing and configuring the database are as follows:
-
Undo Tablespace: When running the SYNC processes, especially the initial SYNC, the Undo tablespace is utilized especially when transferring large numbers of rows from the Enterprise Manager instance to Always-On Monitoring.
-
Temp Tablespace: The SYNC process will also utilize TEMP tablespace, especially when indexes are created or sorting occurs during the data movement process.
-
Always-On Monitoring Tablespace: Table data and indexes specific to Always-On Monitoring are stored in this tablespace.
-
Redo Logs: Redo logs should be large enough to minimize the number of checkpoints that occur during times when the SYNC is occurring. It is recommended to configure 3 x 1 GB REDO log files.
-
Special Oracle Parameter Settings: For Always-On Monitoring, it is desirable to maintain the parameters used in the Enterprise Manager repository, especially if the Always-On Monitoring schema is to be populated in the Enterprise Manager repository database. The testing of the SYNC and the other major Always-On Monitoring functions indicates that the Enterprise Manager parameter settings should be fine for the Always-On Monitoring database. This fact is important to consider if configuring a separate database instance. As is the case with the Enterprise Manager Repository, the following parameter should be set for the Always-On Monitoring Repository to avoid unforeseen optimizer issues:
ALTER SYSTEM SET OPTIMIZER_ADAPTIVE_FEATURES=FALSE SCOPE=BOTH SID='*';
Table 1 represents an example of the sizing of the above components for an Always-On Monitoring schema that is being used for a large OPC database. Note that these figures represent the sizes of the tablespaces after the initial full SYNC between Always-On Monitoring and Enterprise Manager. Also note that the Redo Log files are not included in these calculations:
Table 12-1 Always-On Monitoring Tablespace Space Allocation
Always-On Monitoring Repository Space Consumption Tablespace Name Used Space (MB) Free Space (MB) Total Allocation (MB) Percentage Free (%) TEMP
0
30,720
30,720
100%
EMS_TABLESPACE
6,430
44,797
51,200
87%
SYSAUX
1,385
85
1,470
6%
SYSTEM
896
4
900
0%
UNDOTBS1
84
30,636
30,720
100%
USERS
1
4
5
30%
Totals
8.769
106,246
115,015
92%
For this particular configuration, the absolute minimum for disk space required was 9 GB based on the used Tablespace. To ensure room for growth with this schema, it is recommended to plan on allocating at least 120 GB of space for the Always-On Monitoring database if creating a new Oracle instance. The TEMP and UNDO tablespaces are configured to handle initial and subsequent SYNC operations ensuring there is no issue with TEMP or REDO saturation. In addition, the Always-On Monitoring tablespace is sized to ensure no interruption due to saturation of the tablespace.
In order to accurately size the Always-On Monitoring tablespace for current usage and future growth, it is important to understand the following:
-
What data from what tables is being transferred from the Enterprise Manager Repository to the Always-On Monitoring Schema.
-
Knowing the number of rows transferred for each table, what is the approximate number of Bytes per Row for the tables and indexes?
Table 2 shows a subset of the tables and indexes in the Always-On Monitoring schema, highlighting the number of rows, total space consumption, and the number of bytes per row:
Table 12-2 Always-On Monitoring Table and Index Space Allocation
| Always-On Monitoring Table and Index Space Allocation Sample | |||||
|---|---|---|---|---|---|
| Owner | Segment Name | Segment Type | Partition Name | Size (MB) | Number of Rows |
|
Always-On Monitoring |
MGMT_TARGET_PROPERTIES |
TABLE |
Non-Partitioned |
1,472 |
15,408,952 |
|
Always-On Monitoring |
MGMT_TARGET_PROPERTIES_IDX_02 |
INDEX |
Non-Partitioned |
1,152 |
15,215,316 |
|
Always-On Monitoring |
MGMT_TARGET_PROPERTIES_PK |
INDEX |
Non-Partitioned |
856 |
15,462,104 |
|
Always-On Monitoring |
MGMT_TARGET_PROPERTIES_IDX_01 |
INDEX |
Non-Partitioned |
584 |
14,871,521 |
|
Always-On Monitoring |
EM_MANAGEABLE_ENTITIES |
TABLE |
Non-Partitioned |
496 |
1,177,065 |
|
Always-On Monitoring |
MGMT_TARGET_PROPERTIES_IDX_03 |
INDEX |
Non-Partitioned |
472 |
16,105,162 |
|
Always-On Monitoring |
EM_MANAGEABLE_ENTITIES_UK1 |
INDEX |
Non-Partitioned |
136 |
1,201,617 |
|
Always-On Monitoring |
EM_MANAGEABLE_ENTITIES_UK2 |
INDEX |
Non-Partitioned |
120 |
1,133,804 |
|
Always-On Monitoring |
EM_MANAGEABLE_ENTITIES_IDX01 |
INDEX |
Non-Partitioned |
112 |
1,184,414 |
|
Always-On Monitoring |
EM_MANAGEABLE_ENTITIES_IDX07 |
INDEX |
Non-Partitioned |
112 |
1,166,536 |
|
Always-On Monitoring |
EM_MANAGEABLE_ENTITIES_IDX03 |
INDEX |
Non-Partitioned |
96 |
1,182,817 |
|
Always-On Monitoring |
EM_MANAGEABLE_ENTITIES_IDX04 |
INDEX |
Non-Partitioned |
80 |
1,218,977 |
|
Always-On Monitoring |
EM_MANAGEABLE_ENTITIES_IDX05 |
INDEX |
Non-Partitioned |
72 |
1,104,428 |
|
Always-On Monitoring |
EM_MANAGEABLE_ENTITIES_IDX06 |
INDEX |
Non-Partitioned |
59 |
673,838 |
|
Always-On Monitoring |
EM_MANAGEABLE_ENTITIES_IDX08 |
INDEX |
Non-Partitioned |
44 |
1,215,411 |
|
Always-On Monitoring |
EM_MANAGEABLE_ENTITIES_PK |
INDEX |
Non-Partitioned |
41 |
1,172,101 |
|
Always-On Monitoring |
EM_MANAGEABLE_ENTITIES_IDX09 |
INDEX |
Non-Partitioned |
40 |
1,192,236 |
|
Always-On Monitoring |
EM_MANAGEABLE_ENTITIES_IDX02 |
INDEX |
Non-Partitioned |
37 |
1,178,410 |
|
Always-On Monitoring |
EM_VIOLATIONS |
TABLE |
Non-Partitioned |
28 |
112,106 |
|
Always-On Monitoring |
EM_METRIC_COLUMN_VER_PK |
INDEX |
Non-Partitioned |
17 |
611,561 |
12.2.1.2 Database Character Set Definition
To ensure that the data being transferred from the Enterprise Manager Repository to the Always-On Monitoring Repository is stored and represented properly when the Always-On Monitoring Repository is on a separate instance from Enterprise Manager, it is important to ensure that the character set matches between the two databases/instances. For Enterprise Manager, the NLS_CHARACTERSET is defined as AL32UTF8.
If setting up an Always-On Monitoring Instance manually with the Oracle Installer, the instance will default to WE8MSWIN1252. Ensure at this point that the option AL32UTF8 is selected from the drop down box so that the correct character set is installed from the start.
To determine the character set on the Enterprise Manager Repository, run the following query:
SELECT * from nls_database_parameters where parameter='NLS_CHARACTERSET';
Run this query as well on the Always-On Monitoring Repository to ensure the character sets match. If the Always-On Monitoring Repository character set is different, the following is recommended to change the character set on the Always-On Monitoring Repository to match that of the Enterprise Manager Repository
--Shutdown and start the database in a restricted mode.
SHUTDOWN IMMEDIATE;
STARTUP RESTRICT;

--Set JOB_QUEUE_PROCESSES and AQ_TM_PROCESSES to its default value i.e.0
ALTER SYSTEM SET JOB_QUEUE_PROCESSES = 0;
ALTER SYSTEM SET AQ_TM_PROCESSES=0;

-- Set the required character set.
ALTER DATABASE CHARACTER SET AL32UTF8;

 -- if the above fails:
ALTER DATABASE CHARACTER SET INTERNAL_USE AL32UTF8;

--Shutdown and restart the database in normal mode.
SHUTDOWN IMMEDIATE;
STARTUP;
/
12.2.2 Creating the Always-On Monitoring Repository User
Important:
The Always-On Monitoring Repository should not be housed within the Enterprise Manager Repository database. Housing the Always-On Monitoring Repository in a separate database allows Always-On Monitoring to function even if the Enterprise Manager Repository goes down.Connect to the database to be used as the Always-On Monitoring Repository, create the Always-On Monitoring user and then grant it the required privileges. The following example illustrates this process.
SQL> create user ems identified by ems;
SQL> grant CREATE SESSION, ALTER SESSION, CREATE DATABASE LINK, CREATE MATERIALIZED VIEW, CREATE PROCEDURE, CREATE PUBLIC SYNONYM, CREATE ROLE, CREATE SEQUENCE, CREATE SYNONYM, CREATE TABLE, CREATE TRIGGER, CREATE TYPE, CREATE VIEW, UNLIMITED TABLESPACE, SELECT ANY DICTIONARY to ems;
SQL> grant EXECUTE ON SYS.DBMS_CRYPTO to ems;
SQL> grant EXECUTE ON SYS.DBMS_AQADM to ems;
SQL> grant EXECUTE ON SYS.DBMS_AQ to ems;
SQL> grant EXECUTE ON SYS.DBMS_AQIN to ems;
SQL> grant EXECUTE on SYS.DBMS_LOCK to ems;
SQL> grant EXECUTE ON SYS.DBMS_SCHEDULER to ems;
SQL> grant create job to ems;
12.2.2.1 Granting Required Privileges to the Always-On Monitoring Schema Owner
To ensure proper functionality of Always-On Monitoring, the Always-On Monitoring schema owner needs to have the correct privileges. The following sample script details all grants required for the Always-On Monitoring Schema:
grant CREATE SESSION,
      ALTER SESSION,
      CREATE DATABASE LINK,
      CREATE MATERIALIZED VIEW,
      CREATE PROCEDURE,
      CREATE PUBLIC SYNONYM,
      CREATE ROLE,
      CREATE SEQUENCE,
      CREATE SYNONYM,
      CREATE TABLE,
      CREATE TRIGGER,
      CREATE TYPE,
      CREATE VIEW,
      UNLIMITED TABLESPACE,
      SELECT ANY DICTIONARY to ems;
grant EXECUTE ON SYS.DBMS_CRYPTO to ems;
grant EXECUTE ON SYS.DBMS_AQADM to ems;
grant EXECUTE ON SYS.DBMS_AQ to ems;
grant EXECUTE ON SYS.DBMS_AQIN to ems;
grant EXECUTE on SYS.DBMS_LOCK to ems;
grant EXECUTE ON SYS.DBMS_SCHEDULER to ems;
grant create job to ems;
Alternatively, you can grant privileges by executing each grant statement from the SQL command line:
SQL> grant CREATE SESSION, ALTER SESSION, CREATE DATABASE LINK, CREATE MATERIALIZED VIEW, CREATE PROCEDURE, CREATE PUBLIC SYNONYM, CREATE ROLE, CREATE SEQUENCE, CREATE SYNONYM, CREATE TABLE, CREATE TRIGGER, CREATE TYPE, CREATE VIEW, UNLIMITED TABLESPACE, SELECT ANY DICTIONARY to ems;
SQL> grant EXECUTE ON SYS.DBMS_CRYPTO to ems;
SQL> grant EXECUTE ON SYS.DBMS_AQADM to ems;
SQL> grant EXECUTE ON SYS.DBMS_AQ to ems;
SQL> grant EXECUTE ON SYS.DBMS_AQIN to ems;
SQL> grant EXECUTE on SYS.DBMS_LOCK to ems;
SQL> grant EXECUTE ON SYS.DBMS_SCHEDULER to ems;
SQL> grant create job to ems;
12.2.3 Installing Always-On Monitoring
Always-On Monitoring is a self-contained application that is supplied with the Enterprise Manager software distribution (located in the sysman/ems directory) and is also available via the Self-Update function in Enterprise Manager. From either source, find the Always-On Monitoring installation zip file, ems_13.1.0.0.0.zip and unzip that file in the location you have selected to install Always-On Monitoring.
12.3 Configuring Always-On Monitoring
Once Always-On Monitoring has been installed, the Always-On Monitoring configuration assistant script is used to configure the service to communicate with the Enterprise Manager installation that it will monitor.
Always-On Monitoring configuration involves the following steps:
-
Using the Always-On Monitoring Configuration Assistant (EMSCA)
-
Synchronizing Always-On Monitoring with Enterprise Manager for the First Time
-
Configuring Enterprise Manager to Work with Always-On Monitoring
12.3.1 Using the Always-On Monitoring Configuration Assistant (EMSCA)
The Always-On Monitoring configuration assistant is a script located under the Always-On Monitoring installation scripts directory. The following assumes Always-On Monitoring is installed in a location referred to using the environment variable EMS_HOME.
Run the configuration assistant located in $EMS_HOME/scripts. The EMSCA may be invoked with no parameters and will prompt for the necessary information. Once the configuration has completed, record the Always-On Monitoring Upload URL as it will be used later to configure Enterprise Manager.
Example:
$ ./emsca
Oracle Enterprise Manager Cloud Control 13c Release 1
Copyright (c) 1996, 2015 Oracle Corporation.  All rights reserved.
---------------------------------------------------------------
Always-On Monitoring Repository Connection String : myserver:35074:semgc3
Create Always-On Monitoring Repository User [n] :
Always-On Monitoring Repository SYSDBA Username : sys
Always-On Monitoring Repository SYSDBA Password :
Always-On Monitoring Repository Username [ems] :
Always-On Monitoring Repository Password [ems] :
Enterprise Manager Repository Connection String : myserver:35074:semgc3
Enterprise Manager Repository Username : sysman
Enterprise Manager Repository Password :
Creating Always-On Monitoring repository user ems
Enter Enterprise Manager Middleware Home : $MW_HOME
Connecting to Always-On Monitoring repository.
Creating Always-On Monitoring repository schema
Creating repository storage for Targets data.
Creating repository storage for Alerts and Availability data.
Creating repository storage for Notification Metadata data.
Creating repository storage for Target Metric Metadata data.
Registering Always-On Monitoring instance
Always-On Monitoring Upload URL: https://myserver:8081/upload
Oracle PKI Tool : Version 12.1.3.0.0
Copyright (c) 2004, 2014, Oracle and/or its affiliates. All rights reserved.

Certificate was added to keystore
If you want to create the Always-On Monitoring repository yourself, run the following:
$ ./emsca -createEmsDbUser=false
Oracle Enterprise Manager Cloud Control 13c Release 1
Copyright (c) 1996, 2015 Oracle Corporation.  All rights reserved.
---------------------------------------------------------------
Always-On Monitoring Repository Connection String : myserver:35074:semgc3
Always-On Monitoring Repository Username : ems
Always-On Monitoring Repository Password :
 Enterprise Manager Repository Connection String : myserver:35074:semgc3
Enterprise Manager Repository Username : sysman
Enterprise Manager Repository Password :
 Enter Enterprise Manager Middleware Home : $MW_HOME
Connecting to Always-On Monitoring repository.
Creating Always-On Monitoring repository schema
Creating repository storage for Targets data.
Creating repository storage for Alerts and Availability data.
Creating repository storage for Notification Metadata data.
Creating repository storage for Target Metric Metadata data.
Registering Always-On Monitoring instance
Always-On Monitoring Upload URL: https://myserver:8081/upload
Oracle PKI Tool : Version 12.1.3.0.0
Copyright (c) 2004, 2014, Oracle and/or its affiliates. All rights reserved.

Certificate was added to keystore
It may also be run using a response input file containing the necessary inputs. An example of a response input file is shown below.
emsRepConnectString=localhost:1521:xe
emsRepUsername=ems
emsRepPassword=ems
emRepConnectString=mymachine.mycompany.com:15044:semgc3
emRepUsername=sysman
emRepPassword=sysman
#
emsPort=8081
http.protocol=http
#
#mw.home=$MW_HOME
Note:
mw.home is required only if using http.protocol=https, which is the default. emsPort is optional and allows you to specify which port is used by Always-On Monitoring. All other values are required.The following table lists available EMSCA parameters.
| EMSCA Prompt | Description |
|---|---|
|
Always-On Monitoring Repository Connection String |
The connect string used to locate the Always-On Monitoring repository. This may be any valid service descriptor or may be a |
|
Always-On Monitoring Repository Username |
The username associated with the Always-On Monitoring repository. See the "Prerequisites" for more details. |
|
Always-On Monitoring Repository Password |
The password associated with the Always-On Monitoring repository user. See the "Prerequisites" for more details. |
|
Enterprise Manager Repository Connection String |
The connect string used to locate the Enterprise Manager repository. This may be any valid service descriptor or may be a host:port:sid. |
|
Enterprise Manager Repository Username |
The username of the Enterprise Manager SYSMAN user. |
|
Enterprise Manager Repository Password |
The password of the Enterprise Manager SYSMAN user. |
|
Enterprise Manager Middleware Home |
The path to the Middleware home where the Enterprise Manager Management Service (OMS) Middleware is installed. Note: This must be an absolute path but can include any environment variables. For more information about the Middleware home and other Enterprise Manager installed components, see the Oracle® Enterprise Manager Cloud Control Basic Installation Guide. |
Remove the Em Key from the Enterprise Manager Repository
Execute the following command to remove the key.
% emctl config emkey -remove_from_repos
Un-install Always-On Monitoring
If the need arises, you can use EMSCA to un-install Always-On Monitoring as shown in the following example.
$ ./emsca uninstall
Oracle Enterprise Manager Cloud Control 13c Release 1
Copyright (c) 1996, 2015 Oracle Corporation. All rights reserved.
---------------------------------------------------------------
Loading configuration from: /homedirectory/ems/conf/emsConfig.properties
 Connecting to Always-On Monitoring repository.
 Execute the following:
 emctl delete property -name "oracle.sysman.core.events.ems.emsURL" -sysman_pwd <pwd> to unset the value of the property.
 Uninstall completed.
12.3.2 Configuring Email Servers in Enterprise Manager
When Always-On Monitoring sends email notifications, it does so using email server configurations that it obtains from Enterprise Manager during the synchronization step. For Always-On Monitoring to function properly, email servers must be configured in Enterprise Manager before performing an Always-On Monitoring synchronization. See "Setting Up a Mail Server for Notifications" for more information.
If changes to the email server configurations are made in Enterprise Manager, Always-On Monitoring must be synchronized again to retrieve the updated email server configuration. Refer to the subsequent section on performing an incremental synchronization of the Always-On Monitoring.
12.3.3 Configuring Downtime Contacts in Enterprise Manager
Once Always-On Monitoring is synchronized with Enterprise Manager, the monitoring service can send email notifications to the appropriate administrators when the OMS is down (downtime contacts). Prior to running Always-On Monitoring for the first time, downtime contacts should be configured in Enterprise Manager. The downtime contacts that Always-On Monitoring sends notification to may be any one of the following forms.
-
Global downtime contact
-
Per-target downtime contact based on target property
-
Per-target downtime contact based on event rules
If email addresses are specified for both Global and Per-target forms, then all email addresses will be used.
If changes to the downtime contacts are made in Enterprise Manager, Always-On Monitoring must be synchronized again to retrieve the updated downtime contact configuration. Refer to the subsequent section for instructions on performing an incremental synchronization of Always-On Monitoring.
The global downtime contact is a single property set on the Enterprise Manager site. Once set, all target status events and metric alerts across all targets will be sent to the recipients specified in the global downtime contact property.
% emcli set_oms_property -property_name='oracle.sysman.core.events.ems.downtimeContact'
-property_value='<email addresses>'
Per-Target Downtime Contact from Target Property
The email addresses for these downtime contacts should be specified in the Downtime Contact target property for each target. There are three ways to specify the Downtime Contact target property:
-
For each target, navigate to the Target Properties page, which can be accessed from the target's homepage. From the target menu on the target homepage, select Target Setup and then Properties. The Target Properties page displays.
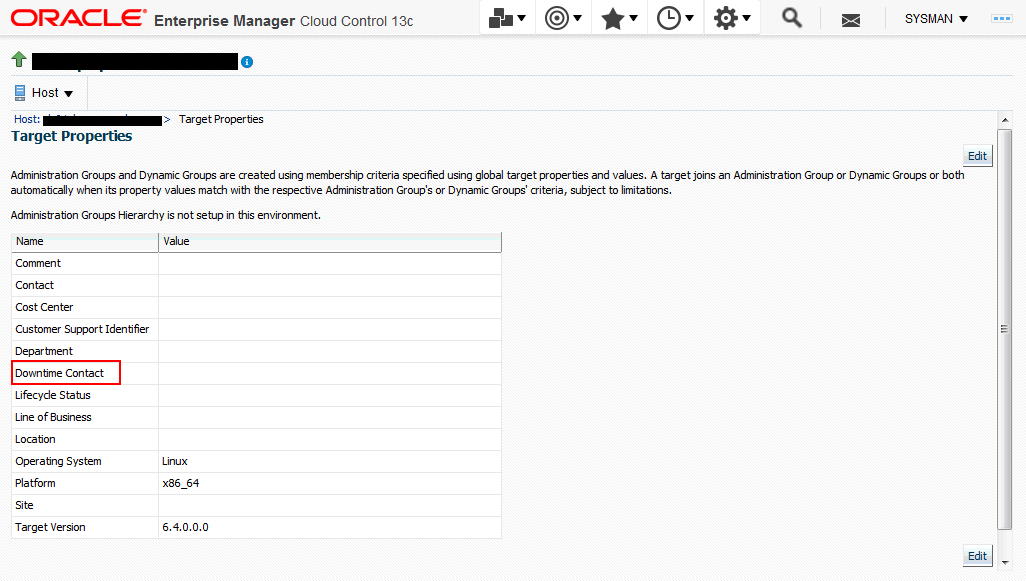
Click on Edit and specify the email address in the Downtime Contact target property. You can specify multiple email addresses by separating them with commas.
-
Use the EM CLI set_target_property_value verb.
emcli set_target_property_value -property_records="target_name:target_type:property_name:property_value"Example:
%./emcli set_target_property_value -property_records="myhost:host:Downtime Contact:John.Doe@mycompany.com"For more information about the set_target_property_value verb, see the Oracle Enterprise Manager Command Line Interface Guide.
-
By leveraging the email recipients in the target down event rules in Enterprise Manager Cloud Control. See the following section for more details.
Per-Target Downtime Contact from Event Rules
Always-On Monitoring may also send email notifications to different users for each target. These contacts are generated in Enterprise Manager based on the event rules for that target. Therefore, as event rules are changed in Enterprise Manager, the contacts must be re-generated and an incremental synchronization performed.
By leveraging the event rule setup, the downtime contact will be generated based on the email recipient for the event rule for a Target Availability event type where Down status has been selected.
Note:
Although downtime contacts are generating using only Target Availability event rules, Always-On Monitoring will send notifications for both target availability and metric threshold alerts.You can review and update the recipients of your target availability (status down) event rules. Doing so allows you to generate a list of downtime contacts using EM CLI or by submitting the downtime contact generation job.
Generating Downtime Contact using EM CLI
From the EM CLI, use the generate_downtime_contact command to produce downtime contacts for a specific target. The command simulates ALL Target Availability rules that would affect that particular target and generates a list of email addresses that includes the output from all rules. The optional -set parameter will cause the contact to be saved so that Always-On Monitoring synchronization can retrieve it later.
% emcli generate_downtime_contact -target_name=<name> -target_type=<type> -set
Generating Downtime Contact Enterprise Manager Job
% emcli create_job -input_file=property_file:<job_prop_file> -name="GenerateDowntimeContacts"
Where the job_prop_file refers to a properties file with the following content:
# job type
type=CoreSetDowntimeContacts
# description
description=You job description
# target names, the list of target names
variable.target_names=host1,database2
# target types, the list of target types corresponding to the target list above
variable.target_types=host,oracle_database
# set on all targets, true to update contacts, false to print output but not save
variable.set_all_targets=true
# frequency to run job, refer to Enterprise Manager documentation for options
schedule.frequency=IMMEDIATE
Note:
The process of generating the downtime contacts thru either the EM CLI or the downtime contact generation job, does not immediately make the contacts available to the monitoring service. A separate Always-On Monitoring synchronization must be done each time these contacts are updated.Types of Alerts Received by Downtime Contacts
Once configured, Always-On Monitoring will send email notifications for:
-
All target status alerts and metric alerts (critical, warning, and clear).
-
Metric collection errors (both critical and clear).
Target status alerts for aggregate targets, such as groups and clusters, whose status is based on the status of its component members is not be supported. Instead, alerts will be sent for the individual members of these aggregate targets.
Note:
Currently, email notification is the only type of notification supported.The recipients of the email should be email addresses. The recipients are specified using the global property downtimeContact or the per-target Downtime Contact. If both are specified, emails will be sent to all recipients specified.
If the global property downtimeContact is specified, all alerts on all targets will be sent to the recipients specified in the global property downtimeContact. If the per-target property Downtime Contact is specified, all target status and metric alerts for that target will be sent to the recipients specified in that property.
12.3.4 Synchronizing Always-On Monitoring with Enterprise Manager for the First Time
Before starting Always-On Monitoring for the first time, your must synchronize Always-On Monitoring with Enterprise Manager. Synchronization copies notification configuration and downtime contacts from Enterprise Manager targets, thus allowing Always-On Monitoring to monitor alerts and send email notifications.
To perform Always-On Monitoring-Enterprise Manager synchronization:
% $EMS_HOME/scripts/emsctl sync

Oracle Enterprise Manager Cloud Control 13c Release 1
Copyright (c) 1996, 2015 Oracle Corporation. All rights reserved.
------------------------------------------------------------------
 Connecting to Always-On Monitoring repository.
Starting synchronization with Enterprise Manager.
Synchronizing with Enterprise Manager repository: sysman@myserver.myco.com:35074:semgc4
Synchronizing Targets data.
Synchronizing Alerts and Availability data.
Synchronizing Notification Metadata data.
Synchronizing Target Metric Metadata data.
Synchronization complete at : Thu Oct 22 06:50:56 PDT 2015
Note:
Synchronization should be run again whenever there are changes made to Enterprise Manager. For example, after adding new hosts or targets, changing the email server, or changing the downtime contacts, an incremental synchronization is required in order for Always-On Monitoring to pick up the latest configurations. See "Running an Incremental Synchronization Manually" for additional details.12.3.5 Configuring Enterprise Manager to Work with Always-On Monitoring
The final step in the configuration of Always-On Monitoring is to update Enterprise Manager to include the upload URL for the service. The upload URL is displayed by Always-On Monitoring Configuration Assistant upon successful completion of the configuration of the service. Always-On Monitoring configuration properties file also includes the protocol and port configured for the service so that the upload URL will be of the form:
https://yourhostname:8081/upload
Once configured, the URL will be sent to all Agents, both existing agents and any Agents deployed in future. Hence, configuration only needs to be done once.
HTTPS is the default protocol for Always-On Monitoring and the default port is 8081. Please refer to the emsca or Always-On Monitoring configuration file for the configured values.You can find the configuration file at the following location:
$EMS_HOME/conf/emsConfig.properties
To configure Enterprise Manager with Always-On Monitoring upload location, the following command should be executed from Enterprise Manager.
% emctl set property -name "oracle.sysman.core.events.ems.emsURL" -value "https://yourhostname:8081/upload" -sysman_pwd sysman
12.3.6 Verifying the Always-On Monitoring Upload URL on Enterprise Manager
You can determine the upload URL by issuing the following command:
%emsctl status
Example:
$ ./emsctl status
Oracle Enterprise Manager Cloud Control 13c Release 1
Copyright (c) 1996, 2015 Oracle Corporation. All rights reserved.
------------------------------------------------------------------
Always-On Monitoring Version : 13.1.0.0.0
Always-On Monitoring Home : /mycomputer/ems
Started At : December 4, 2015 8:07:12 AM PST
Last Repository Sync : December 4, 2015 8:06:10 AM PST
Upload URL : https://myserver:8081/upload
Always-On Monitoring Process ID : 28171
Always-On Monitoring Repository : myserver.myco.com:15044:sarview
Enterprise Manager Repository : myserver.myco.com:15044:sarview
Notifications Enabled : false
Total Downtime Contacts Configured : 1
You can verify the setting in the OMS by using the emctl get property command.
You can verify the setting on a particular Agent by looking at $AGENT_HOME/sysman/config/emd.properties and searching for EMS_URL.
12.4 Saving the Em Key
Always-On Monitoring requires the Em key in order to be able to synchronize with the Enterprise Manager repository and reuse the SMTP (email) gateway configuration information from Enterprise Manager.
Important:
The Em key needs to be copied to the Enterprise Manager repository BEFORE configuring Always-On Monitoring. Not doing so will result in errors when running emsca.Once Always-On Monitoring configuration is complete (emsca has successfully run through completion), immediately remove the Em key from the Enterprise Manager repository. Note: Always-On Monitoring does not have to be restarted. To store the key in the repository, run the following emctl commands from the $MW_HOME/bin directory, where $MW_HOME is the Enterprise Manager Middleware Home directory.
% emctl config emkey -copy_to_repos
Once Always-On Monitoring configuration is complete, execute the following command to remove the key.
% emctl config emkey -remove_from_repos
12.5 Controlling the Service
Starting Always-On Monitoring:
% $EMS_HOME/scripts/emsctl start
Oracle Enterprise Manager Cloud Control 13c Release 1
Copyright (c) 1996, 2015 Oracle Corporation. All rights reserved.
------------------------------------------------------------------
Starting Always-On Monitoring.
Notifications Enabled : false
Total Downtime Contacts Configured : 1
Always-On Monitoring is up.
Enabling/Disabling Notifications
Always-On Monitoring initial configuration has notifications disabled—the service will not send emails as new alerts are received. You must first enable Always-On Monitoring to send email notifications. Always-On Monitoring notification enable/disable setting is persistent across starts/stops of Always-On Monitoring. The enable_notification command will automatically perform an incremental sync.
% $EMS_HOME/scripts/emsctl enable_notification
Oracle Enterprise Manager Cloud Control 13c Release 1
Copyright (c) 1996, 2015 Oracle Corporation. All rights reserved.
------------------------------------------------------------------
Notifications have been enabled. There are downtime contacts configured.
 Connecting to Always-On Monitoring repository.
Starting synchronization with Enterprise Manager.
Synchronizing with Enterprise Manager repository: sysman@myserver.myco.com:35074:semgc4
Synchronizing Targets data.
Synchronizing Alerts and Availability data.
Synchronizing Notification Metadata data.
Synchronizing Target Metric Metadata data.
Synchronization complete at : Thu Oct 22 07:01:20 PDT 2015
If you do not want to perform a SYNC then add the -nosync option.
$EMS_HOME/scripts/emsctl enable_notification -nosync
Oracle Enterprise Manager Cloud Control 13c Release 1
Copyright (c) 1996, 2015 Oracle Corporation. All rights reserved.
------------------------------------------------------------------
Notifications have been enabled. There are downtime contacts configured.
To disable notifications but leave Always-On Monitoring running use the disable_notification command:
% $EMS_HOME/scripts/emsctl disable_notification
Oracle Enterprise Manager Cloud Control 13c Release 1
Copyright (c) 1996, 2015 Oracle Corporation.  All rights reserved.
---------------------------------------------------------------
Notifications have been disabled.
Use the emsctl status command to ascertain the operational status of Always-On Monitoring.
Example:
% $EMS_HOME/scripts/emsctl status

Oracle Enterprise Manager Cloud Control 13c Release 1
Copyright (c) 1996, 2015 Oracle Corporation. All rights reserved.
------------------------------------------------------------------
Always-On Monitoring Version : 13.1.0.0.0
Always-On Monitoring Home : /homedirectory/ems
Started At : October 22, 2015 6:53:30 AM PDT
Last Repository Sync : October 22, 2015 6:50:51 AM PDT
Upload URL : https://myserver:8081/upload
Always-On Monitoring Process ID : 563
Always-On Monitoring Repository : myserver.myco.com:35074:semgc4
Enterprise Manager Repository : sysman
Notifications Enabled : false

Always-On Monitoring is up.
Pinging Always-On Monitoring
In addition to running the emsctl status command, you can also issue the ping command if you just want to see that Always-On Monitoring service is up without listing all the operational details.
Example:
$EMS_HOME/scripts/emsctl ping

Oracle Enterprise Manager Cloud Control 13c Release 1
Copyright (c) 1996, 2015 Oracle Corporation. All rights reserved.
------------------------------------------------------------------
Always-On Monitoring is running
Log Files
Log files record Always-On Monitoring events that occur during operation and are generated as follows:
-
emsca logs: emsca.err (only errors), emsca.log.0 (rotating log file that contains all output including errors).
-
ems logs: ems.err (only errors), ems.log.0 (rotating log file that contains all output including errors).
These files are located in the $EMS_HOME/logs directory.
Log levels determine the type and operational severity of information recorded in the log files. Levels can be set to any one of the following:
-
INFO: Always-On Monitoring operational events such and login, logout, or any other events tied to Always-On Monitoring lifecycle.
-
DEBUG: Information considered useful when tracing the flow of Always-On Monitoring events to isolate specific problems.
-
WARN (default setting): Unexpected operational Always-On Monitoring events. These Always-On Monitoring events that should be tracked, but may not require immediate administrator intervention.
-
ERROR: Always-On Monitoring operational malfunction.
To change the log level, add the logLevel=... property to $EMS_HOME/conf/emsConfig.properties. Note that this applies only to the current Always-On Monitoring instance.
Important:
you must bounce Always-On Monitoring in order for the log level changes to take affect.Use the emsctl stop command to stop Always-On Monitoring.
$EMS_HOME/scripts/emsctl stop
Oracle Enterprise Manager Cloud Control 13c Release 1
Copyright (c) 1996, 2015 Oracle Corporation. All rights reserved.
------------------------------------------------------------------
Shutting down Always-On Monitoring.
Always-On Monitoring is stopped.
12.5.1 Always-On Monitoring Commands
The following commands are used to control Always-On Monitoring:
Always-On Monitoring Control
Starts Always-On Monitoring.
Shuts down Always-On Monitoring.
emsctl enable_notification -nosync (optional)
Allow Always-On Monitoring to send email notifications. By default, an incremental SYNC is performed when enabling email notifications. To prevent synchronization with the Enterprise Manager OMS, specify the -nosync option.
Prevent Always-On Monitoring from sending email notifications.
Ping the Always-On Monitoring service to determine whether it is up or down.
Synchronize Always-On Monitoring target and notification data with the Enterprise Manager repository.
Display information related Always-On Monitoring operational status.
Display the current Always-On Monitoring performance statistics
Display Always-On Monitoring configuration properties.
emsctl set_property -name=<property name> -value=<property value>
Set Always-On Monitoring configuration properties. For a complete list of configuration properties, see "Modifiable Always-On Monitoring Properties."
emsctl unset_property -name=<property name>
Unset an existing Always-On Monitoring configuration property. For a complete list of configuration properties, see "Modifiable Always-On Monitoring Properties."
emsctl update_task -task_name=<SYNC|PURGE> -run_interval=<time in minutes between task executions>
Update the intervals for performing Always-On Monitoring tasks such as SYNC or PURGE.
emsctl set_em_repos_conn -username=<em username> -password=<em password> -connect_string=<em connect descriptor>
Update the username, password and connect string used to connect to Enterprise Manager repository database.
emsctl set_ems_repos_conn -username=<ems username> -password=<ems password> -connect_string=<ems connect descriptor>
Update username, password and connect string used to connect to the Always-On Monitoring repository database.
12.6 Updating Always-On Monitoring
In order to carry out the notification function of the Enterprise Manager OMS, Always-On Monitoring requires target monitoring and administrator notification configuration data to be synchronized with the OMS. Full synchronization is performed when you install Always-On Monitoring. Incremental synchronization must be performed thereafter in order to keep Always-On Monitoring monitoring/notification configuration current.
The following changes to Enterprise Manager will require an incremental Always-On Monitoring synchronization:
-
New hosts (Agents) added
-
New targets added
-
Changes to downtime contacts
-
Changes to administrator email addresses
-
Changes to email server configuration
Always-On Monitoring stays in SYNC with Enterprise Manager automatically via an incremental synchronization job that runs every 24 hours. You can change the synchronization interval using the emsctl update_task command.
$EMS_HOME/emsctl update_task -task_name=<SYNC|PURGE> -run_interval=<time in minutes between task executions>
Incremental synchronization can be run manually via the emsctl sync command.
Running an Incremental Synchronization Manually
You can, at any time, perform an incremental Always-On Monitoring synchronization by running the sync command.
% $EMS_HOME/scripts/emsctl sync
When performing a manual incremental synchronization, you do not need to shut down Always-On Monitoring: You can run the SYNC command regardless of whether Always-On Monitoring is up or down.
Note:
An incremental synchronization is automatically performed whenever you run the enable_notification command. You can bypass the synchronization by specifying the -nosync option.12.7 Data Maintenance
The Always-On Monitoring repository contains historical availability and metric violations data. This data is maintained for 6 months (default interval). Data older than 6 months is deleted (purged) from the repository.
Data maintenance is controlled by following settings:
-
Purge Interval—Determines how often the data is purged from Always-On Monitoring repository.
-
Purge Duration—Determines how much data is kept during the purge process.
You can change the purge interval via the update_task command:
$EMS_HOME/scripts/emsctl update_task -task_name=PURGE -run_interval=<the number of minutes between purge runs>
You can change the purge duration via the set_property command:
$EMS_HOME/scripts/emsctl set_property -name=purge.Duration -value=<the number of minutes of data to keep>
12.8 Controlling Always-On Monitoring Configuration Settings
Always-On Monitoring configuration settings define how your Always-On Monitoring deployment operates within your environment. These settings are stored in two locations:
-
What: Properties that are specific to a particular instance of Always-On Monitoring:
Location:
$EMS_HOME/conf/emsConfig.propertiesProperties that are shared by all Always-On Monitoring instances are stored in Always-On Monitoring repository.
-
What: The HTTP port Always-On Monitoring listens on and the LogLevel.
Location:
$EMS_HOME/conf/emsConfig.properties
The following commands are used to view and set the configuration properties:
To list all properties and their values:
$EMS_HOME/scripts/emsctl list_properties
To set a property value:
$EMS_HOME/scripts/emsctl set_property -name=<propertyname> -value=<propertyvalue>
To remove a property value:
$EMS_HOME/scripts/emsctl unset_property -name=<propertyname>
12.9 Getting Performance Information
You can see how well your Always-On Monitoring installation is operating by viewing Always-On Monitoring performance information such as load and thruput. Use the getstats command to display Always-On Monitoring performance statistics:
$EMS_HOME/scripts/emsctl getstats
12.10 Modifiable Always-On Monitoring Properties
Always-On Monitoring allows you to change various properties that define how your Always-On Monitoring deployment operates. The following table lists available Always-On Monitoring properties.
Table 12-4 Always-On Monitoring Properties
| Property Name | Description | Default Value | Range of Values |
|---|---|---|---|
|
connPool.initialSize |
The initial number of Always-On Monitoring repository connections to be created in the repository connection pool |
1 |
1-connPool.maxSize |
|
connPool.maxSize |
The maximum number of Always-On Monitoring repository connections to be created in the repository connection pool |
100 |
connPool.minSize – 500 |
|
connPool.minSize |
The minimum number of Always-On Monitoring repository connections to be kept in the repository connection pool after growth |
10 |
connPool.initialSize – connPool.maxSize |
|
failover.heartbeatInterval |
The interval in seconds between heartbeats sent from the running Always-On Monitoring to other Always-On Monitoring instances |
60 |
30 – 3600 |
|
http.idleTimeout |
Time in milliseconds before idle web server connections in the Always-On Monitoring are released and terminated |
60000 |
10000 – 120000 |
|
http.maxThreads |
The maximum number of Always-On Monitoring web server threads to be created in the web server connection pool |
50 |
http.minThreads – 100 |
|
http.minThreads |
The minimum number of Always-On Monitoring web server threads to be created in the Web server connection pool |
10 |
1 – http.maxThreads |
|
nls.useSystemLocale |
Reserved for future use |
false |
|
|
notif.enabled |
If email notifications are enabled or not; typically sent using |
true |
true/false |
|
notif.senderAddress |
Override sender email address for e-mails sent from Always-On Monitoring. Otherwise address is the same as the Enterprise Manager email address |
null |
|
|
notif.senderName |
Override sender email username for e-mails sent from Always-On Monitoring. Otherwise name is the same as the Enterprise Manager email name |
null |
|
|
purge.Duration |
Amount of data (in minutes) kept in all historical Always-On Monitoring tables |
259200 |
10080 – 0 (infinite) |
|
sync.allowIncrSync |
Reserved for future use |
false |
true/false |
|
tasks.poolSize |
Number of threads to use in the background task execution pool |
20 |
1-50 |
|
tasks.purgeRunInterval |
Interval in minutes between instances of the data purge task |
10080 |
3600 – 10080 |
|
tasks.syncRunInterval |
Interval in minutes between instances of the incremental sync task |
1440 |
60 - 3600 |
12.11 Diagnosing Problems
Though robust and easy to install and configure, you may encounter problems while using Always-On Monitoring. In general, Always-On Monitoring problems can be classified into three types:
-
Problems starting Always-On Monitoring
-
Problems with Always-On Monitoring-OMS SYNC
-
Not receiving email
By following the diagnostic procedure below, you can resolve the majority of issues that may occur when using Always-On Monitoring.
-
Check the log files.
-
Verify that the URL is set in Enterprise Manager.
-
Verify that the URL is set on the Management Agent.
-
Verify that Always-On Monitoring is running and notifications are enabled.
-
Verify that downtime contacts have been specified in Enterprise Manager and Always-On Monitoring.
12.12 High Availability and Disaster Recovery
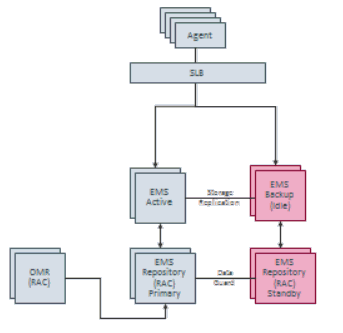
The purpose of Always-On Monitoring is to make sure your Enterprise Manager environment continues to be monitored while Enterprise Manager OMS is down. However, the Always-On Monitoring service itself can be made highly available by adhering to the Enterprise Manager Maximum Availability Architecture (MAA) guidelines. By setting up Always-On Monitoring as a highly available service, you can ensure that targets will continue to be monitored in the event of catastrophic system failure.
12.12.1 Running Multiple Always-On Monitoring Instances
The Always-On Monitoring provides you with the ability to continue alert monitoring while Enterprise Manager is down. By itself, Always-On Monitoring can be made highly available by implementing multiple instances for load sharing/high availability.
Adding multiple Always-On Monitoring instances provides the following HA advantages:
-
Shares the work of receiving and recording alerts from agents. If an instance goes down for some reason, a server load balancer (SLB) can redirect those requests to surviving instances
-
Shares the work of sending of notifications. For ordering reasons, all notifications for a target are directed to one Always-On Monitoring instance. If that Always-On Monitoring instance goes down, the responsibility for its "queues" are transferred to another instance.
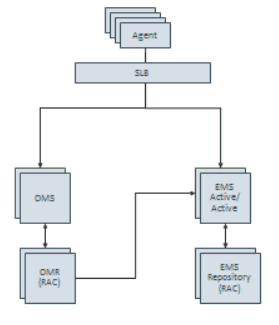
The following diagram shows a typical Always-On Monitorying HA deployment.
12.12.1.1 Shared Configuration Storage for the Multiple Instances
Instead of maintaining Always-On Monitoring configuration in the file system on each node, all instances can share a common configuration. This allows a single configuration at one location to be modified and read from all the instances.
You use the following EMSCTL commands to modify properties:
-
emsctl set_property
-
emsctl unset_property
To obtain a list of current property values: use the
-
emsctl list_properties
When a property is modified on one instance, all other Always-On Monitoring instances receive a JMS AQ message that tells them to refresh the value from the repository.
12.12.1.2 Notification Queues for Tracking Incoming Alerts
Each Always-On Monitoring instance that receives an alert stores the alert and records an entry in one of 16 event notification queues. Ownership of these notifications queues is distributed among the running Always-On Monitoring instances.
A failover system notices when Always-On Monitoring instances are not up (and heartbeating) and switches ownership away from the instance that is down to other Always-On Monitoring instances that are up. The failover system then sends a JMS AQ message notifying all up instances of the change.
12.12.1.3 Task Scheduler System
A Task scheduler system remembers shared responsibilities among the Always-On Monitoring instances and is responsible for reminding the instances to do the work on a schedule. The task request is sent to an Always-On Monitoring instance that is known to be up. This reduces the possibility of multiple instances trying to do the same work and running into conflicts.
12.12.1.4 Configuring an SLB
When multiple Always-On Monitoring instances are present, we expect that traffic to these instances is directed through a SLB.
When HA is added to an Always-On Monitoring instance that was configured as a single instance, we will need to repopulate the Always-On Monitoring instance's certificates with fresh copies that have the SLB host name in them. With 13.1 this is not supported directly via emsca and the following workaround is required to resecure the Always-On Monitoring instance once the SLB has been configured and EM has been resecured with the SLB.
-
Stop the Always-On Monitoring instance.
-
Back up the contents of the
$EMS_HOME/conf/directory -
Remove/delete all files in the
$EMS_HOME/conf/directory except emsConfig.properties and emsConn.ora (e.g. cwallet.sso, ems.cert, ems.jks) -
Execute the script in
$EMS_HOME/scripts/emsKeystoreCreator. -
grep cwallet$EMS_HOME/scripts/emsKeystoreCreatorThe output should appear similar to:
SSO HOME=/a/path/to/mwhome/upload/cwallet.sso -
Copy the file identified by
SSO_HOMEin that script to the$EMS_HOME/confdirectory -
Restart the Always-On Monitoring instance.
-
Repeat steps 1 through 7 for all Always-On Monitoring instances already configured.
-
Make sure to emctl set property the emsUrl property to use the newly configured EMS upload URL setup on the SLB
The URL displayed from emsca and/or emsctl status is the local URL for that Always-On Monitoring instance. In an HA configuration, this local URL is NOT used as the Always-On Monitoring URL, but is used to set up the Always-On Monitoring pool in the SLB. The host and port for each Always-On Monitoring instance is used in the pool with the /upload PUT URL as the target for that pool.
When configuring the SLB, the monitoring URL is the /upload GET URL. This URL returns the string "Always On Monitoring is active."
Note:
Always-on monitoring is supported on F5 from version 11.4.x onwards.12.12.2 Always-On Monitoring Disaster Recovery
Disaster Recovery (DR) allows Always-On Monitoring functionality to transition to a different location in the case of a site-wide failure.
There are existing procedures that allow an Enterprise Manager site to have a standby created for DR reasons. These procedures involve having the primary repository database's contents mirrored at the standby site using DataGuard, and the ability to link to the file system contents from the secondary site.
A very similar implementation can be used for Always-On Monitoring instances as well. An Always-On Monitoring DR setup is active-passive: If the primary site goes down, the virtual IP fails over to the standby node and, once the standby Always-On Monitoring instance is brought up, it runs exactly as it did on the primary node (because of the file system sharing and the virtual IP). In summary, the Always-On Monitoring repository needs to be available at the standby site, and the Always-On Monitoring instances' file systems need to be replicated. The following diagram shows the typical DR deployment for Always-On Monitoring.