26 Personalizing Cloud Control
You can personalize the page layout and data displayed in certain Cloud Control pages, including target home pages such as the Oracle WebLogic Server target home page. The changes you make are persisted for the currently logged in user, enabling you to create customized consoles for monitoring various target types.
Personalization support provided in the current release allows you to:
-
Customize the layout of regions on a page
-
Add a region to, or remove a region, from a page
-
Specify what data should be displayed within each region
-
Set your own homepage
Note that not all pages in Cloud Control can be personalized. The page edit mode will only be enabled for those pages or page regions that can be modified.
This chapter contains the following sections:
26.1 Personalizing a Cloud Control Page
Pages in Cloud Control are laid out in a columnar format. Each column contains one or more regions, each of which contains data rendered as a bar chart, graph or other visual component.
You can modify the layout of columns within a page, as well as select the regions to display within each column, enabling you to personalize how the data on a page is arranged and displayed.
To personalize a page:
-
Navigate to the page you want to personalize.
-
Do one of the following:
-
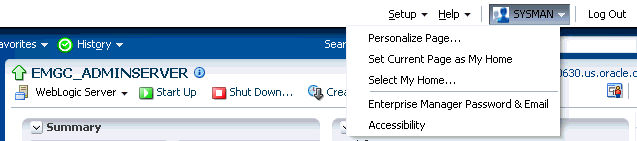
Select Personalize Page from the menu item that displays the username of the currently logged-in user, just to the left of the Log Out menu item. In Figure 26-1, the menu item displays the SYSMAN user name.
-
Or, click the ”Personalize Page” icon on the right-hand side of the page, shown just above the ”Page Refreshed” time stamp, as shown in Figure 26-2.
Note that the menu item or icon will only be enabled if the page you are currently on can be personalized.
-
-
You are now in page edit mode. Click the Change Layout button. A graphical menu of column layout options opens.
-
Select the column layout you want to use.
-
Next, add a region to each column. Click the Add Content button for a specific column. The Resource Catalog, which contains available components used to display data, opens.
-
Select a region, then click Add to add it to the column. Note that you can ”stack” regions on top of one another.
-
Once a region has been added to a column, you can:
-
Customize the region. See Section 26.2, "Customizing a Region" for details.
-
Click the View Actions menu in the upper right corner of the region to move the region up or down within the column.
-
Drag the region from one column to another.
-
-
Click Close to save your changes.
26.2 Customizing a Region
A region contains business data rendered as a bar chart, graph or other visual component. You can select the component to display within a specific region.
To customize a region within a page column:
-
Navigate to the page containing the region you want to customize and enable the page editing mode as described in Section 26.1, "Personalizing a Cloud Control Page".
-
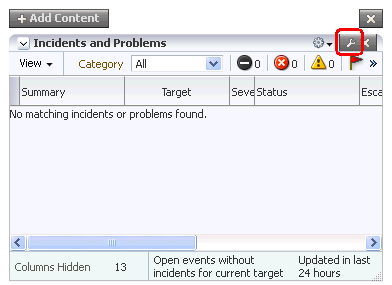
Click the ”ratchet” icon next to the ”X” icon within a region, as shown in Figure 26-3. Note that the icon will only be enabled if the region can be customized.
For most resources, you will specify the target host from which to collect data.
Other configurable parameters and customization options vary between regions. When you click the icon, a dialog opens to enable you to specify parameters, such as target type, target name and metric name.
-
If at a later time you want to remove the region from the page, click the ”X” icon in the region.
-
Click Close to save your changes.
26.3 Setting Your Homepage
Cloud Control allows you to choose the page that will serve as your homepage - the first page you see after logging in to Cloud Control. You can either:
-
Choose your own page, such as a target homepage that you view frequently or have customized to suit your specific needs
-
Select from a pre-designed homepage templates created for specific types of Cloud Control users
-
Navigate to the page you want to set as your homepage.
-
Select Set Current Page As My Home from the menu item that displays the username of the currently logged-in user, just to the left of the Log Out menu item, as shown in Figure 26-1.
Selecting a Pre-Designed Homepage
-
Select Select My Home from the menu item that displays the username of the currently logged-in user, just to the left of the Log Out menu item, as shown in Figure 26-1.
-
Click the Preview button to preview a page design template you are interested in.
-
Click the Select As My Home button to select a template as your homepage. Once you have selected a page, you can customize it to suit your needs.
Your homepage is saved as a ”favorite” page. To de-select your current homepage:
-
From the Favorites menu, select Manage Favorites.
-
Select your homepage from the list, then click the Remove Selected button.
-
Click OK when finished.
26.4 Setting Pop-Up Message Preferences
The Pop-Up Message Preferences page allows you to select the messages from different sub-components, that you would like to display in real-time to the user on any page in the Enterprise Manager Cloud Console.
Notification messages like target status change, and command-line broadcast messages from the Super Administrators can be displayed by making appropriate setting changes to this page. By default, the pop-up messages are set to show status.
If you choose to retain the show status for these pop-up messages, you can set the following preferences:
-
Show target status change messages: This option displays a message every time there is a change in the target status. For example, if your target goes down or comes up, you will see a notification on the page. By default, the messages lasts for 15 seconds. If you deselect this option, the messages will not be displayed on the target page.
-
Show messages sent by super administrator using EMCLI messages: This option enables you to see all the messages sent by the super administrator. By default, the messages appear on all the screens in the Enterprise Manager Cloud Control Console. If you deselect this option, the messages will not be displayed on the screens.
For example, if you run the following command, a pop-up with the custom message appears on every screen of the Enterprise Manager Cloud Control Console.
emcli send_popup_message -messageType="INFO" -toOption="ALL" -message="EM will be taken down in an hour for an emergency patch"The messages are usually transient and last for a stipulated amount of time on a particular page. However, for command line messages, there is an added flexibility in terms of allowing the message to stay on the page until the user chooses to close it.
The following types of messages are supported from this page: Confirmation, information, warning, error, and fatal. By default, the length that a message is displayed for is set to 15 seconds. You can change this value, if required.