42 Performing Engineered System Software Updates
This chapter explains how you can use Enterprise Manager Cloud Control 13c to apply Quarterly Full Stack Download Patch (QFSDP) on Exadata and Exalytics targets. In particular, this chapter covers the following:
42.1 Overview of Exadata System Software Update
Using Quarterly Full Stack Download Patches (QFSDP), you can update each component of an Exadata target, individually, independent of the other Exadata target components. Also, you can apply a different QFSDP on each Exadata target component. This approach minimizes downtime, as you can update a few Exadata component targets at a time, keeping the other components up and running. You need not update all the Exadata target components at once.
To update Exadata target components, you must use the Exadata Target Maintenance page. To access the Exadata Target Maintenance page, from the Targets menu, select Exadata. Click the Exadata target that you want to update. On the Exadata target home page, from the Database Machine menu, select Software Update.
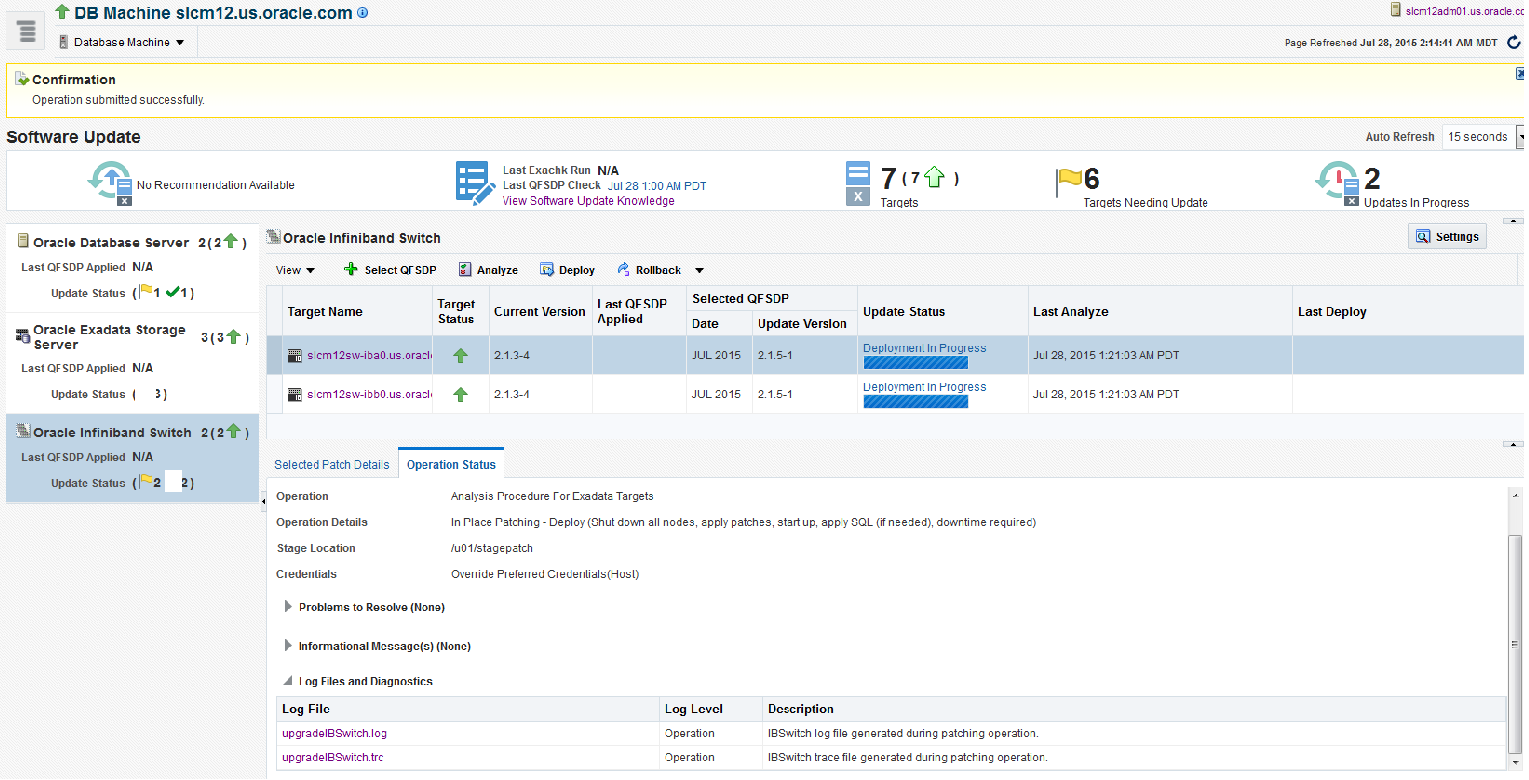
Table 42-1 Exadata Update Information
| Parameter Name | Description |
|---|---|
|
Recommended QFSDP |
The patch recommendation feature for Exadata can function in two different modes: Online Mode and Offline Mode. In the Online Mode, the Download System Patch & Evaluate Patch Recommendations Job downloads the QFSDPs from the support site, and evaluates the Patch Recommendations. In the Offline Mode, you must upload the QFSDP to Software Library using EMCLI, following which, the Download System Patch & Evaluate Patch Recommendations Job checks for patches in the Software Library, and evaluate the Patch Recommendations for discovered Engineered System Targets. The Recommended QFSDP section provides a link to the readme of the patch, and the timestamp of the actual patch download. |
|
Last QFSDP Check |
The QFSDP check happens at an interval of 24 hours. The time when the last check happened is recorded in this section. |
|
Targets |
All the targets configured on the Exadata system and their status is recorded in this section. |
|
Targets Needing Updates |
The targets that are part of the system but are not at the latest patch level are the ones that need to be patched. The information about the number of targets that must be patched to bring them upto the recommended patch level is available here. |
|
Updates in Progress |
When you deploy or rollback a patch, the deployment procedure is submitted and the updates are said to be in progress. The number of targets that are involved in the update process is mentioned here. |
|
Components |
The Software Update page enables you to update the following components of the Exadata targets:
For any of the selected targets, you can view the following details:
|
| Status | Description |
|---|---|
|
|
This symbol implies that the selected target(s) of the components require updates to bring them to the recommended patch level. |
|
|
This symbol implies that the patch is currently being deployed, and the procedure is in progress. If it is successful, then a tick mark will appear, if not you will see a cross mark against the respective targets. |
|
|
This symbol implies that the selected target of the component is up-to-date with the latest patch. |
|
|
This symbol implies that patching failed, and that the patch could not be applied on the designated targets. |
For a selected component, in addition to details like the target name, status, version, update status, and when the last analyze and deploy happened, you have the following details:
-
Selected Patch Details: Details like the bug fixed and knowledge articles related the update are displayed here.
-
Operation Status: Information of the current operation on the targets is available in this section. For more granular details, select the Operation Tab to view the:
-
Summary: All the information that you have entered is available in the summary section. After the Analyze step completes, you can view the patching steps. Click Download to download and view the Oplan-based steps that are generated.
-
Problems to Resolve: Any issue encountered during analysis and deploy phase is recorded in this section.
-
Information Messages: This section contains the information text.
-
Log Files and Diagnostics: When the Analyze, Deploy, or Rollback phase is in progress, a list of static links are displayed. Click on the link to fetch the on-demand files and view the details of the log files and trace files that contain information about the patching steps performed on the targets.
Once the patching process is complete, the log files are automatically fetched and stored in the OMS Repository. Click the link to download the zip file. The zip contains log and trace files that contain information about the patching steps are performed on the targets.
-
42.2 Configuring Options for Exadata Component Software Updates
Before patching an Oracle Exadata target component, you can choose to set up the options for patching, such that the options are reused for subsequent patching of targets within the same component present in the same Exadata system. Setting up the patch options enables you to proceed with the analysis phase of a subsequent Exadata target component patching operation without having to re-enter the options.
To set up the update options for a particular Exadata component, follow these steps:
-
From the Targets menu, select Exadata.
-
Click the name of an Exadata target.
-
On the Exadata target home page, from the Database Machine menu, select Software Update.
-
In the Component Navigation section, select the required Exadata component.
-
Click Settings.
-
Specify the following options:
-
Operation Mode: (only for Oracle Exadata Storage Server and Oracle Infiniband Switch targets) Select the mode of patching that you want to use. You can choose to patch the component targets in rolling mode or parallel mode. Note that for an Infiniband Switch target, only the rolling mode of patching is supported.
Out of the component targets selected for patching, if you want to patch a single target at a time, select Rolling. This is the default option, and it involves very little downtime. For information on how to do so, see Pausing the Patching Operation While Patching Targets in Rolling Mode.
However, if you want to simultaneously patch all the component targets selected for patching, select Parallel. This option involves downtime, as all the component targets are shut down for a significant period. However, this process consumes less time, as all the component targets are patched simultaneously.
-
Where to Stage: If you want the wizard to stage the patches from Software Library to a temporary location before the patch is applied on the component target, select Yes for Stage Patches, then specify the location where you want the patches to be staged. However, if you have already manually staged the patches that you want to apply, select No for Stage Patches, then specify the location where you staged the patches. If the stage location is a shared location, select Shared Location.
To manually stage QFSDP, download the patch, navigate to the location (parent directory) where you want to stage the patch, create a subdirectory with the same name as the patch zip file, then extract the contents of the patch zip file into this subdirectory.
For example, if you downloaded patch
699099.zip,and the stage location, which is the parent directory, is/u01/app/example/em/stagepatch,then, in this parent directory, create a subdirectory titled699099and extract the contents of the zip file. Specify/u01/app/example /em/stagepatchas the stage location. -
Credential Information: Provide the required credentials. You can choose to use preferred credentials, or override them with different credentials.
-
Customization: For patching Oracle Database Server targets, you can select the following options:
-
Restart target after deployment: Select this option to restart the Oracle Database Server target after applying the Quarterly Full Stack Download Patch (QFSDP).
-
Run script before deployment: Select this option to run a script on the Oracle Database Server target before deploying the QFSDP. Specify the location where the script is hosted.
-
Run script after deployment: Select this option to run a script on the Oracle Database Server target after deploying the QFSDP. Specify the location where the script is hosted.
-
-
Notifications: Specify whether or not you want to enable email notifications when the patching operation is scheduled, starts, requires action, is suspended, succeeds, and fails.
To enable email notifications, select Receive notification emails when the patching process, then select the required options. If a warning message, mentioning that the sender or the receiver email address is not set up, is displayed, perform the action mentioned in the warning.
-
-
Click Apply to save the settings. Once saved, the setting will be available for the next set of patching operation.
42.3 Updating Exadata Database Servers
To patch the Exadata Database Server or Compute Node Server components of an Exadata target, follow these steps:
-
From the Targets menu, select Exadata.
-
Click the name of the Exadata target that you want to patch.
-
On the Exadata target home page, from the Database Machine menu, select Software Update.
-
In the Component Navigation section, select Oracle Database Server.
-
Select the targets that you want to patch, then click Select QFSDP.
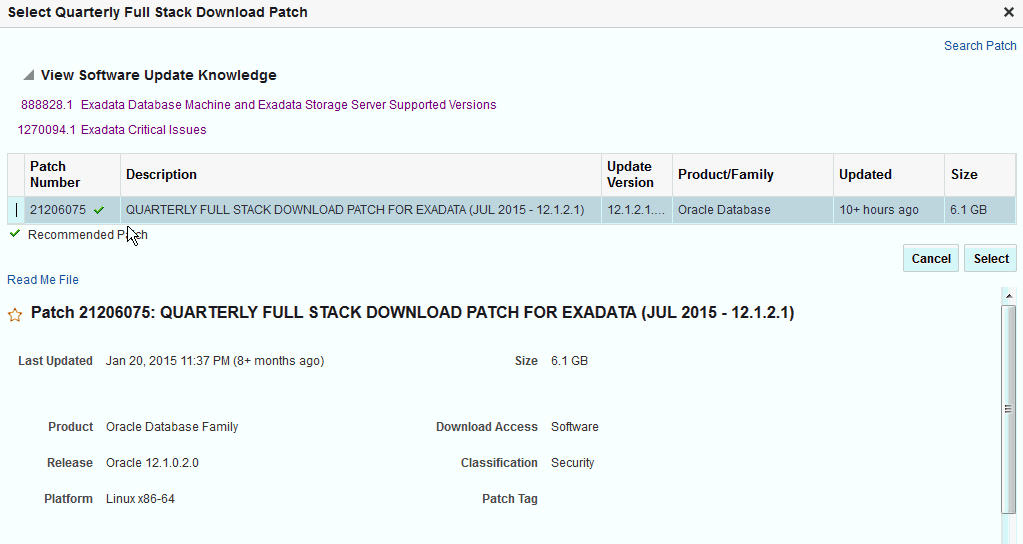
The Select Quarterly Full Stack Download Patch window displays a list of QFSDPs that can be applied on the Oracle Database Server target. The recommended (latest) patches are marked with a tick. Select the QFSDP that you want to apply, then click Select.
-
Click Analyze.
Specify a schedule for the analysis. If you haven't specified any schedule, the Deployment Procedure will run immediately.
Verify the provided options. If you haven't already specified the options (as described in Section 42.2), provide the required options.
Click Submit.
-
Once the analysis is complete, click Deploy. Deploy uses the options selected for Analyze. Once deployed, the Last QFSP Applied is applied to the update, and the current revision will show the latest version.
42.4 Updating Exadata Storage Servers
To patch the Oracle Exadata Storage Server components of an Exadata target, follow these steps:
-
From the Targets menu, select Exadata.
-
Click the name of the Exadata target that you want to patch.
-
On the Exadata target home page, from the Database Machine menu, select Software Update.
-
In the Component Navigation section, select Oracle Exadata Storage Server.
-
Select the targets that you want to patch, then click Select QFSDP.
The Select Quarterly Full Stack Download Patch window displays a list of QFSDPs that can be applied on the Oracle Database Server target. The recommended (latest) patches are marked with a tick. Select the QFSDP that you want to apply, then click Select.
The Software Update Knowledge section contains information about software patches and releases for Oracle Exadata Database Machine running Exadata Storage Server Software and a list fixes and workarounds that are deemed critical for Exadata Storage Server.
For information on installing the Quarterly Full Stack Download Patch for Oracle Exadata, click ReadMe File.
-
Click Analyze.
Specify a schedule for the analysis. If you haven't specified any schedule, the Deployment Procedure will run immediately.
Verify the provided options. If you haven't already specified the options (as described in Section 42.2), provide the required options.
Click Submit.
Note:
Target-level patch monitoring has been enabled for Oracle Exadata Storage Server components of an Exadata target. When there are multiple targets selected for patching, monitoring the patching status of individual targets is possible, and does not depend on the deployment procedure completion or failure.For example, assuming host 1, host 2, and host 3 are being patched, and the deployment procedure fails because patching host 3 wasn't successful; target-level patch monitoring still allows you to monitor the patching status' of host 1 and host 2 independently.
-
Once the analysis is complete, click Deploy.
42.5 Updating Exadata Infiniband Switches
To patch the Oracle Infiniband Switch components of an Exadata target, follow these steps:
Note:
The Exadata Infiniband Switches supports only component-based update.You cannot update individual targets.-
From the Targets menu, select Exadata.
-
Click the name of the Exadata target that you want to patch.
-
On the Exadata target home page, from the Database Machine menu, select Software Update.
-
In the Component Navigation section, select Oracle Infiniband Switch.
-
Select the targets that you want to patch, then click Select QFSDP.
The Select Quarterly Full Stack Download Patch window displays a list of QFSDPs that can be applied on the Oracle Database Server target. The recommended (latest) patches are marked with a tick. Select the QFSDP that you want to apply, then click Select.
-
Click Analyze.
Specify a schedule for the analysis. If you haven't specified any schedule, the Deployment Procedure will run immediately.
Verify the provided options. If you haven't already specified the options (as described in Section 42.2), provide the required options.
Click Submit.
-
Once the analysis is complete, click Deploy.
42.6 Rolling Backup Deployed Software Updates
To rollback a Quarterly Full Stack Download Patch (QFSDP) that is deployed on an Oracle Exadata component, follow these steps:
Note:
You can not select the patch you want to rollback, instead, you can only rollback the latest QFSDP applied using Cloud Control.-
From the Targets menu, select Exadata.
-
Click the name of the Exadata target on which the Quarterly Full Stack Download Patch (QFSDP) that you want to rollback is deployed.
-
On the Exadata target home page, from the Database Machine menu, select Software Upgrade.
-
In the Component Navigation section, select the Exadata target component on which the QFSDP that you want to rollback is deployed.
-
(Applicable for Oracle Exadata Storage Server and Oracle Infiniband Switch only) From the Rollback menu, select Prerequisite Only to analyze if the patch is suitable for a roll back. If the analysis is successful, you can proceed to the next step.
-
From the Rollback menu, select Rollback to rollback to the last deployed patch.
Specify a schedule for the rollback operation. Provide the required options, then click Rollback.
42.7 Patching Oracle Identity Management Targets
Using patch plans, you can patch those Oracle Access Management Server and Oracle Identity Management Server targets that were provisioned using Identity Management Lifecycle tools. Other Oracle Identity Management targets are not supported for patching.
To patch Oracle Access Management Server and Oracle Identity Management Server targets (that were provisioned using Identity Management Lifecycle tools) using patch plans, you must have an Identity Management Pack Plus license. Also, the 12.1.0.6 Enterprise Manager for Oracle Fusion Middleware plug-in (or higher) must be deployed on the OMS, and on all the Management Agents running on the hosts on which the Oracle Access Management Server and Oracle Identity Management Server targets are deployed.
To patch Oracle Access Management Server and Oracle Identity Management Server targets using a patch plan, follow these steps:
-
Identify the patches that you want to apply, using patch recommendations, or by searching for the patches.
For information on how to search for patches, see Searching for Patches on My Oracle Support and Searching for Patches in Oracle Software Library.
-
Create, analyze, and deploy a patch plan containing the required patches, as described in Creating, Analyzing, Preparing, and Deploying Patch Plans.
42.8 Overview of Exalytics System Software Update
Enterprise Manager Cloud Control 13c enables you to apply Patch Set Updates (PSU) on Exalytics targets. Using PSUs, you can patch an Exalytics target component individually, independent of the other Exalytics target components. Also, you can apply a different Patch Set Update (PSU) on each Exalytics target component. This approach' minimizes downtime, as you can patch a few Exalytics target components at a time, while keeping the other components up and running.
For example, you can apply a particular Patch Set Updates on two compute nodes of an Exalytics target at a particular point in time, and apply a different PSUs on two other compute nodes of the Exalytics target one hour later. You need not patch all the compute nodes of an Exalytics target at once.
To patch Exalytics target components, you must use the Exalytics Patching page. To access the Exalytics Patching page, from the Targets menu, select Exalytics. Click the Exalytics target that you want to patch. On the Exalytics target home page, from the Exalytics System menu, select Patching.
42.9 Configuring the Options for Oracle Exalytics Updates
Before patching an Oracle Exalytics target component, you can choose to set up the options for patching, such that the options are reused for subsequent patching operations. Setting up the patch options beforehand enables you to proceed with the analysis phase of a subsequent Oracle Exalytics patching operation without having to re-enter the options.
To set up the options for an Oracle Exalytics patching operation, follow these steps:
-
From the Targets menu, select Exalytics.
-
Click the name of the Oracle Exalytics target for which you want to set up the patch options.
-
On the Oracle Exalytics target home page, from the Exalytics System menu, select Software Update.
-
In the Component Navigation section, select either Compute Node or BI Instance, then click Settings.
-
Operation Mode: Select the mode of patching that you want to use. You can choose to patch the component targets in rolling mode or parallel mode.
Out of the component targets selected for patching, if you want to patch a single target at a time, select Rolling. This is the default option, and it involves very little downtime. While patching your component targets in rolling mode, you can choose to pause the execution of the patching deployment procedure after each node is patched. For information on how to do so, see Pausing the Patching Operation While Patching Targets in Rolling Mode.
However, if you want to simultaneously patch all the component targets selected for patching, select Parallel. This option involves downtime, as all the component targets are shut down for a significant period. However, this process consumes less time, as all the component targets are patched simultaneously.
-
Stage Patches: If you want the wizard to stage the patches from Software Library to a temporary location before the patch is applied on the component target, select Yes for Stage Patches, then specify the location where you want the patches to be staged. However, if you have already manually staged the patches that you want to apply, select No for Stage Patches, then specify the location where you staged the patches. If the stage location is a shared location, select Shared Location.
To manually stage the patches, download the patch, navigate to the location (parent directory) where you want to stage the patch, create a subdirectory with the same name as the patch zip file, then extract the contents of the patch zip file into this subdirectory.
-
Host Credential (only for Compute Node): Provide the required credentials. You can choose to use preferred credentials, or override them with different credentials.
-
Oracle Home Credentials (only for BI Instance): Provide the required credentials. You can choose to use preferred credentials, or override them with different credentials.
-
WebLogic Domain Credentials (only for BI Instance): Provide the WebLogic Domain Credentials. You can choose to use preferred credentials, or override them with different credential.
-
Customization(only for Compute Node): For patching Compute Nodes, by default, the wizard uses a static, Oracle-supplied deployment procedure to apply patches. Click Create Like and Edit to customize the default deployment procedure.
For patching Compute Node targets, you can select the following options:
-
Restart target after deployment: Select this option to restart the Oracle Database Server target after applying the Quarterly Full Stack Download Patch (QFSDP).
-
Run script before deployment: Select this option to run a script on the Oracle Database Server target before deploying the QFSDP. Specify the location where the script is hosted.
-
Run script after deployment: Select this option to run a script on the Oracle Database Server target after deploying the QFSDP. Specify the location where the script is hosted.
-
-
Notifications: Specify whether or not you want to enable email notifications when the patching operation is scheduled, starts, requires action, is suspended, succeeds, and fails.
To enable email notifications, select Receive notification emails when the patching process, then select the required options. If a warning message, mentioning that the sender or the receiver email address is not set up, is displayed, perform the action mentioned in the warning.
-
42.10 Updating Oracle Exalytics Compute Nodes
To patch the compute nodes of an Oracle Exalytics target, follow these steps:
Note:
When you deploy a Patch Set Update (PSU) on an Oracle Exalytics compute node, the Oracle Integrated Lights Out Manager (ILOM) firmware installed on the compute node is also patched by default. You do not need to patch the ILOM firmware separately.-
From the Targets menu, select Exalytics.
-
Click the name of the Oracle Exalytics target that you want to patch.
-
On the Oracle Exalytics target home page, from the Exalytics System menu, select Software Update.
-
In the Component Navigation section, select Compute Node.
-
Select the compute nodes that you want to patch, then select Add Patch.
The Select Patch window displays a list of Patch Set Updates that can be applied on the compute nodes. The recommended (latest) patches are marked with a tick. Select the Patch Set Update (PSU) that you want to apply, then click Select.
-
Click Analyze.
Specify a schedule for the analysis. Verify the provided options. If you haven't already specified the options (as described in Section 42.9), provide the required options .
Click Submit.
-
Once the analysis is complete, click Deploy.
42.11 Updating Oracle Exalytics Business Intelligence Instance
To patch the BI Instance of an Oracle Exalytics target, follow these steps:
Note:
When you deploy a Patch Set Update (PSU) on an Oracle Exalytics compute node, the Oracle Integrated Lights Out Manager (ILOM) firmware installed on the compute node is also patched by default. You do not need to patch the ILOM firmware separately.-
From the Targets menu, select Exalytics.
-
Click the name of the Oracle Exalytics target that you want to patch.
-
On the Oracle Exalytics target home page, from the Exalytics System menu, select Software Update.
-
In the Component Navigation section, select BI Instance.
-
Select the BI Instance that you want to patch, then select Select PSU.
The Select Patch Set Updates window displays a list of Patch Set Updates that can be applied on the BI Instances. Select the Patch Set Update (PSU) that you want to apply, then click Select.
-
Click Analyze.
Specify a schedule for the analysis. Verify the provided options. If you haven't already specified the options (as described in Section 42.9), provide the required options.
Click Submit.
-
Once the analysis is complete, click Deploy.