8 Customizing Support Ticketing Inbound Operations
Ticketing Inbound is a new feature added in Enterprise Manager 12c. This feature synchronizes the ticket status between Service Desk and Enterprise Manager.
When a ticket or incident created by Enterprise Manager is updated manually at the Service Desk console, the new ticket status is updated in Enterprise Manager. The update at the Service Desk console triggers a notification method that calls the EM CLI utility to send the new status to Enterprise Manager.
This chapter provides the following procedures to set up the ticketing inbound feature:
8.1 Adding a Custom Field to CASD
This section provides instructions to add a custom field to the CASD database schema to contain the Enterprise Manager connector identifier information. The identifier must be stored with the incident, because it is a required value that must be supplied when status updates are sent to Enterprise Manager.
To add the custom field:
-
Start the Web Screen Painter and log in using an account that has permission to update database schemas.
-
Select Tools from the menu, then Schema Designer.
The Schema Designer window appears.
-
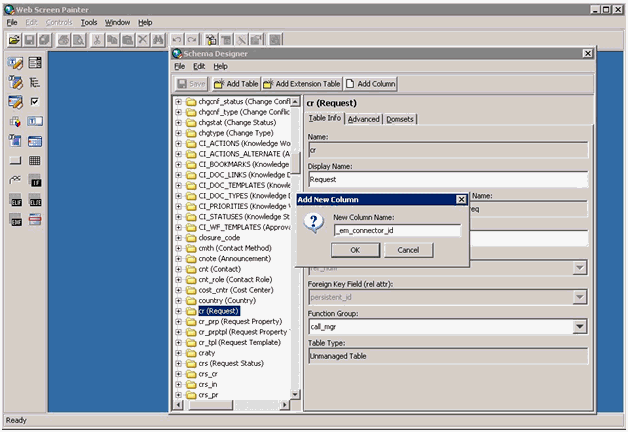
Scroll down through the list of tables, right-click on cr (Request), and select Add Column.
The Add New Column pop-up appears, as shown in Figure 8-1.
-
Enter a column name of _em_connector_id and click OK.
A form appears that contains the new column information.
-
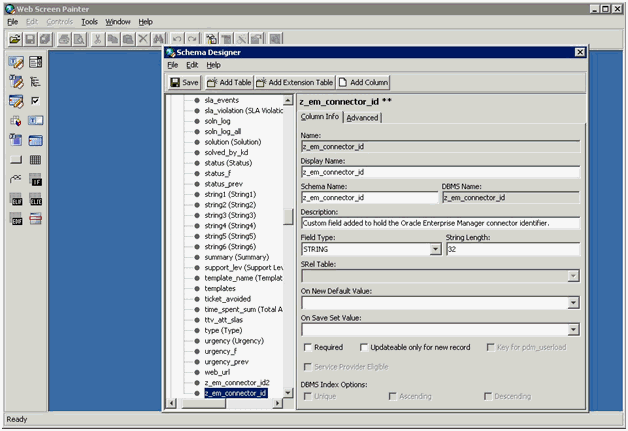
Set the Field Type to STRING and the String Length to 32. You can also optionally add a description.
-
Click Save after you have entered the information.
Figure 8-2 shows an example of a completed form.
-
From the File menu, click Save and Publish.
-
Click Yes on the confirmation window when it appears.
-
Click OK on the informational window when it appears.
-
Stop the CA Server.
-
Run the pdm_publish utility to publish the changes to the CA Server.
-
Start the CA Server.
8.2 Setting Up EM CLI
Install the Enterprise Manager EM CLI Client on the system where the CA Server is installed. The EM CLI Client will need to be able to communicate with your OMS.
To install the Enterprise Manager EM CLI Client:
-
Log into the Enterprise Manager console.
-
From the Setup menu, select Command Line Interface.
-
Click the Download the EM CLI kit to your workstation link, and download the .jar file to the CASD server.
-
At the CASD server, set your JAVA_HOME environment variable and ensure that it is part of your PATH. You must be running Java 1.6.0_25 or greater. For example:
setenv JAVA_HOME /usr/local/packages/j2sdk1.6.0_2
setenv PATH $JAVA_HOME/bin:$PATH
-
Install the EM CLI Client on the CASD server. You can install the client portion of EM CLI in any directory using the following command, where
<emcli_dir>is the installation directory:java -jar emclikit.jar client -install_dir=<emcli_dir>
-
Open a window using the account that runs the CA Server. On a Windows system, this should be the System account.
To open a window running the System account, run the following command with <time> being 1 minute in the future. At the time specified, a window opens at the system console running under the context of the System account.
at <time> /interactive cmd.exe
-
Run the following command to configure the EM CLI Client to connect to OMS, where <hostname> is the host name or IP address where the OMS server is located, and <sysman_pwd> is the password for the sysman account in OMS:
<emcli_dir>\emcli setup -url=https://<hostname>:7801/em -username=sysman -password=<sysman_pwd>
-
Run the following command to synchronize the EM CLI Client with OMS:
<emcli_dir>\emcli sync
8.3 Installing the Notification Script
CASD calls the notification script whenever a status change occurs to call the EM CLI Client to send the status update to OMS. The script that is used depends on the platform of the CASD Server. On Windows platforms, the notification script is named lferun.cmd, and on Unix platforms the script is named lferun.sh. On Windows platforms, the lferun.exe and send2em.cmd files are also required.
All of the files are packaged in the casd_notification.zip file. Obtain a copy of this file from the Management Server host system as specified in Section 8.5, "Exporting the Notification Script Files". To install the files, copy and unzip the casd_notification.zip file into any directory on the CASD Server system.
The following sections explain how to set up the scripts based on platform.
-
Open the lferun.cmd file with a text editor. Set the NOTIF_DIR variable to the full path of the notification script, and then save the file.
-
Open the send2em.cmd file with a text editor. Set the EMCLI_DIR variable to the full path of the installation directory for the EM CLI Client, and then save the file.
-
Open the lferun.sh file with a text editor. Set the EMCLI_DIR variable to the full path of the installation directory for the EM CLI Client, and then save the file.
-
Execute the following command to change the permissions on the script file:
chmod 755 ./lferun.sh
8.4 Setting up Status Notification
To configure CASD to call the notification script:
-
Log into the CASD console with an account that has Administrative permissions.
-
Click on the Administration tab and expand Notifications.
-
Click on Notification Methods, then click on Create New.
The Create New Notification Method window appears.
-
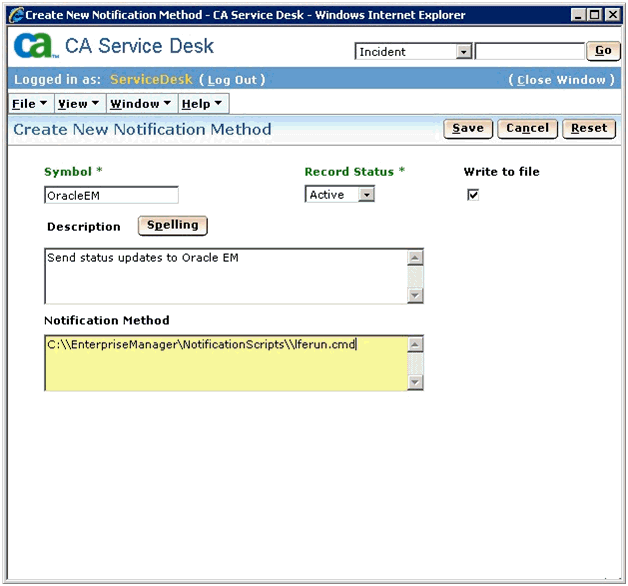
Enter information in the fields as shown in Figure 8-3. The path in the Notification Method field should be the path where the notification script is installed.
Note:
On Windows platforms, you must use double backslashes to separate directory names in the path. -
Click Save.
-
Click on Notification Rules, then click on Create New.
The Create New Notification Rule window appears.
-
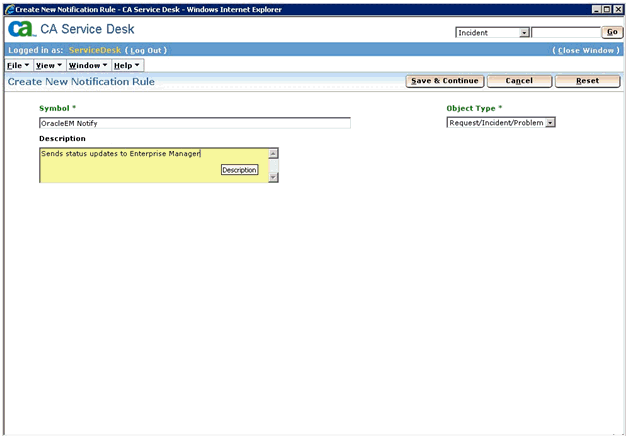
Enter information in the fields as shown in Figure 8-4, then click Save & Continue.
-
Select a Message Template of Default Update Status message template for request/incident/problem or any other appropriate template.
Note:
It is imperative that the template selected has the Auto Notification set to Yes. If the template you want to use does not have it set to Yes, edit the template and check the Auto Notification check box. -
Click on the Contacts tab, then click on Update Contacts.
The Contact Search window appears.
-
Enter information for the account the CASD adapter uses exclusively, and click Search to retrieve the contact information.
-
Click on the account name in the left column, click on the >> button to move it to the right column, then click OK.
-
Click Save to save the new notification rule.
-
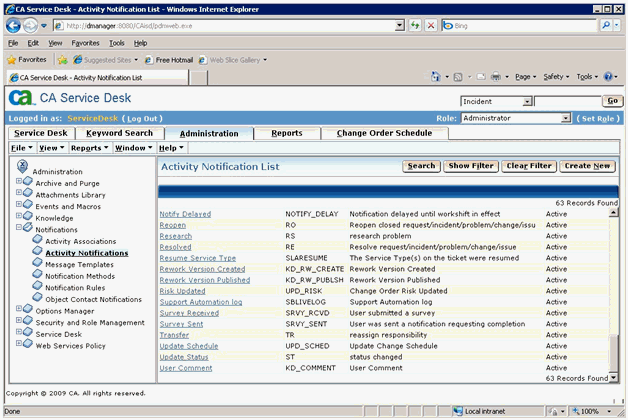
Click on Activity Notifications and find Update Status in the Activity Notification List. See Figure 8-5 for an example of the Activity Notification List.
-
Click on Update Status, then click Edit.
The Update Status Activity Notification Detail window appears.
-
Click on Update Notification Rules.
The Notification Rules Search window appears.
-
Enter OracleEM Notify in the Symbol field and click Search.
-
Click on OracleEM Notify in the left column, click the >> button to move it to the right column, then click OK.
The Update Status Activity Notification Detail window should appear.
8.5 Exporting the Notification Script Files
The notification script files are included in the Self Update archive that was installed in Section 2.2, "Installing the Connector".
To extract the script files:
-
Determine the command required to export the archive files. To do this, perform the following steps:
-
From the Setup menu, select Extensibility, then Self Update.
-
Click on the Management Connector link in the Type column.
The CASD connectors appear in the list with a status of Available.
-
Click on the CASD connector, then select Export from the Actions list.
A pop-up window, like the example shown in Figure 8-6, appears with the command required to export the file.
-
-
Open a command window on the Management Server host system and navigate to a temporary directory where you can copy and unzip the file.
-
Log into EM CLI using the following command. You will be asked to provide the password information for the sysman account.
emcli login -username=sysman
-
Run the EM CLI export_update command from your system, changing <dirname> to the full path of the temporary directory.
This action creates a zip file. The file name is comprised of the id value you specify in the export_update command with a .zip extension. In the example command in Figure 8-6, the zip file name would be:
E9F684312AE7A18E98340715D079E58D.zip
-
Extract the adapter installation jar file from the zip file using the following command:
unzip *.zip archives/casd_notification.zip
8.6 Uninstalling the Customization to CASD
To uninstall changes made to CASD to allow for inbound ticketing operations, you must remove the notification method setup to call the notification script. Perform the following steps:
-
Log in to the CASD console with an account with Administrative permissions.
-
Click the Administration tab and expand Notifications.
-
Click Message Templates and select the Default Update Status message template for request/incident/problem or the template used for initial setup.
-
Click the Contacts tab, then click Update Contacts.
-
Click on the account name in the right column, and move it to the left column, then click OK.
-
Click Save.
-
Click Activity Notifications and find Update Status in the Activity Notification List.
-
Click Update Status, then click Edit.
-
Click Update Notification Rules.
-
Enter OracleEM Notify in the Symbol field and click Search.
-
Click OracleEM Notify in the right column and move it to the left column, then click OK.
8.7 Uninstalling EM CLI
To uninstall the Enterprise Manager command line interface (emcli) perform the following steps:
-
Navigate to the
emcliinstallation directory. -
Delete the
emclidirectory from the system.
