5 Creating, Editing, and Using Jobs
This chapter describes how to create and edit jobs in Enterprise Manager Cloud Control for the Microsoft SQL Server.
The following topics are provided:
5.1 Creating and Editing Jobs
To create and edit jobs, follow these steps:
-
In Enterprise Manager Cloud Control 13c, click Enterprise, then Job, then click Activity.
-
On the Job Activity page (Figure 5-1), select a job type from the Create Job menu and click Go.
Select one of the following:
-
Microsoft SQL Server and/or SQL Agent Start
-
Microsoft SQL Server and/or SQL Agent Stop
-
Microsoft SQL Server Pause or Resume
-
Microsoft SQL Server Kill Session
-
Microsoft SQL Server Backup Database
-
Microsoft SQL Server Delete Backup Database
-
Microsoft SQL Server Restore Database
-
Microsoft SQL Server Create Index
-
-
In the General tab of the Create <Job Type> Job page, provide a name for the job and add the individual targets or one composite target such as a Group.
Note:
If you are editing a job, then modify the job name and the selected targets. -
In the Parameters tab of the Create <Job Type> Job page, from the Options menu, select an appropriate option to make the job function accordingly when it starts.
You can select one of these options as shown in Table 5-1:
Table 5-1 Job Parameters Options
Job Type Available Options Microsoft SQL Server and/or SQL Agent Start
-
Start SQL Server and SQL Server Agent services
(You will select this option when both, SQL Server and SQL Server Agent, are stopped or when SQL Server is running but the SQL Server Agent is stopped)
-
Start SQL Server service
(You will select this option when both, SQL Server and SQL Server Agent, are stopped and if you want to start only the SQL Sever)
Microsoft SQL Server and/or SQL Agent Stop
-
Stop SQL Server and SQL Server Agent services.
You will select this option:
- When both SQL Server and SQL Server Agent are running.
- When SQL Server is paused but the SQL Server Agent is running.
- When SQL Server is running/paused but the SQL Server Agent is stopped.
-
Stop SQL Server Agent service.
(You will select this option when you want to stop a running SQL Server Agent)
Microsoft SQL Server Pause or Resume
-
Pause SQL Server service
(You will select this option when you want to pause a running SQL Server)
-
Resume SQL Server service
(You will select this option when you want to resume a paused SQL Server)
Microsoft SQL Server Kill Session
-
End a single active SQL Server user session.
(You will select this option to end an active user session by specifying the session ID)
Microsoft SQL Server Backup Database
-
Creates a backup of the database specified by Database Name in the Parameters section of the job.
-
Unless specified by editing the monitoring configuration of a deployed target in the Backup Path value, the database backup files will be saved to the default SQL Server backup location. The path specified must not end in a backslash.
-
The Backup job is also available as a button on the Database page in the Backup Management section as Backup Now.
(You will select this job when you want to take a backup of the specified database.)
-
The Backup job comes with Full or Differential backup options.
-
The Backup job also comes with the option to backup all databases on an instance. This option is available when creating the backup job from the Job Activity page (Figure 5-1).
-
This option will back up all databases except
master,model,msdb, andtempdb. This requires that all databases being backed up are set to the Simple Recovery Model, or the job will fail without backing up any databases.
Microsoft SQL Server Delete Backup Database
-
Removes the backup file from the SQL Server by specifying Media Set ID and full path to the backup file in the Job Parameters section.
-
The Delete Backup job is also available as a button on the Database page in the Backup Management section as Delete.
(You will select this job when you want to remove backup file that is no longer needed)
Microsoft SQL Server Restore Database
-
Restores a database from backup by specifying the full path to the backup file as well as the database name in the Job Parameters section.
-
The Restore Database jobs is also available as a button on the Database page in the Backup Management section as Restore.
(You will select this option when you want to restore a database from a backup taken using the Microsoft SQL Server Backup Database job.)
-
The restore job may be run with a full backup file or a full backup file plus a differential backup file.
Cloud Control starts the SQL server and agent services according to the selection made.
-
-
In the Credentials tab of the Create <Job Type> Job page, select an appropriate option for credentials.
You can choose to use the preferred credentials that are already set or override the preferred credentials with new credentials. In either case, you need to provide the credentials for agent host and database host.
To set the preferred credentials, click Preferences at the top-right corner of the Cloud Control console. From the left-vertical navigation bar, click Preferred Credentials. Cloud Control displays the Preferred Credentials page. On this page, you can set the preferred credentials
-
In the Schedule tab of the Create <Job Type> Job page, schedule the job.
-
In the Access tab of the Create <Job Type> Job page, define or modify the access you want other users to have to this job.
-
Click Submit to create the job.
Notes:
-
To enable use of the Job buttons found in the Summary section of the Target home page and the Backup Management buttons found in the Database page, be sure to set the Preferred Credentials with SQL Server Authentication for the Microsoft SQL Server target type.
-
Regardless of the authentication used for monitoring, the Kill Session, Backup, Delete Backup, and Restore jobs require SQL Server Authentication. To use these jobs be sure to specify credentials for SQL Server authentication.
-
The Microsoft SQL Server Pause or Resume job is only supported for stand-alone Microsoft SQL Server instances. Pause of Resume Jobs submitted for Microsoft SQL Server 2005, 2008, 2012, and 2014 cluster instances will fail with the appropriate error message.
5.2 Using the Backup and Restore Jobs
To use the backup and restore jobs:
-
From the Targets, select All Targets, then select the Microsoft SQL Server target.
-
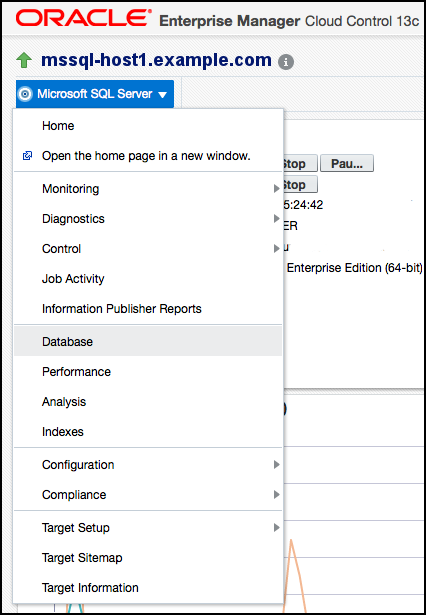
From the Microsoft SQL Server menu, select Database as shown in Figure 5-2:
-
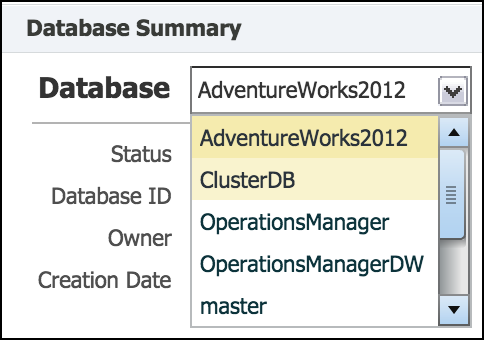
Use the drop down to select the database you wish to back up as shown in Figure 5-3.
Several options are available using the Backup Management Region.
-
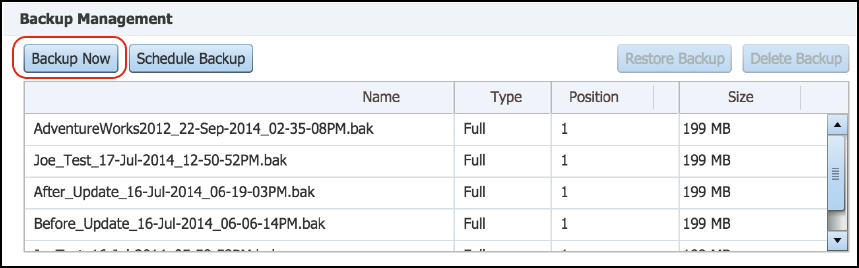
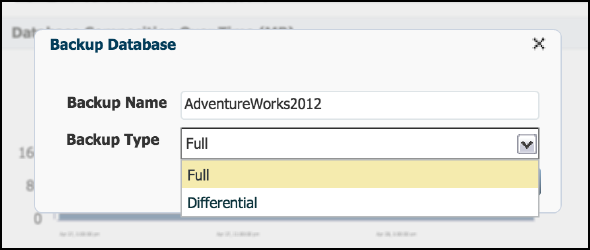
Click Backup Now to create a backup immediately (Figure 5-4).
If you want to give your backup a custom name, then use the Backup Name text box. Select either Full or Differential for the Backup Type (Figure 5-5). Click Backup to confirm.
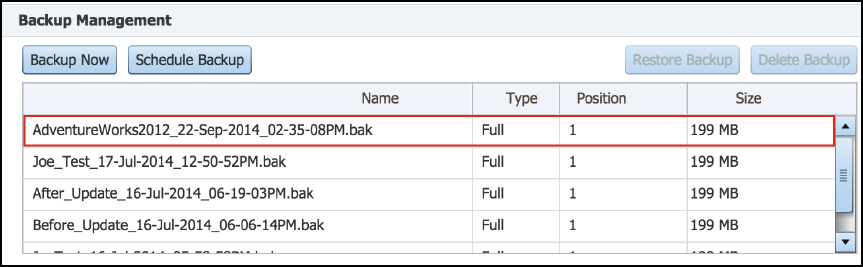
When the backup is complete, it will appear in the list (Figure 5-6):
-
You can also create a backup schedule by clicking Schedule Backup.
-
Click Yes to confirm that you would like to go to Enterprise Manager's job creation system where you can complete the scheduling process.
-
Give the Job a name (Figure 5-7):
-
Click on Parameters and specify the name of the database you wish to backup.
-
Optionally, you can specify a custom backup name and use the Backup Type drop down to select Full or Differential. Users also have the option to back up all user databases on the instance by selecting True for Backup All User Databases. Otherwise, only the specified database is backed up.
-
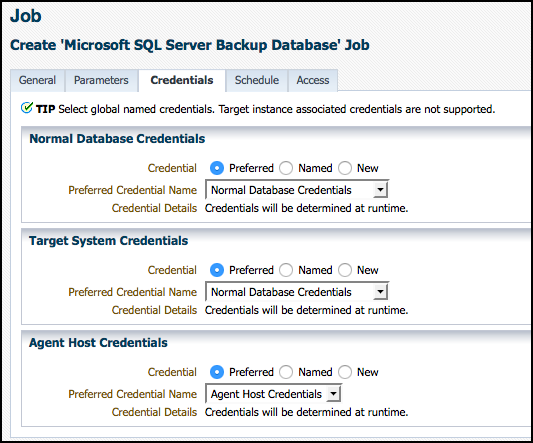
Select or enter credentials as shown in Figure 5-8. If you've configured Preferred Credentials for the target, you can select SYSADMIN Database Credentials, Target System Credentials, and Agent Host Credentials.
-
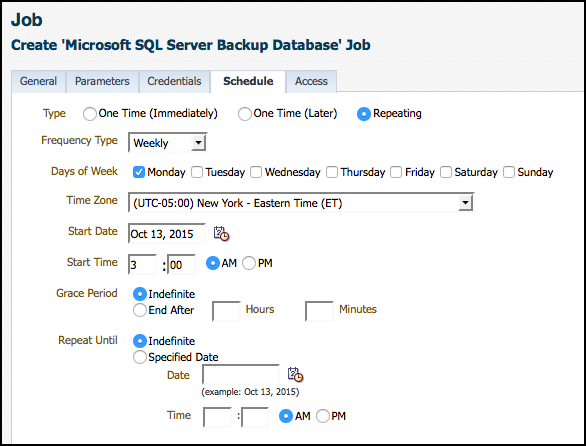
Use Enterprise Manager's built-in scheduling options to define the time and recurrence of the schedule as shown in Figure 5-9:
-
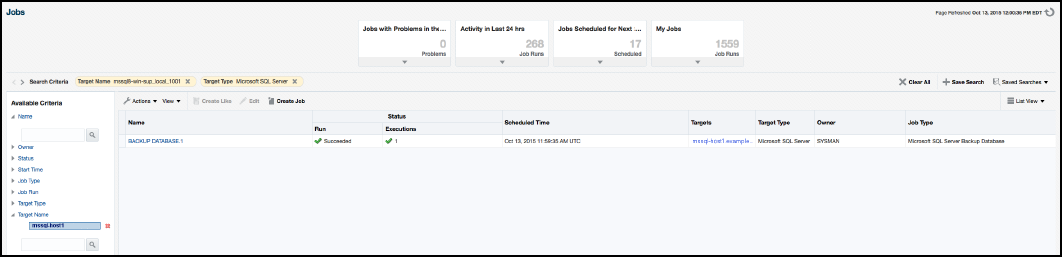
Click Submit. The schedule will be shown in the Job Activity view (Figure 5-10).


Note:
You can only restore backups that meet the following criteria. The backup is:-
File backup (not tape)
-
MS SQL Server knows this backup (that is, the backup is in the list of known backups, list comes from query, seen below)
-
Not password protected
-
Of the type 'SIMPLE'
-
Not damaged