10 Configuring a Failover Collector System
This chapter describes the procedure for configuring a failover remote Collector system that will take over monitoring of network traffic in the event that the primary Collector system becomes unavailable. Note that the described procedure assumes that the primary Collector system has been installed, configured, and is fully operational.
The procedure to configure a failover Reporter system is described in Chapter 9, "Configuring a Failover Reporter System".
Be aware that SSL and Oracle Forms traffic are particularly sensitive to disruptions in the TCP packet stream. This is because they require state information to be maintained for the duration of the connection. Therefore, during a failover or fallback, traffic may be lost.
10.1 Introduction to Failover Collector Systems
The configuration of a secondary (or failover) Collector system offers the advantage that it can seamlessly take over monitoring of network traffic in the event that the primary Collector system becomes unavailable. In this way, a high level of operational reliability is achieved. Note that this facility is only available for remote Collectors. The configuration of a failover Collector system is shown in Figure 10-1.
Figure 10-1 Failover Collector Configuration
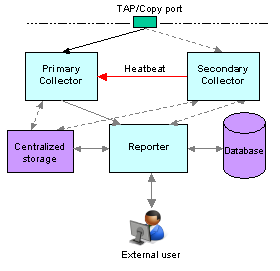
Description of ''Figure 10-1 Failover Collector Configuration''
At server level, a crossover network cable connects the primary and secondary Collector systems.As long as a regular "heartbeat" continues between the primary and secondary servers, the secondary server will not initiate monitoring of the network traffic. However, the secondary server will take over the monitoring task of the primary Collector as soon as it detects a failure in the "heartbeat" of the primary server. This process is referred to as failover. The secondary Collector will take over the primary Collector's virtual IP address, and it is through this that the Reporter system will communicate with it.
Note that failback (that is, the process of restoring the primary Collector to its original state), must be performed manually. The procedure is described in Section 10.4, "Initiating Collector Failback".
In order to configure a failover Collector installation, the following conditions must be met:
-
A secondary TAP or copy port must be inserted at the same location as the primary one within the monitored network.
-
The RUEI software version of the primary and secondary Collectors must be identical.
-
The primary and secondary Collector systems must be directly connected via a crossover cable. In addition, both systems must also be connected to a local or public network in order to connect to the Reporter system.
-
Both the primary and secondary Collector systems must have direct access to the same shared storage on which log files and replay data is written. In particular, the
$RUEI_DATA/collectordirectory must be accessible by both systems.
When configuring a failover Collector system, be aware of the following:
-
When failover to the secondary Collector is initiated, the data that is currently being recorded by the primary Collector is lost. Typically, this represents information about traffic for up to a 1-minute period.
-
When failover is initiated, state information that needs to be maintained for the duration of the connection for TCP, HTTP, SSL and Oracle Forms-based sessions is lost. Therefore, details of these sessions during failover are not available.
-
Because of the above points, some page views are lost. It is possible that these pages contain session logon details. In this case, the session is reported as anonymous. In addition, specific user flow steps can be lost.
10.2 Installing the Secondary Collector
The installation procedure for a secondary Collector system is identical to that of a remote Collector system.
-
Install the Linux operating system and the RUEI Collector software on both Collector systems. The procedure to do so is described in Section 2.1, "Prerequisites".
-
When starting the installation procedure for the secondary Collector system, ensure that the
/etc/ruei.conffile is identical to that of the primary Collector system.
10.3 Configuring the Secondary Collector
Do the following:
-
Copy the .
sshdirectory (created when following the procedure described in Section 2.13, "Configuring Reporter Communication (Split-Server Setup Only)" on the primary Collector to the secondary Collector. Note that it must be copied to the same location. -
On the primary Collector system, issue the following commands to add the "host keys" for the Collector to the global
known_hostsfile on the Reporter system:. /etc/ruei.conf ifconfig ${RUEI_COL_FAILOVER_VIRTUAL_DEV}:0 $RUEI_COL_FAILOVER_VIRTUAL_IP \ netmask $RUEI_COL_FAILOVER_VIRTUAL_MASK up sleep 2 arping -c 3 -A -I $RUEI_COL_FAILOVER_VIRTUAL_DEV $RUEI_COL_FAILOVER_VIRTUAL_IPOn the Reporter system, use an
arp-aorpingcommand to check that you can reach the virtual IP address on the primary Collector system.Then, issue the following command:
ssh-keyscan -t rsa,dsa Collector-virt-ip-address >> /etc/ssh/ssh_known_hostsAs the
RUEI_USERuser, ensure that the virtual Collector IP address is not specified in the~/.ssh/known_hostsfile.Attempt to establish an SSH connection as the
RUEI_USERuser from the Reporter system to the primary Collector system. Note that you should not receive any warning or prompt about the host key, and you should be logged in automatically.On the primary Collector system, bring down the virtual IP address using the following command:
ifconfig ${RUEI_COL_FAILOVER_VIRTUAL_DEV}:0
$RUEI_COL_FAILOVER_VIRTUAL_IP netmask $RUEI_COL_FAILOVER_VIRTUAL_MASK down
Repeat the above procedure for the secondary Collector system. Upon completion, four keys should be specified in the
/etc/ssh/ssh_known_hostsfile for the virtual IP address. -
Ensure that the
uidandgidsettings of theRUEI_USERuser are the same on both the primary and secondary Collector systems. For example:id moniforce uid=501(moniforce) gid=502(moniforce) groups=502(moniforce)
Important
If you need to change the
UIDof theRUEI_USERuser on an operational Collector system, you should:-
Issue the following commands as the
RUEI_USERuser:appsensor stop wg sslloadkeys -f
Note that you should enter
yes(written in full) when prompted. -
Change the user:group ownership of all files and directories under
/var/opt/ruei/collectorto the newUID. -
Issue the following command as the
rootuser:/etc/init.d/crond restart
-
-
Configure the static IP addresses on both Collector systems used for the crossover cable. This can be done using a utility such as
system-config-network. -
Mount the shared storage on the
RUEI_DATA/collectordirectory, and edit the/etc/fstabfile so that it is mounted at boot. For example:10.6.5.9:/home/nfs /var/opt/ruei/collector/data nfs rsize=1024,wsize=1024 0 0
Important:
Note that if the Collector is already operational before this step, and the$RUEI_DATA/collectordirectory is not shared, the existing directory content must be copied to the mount point specified above. Security Officers should be aware that this copying process includes server SSL keys.Note that if the Collector is already operational before this step, and the
$RUEI_DATA/collectordirectory is not shared, the existing directory content must be copied to the mount point specified above. Security Officers should be aware that this copying process includes server SSL keys.Alternatively, if your shared storage does not provide sufficient bandwidth to keep up with the storage of replay data, you can symlink the
REPLAYdirectories to a local location instead. In this case, only the HTTP log files and logs will be written to the shared disk. However, be aware that if you specify this configuration, replay data recorded before failover is initiated will be lost, and only sessions after the failover are accessible. In addition, these links will be reset to factory defaults and, therefore, the directories do not currently exist in the initial Collector setup. -
Edit the
/etc/ruei.conffile on both the primary and secondary Collector systems to specify the virtual, primary, and standby IP addresses. For example:RUEI_COL_FAILOVER_PRIMARY_IP=192.168.56.201 # crossover cable primary RUEI_COL_FAILOVER_STANDBY_IP=192.168.56.202 # crossover cable secondary RUEI_COL_FAILOVER_VIRTUAL_IP=10.11.12.23 # (virtual) IP to access Collector RUEI_COL_FAILOVER_VIRTUAL_DEV=eth0 RUEI_COL_FAILOVER_VIRTUAL_MASK=255.255.255.0
The RUEI_COL_FAILOVER_PRIMARY_IP and RUEI_COL_FAILOVER_STANDBY_IP settings should specify the IP addresses of the crossover cable between the two Collector systems. See Section 2.4.1, "Check The RUEI Configuration File" for an explanation of these settings. Note that the settings specified on both Collector systems must be identical.
-
Ensure that all communication between the Reporter and the Collector is via the specified virtual IP address. This is necessary to ensure automatic failover to the secondary Collector system in the event that the primary Collector system becomes unavailable. Note that this may require you to reconfigure existing Collector systems.
-
Install the
ruei-collector-failover.shscript on both Collector systems. For example, in the/usr/local/bindirectory. It is located in the RUEI zip file (see Section 2.3, "Unpacking the RUEI Software"). -
Add the following entry to the
rootuser'scrontabfile of both the primary and secondary Collector systems:* * * * * /usr/local/bin/ruei-collector-failover.sh
This causes the secondary Collector to send a heartbeat signal to the primary Collector every 60 seconds, and take over processing of RUEI monitored traffic in the event that the Primary Collector becomes unavailable.
Wait at least 60 seconds.
-
Check the output of the
/sbin/ifconfigcommand on the primary Collector to ensure that the virtual IP address has been correctly configured. For example:$ /sbin/ifconfig eth0 Link encap:Ethernet HWaddr 08:00:27:F7:B0:14 inet addr:192.168.56.201 Bcast:192.168.56.255 Mask:255.255.255.0 inet6 addr: fe80::a00:27ff:fef7:b014/64 Scope:Link UP BROADCAST RUNNING MULTICAST MTU:1500 Metric:1 RX packets:80 errors:0 dropped:0 overruns:0 frame:0 TX packets:311 errors:0 dropped:0 overruns:0 carrier:0 collisions:0 txqueuelen:1000 RX bytes:12793 (12.4 KiB) TX bytes:26268 (25.6 KiB) eth0:0 Link encap:Ethernet HWaddr 08:00:27:F7:B0:14 inet addr:10.11.12.23 Bcast:192.168.56.255 Mask:255.255.255.0 UP BROADCAST RUNNING MULTICAST MTU:1500 Metric:1 -
Unregister the primary remote Collector with the Reporter, and re-register it using the virtual IP address.
-
Shutdown the primary Collector system, and verify that the secondary Collector begins processing monitored traffic. A warning that the primary system is unreachable and that the secondary system is being activated should be reported in the event log. Note that after doing so, you must perform a failback to return your RUEI installation to its original state.
10.4 Initiating Collector Failback
Failback to the primary Collector system must be performed manually in order to return your RUEI installation to its original state. Do the following:
-
On the primary Collector system, issue the following commands:
. /etc/ruei.conf
echo $RUEI_COL_FAILOVER_PRIMARY_IP > \ /var/opt/ruei/collector/active-failover-server
-
On the secondary Collector system, issue the following commands:
. /etc/ruei.conf ifconfig ${RUEI_COL_FAILOVER_VIRTUAL_DEV}:0 $RUEI_COL_FAILOVER_VIRTUAL_IP \ netmask $RUEI_COL_FAILOVER_VIRTUAL_MASK down -
On the primary Collector system (with the
/etc/ruei.conffile still loaded), issue the following commands:ifconfig ${RUEI_COL_FAILOVER_VIRTUAL_DEV}:0 $RUEI_COL_FAILOVER_VIRTUAL_IP \ netmask $RUEI_COL_FAILOVER_VIRTUAL_MASK up sleep 2 arping -c 3 -A -I $RUEI_COL_FAILOVER_VIRTUAL_DEV $RUEI_COL_FAILOVER_VIRTUAL_IP