| Siebel CRM Advisor Administration Guide Siebel Innovation Pack 2015 E24718-01 |
|


 Previous |
 Next |
View PDF |
| Siebel CRM Advisor Administration Guide Siebel Innovation Pack 2015 E24718-01 |
|
Previous |
Next |
View PDF |
Use Trigger and Target Feature tables when you want the values to appear in a UI control to change depending on a selection in another UI control. For example, if you want to display a set of values in either inches or centimeters, use a UI control tied to a Trigger table to allow a user to select Metric or Imperial. Based on that selection, a drop-down list tied to a Target table displays a set of values for Centimeters or a set of values for Inches. This relationship is shown in Figure 12-1.
Target tables allow you to create multiple sets of data (row types) for the same table. The Target table is a Feature table whose rows are defined by one or more row types. A row type is one particular set of values that appears if the user selects a certain value from the trigger table.
The Trigger table defines a relationship between its Code values and the named row types in the Target table. The field values in a Trigger table column are used to dynamically set the active row set for the Target table.
In the Trigger and Target example of a drop-down list that displays metric and imperial measurements, the UI control tied to the Trigger table gives the user the option of selecting Metric or Imperial. The UI control tied to the Target table displays one of two sets of values:
If the user selects Metric, the Trigger table references the Metric Row Type in the Target table and displays the metric values 50 cm, 65 cm, 81 cm.
If the user selects Imperial, the Trigger table references the Imperial Row Type in the Target table and displays the imperial values 20 inch, 27 inch, 32 inch.
In the Target table, there are two row types: Metric and Imperial. You create these row types in the Target Feature table editor. By default, the Feature table designer creates a row type named table_DATA, where table is the name of the table. The CODE values for both sets are the same (for example, SM, MED, LG). The Description column contain the values for each set of data. Data in the Configuration table references only the single set of CODE values, so no extra work is required in the Configuration table to make reference to multiple row types in the Target table.
To determine which row type appears, the Trigger table contains a trigger column that references the Target table. This column contains the names of the row types: Metric and Imperial.
|
Note: A browser-based application offers unconstrained selections, that is, users can move freely from UI control to UI control, making selections from a complete list of options, and can go back and change selections without restriction. Trigger and Target Feature tables should be used only in cases where they best serve the user. |
To create trigger and target feature tables for Advisor applications, perform the following tasks:
To edit rows in the Feature table
See "Editing a Feature Table" for instructions on completing this step.
Each of these steps is explained in the following procedures.
To create a target feature table
Navigate to Administration - Product, then Advisor Pagesets and My Pagesets.
Select the pageset for which you want to create a target feature table, and click the Feature Tables view tab.
Choose New Record from the Feature table list menu.
A new Feature Table window appears.
Enter a name, without spaces, for the Feature table.
To create new Row Types for the target feature table
Navigate to Administration - Product, then Advisor Pagesets and My Pagesets.
Select a pageset, and click the Feature Tables view tab.
Select a Target table.
Click the Editor view tab.
In the Editor view, click New.
A new row appears in the editor.
Click the Row Type picklist icon to open the Feature Table Rowset picklist.
The four types of feature tables are described in Chapter 7, "Working with Advisor Feature Tables."
To create a trigger feature table
Navigate to Administration - Product, then Advisor Pagesets and My Pagesets.
Select a pageset, and click the Feature Tables view tab.
From the Feature Table list menu, choose New Record.
A new Feature Table record appears.
Complete the following required fields.
| Field Name | Description |
|---|---|
| Name | Enter a name, without spaces, for the Feature table. |
| Table Type | From the Table Type drop-down list, select Trigger. |
Select the Designer tab, and choose New Record from the list menu.
A new record appears.
Complete the following fields.
| Field Name | Description |
|---|---|
| Column Name | This column links to the Target table. |
| Target Table | Open the Target Table picklist and select the Target table you created in the previous procedure. |
Select the Editor tab and follow the steps in "To enter data in an Advisor pageset feature table".
|
Note: In the column tied to the Target table, enter row types. |
To tie the Trigger and Target Feature tables to UI controls
Follow the steps in the procedure "About Advisor Input UI Controls" to create a UI control to display the trigger table values and a UI control to display the target table values.
In this example, you add Trigger and Target Feature tables that populate a drop-down list with appropriate year values, based on whether a user wants to purchase a new or used car.
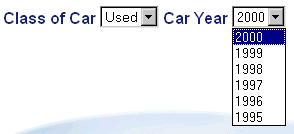
At runtime, if users of the Advisor application select New for Class of Car, they have one option in the Car Year drop-down list, see Figure 12-2.
If users select Used, they can choose from a list of year values, see Figure 12-3.
Creating the YEAR target table requires three steps:
Creating a target table named YEAR.
Creating row types for the table.
Populating the target table with values.
Each of these steps is explained in the following procedures.
To create the YEAR target table
Navigate to Administration - Product, then Advisor Pagesets and My Pagesets.
Select a pageset, and click the Feature Tables tab.
Choose New Record from the list menu.
A new Feature Table record appears.
Enter YEAR in the Name field.
From the Table Type drop-down list, select Target.
To create the row types for the YEAR Target table
Navigate to Administration - Product, then Advisor Pagesets and My Pagesets.
Select a pageset, and click the Feature Tables view tab.
In the Feature Tables tab, select the YEAR Target table.
On the Editor tab, click New.
A new row appears in the editor.
Click the Row Type picklist icon to open the Feature Table Rowset picklist.
Click New.
The Feature Table Rowset dialog appears.
In the Name text box, enter YEAR_NEW.
Click Save.
Repeat Steps 4 through 6 and create a second new rowset named YEAR_USED.
To populate the YEAR target table
Navigate to Administration - Product, then Advisor Pagesets and My Pagesets.
Select a pageset, and click the Feature Tables view tab.
Select the YEAR target table from the Feature Tables list.
On the Editor tab, create a row with values for the YEAR_NEW rowset.
In the Feature table editor, create a row with values for the YEAR_USED rowset.
Use the following procedure to create the CLASS Trigger Table.
To create the CLASS Trigger Table
Navigate to Administration - Product, then Advisor Pagesets and My Pagesets.
Select a pageset, and click the Feature Tables view tab.
From the Feature Table applet menu, choose New.
A new Feature Table window appears.
In the Name text box, enter CLASS.
From the Type drop-down list, select Trigger.
From the Designer tab form menu, choose New Record.
In the Column Name text box, enter YEAR.
In the Designer tab, the Target Table button is enabled.
Click the Target Table button to open the Target Table picklist.
Select the YEAR target table and click OK.
Follow the steps in "To enter data in an Advisor pageset feature table".
|
Note: In the column tied to the Target table, you can only enter row types. |
Use the following procedure to create UI controls to display the Trigger and Target values.
To tie the Trigger and Target Feature tables to UI controls
Navigate to Administration - Product, then Advisor Pagesets and My Pagesets.
Select a pageset.
In the Input UI tab, click New.
Enter values in the new row.
For more information, see Section , ”To create input UI controls with Advisor”.
Click New again.
Enter values for the second row.
As mentioned in "Trigger and Target Feature Tables" a change in a trigger may cause a change in the set of options presented in one or more target choices. Two variations on the supported trigger and target functionality are multi-variable triggers and cascading triggers. For these variations, see Appendix A, "Implementation of Multi-Variable and Cascading Triggers."