| Siebel CRM Configuring Siebel Open UI Siebel Innovation Pack 2015 E52417-01 |
|


 Previous |
 Next |
View PDF |
| Siebel CRM Configuring Siebel Open UI Siebel Innovation Pack 2015 E52417-01 |
|
Previous |
Next |
View PDF |
This topic describes some of the general customization tasks that you can do in Siebel Open UI. It includes the following information:
"Deriving Presentation Models, Physical Renderers and Plug-in Wrappers"
"Adding Presentation Model Properties That Siebel Servers Send to Clients"
"Using the Base Physical Renderer Class With Nonapplet Objects"
"Allowing Users to Interact with Clients During Business Service Calls"
You must enable the object manager to use Siebel Open UI before you can do any customization work.
To enable object managers for Siebel Open UI
Enable the object manager for the Siebel Server:
Log in to the Siebel CRM client with administrator privileges.
Navigate to the Administration - Server Configuration screen, and then the Servers view.
In the Components list, query the Component field for the object manager where you must enable Siebel Open UI.
For example, query for the following value. You must include the double quotes:
"Call Center Object Manager (ENU)"
In the bottom applet, click Parameters.
In the Component Parameters list, query the Parameter field for EnableOpenUI.
Set the Value on Restart field to TRUE.
Log out of the client, and then close the browser.
As an alternative to using the administrative screens, you can modify the application configuration file on the Siebel Server in the same way that you modify this file on the client in Step 2.
Enable Siebel Open UI on the Mobile Web Client:
On the client computer, use a text editor to open the application configuration file.
For example, to open the configuration file for Siebel Call Center, navigate to the following folder, and then open the uagent.cfg file:
client_install_location\bin
In the InfraUIFramework section, set the EnableOpenUI parameter to the following value:
[InfraUIFramework]
EnableOpenUI=TRUE
Save, and then close the application configuration file.
Log in to Siebel Call Center, and then verify that it opens the Siebel Open UI client.
To revert to the high-interactivity client, you can set the EnableOpenUI parameter to FALSE. If you do this reversion, then you must use Internet Explorer, version 8 or earlier when you open the client.
Stop the Siebel Server:
On the computer where the Siebel Server resides, click the Start menu, Control Panel, Administrative Tools, and then the Services menu item.
In the Services dialog box, right-click the Siebel Server service, and then click Stop.
Wait for the Siebel Server to stop.
Optional. Add object managers for Siebel Mobile:
Stop the Gateway Server, and then make a backup copy of the siebns.dat file.
Restart the Gateway Server.
Open a command line window and set the SIEBEL_HOME environment variable to the following folder:
SES_HOME/siebsrvr
Navigate to the following folder:
SES_HOME/siebsrvr/bin/language_code
For more information about the language_code, see "Languages That Siebel Open UI Supports".
Run the create_compdef_sia.ksh script or the create_compdef_sia.bat file. Use the following parameters:
./create_compdef_sia.ksh GATEWAY:port_number ENTERPRISE user_name user_password language_code
Examine the srvrcfg log files, and then make sure Siebel CRM did not log any errors when it enabled the new server components.
Open the Server Manager, and then run the following commands:
enable compgrp HandheldSync for server server_name
enable compgrp HandheldSyncSIS for server server_name
Start the Siebel Server:
Click the Start menu, Control Panel, Administrative Tools, and then the Services menu item.
In the Services dialog box, right-click the Siebel Server service, and then click Start.
Wait for the server to start.
Optional. Make sure the server components you enabled in Step 4g are on line.
Optional. Add virtual directories for Siebel Mobile object managers:
Use Windows Explorer to navigate to the following folder:
INSTALL_DIR\eappweb\bin\
Create a back up copy of each of the following files:
eapp.cfg.
eapps_sia.cfg.
Web server configuration files. For example, obj.conf, httpd.conf, and so on.
Stop the HTTP server.
Open a command line window and navigate to the following folder:
INSTALL_DIR/eappweb/config
Run the new_virdirs.bat script or the new_virdirs.sh script. Use values from the following table:
| Operating System | Command |
|---|---|
| Windows | Run the following command:
new_virdirs.bat language_code |
| Unix | Run the following command:
newvirdirs.sh languages web_server where:
|
If the script fails to run correctly, then you must restore all files from the backup copies you made in b, and then run the script again until it successfully finishes.
Restart the HTTP Server.
Make sure you can use the URL to access the new server components.
Log in to the Siebel CRM client and make sure it displays the Siebel Open UI client.
Table 5-1 describes how Siebel Open UI loads a Siebel application differently depending on how you set the EnableOpenUI parameter.
Table 5-1 How Siebel Open UI Loads the Siebel Application Depending on How You Set the EnableOpenUI Parameter
| EnableOpenUI Setting | Description |
|---|---|
|
EnableOpenUI=FALSE |
If you:
|
|
EnableOpenUI=TRUE |
If you:
|
This topic describes how to prepare Siebel Tools so that you can use it to customize Siebel Open UI. For more information, see Using Siebel Tools.
To prepare Siebel Tools to customize Siebel Open UI
Add the EnableOpenUI parameter to the Siebel Tools configuration file:
In Windows Explorer, navigate to the following folder:
SIEBEL_TOOLS_HOME\bin\language_code
For more information about the language_code, see "Languages That Siebel Open UI Supports".
Use a text editor to open the tools.cfg configuration file.
Add the following parameter to the InfraUIFramework section:
EnableOpenUI = TRUE
Display object types:
Open Siebel Tools.
For more information, see Using Siebel Tools.
Choose the View menu, and then the Options menu item.
Click the Object Explorer tab.
Scroll down through the Object Explorer Hierarchy window to locate the object type you must display.
It is recommended that you set up Siebel Tools to display all object types. To display an object type and all child object types of an object type, make sure the parent includes a check mark with a white background.
Click OK.
You can use the configuration file to specify parameters that determine how a specific Siebel application runs. For more information about the application configuration file, see Configuring Siebel Business Applications.
To modify the application configuration file
Open Windows Explorer, and then navigate to the following folder:
INSTALL_DIR\eappweb\bin\language_code
For more information about the language_code, see "Languages That Siebel Open UI Supports".
Use a text editor to open the application configuration file that you must modify.
Each Siebel application uses a different configuration file. For example, Siebel Call Center uses the uagent.cfg file. The application configuration file uses the .cfg file extension.
Locate the section that you must modify.
Each application configuration file uses square brackets to indicate a section. For example:
[InfraUIFramework]
Modify an existing parameter or add a separate line for each parameter that you must specify.
Use the following format:
parameter_name = "<param1 param2>"
where:
param1 and param2 are the names of the parameters.
For example:
TreeNodeCollapseCaption = "<img src='images/tree_collapse.gif' alt='-' border=0 align=left vspace=0 hspace=0>"
Deriving is a coding technique that you can use with Siebel Open UI to create a reference between two presentation models, physical renderers, or plug-in wrappers. Where Siebel Open UI derives one presentation model, physical renderer or plug-in wrapper from another presentation model, physical renderer or plug-in wrapper. This referencing can make sure that the derived object uses the same logic as the source object. It also helps to reduce the amount of coding you must perform.
The following code includes all the code required to derive one presentation model from another presentation model:
|
Note: he same methodology can be applied for physical renderers and plug-in wrappers. |
if( typeof( SiebelAppFacade.derived_PM_name) === "undefined" ){
  SiebelJS.Namespace( "SiebelAppFacade.derived_PM_name" );
  define( "siebel/custom/derived_PM_name", ["siebel/custom/source_PM"],function(){
    . . .
SiebelJS.Extend(derived_PM_name, SiebelAppFacade.source_PM );
});
}
where:
derived_PM_name is the name of a presentation model that references another presentation model.
source_PM is the name of a presentation model that provides the code that derived_PM_name uses. The source_PM must already exist.
You must include the define and Extend statements.
For example, the following code derives a presentation model named derivedpm2 from another presentation model, named derivedpm1:
if( typeof( SiebelAppFacade.derivedpm2 ) === "undefined" ){
  SiebelJS.Namespace( "SiebelAppFacade.derivedpm2" );
  define( "siebel/custom/derivedpm2", ["siebel/custom/derivedpm1"], function(){
    . . .
SiebelJS.Extend( derivedpm2, SiebelAppFacade.derivedpm1 );
});
}
This topic describes how to add presentation model properties that the Siebel Server sends to the client. It includes the following information:
"Adding Presentation Model Properties That Siebel Servers Send for Applets"
"Adding Presentation Model Properties That Siebel Servers Send for Views"
"Customizing Control User Properties for Presentation Models"
It is strongly recommended that you configure custom presentation model properties only if the predefined presentation model properties do not meet your requirements.
This topic describes a general approach to customizing applet user properties for presentation models. The Siebel Server sends these properties to the client.
To add presentation model properties that Siebel Servers send for applets
Add user properties to the applet:
Open Siebel Tools.
For more information, see Using Siebel Tools.
In the Object Explorer, click Applet.
In the Applets list, query the Name property for the applet that you must modify.
For example, query the Name property for Contact List Applet.
In the Object Explorer, expand the Applet tree, and then click Applet User Prop.
In the Applet User Props list, add the following applet user property.
| Name | Value |
|---|---|
| ClientPMUserPropn
For example, ClientPMUserProp1 |
user_property_name
You can specify one or more user properties. Siebel Open UI sends these user properties to the presentation model that it uses in the client to display the applet. To specify more than one user property, use a comma and a space to separate each user property name. For example: User Property1, User Property2 Each user property that you specify must exist in the Siebel repository, and each of these user properties must contain a value in the Value property. |
(Optional) Specify more ClientPMUserPropn user properties, as necessary.
You can specify more than one ClientPMUserPropn user property, as necessary. Repeat Step e for each ClientPMUserPropn user property that you require.
Compile your modifications.
Modify the presentation model:
Use a JavaScript editor to open your custom presentation model file that Siebel Open UI will use to display the applet that you modified in Step 1.
If your custom presentation model does not override the Setup method, then configure Siebel Open UI to do this override.
For more information about how to configure an override, see "Process of Customizing the Presentation Model".
Locate the following section of code:
presentation_model.Setup(propSet)
For example, if the class name is CustomPM, then locate the following code:
CustomPM.prototype.Setup = function (propSet)
Add the following code to the section that you located in Step c:
var consts = SiebelJS.Dependency("SiebelApp.Constants");
var apm = propSet.GetChildByType(consts.get("SWE_APPLET_PM_PS"));
where:
SWE_APPLET_PM_PS is a predefined constant that Siebel Open UI uses to get the presentation model properties that it uses to display the applet. The Siebel Server sends these properties in a property set.
Add the following code anywhere in the presentation model:
var value = apm.GetProperty("user_property_name")
For example:
var value = apm.GetProperty("User Property1")
You must configure Siebel Open UI so that it runs the Setup method that you specify in Step c before it encounters the code that you add in Step e.
This topic describes how to customize view user properties for presentation models. The Siebel Server sends these properties to the client.
To add presentation model properties that Siebel Servers send for views
Add user properties to the view:
Open Siebel Tools.
For more information, see Using Siebel Tools.
In the Object Explorer, click View.
In the Views list, query the Name property for the view that you must modify.
For example, query the Name property for Contact List View.
In the Object Explorer, expand the View tree, and then click View User Prop.
Do Step 1e through Step 1g, except add view user properties to a view instead of adding applet user properties to an applet.
If your custom view presentation model does not override the Setup method, then configure Siebel Open UI to do this override:
Do Step 2 except use vpm instead of apm:
Use a JavaScript editor to open the presentation model file that Siebel Open UI uses to display the view that you modified in Step 1.
Add the following code:
var consts = SiebelJS.Dependency("SiebelApp.Constants");
var vpm = propSet.GetChildByType(consts.get("SWE_VIEW_PM_PS"));
where:
SWE_VIEW_PM_PS is a predefined constant that Siebel Open UI uses to get the presentation model properties that it uses to display the view. The Siebel Server sends these properties in a property set.
Add the following code:
var value = vpm.GetProperty("user_property_name")
For example:
var value = vpm.GetProperty("User Property1")
For more information about how to configure an override, see "Process of Customizing the Presentation Model".
This topic describes how to customize control user properties for a presentation model.
To customize control user properties for presentation models
Add user properties to the control:
Open Siebel Tools.
For more information, see Using Siebel Tools.
In the Object Explorer, click Applet.
In the Applets list, query the Name property for the applet that you must modify.
For example, query the Name property for Contact List Applet.
In the Object Explorer, expand the Applet tree, and then Control.
In the Controls list, query the Name property for the control that you must modify.
For example, query the Name property for NewRecord.
In the Object Explorer, expand the Control tree, and then click Control User Prop.
In the Control User Props list, Do Step 1e through Step 1g, except add control user properties to the control instead of adding applet user properties to an applet.
Modify the custom presentation model of the applet where the control resides:
|
Note: This step can also be accomplished using a plug-in wrapper written for customizing the control. |
Configure Siebel Open UI to get the control object. You can do one of the following:
Use the following code to get the control object from the GetControls presentation model property:
var controls = this.Get("GetControls");
for (var control in controls){
var cpm = control.GetPMPropSet(consts.get("SWE_CTRL_PM_PS"));
// Do something with cpm
}
Use the following the GetControl method to get an instance of the Account Name control:
var myControl = this.GetControl ("Account Name");
var cpm = myControl.GetPMPropSet(consts.get("SWE_CTRL_PM_PS"));
Add the following code:
var consts = SiebelJS.Dependency("SiebelApp.Constants");
var cpm = control.GetPMPropSet(consts.get("SWE_CTRL_PM_PS"));
where:
GetPMPropSet is a method that gets the property set for this control. For more information, see "GetPMPropSet Method".
SWE_CTRL_PM_PS is a predefined constant that Siebel Open UI uses to get the presentation model that it uses for the control object. The Siebel Server sends these properties in a property set.
Add the following code:
var value = cpm.GetProperty("user_property_name")
For example:
var value = cpm.GetProperty("User Property1")
This topic includes some examples that describe how to bind methods. For other examples that bind methods, see the following topics:
You can use the AttachPMBinding method to bind a method that resides in a physical renderer and that Siebel Open UI must call when the presentation model finishes processing.
To bind methods that reside in the physical renderer
Add the method reference in the physical renderer.
Configure Siebel Open UI to send the scope in the binderConfig argument of the AttachPMBinding method as a scope property.
For more information, see "AttachPMBinding Method".
The example in this topic conditionally binds a method.
To conditionally bind methods
Add the following code:
this.AttachPMBinding("DoSomething",function(){SiebelJS.Log("After DoSomething");},{when: function(function_name){return false;}});
where:
function_name identifies the name of a function.
In this example, if Siebel Open UI calls DoSomething, then the presentation model calls the function_name that the when condition specifies, and then tests the return value. If function_name returns a value of:
true. Siebel Open UI calls the AttachPMBinding method.
false. Siebel Open UI does not call the AttachPMBinding method.
If you do not include the when condition, then Siebel Open UI runs the DoSomething method, and then calls the AttachPMBinding method. For more information, see "AttachPMBinding Method".
This topic includes some examples that describe how to call methods for applets and business services. For other examples that call methods, see the following topics:
The example in this topic describes how to call a method when the user clicks a button.
To call methods for buttons
Modify the plug-in wrapper:
Use a JavaScript editor to open the plug-in wrapper for the button.
Locate the click handler for the button.
Add the following code to the code you located in Step b:
var inPropSet = CCFMiscUtil_CreatePropSet();
//Define the inPropSet property set with the information that InvokeMethod sends as input to the method that it calls.
var ai= {};
ai.async = true;
ai.selfbusy = true;
ai.scope = this;
ai.mask = true;
ai.opdecode = true;
ai.errcb = function(){
  //Code occurs here for the method that Siebel Open UI runs if the AJAX call fails
  };
ai.cb = function(){
  //Code occurs here for the method that Siebel Open UI runs if the AJAX call is successful
  };
this.GetPM().ExecuteMethod("InvokeMethod",input arguments, ai);
where:
input arguments lists the arguments that InvokeMethod sends as input to the method that it calls.
For example, the following code specifies to use the InvokeMethod method to call the NewRecord method, using the properties that the inPropSet variable specifies for the ai argument:
this.GetPM().ExecuteMethod("InvokeMethod", "NewRecord", inPropSet, ai);
For more information, see "InvokeMethod Method for Application Models" and "NewRecord Method".
Modify the presentation model:
Use a JavaScript editor to open the presentation model for the applet that you must modify.
Locate the code that calls the Init method.
Add the following code to the code that you located in Step b:
this.AttachPreProxyExecuteBinding("method_name", function(methodName, inputPS, outputPS){// Include code here that Siebel Open UI runs before the applet proxy sends a reply.});

this.AttachPostProxyExecuteBinding("method_name", function(methodName, inputPS, outputPS){// Include code here that Siebel Open UI runs after the applet proxy sends a reply.});
where:
method_name identifies the name of the method that InvokeMethod calls. Note that Siebel Open UI comes predefined to set the value of the methodName argument in the following code to WriteRecord, by default. You must not modify this argument:
function(methodName, inputPS, outputPS)
For example:
this.AttachPreProxyExecuteBinding("WriteRecord", function(methodName, inputPS, outputPS){// Include code here that Siebel Open UI runs before the applet proxy sends a reply.});

this.AttachPostProxyExecuteBinding("WriteRecord", function(methodName, inputPS, outputPS){// Include code here that Siebel Open UI runs after the applet proxy sends a reply.});
For more information, see "WriteRecord Method", "AttachPostProxyExecuteBinding Method", and "AttachPreProxyExecuteBinding Method".
The example in this topic describes how to call a method for a business service when the user clicks a button.
To call methods for buttons
Use a JavaScript editor to open the plug-in wrapper for the button.
Locate the click handler for the button.
Add the following code to the code that you located in Step 2:
var service = SiebelApp.S_App.GetService("business_service_name");
if (service) {
  var inPropSet = CCFMiscUtil_CreatePropSet();
  //Code occurs here that sets the inPropSet property set with all information that Siebel Open UI must send as input to the method that it calls.
  var ai = {};
  ai.async = true;
  ai.selfbusy = true;
  ai.scope = this;
  ai.mask = true;
  ai.opdecode = true;
  ai.errcb = function(){
      //Code occurs here for the method that Siebel Open UI runs if the AJAX call fails
    };
  ai.cb = function(){
      //Code occurs here for the method that Siebel Open UI runs if the AJAX call is successful
    };
  service.InvokeMethod("method_name", "input_arguments", ai);
}
For more information, see "InvokeMethod Method for Presentation Models".
This topic describes how to use the Base Physical Renderer class with nonapplet objects that you customize. It includes the following topics:
"Modifying Nonapplet Configurations for Siebel CRM Version 8.1.1.10, 8.2.2.3, or Earlier"
"Declaring the AttachPMBinding Method When Using the Base Physical Renderer Class"
The BasePhysicalRenderer class simplifies calls that Siebel Open UI makes to the AttachPMBinding method for nonapplet objects. You can configure Siebel Open UI to use the BasePhysicalRenderer class to identify the physical renderer, call AttachPMBinding, and specify the configuration for the scope of a nonapplet object. You can then use a custom physical renderer to call AttachPMBinding with the appropriate handler.
Siebel Open UI uses the PhysicalRenderer class to interface with and to render applets. Starting with Siebel CRM versions 8.1.1.11 and 8.2.2.4, it uses the BasePhysicalRenderer class to render nonapplet objects. It uses this class to separate the interface to the physical renderer from the physical renderer. Siebel Open UI uses the BasePhysicalRenderer class only with nonapplet objects, such as the toolbar or predefined query bar.
If your deployment includes nonapplet custom rendering, and if it uses Siebel CRM version 8.1.1.10, 8.2.2.3 or earlier, then it is strongly recommended, but not required, that you modify your configuration so that it uses the BasePhysicalRenderer class to render your custom, nonapplet objects. If your deployment uses the PhysicalRenderer class to render nonapplet objects, then this class will provide access to applet functionality and properties that it does not require to do the rendering, which could degrade performance or result in rendering problems.
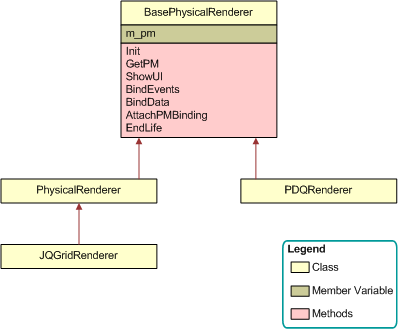
Siebel Open UI defines the BasePhysicalRenderer class in the basephyrenderer.js file.
Figure 5-1 illustrates the hierarchy that the BasePhysicalRenderer class uses for non-mobile applications. The member variable is a variable that is associated with the class. All methods can access this member variable.
Table 5-2 describes how to use methods with the BasePhysicalRenderer class.
Table 5-2 How to Use Methods with the Base Physical Renderer Class
| Method | Description |
|---|---|
|
Init |
Use this method to initialize the BasePhysicalRenderer class. For more information, see "Init Method". |
|
GetPM |
Use this method to retrieve the presentation model object on which the base physical renderer is running. For more information, see "GetPM Method for Physical Renderers". |
|
ShowUI |
Use this method to display the DOM area corresponding to this physical renderer. Any customization on rendering of controls owned by this applet should be left to the respective plug-in wrappers. For more information, see "ShowUI Method" and "Deriving Presentation Models, Physical Renderers and Plug-in Wrappers". |
|
BindEvents |
Use this method to attach event handlers to the applet area that runs on this physical renderer. Any customizations relating to event attachment to controls owned by this applet should be left to the respective plug-in wrappers. For more information, see "BindEvents Method". |
|
BindData |
Use this method to bind data attributes to the applet area that runs on this physical renderer. Any customizations relating to event attachment to controls owned by this applet should be left to the respective plug-in wrappers. For more information, see "BindData Method" and "Deriving Presentation Models, Physical Renderers and Plug-in Wrappers". |
|
AttachPMBinding |
Use this method to configure Siebel Open UI to do the same work that the AttachPMBinding method does in a presentation model. You can use the following argument to call the AttachPMBinding method: scope You can use the following arguments with the AttachPMBinding method:
For more information, see "AttachPMBinding Method". |
|
EndLife |
Use this method to end the life of the physical renderer. It is recommended that you use the EndLife method to clean up the custom event handler. This clean up includes releasing events, deleting unused variables, and so on. For more information, see "EndLife Method". |
If you configure Siebel Open UI to use the BasePhysicalRenderer class, then you must declare the AttachPMBinding method.
To declare the AttachPMBinding method when using the Base Physical Renderer class
Use a JavaScript editor to open your custom physical renderer.
Locate the Init method.
Add the following code to the Init method that you located in Step 2:
CustomPhysicalRenderer.prototype.Init = function(){
  // Be a good citizen. Call Superclass first
  SiebelAppFacade.CustomPhysicalRenderer.superclass.Init.call(this);
  // Call AttachPMBinding here.
}
For example:
CustomPhysicalRenderer.prototype.Init = function(){
  SiebelAppFacade.CustomPhysicalRenderer.superclass.Init.call(this);
  this.AttachPMBinding("EndQueryState", EndQueryState);
}
An arbitrary scope is any scope other than the scope that calls the handler. You can configure Siebel Open UI to send to the AttachPMBinding method any scope that is available in the physical renderer. You can use the BasePhysicalRenderer class to send an arbitrary scope that identifies the handler method that Siebel Open UI must use.
To send an arbitrary scope
Use a JavaScript editor to open your custom physical renderer.
Add the following code to send an arbitrary scope as an argument:
this.AttachPMBinding ("FocusOnApplet", FocusOnApplet, arbitrary_scope );
For example:
this.AttachPMBinding ("FocusOnApplet", FocusOnApplet, SiebelAppFacade.S_App);
where:
SiebelAppFacade.S_App is an arbitrary scope because it is not the calling scope that the this statement identifies, which Siebel Open UI assumes in BasePR, by default. In this example, the FocusOnApplet handler must exist in the SiebelAppFacade.S_App scope.
If you must write code that accesses a proxy object, then it is strongly recommended that you access this proxy object through a physical renderer. The physical renderer typically exposes the interfaces that allow access to operations that Siebel Open UI performs on the proxy object. The example in this topic accesses a proxy object for an active control.
To access proxy objects
Use a JavaScript editor to open your custom physical renderer.
Add the following code:
this.ExecuteMethod("SetActiveControl", control);
This example code accesses a proxy object so that Siebel Open UI can modify an active control.
It is recommended that you do not write code that directly accesses a proxy object from a physical renderer. In the following example, Siebel Open UI might remove the GetProxy method from the presentation model, and any code that references GetProxy might fail. It is recommended that you do not use the following code:
this.GetProxy().SetActiveControl(control);
Siebel Open UI removed the scope argument for calls that it makes to the AttachPMBinding method with nonapplet objects, starting with Siebel CRM versions 8.1.1.11 and 8.2.2.4. You can modify your custom code to use this new configuration.
To modify nonapplet configurations for Siebel CRM versions 8.1.1.10, 8.2.2.3, or earlier
Use a JavaScript editor to open your custom physical renderer.
Locate the following code:
this.GetPM().AttachPMBinding ("FocusOnApplet", FocusOnApplet, {scope:this});
In this example, AttachPMBindings uses the scope argument to do a call in Siebel CRM version 8.1.1.10, 8.2.2.3, or earlier.
Replace the code that you located in Step 2 with the following code:
this.AttachPMBinding ("FocusOnApplet", FocusOnApplet);
You can use this code starting with Siebel CRM versions 8.1.1.11 and 8.2.2.4.
The example in this topic configures Siebel Open UI to attach a local component
as the child of a view component, and it uses the property set that Siebel Open UI uses to create this component to specify the name of the module.
Siebel Open UI uses this module for the presentation model and the physical renderer.
To create components
Create the property set. Use the following code:
var psInfo = CCFMiscUtil_CreatePropSet();
psInfo.SetProperty(consts.get("SWE_UIDEF_PM_CTR"), "siebel/custom/customPM");
psInfo.SetProperty(consts.get("SWE_UIDEF_PR_CTR"), "siebel/custom/customPR");
where:
siebel/custom/customPM is the module name that identifies the siebel/custom/customPM.js presentation model
siebel/custom/customPR is the module name that identifies the siebel/custom/customPR.js physical renderer
Create the dependency object. Use the following code:
var dependency = {};
dependency.GetName = function(){return "custom_Dependency_object";}
This example assumes that it is not necessary that this component references an applet, so the code limits the scope to a view.
Call the MakeComponent method. Use the following code:
SiebelAppFacade.ComponentMgr.MakeComponent(SiebelApp.S_App.GetActiveView(), psInfo, dependency);
For more information, see "MakeComponent Method" and "GetActiveView Method".
The user cannot interact with the client during a synchronous request to a business service until the client receives the reply for this request from the Siebel Server. However, the user can interact with the client while it is waiting for a reply during an asynchronous request. This topic describes how to write JavaScript code so that it sends an asynchronous request that allows the user to continue to use the client without interruption during the call. You use the following code to specify an asynchronous call:
async = true or false
For example, the following code makes an asynchronous request:
async = true
To view an example presentation model that includes more than one instance of enabling and disabling an asynchronous call, download the msgbrdcstpmsync.js file, and then search this file for the following string:
lpsca.async
To get a copy of this file, see Article ID 1494998.1 on My Oracle Support.
For more information, see "About Synchronous and Asynchronous Requests".
To allow users to interact with clients during business service calls
Use a JavaScript editor to open the presentation model that you must modify.
Locate the ExecuteMethod that calls the business service that you must modify.
Siebel Open UI uses the ExecuteMethod method to call a business service. For more information, see "ExecuteMethod Method".
Add the following code to the ExecuteMethod call that you located in Step 2:
var service = SiebelApp.S_App.GetService("service_name");
var inPropSet = SiebelApp.S_App.NewPropertySet ();
// set all the input arguments through inPropSet.SetProperty("property_name",
"property_value")
var outPropSet;
if(service){
  var config = {};
  config.async = true;
  config.scope = this;
  config.cb = function(){
    outPropSet = arguments[2];
    if (outPropSet!== null){
      output_property_set
    }
  }
  service.InvokeMethod ("method_name", inPropSet, config);
}
where:
inPropSet.SetProperty allows you to add input arguments to the business service that resides on the Siebel Server.
service_name is the name of the business service that Siebel Open UI must call.
config.async is set to true.
config.scope = this attaches a scope to the callback function so that you are not required to use var that=this to resolve the scope. For more information, see "Coding Callback Methods".
method_name is the name of a business service method that resides in the business service that you specify in service_name.
output_property_set is the name of the property set that Siebel Open UI uses to store the output of this asynchronous call.
For example, the following code creates an asynchronous call to create a list of quotes:
var service = SiebelApp.S_App.GetService("Create Quote Service");
var inPropSet = SiebelApp.S_App.NewPropertySet ();
var outPropSet;
if(service){
  var config = {};
  config.async = true;
  config.scope = this;
  config.cb = function(){
    outPropSet = arguments[2];
    if (outPropSet!== null){
      quoteList
    }

  service.InvokeMethod ("Create Quote", inPropSet, config);
}
where:
quoteList is an output property set that contains a list of quotes that Siebel Open UI gets from the Create Quote business service method.
Prior to Siebel CRM release 8.1.1.13, Siebel Open UI used the ErrorObject method to display the error dialog box. This method calls a browser alert method that displays the dialog box as a browser notification. Beginning with Siebel CRM release 8.1.1.13, you can modify this configuration so that Siebel Open UI displays the notification in a status bar or in a custom dialog box.
Siebel Open UI uses the following rendering files to display error messages:
errorobjectrenderer.js. Displays an error alert or SWEAlert message.
errorstatusbarrenderer.js. Displays an error message in a custom error status bar in the browser.
errorpopuprenderer.js. Displays a custom dialog box that includes an error message.
Note the following:
The errorobjectrenderer.js file is the only file that comes predefined with Siebel Open UI and does not require you to configure the manifest or to modify a method. You must not modify this file.
The manifest does not come predefined to use the errorstatusbarrenderer.js file or the errorpopuprenderer.js file. If your customization requires one of these files, then you must add it to the manifest.
Siebel Open UI renders only one of these files at a time. If you add errorstatusbarrenderer.js or errorpopuprenderer.js to the manifest, then Siebel Open UI uses one of these files instead of errorobjectrenderer.js.
These files use the following constructor. You must not modify this constructor:
SiebelApp.S_App.ErrorObjectRenderer
These files reference the following method. For more information about this method, see "ShowErrorMessage Method":
ShowErrorMessage(message)
Each file uses the typical sequence that a physical renderer uses. For example, each file calls the following methods in the following sequence. You must not modify this sequence. For more information, see "Life Cycle of a Physical Renderer":
ShowUI
BindData
BindEvents
For more information about configuring error messages in Siebel Open UI, see "Configuring Error Messages for Disconnected Clients".
To customize how Siebel Open UI displays error messages
Optional. Modify the style that Siebel Open UI uses when it displays the error status bar.
If your customization uses the errorstatusbarrenderer.js file, then you can style the status bar by adding style rules for the siebui-statusbar class in a custom cascading style sheet and place it in following folder:
files\custom\my-style.css
You must add the style sheet to the manifest by following the steps outlined in "Configuring Manifests".
Configure the manifest. For more information about how to do this step, see "Configuring Manifests":
Log in to a Siebel client with administrative privileges.
Navigate to the Administration - Application screen, and then the Manifest Files view.
Add one of the following files, depending on your customization requirements:
custom/errorstatusbarrenderer.js
custom/errorpopuprenderer.js
Navigate to the Manifest Administration view.
In the UI Objects list, specify the following object.
| Field | Value |
|---|---|
| Type | Application |
| Usage Type | Theme |
| Name | PLATFORM INDEPENDENT |
In the Object Expression list, add the following subexpression.
| Field | Value |
|---|---|
| Group Name | Leave empty. |
| Expression | Desktop |
| Level | 1
Siebel Open UI only uses the renderer whose level is set to 1. |
| Operator | Leave empty. |
| Web Template Name | Leave empty. |
In the Files list, click Add.
In the Files dialog box, click Query.
In the Name field, enter the path and file name that you added in Step c:
files/custom/my-style.css
Click Go.
Test your work:
Log out of, and then log back into the client.
Do something that results in an error.
Verify that the client displays an error message according to your modifications.
The Siebel Open UI client can be configured to control the navigation options available to users. By default the Side Menu icon is used to control navigation. Without configuration, two additional options are available for navigation: Tab and Tree.
In some deployments, you might want to restrict the use of a navigation option to a predefined group. This topic explains how to control which navigation options are available to which users.
To customize the available navigation options
Create an expression for the navigation option that you want to restrict:
Log in to a Siebel client with administrative privileges.
Navigate to the Administration - Application screen, and then the Manifest Expressions view.
Click the plus (+) icon to create a new expression.
Specify a name for the expression.
Specify the restrictive expression.
Create a copy of the navigation type that you want to restrict:
Navigate to the Administration - Application screen, and then the Manifest Administration view.
In the UI Objects list, search with the following specifications:
| Field | Value |
|---|---|
| Type | Navigation |
| Usage Type | Physical Renderer |
| Name | NAVIGATION*
You can reference any navigation option. |
Select the navigation option that you want to modify. The three available options are NAVIGATION_SIDE, NAVIGATION_TAB, and NAVIGATION_TREE.
Take note of the exact file name that is listed in Files applet, you will need this information in a later step.
Select the Edit menu, then Copy Record.
Edit the navigation type:
Verify your work:
Log out of the client, and then log back into the client.
This step refreshes the manifest.
Navigate to the User Preferences screen, then the Behavior view.
Verify that the correct options are available in the Navigation Control drop-down menu for the user with which you are logged in.
The example in this topic describes how to restricts the Tree navigation option to only the ADMIN user in Siebel Open UI.
This topic gives one example of restricting navigation options. You might use this feature differently, depending on your business model.
To restrict the Tree navigation option to only the ADMIN user
Create an expression that restricts availability to administrator only:
Log in to a Siebel client with administrative privileges.
Navigate to the Administration - Application screen, and then the Manifest Expressions view.
Click the plus (+) icon create a new expression.
Specify the following in the Name field:
Admin Only
Specify the following in the Expression field:
GetProfileAttr('Login Name') = 'ADMIN'
Create a copy of the NAVIGATION_TREE object:
Navigate to the Administration - Application screen, and then the Manifest Administration view.
In the UI Objects list, search with the following specifications:
| Field | Value |
|---|---|
| Type | Navigation |
| Usage Type | Physical Renderer |
| Name | NAVIGATION_TREE |
Select the NAVIGATION_TREE record.
Select the Edit menu, then Copy Record.
Edit the new NAVIGATION_TREE record:
Select the copy of the NAVIGATION _TREE record.
Click the plus (+) icon in Object Expression applet.
In the Expression field, specify the expression Admin Only.
Click the plus (+) icon in the Files applet to add the following file:
jsTreeCtrl.js
Verify your work:
Log out of the client, and then log back into the client as a user other than ADMIN.
Navigate to the User Preferences screen, then the Behavior view.
Verify that the only the following two options are available in the Navigation Control drop-down menu:
Side Menu
Tab
Log out of the client, and then log back into the client as the ADMIN user.
Navigate to the User Preferences screen, then the Behavior view.
Verify that the only the following three options are available in the Navigation Control drop-down menu:
Side Menu
Tab
Tree