| Siebel CRM Siebel Mobile Guide: Disconnected Siebel Innovation Pack 2015, Rev. D E52427-01 |
|


 Previous |
 Next |
View PDF |
| Siebel CRM Siebel Mobile Guide: Disconnected Siebel Innovation Pack 2015, Rev. D E52427-01 |
|
Previous |
Next |
View PDF |
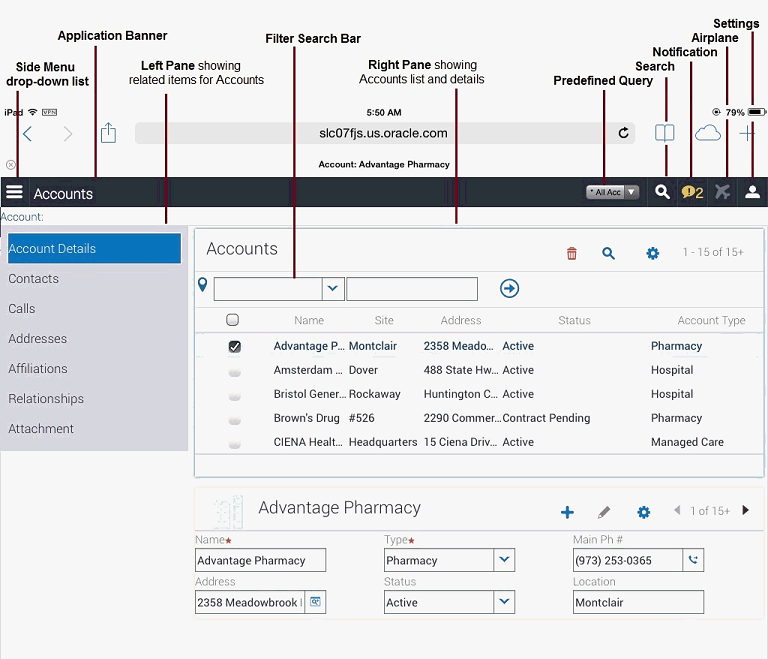
The application user interface for Siebel Mobile is divided into three areas: The application banner, the left pane, and the right pane. The callouts in Figure 8-1 show these three areas.
If you navigate away from the Siebel Mobile application in online or offline mode and then return to the application, then the application reloads. The current application context is also maintained even after the application reloads. You can navigate away from the mobile application by, for example, selecting a URL link from within the application on your iPad or switching to another application.
|
Note : If using the Siebel App on an iOS or Android device to access Siebel Mobile applications, then the following icons appear on the top, right side of the screen (under the application banner): Refresh, Attachment, and Home. For more information about these icons and about using the Siebel app to log in to an application, see"Configuring the Siebel App on iOS and Android Devices". |
The application banner appears along the top of the UI, and it persists for all views. The Side Menu is available on the left side of the application banner and the following options are available on the right side as shown in Figure 8-1: PDQ (Predefined Query) drop-down list, Search, Notification, Airplane, and Settings.
Side Menu. Tap the Side Menu icon to display the Siebel Objects available in the mobile application. Selecting any Siebel object redirects you to a screen where you can manage the selected Siebel object. Table 8-1 shows the Siebel objects that are typically available from the Side Menu for each Siebel Mobile disconnected application.
PDQ. Tap the drop-down list to display a list of the available predefined queries, which you can run for the object selected from the Side Menu. For more information, see "Running Predefined Queries in Siebel Mobile". PDQ is not supported in offline mode.
Search. Tap the magnifying glass icon to perform a search. For more information, see "Searching for Records in Siebel Mobile".
Notification. Tap the exclamation mark icon to display notification messages. For more information, see "Reviewing Notification Messages in Siebel Mobile".
Airplane. Tap the airplane icon to go offline and work in disconnected mode, to go back online after you have finished working in offline mode, or to synchronize data as required. For more information about the behavior of the airplane icon, see "Using the Airplane Icon on the Application Banner".
Settings. Tap the photo icon to configure the behavior of and notifications for Siebel Mobile disconnected applications, or to log out of Siebel Mobile disconnected applications. For more information, see "Configuring Application Settings for Siebel Mobile".Log out is not supported in offline mode.
The left pane, on the left side of the UI, typically displays the related item information according to the object that is selected from the Side Menu. In Figure 8-1 for example, Accounts is selected from the Side Menu and the related items for Accounts are as follows: Contacts, Calls, Addresses, Affiliations, Relationships, and Attachment.
The right pane or work area, on the right side of the UI, typically displays context information according to the selection that you make from the Side Menu on the application banner, the left pane, and in the UI in general. For example:
If you tap the Side Menu icon on the application banner and select Accounts, then the following context information appears in the work area:
Object List. The Accounts list appears at the top of the screen in the work area.
Object Details. The details for the selected account appear below the Accounts list.
If you tap the Side Menu icon on the application banner and select Accounts, select an account from the Accounts list in the work area, select Calls from the related items for the account in the left pane, then the following context information appears in the work area:
Selected Object Details. The details for the selected account appear at the top of the screen.
Selected Related Item List. The Calls associated with the selected account appear next.
Table 8-1 Siebel Objects Available from the Side Menu on the Application Banner
| Application | Siebel Objects |
|---|---|
|
Siebel Mobile application for Siebel Pharma |
The following Siebel objects are typically available from the Side Menu on the application banner: Calls, Accounts, and Contacts. For more information, see Chapter 9, "Using the Siebel Mobile Disconnected Application for Siebel Pharma." |
|
Siebel Mobile application for Siebel Sales |
The following Siebel objects are typically available from the Side Menu on the application banner: Accounts, Contacts, Leads, Opportunities, Quotes, Orders, and Activities. For more information, see Chapter 10, "Using the Siebel Mobile Disconnected Application for Siebel Sales." |
|
Siebel Mobile application for Siebel Service |
The following Siebel objects are typically available from the Side Menu on the application banner: Activities, Service Requests, Accounts, Browser, Orders, Invoices, Assets, and Shifts. For more information, see Chapter 11, "Using the Siebel Mobile Disconnected Application for Siebel Service." |
Siebel Mobile works with a variety of mobile and tablet devices. If you are familiar with navigating iPad applications, then you will find that navigating Siebel Mobile is similar. The following procedure shows you how to navigate Siebel Mobile. This procedure assumes that your mobile device is in landscape mode.
To navigate Siebel Mobile in landscape mode
Start the browser on your mobile device.
Type the URL address for the Siebel Mobile disconnected application, and then log in to the application as shown in "Logging In to Siebel Mobile".
The Siebel Mobile home page appears immediately after logging in, and it is the starting point for using the application. The following interface elements are present on the home page in landscape mode:
Application banner. Appears along the top of the home page, and it persists for all views. For more information about the options available on the application banner, see "Application Banner".
Left pane. Displays related item information according to the object that is selected from the Side Menu on the application banner.
Right pane (work area). Displays context information according to the selection that you make from the Side Menu on the application banner, the left pane, and in the UI in general.
To navigate away from the current list and details view, tap the Side Menu icon on the application banner and choose another Siebel object.
To search for records in Siebel Mobile, see "Searching for Records in Siebel Mobile".
To create, modify, or delete records in Siebel Mobile, see "Managing Records in Siebel Mobile".
To log out of Siebel Mobile, see "Logging Out of Siebel Mobile".
You navigate Siebel Mobile in portrait mode in much the same way as in landscape mode, except for one difference. The home page displays only the application banner and the work area by default. That is, there is only one pane in portrait mode.
The following procedure shows you how to navigate Siebel Mobile in portrait mode. This procedure assumes that your mobile device is in portrait mode.
To navigate Siebel Mobile in portrait mode
Start the browser on your mobile device.
Type the URL address for the Siebel Mobile disconnected application, and then log in to the application as shown in "Logging In to Siebel Mobile".
The Siebel Mobile home page appears immediately after logging in, and it is the starting point for using the applications. The following interface elements are present on the home page in portrait mode:
Application banner. Appears along the top of the home page, and persists for all views. For more information about the options available on the application banner, see "Application Banner".
Work area. Displays context information according to the selection that you make from the Side Menu on the application banner and in the UI in general.
To navigate away from the current view, tap the Side Menu icon on the application banner and choose another Siebel object.
To search for records in Siebel Mobile, see "Searching for Records in Siebel Mobile".
To create, modify, or delete records in Siebel Mobile, see "Managing Records in Siebel Mobile".
To log out of Siebel Mobile, see "Logging Out of Siebel Mobile".
When selecting fields, drop-down lists, and records in Siebel Mobile, you can perform the following actions:
Tap an editable field in the application to automatically display one of the following, according to the field type: drop-down list, text box, or date selector.
A star icon beside a field name indicates that the field is a required field. Some required fields have a default value, other required fields display an error if no value is entered.
Tap anywhere on a drop-down list field to open the drop-down list.
Select multiple options from an associated drop-down list.
Tap once to select an option. Tap the same option again to deselect the option.
Tap a record to open and display the record details.
Tap a related item belonging to a record to open the related item.
Close a dialog box by tapping anywhere outside the dialog box.
Double-tapping is supported in Siebel Mobile.
For example, you can close a dialog box by double-tapping the selected entry in the dialog box.
Inline editing is configured by default in Siebel Mobile and allows you to do the following:
Edit fields directly on Form (detail) and List applets without opening the Edit page for the record.
Edit fields in tables, windows and dialog boxes, and in many linked records on main record Form (detail) applets.
You cannot edit fields inline if any one of the following is true:
If the field is read-only, then you cannot edit the field inline.
If the field is a calculated field, then you cannot edit the field inline.
After you edit the fields in a record, you must navigate away from the record to save your changes to it.
Check boxes can be configured to appear in one of the following formats in your mobile application:
As a regular check box. Tap the check box to display a check icon. Tap the check box again to remove the check icon.
As a flip switch. This is the default behavior. Tap or swipe the switch to display On. Tap or swipe the switch again to display Off.
For more information about customizing check boxes, see Configuring Siebel Open UI.