2 Configuring the Solaris System for ACSLS HA
Once the basic Solaris 11.2 system is installed, there are three contexts that entail specific configuration requirements for Solaris Cluster and ACSLS HA.
-
Configure
/etc/hosts. -
Configure access privileges for the
rootuser. -
Configure network interface for multipath internet access.
-
Configure multipath disk I/O.
Configuring /etc/hosts
Your /etc/hosts file on each node should contain entries for the localhost, the two cluster node names and their ip addresses, and the logical host.
127.0.0.1           localhost   loghost
129.99.99.101       thisNode.domain.com   thisNode
129.99.99.102       sisterNode
129.99.99.100       logicalHost.domain.com    logicalHost
Access Configuration for root
Solaris cluster monitoring and fail over operations are handled by the root user who must have control over the entire cluster from either node. The root user is established as a trusted user, providing private network access between nodes with secure shell (ssh) authentication
-
Enable direct root access to each node from an external system. Edit the file,
/etc/user_attr, and comment out (or remove) the line that specifies a role forroot.# root::::type=role -
Allow
rootto log into the system from points other than the system console.Edit the file,
/etc/default/login, and comment out the line that specifies console only access.# CONSOLE=/dev/console -
Permit secure shell login access for
root.Edit the file,
/etc/ssh/sshd_config, and specify yes toPermitRootLogin.PermitRootLogin=yesRepeat steps 1-3 on the adjacent node.
-
Establish
rootas a Trusted User. This sets a login protocol for root to each node from the sister node for which the authentication is established without the need for a password.-
Create a public/private RSA key pair. To allow login from one node to the other without a password, do not enter a passphrase.
# cd /root/.ssh
# ssh-keygen -t rsa
Enter file in which to save the key (//.ssh/id_rsa): ./id_rsa
Enter passphrase (empty for no passphrase):
Enter same passphrase again:
Your identification has been saved in ./id_rsa.
Your public key has been saved in ./id_rsa.pub.
The key fingerprint is:
1a:1b:1c:1d:1e:1f:2a:2b:2c:2d:2e:2f:ea:3b:3c:3d root@node1
This creates two files in the
/root/.sshdirectory:id_rsaandid_rsa.pub. -
Copy
id_rsa.pubto the/root/.sshdirectory on the sister node:# cat id_rsa.pub | ssh root@node2 \ 'cat >> /root/.ssh/authorized_keys' Password:
-
With the authentication key in place, test the ability to assert commands remotely without a password.
# hostname
node1
# ssh root@node2 hostname
node2
-
Multipath Network Configuration
Redundancy is the overall scheme for high-availability computing. Redundancy applies not only to the servers, but to each communication interface on each server. For the public interface, using Internet Protocol Multi Pathing (IPMP) on Solaris. Internet Protocol Multi Pathing provides instant NIC recovery for failing network communications without the need for a general system failover. For the library interface, this means using a dual TCP/IP connection with two network interfaces across two independent routes. If any element in one route should fail, ACSLS continues to communicate over the alternate interface.
ACSLS HA requires redundant network connections for:
-
Public and client communications
-
Library communications
-
Private intra-node cluster communications
Figure 2-1 Single HBCr Library Interface Card Connected to Two Ethernet Ports on each Server Node
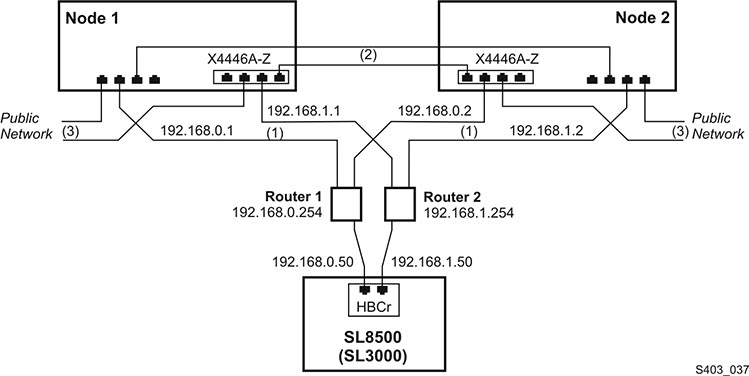
Description of ''Figure 2-1 Single HBCr Library Interface Card Connected to Two Ethernet Ports on each Server Node''
The figures in this section show eight Ethernet ports accessible with two separate controllers on each server. Six ports provide the three redundant connections. Two ports in this configuration remain unused. Despite the seeming complexity, there are only three dual-path Ethernet connections from each server:
-
Server-library communication
-
Server-to-server heartbeat exchange over a private network
-
Server-to-client communication over a public network
Figure 2-2 Dual-HBC Configuration on a Library with Redundant Electronics
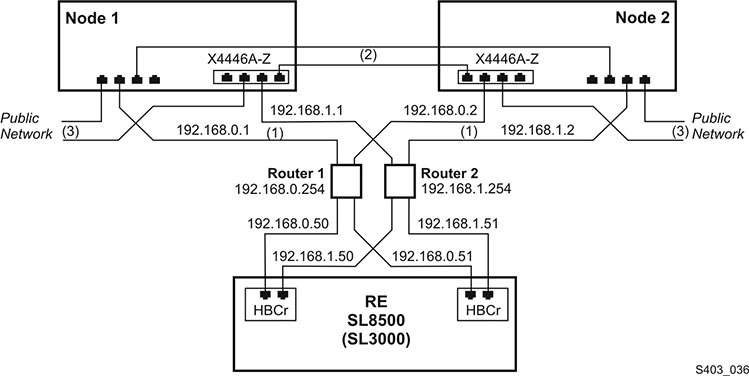
Description of ''Figure 2-2 Dual-HBC Configuration on a Library with Redundant Electronics''
In a library with redundant electronics, there are two independent paths from each server node to each HBCr library controller. If communication to both ports on one HBCr interface should fail, ACSLS HA invokes an automatic switch to the alternate HBCr card. All of this is accomplished without the need to fail over to the alternate server node.
The Public Interface and IPMP
Solaris IPMP provides a mechanism for building redundant network interfaces to guard against failures with NICs, cables, switches or other networking hardware. When configuring IPMP on your Solaris host combine two or more physical network interfaces into a single IPMP group.
To view a mapping of network interface names to physical devices use the command, dladm show-phys:
Example:
# dladm show-phys
LINK       MEDIA         STATE      SPEED  DUPLEX    DEVICE
net2       Ethernet      up         100    full      ixgbe1
net3       Ethernet      up         10000  full      ixgbe3
net0       Ethernet      up         10000  full      ixgbe2
net1       Ethernet      up         1000   full      ixgbe0
To show the state of configured network interfaces, use ipadm.
Example:
# ipadm
NAME          CLASS/TYPE STATE  UNDER  ADDR
lo0           loopback   ok     --     --
   lo0/v4     static     ok     --     127.0.0.1/8
   lo0/v6     static     ok     --     ::1/128
net1          ip         ok     --     --
   net1/v4    static     ok     --     129.99.99.99/24
   net1/v6    addrconf   ok     --     fe99::999:999:ff23:ee02/10
net4          ip         ok     --     --
   net4/v4    static     ok     --     129.999.99.99/24
Two interfaces must be configured and assigned to a common group-id for ACSLS HA. Among these interfaces can be the primary interface of the server. In this case, since the ip address is already assigned to the interface (and not to the group), it is necessary to unconfigure this interface, then reconfigure it under the ipmp group.
Since network communication is interrupted during this operation, it is necessary to conduct the following steps from the server console.
To unconfigure the existing primary interface:
ipadm delete-addr <primary interface>
Example:
# ipadm delete-addr net0/v4
ipadm delete-ip <primary interface>
Example:
# ipadm delete-ip net0
To reconfigure the primary interface:
ipadm create-ip <primary interface>
Example:
# ipadm create-ip net0
To create a second primary interface:
ipadm create-ip <primary_interface>
Example:
# ipadm create-ip net5
To create the ipmp group:
ipadm create-ipmp <group_name>
Example:
# ipadm create-ipmp ipmp0
Note:
The group name must be alpha-numeric.To assign the host ip-address to the group:
ipadm create-addr -T static -a <ip-address> <group_name>
Example:
# ipadm create-addr -T static -a 129.99.99.9 ipmp0
To add the primary interface to the group:
ipadm add-ipmp -i <primary_interface> <group_name>
Example:
# ipadm add-ipmp -i net0 ipmp0
To add a second interface to the group:
ipadm add-ipmp -i <second_primary_interface> <group_name>
Example:
# ipadm add-ipmp -i net5 ipmp0
Verify your ipmp configuration using ipmp:
# ipadm
NAME              CLASS/TYPE STATE        UNDER      ADDR
ipmp0             ipmp       ok           --         --
   ipmp0/v4       static     ok           --         123.45.67.89/8
lo0               loopback   ok           --         --
   lo0/v4         static     ok           --         127.0.0.1/8
   lo0/v6         static     ok           --         ::1/128
net0              ip         ok           ipmp0      --
net5              ip         ok           ipmp0      --
Observe that two network interfaces were configured under the ipmp0 group. Observe that a version-4 ip address was assigned to the ipmp0 group.
You may need to reboot the system to commit these changes and to establish network communications under the new configuration
Repeat network configuration on the sister node.
The mapping between the ipmp group and the cluster public IP address is established when you start the cluster with start_acslsha.sh. See "ACSLS Cluster Operation".
The Library Interface
Two remaining network interfaces are needed for the library configuration. For this example, net1 and net6 are used. Notice (in Figure 2-1 and Figure 2-2) that these two connections are routed over separate subnets to eliminate a router as single point of failure between the clustered server and the library.
-
Create the two network interfaces on each node.
# ipadm create-ip net1
# ipadm create-ip net6
-
Assign the
ip-addressfor each interface.# ipadm create-addr -T static -a <ip-address> net1/v4 # ipadm create-addr -T static -a <ip-address> net6/v4
The address object is typically named using the interface and the protocol version:
net1/v4 -
Verify your
ipmpconfiguration:# ipadm NAME CLASS/TYPE STATE UNDER ADDR ipmp0 ipmp ok -- -- ipmp0/v4 static ok -- 123.45.67.89/8 lo0 loopback ok -- -- lo0/v4 static ok -- 127.0.0.1/8 lo0/v6 static ok -- ::1/128 net0 ip ok ipmp0 -- net1 ip ok -- -- net1/v4 static ok -- 192.168.0.1/8 net5 ip ok ipmp0 -- net6 ip ok -- -- net6/v4 ip ok -- 192.168.1.1/8
-
Reboot each node for these settings to take effect.
Multipath Disk Configuration
The external shared disk array connects to the two hosts, each with redundant fibre or SAS connections between the server and the disk array
Figure 2-3 Two Fibre Connections Per Server to External Shared Storage Array

Description of ''Figure 2-3 Two Fibre Connections Per Server to External Shared Storage Array''
The array should be setup to present two virtual drives to the attached host.
Solaris 11.2 takes care of multipath (MPXIO) settings automatically if it senses more than one path to a disk device. Verify that your Solaris system is properly configured with redundant connections to each virtual disk in the array.
# mpathadm list lu

/dev/rdsk/c0t600A0B800049EE1A0000840552D3E2F9d0s
       Total Path Count: 2
       Operational Path Count: 2
/dev/rdsk/c0t600A0B800049EDD600000DAD52D3DA90d0s2
       Total Path Count: 2
       Operational Path Count: 2
The mpathadm display should reveal two disk devices, each with an operational path count of 2.
If you run ACSLS HA on a SPARC system, mpathadm displays nothing until you have configured MPXIO. If the display reveals nothing, or reveals an improper configuration, proceed at this point to configure MPXIO using stmsboot -e on your Solaris 11.2 system. Refer to the document, Oracle Solaris Administration: SAN Configuration and Multipathing from the Oracle Technology Network library: http://docs.oracle.com/cd/E23824_01/html/E23097.
Be aware that Solaris I/O multipathing-enabled devices receive new names that indicate that they are under Solaris I/O multipathing control. A device has a different name from its original name.
Original device name:    c1t0d0
Name After stmds boot:   c0t600A0B800049EDD600000C9952CAA03Ed0