2. Bank Parameters
This chapter contains the following sections:
- Section 2.1, "Bank Parameters Maintenance"
- Section 2.2, "Confirmation/Affirmation Type Maintenance"
- Section 2.3, "Branch Restriction Maintenance"
- Section 2.4, "Maintaining Global Intermediary Identification Number"
2.1 Bank Parameters Maintenance
This section contains the following topics:
- Section 2.1.1, "Defining Bank Level Parameters"
- Section 2.1.2, "Financial Preferences Tab"
- Section 2.1.3, "General Preferences Tab"
- Section 2.1.4, "FATCA Tab"
- Section 2.1.5, "Preferences Button"
- Section 2.1.6, "Account Mask Button"
2.1.1 Defining Bank Level Parameters
In the ‘Bank Wide Parameters’ screen, you maintain basic information about your bank such as its name, head office, account number structure, local currency and so on.
The details that you maintain in this screen will be made applicable to all branches of your bank. For instance, the account number structure that you define in this screen will be a common format for customer accounts in all branches of your bank.
Invoke the ‘Bank Parameters’ screen by typing ‘STDBNKPM’ in the field at the top right corner of the Application tool bar and clicking the adjoining arrow button.
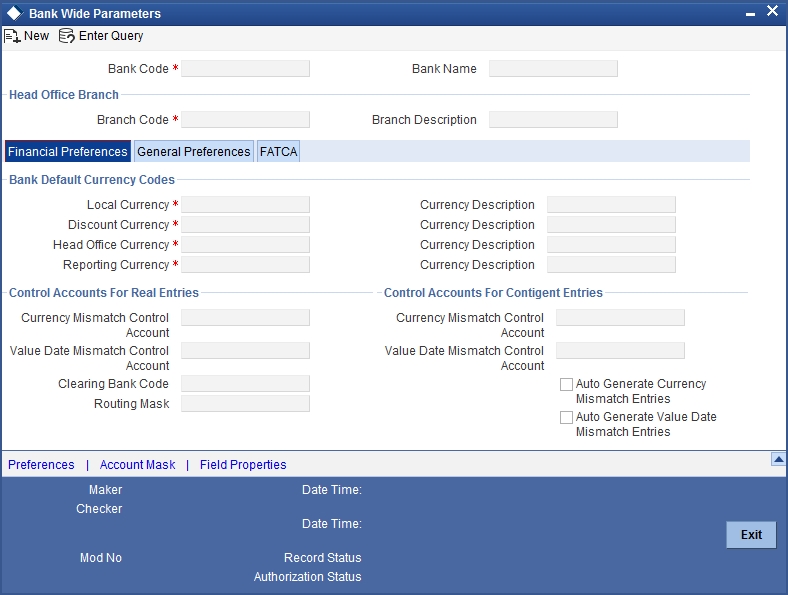
You can maintain the following details in this screen:
Bank Code
In Oracle FLEXCUBE a bank is identified by a unique four-character code. You can follow your own convention in devising this code. In all inter-bank transactions this code identifies your bank.
Name
You can also specify the detailed name of the bank. This name will always be displayed whenever the bank code is used.
Specifying Details of Head Office Branch
After specifying a code to identify your bank, you should specify details of the head office of your bank.
Code
From the list of the branches you have already maintained of your bank, designate one as your Head Office
Description
The description of the branch designated as Head Office is displayed.
2.1.2 Financial Preferences Tab
In this screen, you can maintain information regarding default currency for the branch, specify if balancing entries must be automatically generated in case of mismatches, define routing mask, clearing bank code etc.
Specifying Default Currency Codes
You can indicate currency preferences for your bank. You can specify preferences to indicate the default currencies for the following purposes:
- Local — The currency that you indicate as the local currency will be taken as the local currency for all branches of your bank and the default currency for all transactions input into Oracle FLEXCUBE. The income and expense balances of your bank will also be maintained in this currency
- Discount — If the discount rate for a particular currency is not maintained the discount rate of the specified discount currency will be picked up for discounting profits on forward foreign exchange contracts
- Head Office — The default currency for the Head Office
- Reporting — The default currency in which all financial reporting should be done
You will not have an option to modify the default currencies that you specify after the Bank Parameters record has been stored and authorized.
Auto Generate Currency and Value Date Mismatch Entries
You can specify that balancing entries must be generated automatically by Oracle FLEXCUBE, in the case of currency or value date mismatches in accounting entries due to transactions that are not balanced with respect to currency or value dates, for each branch (single entity) of your bank.
To specify the automatic generation of such balancing entries for currency mismatches, select the options ‘Auto Generate Currency Mismatch Entries’ and for generation of balancing entries to correct value date mismatches, select ‘Auto Generate Value Date Mismatch Entries’ in the Bank Wide Parameters screen.
If indicated in the Bank Wide Parameters, balancing entries will be automatically generated for any event if a mismatch of currency or value date entries (or both) is involved in any module of Oracle FLEXCUBE, with the exception of manually entered journal entries.
Specifying Control Accounts for Auto Balancing Entries (Real and Contingent)
If you specify that such automatic balancing entries must be generated, you can also specify the control accounts into which the entries must be booked.
There are two sets of accounts that you can maintain in the Bank-Wide Parameters screen, one for mismatches arising out of entries to real accounts and another for mismatches arising out of entries to contingent accounts. The relevant Control accounts must therefore be of Real or Contingent nature (as defined in the GL – Chart of Accounts). Such balancing entries will be automatically generated if a mismatch of currency or value date entries (or both) is involved in any module of Oracle FLEXCUBE, except Journal Entry.
In your Chart of Accounts, you must ensure that the following conditions are not indicated for the control accounts that you have specified for the currency mismatch and value date mismatch entries:
- Position accounting: Even if position accounting is set to “Yes” for the control account, the system will not pass any position accounting entries, since position accounting is done only for the main set of entries and not for the auto-balancing entries.
- Account revaluation: Account revaluation must be set for the control accounts since the effect of revaluing these balances would be offset the effect of revaluing the original GLs. (the GLs into which the main entries were posted).
- Direct posting: If you post a manual entry to one of the Control Accounts and the Position Entry Flag for the Control Account is set to 'Yes', then the system will do position accounting for that entry. Hence, for the GLs set-up as Control Accounts, the “Direct Posting” flag in the Chart of Accounts maintenance must be turned OFF.
Note
Additionally, it is also recommended that these Control Account GL's that you have specified in the Bank Wide Parameters screen for the mismatch entries are not used as part of Role to Head Mapping in any of the products. If maintained, the system would pass mismatch adjustment entries into the same GLs in which the main entries have been passed. There is no system-enforced validation of this and this aspect needs to be taken care of during Product set-up.
Generating Automatic Balancing Entries
In the case of transactions entered in any of the front-end modules of Oracle FLEXCUBE, the accounting process checks the entries at each business event, and automatically generates the balancing entries in case of a mismatch in currency or value date entries (or both).
Manually entered journal entries
In the case of manually entered journal entries, a journal batch that has been opened must be closed before it is authorized. During closure, the accounting process checks to see that the batch is balanced with respect to currency and value date entries. If a mismatch is detected, the accounting process raises an override to this effect. Depending upon how the override is configured, for your bank, the user who has opened the batch could adopt either of the following courses of action:
- If the override is configured to be an error, the system will not allow the user to close the batch without balancing the mismatches.
- If the override is configured to be a warning (either ‘Override’ or ‘Ignore’), the user can save the batch with the mismatches. No balancing entries are automatically generated by the system for the mismatch.
Uploaded journal entries
In the case of uploaded journal entries, a journal batch that has mismatched entries is not rejected, but an override is raised by the accounting process. Depending upon how the override is configured, for your bank, the accounting process takes either of the following paths:
- If the override is configured to be an error, then the batch is rejected, and must be uploaded again with the corrected entries.
- If the override is configured to be a warning, the accounting process automatically generates the balancing entries for the currency or value date mismatches, for the batch, and posts them to the requisite control accounts specified in the Bank Parameters.
In each case, the transaction reference for the balancing entries is the same as that of the original accounting entry, in which the mismatch occurred, and the other details of the balancing entries are, by default, the corresponding values in the original entries.
The mismatch balancing entries are generated in the following order or preference:
- Currency mismatch balancing entries
- Value Date mismatch balancing entries
In the case of mismatches in accounting entries due to inter-branch transactions, the inter-branch balancing entries are generated before any balancing entries for currency mismatches, and then, finally, the value date mismatches.
Routing Mask
A mask defines the manner in which a Routing Number is generated for your bank. It is on the basis of the routing number that Oracle FLEXCUBE processes clearing transactions.
The following is a typical mask format: ‘BBBbbbSSS’, wherein, ‘BBB’ indicates the bank code, ‘bbb’ indicates the branch, and ‘SSS’ indicates the sector to which the branch belongs. On the basis of the routing number, clearing transactions are routed to the appropriate branch of your bank.
Clearing Bank Code
Specify the code by which your bank is identified in the Clearing Network you participate in. This has to the same as that specified for your bank in the Clearing Bank Code Maintenance screen.
2.1.3 General Preferences Tab
In this screen, you can define format masks (for general ledger, CIF), choose if batch numbers should be auto-generated by the system, specify the details for cheque numbering etc.
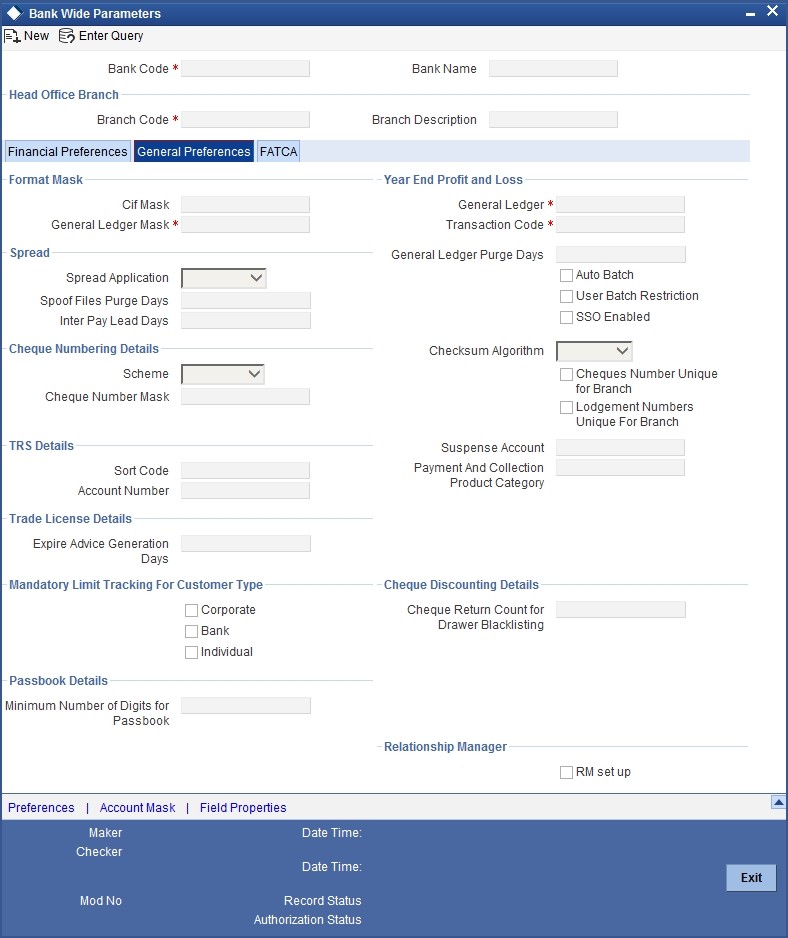
Defining Format Masks
A format mask is a structure that you can you can define for various elements that need to be entered in Oracle FLEXCUBE. You can define format masks for the following elements:
- General Ledgers
- Customer Identification File codes
- Customer account numbers
Once defined, you can modify the structure of a format mask only if no Customer or General Ledger Account has been opened using the mask. Customer Account mask is defined from the ‘Account Mask’ Button.
For more details on defining customer account mask, refer the section titled ‘Specifying Account Generation Parameters at Bank Level’.
CIF Mask
You can maintain a mask for generation of identification numbers (CIF Number) for customers of your bank. During customer information maintenance, the system will automatically generate the CIF numbers based on the mask you define here and the customer number range maintained at the branch level.
A CIF mask consists of a maximum of 9 digits. The CIF mask could have only numbers or could be alpha numeric or could also have the branch code as a part of it.
For instance, you can maintain the CIF Mask as ‘bbbnnnnnn’ where ‘bbb’ represents a three-digit branch code and ‘nnnnnn’ represents a 6-digit number.
GL Mask
You can indicate a mask for the general ledgers that are maintained for your bank. The mask that you define here will be enforced whenever a General Ledger is created in the Chart of Accounts screen.
A GL mask can consist of a maximum of nine alphanumeric characters. It can be built using a combination of numbers and letters to indicate for instance, the category of the GL - asset, liability etc., the GLs hierarchical position and so on.
Each element used to define the mask would represent a single character. To represent an alphabet of the English language, indicate “a”. To represent a number, indicate “n”. The last character would be a D or d, which indicates a check digit generated by the system. For a numeric check digit define it as‘d’; for an alphanumeric check digit define it as ‘D’.
You may use any of the following punctuation in the GL mask:
- dash (-)
- comma (,)
- asterisk (*)
- Full Stop (.)
- Forward slash (/)
For example, You wish to create a two level GL structure for your bank. You could define the first two characters of the GL to represent the category asset, liability etc., aa; the next two characters, nn, to represent the first level GL; and the next three characters, nnn, to represent the second level GL. A GL based on the given structure would read as AS01001 where AS represents the GL category - asset; 01 represents the first level GL; 001 represents the second level GL.
For creating this structure you would define your GL mask as - aannnnn’d/D’.
If you want to define your second level GL with a 4 digit numeric code instead of 3; other parameters remaining the same your mask would read as aannnnnn ‘d’/ ‘D’.
Indicating Year-end Profit & Loss
General Ledger
At the end of any financial year the balances in the income and expense accounts are posted by Oracle FLEXCUBE into a separate year-end account for the purpose of consolidation of balances and turnovers. This account is called the Year End profit and loss General Ledger Account.
You also specify year-end profit and loss GL for each GL account you maintain in the ‘Chart of Accounts’ screen. The year-end account specified at the bank level is the default year end profit and loss GL for all GL accounts maintained in the ‘Chart of Accounts - GL’ screen. If you do not specify the account to which year end balances of a particular GL should be posted, it will be posted to the bank’s year-end profit and loss account.
You can select a GL code from the option list of all assets, liabilities, income and expense GLs maintained in the chart of accounts screen.
Transaction Code
Indicate the transaction code that should be used to post the balances in the income and expense accounts to the year-end GL account.
You can select a transaction code from the list of transaction codes maintained in the ‘Transaction Code Maintenance’ screen.
Spread
Capture the following details.
Spread Application
Indicate the transaction legs for which the spread should be applicable. Choose the appropriate option from the following available in the adjoining drop-down list:
- Single Leg
- Both Legs
Spool File Purge Days
Specify the duration for which spool files should be stored in the spool file directory.
Interpay Lead Days
Specify the inter-pay lead days required for fetching billing records for inter-pay files for automatic billing of clients..
Each time you post journal and multi offset entries, you need to open a batch. You can specify that the batch numbers of the journal entry batches opened in your bank should be generated automatically by enabling the Auto Batch option.
Consequently, the system automatically generates batch numbers while posting journal and multi offset entries.
2.1.4 FATCA Tab
In this screen, you can maintain the details regarding the banks' own FATCA classification. You mainly need to maintain the details in the following screen to identify:
- If FATCA is applicable to the bank
- The banks' own FATCA classification
- The banks' IRS issued EIN as well as its issue and expiry date
You can maintain these details by clicking the 'FATCA' tab. The screen appears as shown below:
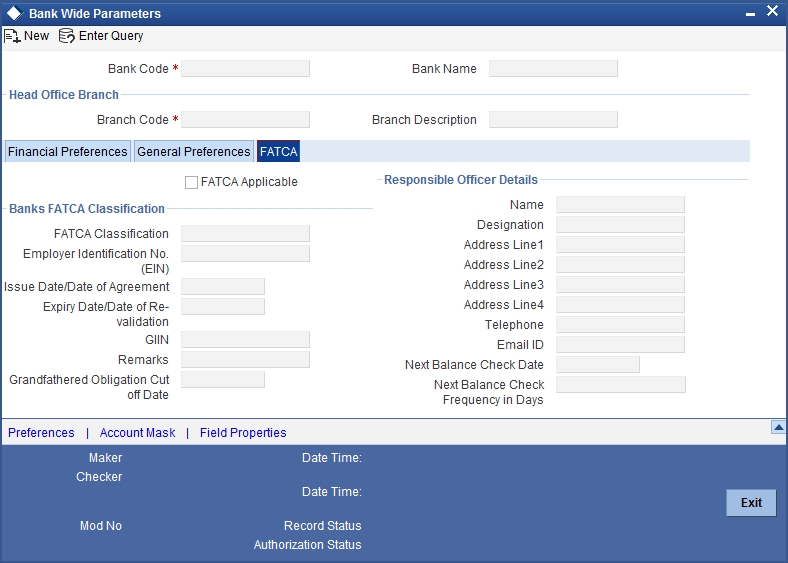
FATCA Applicable
Check this box to indicate that the FATCA rules are applicable to the bank.
Banks FATCA Classification
FATCA Classification
Specify the bank's own FATCA classification. The adjoining option list displays the all the allowed classifications maintained for customer type bank using the 'Customer Type-Wise FATCA Parameters' screen.
Employer Identification No. (EIN)
Specify the employer identification number (EIN) issued to the bank by IRS.
Note
All the statuses do not require employer identification number (EIN).
Issue Date/Date of Agreement
Specify the date on which the employer identification number (EIN) was issued by IRS; or the date on which the bank entered into an agreement with IRS.
Expiry Date/Date of Revalidation
Some classification requires revalidation of employer identification number (EIN) periodically. Specify the date on which the EIN is to be revalidated.
GIIN
Specify the global Intermediary Identification number issued to the bank by the IRS.
Remarks
Provide any remarks, comments or observations regarding the Bank's FATCA Classification.
Grandfathered Obligation Cut off Date
Specify the cut off date for grandfathered obligations. The system will identify the grandfathered obligations based on the cut-off date. this date will be maintained at the bank parameter level.
Responsible Officer Details
Name
Specify the name of the officer responsible for FATCA compliance.
Designation
Specify the designation of the officer responsible for FATCA compliance.
Address Line 1
Specify the address of the officer responsible for FATCA compliance.
Address Line 2
Specify the address of the officer responsible for FATCA compliance.
Address Line 3
Specify the address of the officer responsible for FATCA compliance.
Address Line 4
Specify the address of the officer responsible for FATCA compliance.
Telephone
Specify the telephone number of the officer responsible for FATCA compliance.
Email ID
Specify the e-mail ID of the officer responsible for FATCA compliance.
Next Balance Check Date
Specify the next balance check date.
Next Balance Check Frequency in Days
Specify the next balance check frequency in days.
The system will perform the following validations while saving the bank’s own FATCA classification:
- If ‘FATCA Applicable’ field is checked then the system will capture the bank’s own FATCA classification, GIIN number, Responsible officer name, designation, address line 1, telephone number and e-mail ID.
The GIIN entered should be validated against the list of GIINs provided by IRS. If the GIIN captured is not present in the list of GIIN, the system will display an override message. If you accept the override, then the record will be saved. If you cancel the override message, then the system will not save the record and ‘FATCA Applicable’ field will be unchecked.
2.1.5 Preferences Button
In the Bank-Wide Preferences screen, you can specify the following:
- The route of inter-branch accounting — through HO, through RO or directly between branches
- Exchange rate preferences — to be maintained for the bank as a whole or at each branch
- Preference relating to update of GL balances — on-line or at the End of day
- Preference relating to Position Accounting
- Interface details
Click the ‘Preferences’ button to invoke the ‘Preferences’ screen.
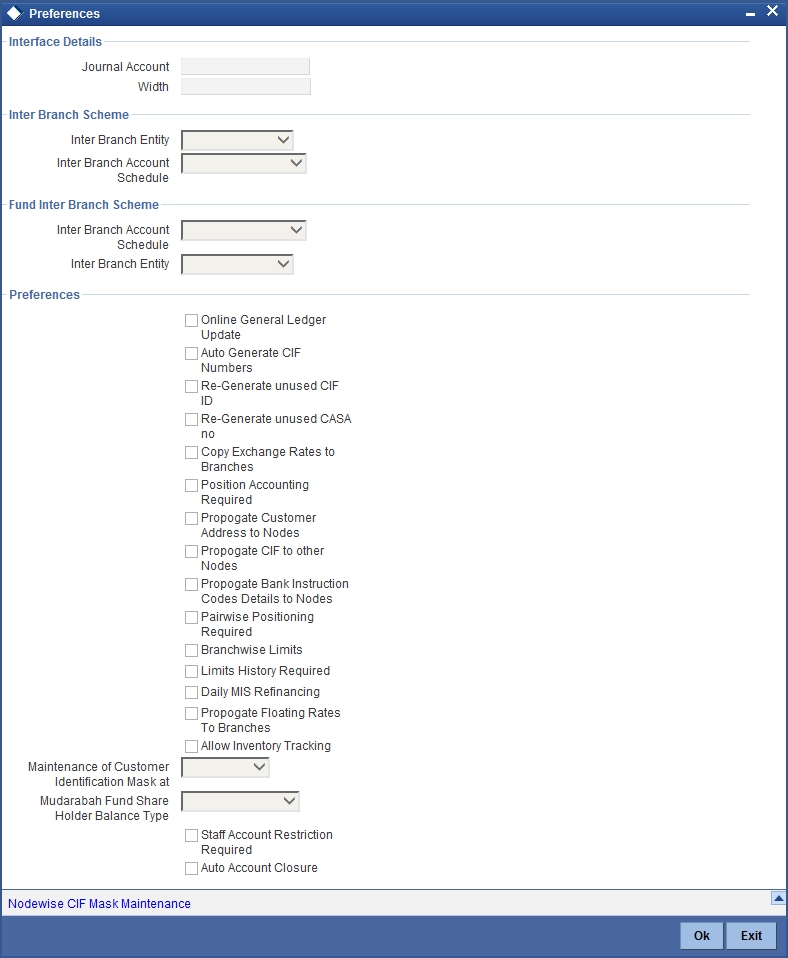
Interface Details
Specify the following details:
Journal Account
Specify Journal Account of the Interface details
Width
Specify width of the interface.
Inter Branch Scheme
Indicate the following details.
Inter Branch Account Schedule
You can indicate the route through which accounting entries for inter-branch transactions should be settled. You can select one of the following routes from the option list that is available:
- Choose ‘Through HO’ to indicate that inter-branch transactions should be settled through the Head Office
- If you specify ‘Through RO’ the accounting entries would be routed through the regional office. If two branches involved in a transaction do not report to a common regional office, the accounting entry would be routed through the HO
- If you specify ‘Direct’, each branch would have a direct accounting relationship with every other branch
The receivable and payable accounts between the branches, referred to as ‘due from’ and ‘due to’ accounts, are maintained in the ‘Inter-branch parameters’ screen.
For example, suppose the University Savings Bank has the following set up for its head office and branches in Headington, Oxford:
Roosevelt Avenue Branch, is the HO with Branch Code 000
Foxlake Drive Branch (Branch Code 001)
Mountainwood Road branch (Branch Code 002)
You have indicated that inter-branch transactions should be routed through the Head Office. Ms. Tanya Agnihotri has an account in Branch 002. She makes a cash withdrawal from Branch 001. This being an inter-branch transaction, Branch 001 will have to recover the money from Branch 002.
In this example the following movement of funds is involved:
- At Branch 001, the cash account is credited for the transaction amount and due from Head Office account debited.
- At Branch 000, the due from Branch 002 is debited and the due to Branch 001 is credited.
- At Branch 002, the Customer Account is debited and the due to Head Office account credited
Inter Branch Entity
Oracle FLEXCUBE allows you to post accounting entries related to inter-branch transactions to either of the following:
- Customer Accounts
- General Ledgers
- Both
If you select Customer Accounts as an inter-branch entity, you can specify the currency and the actual customer accounts involved in an inter-branch transaction between two branches of your bank. If the inter-branch entity is specified as ‘General Ledgers’, you need to specify the internal accounts that would be involved in a transaction between two different branches of your bank. If you select ‘Both’ option, it indicates that inter branch accounting entries could be posted for both GL and Customer accounts.
Fund Inter Branch Scheme
Indicate the following details.
Inter Branch Account Schedule
You can indicate the route through which accounting entries for inter-branch fund transactions should be settled. You can select one of the following routes from the option list that is available:
- Choose ‘Normal’ to indicate the inter-branch routing defined for corporate transactions will be applicable to the inter-branch fund transactions as well.
- Choose ‘Through HO’ to indicate inter-branch transactions should be settled through the Head Office.
- If you specify ‘Through RO’ the accounting entries would be routed through the regional office. If two branches involved in a transaction do not report to a common regional office, the accounting entry would be routed through the HO.
- If you specify ‘Through RO and HO’, the accounting entries would be routed through the Regional Office of the first branch, then the Head Office. From the Head Office, the entries would be routed through the Regional Office of the second branch.
- If you specify ‘Direct’, each branch would have a direct accounting relationship with every other branch.
The receivable and payable accounts between the branches, referred to as due from and due to accounts, are maintained in the ‘Inter-branch parameters’ screen.
Inter Branch entity
Oracle FLEXCUBE allows you to post accounting entries related to inter-branch fund transactions to a General Ledger that you have specified.
If you choose ‘Normal’ as the inter-branch routing, and you have not selected the option ‘Allow Corporate Access’ in the Branch Parameters screen, the Inter Branch transfer options you have chosen will be used.
If you have selected the option ‘Allow Corporate Access’ in the Branch Parameters screen and the branch is a fund branch, the entity will be defaulted as General Ledger. The GL will be based on the maintenance you have carried out in the Fund Inter Branch Accounts Maintenance screen, for the fund id. The same is explained in the chapter Accounts for Inter-branch transactions.
Online GL Updates
The update of GL balances can take place either on-line or during End of Day. For an on-line update select this checkbox.
Re-generate unused CIF ID
Check this box to indicate that the unused CIF ID needs to be re-generated automatically.
Note
Unused sequence number’s of CIF is tracked for re-use only in the following scenarios:
- If the user cancels without saving new customer maintenance.
- If the user deletes a new customer before authorizing it.
- Unused customer account is regenerated on next day post cancelling or deleting.
Re-generate unused CASA no
Check this box to indicate that the unused CASA number needs to be re-generated automatically.
Note
Unused sequence number’s of CASA is tracked for re-use only in the following scenarios:
- If the user cancels without saving a new CASA maintenance.
- If the user deletes a new CASA before authorizing it.
- The sequence numbers marked during delete operation is re-used in ascending order. The sequence numbers marked during cancel operation is reused only from next working day to prevent concurrency issues.
Auto- Generate CIF Numbers
This indicates whether or not the CIF should be generated automatically. Check this box to indicate the CIF number needs to be generated automatically.
Note
Unused sequence number’s of CIF is tracked for re-use only if the CIF is generated automatically.
Copy Exchange Rates to Branches
Exchange rates are maintained for a currency pair and are used to calculate the equivalent of one currency against the other. These exchange rates can be maintained in each branch or at the Head office. You can indicate your preference.
If you check against the option ‘Copy to Branches’ the exchange rates maintained at the Head Office will be made applicable to all branches of the bank. Leave it unchecked to indicate that exchange rates should be maintained at each branch.
Note
Propagation of rates happens only when the country code is same as uploaded country code.
Position Accounting Required
You can retrieve the position of a foreign currency, any time, by opting for position accounting in your bank. When you opt for position accounting, you maintain a Position GL and a Position Equivalent GL for every foreign currency maintained in your bank. The Position GL reflects the current position of the currency.
If you opt for position accounting while defining Bank-Wide Parameters, you have to maintain Position GLs and Position Equivalent GLs for every foreign currency that your bank deals in. When maintaining GLs for your bank, you can opt to link the different currencies, associated with the GL to either of the following:
- The Position GLs that you have specified for the currency (Your specifications in the Currency Definition screen will default here)
- Position GLs of your choice
As part of setting up the bank level preferences you can indicate whether MIS refinancing processing is required on a daily basis for the particular branch of your bank.
If you indicate that MIS refinancing should be done on a daily basis, refinance processing will be done on a daily basis for the following modules:
- Loans and Deposits
- Money Market
Note
You can indicate the rate type that is to be used for individual LD, and MM transactions while processing the contract.
Propagate Floating Rates to Branches
You have to indicate whether the floating rates maintained at the head-office of your bank should be propagated across all the branches of your bank.
Check the box positioned next to this field to indicate that floating rates need to be propagated across branches. Consequently, each time you maintain a floating rate for a particular rate code and currency combination at your bank, a corresponding floating rate record will be created and sent to all the branches of your bank.
Limits History Required
You can indicate whether date-wise limits history needs to be maintained for the Bank. If you choose to enable this option, the limits history is maintained at the following levels:
- Liability level history for storing liability records
- Limit level history for storing Lines records
- Line level history for storing Line Utilization records
Conditions for collating Limits History data:
- There is no retrospective effect on limits history.
- Back-valued contracts and account transactions do not result in any adjustment to the previous records in the history. Such transactions are inserted with the current EOD date. Similarly any future-dated contracts and account transactions are also inserted with the current EOD dates.
- In cases where the main line is changed to a sub line, the utilization is transferred from the old main line to the new main line and the effect cascades to the ultimate parent line. But existing records are not changed or updated.
- Existing data will not reflect the change in the liability number for a customer.
- Revaluation has no effect on the limits history data
- Limits history is not maintained country-wise
The data is archived during the EOD processing. The history data is not updated for holidays.
Note
If there is no change for a liability/limit/line, data is not archived for that day.
Note
This option can be enabled or disabled at any point of time. Limits history will be recorded with effect from the day the option is enabled. Disabling the option will however not automatically purge history data.
You have the option of querying Liability history and drilling down to Limits Line history and further drilling down to Contract-wise Utilization history. Clean risk data is displayed only as of the date of query and history for the same is not maintained.
Branch wise Limits
This option indicates whether or not the limits tracking must be done at the branch level. If this box is checked, you will be allowed to view/change only the lines created from that branch for a given liability.
To illustrate, if you open any credit line facility in branch BR1, then in the Limit Restriction screen, the only branch available will be BR1.
Checking this option will also allow you to View details of line utilization at the branch level in the Limits Query screen.
For a total utilization of a global customer maintained in HO, you would have to generate a report of the limit utilization for each instance.
Pairwise Positioning Required
You have to select this option to indicate whether pair wise positioning entries need to be stored/handed off or not. If selected, the system will store position creating pair entries separately for handoff to other external systems.
When processing accounting entries, the system will check whether you have opted for pair wise positioning. If you opt for this option, the system will check for the following conditions in all the accounting entries that are posted:
- The set of entries posted are balanced i.e. total LCY debit is equal to total LCY credit
- At least one pair of accounting entry is in FCY
- Both the currencies are not the same
If the above conditions hold true, the system will store the entries along with the following information:
- Dr. Account: indicates the debit leg’s account GL
- Cr. Account: indicates credit leg’s account GL
- Event Code: is the event of the transaction
- Dr CCY/Bought Currency
- Dr. Amount/Bought Amount
- Cr. CCY/Sold Currency
- Cr. Amount/Sold Amount
- Dr Booking Date/Cr Booking Date
- Dr Value Date/ Cr Value Date
- Dr Transaction Code/Cr Transaction Code
- Exchange Rate
- Hand Off Flag
Note
While passing pair wise position entries, the main component will be passed with TRF_AMT tag and the equivalent entry will be passed with the AMT_EQUIV tag.
In case of accruals/revaluation also, if position entries are created, the corresponding entries will be stored separately for hand off.
Note
Pair-wise Positioning Required will decide whether position creating pair entries need to be stored by the accounting processor separately for handing off to other system.
Propagate CIF to other Nodes
You need to indicate whether or not the CIF number maintained in HO has to be propagated to other branches present in different instances. Check this box to indicate the CIF number has to be propagated to other Nodes/instances.
Propagate Customer Addresses to Nodes
You need to indicate whether or not the customer addresses maintained in HO has to be propagated to other branches present in different instances. Check this box to indicate the Customer addresses has to be propagated to other Nodes/instances.
Propagate Bank Instruction Codes Details to Nodes
This indicates whether or not the BIC data maintained in HO has to be propagated to other branches present in different instances. Check this box to propagate BIC details.
Maintenance of Customer Identification Mask at Branch/Node level
This option gives you the flexibility to define different CIF masks at the Nodes/Bank level. If you select ‘Bank’ from the option list, then the CIF mask given at Bank level will be applied to all the branches under it.
Mudarabah Fund Shareholder Balance Type
Specify whether the system should consider the month-end balance or the monthly average balance of the GL to compute the shareholders’ investment in the linked Mudarabah fund. Choose from the following options available in the drop-down list:
- Monthly Average Balance
- Month End Balance
The option specified here will be common to all the shareholder GLs identified under the Mudarabah fund and once Mudarabah fund shareholder balance type is input and authorized, it will not be allowed to modify later.
Staff Account Restriction Required
Check this option to apply staff account restriction at the bank level.
Auto Account Closure
Check this box to enable Account Auto Closure functionality.
If you select ‘Node’ from the option list, you will need to maintain CIF masks at the Node level in the ‘Node-wise CIF Mask Maintenance’ screen. This would ensure that the branches maintained in different nodes/instances have different CIF masks.
Click ‘Nodewise CIF mask Maintenance’ button to access this screen. The screen appears as shown below:
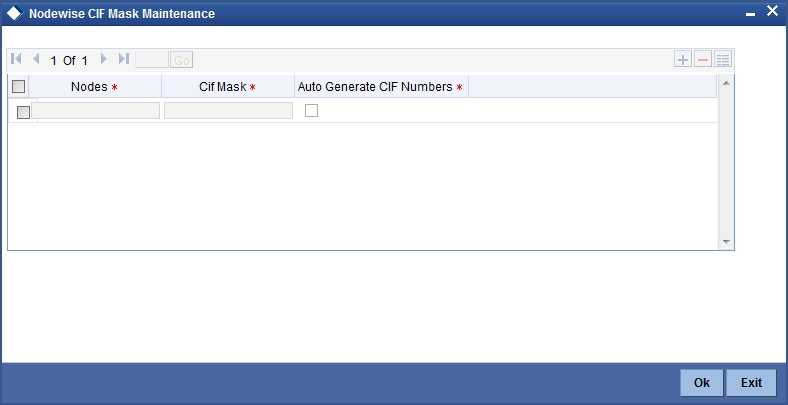
You can specify the following details here:
Nodes
This indicates the node/instance for which the CIF mask is required. Select a node from the option list provided.
Customer Identification File Mask
This indicates the CIF mask for the corresponding instance/node. Select a CIF mask from the option list provided.
Autogenerate Customer Identification File Number
This indicates whether or not the CIF should be generated automatically. Check this box to indicate the CIF number needs to be generated automatically.
Allow Inventory Tracking
You can use this check box to allow/disallow inventory management and tracking. To use inventory management module, check this box.
Note
If inventory tracking is allowed then ‘Cheque Numbering Scheme’ should be left blank/null.
For more details on Inventory Tracking, refer the Instruments Inventory Tracking User Manual.
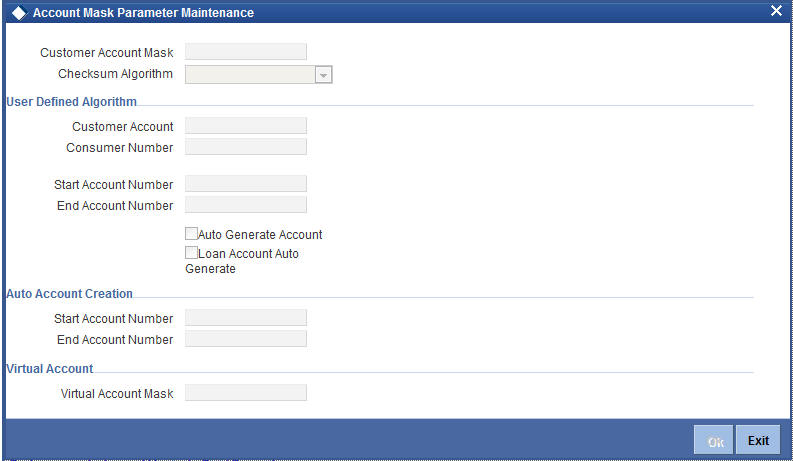
2.1.6 Account Mask Button
Account numbers in your bank are generated in the format of the account mask that you specify through the ‘Account Parameters’ sub-screen of the Bank-wide Parameters screen. Click ‘Account Mask’ button in the Bank-wide Parameters screen. Account Parameters screen is displayed. The screen appears as shown below:
Note
Since account level parameters are defined at the bank-level, by default these parameters will be defaulted to all the branches of your bank. However, individual branches of your bank will be allowed to change these specifications.
Specifying Customer Account Mask
Account numbers can either be generated automatically or you can choose to allocate them manually. In Oracle FLEXCUBE you have the option of maintaining three types of account masks.
They are as follows:
- Alphanumeric – this type of an account mask is a combination of alphabets and numbers where you can build the mask with components such as the Branch Code, the Account Class, the Currency Code, a check digit, etc
- Numeric - is a numeric type of account mask where the checksum algorithm associated with the account mask is either Modulo 11, Modulo 11 with weights or Modulo 97.
- Pure Numeric – is a numeric type of account mask, which does not have a checksum algorithm, associated with it. If you are maintaining a pure numeric mask you have to identify the start and end account number which is to be associated with it.
Alphanumeric customer account masks
The alphanumeric customer account mask can have a maximum of twenty alphanumeric characters. It can comprise of one or more of the following elements in combination:
- Account Class — Use “ACLASS” to indicate that the account class to which the account belongs should be part of the mask.
- CIF Number — You can incorporate the nine-character CIF code assigned to the customer into the mask. To do so indicate ‘CIF Number’ in the mask.
- Currency — To add the currency of the customer account, use ’CCY’
- To indicate an alphabet or number — Each element used to define the mask would represent a single character. To represent an alphabet of the English language, indicate “a”. To represent a number, indicate “n”.
- Punctuation Marks — When defining the customer account mask
you have the option of separating the elements. To do this, you may use
the following punctuation marks:
- Dash (-)
- Comma (,)
- Asterisk (*)
- Full stop (.)
- Forward slash (/)
For Check Digit - The last character in the customer account mask should always be a ‘D’ or ‘d’. This indicates the check digit, which is generated by the system. When specified in the mask, the check digit component is generated using either of the following methods:
- Modulo 11
- Modulo 97
- Modulo 11 with Weights
- User Defined Algorithm
If you choose Modulo 97, all components of the account mask (for example, the Branch Code, the Account Class, the CIF ID, etc.) should be numeric. For example, if you enter ‘bbb’ in the account mask field (indicating that the branch code should be part of the account number), and choose the Modulo 97 option, ensure that the branch code is a numeric value, such as ‘000’, ‘123’, etc.
Note
The maximum length of twenty characters for the customer account mask is inclusive of the check digit
All customer accounts that are entered in any branch of your bank will compulsorily have to conform to the mask.
For example, you want the following elements to be part of the customer account mask:
The currency of the account
The nature of the account (savings, current etc.) and
The Customer Id
Given the above criteria the customer account mask would be:
ACLASSCCYCIFNUMBERn’D’
This corresponds to:
LLLLL$$$CCCCCCCnD
All customer accounts entered in any branch of your bank would now comprise of these elements, in the order defined in the mask.
A customer with CIF number 10005 has opened his first USD savings account with your bank, and the Account class for savings accounts is INDSB. His account number would read:
INDSB-USD-10005-1’D’
Similarly, the second GBP current account of a corporate customer with CIF Number 20005, would read
CUCOR-GBP-20005-2’D’
'CUCOR' being the account class representing current accounts of corporate customers.
Account mask generation using Alternate branch code
Alternate branch code will be represented as literal ‘r’ in the account mask. Following validations will be performed during account mask generations.
- The system will generate the unique serial number if:
- Alternate Branch code alone is there in the account mask
- Alternate Branch code is in combination with other literal like account code, currency type etc. in the account mask
- The serial number generated for the alternate branch code will be unique when two separate branches have the same alternate branch code.
- The system displays an error if the length of literal ‘r’ in the account mask used and the alternate branch code are not consistent. The system will not allow the account number generation.
- Modification to the alternate branch code will affect only the new account number. generation. It doesn’t have any effect on the existing account number.
- The serial number generated should be unique for a particular criteria (alternate branch code/ customer/ currency/account class etc.) irrespective of the length of the corresponding literal maintained in the mask.
Characters Supported for Various Fields in Account Mask:
| Field | Mask character | Max length supported | |||
|---|---|---|---|---|---|
| Account class code | L | 6 | |||
| Account code | T | 4 | |||
| Currency code | $ | 3 | |||
| Currency type | Z | 3 | |||
| Customer number | C | 9 | |||
| Branch code | b | 3 | |||
| Alternate Branch code | r | 5 | |||
| Serial Number | S | - | |||
| Numeric value(user to input) | n | - | |||
| Alphabet value(user to input) | a | - | |||
| UDF | U | - |
Note
- Account mask should not have both the branch code and the alternate Branch code in the same mask
- You must specify the mask character in the same case as mentioned
above.
Field Case 1 Case 2 Case3 Case4 CIF number 015005624 015005624 015005624 015005624 Currency code GBP GBP GBP YUV Currency type O O O YA1 Account class SAVINV CACIN 123456 SAVINV Account code SA12 SA12 8909 SA12 Branch code 014 015 015 015
| Mask maintained | Booked against | Chk sum Algorithm | Generated Account Number | ||||
|---|---|---|---|---|---|---|---|
| LLLLLL$$$CCCCCCCCSSd | Case 1 | Modulo 11 | SAVINVGBP15005624019 | ||||
| LLLL$$$TTCCCCCCCCSSd | Case 1 | Modulo 11 | SAVIGBPSA15005624028 | ||||
| LLLLLL$$$ZZCCCCCCnnd | Case 2 | Modulo 11 | CACINGBPO005624997 | ||||
| nnnnnnnD | Case 1 | Modulo 11 | 09888994 | ||||
| bbbbLLLZZZZCCCCCnnd | Case 4 | Modulo 11 | 015SAVYA105624074 | ||||
| LLLLLL$$$CCCCCCCSSDD | Case 1 / 2 | Modulo 97 | Error. Will not be able to generate the check digit. The control digits value must be numeric for Modulo 97. | ||||
| LLLLLLTTTTTCCCCCSSDD | Case 3 | Modulo 97 | 12345689090056240150 |
Customer Account Number Containing a UDF Value
While defining a customer account if you include ‘U’ in the account mask, it indicates that the customer account numbers will have the value of a user-defined field.
The number of U’s will depend on the length of the UDF value that has to be included in the customer account number. For example, if you want to include 3 characters from a UDF, the account mask should consist of UUU (in addition to other parameters which you want to include in the customer account numbers).
Note
- A user-defined field can be part of the customer account mask only if the customer account number generation is not automatic.
- Since a customer account number in Oracle FLEXCUBE can accommodate only up to 20 characters you have to ensure that the account mask you have defined does not exceed this number.
Numeric Account Masks with Modulo 11 and Modulo 97 as Checksum Algorithms
A numeric type of mask can have a maximum of twenty numeric characters, inclusive of the checksum algorithm.
If you associate Modulo 11, as the checksum algorithm, a single character D will be appended to the numeric mask. Let us assume that you have an account mask with five numeric values – ‘nnnnn’ and associated Modulo 11 as the checksum algorithm. The system automatically appends ‘D’ to the numeric mask. The generated account numbers will have the following format – nnnnnD.
If the Account mask is Alphanumeric, and check sum digit is needed as per Modulo 11, then the check digit- 'd' has to be manually specified in the mask. For example, if you need an account mask as 'bbbCCCCCCSS', then considering Modulo 11 check sum digit, you need to input the mask as 'bbbCCCCCCSSd'.
Similarly, if you associate Modulo 97, with an account mask of five numeric values, the system appends a double-digit value of DD to the mask. The generated accounts will have the following format – nnnnnDD
Note
As system automatically appends DD in case of Modulo 97, if you input the customer mask with 'DD', system will display the error message as 'Cannot have D denoting Alphanumeric Characters'.
if you input 'dd' in the mask, then system displays the error message as 'Cannot have d denoting Alphanumeric Characters in account mask while using mod97 Checksum algorithm'.
System automatically appends DD always at the end of the Mask.
| Algorithm | Contents of the mask | Check sum digit | Check digit character | Remarks | |||||
|---|---|---|---|---|---|---|---|---|---|
| Modulo 11 | Alphanumeric | User to input | d | Check digit should be specified manually in the mask | |||||
| Modulo 11 | Numeric | Auto append | D | System appends the check digit automatically, however, the mask characters should be 'n' for example, nnnnD | |||||
| Modulo 97 | Alphanumeric | Auto append | DD | If the values for the mask are alphanumeric, then check digit will not be generated | |||||
| Modulo 97 | Numeric | Auto append | DD | - | |||||
| wing format – nnnnnDD. |
Numeric Account Masks with ‘Modulo 11 with Weights’ as Checksum Algorithm
The account mask with ‘Modulo 11 with Weights’ algorithm can have a maximum of 13 digits. It comprises of the following elements:
- Branch Code (3 digits) – Indicates the branch at which the customer account is maintained.
- Account Code (1 digit) – This will indicate the account code of the account class to which the customer account belongs. During account number generation (in the Customer Account Maintenance screen), you need to select the account class from the option-list provided. The system will then convert it to the account code maintained for that account class. The account code thus becomes a part of the customer account number.
- Currency Type (1 digit) – This will represent the currency type of the account currency. As explained for account code, you will select a 3-digit currency code during account generation. The system will convert it to the currency type maintained for that currency. The currency type will then form a part of the account mask.
- CIF Number – You can also include the CIF number of the customer as part of the account mask. The CIF number is automatically generated by the system when you capture customer details in the Customer Information Maintenance screen. During customer account maintenance, you can select the CIF number from the option list provided.
Sequence Number (1 digit) – The sequence number is automatically
generated by the system for a combination of account code + currency
type + customer. This means that, for this combination, you can maintain
nine accounts. To maintain the 10th account for the same combination,
the system will use the ‘Dummy Customer No. Range’ maintained
at the branch level’.
Refer the section titled ‘Creating Branches’ of this
document for more details on dummy number range.
- Control Number (1 digit) - This is the 13th digit of the account number. This number is also automatically generated by the system based on the ‘Modulo 11 with Weights’ algorithm.
For the above combination, the customer account mask would be:
‘bbbTZCCCCCCSd’
Where,
- bbb – is the branch code
- T – indicates the account code
- Z – is the currency type
- CCCCCC – is the CIF number of the customer
- S – is the sequence number for a combination of account code, currency type and customer
- d – is the control number generated by ‘Modulo 11 with Weights’ algorithm
The following example illustrates the manner in which the system calculates the 13th digit for a customer account number using the ‘Modulo 11 with Weights’ algorithm.
Assume that the account number of a customer is ‘000-4-1-123456-1’. As per this algorithm, the value of each position (1 to 12) is multiplied with the weight for each position (the weights are provided by your bank). Further, the sum of the product obtained is divided by 11. The remainder of the division will determine the value of the 13th digit.
The position-wise weight and account number and the product (of weight and number) is as follows:
| Position | 1 | 2 | 3 | 4 | 5 | 6 | 7 | 8 | 9 | 10 | 11 | 12 | |||||||||||||
| Weight (W) | 2 | 4 | 8 | 5 | 10 | 9 | 7 | 3 | 6 | 2 | 3 | 5 | |||||||||||||
| Acct. No (N) | 0 | 0 | 0 | 1 | 2 | 3 | 4 | 5 | 6 | 4 | 1 | 1 | |||||||||||||
| Product (W * N) | 0 | 0 | 0 | 5 | 20 | 27 | 28 | 15 | 36 | 8 | 3 | 5 |
Sum of the product = 147.
Divide the value 147 by 11 to obtain the remainder
Remainder = (147/11) = 4
As per this algorithm, if the remainder is 10, then the control number will be zero. If it is any value other than 10, the remainder itself will be taken as the control number.
Therefore, the 13th digit = 4.
The customer account number will now read as ‘000-4-1-123456-1-4’
Numeric Account Masks with User Defined Algorithms as Checksum Algorithm
If the check digit component within a Customer Account Number is to be generated using a method of your choice you must identify the following:
- The User Defined Algorithm for the Customer Account Number – this identifies the name of the user-defined algorithm for check digit generation of account numbers.
- The User Defined Algorithm for Consumer Number – this stores the name of the user-defined algorithm for validating consumer numbers.
While capturing Customer Account numbers, the System checks for your specification for the checksum algorithm. If you have selected User Defined, the check digit is generated using the specified user-defined algorithm.
- Unused sequence numbers of CASA cannot be tracked for re-use if the sequence number is generated by user defined algorithm
Since these parameters are maintained for your bank, they are defaulted to the branches of your bank. You will not be allowed to change these for a specific branch of your bank.
Note
Unused sequence numbers of CASA can be tracked for re-use only if the customer account mask contains numeric mask.
- If the account mask contains any of the following characters, the lost account number is re-used only if the same customer opens another account with the same branch code, account class, currency & sequence number combination:
- C(Customer number)
- b(Branch)
- T(Account class)
- Z(Currency)
- S(Single digit sequence number)
- SS(Double digit sequence number)
- Unused customer account number is reused in the same day, except in the following scenarios:
- Session termination for the current user
- Multiple windows opened for the same Function ID by the current user.
Pure Numeric Masks
A numeric account mask, which does not have a checksum algorithm associated with it, is called a pure numeric mask. Since it does not have a checksum algorithm associated with it you will have to specify the start and end account numbers and enable the auto-generated option.
The start account number forms the basis on which customer accounts numbers are to be generated. Similarly, you will not be allowed to maintain account numbers beyond the end account number.
Let us assume, that you are have maintained the following details in the Account Parameters screen at your bank:
| Customer Account Mask | nnnnn | ||
|---|---|---|---|
| Start Account Number | 1 | ||
| End Account Number | 50000 | ||
| Cust Accunt Auto Generate | Yes |
While generating a new account number the system will automatically generate 00001 corresponding to nnnnn. The next account will be – 00002.
Note
'n' is allowed in the account mask, only if auto account number generation is selected at branch level.
Including Value of a UDF as Part of Customer Account Number
If your bank has not opted for automatic generation of account numbers, you can specify a structure for customer account numbers. The structure can be a combination of CIF number, account class, value of a user defined field, currency, branch code, alphabets/numeric and a check digit which is automatically generated by the system.
For example, an account mask is CCCCCCCLLbbbUUU$$$ad.
This implies that a customer account number will contain:
CIF Id – represented by C
Account Class represented by L
Branch Code represented by b
Values of a user defined field represented by U
Any user-input alphabet represented by a (enter ‘n’ if you want to include a numeric)
Currency Code represented by $$$
A check digit (which is automatically generated by the system) represented by ‘d’
Note
The number of C’s in the account mask should match with the CIF mask that you have specified. For instance, if the CIF mask is aaaannn (7characters), the account mask should consist 7 C’s to include the CIF Id in the customer account number.
The value of a user-defined field can be used to include an additional parameter (for example: the code of the country to which the customer belongs) in the customer account number.
The steps involved for including the value of a user-defined field in a customer account number are as follows:
- Include ‘U’ in the customer account mask to indicate that the customer account number should contain the value of a UDF
- Create a new user defined field
- Link it to the Function Id STDCIF
- Specify the value of the user defined field at the time of creating a customer
- Specify the UDF whose value has to be included in the customer account number to the Oracle FLEXCUBE implementer. The implementer will indicate this at the back end.
Maintaining Ten Digit Masks with Running Sequence Numbers
You can maintain a 10-digit mask of any combination, wherein the last two digits will necessarily be a running sequence number. This number will be automatically generated by the system. For instance, if you want to maintain a mask for the customer number and currency combination followed by the two digit running number, you will have to maintain the mask as CCCCC$$$SS. Here, CCCCC stands for the customer number, $$$ stands for the currency of the account and SS stands for the running number. The system will generate the last two-digit number in a continuous sequence irrespective of the combination that you specify in the mask.
For example, let us assume that you want the customer account number to be a combination of the customer number and the account currency followed by the serial number. To achieve this, you have to specify the mask as CCCCC$$$SS. Based on this mask, for a customer with CIF ID 40207 with account in USD, the account number will be 40207USD01. If the same customer has another account in GBP, the next account number would be 40207GBP02. That is, there will not be any holes in the system generated running number.
Virtual Account Mask
The current support of defining the mask at the branch level which takes precedence over the mask provided at the bank level, is extended for “Virtual Account Mask” also.Specify the virtual account mask in this field. The following values can be specified in this field:
- “b” Branch code of the physical account.
- “i” Virtual Customer id defined at CIF.
- “c” CIF id of the physical account.
- “y” CCY of the physical account.
- “v” Virtual Account Code.
- “n” Enterable Number.
The customer account mask and the virtual account mask values cannot be the same. The system will display an error message if both of these values are the same. The virtual account mask should contain ‘n’ as one of the values.
If the length of the mask provided is greater than the actual value available, then the system takes ‘0’ as a preceding value to match the number of digits. For Example : If the actual value of customer id is 5 digits and the mask has been defined as 6 digits like ‘cccccc’, then the first digit is considered as ‘0’ and the remaining 5 digits will take the value of the customer id.
The first ‘n’ number of characters is considered as a value for the mask.
Example
If a customer ID consists of 6 digits and if the virtual account mask for customer number is defined as 3 digits, then the first three digits of the customer ID needs to be specified or else an error message is displayed.
Note
Providing virtual account mask at Bank level is mandatory.
Specifying Auto Account Creation Parameters
You may wish the system to automatically create current accounts for customers at the time of loan initiation. These system-created current accounts are for use as settlement accounts.
Here, you need to specify the range of numbers available for such auto created accounts by mentioning a start and an end number.
If you wish to retain the facility of auto creation of current accounts at loan initiation, you will have to ensure that the account number mask does not have any user input character.
2.2 Confirmation/Affirmation Type Maintenance
This section contains the following topics:
- Section 2.2.1, "Invoking Confirmation/ Affirmation Type Maintenance"
- Section 2.2.2, "Viewing Confirmation/ Affirmation Type Summary Details"
2.2.1 Invoking Confirmation/ Affirmation Type Maintenance
Manual confirmations received by FAX/telephone/Hard-copy etc. (Affirmation) need to be registered for a deal. You can maintain different Confirmation/Affirmation Types using ‘Confirmation/Affirmation Type Maintenance’ screen. You can invoke this screen by typing ‘STDCNTYP’ in the field at the top right corner of the Application tool bar and clicking the adjoining arrow button.
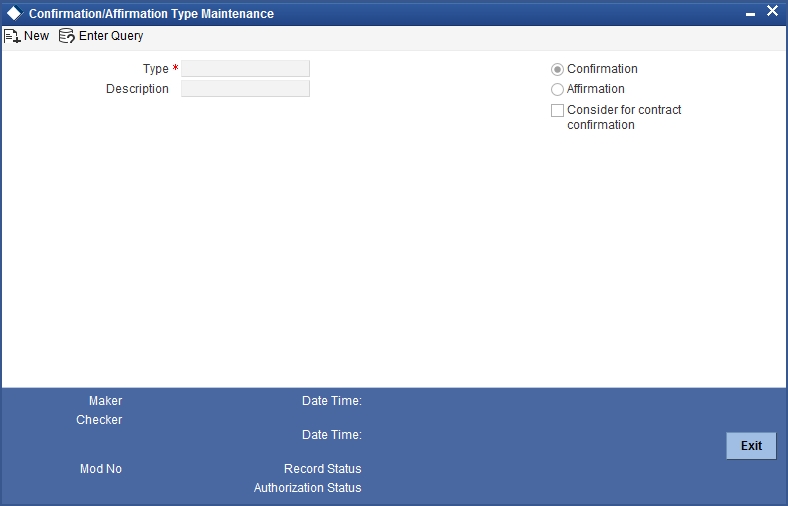
You can specify the following details:
Type
Specify the confirmation or affirmation type.
Type Description
Specify the description for the selected type.
Confirmation/Affirmation
Select the type of contract. The options are as follows:
- Confirmation
- Affirmation
Consider for Contract Confirmation
Check this box for affirmation type of contract.
If this field is checked for an affirmation type and an affirmation is done for the contract with this affirmation type, then the contract will be considered as ‘Confirmed’.
2.2.2 Viewing Confirmation/ Affirmation Type Summary Details
You can view confirmation or affirmation type details using ‘Confirmation/ Affirmation Type Summary’ screen. You can invoke this screen by typing ‘STSCNTYP’ in the field at the top right corner of the Application tool bar and clicking the adjoining arrow button.
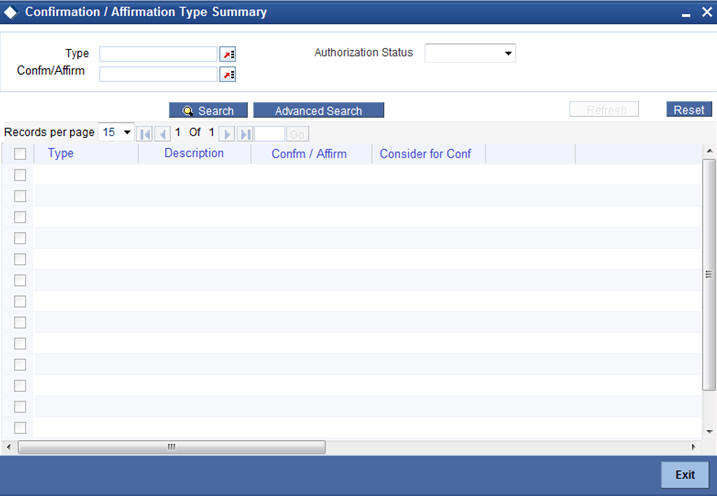
In the above screen, you can base your queries on any or all of the following parameters and fetch records:
- Authorization Status
- Type
- Confirm/Affirm
Select any or all of the above parameters for a query and click ‘Search’ button. The following records are displayed.:
- Type
- Description
- Confirm/ Affirm
- Confirm for Confirmation
2.3 Branch Restriction Maintenance
This section contains the following topics:
2.3.1 Placing User Restrictions on Data Entry Batches
You can restrict the usage of batches to specific user by placing bank-wide User level batch restrictions. If you enable this option as a Bank Parameter, you need to allocate the batch number range for each user through the ‘Batch Restriction Maintenance’ screen.
The restriction on the usage of batch numbers is made applicable on data entry and PC transactions. The user will be allowed to enter only those batches reserved for the user profile. As a result, each time a user specifies a batch number; it will be validated against the ‘Allocated Batch Number Range’.
This feature is applicable only when batch generation is manual. Therefore, if you enable this option, you must ensure that the Auto Generate option has not been enabled. In a scenario where the User Restriction for Batch Number field is enabled and Auto Batch option has also been enabled, the system displays an error message as “Not a Valid Batch Number For the User”.
In case you choose to auto generate batch numbers, the System will not perform the batch restriction validation.
You can invoke the ‘Batch Restrictions Maintenance’ screen by typing ‘STDBRRES’ in the field at the top right corner of the Application tool bar and clicking the adjoining arrow button.
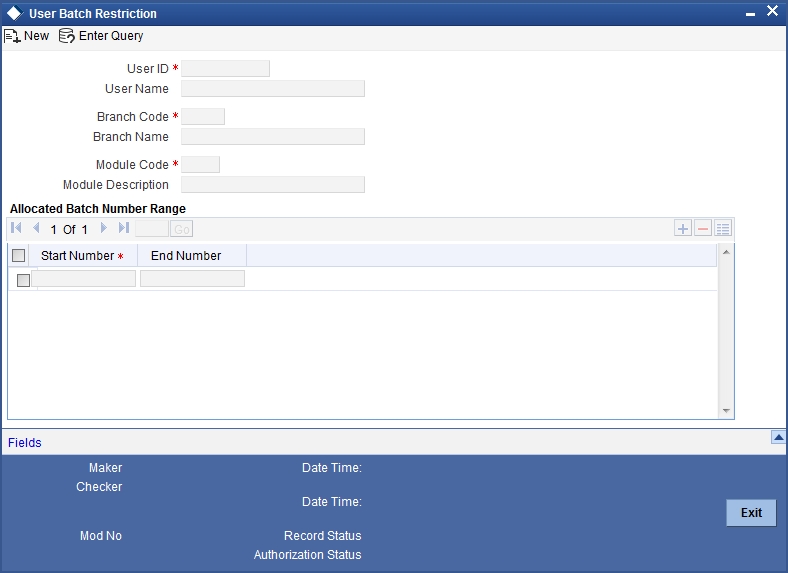
Specify the following details in this screen:
- The User Profile for which the restrictions are being maintained. A list of all the User Profiles with access rights to the DE and PC modules is displayed in the option list. You can select the appropriate.
- The branch of your bank for which the restrictions will be made applicable. You can either choose a specific branch or make the restriction applicable to ‘All’ the branches of your bank.
- The module for which you are maintaining the Allocated Batch Number Range. This can either be PC or DE.
- The batch number range, which is indicated in terms of Start and End numbers. The range that you specify is allocated to the user. For distinct numbers, the start number and end number of the range will be the same.
Note
While processing DE and PC transactions, the batch number specified by the user is validated against the allotted range. If the validation fails, an error message is displayed.
These validations are made applicable even during the Batch Upload operations for the following functions:
- Journal Online – Single Entry
- Multi-offset Entry
- Teller Transaction Input
SSO Enabled
To enable Single Sign On (SSO) for your installation check the SSO Enabled check box. This enables restricted login from external systems into Oracle FLEXCUBE.
General Ledger Purge Days
You can specify here the maximum number of working days, the average GL balance computation for which is to be retained in the System.
Specifying Cheque Numbering Details
Scheme
In Oracle FLEXCUBE, cheque numbers can be generated automatically or can be manually entered. If you indicate manually, you can draw up numbering conventions and assign numbers to the cheques that are issued.
Cheque Number Mask
Specify the mask of a cheque number to be used by the bank.You can define numeric cheque mask as a series of N.
While defining an alpha numeric cheque mask, the alphanumeric character should always precede the numeric characters. For example: AANNNN, A being alpha numeric character and N being numeric character. Numeric characters should always follow the alpha numeric characters.
If cheque numbering scheme is 'Automatic' and checksum algorithm is selected, the 'Cheque mask' can be defined as only numeric. The cheque mask can contain only 'N' or can start with a 'T' followed by 'N'. If the cheque mask contains a 'T' in the first position, it indicates that the cheque is of type EURO or COMMERCIAL. If the mask contains only 'N', then the cheque is only numeric and cannot be EURO / COMMERCIAL. An appropriate error message is displayed if cheque numbering scheme is 'Automatic' and cheque number mask defined contains anything other than 'N' or 'T' in the first position.
If the cheque numbering scheme is ‘Automatic’ and checksum algorithm is selected at bank parameter, the cheque mask cannot be defined as alpha-numeric. The system validates if the cheque mask is alphanumeric and inventory is enabled at bank parameter. The system displays an appropriate error message as ‘Alpha-numeric Cheque number is not supported as Inventory tracking is enabled’.
Checksum Algorithm
If you choose the automatic generation option you can indicate the algorithm based on which the cheque digit should be generated. A cheque number consists of three components:
- A check digit
- A cheque type
- A running serial number
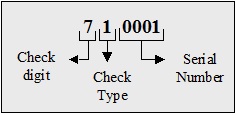
You have the option to choose the algorithm to be used to arrive at the check digit. Currently Oracle FLEXCUBE supports only the Modulo-7 algorithm. Based on this algorithm the check type and serial number is divided by seven, and the remainder is taken to be the check digit. If the remainder is zero, then the check digit is set to seven.
The cheque type indicates whether the cheque is a Euro or Commercial cheque. The numeral 1 before a cheque serial indicates a Euro cheque and 2 indicates a Commercial cheque.
The cheque serial number is generated sequentially starting from 0001. This running serial number is assigned taking into account the last check number issued for the account.
Cheque Numbers Unique For Branch
For cheque numbers that are automatically generated, you can choose to make cheque numbers unique across the branches of your bank.
If you indicate that serial numbers need not be unique, you can have the same cheque number assigned to cheque leaves of different accounts within a branch. In effect cheque numbers remain unique to an account.
Lodgment Numbers Unique for Branch
You can indicate whether lodgment leaves must have unique numbers in a branch, or must be unique for individual accounts.
For example, in the Bank Wide Parameters, you have specified that lodgment book numbers must be unique for the branch. This means that lodgment numbers need to be unique across all accounts of that branch. For instance, if a book is maintained with the Start Number as 1, and containing 25 leaves, you cannot start another book in respect of any other account, with these numbers.
If you have specified that lodgment book numbers must be unique to accounts in the branch, and a book is maintained with the Start Number as 1, and containing 25 leaves, you cannot start another book in respect of the same account, with these numbers. However, you can start a book with the same numbers in respect of another account in the branch.
Specifying TRS Details
You can maintain the following details that will be used by the system to raise direct debit for Tax Relief at Source (TRS) rebate availed by customers on mortgage loans. The direct debit is raised during the End of Day (EOD) process after the LD batch processes.
Sort Code
Specify the destination bank code for which the bank raises direct debits for TRS claims.
Account Number
The destination account for which the bank raises direct debits for TRS claims.
Payment & Collection Product Category
Specify the Payments and Collections (PC) product category that would be used by the bank to raise direct debits for TRS claims.
Suspense Account
Specify the account that would be debited with the TRS amount, to credit customer account.
For more details about processing for TRS, refer the Loans module user manual and the Payments and Collections user manual.
Viewing Trade License Details
Expiry Advice Generation Days
If the trade license is set to expire on a particular date, the number displayed here denotes the number of days before that date when an advice is generated and sent to the customer informing about the impending expiration.
Specifying Mandatory Limit Tracking For Customer Type
You can maintain limit tracking as a mandatory option based on the customer type.
Corporate
Check this box if it is mandatory to link customer of Corporate type to credit line.
Bank
Check this box if it is mandatory to link customer of Bank type to credit line.
Individual
Check this box if it is mandatory to link customer of Individual type to credit line.
If a contract is saved without selecting the limit line for customers checked for mandatory limit tracking, then the system displays the error message as “Limit tracking is mandatory for this customer <Customer CIF>”.
Note
- By default the customer type is selected as ‘Individual’. However you can modify it.
- At the customer maintenance level, system defaults ‘Track Limits’ option based on the option set here.
Specifying Cheque Discounting Details
Cheque Return Count for Drawer Blacklisting
The system displays the number of cheque returns for a drawer. During the cheque return processing, the system check the number of cheque returns against this maintenance and marks the drawer as ‘Blacklisted’ drawer.
Specifying Passbook Details
Minimum Number of Digits for Passbook
Specify the minimum number of digits for creating passbook number. The system defaults the minimum value 10. However you can modify it.
2.3.2 Fields Button
You can associate values to all the User Defined fields created and attached to the Bank Parameters Screen. You can view the list of User Defined fields associated by clicking the ‘Fields’ button. The screen appears as shown below:
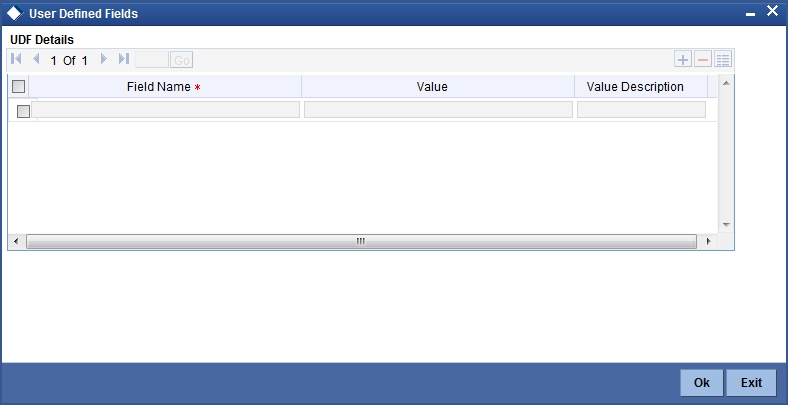
You can enter the value for the UDFs listed here in the ‘Value’ column.
For more details on how to create user Defined fields, refer chapter ‘Creating custom fields in Oracle FLEXCUBE’ in the User Defined Fields User Manual under Modularity.
2.4 Maintaining Global Intermediary Identification Number
Global Intermediary Identification Number (GIIN) is the number by which IRS will identify financial institutions. GIIN will be issued by IRS to all banks that registers with them. It is the only way any bank can verify the participation status of a Foreign Financial Institution (FFI). GIIN list will be published by IRS every month. All participating and deemed compliant foreign financial institutions will have to apply to IRS and obtain GIIN. Other participating banks, USWA’s etc.. will use GIIN to identify a banks participation status.
You can maintain GIIN details using ‘Global Intermediary Identification Number (GIIN) Maintenance’ screen, invoked from the Application Browser. You can invoke this screen by typing ‘STDGIINM’ in the field at the top right corner of the Application tool bar and clicking the adjoining arrow button.
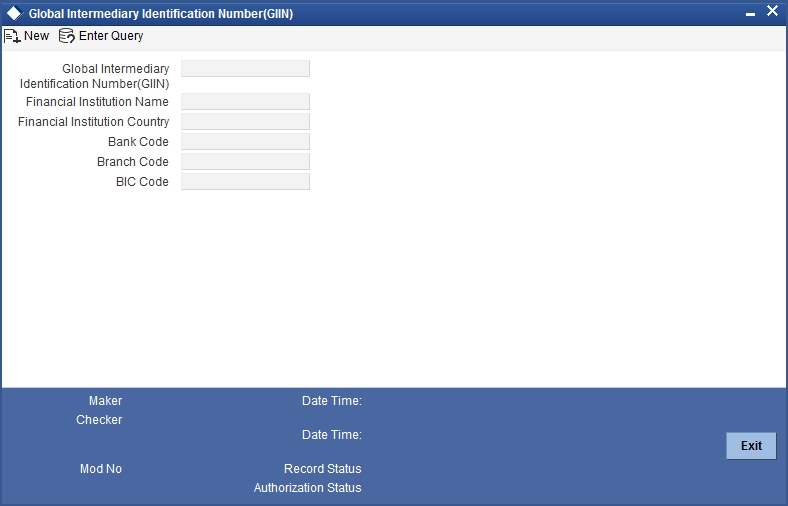
You can specify the following details;
Global Intermediary Identification Number (GIIN)
Specify the GIIN code. you can also select the valid GIIN code from the adjoining option list.
Financial Institution Name
Specify the financial institute which has been assigned in the GIIN.
Financial Institution Country
Specify the country name where the financial institute is present
Bank Code
Specify the bank code details. You can also select the valid bank code from the adjoining option list.
Branch Code
Specify the branch code. You can also select the valid branch code from the adjoining option list.
BIC Code
Specify the BIC code. You can also select the valid BIC code from the adjoining option list.