| Oracle® Retail Mobile Merchandising User Guide Release 15.0 E63786-01 |
|

 Previous |
The Merchandising Mobile application is for users and administrators of Oracle Retail Invoice Matching. This includes finance managers and buyers. The primary role of this application is to prioritize work for matching invoices in ReIM, to provide finance managers visibility to employee workload and to also provide both finance managers and buyers a quick glance at supplier performance.
This mobile application enables you to view employee workload to check on employee productivity and potentially redistribute workload if necessary. A buyer could use this mobile application to check on supplier performance.
The following reports are covered in this chapter:
ReIM Dashboard
Upcoming Invoices Report
Automatch Rate Report
Supplier Sites Screen
Employees Screen
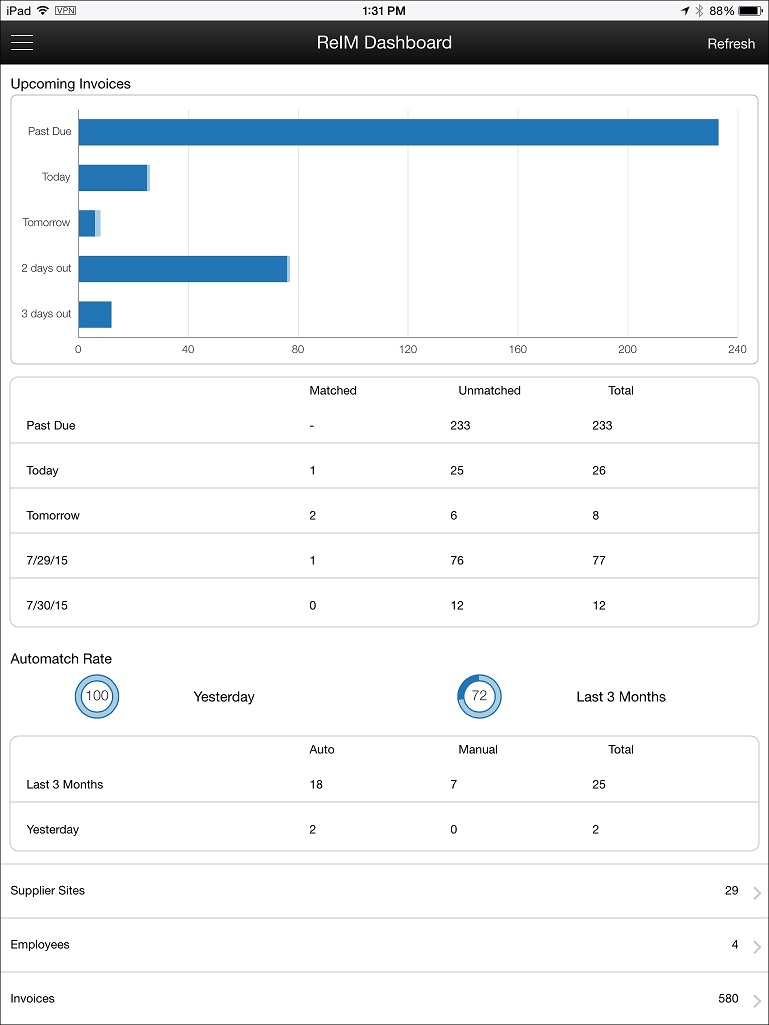
After logging into the application for the first time you will see the ReIM Dashboard with the upcoming Invoices report at the top.
Tap Refresh in the upper right corner in Portrait view on the tablet. The application will query the data and update the screen.
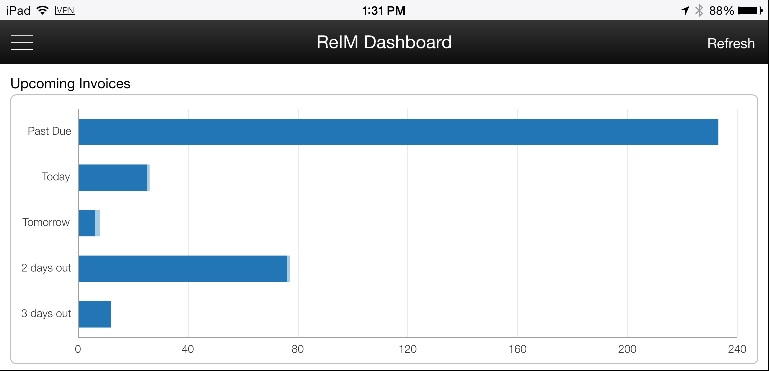
The Upcoming Invoices section at the top use dark blue shaded bars to represent the remaining invoices that need to be manually matched by the user. The light blue shaded bars represent the invoices that have been manually matched.
Report date ranges include:
Past Due
Today
Tomorrow
2 days out
3 days out
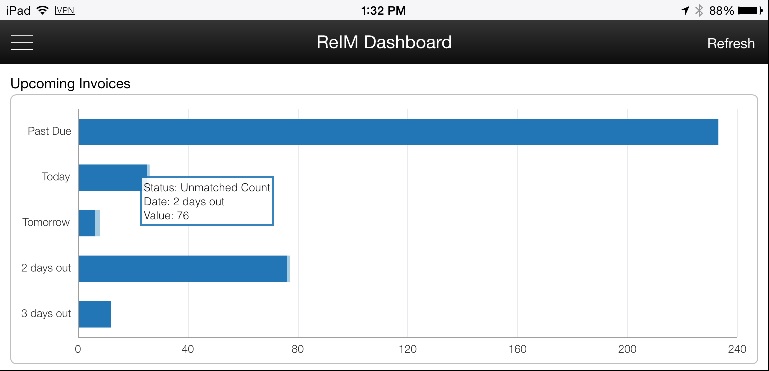
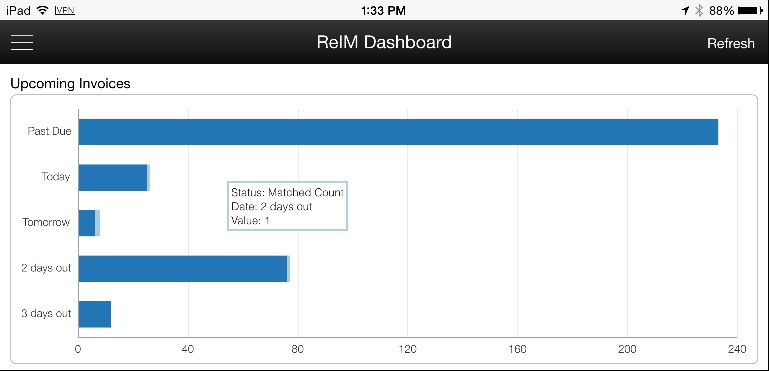
Tap and Hold Over the shaded bars and a pop-up appears showing the numeric value of that bar.
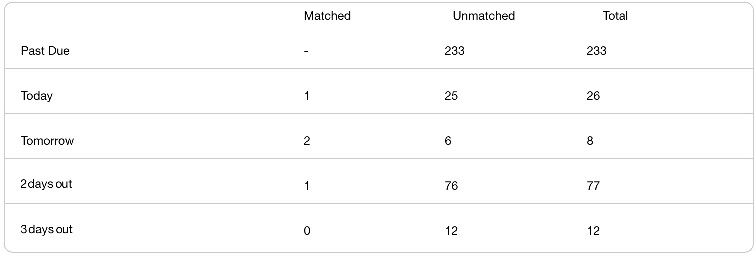
The table directly under the Upcoming Invoices section shows the number of matched and unmatched invoices for each date range listed previously. It also shows the total of the combined matched and unmatched invoices.
|
Note: The data displayed will be a roll up of all the employees that roll up to the user. For Past Due Matched, a dash will be displayed as it doesn't make functional sense to display a metric for invoices matched in the past. Unauthorized users will see zeros in this area. |
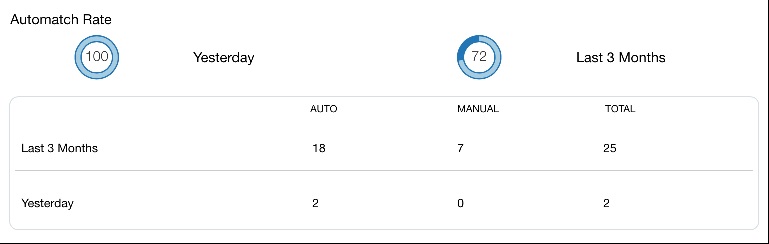
The AutoMatch Rate report will allow you to quickly see the total number of invoices in matched status that were matched by the auto match batch in comparison with the total number of invoices that were manually matched by the ReIM user. Auto resolved invoices will also be included in the Automatch totals. The table underneath the Automatch Rate graphic will show the totals.
The number shown and represented by the light blue bar is the number that is auto matched.
The remaining percentage represented by the dark blue bar will be the number that was manually matched.
The number in the center is the percentage of time that the invoices were auto matched by the auto match batch.
The report will be calculated for the user and can be viewed 2 different ways.
Yesterday
Last 3 months
The data displayed will be as follows:
Finance Manager: Data will be a rollup of all of the employee's outstanding invoices. A manager's assigned suppliers (if any) are included in their data rollup.
Buyer: Buyer reports will have zeros displayed. A Buyer will only be able to search for suppliers or invoices but will not have any data filtered for them.
You are able to view supplier performance in this area. The number represents the total number of suppliers that will be viewed. Once you are in the Supplier sites screen, they can apply a filter to narrow down the data.
Tap on the arrow to take you into the Supplier site screen where you are able to view supplier performance.
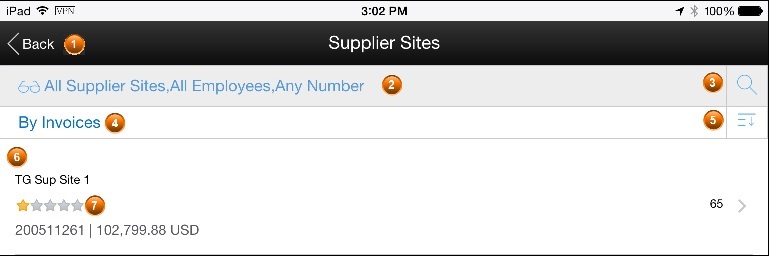
The Supplier Sites area is marked as follows:
Back:Tap < Back link to return to the ReIM dashboard.
Filter Panel: This panel displays all of the filters that you set and are carried over from the previous screen. When you tap on this section, the Supplier Sites Criteria screen will open and allow you to update the invoice criteria by Supplier Site, Employee, or Number of Outstanding Invoices.
Magnifying Glass Search: Tapping on the magnifying glass will enable a text box for a keyword search where you type in a word and conduct a search. This search will re-query the database so it is independent from the filter that is already selected. (For example, if you filtered on Atlas Supplier's invoices but tap the magnifying glass and enter an invoice from another supplier, the invoice details for that supplier will be returned). You can search for the following details and can enter a partial description:
Supplier site name
Supplier site
|
Note: There will be an X icon in the text box that will allow you to clear the current search. You can use the Screen sort and Sort order to apply to the search that was conducted by the magnifying glass search. The only way to clear the current search is to go back into the Text box and use the X icon to clear it, or to move to another screen, or toggle to a different date range. |
Screen Sort: Allows the user to determine how to sort the screen. The default for the Supplier site screen should be a Sort by # of Invoices (descending), but if you tap inside this section you are given the choice to select a sort by Supplier site Name and it will default to an A-Z sort.
Sort Order: Tapping this section changes the sort order. If you are sorting By Number of Invoices, the change will update to show the least number of invoices first. If you are sorting by Supplier site Name it will change it to a Z-A sort.
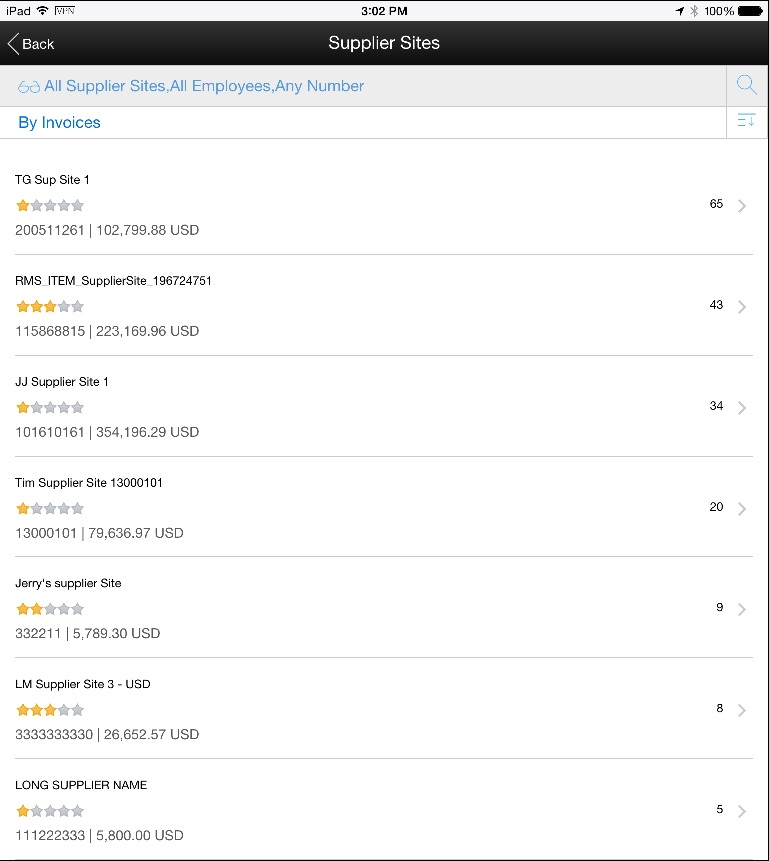
Supplier Details: Each supplier site is listed and you are able to scroll vertically to see all suppliers. The details shown for each supplier are:
Supplier site name
Supplier site scorecard rating
Supplier site ID
Total amount of the outstanding invoices in supplier currency
The number on the far right is the total number of outstanding invoices for each supplier.
Supplier Site Scorecard: This is a star rating that is shown at the supplier site level. The supplier site rating is based on certain parameters such as discrepancy occurrence rate, exact matches versus matches within tolerance, and shipping performance. Each criteria's weight assignment is stored on a configuration table in ReIM.
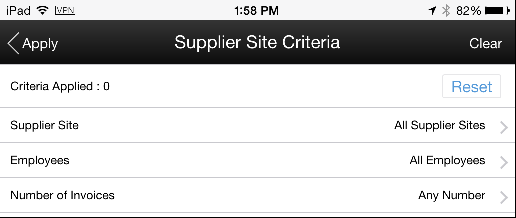
When you click on the Supplier Site Filter Panel area, you are brought to a series of search screens that you can use to filter the results. The Criteria selection will only apply to the Supplier Site screen, and the inputs will be saved for each user.
Tapping the desired area in this screen enables the following choices:
Apply - Brings you back to the Supplier Site screen which refreshes and applies the selected filters you enabled on the Supplier Site Criteria screen. The filter is saved by user and kept for subsequent logins until that user updates the filter criteria.
Clear - Removes all of the filters that have been previously selected and will apply the Supplier sites, Employee, and Number of Invoices default criteria.
Criteria Applied - this section shows how many of the following sections have criteria applied.
Reset - Tapping this button will set all of the criteria back to the executed set of criteria.
Supplier Site - Tapping this area will bring you to the Supplier Site Criteria search screen.
Employees - Tapping this area will bring you to the Employee Search screen.
Number of Invoices - Tapping in this area enables an entry field where you can enter in a number to filter for that number and above for outstanding invoices.
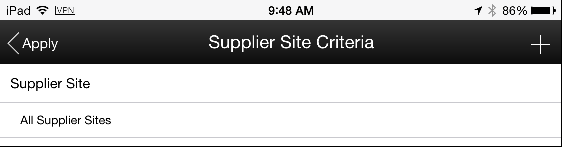
When you tap on Supplier Site or Employees, you are brought to a series of search screens that you can use to select supplier sites or users, and filter suppliers by these criteria. The criteria selection will only apply to the Supplier screen, and the inputs will be saved for each user.
Tapping the desired area in this screen enables the following choices:
Apply - Brings you back to the Supplier Site screen which refreshes and applies the selected filters you enabled on the Supplier Site Criteria screen. The filter is saved by user and kept for subsequent logins until that user updates the filter criteria.
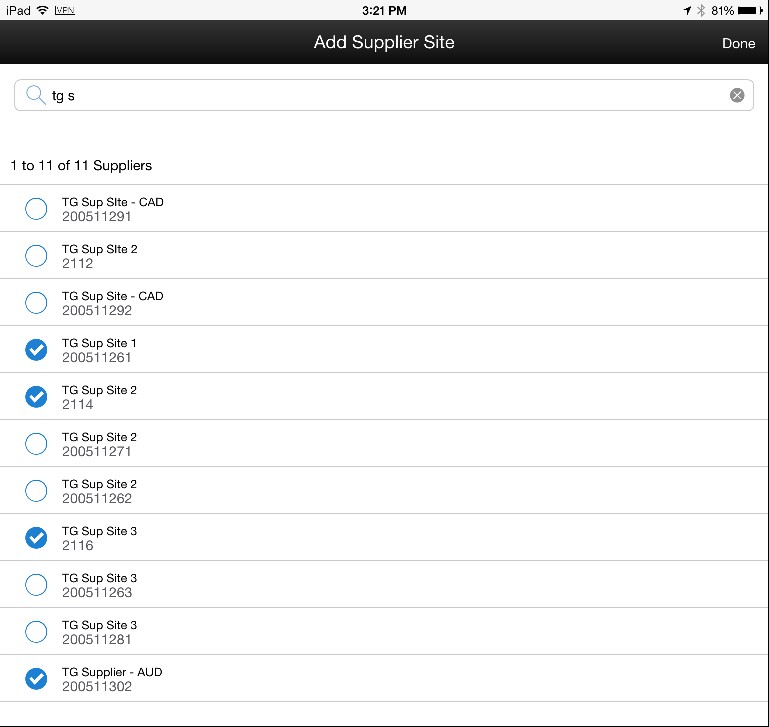
+ (Add icon) - Brings you to the Add Supplier Site screen where you enter in a supplier site or name.
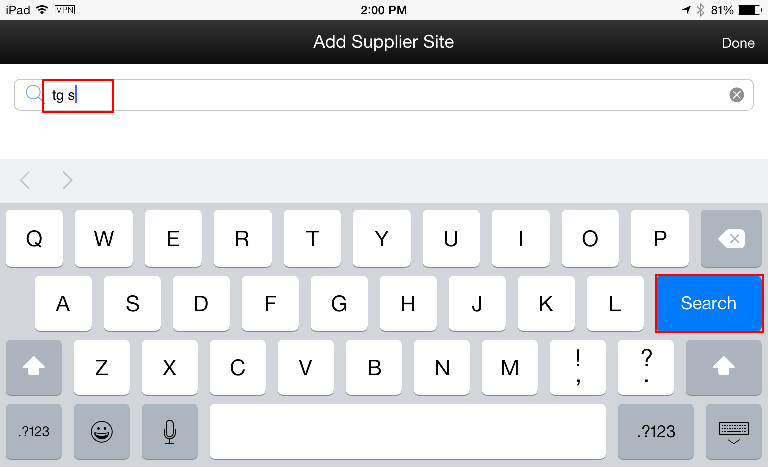
The Keyword search section allows you to either type in the Supplier site name or ID. You must enter at least 3 characters to perform a keyword search.
Type in the desired keywords and tap the Search button to see the results.
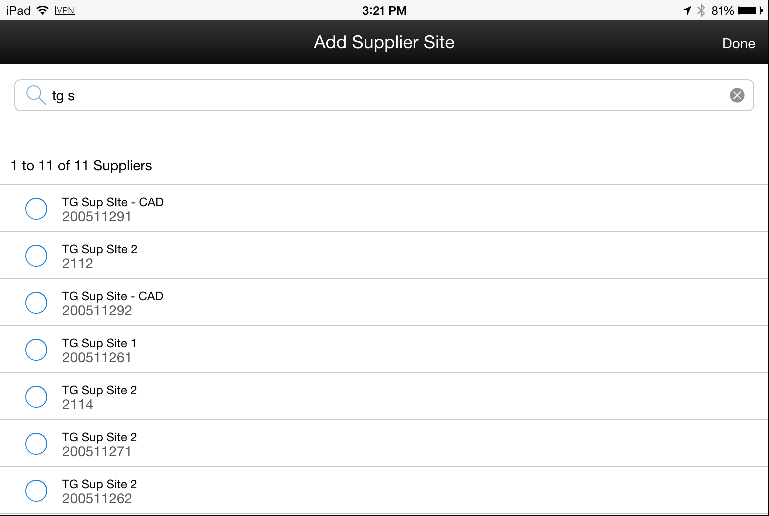
Select the supplier sites that you want to include in your filter. Tap Done to return to the Add Supplier Site screen with the results of the keyword search.
When you tap on a specific supplier site the details for that supplier site are displayed on the Supplier Site Details screen.
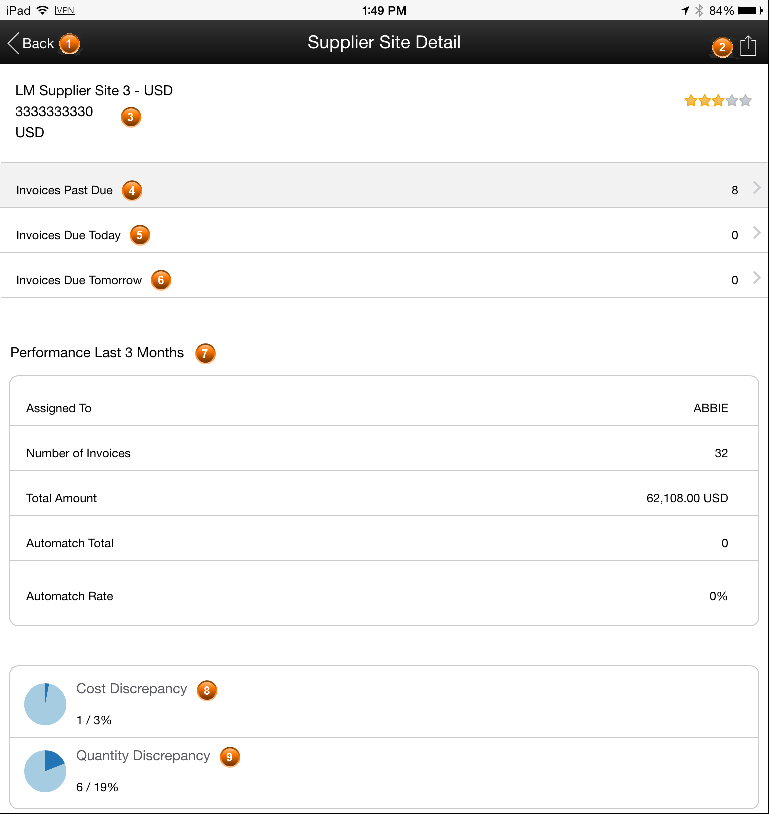
This area includes the following details about the supplier site:
Back:Tap < Back link to navigate back to the Supplier Site screen to see the full list of filtered suppliers.
Share Icon: Allows you to email the details in a contextual format. When you tap the share icon, you are taken to an email and the fields will be as follows:
To:
CC/BCC:
Subject: Supplier Site Detail
Supplier Site Listing: This section provides the name of the supplier site that was selected from the previous Supplier site screen. This section also lists the Supplier site and Supplier Currency as well as the supplier performance star rating.
Invoices Past Due: When user clicks in the Invoices Past Due box, they will be taken to the Invoices screen and will show the user all invoices for the selected supplier that are past due. The number shows how many invoices are currently past due.
Invoices Due Today: When user clicks in the Invoices Due today box, they will be taken to the Invoices screen and will show the user all invoices for the selected supplier site that are due today The number shows how many invoices are currently due today.
Invoices Due Tomorrow: When user clicks in the Invoices Due tomorrow box, they will be taken to the Invoices screen and will show the user all invoices for the selected supplier that are due tomorrow. The number shows how many invoices are due tomorrow.
Performance Last 3 Months: The data in the Supplier Site performance section should be as follows:
Assigned to: This is the name of the employee that is responsible for matching the invoices for the supplier site that is displayed. This is typically someone in an Accounts Payable/Reviewer role.
Number of Invoices: This number should represent the total number of the invoices by the given supplier site over the past 3 months.
Total Amount: This should be the total monetary cost amount over the past 3 months of invoices by Supplier currency for a given supplier site.
Automatch Total: The total number of invoices over the past 3 months for the given supplier site that were matched successfully by the automatch process.
Automatch Rate: The Automatch rate as a percentage over the past 3 months for the given supplier site.
Cost Discrepancy: The number of total invoices for the given supplier site over the past 3 months that had a cost discrepancy and the percent to total that this represents.
Quantity Discrepancy: The number of total invoices for the given supplier site over the past 3 months that had a quantity discrepancy and the percent to total that this represents.
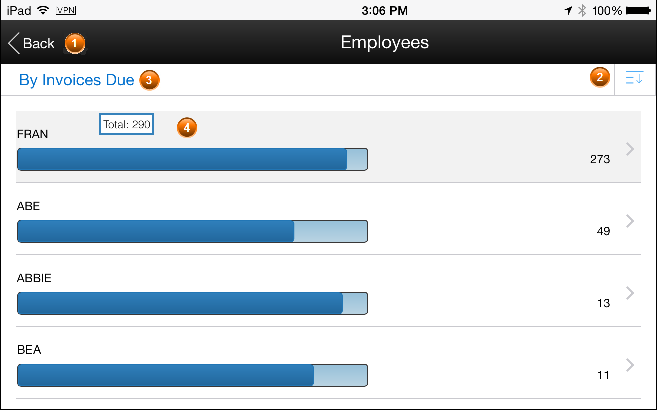
This area is enabled for users that have employees reporting to them.
Tapping the desired area in this screen enables the following choices:
Back:Tap <Back link to return to the main dashboard screen
Screen Sort: This section allows the user to determine how to sort the screen. The default for the Employees screen should be by Total Invoices due (Descending), but if the user taps inside this section they will be given the choice (dropdown) to sort by Employee name (ascending).
Sort Order: Tapping this section changes the sort order. If the user is sorting By Invoices due, the change will update to show the smallest number of invoices first. If user is sorting by employee name, descending.
User Name with Horizontal Graph: The horizontal bar graphically shows the employee progress. The darker shading should represent the number of invoices remaining, the lighter shading should be what is completed. Tap and Hold Over a shaded bar and a pop-up appears showing the numeric value of that portion of the bar.
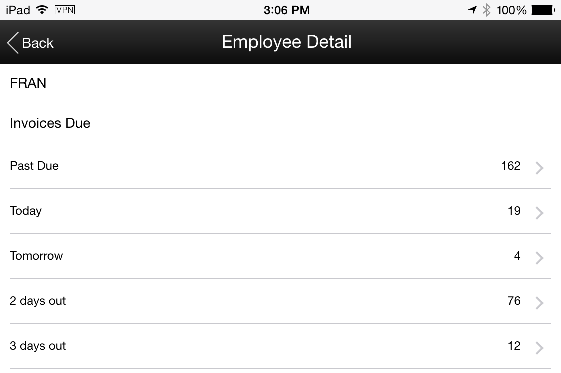
This screen appears when you tap an employee listed in the User Name with Horizontal Graph area.
Back:Tap <Back link to return to the Employee screen where you will see the full list of employees displayed as user names.
User Name: This shows the name of the user name of the employee that is selected from the previous Employee screen
Invoices Due: Shows a count of the number of invoices that this employee has outstanding that need to be manually matched. They are listed for the following dates:
Past Due
Today
Tomorrow
2 days out
3 days out
Date Boxes: To display a list of Invoices that are filtered by that employee and the previously tapped date selection, tap any of the date boxes.
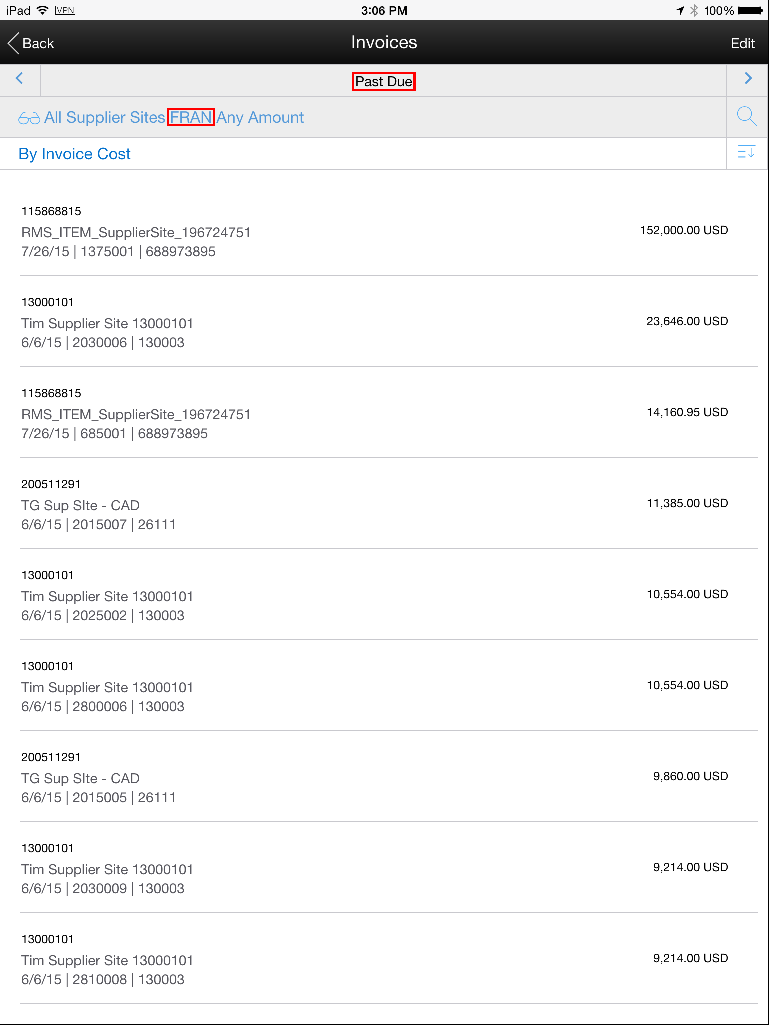
The Invoices screen is where you can view a list of invoices that are due and need to be matched. The number represents the total number of Invoices that will be viewed. Once in the Invoices screen, you can apply a filter to narrow down how the invoices are viewed. When you launch into the Invoices screen from the dashboard screen, you will see invoices for All suppliers, All employees (Manager Role), and you will first see the invoices that are Past Due, then you can tap through the different due dates to see other dates.
Back:Tap <Back link to return to the previous screen which could be Supplier Detail, Employees, or the ReIM Dashboard screen.
Edit: Tap Edit enables selection of the invoices so you can act by sending the selected invoices to someone to look into further.
Time Periods: Displays what time period that the invoices are currently being filtered by (filter was chosen from the previous screen). The possible periods for this section include:
Past Due
Today
Tomorrow
2 days out
3 days out
Forward and Backward Arrows: When you Tap either the forward or backward arrow, the screen will refresh and display the invoice details based on this new time filter. This will just be a continuous loop. So when you are 3 days out and you tap the forward arrow, you are taken to the Past due invoices. When on past Due, tap the backwards arrow you are taken to the 3 days out view.
Filter Panel: This panel displays all of the filters that you set and are carried over from the previous screen. When you tap on this section the Invoice Criteria screen opens and allows you to update the invoice criteria by Supplier, Employee, or Invoice amount. See Supplier Site Criteria for more details.
Magnifying Glass Search: Tapping on the magnifying glass will enable a text box for a keyword search where you type in a word and conduct a search. This search will re-query the database so it is independent from the filter that is already selected. (For example, if you filtered on Atlas Supplier's invoices but tap the magnifying glass and enter an invoice from another supplier, the invoice details for that supplier will be returned). You can search for the following details and can enter a partial description:
Invoice
Supplier site name
Supplier site
|
Note: There will be an X icon in the text box that will allow you to clear the current search. You can use the Screen sort and Sort order to apply to the search that was conducted by the magnifying glass search. The only way to clear the current search is to go back into the Text box and use the X icon to clear it, or to move to another screen, or toggle to a different date range. |
Screen Sort: Allows the user to determine how to sort the screen. The default for the Invoices screen should be by Total Invoice Cost (Descending), but if you tap inside this section you are given the choice to sort by Invoice (Ascending).
Sort Order: Tapping this section changes the sort order. If you are sorting By Invoice Cost, the change will update to show the smallest cost invoice first. If you are sorting by Invoice it will change the sort order to descending.s
Invoices: Each individual invoice is listed for the given supplier after applying all of the other filters. For each invoice this area displays the supplier site, supplier site name, invoice due date, invoice, location, and invoice cost.