| Oracle® Retail Mobile Merchandising User Guide Release 15.0 E63786-01 |
|

 Previous |
 Next |
ReSA mobile consists of a Store Day Summary Dashboard. The topics in this chapter describe how to select, view, search, edit, cancel, and email in the ReSA Store Day Summary Dashboard.
The following topics are covered in this chapter:
|
Note: The toolbar buttons enable you to work with Mobile Merchandising applications. For information on the navigation toolbar, see Navigation Tools section in the Mobile Merchandising Overview chapter. |
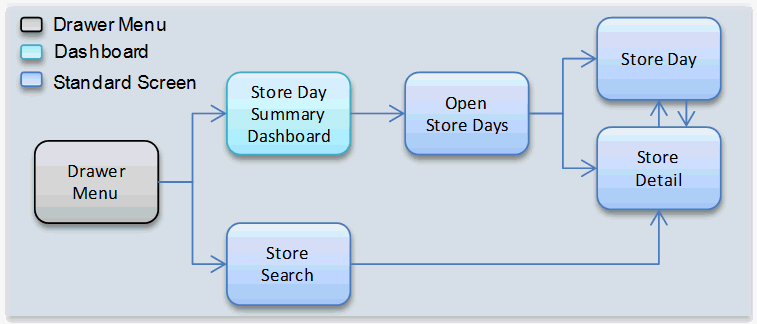
Tapping the Drawer icon from anywhere in the application displays the ReSA drawer menu. You will only see the options for which you have security access.
There are two Sales Audit workflow options in the ReSA Drawer menu:
The Dashboard option launches the Store Day Summary dashboard with the Open Store Days view.
The Store Search option launches the Store Search screen where you can search for a specific open store to view.
The following menus can be accessed from the ReSA Drawer menu:
Tapping the application switcher menu icon displays the ReSA and Recent Allocation drawer menu.
The Dashboard displays automatically when you access ReSA Mobile. The Dashboard and Store Search workflows can both be accessed from the ReSA Mobile Drawer menu. The Store Day Details workflow is accessed through the Store Day Summary Dashboard and the Store Search workflows.
The following illustration shows a portion of a sample navigation model.
You can see the following views in the Store Day Summary Dashboard:
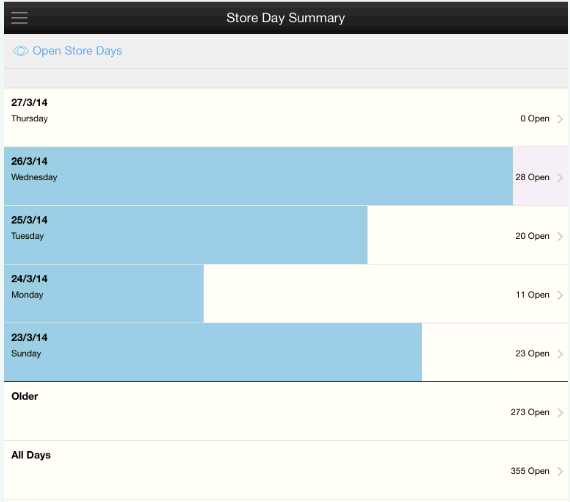
The Store Day Summary - Open Store Days provides the number of open stores for which the sales audit manager is responsible. The stores for which you are responsible are those associated with you in ReSA's employee maintenance using location traits.
To view the Store Day Summary - Open Store Days:
From the Application Switcher menu screen, tap Dashboard. The Store Day Summary - Open Store Days screen appears.
Tap the View Selector icon Open Store Days to cycle through the four available Store Day Summary views. Tapping and holding the bar displays a menu of the available views allowing you to select the desired view directly.
There are seven sections displayed in the Store Day Summary - Open Store Days view.
The first five sections contain the five most recent days, starting with yesterday (today's date minus 1).
The date is displayed on the left side of the section with the day of the week displayed below it. The five dates displayed are today minus 1 through today minus 5.
The right side of the section contains the count of open stores to which you are assigned for the date followed by the word Open. If no open stores are found the count is displayed as 0 Open.
The length of the blue bar represents the number of open stores for each section except the Older and All Days sections.
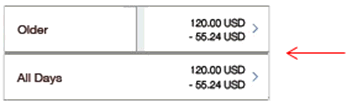
After the fifth section a separator divides the individual; date and Older section.
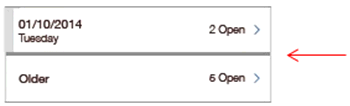
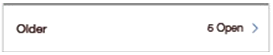
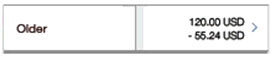
If there are open stores to which you are assigned for dates beyond the initial five days (open days before today minus 5), the count of those stores is displayed in the section labeled Older. If no open stores are found the section will still display with a count of 0 Open.
A total count of all open stores to which you are assigned is displayed in the section labeled All Days.
You can view more details by tapping the Arrow icon on the extreme right side of the section. The Open Store Days screen appears. See Figure 2-6.
This section contains the following information about open store days:
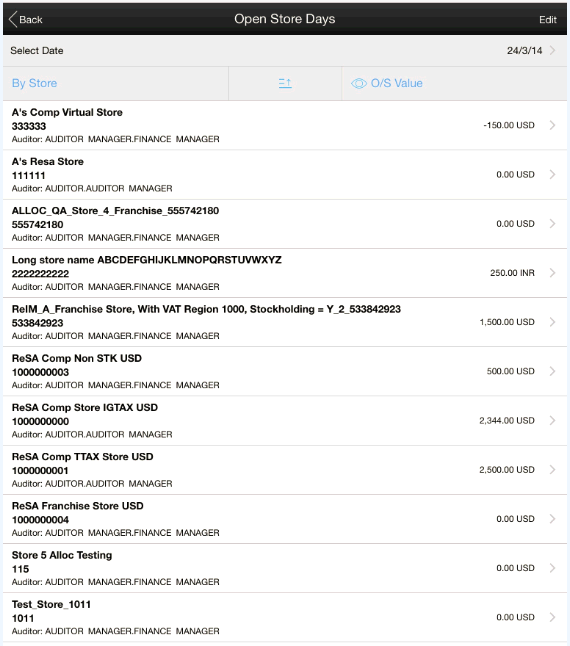
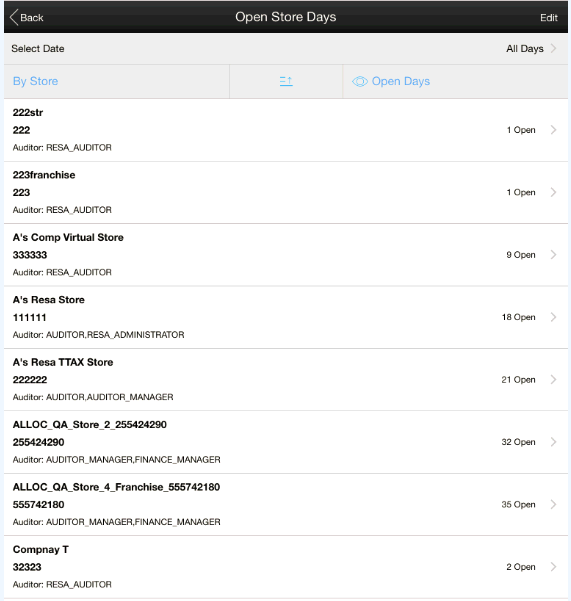
The Open Store Days screen displays a list of open stores to which you are assigned. These can be for a single day, for all Older days, or for All Days.
To view an open store days:
From the Store Day Summary - Open Store Days screen, tap the Arrow icon. The Open Store Days screen appears.
To return to the previous screen, tap Back or tap the Back icon. The Store Day Summary dashboard appears. See Figure 2-2.
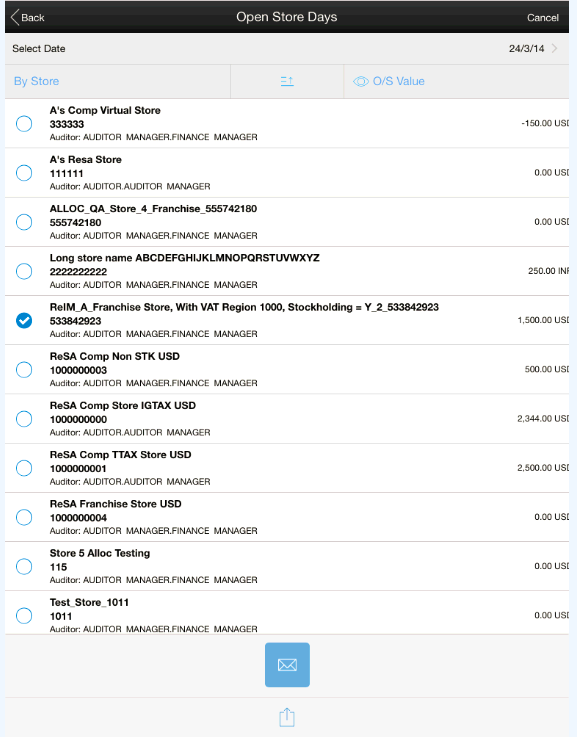
To edit open store days:
From the Open Store Days screen, tap Edit. The selection circles appears next to each store and an Action Choice icon displays at the bottom of the screen.
You can select one or more stores and send an email to the auditors assigned to the selected stores. For information on sending an email, see Sending an Email section.
To send an email:
From the Open Store Days screen, tap Edit. A selection circles appears next to each store.
Select a store. The Action Choice icon appears at the bottom of the screen. See Figure 2-10.
Tap the Action Choice icon. The Email icon appears at the bottom of the screen.
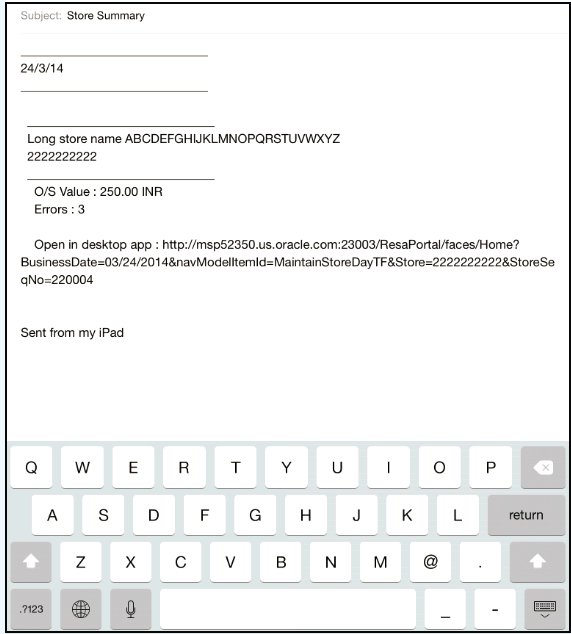
Tap the Email icon. The email generated appears in the mobile email client on the device screen.
The subject of the email is displayed. This field is system generated and user editable. The following details are displayed:
Store/business date
Store Name
Store ID
Chain Name
O/S Value
Errors
Message containing Open in desktop app followed by a hyperlink/URL
You can add additional comments prior to sending the email.
|
Note: Copying and pasting the URL included in the email into a browser, enables the recipient to launch directly into the ReSA desktop application to the Store Day Summary screen for the specific store day. |
The Store Day Details workflow is accessed through the Store Day Summary dashboard and the Store Search workflow.
This section contains the following topics about viewing Open Store Days:
When you select a single day from the Store Day Summary dashboard, the Open Store Days screen displays all open stores to which you are assigned for the selected day. In this scenario, there are only two available views, the Over/Short Value view and the Error Count view. By default when you first view this screen, the data is sorted by Store (alphabetically by store name) and the O/S Value view is displayed. If there are no open stores for the selected date, the no data to display message appears. This is the same text that appears in search results in the ReSA ADF desktop application. See Figure 2-6.
When you select the Older section from the Store Day Summary dashboard, the Open Store Days screen displays all open stores assigned to you for all days older than the current date minus 5. In this scenario, there are four available views; Open Days, O/S Days, O/S Sums, and Error Count. When you first view this screen the data is sorted By Store (alphabetically by store name) and the Open Days view is displayed. If there are no open stores for the selected date, the no data to display message appears. This is the same text that appears in search results in the ReSA ADF desktop application. See Figure 2-7.
When you select the All Days section from the Store Day Summary dashboard the Open Store Days screen displays all open stores assigned to you for all days. If there are no open stores for the selected date, the no data to display message appears. This is the same text that appears in search results in the ReSA ADF desktop application. See Figure 2-8.
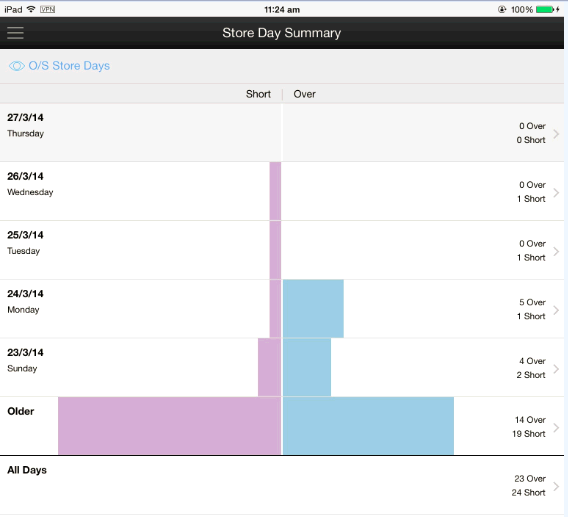
The Store Day Summary - Over/Short Store Days view provides the count of overages and the count of shortages for all open stores on a given day for which the sales audit manager is responsible. If the Over/Short value for the store day is a positive value it is considered an overage; if the Over/Short value for the store day is a negative value it is a shortage.
This section contains the following topic to help you understand and manage over/short store days:
To view the Store Day Summary - Over/Short Store Days:
From the Store Day Summary - Open Store Days, tap the View Selector icon. The Store Day Summary - O/S Store Days screen appears.
Tap the View Selector icon O/S Store Days to cycle through the four available Store Day Summary views. Tapping and holding the bar displays a menu of the available views allowing you to select the desired view directly.
The screen is divided into two halves. The length of the bar is proportionate to the shortfall/surplus.
There are seven sections displayed in this view.
The first five sections contain the five most recent days, starting with yesterday (today's date minus 1), each containing the count of overages for open stores and the count of shortages for open stores to which you are assigned.
The date is displayed on the left side of the section with the day of the week displayed below it. The five dates displayed are today minus 1 through today minus 5.
The right side of the section contains the count of open stores to which you are assigned for the date followed by the word Over and the count of open stores to which you are assigned with shortages for the date followed by the word Short. The shortage count appears below the overage count. If no stores are found the count will be 0 Over or 0 Short.
This view displays Over Short Store days, basically number of stores which have either over or short totals for that date.
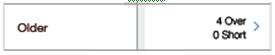
The Older label displays the counts of overages and shortages of stores prior to the first five dates. If no overages or shortages are found, the section will still display with a count of 0 Over, or 0 Short.
A separator divides the sections containing the graphical visual and the sections that are not a part of the graph. In this view the separator is between the Older and the All Days section.
A total count of all overages and shortages for open stores to which you are assigned is displayed in the section labeled All Days.
You can view more details by tapping the Arrow icon on the extreme right side of the section. The Open Store Days screen appears. See Figure 2-6.
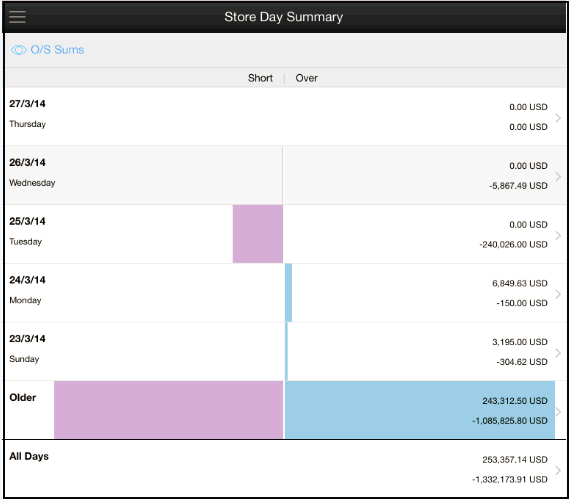
The Store Day Summary - Over/Short Store Sums view provides the sums of all overages and all shortages for all open stores on a given day for which the sales audit manager is responsible. If all locations to which you are responsible have the same local currency, all monetary values are displayed in the local currency. Otherwise, all monetary values are displayed in the retailer's primary currency. If the Over/Short value for the store day is a positive value it is considered an overage; if the Over/Short value for the store day is a negative value it is a shortage.
This section contains the following topic to help you understand and manage over/short sums:
To view the Store Day Summary - Over/Short Sums:
From the Store Day Summary - Open Store Days, tap the View Selector icon. The Store Day Summary - O/S Sums screen appears.
Tap the View Selector icon O/S Sums to cycle through the four available Store Day Summary views. Tapping and holding the bar displays a menu of the available views allowing you to select the desired view directly.
The screen is divided into two halves. The length of the bar is proportionate to the shortfall/surplus.
There are seven sections displayed in this view. The first five sections contain the five most recent days, starting with yesterday (today's date minus 1); each containing the sum of overages for open stores and the sum of shortages for open stores.
The first five sections contain the five most recent days, starting with yesterday (today's date minus 1), each containing the sum of overages for open stores and the sum of shortages for open stores.
The date is displayed on the left side of the section with the day of the week displayed below it. The five dates displayed are today minus 1 through today minus 5.
The right hand section contains the sum of the over and shortages, together with their values in the local or retailer's default currency. The short value is preceded with a -. If no stores are found with an over or short value, a zero value is displayed rather than leaving the section blank. The over and short total values are represented in local or retailers primary currency.
The left portion of the bar represents shortages and the right portion of the negative stack bar represents overages. The red/blue for shortages/overages respectively is the percentage representation of the shortage/overage value for open stores for a specific day, assuming the width of each halves of the stack bar represents all possible open stores to which one is assigned.
The Older label displays the sums of overages and shortages of open stores prior to the first five dates. If no overages or shortages are found, the section will still display with a sum of zero rather than leaving it blank.
A separator divides the sections containing the graphical visual of the blue bars and the sections that are not a part of the graph. In this view the separator is between the Older and the All Days section.
A sum of all overages and shortages for all open stores to which you are assigned is displayed in the section labeled All Days.
You can view more details by tapping the Arrow icon on the extreme right side of the section. The Open Store Days screen appears. See Figure 2-6.
The Store Day Summary - Error Count view provides the number of outstanding errors on the specified days for stores for which the sales audit manager is responsible. An outstanding error is defined as an error that exists against a store day that has not been overridden.
This section contains the following topic to help you understand and manage the error count:
To view the Store Day Summary - Error Count:
From the Store Day Summary - Open Store Days, tap the View Selector icon. The Store Day Summary - Error Count screen appears.
Tap the View Selector icon Error Count to cycle through the four available Store Day Summary views. Tapping and holding the bar displays a menu of the available views allowing you to select the desired view directly.
There are seven sections displayed in the Store Day Summary - Error Count view.
The first five sections contain the most recent days, starting with yesterday (today's date minus 1), each containing the number of outstanding errors.
The date is displayed on the left side of the section with the day of the week displayed below it. The five dates displayed are today minus 1 through today minus 5.
The right side of the section contains the count of outstanding errors for the date, followed by the word Errors. If no outstanding errors are found the count will be 0 Errors.
A visual representation of the error count is displayed in each section except for the All Days section. A blue bar representing the number of errors fills each section. Assuming the width of the screen represents all outstanding errors, the percentage of outstanding errors for the specified date out of total outstanding errors for all open store days is used to fill the same percentage of the section. If there are 100 errors and 50 of the errors occurred against stores on the specified day, then 50% of the section will be blue, the bar extends exactly halfway across the screen.
The Older label displays the counts of outstanding errors for store days to which you are assigned prior to the first five dates.
A separator divides the sections containing the graphical visual of the blue bars and the sections that are not a part of the graph. In this view the separator is between the Older and the All Days section.
A total count of outstanding errors for all store days is displayed in the section labeled All Days.
You can view more details by tapping the Arrow icon on the extreme right side of the section. The Open Store Days screen appears. See Figure 2-6.
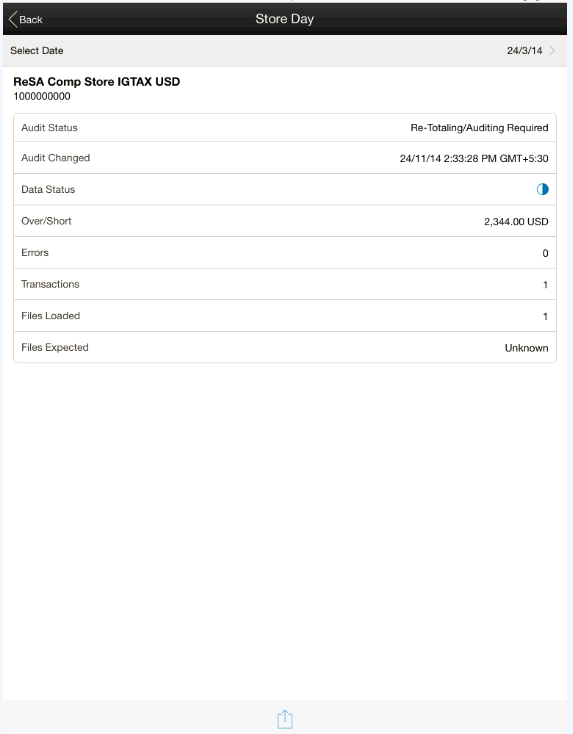
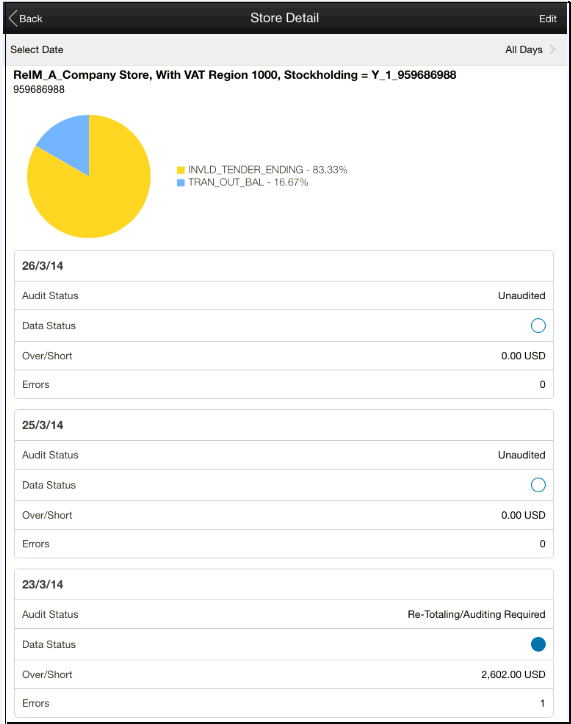
The Store Day screen displays details about a specific store day. You can access the Store Days from the Open Store Days - Single Day screen (see Figure 2-6) or from the Store Detail screen (see Figure 2-32).
This section contains the following topics to help you search view a store day and to send an email:
To view a store day:
From the Application Switcher menu screen, tap Dashboard. The Store Day Summary - Open Store Days screen appears. See Figure 2-2.
From the Store Day Summary - Open Store Days screen, tap the Arrow icon. The Open Store Days screen appears. See Figure 2-9.
From the Open Store Days screen, tap the Arrow icon. The Store Day screen appears.
Table 2-1 Store Day Screen Descriptions
| Field | Description |
|---|---|
|
Audit Status |
The audit status of the store day, based on code type Sales Audit Audit Status (SAAS). |
|
Audit Changed |
Contains the date/time of the most recent change to the audit status for the store day. |
|
Data Status |
Each store day is assigned a data status. This is shown in the form of a Harvey Ball giving a visual representation of the current status. The status shows whether sales records for the day have been loaded in ReSA such that auditor can work or not. For information on data statuses, see Table 2-2. |
|
Over/Short |
This field is system generated and user editable. |
|
Errors |
It contains the number of outstanding errors for the store day. Errors are considered outstanding when they exist against the store day and have not been overridden. |
|
Transactions |
It contains the number of transactions that exist for the store day. |
|
Files Loaded |
It contains the number of files that have been loaded for the store day. |
|
Files Expected |
It contains the number of files the system expects to load for the store day. |
To send an email:
From the Store Day Summary - Open Store Days screen, tap the Arrow icon. The Open Store Days screen appears. See Figure 2-9.
From the Open Store Days screen, tap Edit. The selection circles appears next to each store and an action menu displays at the bottom of the screen. See Figure 2-10.
Select a store. The Action Choice icon appears at the bottom of the screen. See Figure 2-10.
Tap the Action Choice icon. The Email icon appears.
Tap the Email icon. The email generated appears in the mobile email client on the device screen.
The subject of the email is displayed. This field is system generated and user editable. The following details are displayed:
Store/business date
Store Name
Store ID
Chain Name
O/S Value
Errors
Message containing Open in desktop app followed by a hyperlink/URL
You can add additional comments prior to sending the email.
|
Note: Copying and pasting the URL included in the email into a browser, enables the recipient to launch directly into the ReSA desktop application to the Store Day Summary screen for the specific store day. |
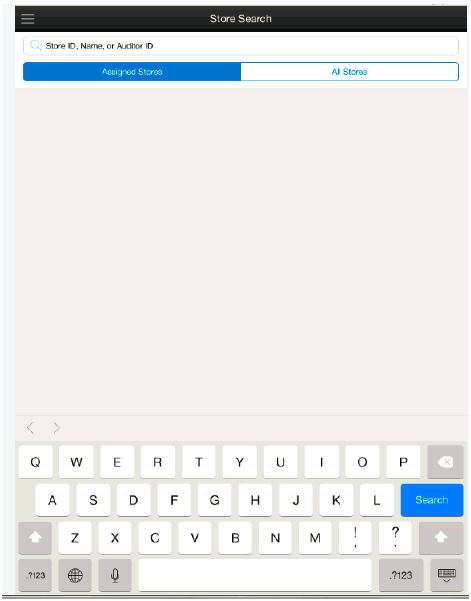
You can search for a specific open store by entering some basic criteria in the Store Search option.
This section contains the following topics to help you search a store and view store search results:
To Search for a Store:
From the Drawers menu, tap Store Search. The Store Search screen appears.
Tap the Search icon and enter one of the three following items to start a search:
Store ID
Name
Auditor ID
The onscreen keyboard appears.
|
Note: You must enter a minimum of three characters to perform a search. |
Tap the Search button displayed on the onscreen keyboard to execute a search based on the entered search value and the Search Results Filter.
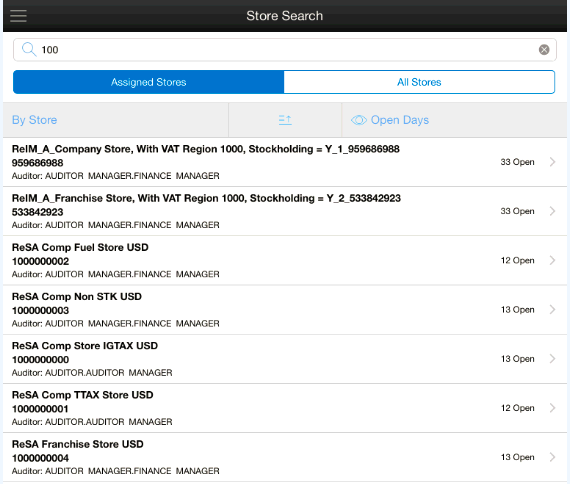
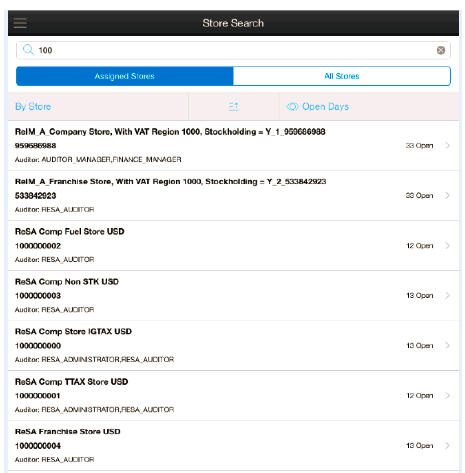
You can either search for all stores to which you are assigned or can access based on data security defined in RMS/ReSA. By default, the search results filter is set to Assigned Stores. See Figure 2-29 and Figure 2-30 for search based on Assigned Stores and search based on All Stores.
Enter search criteria to find the store by using the onscreen keyboard.
To view Store Search Results:
From the Store Search screen Assigned Stores or All Stores column, tap the Search Reset icon. The Search Reset icon clears the search criteria and allows you to perform a new search.
Tap the Data Sorter icon to sort the list of stores based on the selected sorting option. Tapping the Data Sorter icon the second time reverses the sorted list.
You can either tap the View Selector icon to cycle through the four available Store Day Summary views; or tap and hold the View Selector icon to display the menus of the available views allowing you to select the desired view directly. The following dialog appears: 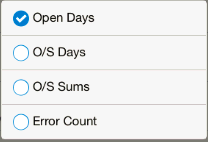
The stores matching the entered search value is displayed. If no matching records are found, the no text to display message appears.
The store name, store ID, and the auditor's application user ID is displayed.
The store's associated value depending on the view selected is displayed.
You can view more details by tapping the Arrow icon on the extreme right side of the section. The Open Store Details screen appears.
The Store Detail screen displays with the same store list with the selected store highlighted.
This section contains the following topics to help you view and edit the store details:
To view Store Details:
From the Store Search screen Assigned Stores or All Stores column, tap the Arrow icon. The Store Detail screen appears:
To return to the previous screen, tap Back or tap the Back icon. The Store Search screen appears. See Figure 2-28.
To Edit a Store Detail:
From the Store Detail screen, tap Edit. A selection circle appears next to each store and an action menu displays at the bottom of the screen.
To return to the previous screen, tap Back or tap the Back icon. The Store Search screen appears. See Figure 2-28.