| Oracle® Agile Engineering Data Management Administration Guide Release e6.2.0.0 E52550-02 |
|

 Previous |
 Next |
| Oracle® Agile Engineering Data Management Administration Guide Release e6.2.0.0 E52550-02 |
|
Previous |
Next |
We support two general ways to deploy Agile e6 software
One single J2EE Server on a separate node, hosting the WebLogic and all J2EE components for Agile e6, and an additional set of servers, hosting the native Agile e6 components.
A set of servers of which every server hosts a complete set of all Agile e6 server components - J2EE and native components. The nodes are installed in a cluster, e.g. as NLB cluster, and load balancing tools are used to distribute the load to the servers.
|
Note: For further information, please refer to the Architecture Guide for Agile e6.2.0.0. |
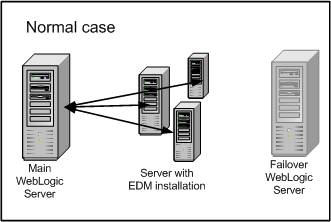
The server having the Agile e6 J2EE components installed - the WebLogic server - is separated from the server with the native Agile e6 components - the EDM server.
We highly recommend setting up two WebLogic servers on separate nodes as failover. The server, which will run from beginning, is called the WebLogic node. The second WebLogic node remains inactive as failover server until the main WebLogic server stops working.
Install the WebLogic server nodes.
|
Note: For further information, please refer to chapter Component Based Installation in Server Installation Guide on Windows and UNIX for Agile e6.2.0.0. |
After completing the installation, stop the failover application server on the failover node.
|
Note: Make sure it does not start automatically, e.g. by self-customized scripts. |
After completing the application server installation, install the EDM systems on separate nodes.
Configure each of them for the main application server node.
After completing the installation, for each EDM system, copy the application configuration file <ep_root>/init/<application-name>.xml and rename it to e.g. <application-name>-failover.xml.
Edit the renamed file and change the application server entry to mention the failover node with the failover application server.
Example:
<IPC AbsEciUrl="eci://localhost:19997" .... </IPC>
In Case of Errors:
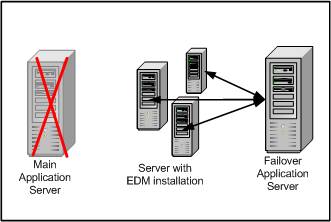
If the main application server stops and cannot be restarted, start the failover application server on the failover node.
Switch to the failover configuration for each EDM system.
Stop the EDM system.
Rename the original configuration file <ep_root>/init/<application-name>.xml to e.g. <application-name>_org.xml.
Rename the backup configuration file <application-name>_failover.xml to <application-name>.xml
|
Note: This file will be used! |
Start the EDM system.
|
Note: The switch to the backup application server is done. |
The 2nd scenario is for a load-balanced cluster with installations of the native Agile e6 components and the WebLogic servers on all nodes. In this case, the Watchdog of the workflow services can only run on one application server. All other Agile e6 J2EE components use the load balancing feature. This includes the cache of the permission managers which will be synchronized over all cluster nodes. After a successful Agile e6 installation, the Watchdog needs to be deactivated on all servers where it is not required, as described below.
Deactivation and Failover for the Workflow Watchdog:
Install WebLogic Server and EDM Server on all Nodes.
|
Note: Further information about the installation can be found in the respective installation manuals for Agile e6.2.0.0. |
Define the node for the active workflow services.
Edit the file "ABS_<application-name>.ini" for all other node(s).
Search for:
ServiceManager\Nodes\localhost\Threads\K]
className=com.agile.abs.workflow.watchdog.WatchdogService
localThread=true
And change it to (comment it):
#[ServiceManager\Nodes\localhost\Threads\K]
#className=com.agile.abs.workflow.watchdog.WatchdogService
#localThread=true
Redeploy all changed applications.
In Case of Errors:
If the main application server with the active Workflow service stops and cannot be restarted, remove the commenting in the file "ABS_<application-name>.ini" for one of the other nodes.
Redeploy the changed application.
|
Note: The switch to another application server with an active workflow services is completed. |
In case several permission managers are used, their cache can be automatically synchronized after a defined time period. The synchronization parameters can be configured in "ABS_<application-name>.ini for every node.
#activate permission manager cache
missing entry
true = activate caching (default)
false = deactivate caching
prmCache=true
To enable caching, set prmCache=true (default). In case the prmCache entry is missing in the ABS...ini file, the cache is activated by default.
To disable caching, set prmCache=false.
#period to check/synchronize the cache of several permission manager
null
prmPeriod=0:10
The prmPeriod defines the time between two checks of the prm time stamp on the data base. If something relevant happened for permission manager in that period, the prm time stamp was changed on database. The value is formatted in hours:minutes (Format: hh:mm). The default is 10 minutes.
|
Note: After the update, the changed application has to be redeployed. |
