| Oracle® Agile Engineering Data Management Administration Guide Release e6.2.0.0 E52550-02 |
|

 Previous |
 Next |
| Oracle® Agile Engineering Data Management Administration Guide Release e6.2.0.0 E52550-02 |
|
Previous |
Next |
When starting the Agile e6 Client, the following connection settings can be passed:
-a <Application Name>
-h <Host Name>
-d <Daemon number>
-p <ECI port>
-u <PLM Username>
-l <logintype>
-f <flag for login dialog>
-t <task>
-home <home directory>
-imageRoot <url>
-imageDir <dir>
-defaults <file|URL>
Java Client Native Installation Windows example:
Open properties for the shortcut "Agile e6.1 Java Client.lnk" in "C:\Documents and Settings\All Users\Start Menu\Programs\"
At the end of the "Target" attribute, add the connection setting you want to use e.g.:
-a plmref -h example.com
It is also possible to edit the "jacc.cmd" file in "C:\Documents and Settings\All Users\Application Data\Oracle\Agile\EDM" and to add the setting there. Search for the line which ends with
…com.agile.jacc.e6.Jacc %*"
and replace this with e.g.:
"…com.agile.jacc.e6.Jacc %* -a < Application Name > -h <Host name>…"
Example - Java Client WebStart:
If not yet available, copy "<ep_root>\staging\product\installation\JavaClient\jacc.defaults" to "<ep_root>\staging\custom\installation\JavaClient\jacc.defaults".
Adapt the properties you need in "<ep_root>\staging\custom\installation\JavaClient\jacc.defaults":
jacc.node, jacc.port, jacc.app
The client variable EP_DDM_SITE is used to configure the DFM client location. In addition, the system allows configuring the client location for the Agile e6 AutoVue Integration - EP_PVM_SITE.
|
Note: For more information about EP_PVM_SITE, see the AutoVue Integration Installation and Administration Guide for Agile e6.2.0.0 (Chapter: Configuring Multiple Location Support). |
To configure the Java Client to start with a specific DFM/PVM site, you have several options.
|
Note: The PVM configuration only needs to be performed when using the Agile e6 AutoVue Integration. |
Edit the file "jacc.cmd" in "C:\Documents and Settings\All Users\Application Data\Oracle\Agile\EDM" and to add the setting there, search for the line where "javaw" is executed and add e.g.: -DEP_DDM_SITE="ka" (for AutoVue: -DEP_PVM_SITE="ka"). The line looks like:
""%JAVA_HOME%\bin\javaw.exe" %VM_OPTS% -Djacc.home="$APPDATA\e61" -DEP_DDM_SITE="mu" (for AutoVue: -DEP_PVM_SITE="mu" )…."
OR
Add the following to file jacc.ini in $APPDATA\Agile\e61\:
EP_DDM_SITE=de
For AutoVue: EP_PVM_SITE=de
For example:
"C:\Documents and Settings\<username>\Application Data\Agile\e61\jacc.ini.
The jacc.ini file is available after the first execution of the Java Client.
|
Note: Do not edit the file while the client is running, or your settings will be overwritten. |
OR
Set the environment variable EP_DDM_SITE=de (for AutoVue: EP_PVM_SITE=de) on the client machine application.
|
Note: When using the client environment variable, the variable EP_DDM_SITE=de (for AutoVue: EP_PVM_SITE=de) has to be removed from the file jacc.cmd and jack.ini. |
If not yet available, copy "<ep_root>\staging\product\installation\JavaClient\jacc.defaults" to "<ep_root>\staging\custom\installation\JavaClient\jacc.defaults".
Open "<ep_root>\staging\custom\installation\JavaClient\jacc.defaults" and change the lines:
EP_DDM_SITE=de
For AutoVue: EP_PVM_SITE=de
Deploy the WebStart Java Client.
OR
Set the environment variable EP_DDM_SITE=de (and/or for AutoVue: EP_PVM_SITE=de) on the client machine application.
|
Note: When using this option, the variable EP_DDM_SITE (and/or for AutoVue: EP_PVM_SITE) has to be removed from the jacc.defaults file. |
As described, it is possible to setup the EP_DDM_SITE, and for AutoVue EP_PVM_SITE, in the jacc.defaults file within the WebStart Java Client deployment. If more locations should use the central WebStart Java Client deployment, a different EP_DDM_SITE (and for AutoVue: EP_PVM_SITE) configuration has to exist in the same deployment.
In the following example, the EP_DDM_SITE (and for AutoVue: EP_PVM_SITE) are "de" and "us".
If not yet available, copy "<ep_root>\staging\product\installation\JavaClient\jacc.defaults" to "<ep_root>\staging\custom\installation\JavaClient\jacc_de.defaults".
Open "<ep_root>\staging\custom\installation\JavaClient\jacc_de.defaults" and change the EP_DDM_SITE to EP_DDM_SITE=de (and for AutoVue: EP_PVM_SITE to EP_PVM_SITE=de).
If not yet available, copy "<ep_root>\staging\product\installation\JavaClient\jacc.jnlp" to "<ep_root>\staging\custom\installation\JavaClient\jacc_de.jnlp".
Open "<ep_root>\staging\custom\installation\JavaClient\jacc_de.jnlp" and change the codebase like this:
<!--URL to jacc.defaults, standard is to look at the codebase -->
<argument>-defaults</argument><argument>$$codebase/jacc_de.defaults.</argument>
If not yet available, copy "<ep_root>\staging\product\installation\JavaClient\jacc.defaults" to "<ep_root>\staging\custom\installation\JavaClient\jacc_us.defaults".
Open "<ep_root>\staging\custom\installation\JavaClient\jacc_us.defaults" and change the EP_DDM_SITE to EP_DDM_SITE=us (and for AutoVue: EP_PVM_SITE to EP_PVM_SITE=us).
If not yet available, copy "<ep_root>\staging\product\installation\JavaClient\jacc.jnlp" to "<ep_root>\staging\custom\installation\JavaClient\jacc_us.jnlp".
Open "<ep_root>\staging\custom\installation\JavaClient\jacc_us.jnlp" and change the codebase like this:
<!--URL to jacc.defaults, standard is to look at the codebase -->
<argument>-defaults</argument><argument>$$codebase/jacc_us.defaults.</argument>
Deploy the WebStart Java Client.
|
Note: With this configuration, the user at site "de" can now use the central WebStart Java Client with the URL for the jacc_de.jnlp file and the user at site "us" is using the jacc_us.jnlp file.Example:
|
To verify the current Java Client EP_DDM_SITE (for AutoVue: EP_PVM_SITE) setting, create a LogiView Procedure with the following line:
put (client_env ("EP_DDM_SITE"))
For AutoVue: put (client_env ("EP_PVM_SITE"))
Execute the LGV procedure. If the setup is correct you will see the defined site as output in your client message window.
The Java Daemon has to start and manage EDM Server processes. In case of a client call, it has to start a new server process if no matching server process is already running. If a matching server process is already running, it has to return the server's address. When the client terminates, and if no other client is connected to the same EDM Server process, the Java Daemon has to shutdown the EDM Server process.
The Java Daemon also has to manage all running EDM Server processes, i.e. check if there is still a connection between an EDM Server process and one or more clients. The Java Daemon always has to be able to accept a new client.
|
Note: The Java Daemon Administration Tool or Plugin is an administrator tool only! |
During Agile e6 installation, the Daemon configuration file jade.ini will be installed under <ep_root>/axalant/ini.
During installation, the administrator sets the password for the Daemon Controller. If the password needs to be changed, it has to be changed manually in the configuration file jade.ini.
|
Note: Password has to be encrypted. |
|
Note: The Java Daemon Administration Tool is available in English only! |
To be able to use the Java Daemon Administration Tool, it has to be activated first.
Start Agile e6.
Click the Change the preferences of the application button.

The Agile e6 - Preferences Mask is opened.
Select Plugins.
The Plugins window on the right hand side displays all available plugins.
Select the Daemon plugin.
In the Load column, select the checkbox for the Daemon plugin.
Click Apply.
Click OK.
|
Note: To make the changes operative, restart Agile e6. |
After the restart, the Opens the Java Daemon administration tool button is displayed.
In Agile e6, click the button.
The Daemon Controller window opens at the bottom of the screen.
In the Daemon Controller window, click Start.
Select Connect to daemon...
The Connect to daemon window is opened.
Enter your information in the fields:
Daemon on host:
Port number
Daemon password
Click Connect.
In the Daemon Controller screen, a list of all servers is displayed.
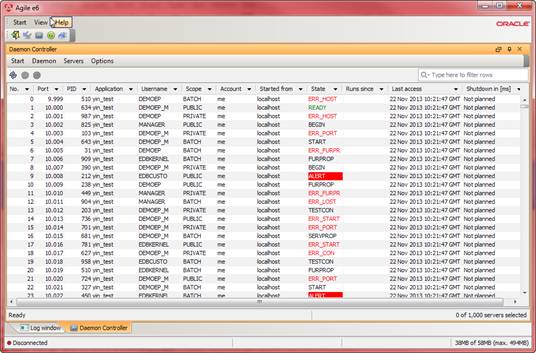
| COLUMN NAME | DESCRIPTION |
|---|---|
| No. | Amount of servers. |
| Port | Port number between server and client. |
| PID | PID of the server process started on this machine. |
| Application | Name of the application used by the server. |
| Username | Name of the Agile e6 user who is using the server process. |
| Scope | Three scopes are possible:
|
| Account | Account name of the user on the client machine. |
| Started from | IP address of the client. |
| State |
|
| Runs since | Time server was started. |
| Last access | Last time the client and the server connected to each other and exchanged data. |
| Shutdown [ms] | Shutdown in ms if a public server is no longer in use. |
The following functionalities are available:
Double-clicking the Daemon Controller window banner
By double-clicking the window banner, the Daemon Controller can be extended over the complete Agile e6 window. Or it can be reduced to the bottom of the Agile e6 window.
Search
General filter
The general filter allows filtering rows for the entered search term.
Column filter
Every column in the Daemon Controller has a filter functionality. Each column filter lists all terms available in the respective column.
Administration of the server
You can administer the servers from:
Servers menu
Context menu
Toolbar buttons
All three options allow to:
Refresh
Refreshes the server list.
Information
Additional server information can be displayed for one or more selected rows.
When selecting more than one server, the information in the Server Information window is displayed below each other.
|
Note: The information in the Server Information window is read only! |
Shutdown server
This option shuts down the selected server, but not the Java Daemon.
To open the Daemon Configuration, open the Daemon menu.
Select Configuration.
The Daemon Configuration screen is opened.
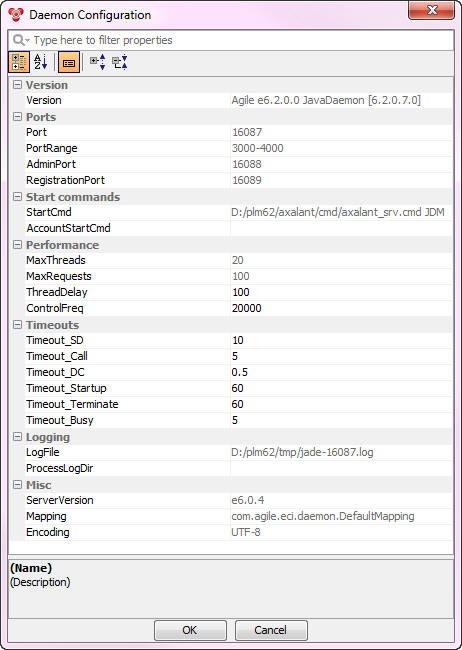
The Daemon Configuration window displays the current Java Daemon configuration and allows modifying certain properties.
By highlighting a property, its description is displayed in the description area.
The search field at the top of the window offers comprehensive search functionality.
At the top, the following display buttons are available:
Categorized
Displays the properties in categories.
Alphabetic
Displays the properties alphabetically.
Show/Hide Description Area
Shows or hides the description area at the bottom of the window.
Expand
In the Categorized view, expands the categories.
Collapse
In the Categorized view, collapses the categories.
Every property value that is not grayed out, can be changed.
1. Double-click the respective value.
2. Enter new value.
3. Click OK.
|
Note: Modifications are only valid for the current session and are not stored in the Daemon configuration file jade.ini. After shutting down the Daemon, these changes are lost. |
The Daemon Controller allows setting a new time value for refreshing the server list. This value defines after which time interval the server will be refreshed.
|
Note: The new value is only valid on the used client machine and will be stored in the local Java configuration file jacc.ini. After a restart of the client, the changed value is still valid. |
|
Note: Default refresh frequency rate = 60000 |
Open the Options menu.
Select Properties.
The Set daemon controller properties screen is opened.
Select Server list refresh frequency (milliseconds).
Enter a value.
Click Set property.
The administrator can disable the Java Daemon, so no new server can access the Daemon. Requests from clients to access the respective server are denied, and the user receives an error message.
To disable the Daemon:
Open the Daemon menu.
Select Disable.
To enable the Daemon:
Open the Daemon menu.
Select Enable.
Open the Daemon menu.
Select Shutdown.
The Shutdown daemon window is opened.
There are two options how to shutdown the Daemon:
Shutdown all servers
The Daemon and all EDM server processes, that are managed by the Daemon, will be shutdown.
Keep all EDM servers running
Only the Daemon will be shutdown. The EDM server processes continue running.
Select a shutdown option.
Click Shutdown.
In case you want to display your own images in the WebStart Java Client, make sure the images or icon file names are all written in lower case as otherwise, they won't be displayed correctly. The WebStart Java Client gets the images from the Web server in which the files are case sensitive.
In some cases it is necessary to increase the available memory for the Agile e6 AutoVue Integration. By default, 512 MB are assigned.
To change the memory settings for the locally installed deployment (JVue.msi) for the Agile e6 AutoVue Integration, perform the following:
Edit the file jvue.cmd in "C:\Documents and Settings\All Users\Application Data\Oracle\Agile EDM" and change the following line:
set VM_OPTS=-Xmx512M
|
Note: Default size is 512 MB. Because the Agile e6 AutoVue Integration uses a 64-bit JVM, you can provide several GB to the Agile e6 AutoVue Integration.If you request more memory than the system can provide, the Agile e6 AutoVue Integration will not work! Example to provide 4GB to the Agile e6 AutoVue Integration: set VM_OPTS=-Xmx4096M |
To change the memory settings for the WebStart deployment (JVue.war) for the Agile e6 AutoVue Integration, perform the following:
Copy the original file jvue.jnlp from the directory: %EP_ROOT%\staging\product\installation\JVue to %EP_ROOT%\staging\custom\installation\JVue
Edit the following line in the file jvue.jnlp to change the available memory:
<j2se version="1.7" max-heap-size="512m"/>
