| Oracle Agile Engineering Data Management Enterprise Integration Platform Administration Guide Release e6.2.0.0 E52568-02 |
|

 Previous |
 Next |
| Oracle Agile Engineering Data Management Enterprise Integration Platform Administration Guide Release e6.2.0.0 E52568-02 |
|
Previous |
Next |
The Agile EDM Connector provides connectivity to Agile EDM in both directions. That means that Agile EDM could be the source of a message transfer or the target of a transfer (e.g. reading in data from an XML file via the XML Connector).
The Agile EDM Connector is using an XML Interface (EXI) on top of the Java ECI interface as communication channel to Agile EDM. That requires additional configuration (provided in loader files and libraries) inside the Agile EDM environment, which you want to connect to from the Integration Platform. Part of that additional configuration is loading XML schemas (IEF Definitions) and XML interface schemas into PLM, which define what entities, mask and filters to use for reading and writing data from the Agile EDM Connector.
Once everything is configured, any kind of object inside Agile EDM (entity records, relation records, files etc.) can be exported from and imported into Agile EDM.
The Agile EDM Connector can be run in two modes: asynchronous and synchronous mode.
In asynchronous mode, the transfer requests (request to export data to EIP) are written into the transfer queue inside Agile EDM. These transfer requests are executed by a background Agile EDM process some time later. After execution of the transfer request, appropriate result and status information is written back to the transfer queue.
In synchronous mode, the transfer requests are written to the transfer queue, too, but in this case, the Agile EDM client (Java, or Web Client) is blocked until a response comes back from the synchronous Agile EDM connector. The synchronous mode may especially be used in cases where a process inside Agile EDM (e.g. Release of a BOM) depends on the outcome of the message transfer to an external system via EIP.
A special feature called XML Snapshot has been provided, which works similar to the synchronous mode as described above. The XML Snapshot feature can be used to synchronously retrieve the data (e.g. BOM) from Agile EDM and store it in the Agile EDM database, instead of sending it directly. This allows bridging the gap between the creation of the transfer request and actually retrieving the data (e.g. BOM) in order to send it to an external system.
Below is a description of the Agile EDM Connector section in the eai_ini.xml file. It describes the connection parameters and the supported business objects and operations.
<connector name="plm" version="2.2.0" active="true" class="com.eigner.eai.connector.plm.PlmConnector">
     …
     <connectionname="default" active="true">
           <host>plm_server</host>
           <socket>16077</socket>
           <env>axalantORIGIN</env>
           <user>EDB-EIP</user>
           <pwd>{PLM-AES-128}+YEVllbJyH1/jvIH9OgsFY21pmz8LbcuR2OWYJ7Uzog=</pwd>
           <id></id>
           <connection-timeout>300000</connection-timeout>
           <call-timeout>300000</call-timeout>
           <queue-mask>EDB-EIP-SEN-SLI</queue-mask>
           <snapshot active="false"/>
           <separator parameters=";" name-value="="/>
     </connection>
     …
     </connector>
Details of the XML tags:
| Tag | Description |
|---|---|
| host | Hostname or IP address of Agile EDM server, where the Agile EDM Java Daemon is running |
| socket | Socket number, which the Java Daemon can be reached through |
| env | Agile EDM environment (application) name |
| user | Agile EDM logon user |
| pwd | Encrypted logon password |
| id | Connector ID, which should be used for querying only certain records from the EDM transfer queue. Only records in the EDM transfer queue, which have the corresponding Connector ID set, will be retrieved by this Agile EDM Connector instance. Please refer to the section "Content of the Transfer Queue" for more information how to utilize the Connector field. |
| connection-timeout | Timeout in milliseconds for connecting to Agile EDM via ECI |
| call-timeout | Timeout in milliseconds for making an ECI call to Agile EDM |
| queue-mask | Allows defining the name of the transfer queue mask in PLM, which should be used for polling the transfer records. This parameter is optional. By default, the mask "EDB-EIP-SEN-SLI" is used. |
| snapshot | Defines whether the XML Snapshot feature is active or not. If the feature is not active, the snapshot feature cannot be used at all. Also, if the feature is not active, respective snapshot tables are not required in PLM at all. For more information about the Snapshot feature please see chapter XML Snapshot Feature |
| separator | Allows specifying the separators for the parameters passed from the transfer queue. For the parameters attribute, the default is ";" (semicolon). For the name-value attribute the default is "=" (equal sign). |
Next is an overview of the supported business objects (e.g. ITEM) and Actions (e.g. CREATE) as described in the external repository file bor_plm.xml. The parameters in each section explain how the connector can get access to the data in Agile EDM, i.e. which operations are supported in which direction using which schemas (masks and entities) as defined in IEF and exported into the schema file (see <path> and <bor-query-string>)
<bor version="2.2.0">
     <path>${eai.conf}/exi_plm.xsd</path>
     <bor-query-string>XML%</bor-query-string>
     <bo name="ITEM">
           <verb name="CREATE" direction="SEND" msg-type="REQUEST" schema="XML-ART"/>
           <verb name="CREATE" direction="RECEIVE" msg-type="RESPONSE" schema="XML-ART"/>
           <verb name="CREATE" direction="SEND" msg-type="RESPONSE" schema="XML-ART"/>
           <verb name="CREATE" direction="RECEIVE" msg-type="REQUEST" schema="XML-ART"/>
           …
     </bo>
     …
</bor>
The XML schema file, automatically exported from Agile EDM, could look as follows
Details of the XML tags:
| Tag | Description |
|---|---|
| path | Path and file name of the schema file of the External XML-Interface |
| bor-query-string | Query string for exporting the IEF formats into the schema file |
| bo | Name of the Business Object e.g. ITEM |
| verb | Name: name of the verb/operation e.g. CREATE direction: direction of the transfer (SEND or RECEIVE) msg-type: type of transfer data (REQUEST or RESPONSE) schema: used IEF Schema for retrieving the data rel-schema: used relation IEF Schema for retrieving the data exi-object: used XML Interface Object for retrieving the data |
This section covers additional configuration inside Agile EDM, like Site Management and Connector IDs.
Site Management configuration could be used if you have one EIP running with one Agile EDM Connector that will feed two or more target systems, e.g. two ERP systems or one ERP system and BPM.
The standard workflow definition in eai_ini.xml is then not sufficient anymore as only the first workflow with the Agile EDM Connector as a source connector will be used. As a result, the additional workflows with the same Agile EDM Connector will not be taken into consideration (see Workflow Section). The Site Management inside Agile EDM allows predefining the target connector name and therefore allowing the EIP to pick the proper workflow definition.
The Integration Platform uses the site configuration table defining the target system (connector name) of the sent data record(s).
|
Note: Only the fields Site and Site Code are mandatory for using Site Management with EIP. It is also recommended to fill in the Comment field. |
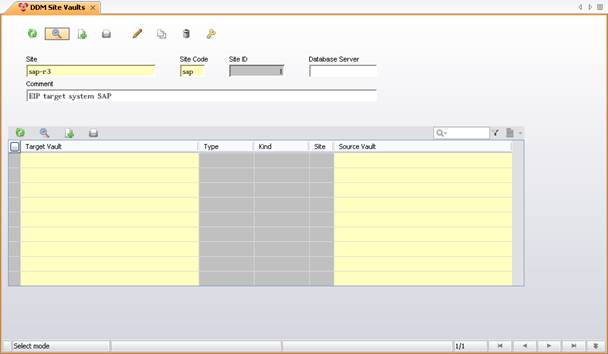
The site name will be used later on to find the target connector from a workflow definition in the Enterprise Integration Platform. The site ID can be used for assigning it to the data record, which should be transferred.
In the above example, the Site Code is "erp" and the Site name is "erp". An entry in the Agile EDM Transfer Queue could then be created or assigned to the Site Code "erp". Whenever the Agile EDM Connector finds an entry with the code "erp", it looks for the respective site name ("erp"), which it takes for defining the name of the target connector (also "erp"). Of course, the appropriate <workflow> definition has to exist in eai_ini.xml (source connector "plm" and target connector "erp"), which defines the mapping files (pipes) in addition.
|
Note: Please keep the site names in sync with the target systems (logical connector names) inside the Enterprise Integration Platform! |
Connector IDs could be used if there are two or more Agile EDM Connectors (could also run in more than one EIP instance) that are configured against the same PLM system (same environment or application).
If the Connector ID would not be used, the Agile EDM Connectors would operate on the same entries inside the transfer queue and it is likely that they will process the wrong entries, which are meant for another Agile EDM Connector.
To configure Connector IDs, both the configuration of the Agile EDM Connector inside eai_ini.xml and the customizing inside Agile EDM need to be adapted.
For each Agile EDM Connector that runs against the same environment, define an own and unique numeric Connector ID inside the eai_ini.xml file:
<connection name="default" active="true">
           …
           <id>1</id>
           …
     </connection>
Inside Agile EDM, modify the LogiView procedure that gets called for initiating the transfer (and creating the entry in the transfer queue), e.g. EP_REPLICATION/RPL_CreateRequest. It needs to fill the field T_EER_SEN.CONNECTOR_ID with one of the previously defined Connector IDs. Then this entry will only be read by the Agile EDM Connector with the same ID.
The XML-Interface is used as a layer between the Agile EDM Connector and Agile EDM. It serves as an XML-based input/output service in order to retrieve data from Agile EDM (query and checkout operations) and bring data into Agile EDM (insert, update, checking and delete operations). Following customizing needs to be done in Agile EDM before you can use the XML-Interface:
The IEF formats are used to describe the EXI schemas, i.e. which entities, relationships and forms should be used for saving and retrieving the data.
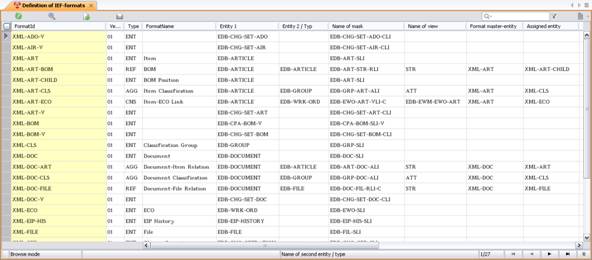
The IEF formats allow defining schema hierarchies by connecting different formats via the fields "Format master-entity" and "Assigned entity". The Integration Platform automatically exports all EXI schemas into an external XML Schema File (XSD) when launching the Integration Platform in test mode. EXI does NOT use any IEF format to field assignment of the IEF tool. The fields are directly retrieved from the corresponding DataView forms, as defined in the IEF format (name of mask). The external file name of the XML schema file <path> and the query string <bor-query-string> for the formats (e.g. "XML%") can be configured in the bor_plm.xml file of the Integration Platform. Below are some sample settings in section in the bor_plm.xml file:
<bor version="2.2.0">
     <path>${eai.conf}/exi_plm.xsd</path>
     <bor-query-string>XML%</bor-query-string>
The XML schema file, automatically exported from Agile EDM, could look as follows (example just includes the export of certain fields of the schema XML-ART):
<xsd:element name="XML-ART">
     <xsd:complexType>
        <xsd:choice maxOccurs="37">
           <xsd:element name="T_MASTER_DAT.PART_ID" nillable="true" minOccurs="0">
                       <xsd:simpleType>
                             <xsd:restriction base="xsd:string">
                                   <xsd:maxLength value="40"/>
                             </xsd:restriction>
                       </xsd:simpleType>
                 </xsd:element>
                 <xsd:element name="T_MASTER_DAT.PART_VERSION" nillable="true" minOccurs="0">
                       <xsd:simpleType>
                             <xsd:restriction base="xsd:string">
                                   <xsd:maxLength value="10"/>
                             </xsd:restriction>
                       </xsd:simpleType>
                 </xsd:element>
The XML Interface introduces the notion of XML interface objects. These interface objects are a high level definition of XML schema hierarchies, incl. the possibility to predefine query defaults and exclusion of schemas. The interface object refers to the top-level schema (IEF Format), which should be used for a query operation. All schemas (IEF formats), which are linked to the top-level schema via the field "Format master-entity", are part of the schema hierarchy. When EXI/EIP is trying to resolve the structure underneath the top-level schema it always looks for child schemas, which point to the parent schema via the name of the parent schema as value in the field "Format Master Entity". That way you can build up a multi-level hierarchy of schemas in order to export multi-level structures via EXI/EIP.
|
Note: Interface Objects are only used for queries right now! |
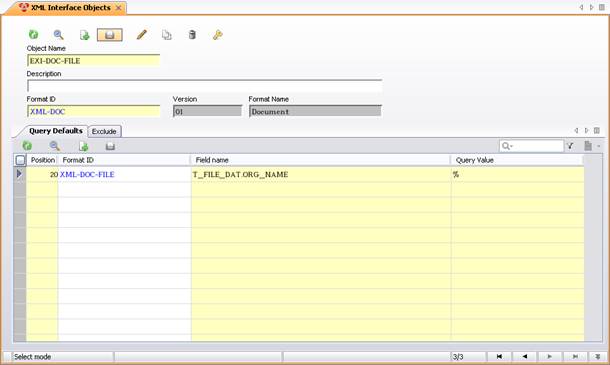
The tab "Query Defaults" allows predefining query values for all schemas (and their respective fields as defined in the DataView form), which are part of the schema hierarchy. Below example defines that only GIF-files should be queried. It is also possible to use DataView defaults as query values. Simply refer to the default via "#<default name>". The XML Interface then tries to replace it with the respective default value based on the logon user! The tab Exclude allows excluding certain schemas, which are part of the schema hierarchy, but should not be included in that specific query scenario as described by the interface objects.
Using the XML Interface in outbound mode means that Agile EDM is used as the source system. The XML-Interface can be used for exports (Agile EDM outbound) in two different ways:
Direct usage of the XML schema (IEF Format) names OR (they cannot be used together!)
The Integration Platform allows using both ways to retrieve data in order to export to external systems.
The configuration file eai_ini.xml of the Integration Platform allows using one of those 2 options for each business object / verb combination:
1 <bo name="DOCUMENT">
2  <verb name="CREATE" direction="SEND" msg-type="REQUEST" schema="XML-DOC"                        rel-schema="XML-DOC-ART"/>
3  <verb name="UPDATE" direction="SEND" msg-type="REQUEST" schema="XML-DOC"                        rel-schema="XML-DOC-ART"/>
4 <verb name="QUERY" direction="SEND" msg-type="REQUEST" schema="XML-DOC"/>
5 </bo>
6 <bo name="DOCUMENT-FILE">
7 <verb name="CHECKIN" direction="SEND" msg-type="REQUEST" exi-object="EXI-DOC-FILE">
8 <replace object="XML-DOC-FILE" name="checkout" ckopath="${eai.temp}" ckoflag="all" rename="{DOCUMENT_ID}-{T_FILE_DAT.STEP_ID}.{ext}"/>
9 </verb>
10  <verb name="CHECKOUT" direction="SEND" msg-type="REQUEST" schema="XML-DOC"                        rel-schema="XML-DOC-FILE"/>
11   </bo>
| Line 1: | Describes the business object, here DOCUMENT. |
| Line 2: | Defines the verb/operation (here CREATE), which should be executed in the target system. The attribute <schema> refers to the XML-schema (IEF format), which should be used for retrieving the data from Agile EDM (the C_ID of the data record, which should be exported, is provided in the Agile EDM transfer queue).
The attribute <rel-schema> allows providing the name of a relationship schema (optional as shown in line 4), if related data should be part of the export query. The query descriptor below was created by using the definition in line 2. It shows the combination of the main operation object XML-DOC and the related operation object XML-DOC-ART. This query descriptor is used internally by the Integration Platform to retrieve the data, which should be exported from Agile EDM.
<operations>
      <operation object="XML-DOC" name="query">
            <where C_ID="1365015592"/>
            <select>
                  <operation object="XML-DOC-ART"/>
            </select>
      </operation>
</operations>
|
| Line 4: | Does only use the <schema> attribute and makes no use of the <rel-schema> attribute, since this is not required for the DOCUMENT/QUERY operation. |
| Line 7: | Shows the usage of the XML interface object, which is referred to by the attribute exi-object. No further attributes are required when using the interface objects, since all relationships and query defaults are defined inside Agile EDM (as described in the previous chapter).
The Integration Platform reads the complete schema structure of the interface object from Agile EDM and adds the where-clause to the top-level schema, which contains the C_ID of the data record in the Agile EDM transfer queue. |
| Line 8: | Shows a specialty of the Agile EDM Connector, which is currently only used for file checkout operations. The connector uses the replace element in the following way: it queries for the schema name as described in the <attribute> object. Whenever it finds the object in the structure as defined in the XML interface object, it replaces and adds the attributes, which are provided in the replace element.
Checking in and out files is the only scenario where the XML-Interface requires additional parameters (as XML attributes). More information about the parameters for checking-out files is provided in a section below. The query descriptor below was created by using the definition in lines 7 - 9. It shows the combination of the XML interface object EXI-DOC-ALL, which contains a large schema hierarchy and the additional attributes for the file checkout. This query descriptor is used internally by the Agile EDM Connector to retrieve the data, which should be exported from Agile EDM.
<operations>
   <operation object="XML-DOC">
      <where C_ID="1365015592"/>
        <select>
           <operation object="XML-DOC-ART">
               <select>
                <operation object="XML-ART">
                     <where _parent=""/>
                        <select>
                           <operation object="XML-ART-BOM">
                               <select>
                                 <operation object="XML-ART-CHILD">
                                  <where _parent=""/>
                                    </operation>
                                      </select>
                                      </operation>
                                 </select>
                          </operation>
                    </select>
                  </operation>
                  <operation object="XML-DOC-FILE" name="checkout" ckopath="d:/temp" ckoflag="all" rename="{DOCUMENT_ID}-{T_FILE_DAT.STEP_ID}.{ext}">
                 <where T_FILE_DAT.ORG_NAME="%.jpg"/>
                   <select>
                              <operation object="XML-FILE">
                                    <where _parent=""/>
                              </operation>
                        </select>
                  </operation>
            </select>
      </operation>
</operations>
|
Using the XML Interface inbound, means that Agile EDM is used as the target system.
The external XML interface is also used by the Agile EDM Connector, when Agile EDM is the target system of a data transfer. Let us assume a scenario, where an XML file is the source (system) of the data transfer. The Agile EDM Connector does directly channel through the XML data, which is provided by the XML connector. In case an XML file is used as source, the XML structure, as expected by the external XML interface, needs to be provided. The XML interface allows the following operations right now:
Create
Update
Delete
Query
Check-In (of files)
Check-Out (of files)
Miscellaneous utility operations as described in "Special Operations."
The following element tags can be used for the above operations:
edit:
Describes the names and the values of the fields that should be edited. The edit operation does not make sense for query and delete operations.
where:
Provides the search criteria for the records the operation should be performed against.
select:
Just provides the names of the fields (as attribute names), which should be returned after the operation. Please note that the attribute value is not used right now.
The allowed elements and attributes will be explained by examples below. Imagine a scenario, where you want to create an item inside Agile EDM. The following XML descriptor could be used:
1    <data>
2          <operation name="create" object="XML-ART">
3                <edit T_MASTER_DAT.PART_ID="P100074324"
4                T_MASTER_DAT.PART_VERSION="2"
5                T_MASTER_DAT.PART_NAME="Assembly"
6                T_MASTER_DAT.UNIT="kg"/>
7                <select T_MASTER_DAT.PART_ID=""
8                T_MASTER_DAT.LEV_IND=""/>
9          </operation>
10   </data>
| Line 2: | Describes the used schema (XML-ART) and the operation (create). |
| Line 3-6: | Provides the values of the edit fields, i.e. the fields (provided as attribute name) should be filled with values (provided as attribute values) |
| Line 7-8: | Provides the names of the fields, which should be selected AFTER the create-operation and be returned to the calling application as XML. The XML attribute values are not used and therefore can be left empty (=""). |
The following section shows an update scenario of multiple item master records:
1    <data>
2          <operation name="update" object="XML-ART">
3                <edit T_MASTER_DAT.PART_NAME="new part name"/>
4                <where T_MASTER_DAT.PART_ID="P1000%"/>
5                <select T_MASTER_DAT.PART_ID=""
6                T_MASTER_DAT.PART_NAME=""
7                T_MASTER_DAT.PART_VERSION=""/>
8          </operation>
9    </data>
| Line 2: | Describes the used schema (XML-ART) and the operation (update). |
| Line 3 | Provides the values of the edit fields, i.e. the field values of ALL found records are changed. |
| Line 4 | Defines the where-clause, which is used for querying the respective record(s). |
| Line 5-7: | Provides the names of the fields, whose values should be returned after the update operation. Here, the select-clause makes absolute sense, since MULTIPLE records could have been updated, which you want to double-check. |
The following section shows a delete scenario of an item master:
1    <data>
2          <operation name="delete" object="XML-ART">
3                <where T_MASTER_DAT.PART_ID ="P100074324"/>
4          </operation>
5    </data>
| Line 2: | Describes the used schema (XML-ART) and the operation (delete). |
| Line 3 | Provides the search criteria for the item query. |
|
Note: Please use this operation with caution as it will delete the objects in the database. |
The following section shows a query scenario of an item master with the attached documents:
1    <data>
2      <operation name="query" object="XML-ART">
3          <where T_MASTER_DAT.PART_ID="P100074324"/>
4             <select>
5                <operation object="XML-ART-DOC" name="create">
6                    <where T_DOC_DAT.DOCUMENT_ID="M100074324" T_DOC_DAT.SHEET_NO="0" T_DOC_DAT.DOC_VERSION="00"/>
7                  <edit T_DOC_DAT.DOCUMENT_ID="M100074324" T_DOC_DAT.SHEET_NO="0" T_DOC_DAT.DOC_VERSION="00"/>
8                      </operation>
9                </select>
10         </operation>
11   </data>
| Line 2: | Describes the used schema (XML-ART) and the operation (query). |
| Line 3 | Provides the search criteria for the item query |
| Line 5-7: | Queries for the documents related to the item, which was retrieved in line 2-3. |
The following section shows a file checkout operation:
1    <data>
2          <operation name="query" object="XML-DOC">
3                <where T_DOC_DAT.DOCUMENT_ID="Specification-123"/>
4                <select>
5                      <operation object="XML-DOC-FILE" name="checkout" ckopath="d:/temp" ckoflag="all" rename="{DOCUMENT_ID}-{T_FILE_DAT.STEP_ID}.{ext}">
6                            <where T_FILE_DAT.ORG_NAME="%.jpg"/>
7                      </operation>
8                </select>
9          </operation>
10   </data>
| Line 2: | Query for the specific document master. |
| Line 3 | Provides the search criteria for the document query. |
| Line 5-7: | Queries for the files related to the document master, which was retrieved in line 2-3. "ckopath" and "ckoflag" are exactly the same parameters as required by the ECI function eci_cko_typ_fil. The attribute "rename" allows to rename the checked-out file based on the provided schema (field name and extension place holder). |
|
Note: The placeholder "{ext}" gets replaced by the extension (everything after the last dot) of the original filename (T_FILE_DAT.ORG_NAME). All other placeholders must refer to a database field. |
The following section shows a file check-in operation:
1    <data>
2          <operation name="query" object="XML-DOC">
3                <where T_DOC_DAT.DOCUMENT_ID="Specification-123"/>
4                <select>
5                  <operation ckiselflag="1" object="XML-DOC-FILE" name="checkin">
6                            <where T_FILE_DAT.ORG_NAME="eai.log"
                                    T_FILE_DAT.ORG_DISCPATH="d:\temp"
                                    T_FILE_DAT.STORAGE_AREA="Vault"/>
7                            <edit T_FILE_DAT.ORG_NAME="eai.log"
                                    T_FILE_DAT.ORG_DISCPATH="d:\temp"
                                    T_FILE_DAT.STORAGE_AREA="Vault"
                                    T_FILE_DAT.ORG_NODE="#SERVER"/>
8                      </operation>
9                </select>
10         </operation>
11   </data>
| Line 2 - 3 | Query for the specific document master, which the file should be attached to |
| Line 5 | Calls the check-in operation on the Document-File relation form; ckiselflag should be set accordingly (please refer to documentation of ECI function eci_cki_typ_fil for more information) |
| Line 4 | Provides the search criteria for checking the existence of the file. This where-statement is mandatory due to the different options of the attribute ckiselflag (e.g. overwriting existing files) |
| Line 5-7: | Provides the field values, which should be entered when inserting the file relation. At a minimum, the mandatory fields need to be provided and the Org. Node has to be set to "#SERVER", since only the server-side check-in is currently supported. |
In addition to the standard operations for retrieving and modifying data (query, create etc), special operations can be used for setting environment parameters in Agile EDM. It is, for example, possible to set the version view or to set certain system parameters via special EXI operations, which are described below:
1    <operation name="context" value="DSG">
2    <operation name="versionview" view="3">
3    <operation name="sysval" sysname="EP_DDM_SITE" value="ka">
4    <operation name="XML-ART-BOM" usx="xedb_hierarcy_ver"           param="EDB-ARTICLE EDB-ART-HIE-SLI T_MASTER-STR ">
5    <operation name="syslang" value="ENG">
6    <operation name="userlang" value="ENG">
7    <operation name="setdefault" default="EDB-CHG-EDB-PRE" value="on" type="S"/>
8    <operation name="usx" usx="lgv_nosel_run " param="DEMO/Test"/>
| Line 1 | Sets the context which should be used for the following operations. |
| Line 2 | Sets the version view (e.g. Design, Production, Global) and production date. |
| Line 3 | Sets a system parameter. |
| Line 4: | Calls a userexit providing some parameters. |
| Line 5: | Sets the system language for the following operations. |
| Line 6: | Sets the user language for the following operations. |
| Line 7: | Sets a default value. |
| Line 8: | Calls a userexit providing some parameters. |
The XML-Interface uses a certain XML format for the data provided. A detailed knowledge of this format is required for defining XSL mapping files for the Integration Platform!
Below is an example of an Agile EDM document record provided by the XML-Interface for following query descriptor:
XML Query Descriptor:
<data>
     <operationobject="XML-DOC" name="query">
           <where C_ID="1365015592"/>     </operation>
</data>
XML Result:
<XML-DOC _id="EDB-DOCUMENT.1365015592">
     <T_DOC_DAT.C_ID>1365015592</T_DOC_DAT.C_ID>
     <T_DOC_DAT.C_VERSION>7</T_DOC_DAT.C_VERSION>
     <T_DOC_DAT.C_UIC>38</T_DOC_DAT.C_UIC>
     <T_DOC_DAT.C_GIC>100</T_DOC_DAT.C_GIC>
     <T_DOC_DAT.C_ACC_OGW>dwr</T_DOC_DAT.C_ACC_OGW>
     <T_DOC_DAT.C_CRE_DAT>2002-07-12T10:58:12</T_DOC_DAT.C_CRE_DAT>
     <T_DOC_DAT.C_UPD_DAT>2002-07-15T04:27:24</T_DOC_DAT.C_UPD_DAT>
     <T_DOC_DAT.DOCUMENT_ID>eai-document</T_DOC_DAT.DOCUMENT_ID>
     <T_DOC_DAT.SHEET_NO>0</T_DOC_DAT.SHEET_NO>
     <T_DOC_DAT.DOC_VERSION>00</T_DOC_DAT.DOC_VERSION>
     <T_DOC_DAT.DOC_REVISION>000</T_DOC_DAT.DOC_REVISION>
     <T_DOC_DAT.DOC_NAME_ENG>german</T_DOC_DAT.DOC_NAME_ENG>
     <T_DOC_DAT.DOC_NAME_GER>english</T_DOC_DAT.DOC_NAME_GER>
     <T_DOC_DAT.DOC_NAME_FRA>french</T_DOC_DAT.DOC_NAME_FRA>
     <T_DOC_DAT.STEP_DESCR>new description</T_DOC_DAT.STEP_DESCR>
     …
</XML-DOC>
The following type conversions (of the retrieved data) are performed by the XML-Interface:
Mapping between DataView basic data types and XML data types
| Agile EDM Data Type | XML Data Type |
|---|---|
| String (S) | string |
| Money (M) | string |
| Character (C) | string |
| Float (F) | double |
| Integer (I) | integer |
| Logic (L) | Boolean ("true" / "false") |
| Date (D) | dateTime (e.g. "2000-01-31T03:23:35") |
| Binary (B) | base64Binary (not implemented yet) |
The example below includes an Agile EDM document record plus its file relationship. XML Query Descriptor:
<data>
     <operationobject="XML-DOC" name="query">
           <where C_ID="1365015592"/>
           <select>
                 <operation object="XML-DOC-FILE"/>
           </select>
     </operation>
</data>
XML Result (subset shown):
<XML-DOC _id="EDB-DOCUMENT.1365015592">
     <T_DOC_DAT.C_ID>1365015592</T_DOC_DAT.C_ID>
     <T_DOC_DAT.C_VERSION>7</T_DOC_DAT.C_VERSION>
     <T_DOC_DAT.C_UIC>38</T_DOC_DAT.C_UIC>
     <T_DOC_DAT.C_GIC>100</T_DOC_DAT.C_GIC>
     <T_DOC_DAT.C_ACC_OGW>dwr</T_DOC_DAT.C_ACC_OGW>
     <T_DOC_DAT.C_CRE_DAT>2002-07-12T10:58:12</T_DOC_DAT.C_CRE_DAT>
     <T_DOC_DAT.C_UPD_DAT>2002-07-15T04:27:24</T_DOC_DAT.C_UPD_DAT>
     <T_DOC_DAT.DOCUMENT_ID>eai-document</T_DOC_DAT.DOCUMENT_ID>
     <T_DOC_DAT.SHEET_NO>0</T_DOC_DAT.SHEET_NO>
     <T_DOC_DAT.DOC_VERSION>00</T_DOC_DAT.DOC_VERSION>
     <T_DOC_DAT.DOC_REVISION>000</T_DOC_DAT.DOC_REVISION>
     <T_DOC_DAT.DOC_NAME_ENG>german</T_DOC_DAT.DOC_NAME_ENG>
     <T_DOC_DAT.DOC_NAME_GER>english</T_DOC_DAT.DOC_NAME_GER>
     <T_DOC_DAT.DOC_NAME_FRA>french</T_DOC_DAT.DOC_NAME_FRA>
     <T_DOC_DAT.STEP_DESCR>new description</T_DOC_DAT.STEP_DESCR>
     <T_DOC_DAT.DOC_TYPE>TEXTFILE</T_DOC_DAT.DOC_TYPE>
     ...
</XML-DOC>
<XML-DOC-FILE _parent_id="EDB-DOCUMENT.1365015592" _child_id="EDB-FILE.1742809496" _id="XML-DOC-FILE.1262653930">
     <T_DOC_FIL.C_VERSION>1</T_DOC_FIL.C_VERSION>
     <T_DOC_FIL.C_UIC>38</T_DOC_FIL.C_UIC>
     <T_DOC_FIL.C_GIC>100</T_DOC_FIL.C_GIC>
     <T_DOC_FIL.C_ACC_OGW>dwr</T_DOC_FIL.C_ACC_OGW>
     <T_DOC_FIL.C_CRE_DAT>2002-07-12T06:13:50</T_DOC_FIL.C_CRE_DAT>
     <T_DOC_FIL.C_UPD_DAT>2002-07-12T06:13:50</T_DOC_FIL.C_UPD_DAT>
     <T_DOC_FIL.POS_NO>10</T_DOC_FIL.POS_NO>
     <T_FILE_DAT.STORAGE_AREA>Vault</T_FILE_DAT.STORAGE_AREA>
     <T_FILE_DAT.ORG_NAME>xsl_param.jpg</T_FILE_DAT.ORG_NAME>
     <T_FILE_DAT.OP_SYST>intel-ms-nt4.0</T_FILE_DAT.OP_SYST>
     <T_FILE_DAT.STEP_ID>FMS-0000000000001002</T_FILE_DAT.STEP_ID>
     ...
</XML-DOC-FILE>
The synchronous Agile EDM Connector provides synchronous processing of transfer requests initiated from inside Agile EDM. That means that the Agile EDM Client is "locked" until the response is coming back from the target system. It is also possible to display the data, which is coming back from the target system inside an Agile EDM mask.
In order to provide connectivity to the synchronous Agile EDM Connector, additional userexits have been developed, which can be called from LogiView procedures. Those userexits allow connecting to the Synchronous Agile EDM Connector as well as transfer request data, which should be forwarded to the target system by the connector.
Before the synchronous Agile EDM Connector can be used, several configuration steps have to be performed:
The userexits for connecting to the connector have to be made visible inside Agile EDM by installing a library file (see Enterprise Integration Platform Installation Guide for Agile e6.1.3.0).
Depending on the specific use-case, respective LogiView procedures have to be developed for calling these userexits (see below) for calling the connector. Those LogiView procedures can be called either from a menu or from a lifecycle transition.
The synchronous Agile EDM Connector has to be activated inside the configuration file eai_ini.xml (see below).
In order to provide a "synchronous communication" between Agile EDM and the Integration Platform, following components had been implemented:
The synchronous Agile EDM Connector, which is started and managed by the Integration Platform
Some userexits for connecting to the Agile EDM Connector
Some userexits and Agile EDM forms for displaying the result data
The synchronous Agile EDM Connector is started up by the Integration Platform. Some configuration parameters in the eai_ini.xml file define, whether it is activated (<active>), what port it should listen for requests (<port>) from Agile EDM, which asynchronous Agile EDM Connector it is related to (<connector>) and the location of the Business Object Repository <bor-location>
<synchronous name="plm-sync" version="2.2.0" active="true" class="com.eigner.eai.connector.plm.sync.PlmSyncConnector">
     <port>19994</port>
     <connector>plm</connector>
     <borlocation="${eai.conf}/bor_plm_sync.xml"/>
</synchronous>
The file bor_plm_sync.xml contains the Business Object Repository for the synchronous Agile EDM Connector. In general, here it is defined what should be done with the result data coming back from the target connector, e.g. displaying the data in a mask or doing nothing.
<?xml version="1.0" encoding="ISO-8859-1"?>
<bor version="2.2.0">
     <bo name="ITEM" verb="QUERY" entity1="EDB-CENTRAL" entity2="" mask="EDB-EIP-SYN-ITM-SFR" submask="" masktype="FORM"/>
     <bo name="ITEM-REVISION" verb="QUERY" entity1="EDB-CENTRAL" entity2="" mask="EDB-EIP-SYN-ITR-CFR" submask="" masktype="FORM"/>
     <bo name="BOM" verb="QUERY-SINGLE" entity1="EDB-CENTRAL" entity2="EDB-CENTRAL" mask="EDB-EIP-SYN-BOM-CFR" submask="EDB-EIP-SYN-HIE-RLI" masktype="COMBINED"/>
     <bo name="BOM" verb="QUERY-MULTI" entity1="EDB-CENTRAL" entity2="EDB-CENTRAL" mask="EDB-EIP-SYN-BOM-CFR" submask="EDB-EIP-SYN-HIE-RLI" masktype="COMBINED"/>
     <bo name="WHERE-USED" verb="QUERY" entity1="EDB-CENTRAL" entity2="" mask="EDB-EIP-SYN-WU-SLI" submask="" masktype="LIST"/>
     <bo name="DOCUMENT" verb="QUERY" entity1="EDB-CENTRAL" entity2="EDB-CENTRAL" mask="EDB-EIP-SYN-DOC-CFR" submask="EDB-EIP-SYN-FIL-RLI" masktype="COMBINED"/>
     <bo name="ECM" verb="QUERY" entity1="EDB-CENTRAL" entity2="" mask="EDB-EIP-SYN-ECM-SFR" submask="" masktype="FORM"/>
</bor>
The elements <bo … /> allow you to define, which Agile EDM forms should be used for displaying the result data of a transfer operation, e.g. ITEM/QUERY. This setup is used by the userexits inside Agile EDM (described below) in order to display the result data on the Agile EDM screen.
Details of the XML tag bo:
| Attribute | Description |
|---|---|
| name | Name of the Business Object, which this configuration should be used for. |
| verb | Name of the verb this configuration should be used for. |
| entity1 | Name of entity 1, which should be used for opening the header form (->mask). |
| entity2 | Name of entity 2, which should be used for opening the sub-list (->submask) related to the header form. |
| mask | Name of the header form, which should be used for displaying the result data. |
| submask | Name of the sub-list, which should be used for displaying the "relation" result data. This is only used for mask type COMBINED. |
| masktype | Type of mask that should be used for displaying the result data
|
The userexits are provided as shared libraries for Agile EDM. After loading the libraries, following userexits are available:
eip_sync_connect:
Connects to the Integration Platform Server.
eip_sync_disconnect:
Disconnects from the Integration Platform Server.
eip_sync_process:
Starts a transfer operation by contacting the Integration Platform Server and providing the respective information about the transfer (parameters are explained below).
eip_sync_params:
Allows providing field name / fielding value pairs for creating a record inside the transfer queue.
eip_sync_fill:
Fills the data collected by eip_sync_process into the mask (should be called in the post-action userexit).
eip_sync_release:
Releases the data collected by eip_sync_process (should be called in the post-mask userexit).
eip_sync_snapshot:
Allows creating a record in the transfer queue (by means of eip_sync_params) and then creates an XML snapshot of the data (e.g. BOM) to be transferred later.
In general, there are two ways how to generate a transfer request from PLM:
Create the request in transfer queue via a LogiView procedure and then call the USX eip_sync_process with the respective parameters. Although this seems to be the easiest way to do it, there might be problems if that LogiView procedure is called inside a database transaction, e.g. in a pre-action USX on a form. Then you need to apply the following approach:
Create a request with a combination of the userexits eip_sync_params and eip_sync_process. In this case, the transfer request in the transfer queue is created by the synchronous Agile EDM Connector (i.e. outside the database transaction of the current PLM Server Process) and then transferred to the target connector.
These userexits could be used from LogiView as shown below. In the delivery, this is called by the LogiView Procedure EP_REPLICATION/ RPL_CreateSyncRequest.
10         RES = @eip_sync_connect()
20         RES = #eip_sync_process(RPL_STRING, RPL_SYNC_TYPE, RPL_SYNC_RESULT)
30         RES = @eip_sync_disconnect()
The LogiView variables in line 20 above have following meaning:
RPL_STRING:            Transfer ID of record in Transfer Queue
RPL_SYNC_TYPE:         Type of result (E or S)
RPL_SYNC_RESULT: Result text of the operation
The userexit eip_sync_connect might provide following return codes:
0 OK
-1000 Already connected
else Return code from ECI
The userexit eip_sync_process might provide following return codes:
0 OK
-1001 Wrong number of arguments
-1002 Argument is not a string
else: Return code from ECI (please refer to the online documentation about the ECI module)
The output variable RPL_SYNC_RESULT returns the result types E (Error) and S (Success), which can be checked for further process handling.
The userexit eip_sync_disconnect might provide following return codes:
0 OK
else Result from ECI
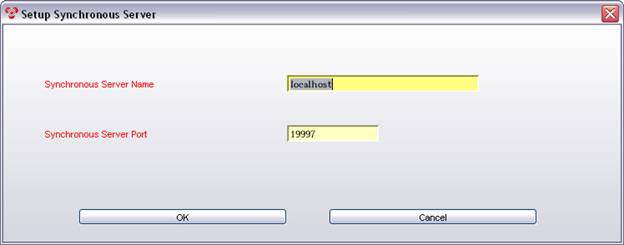
Before you can use the synchronous connection, you also need to set up the server host, where the ECI-Server is running as part of the Integration Platform. This is done by adapting the Agile EDM defaults EIP-SYNC-HOST and EIP-SYNC-PORT inside your Agile EDM environment. EIP-SYNC-HOST should contain the name or IP address of the server, where the Integration Platform is running. EIP-SYNC-PORT should contain the port number of the ECI-Server. The parameters for connecting to the synchronous server can also be set up inside Agile e6 in a setup mask (see screenshot).
The provided port number should correspond with the number, which is configured in the <port>-element of the synchronous Agile EDM Connector in the configuration file eai_ini.xml (example below):
<synchronous name="plm-sync" version="2.2.0" active="true" class="com.eigner.eai.connector.plm.sync.PlmSyncConnector">
     <port>19994</port>
     <connector>plm</connector>
     <borlocation="${eai.conf}/bor_plm_sync.xml"/>
</synchronous>
|
Note: If you want to verify if the synchronous connection is using the correct host and port, you may activate the module trace for module EER. The trace contains the used values for the connection to the synchronous Agile EDM Connector. |
As explained in the overview, it is possible to display the result data of a transfer in an Agile EDM form. The user manual shows the forms, which have been provided out-of-box as part of the SAP-Link solution.
If you want to use your own forms or reuse existing forms for displaying result data, you need to prepare those forms. This means that they need to have certain userexits assigned as Post-Action and Post-Mask Trigger. Below is an excerpt from the repository of the synchronous Agile EDM Connector. There you define, what forms should be used for displaying the result data:
<bor version="2.2.0">
     <bo name="ITEM" verb="QUERY" entity1="EDB-CENTRAL" entity2="" mask="EDB-EIP-SYN-ITM-SFR" submask="" masktype="FORM"/>
     <bo name="WHERE-USED" verb="QUERY" entity1="EDB-CENTRAL" entity2="" mask="EDB-EIP-SYN-WU-SLI" submask="" masktype="LIST"/>
     <bo name="BOM" verb="QUERY-SINGLE" entity1="EDB-CENTRAL" entity2="EDB-CENTRAL" mask="EDB-EIP-SYN-BOM-CFR" submask="EDB-EIP-SYN-HIE-RLI" masktype="COMBINED"/>
     …
</bor>
Depending on the "masktype" (FORM, LIST, COMBINED), the different masks need to have certain userexits assigned to ensure a proper filling and releasing of the mask through the synchronous Agile EDM Connector. Please use this table as a reference for your own masks.
| masktype | mask | submask |
|---|---|---|
| FORM | EDB-EIP-SYN-ITM-SFR Pre-Mask: LIST Post-Mask: eip_sync_release Post-Action: eip_sync_fill | N/A |
| LIST | EDB-EIP-SYN-WU-SLI Pre-Mask: LIST Post-Mask: eip_sync_release Post-Action: eip_sync_fill | N/A |
| COMBINED | EDB-EIP-SYN-BOM-CFR Pre-Mask: LIST Post-Mask: eip_sync_release Post-Action: eip_sync_fill | EDB-EIP-SYN-HIE-RLI Pre-Mask: LIST Post-Mask: --- Post-Action: eip_sync_fill |
Those userexits are required in order to correctly display the result data in the forms:
eip_sync_fill:
Used for filling the fields with the external data
eip_sync_release:
Used for freeing up memory after the display operation
|
Note: The pre-mask userexit should be LIST (if empty), otherwise the mask will not be displayed properly in the Java Client and the Web Client. |
An XML snapshot feature has been developed in order to store the XML data packages inside Agile EDM tables. This snapshot can be transferred by the Agile EDM Connector sometime later by changing the status of the transfer request from SNAPSHOT to INIT.
The snapshot data is stored in a BLOB field in your database. The maximum size of BLOB fields varies from database to database. Please make sure that the database you are using for Agile EDM, is configured appropriately in order to accommodate your needs for maximum size of BLOBs (snapshots). Also inside Agile EDM, additional configuration may be necessary, e.g. setting the maximum BLOB size via the default "BLOBSIZE".
It is possible to activate or deactivate the snapshot feature in the Agile EDM Connector section of the configuration file eai_ini.xml.
A sample LogiView procedure has been provided, which shows how to call the snapshot userexit parameters (EP_REPLICATION/RPL_CreateSnapshot) with the appropriate parameters. Please adapt this to your needs, before it can be called from a menu.
Following steps describe how the snapshot feature can be used:
The LGV CreateSnapshot gets called which write a new transfer request into the transfer queue with the status SNAPSHOT
The LGV calls the Synchronous PLM-Connector (eip_sync_snapshot userexit) to generate the XML Snapshot
The generated XML is stored in a BLOB field in the table T_EIP_SNAPSHT by the Agile EDM Connector
Ÿ The LGV changes the status of the Transfer Queue entry from SNAPSHOT to INIT, which activates the Agile EDM Connector to transfer the data to the EIP controller.
The snapshots are stored in the Agile EDM database inside the table T_EIP_SNAPSHT in the field XML_SNAPSHOT. If you want to export the XML Snapshots in an external file, you can use the DataView userexit cch_get_blb for exporting the data into a file and cch_sel_blb for deleting the data from the BLOB field:
Examples:
For exporting the snapshot, execute the following LGV statement on the selected record: RES = @cch_get_blb("T_EIP_SNAPSHT.XML_SNAPSHOT c:\temp\snapshot.xml C")
For removing the snapshot, execute the following LGV statement on the selected relation record: RES = @cch_sel_blb("T_EIP_SNAPSHT.XML_SNAPSHOT <CLEAR>")
The loopback mode allows running operations through the Synchronous Agile EDM Connector in the context of the user who issues the operators in the client application (Java Client, and Web Client). The supported operations are triggered via the userexits eip_sync_process and eip_sync_snapshot.
This mode was introduced to allow proper processing when an operation needs to be run inside an open transaction (e.g. a status change), where changes in the data must be visible to the operation. This is usually not possible as the PlmSyncConnector runs with its own user.
|
Note: It is highly recommended to not transmit data into another system within an open transaction as this could cause unwanted side effects. When using status changes to trigger the transfer, an intermediate status steps should be introduced before the actual release step. |
In loopback mode, the PlmSyncConnector does not have an attached Agile EDM Connector, as it gets its user credentials from the client application. Therefore, it needs to have all the Agile EDM Connector's configuration values besides host, socket, env, user and password, where only snapshot (if used) and bor are required. In addition, the configuration for loopback is required. It is also recommended to have a separate BOR definition file.
Example:
<synchronous name="plm-sync-loopback" version="2.2.1" active="true" class="com.eigner.eai.connector.plm.sync.PlmSyncConnector">
            <port>19997</port>
            <loopback retries="5" delay="100" initial="0"/>
            <snapshot active="true"/>
<bor location="${eai.conf}/bor_plm_loopback.xml"/>
</synchronous>
The loopback mode could be enabled (and disabled) by calling the userexit eip_sync_enable-loopback for any subsequent call of the userexits eip_sync_process, or eip_sync_snapshot. Enabling the loopback mode is only affecting the behavior of these two userexits and does not have an effect on the EIP's behavior. In the EIP configuration, the loopback mode for a PlmSyncConnector is a static configuration and could not be switched on or off during runtime. The enablement of the loopback mode could be either done per user (at initialization of the user's process) or before each call to either eip_sync_process or eip_sync_snapshot.
It is recommended to copy the existing LogiView procedure EP_REPLICATION/RPL_CreateSyncRequest, e.g. to RPL_CreateLoopbackRequest.
The call to enable to loopback mode needs to be inserted before the call to eip_sync_process, and the call to disable loopback right after the error handling code:
165                        RES = #eip_sync_enable_loopback(RPL_STRING, RPL_STRING)
170                        RES = #eip_sync_process(RPL_STRING, RPL_SYNC_TYPE, RPL_SYNC_RESULT)
…              …
255                        RES = #eip_sync_disable_loopback(RPL_STRING, RPL_STRING)
Then modify the selection that should trigger the operation on loopback mode to call:
EP_REPLICATION/RPL_CreateLoopbackRequest(EAI, ,11,1,UPDATE,ITEM,4711,INIT,Para,y)
515 RES = #eip_sync_enable_loopback(RPL_FLD_NAME, RPL_FLD_VALUE)
It is recommended to copy the existing LogiView procedure EP_REPLICATION/RPL_CreateSnapshot, e.g. to RPL_CreateLoopbackSnaphot.
The call to enable to loopback mode needs to be inserted before the call to eip_sync_snapshot, and the call to disable loopback right after the error handling code:
510               RPL_SYNC_CODE = ""
520                        RES = #eip_sync_snapshot(RPL_NUM, RPL_SYNC_TYPE,                              RPL_SYNC_CODE, RPL_SYNC_RESULT)
…              …
665              RES = #eip_sync_disable_loopback(RPL_FLD_NAME, RPL_FLD_VALUE)
Then modify the selection that should trigger the operation on loopback mode to call:
EP_REPLICATION/RPL_CreateLoopbackSnapshot(EAI, ,11,1,UPDATE,ITEM,4711,INIT,Para,y)
The Transfer Queue is a container for all replication requests, which should be transferred by the Enterprise Integration Platform. It provides a link to the data record (Data Object) via the C_ID of this record. Status information is provided in order to see whether the queue entry had already been processed.

Following fields in the transfer queue are relevant for the export of requests:
| Field name | Description |
|---|---|
| Transfer- ID: | ID of this Transfer Entry. Multiple entries can share the same ID as long as they have different sequence numbers. |
| Sequence: | Sequence of this Transfer Entry. This information is only useful if multiple entries have the same transfer ID. The sequence number defines the order how they will be processed inside one transaction (transfer ID) by the Enterprise Integration Platform. |
| BO Verb Ref: | The Business Object (BO) Verb Reference is the operation (e.g. CREATE, UPDATE, QUERY, DELETE), which should be performed in the target system. This BO Verb must match the settings inside the configuration file of the Agile EDM Connector of the Enterprise Integration Platform. |
| BO ID Ref: | The Business Object (BO) Reference is the name of the Business Object (e.g. ITEM, DOCUMENT, and ECO), which will be exported. This BO name must match the settings inside the configuration file of the Agile EDM Connector of the Enterprise Integration Platform. |
| DO Ref: | The Data Object (DO) Reference refers to the internal C_ID of the data record, which should be transferred, e.g. T_MASTER_DAT.C_ID. In case the relations need to be exported (like Bill of Materials or Item-Document Link), it refers to the C_ID of the parent record. |
| Version: | This is the version of the data record in its respective table, e.g. T_MASTER_DAT. This value is taken over from the C_VERSION field, e.g. T_MASTER_DAT.C_VERSION. Note: This field is currently not used by the Enterprise Integration Platform! |
| Site: | This field contains the 3-letter ID of the target site. The Enterprise Integration Platform automatically gets the respective site name from the site table when reading the queue entry and adds it as a target to the Transfer XML Data Object (XDO).
Note: Please refer to the documentation about the XDOs for further information. |
| Preliminary Flag: | Defines whether preliminary records should be included when exporting data or not. |
| Context: | Context, which should be set before retrieving the transfer data as defined in the transfer queue, e.g. BID. |
| Production Date: | Production Date, which should be set if the version view "Production" has been set and before retrieving the transfer data as defined in the transfer queue, e.g. BID. |
| Version View (read only): | Shows the description of the version view which is set in the next field. |
| Version View: | Version view which should be set before retrieving the transfer data as defined in the transfer queue, e.g. 2 -> Development. |
| ID: | Connector ID which needs to be configured for a specific Agile EDM Connector for retrieving this entry from the transfer queue. Please see the section about the Agile EDM Connector. |
| Status: | This shows the status of the queue entry. Possible values are:
SNAPSHOT: a data snapshot was generated and stored in PLM (see XML Snapshot Feature) INIT - new entry in the queue; entries in transfer queue will only be processed by the Agile EDM Connector when this status is set! READ - already read by the Enterprise Integration Platform SENT: data was sent to the Integration Platform ERROR - error when reading the entry, e.g. because of wrong configuration of the Agile EDM Connector PROCESSED - was sent to the target system and return data was received |
| Synchronous Flag: | This flag shows whether this entry needs to be processed synchronously or asynchronously by the Enterprise Integration Platform. For further information, please refer to the usage of the Synchronous Agile EDM Connector. |
| Snapshot Flag: | This flag defines whether a XML snapshot record was created for this queue entry. For further information, please refer to "Usage of the XML Snapshots". |
| Parameters: | The Parameters field allows to provide additional information to the Enterprise Integration Platform, which could be used, e.g. in the mapping engine. The values should be provided as "name=value" pairs separated by semicolons, e.g. para1=123;para2=abc;para3=xyz The Agile EDM Connector will convert them to attribute "name=value" pairs in the <params> section of the XML Message, e.g. <params para1="123" para2="abc" para3="xyz"/> |
| Userexit (USX) on Success: | This field contains the name of a callback LogiView procedure, which will be called after a successful transfer. A successful transfer is recognized, when the Status field has the value "PROCESSED" and the External Status field has the value "S" (for Success).
The name of the LogiView procedure is automatically entered in that field, when a new queue record is created. You can change the name of the LogiView USX in the LogiView procedure EP_REP_QUEUE/QueuePRA. |
| Userexit (USX) on Error: | This field contains the name of a callback LogiView procedure, which will be called after an unsuccessful transfer. An unsuccessful transfer is recognized, when the Status field has the value "PROCESSED" and the External Status field has the value "E" (for Error).
The name of the LogiView procedure is automatically entered in that field, when a new queue record is created. You can change the name of the LogiView USX in the LogiView procedure EP_REP_QUEUE/QueuePRA. |
| Log ID: | This is the ID of the transfer entry inside the Enterprise Integration Platform queue. Please refer to the documentation about the queue of the Enterprise Integration Platform to obtain more information about a queue entry. |
| External Status: | This is the status of the transfer operation from the Target System. For instance, if a Material Creation Operation could not be performed in the target ERP system, the external status E will be returned. Following statuses are possible:
"S" for Success "E" for Error Note: Please be aware that this status is used to define, which callback userexit (OnError or OnSuccess) is used! |
| External Code: | Message (Error) code that was returned from the external system. The content of the external code is peculiar to the system which is returning the message. |
| External Result: | This is the message from the target system based on the result of the transfer operation. |
| External Result Data: | XDO result data returned from the target system (stores the result data only to the maximum field size of 2000 characters!). |
| User: | This is the name of the Agile EDM user who created this replication request. |
| Date: | This is the time and date in UTC, when this transfer record was created. |
Following functions are available in the No-Select Menu of the Transfer Queue (besides the standard functions like Insert or Query):
| Command | Description |
|---|---|
| Show open records only | Only shows the queue entries with status INIT |
| Show read records only | Only shows the queue entries with status READ |
| Show errors only | Only shows the queue entries with status ERROR |
| Show processed records only | Only shows the queue entries with status PROCESSED |
Following functions are available in the Select Menu of the Transfer Queue (besides the standard functions like Update or Delete):
| Command | Description |
|---|---|
| Show data record | Shows the data record (e.g. item master), which should be transferred in the standard list of the respective entity (e.g. EDB-ARTICLE). |
