| Oracle Agile Engineering Data Management Security Guide Release e6.2.0.0 E52560-02 |
|

 Previous |
 Next |
| Oracle Agile Engineering Data Management Security Guide Release e6.2.0.0 E52560-02 |
|
Previous |
Next |
|
Note: Local FMS is not working in Secure Environment. Only Web Fileservice can be used in Secure Environment. |
Before starting to setup a secure environment, make sure your standard installation works without issues.
|
Note: For information about the installation, please refer to the Server Installation Guide on Windows and UNIX for Agile e6.2.0.0, or Client Installation Guide on Windows for Agile e6.2.0.0. |
In the secure environment we will make some modifications to a standard environment. To configure the secure environment, you need a certificate from a trusted certificate authority.
In this example scenario a self signed certificate is used. The example scenario uses the Windows operating system. Self signed certificates require adding security exceptions to browsers and Java virtual machines to accept these certificates. Certificates from a trusted certificate authority do not need these security exceptions.
|
WARNING: We DO NOT recommend the use of Self Signed Certificates in production environments. |
Setup of a secure productive environment needs expertise in network security setup. The following example shows a simple setup showing the Agile e6 requirements. In productive use customers need to extended the setup with their networking security infrastructure requirements.
In Agile e6 system, it is possible to setup external access to the Agile e6 environment with the Java Client or a web browser using the Web Client. It is possible to setup the complete external communication over Internet using the HTTP/S protocol. Internal intranet communication will still be via HTTP and RPC calls.
|
Note: For Agile e6, the Java Client is the main client. |
This section describes how to setup a secure environment for this use case.
Secure external communication means the communication in the internet from a Java and Web Client over the internet to a server in the DMZ which acts as the End Point for the Java and Web Client. In case of Agile e6, the End Point is Apache HTTPD, configured as a reverse proxy in the DMZ.
A certificate needs to be installed for Apache in the DMZ in this scenario.
Secure internal communication is only possible by enabling PLM-API for the Java Client like for the external secure communication; otherwise the communication from the Java Client to the EDM Server process is not secure.
Using the Web Client with HTTP/S and Web Fileservice with HTTP/S protocol is also secure.
The communication between the servers in the "secured" LAN is unencrypted. Customers need to take care that network traffic in this area cannot be read by unauthorized persons.
Following graphic illustrates an example communication.

As shown in the graphic above, the external Java and Web Client connect to the Proxy Server over HTTP/S. The internal Java and Web Client connect directly to the Oracle WebLogic server.
The proxy server is configured to pass the incoming requests from the internet to the end points on the Oracle WebLogic Server in the intranet.
The end points in the intranet are:
PLM-API for Java Client HTTP support
Java Client WebStart for Java Client download
Web Presentation Service for the Web Client
Web Fileservice for file transfer over HTTP
AutoVue proxy for AutoVue HTTP support
AutoVue viewer deployment for Applet download
Core Web Service for business communication
Streaming File Services for file transfer over Web Services
For this scenario, you have to adapt the Java Client to use HTTP/S protocol and configure the proxy server to pass the incoming requests and accept HTTP/S connections.
|
Note: Setting up the firewalls or other DMZ infrastructure is not part of this document. |
This document describes only the minimal Apache configuration needed, which is not sufficient for securing production environments. Refer to the Apache HTTP Server Version 2.4 Documentation at http://httpd.apache.org/docs/2.4/
This scenario is based on Apache HTTP Server (HTTPD) 2.4.x.
The next steps require an installed Apache, which does not need to be fully configured.
|
Note: On Windows it is not recommended to install the Apache HTTPD Server below "C:\Program Files" or "C:\Program Files (x86)" because these directories require special permissions to write files by the HTTPD server. We use C:\App\Apache24 for this description. |
Replace the following tokens with the values in the following configuration examples.
| Token | Description |
|---|---|
| <proxy_server> | The hostname of the Apache HTTPD server |
| <wl_server> | The hostname of the Oracle WebLogic server |
| <view_proxy> | The hostname of the Oracle AutoVue server |
For the Modules, enable or add the following lines:
LoadModule proxy_module modules/mod_proxy.so
LoadModule proxy_connect_module modules/mod_proxy_connect.so
LoadModule proxy_http_module modules/mod_proxy_http.so
LoadModule substitute_module modules/mod_substitue.so
LoadModule ssl_module modules/mod_ssl.so
For the Reverse Proxy, add a new section:
<IfModule proxy_module>
   ProxyRequests Off
   SSLProxyEngine On
   # JNLP
   <Proxy "*.jnlp">
      SetOutputFilter SUBSTITUTE
      Substitute s#https://<wl_server>:7104/Jacc#https://<proxy_server>/Jacc#i
      Substitute s#https://<wl_server>:7104/JVue#https://<proxy_server>/JVue#i
   </Proxy>
   # Proxies
   ProxyPass /autovueproxy https://<view_proxy>:8443/VueServlet/servlet/VueServlet
   ProxyPassReverse /autovueproxy https://<view_ proxy>:8443/VueServlet/servlet/VueServlet
   ProxyPass /JVue https://<view_proxy>:7104/JVue
   ProxyPassReverse /JVue https://<view_proxy>:7104/JVue
   ProxyPass /plmapi https://<wl_server>:7104/plm-api-axis/services
   ProxyPassReverse /plmapi https://<wl_server>:7104/plm-api-axis/services
   ProxyPass /Jacc https://<wl_server>:7104/Jacc
   ProxyPassReverse /Jacc https://<wl_server>:7104/Jacc
   ProxyPass /FileService https://<wl_server>:7104/FileService
   ProxyPassReverse /FileService https://<wl_server>:7104/FileService
   ProxyPass /AgilePlmWps https://<wl_server>:7104/AgilePlmWps
   ProxyPassReverse /AgilePlmWps https://<wl_server>:7104/AgilePlmWps
   ProxyPass /StreamingFileService https://<wl_server>:7104/StreamingFileService
   ProxyPassReverse /StreamingFileService https://<wl_server>:7104/StreamingFileService
   ProxyPass /CoreServices https://<wl_server>:7108/CoreServices
   ProxyPassReverse /CoreServices https://<wl_server>:7108/CoreServices
</IfModule>
For SSL, activate either one of the following lines:
Include conf/extra/http-sni.conf
Include conf/extra/http-ssl.conf
Modify one of the SSL configuration files which you activated in the previous step.
Add the hostname of your proxy server in the SSL configuration file to avoid getting an error while using the Java Client Webstart.
The following entries have to be added in the section <VirtualHost *:443>.
ServerName <proxy server:ssl port>
The ServerName directive sets the request scheme, hostname, and port that the server uses to identify itself.
SSLCertificateFile <full qualified filename>
This directive points to the PEM-encoded Certificate file for the server and optionally also to the corresponding RSA or DSA Private Key file for it (contained in the same file).
SSLCertificateKeyFile <full qualified filename>
This directive points to the PEM-encoded Private Key file for the server. If the Private Key is not combined with the Certificate in the SSLCertificateFile, use this additional directive to point to the file with the stand-alone Private Key.
SSLCertificateChainFile <full qualified filename>
This directive sets the optional all-in-one file where you can assemble the certificates of Certification Authorities (CA) which form the certificate chain of the server certificate. This starts with the issuing CA certificate of the server certificate and can range up to the root CA certificate. Such a file is simply the concatenation of the various PEM-encoded CA Certificate files, usually in certificate chain order.
|
Note: For more information about SSL please refer to the Apache mod_ssl documentation. |
The reverse proxy is accessible and the default Apache website appears:
https://<proxy_server>
Following links must be accessible without error:
https://<proxy_server>/FileService
https://<proxy_server>/plmapi
https://<proxy_server>/Jacc
https://<proxy_server>/AgilePlmWps
Following links must be accessible without error if you use AutoVue:
https://<proxy_server>/autovueproxy
https://<proxy_server>/
https://<proxy_server>/JVue/jvue.jar
https://<proxy_server>/autovuewrapper/agile-jvue-wrapper.jar
Following links must be accessible without error if you use Web Services:
https://<proxy_server>/CoreServices/BusinessObjectService?WSDL
https://<proxy_server>/StreamingFileService/DocumentFileService?WSDL
The demonstration digital certificates, private keys, and trusted CA certificates should be used in a development environment only. They should NOT be used in a production environment.
They are provided by default during WebLogic installation/domain setup.
For a production environment follow the steps in the WebLogic documentation to use non-demonstration digital certificates, private keys, and trusted CA certificates instead.
|
Note: A demonstration certificate of the WebLogic server will not be accepted by the Apache HTTPD reverse proxy. This will usually result in the proxy error "Error during SSL Handshake with remote server" while accessing the WebLogic server over the proxy server. |
To enable HTTP/S support in the Java Client, you have to activate/change the HTTP/S support setting.
Download Java Client WebStart.
Open https://<proxy_server>/Jacc and select the download link.
After the download of the application, a warning appears that the digital signature of the application cannot be verified. If you trust the publisher, select "Always trust content of this publisher", and run the application.
The Java Client starts.
Open the Java Client Preferences mask.
Enable the HTTP/S support and change/add the Server URL and Service name.
For external clients to:
Server URL: https://<fully qualified proxy_server name>
Service name: plmapi
For internal clients to:
Server URL: https://<fully qualified wl_server name>:<SSL port>
Service name: plm-api-axis/services
The following screen shows an example configuration for an external client:

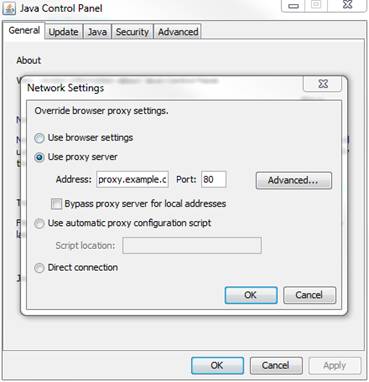
By default, the Java Client uses the proxy configuration of your Java environment. This is configured on the client side in the Java Control Panel.
To configure the proxy settings:
Open MS Windows Control Panel.
Execute Java.
The Java Control Panel opens.
In the General tab, open the Network Settings….
|
Note: Depending on your proxy configuration, one of the proxy settings has to be selected. |
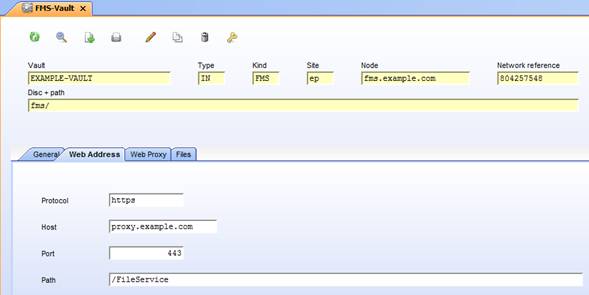
To enable HTTP/S support for the Web Fileservice, the web address in the vault configuration has to be changed.
|
Note: As you can see in the following screenshot, you can only define one web address per vault. This means the web address is the same for internal and external Java/Web Client. If you want to use this vault for internal and external Java/Web Clients, the <proxy_server> must be reached under his name from external and also from internal. |
Start the Agile e6 Java Client with a manager user
Select Manager > File Management > Vaults.
Protocol: https
Host: <proxy server>
Port: 443
Path: /FileService
The following screenshot shows the configuration:
General setup of AutoVue is described in the "AutoVue Integration Installation and Administration Guide for Agile e6.2.0.0".
|
Note: SSL has to be activated for the servlet container of the AutoVue deployment. |
|
Note: Perform these steps only if you are using AutoVue. |
Setup the AutoVue tunneling servlet that it can be accessed via HTTP/S.
For example, tomcat is configured with HTTP/S.
Start an Agile e6 Java Client with a manager user.
Select System > AutoVue > Configuration.
To enable secure communication, the following values must be changed:
EDB-PVM-AV-PROXY:
Value (for example): https://<proxy_server>/autovueproxy
Description: The URL where the AutoVue tunneling servlet can be accessed via HTTP/S.
EDB-PVM-AV-USE-PROXY:
Value: true
Description: Default is set to TRUE to use HTTP/S communication.
EDB-PVM-AV-DMS:
Value (for example): https://<weblogic_server>:<weblogic port>/VueLink/Vuelink
Description: The Oracle Agile DMS servlet address, where the AutoVue server can access the DMS servlet.
No configuration changes have to be done if you want to use the Web Client with HTTP/S.
|
Note: Only use the HTTP/S protocol and port in your browser. |
In the dump, the Web Fileservice adaptations also have to be done (see above) to use file checkin/out in the Web Client with HTTP/S. Proxy configuration will be used from the browser.
Obtain the appropriate certificate for your organization. This must be placed within your installation, and referenced from the file server_web.xml.
In the following you can find an example of the SSL section in the server_web.xml file.
Change the value of the "keystore" parameter to match the location of the certificate.
<Connector className="org.apache.tomcat.service.PoolTcpConnector">
     <Parameter name="handler"
         value="org.apache.tomcat.service.http.HttpConnectionHandler"/>
     <Parameter name="port"
         value="8443"/>
     <Parameter name="socketFactory"
         value="org.apache.tomcat.net.SSLSocketFactory" />
     <Parameter name="keystore"
         value="[example: c:/<Agile_root>/tomcat/conf/keystore]" />
     <Parameter name="keypass" value="password"/>
 </Connector>
If users do not use the Web Client, we recommend to deactivate the Web Client.
To deactivate, follow these steps:
Open the WebLogic installation console.
Login with your WebLogic administrator user.
Open the Deployments.
Select the WebPresentationService.
Click Stop.
This opens a selection menu. We recommend to use one of the following two options:
When work completes
Force Stop Now
The attribute Report_Service_URL has to be changed in all application configuration files in <ep_root>/init/<application>.xml.
Search the following text:
<PLMPresentationServices Report_Service_URL="…"/>
Adapt the Report_Service_URL to:
https://<proxy_server>/AgilePlmWps/reporter/report
If you change this line, the change is valid for the complete application. An internal client will also use this URL.
The workflow mailing and the server side external mailing provide SSL and authentication for mailing.
In the file ABS_<application>.ini, these configuration parameters can be found:
| Configuration Parameter | Description |
|---|---|
| PORT= | Standard SMTP (mail server) port for SSL = 587, without SSL = 25 |
| ConnectTimeOut=60 | Value in seconds; default 1 minute=60 seconds |
| useSSL=false | SSL can be used without additional authentication. If this entry is deleted, the default is true. |
| useAuthentication=false | If this entry is deleted, the default is true. This means active SSL is used and SMTPUserName and SMTPPassword must be set! |
| SMTPUserName= | The user name, account name of the SMTP account.
Note: Always use<account-name>@<domain-name> |
| SMTPPassword= | Password encrypted with epkeytool)
Note: Unencrypted passwords are never accepted, even if authentication is switched off! |
|
Note: These configuration parameters can be filled during installation, but can be changed afterwards. To make changes active, please redeploy the business service. |
|
Note: Empty password is possible as long as authentication is off. |
