Manage SSH
The appliance ships with a Secure Shell (SSH) server that you can use to securely transfer files to and from the appliance. You can configure the SSH server by clicking the SSH Server
link. This page includes links to various options, such as Networking
, Authentication, and Access Control.
SSH is a protocol for securely logging into and transferring files to and from a UNIX system over a network. All SSH traffic is encrypted so that anyone listening on the network cannot capture passwords, unlike the insecure telnet and FTP protocols. An SSH server is a daemon process that runs on a UNIX system waiting for connections. An SSH client is a program that connects to a server to start a remote login session or transfer files. Both the client and server authenticate to each other to ensure the other's identity. Client authentication is performed with a user name and password or a user name and private key, while server authentication always uses a key.
The /etc/ssh
directory contains the configuration files used by the SSH server. The primary file is sshd_config, which consists of a series of directives, one per line, which set options such as the list of denied users or the IP address to listen on. This directory also contains the ssh_config
file, which sets options that apply to the SSH client programs (such as ssh
and scp) that run on your system. Both files are directly edited by the SSH Server
WAI module described in this topic.
Manage the SSH server
By default, the SSH server on the appliance is started at boot time. You can ensure that sshd
is enabled on the Bootup and Shutdown
page (see Start and stop services, reboot, and shut down). The SSH server enables clients to log in and transfer files immediately using the default configuration, when the server process is started. In a typical system, very little configuration is required because the defaults are suitable for a typical server.
The main SSH Server
page displays links that enable you to configure settings such as authentication or networking. The implementation and version of SSH installed is displayed at the top.
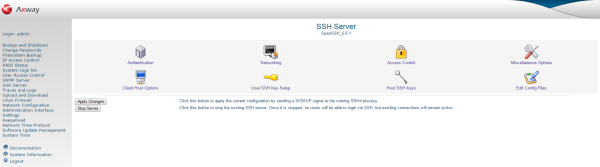
The buttons at the bottom enable you to manage the SSH server as follows:
| Apply Changes
|
Instructs the SSH server to reread its configuration file. Changes made in this module do not take effect until you click this button. |
| Stop Server
|
Stops the running SSH server. When it is stopped, no users can log in over SSH, but existing connections remain active. |
Restrict access to the SSH server
By default, any UNIX user is allowed to remotely log in to the SSH server, or to use it to upload and download files. However, this might not be appropriate for your system. For example, on a mail server system, you might wish to allow users to only log in to POP3 or FTP servers.
To configure the SSH server to restrict login access, perform the following steps:
- On the main SSH Server
page, click the Access Control
icon to specify allowed and denied users.
- To block everyone except a few users, enter a list of user names separated by spaces in the Only allow users
field. You can use the
*
and ?
wildcards (for example, foo*
allows any user whose name begins with foo). Similarly, to deny SSH access for everyone except the members of some groups, complete the Only allow members of groups
field. Users who are secondary members of any matching groups are also allowed. If both fields are completed, users specified in either are allowed.
- Alternatively, you can block only a few specific users or groups using the Deny users
and Deny members of groups
fields. Again, you can use wildcards, and if both fields are completed, users from either are denied.
- Click Saveto update the SSH server configuration file and return to the main page.
- Click the Apply Changes
button to activate the new restrictions.
|
Note
|
You can also use the /etc/hosts.allow
and /etc/hosts.denyconfiguration files to block untrusted client hosts. |
Networking settings
To configure networking settings for the SSH server, click the Networking
icon on the main SSH Server
page, and complete the following steps:
- The SSH server on the appliance accepts connections on all of its IP addresses by default. To restrict the IP address that the appliance accepts connections on, in the Listen on Address
field, select Entered Below. Select
Address
from the list, and enter the IP address in the text box.
- To use the default SSH port (
22) specified in the Listen on port
field, select the Default
option. Otherwise, select the other option, and enter the port that the SSH server should listen on when bound to this IP address.
- To change the default port that the SSH server listens on, enter the new port number in the Listen on port
field. Defaults to 22.
- Use the Accept protocols
field to configure the SSH protocol versions that the SSH server supports. Defaults to SSH v2.
- To disconnect clients that crash, set the Disconnect if client has crashed
option to Yes. This is the default.
- To configure the time the SSH server waits before the client authenticates during a login attempt, enter the time in seconds in Time to wait for login. For no restriction, select Forever
(the default).
- The SSH protocol provides support for port forwarding, which allows clients to access ports on the server's network that they could not ordinarily. Even though this is very useful for users, you might consider it a security risk because it allows anyone using SSH to effectively bypass IP address restrictions on internal servers. To disable this, change the Allow TCP forwarding
field to No.
- The Allow connection to forwarded ports
field determines if hosts other than the server are allowed to connect to ports forwarded back to the client. You can set this to No
to protect client users from attackers who misuse possibly insecure forwarded connections back into the client's network (the default).
- Click the Save
button to save your changes and return to the main page.
- Click the Apply Changes
button on the main page to activate your changes.
Authentication settings
You can configure how clients authenticate and the messages that are displayed to them after login. For example, you can permit or deny authentication by user name and password or user name and certificate, stop the root user logging in, and control if rlogin-style .rhosts
files are trusted.
To configure authentication settings, perform the following steps:
- Click the Authentication
icon on the main SSH Server
page.
- To prevent users logging in with a password, change the Allow authentication by password
field to No. This means that only certificate authentication is accepted, which restricts users who have not logged in before, and cannot create a private key.
- To allow or deny logins with an empty password (assuming this is correct for a user), change the Permit logins with empty passwords
field. For example, you can block this until users have set their passwords by some other method.
- Even though a
root login over SSH is much more secure that one over telnet (which is unencrypted), you can still prevent logins by root. The Allow login by root
field is set to No
by default. You can also select Only with RSA auth
to force root logins to use a certificate for authentication, or Only for commands
to only permit the execution of a single command instead of allowing a full interactive login.
- To stop users from using certificates to authenticate (and force use of passwords instead), select No
in the Allow RSA authentication (SSH 1)
field. You can use this to force users to enter a password every time, instead of relying on a possibly unencrypted private key to do the authentication.
- Similarly, you can also select No
in the Allow DSA authentication (SSH 2)
field.
- To stop the server strictly checking permissions on users' files in their
~/.ssh
directory, select No
in the Check permissions on key files
field. Even though turning off these checks is a bad idea from a security point of view, they can be annoying for users who have set the wrong permissions and cannot figure out why they cannot be authenticated with a certificate.
- To enable the server to display the contents of the message-of-the-day file to users after logging in, select Yes
in Display /etc/motd at login. This file usually contains information about your system or notices to users.
- If you do not trust the contents of users'
~/.ssh/known_hosts
files, select Yes
in the Ignore users' known_hosts file
field. This protects against users configuring host-based authentication with hosts other than those configured by the administrator.
- To send a message to clients before they log in, select the second option in the Pre-login message file
field, and enter the full path to a file containing the text of the message in the text box. For example, this often contains a warning about unauthorized use of the system.
- To specify a non-default file containing public keys used for user authentication, select the File under home
option in the User authorized keys file
field, and enter the full path to the file.
- If you do not trust the contents of
.rhosts
files, select Yes
in the Ignore .rhosts files
field. This is the default. These files trust the client host to have already authenticated the connecting user, and are rather insecure due to the ease with which a source IP address can be faked.
- Click the Save
button to save your changes and return to the main page.
- Click the Apply Changes
button on the main page to activate your changes.
Client hosts options
The SSH Server
module is primarily for configuring an SSH server, but it also enables you to set options that apply to all client connections made from your system using the ssh
and scp
commands. You can set options for connections to all hosts, or to a specific host. For example, you can set the port to connect to, the protocol to use, and local and remote ports to forward. The settings in this module apply to all users on your system, but can be overridden by individual users who edit their ~/.ssh/config
files. This section only describes fields that are useful on a global level.
To configure settings for connections to a specific client host, perform the following steps:
- On the main SSH Server
page, click the Client Host Options
icon. This displays a page containing one icon for each host that options have been set for. Unless you have used this page before, only the special All hosts
icon is displayed. Click this to edit options for connections to any host.
- Click the Add options for client host
link at the bottom of the page to specify a host and the options that apply to it. All fields have a Default
option, which indicates that the setting for all hosts is used instead. This enables you to define options globally, and then override them on a per-host basis.
- In Options for host
, enter the name of the host (used in the
ssh
command line) that the options apply to. You can use wildcards (for example, enter *.acme.com
to match any host in the acme.com
domain. The name must match that used by users in the ssh
and scp
command. If you enter foo
, and a user runs ssh foo.acme.com, the options do not apply, even though both names resolve to the same IP address. For this reason, you can enter the host name as foo*
to catch both possibilities.
- To enable SSH clients to connect to a different host name instead, complete the Real host name to connect to
field. This can be useful if combined with the Port to connect to
field to secretly redirect user connections to a host to a port on another address, which is a tunnel to the actual destination.
- To force clients to use a different port by default, complete the Port to connect to field. This is useful if the SSH server on a host runs on a different port from the usual 22, and you want to avoid explicitly specifying the port in every
ssh
and scp
command.
- By default, the SSH client and server compress and uncompress data sent between them, which can speed up large transfers of compressible data. However, sometimes this can slow things down or be a waste of CPU time (for example, if you are using
scp
to copy lots of GIF files, or connecting to the host over a fast network). To turn off compression, change the Compress SSH traffic
field to No
.
- Normally, the SSH client treats the
~
(tilde) character as an escape that indicates that the next character entered by the user is a ssh
command. For example, ~.
closes the connection, and ~^Z
suspends ssh. The Escape character
field enables you to use a different character by selecting the third radio button, and entering a single character in the text box. You can disable escape support by selecting None. This is useful if you are using the ssh
command to transfer binary data that may contain a tilde.
- If compression is enabled, the Compression level
menu controls the trade off between CPU utilization and the amount of bandwidth. If you select
Worst (1), very little compression is performed. If you select Best (9), a lot more CPU time is expended on reducing the amount of data transferred.
- By default, SSH clients use the privileged source port when connecting, which indicates to the server that it is a trusted program and provides correct information about the user running it. This is necessary for rlogin-style authentication, but unfortunately many networks have their firewalls configured to block connections with privileges source ports, which completely blocks SSH. To enable the clients to use a normal port instead, select No
in the Use privileged source ports
field. Unless you are using host-based authentication, this causes no harm.
- To set the SSH protocol versions that clients try when connecting to this server, choose Selected
in the Try SSH protocols
field, and select the protocols to try. The default is both.
- Click the Create
button at the bottom of the page to save the new per-host settings. These are used by all new client connections made from your system from now on.
When a set of host options is created, an icon for the host is displayed on the Client Host Options
page. You can click this icon to make changes, and click Save. To remove the host, and have connections to it revert to the default options, click Delete. You can also change the defaults that apply to all connects by clicking the All Hosts
icon, and making changes. Of course, some fields do not make sense in this context, such as Real host name to connect to
and Port to connect to, and should not be used.
Set up SSH for new users
Before UNIX users can use certificate authentication to log in to an SSH server, they must generate a private key with the ssh-keygen
command. To set up SSH for new users, perform the following steps:
- On the main SSH Server
page, click the User SSH Key Setup
icon.
- Select the Setup SSH key for new Unix users
check box, so that
ssh-keygen
is run for new accounts.
- To enable the new user's public key to be added to the list of keys that are authorized to use the account, select the Copy new identify.pub to authorized_keys
check box. If this is not selected, the user must do this manually before authentication with their new certificate is accepted.
- To set a passphrase for new users' private keys, select the Use password as key passphrase
check box. If this is left unselected, no passphrase is set (which is more user-friendly, but less secure).
- Click the Save
button to save your changes and return to the main page.
- Click the Apply Changes
button on the main page to activate your changes.
Additional options
The SSH Server
page also includes links to the following options:
| Host SSH Keys
|
Enables you to view the contents of the following host SSH key files:etc/ssh/ssh_host_key.pubetc/ssh/ssh_host_dsa_key.pubetc/ssh/ssh_host_rsa_key.pub
|
| Edit Config Files
|
Enables you to view and edit the contents of the following SSH config files:etc/ssh/sshd_configetc/ssh/ssh_config
|
| Miscellaneous Options
|
You can also set the following SSH server options (the default settings should suit most cases):- Allow X11 connection forwarding: Select whether to run X11 applications on the server and have an X11 connection tunnelled back through the SSH connection to your local display.
- X11 display offset: Enter the first display number available for X11 forwarding. This prevents the SSH daemon from interfering with X11 servers.
- Full path to xauth program: Enter the full path to
xauth
(for example, /usr/X11R6/bin/xauth). - System log facility: Select the syslog facility used to log error and information messages from the SSH server.
- Logging level: Select an SSH logging level from the drop-down list.
- Server key size: Enter an SSH server key size (for example, 2048 bits).
- Server key regeneration interval: Enter how often the SSH server regenerates the key used for encrypting connections. For more security, specify less seconds.
- PID file: Enter the location of the file that contains the process identifier of the SSH daemon (for example,
/var/run/sshd.pid). - Use separate unprivileged process: Select whether to use a separate process for additional security. This restricts the potential effects of programming errors. A bug in a separate unprivileged child process cannot compromise the system.
|