13 Working with Reports Extensibility
This chapter provides overview information about the Oracle Business Intelligence (BI) Publisher and reports extensibility for Oracle Communications Network Integrity.
This chapter contains the following sections:
About BI Publisher
Oracle BI Publisher (formerly XML Publisher) is an enterprise reporting solution to design, use, author, manage, and deliver report documents in various formats. This tool provides the following services:
-
Creating New Report
-
Uploading Existing Report
-
Organizing reports in folders
-
Viewing a report in various formats like RTF, HTTP, PDF, XLS
-
Scheduling a report for delivery to destination like Email id
-
Internationalization of report
-
Configuring various data sources like Oracle Business Intelligence Enterprise Edition (OBIEE), Web service, and database
This chapter does not describe all Oracle BI Publisher features. Customized, or more advanced reports can be created using BI Publisher. For more information about Oracle BI Publisher, see the Oracle Business Intelligence Publisher Installation documentation:
https://download.oracle.com/docs/cd/E12844_01/doc/bip.1013/e12690/toc.htm
About BI Publisher Desktop
BI Publisher Desktop is a plug-in for Microsoft Word that enables a user to create report templates and represent data from data sources. This plug-in provides various wizards to create tables, grouped tables, graphs, charts, and so on. It internally uses Microsoft Word's native features and the eXtensible Stylesheet Language (XSL) to implement these wizards.
Reports Provided with Network Integrity
Network Integrity includes the following BI Publisher reports:
Scan History Report
The Scan History Report shows the discovery and discrepancy summaries for each scan for each scan configuration falling within the specified start and end dates. This report is accompanied by the following graphs:
-
Discovery Scan History: a graph showing a history of the run discovery scans.
-
Discrepancy Scan History: a graph showing a history of the run discrepancy scans.
-
Discrepancy Severity History: a graph showing a history of the discrepancies by severity.
The following fields are used to generate this report:
-
Start Time: the date stamp indicating when a scan started.
-
End Time: the date stamp indicating when a scan finished.
Discovery Scan Summary Report
The Discovery Scan Summary Report shows the summary of the latest scan for each scan configuration, per vendor and per device type. This report generates a pie-chart, illustrating the summary findings, for each scan configuration.
The following fields are used to generate this report:
-
Vendor: the name of the vendor for the discovered device.
-
Device Type: the type of device discovered.
Device Discrepancy Detection Summary Report
The Device Discrepancy Detection Summary Report shows the summary of the latest scan for each scan configuration. This report generates a pie-chart that shows the accuracy of the latest scans for each scan configuration.
The following fields are used to generate this report:
-
Vendor: the name of the vendor for the discovered device.
-
Device Type: the type of device discovered.
Device Discrepancy Detection Detail Report
The Device Discrepancy Detection Detail Report lists details of all discrepancies for the latest scan for each scan configuration.
The following fields are used to generate this report:
-
Vendor: the name of the vendor for the discovered device.
-
Root device name: the name of the root device in the scan result tree.
-
Root device type: the type of the root device in the scan result tree.
-
Owner: the user name of the owner of the discrepancy.
-
Parent entity type: the type of the parent entity on which discrepancy occurred.
-
Parent entity name: the name of the parent entity on which discrepancy occurred.
-
Entity type: the type of the entity on which discrepancy occurred.
-
Inventory value: the value of the field on the inventory side on which discrepancy occurred.
-
Network value: the value of the field on the network side on which discrepancy occurred.
-
Severity: the severity of the discrepancy (for example, major, critical, minor, warning).
-
Discrepancy type: the type discrepancy (for example, entity+, entity-, attribute).
-
Description: the description of the discrepancy.
-
Status: the status of the discrepancy (for example, processed, failed, ignored).
-
Scan name: the name of the scan in which the discrepancy is found.
Discrepancy Corrective Action Report
The Discrepancy Corrective Action Report shows corrective actions against specified discrepancies for the latest scan for each scan configuration. Discrepancies that have not been actioned are not considered in this report.
The following fields are used to generate this report:
-
Submitted By: the user who submitted the discrepancy for correction.
-
Action: the action taken against the discrepancy.
-
Discrepancy Status: Status of the discrepancy.
-
Owner: the user name of the owner of the discrepancy.
-
Priority: the priority of the discrepancy.
-
Failure Reason: the reason for failure for the corrected discrepancy.
-
Discrepancy Type: the type discrepancy (for example, entity+, entity-, attribute)
-
Entity Type: the type of the entity on which discrepancy occurred.
-
Inventory Value: the value of the field on the inventory side on which discrepancy occurred.
-
Network Value: the value of the field on the network side on which discrepancy occurred.
Network Integrity Report Building Blocks
Network Integrity uses BI Publisher to generate reports. These reports use Rich Text Format (RTF) templates and a report Definition Extensible Markup Language (XML) file (.xdo) that tracks the various data sources, parameters, values, rendering options, and report properties that BI publisher uses to populate the RTF reports.
RTF Templates
The RTF template defines the layout and display for report data. The BI Publisher server uses the templates to format the data from various data sources. These formats include tables, charts, graphs, and so on.
A user can use general word processing features and BI Publisher's simplified tags for XSL expressions. The template parser inside the server processes the RTF document and converts it to XLS formatting objects (XSL-FO), useful for rendering the final formatted report in PDF, RTF, or HTML formats.
Report Definition Files
The reports Definition file (.xdo) contains all the configurations pertaining to a report and all the layout definitions that refer to the various templates used by the report.
Data Source Query Tools
The data source tools use various protocols such as SQL, Web service, and XML files that can get data from data sources for use in a report. Network Integrity typically uses SQL queries pertaining to Network Integrity schemas and retrieves query results from a Network Integrity database through Java database connectivity (JDBC).
See Network Integrity Information Model Reference for more information about how entities and parameters relate to the Network Integrity database.
Parameters
Parameters capture values at run-time and use these values to filter or manipulate data. Parameter definitions includes data type, default value, parameter type, display label, and list of values.
List of Values
The Menu parameter type uses the list of values definitions that BI Publisher render as a dropdown in a report. The dropdown menu is populated with values defined in the list of values. This definition can be a pre-defined hard coded list or it can be the result of an SQL query.
Rendering Options
You can render reports using formats like PDF, RTF, HTML, EXCEL, and so on. You can choose the render option for the reports they create.
Report Properties
The following list provides details on various report property functions:
-
Run report online: Enable this property to view a report online. You can only schedule and view reports in history after BI Publisher runs the scheduled report.
-
Show Controls: Enable this property to see the parameters and other View report screen controls like View, Send, Schedule, Analyzer, and so on.
-
Show Report Links: Enable this property to see a link menu in the view report screen that contains different menu items that provide HTTP links for a report. You can bookmark these links.
-
Auto Run: Enable this property to cause a report to run automatically when a user attempts to view it. If this property is not enabled, the user must click View in the view screen of the report.
-
Enable document cache: Enable this property to provide a cache in the report document. This property is appropriate for reports that connect to live databases that are frequently updated.
Developing BI Publisher Reports
This section explains how to develop a custom report by creating an example report called Discrepancy Severity History Report.
Report Requirements
The Discrepancy Severity History Report requires the following
-
Display the following fields:
-
Scan Name
-
Discrepancy Scan Start & End time
-
Counts of Critical, Major, Minor, Warning discrepancy types
-
-
Filter on discrepancy start date.
-
Group data by scan name.
-
Create a bar chart for all discrepancy severity types.
Knowledge of the Network Integrity data model is necessary to write the SQL queries needed for the Discrepancy Severity History Report (see Network Integrity Models). This information is provided in the following sections.
Configuring a Data Source Tutorial
The following steps provide a tutorial for configuring a data source:
-
Log on to BI Publisher as an Administrator.
-
Click the Admin tab.
-
Click JDBC Connection under the Data Sources section
-
Click demo to edit the connection details for this data source.
-
In the Update Data Source screen, enter the following details:
-
For Connection String, enter:
jdbc:oracle:thin:@Host_name:Port:SID
For example, a sample connection string may look like jdbc:oracle:thin:@myhost:1521:orcl
-
For the User Name, enter:
oe
-
For the Password, enter:
oe
-
For the Database Driver Class enter the default:
oracle.jdbc.driver.OracleDriver
-
-
Click Test Connection.
-
Click Apply to save the connection details after confirmation that the connection is successfully established.
Creating a Report Tutorial
The following steps provide a tutorial for creating a report:
-
Log on to BI Publisher as an Administrator.
-
Click the Reports tab.
-
Click the MyFolders link.
-
Click Create a new folder link in the Folder and Report Tasks tab.
-
Enter the following folder name:
Test
-
Click Create to create the folder.
-
Click the new Test folder.
-
Click Create a new Report.
-
Enter the following report name:
Discrepancy Severity History Report
-
Click Create to create the report.
-
Click Edit link below the report name.
-
Select Parameter.
-
Click New button.
-
Enter the following values to create a parameter called p_StartDate.
-
For Identifier, enter:
p_StartDate@
-
For the Parameter Type, select Date.
-
For the Display Label, enter:
Discrepancy Begin Date Range Start
-
For the Date Format String enter:
MM-dd-yyyy
-
-
Repeat steps 12 to 14 to create a parameter called p_EndDate. Label the Identifier as p_EndDate and the Display Label as Discrepancy Start Date Range End.
-
Select Data Model.
-
Click New.
-
Enter the following values to create a data set called MyDataSet.
-
For Name enter:
MyDataSet
-
For Type, select SQL Query.
-
For Data Source select demo from the dropdown menu.
-
For the SQL Query text box enter the following SQL query as required by the Network Integrity model to display the field described in "Report Requirements":
select  dc1.NAME as SCANCONFIGNAME,
        case when dsr.DISCREPDETECTBEGINTIME is null then null else to_char(dsr.DISCREPDETECTBEGINTIME,'YYYY-MM-DD HH12:MI:SS TZR AM') end STARTTIME,
          nvl(to_char(dsr.DISCREPDETECTENDTIME, 'YYYY-MM-DD HH12:MI:SS TZR AM'),' ') as DISCREPDETECTENDTIME,
CASE WHEN DISCREPDETECTBEGINTIME IS NULL THEN NULL ELSE nvl(ddc.NUMBERCRITICAL,0) END C,
        CASE WHEN DISCREPDETECTBEGINTIME IS NULL THEN NULL ELSE nvl(ddc.NUMBERMAJOR,0) END M,
        CASE WHEN DISCREPDETECTBEGINTIME IS NULL THEN NULL ELSE nvl(ddc.NUMBERMINOR,0) END mi,
        CASE WHEN DISCREPDETECTBEGINTIME IS NULL THEN NULL ELSE nvl(ddc.NUMBERWARNING,0) END w,

from
        DISCONFIG dc left outer join DISCONFIG dc1 on dc.scanconfig= dc1.entityid
        left outer join DISSCANRUN dsr on dc.ENTITYID=dsr.CONFIG
        left outer join DISDISCREPANCYCOUNTS ddc on dsr.DISCREPANCYCOUNTS=ddc.ENTITYID

where
dc.scanconfig is not null and
(:p_StartDate is null or trunc(dsr.DISCREPDETECTBEGINTIME, 'DDD') >= :p_StartDate) and
(:p_EndDate is null or trunc(dsr.DISCREPDETECTBEGINTIME, 'DDD') <= :p_EndDate)
-
-
Save the data set. The XML source data can now be viewed in a report.
Building an RTF Template Tutorial
The following steps provide a tutorial for building an RTF template:
-
Using Microsoft Word, create an RTFF file called DiscrepancySeverityHistory.rtf.
-
Open the Microsoft Word file.
-
From the AddIns menu, select BI Publisher.
-
Log on to BI Publisher as an Administrator. The Login Wizard immediately opens to a screen showing the DiscrepancySeverityHistory.rtf report selected.
-
Click the Open Report button.
-
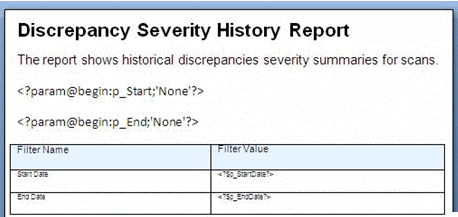
Enter the following text as the title of the report (see Figure 13-1):
Discrepancy Severity History Report
-
Enter the following text as a description of the report (see Figure 13-1):
The report shows historical discrepancies severity summaries for scans.
-
Enter the following code in the field after the description (see Figure 13-1). This code is a declaration of the parameter strings already defined in "Creating a Report Tutorial":
<?param@begin:p_Start;'None'?>
<?param@begin:p_End;'None'?>
-
Below the declaration, insert a table with two columns (see Figure 13-1).
-
Enter the table column titles as FilterName and FilterValue and enter StartDate and EndDate in first column of both the rows (see Figure 13-1).
-
Insert the following code into the second and third rows of the second column respectively (see Figure 13-1).
<?$p_Start?>
<?$p_End?>
-
Select Oracle BI Publisher then Insert then Table wizard.
-
Select the Table option.
-
Click Next.
-
Select the data set that you defined in "Creating a Report Tutorial".
-
Select the field to display on the report and arrange them in an appropriate order.
-
Click Next.
-
Select Scanconfigname from the Group By dropdown menu and to be grouped by horizontally.
-
Click Next.
-
Select any field from the Sort By dropdown menus. This step is optional.
-
Label each field as required.
-
Click Finish.
-
Place the cursor below the table within the groupby clause.
-
Select Oracle BI Publisher then Insert then Chart.
-
From the Data explorer tab, drag the STARTTIME field into the text box adjacent to Labels.
-
Drag the C, M, Mi, W fields into the text boxes adjacent to Values.
-
From the Type dropdown menu, select Line Graph.
-
From the Style dropdown menu, select Confetti.
-
Select the Group Data check mark.
-
Select the Chart is inside group check mark.
-
Change the items as required in the Properties list. The values are True or False.
-
Click OK to insert the chart into the Microsoft Word document.
-
Select Oracle BI Publisher menu then Upload Template As to upload the template to the BI Publisher server.
-
Enter a name for the new template, for example, SevHistoryReportTemplate.
-
Click OK.
-
Navigate to the BI Publisher server where the template is now located.
-
Click View to see the reports.
Using Microsoft Word Native Features and XSL
RTF templates can use standard word processing features of Microsoft Word like tables, formatting, styles, and so on. The BI Publisher Desktop plug-in also provides additional wizards for use in Microsoft Word. These wizards internally generate XSL equivalent code which is interpreted by BI Publisher server while rendering the template.
Using BI Publisher Features
Oracle BI Publisher provides the following important features:
Scheduling Reports
To schedule reports, use the following tasks:
Enabling BI Publisher Scheduler Tutorial
BI Publisher requires a database to create a scheduling schema and a database user to use the scheduling schema.
To create an database user for scheduler schema and grant required permissions to that user, use the following steps:
-
Use the following SQL example to create a database user:
SQL> CREATE USER bipubsched
   2  IDENTIFIED BY welcome
   3  DEFAULT TABLESPACE USERS
   4  TEMPORARY TABLESPACE TEMP
   5  QUOTA 20G ON USERS
   6  QUOTA 1M ON TEMP;

User created.

 SQL> GRANT CREATE SESSION TO bipuser; -- or "GRANT CONNECT TO bipuser;"

 Grant succeeded.

 SQL> grant create table to bipublisher;

 Grant succeeded.
-
Log on to BI Publisher as an Administrator.
-
Select Admin.
-
Under System Maintenance, select Scheduler Configuration.
-
Enter the following values:
-
For Database Connection Type dropdown menu, select jdbc.
-
For Database Type dropdown menu, select Oracle 10g.
-
For Connection String, enter jdbc:oracle:thin:@10.177.219.0:1521:ORCL.
-
For Username, enter bipudsched.
-
Enter a Password.
-
For Database Driver Class, enter oracle.jdbc.OracleDriver.
-
-
Click Text Connections to verify if the connection is successful.
-
If the connection was successful, click Install Schema to install the schema in the database.
-
Restart BI Publisher to apply the change. You can schedule reports after the server restarts.
Using BI Publisher to Schedule Reports Tutorial
To schedule reports, use the follow procedure:
-
In BI Publisher, navigate to the folder you stored your reports.
-
Click Schedule below the report you want to schedule.
-
In the Schedule Reports screen, enter values as required.
Tip:
Before you can configure Email destinations, ensure that the mail server has been configured. This can be done from the Admin tab on the main menu in the Delivery section. -
Click Submit to schedule the report. When the scheduled report has been run, the report is stored in the History.
Localizing Reports
The localization of a report is achieved by translating the templates used for that report and adding those templates to the report Definition in BI Publisher. There are two options for adding translated templates to a report Definition.
Localized Template Option
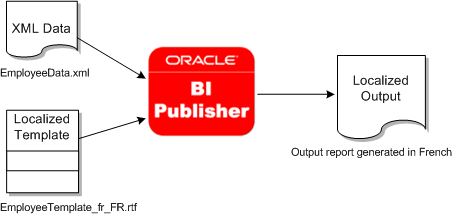
In this option, there is one RTF template for one locale supported for the report. There are n RTF templates for n locales supported. Figure 13-2 illustrated that there is an RTF template with French locale and the data is in an XML file. BI Publisher uses both and renders the report in French text.
Naming convention for the report template is TemplateName_<language code>_<TERRITORY CODE>.rtf.
This RTF template must be uploaded to BI Publisher to include this in the report Definition.
XLIFF File Option
In this option, there is one RTF template for one locale supported for the report. There are n RTF templates for n locales supported. illustrated that there is an RTF template with French locale and the data is in an XML file. BI Publisher uses both and renders the report in French text.
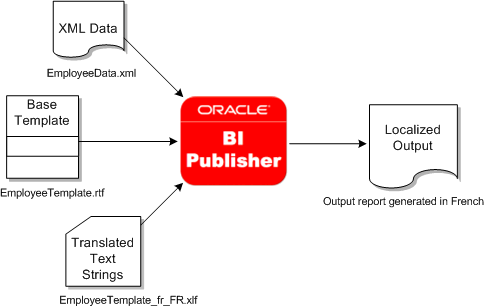
In this option, there one RTF template but n XML localization interchange file format (XLIFF) files for n locales supported. Figure 13-3 illustrates that BI Publisher receives data in XML, base template, and an XLF file with translated text strings to render the report in French text.
Naming convention for the report template is TemplateName_<language code>_<TERRITORY CODE>.rtf.
Upload all supported n XLF files and corresponding n locales to the BI Publisher report to include these into the report Definition.
Installing and Integrating BI Publisher with Network Integrity
BI Publisher can be installed as a standalone application or as a web application deployed in the same application server where the Network Integrity is deployed.
BI Publisher is partially integrated with Network Integrity which supports various BI Publisher application links in the Network Integrity Links tab. The BI Publisher application can be launched from Network Integrity using the BI Publisher link.
Installing BI Publisher in Standalone Mode
The following link provides the steps to install BI Publisher in standalone mode:
https://download.oracle.com/docs/cd/E12844_01/doc/bip.1013/e12690/T434820T487782.htm
Deploying BI Publisher
To deploy BI Publisher as an Enterprise ARchive (EAR) in a WebLogic application server where Network Integrity is running, use the following steps:
-
Download the BI Publisher zip file.
-
Unzip the zip file.
-
Navigate to the RH_Linux/Oracle_Business_Intelligence_Publisher_Standalone/manual/generic directory where the xmlpserver war and ear files are located.
-
Explode the war file to create an xmlpserver directory with all the war files present within using the following command:
jar -xvf xmlpserver.war
-
Deploy the xmlpserver folder onto WebLogic as an application.
-
Copy all the files under RH_Linux/Oracle_Business_Intelligence_Publisher_Standalone/manual/generic directory into (for example) ~/BIP or /home/<username>/BIP
-
Search the xmlp-server-config.xml file in the Network Integrity domain of WebLogic.
-
Insert the following in the file:
path="/home/<username>/BI
-
Save the file.
-
Copy font files from RH_Linux/Oracle_Business_Intelligence_Publisher_Standalone/manual//fonts and put them in JAVA_HOME/jre/lib/fonts. This is the JDK that the Network Integrity installer uses.
-
Restart the application server.
-
Launch BI publisher. For example:
http://localhost:7101/xmlpserver
-
Login as administrator.
Integrating BI Publisher with Network Integrity using WebLogic Enterprise Manager
Complete one of the following prerequisites before attempting this procedure:
To integrate BI Publisher with Network Integrity using the WebLogic Enterprise Manager, use the following steps:
-
Launch WebLogic enterprise manager. For example
http://10.177.219.11:7101/em
-
Log on to Enterprise Manager using the username and password used to log on to WebLogic Admin Console
-
Click the WebLogic Domain folder link in the left side navigation panel.
-
Expand the Weblogic Domain folder to display the domains.
-
Select the domain where the Network Integrity application is installed.
-
Select System Mbean Browser from the dropdown menu. The System Mbean Browser shows all the Mbeans deployed in WebLogic server.
-
Select the NIRegionLinksService Network Integrity Mbean to view its properties.
-
Enter BI Publisher link against any URL property (for example, URL06).
-
Enter the display string of the URL against URLName06. This link appears in the Links tab of the Network Integrity UI the next time the UI refreshes.
Integrating BI Publisher with Network Integrity using JConsole
Complete one of the following prerequisites before attempting this procedure:
To integrate BI Publisher with Network Integrity using the JConsole:
-
Use the following command to launch JConsole in Windows.
%JAVA_HOME%/bin/jconsole -J-Djava.class.path=%JAVA_HOME%\lib\jconsole.jar;%JAVA_HOME%\lib\tools.jar;%WLS_HOME%\server\lib\wljmxclient.jar -J-Djmx.remote.protocol.provider.pkgs=wlserver.management.remote
-
Use the following command to launch JConsole in Linux.
jconsole -J-Djava.class.path=$JAVA_HOME/lib/jconsole.jar:$JAVA_HOME/lib/tools.jar:$WLS_HOME/server/lib/wlserver.jar -J-Djmx.remote.protocol.provider.pkgs=wlserver.management.remote
-
In the JConsole New Connection screen, select the Remote Process option.
-
In the Remote Process text box, enter service:jmx:t3://10.147.240.137:7007/jndi/wlserver.management.mbeanservers.runtime
The host name corresponds to the IP address of the host where Network Integrity is installed.
The port number is the port on which the managed server is running. For example, 7003.
-
Enter the same username and password used for accessing the WebLogic admin console and click connect.
-
Navigate to oracle.communications.integrity then NIRegionalLinksService then oracle.comminications.integrity then Attributes. NIRegionalLinkService is the Mbean placeholder for BI Publisher link.
-
Set URL06 with the BI PublisherWebLogic URL.
-
Set URLName06 with the corresponding display title. Now the Network Integrity shows BI Publisher link that points to the BI Publisher URL in the Links tab after next page refresh.
Integrating BI Publisher with the Network Integrity Installer
Complete one of the following prerequisites before attempting this procedure:
To integrate BI Publisher with Network Integrity using the Network Integrity Installer:
-
Log on to Network Integrity.
-
Navigate to the Network Integrity Installer screen.
-
Navigate to the System Wide Shortcut links (Optional) screen.
-
Enter a name for the link to BI Publisher in the Name text box (for example, BI Publisher).
-
Enter the URL for the link to BI Publisher in the Link text box.
-
Click Next and follow the Wizard instructions.
Uploading and Exporting Reports
Oracle BI Publisher provides the following methods to upload and export reports:
Exporting a Report
To export a BI Publisher report, use the following steps:
-
Log on to BI Publisher as administrator.
-
Click the Admin tab.
-
In the System Maintenance section, click Report Repository.
-
Change the Path if required.
-
Copy the path and paste it into the Explorer Address bar, or an equivalent software.
-
Navigate to User folders.
-
Select the user name associated to the report you want to export. There are n folders for n reports in that user folder. These reports can be zipped and stored in any location for future use.
Uploading a Report
To upload a BI Publisher report, use the following steps:
-
Log on to BI Publisher as administrator.
-
Click the Reports tab.
-
Click My Folders.
-
Click Create a new folder.
-
Click Create.
-
Click the newly created folder link.
-
Click Upload a Report.
-
Save the reports downloaded from secondary memory or from location where they were stored.
-
Unzip each of the zip files into individual folders.
-
Click browse and navigate to the unzipped folder.
-
Select the file with.xdo extension.
-
Click upload button. The report is created in you folder now.
-
Click the report – ”Edit” link and click the ”Layouts” link in the left side navigation.
-
Click browse and upload all the RTF files in the unzipped folder.
-
Click Save link in the left navigation.
-
Repeat steps 10 to 15 for all additional unzipped report folders.