7 About Design Studio Extension
This chapter contains examples and explanations of how to extend certain aspects of the Oracle Communications Network Integrity Incremental TMF814 Discovery cartridge by using Oracle Communications Design Studio. See Network Integrity Developer's Guide for more information. See Network Integrity Concepts for guidelines and best practices for extending cartridges.
The following examples are explained in this section:
Initializing a Custom Object Request Broker
This example explains how you can initialize a custom object request broker (ORB) instead of using the default ORB provided by the Network Integrity Cartridge for CORBA (CORBA cartridge).
To initialize a custom ORB:
-
Open Design Studio in the Design perspective.
-
Create a Network Integrity cartridge project.
-
Make the cartridge project dependent on the CORBA cartridge project.
-
Create a discovery action that uses the CORBA Abstract Discovery action as a processor.
-
Create a discovery processor named Custom CORBA Property Initializer and add it after the CORBA Property Initializer processor.
This processor overrides org.omg.CORBA.ORBClass, org.omg.CORBA.ORBSingletonClass, and any additional parameters specific to ORB implementation from the CORBAProperties JavaBean.
-
Create a discovery processor named Custom ORB Manager to perform custom lookup.
-
(Optional) Disable NamingContextExt lookup.
When enabled, this operation may set the Naming Service Connection Flag to false, causing custom lookup to fail.
Extending the Discover Incremental TMF814 Action
This example explains how to extend the Discover Incremental TMF814 action to collect vendor-specific information. No new common object request broker architecture (CORBA) calls are required to the server because this data is already collected. In this example, managementIP of a managed element (ME) is used as the desired vendor-specific information.
-
Open Design Studio in the Design perspective.
-
Create a Network Integrity cartridge project named TMF814SampleVendorExtension.
-
Make TMF814SampleVendorExtension dependent on the Incremental TMF814 Discovery cartridge project and the TMF814_Model cartridge.
-
Create a discovery action named TMF814 Sample Vendor Extension.
-
Add the Discover TMF814 action as a processor in the TMF814 Sample Vendor Extension action.
-
Create a Physical Device specification named customTMF814MEGeneric and add all the same characteristics as tmf814MEGeneric.
-
Add the managementIP characteristic to customTMF814MEGeneric.
-
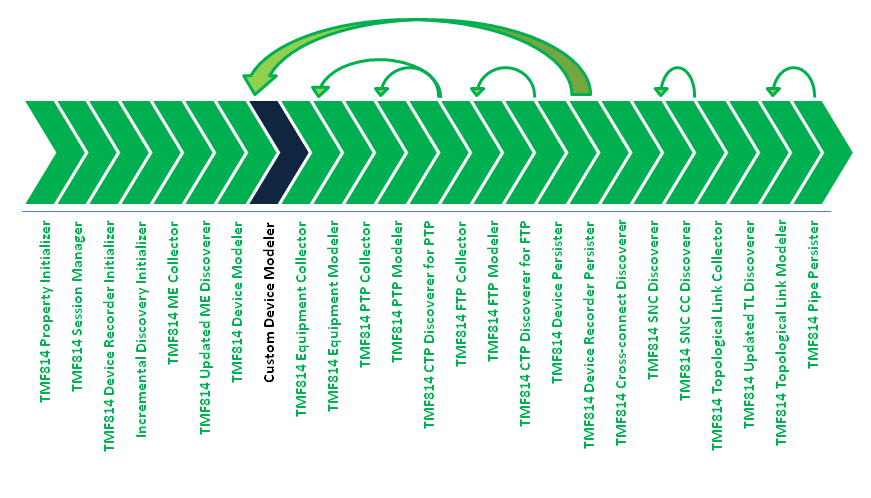
Create a new discovery processor named Custom Device Modeler and insert it after the TMF814 Device Modeler processor. Specify physical device and managed element as input parameters to the processor.
-
In the Custom Device Modeler processor implementation, add code to populate the physical device with managementIP, as shown in the following example:
//Get ME form request ManagedElement_T me = request.getManagedElement(); PhysicalDevice dev = request.getPhysicalDevice(); //Create CustomTMF814MEGeneric spec isntance CustomTMF814MEGeneric customDevice = new CustomTMF814MEGeneric(dev); //TMFAdditionalInfoHelper is a helper class bundled with this cartridge String managementIP = TMFAdditionalInfoHelper.getAdditionalInfo (me.additionalInfo, "managementIP"); customDevice.setManagementIP(managementIP); -
Build, deploy, and test your cartridge.
Your new Custom Device Modeler processor is run in the order shown in Figure 7-1.
Figure 7-1 Custom Device Modeler Processor Workflow

Description of ''Figure 7-1 Custom Device Modeler Processor Workflow''