3 Managing Oracle Database Appliance Virtualized Platform
This chapter provides an overview of the Oracle Database Appliance Virtualized Platform architecture followed by procedures for how to deploy a guest virtual machine, manage high availability, manage CPU pools, and configure network settings for Oracle Database Appliance Virtualized Platform. It also includes information about resizing your Oracle Database domain (ODA_BASE), a privileged virtual machine.
About Oracle Database Appliance Virtualized Platform
Oracle Database Appliance provides the option of deploying a virtualized platform based on Oracle VM. With Oracle Database Appliance Virtualized Platform, you can use the capabilities of Oracle VM to effectively allocate resources to databases and applications running on the same physical Oracle Database Appliance. Rather than simply disabling unnecessary server cores, you can use the excess capacity to host other workloads. This enables consolidation of both databases and applications, while retaining the ease of deployment and management associated with Oracle Database Appliance.
Oracle Database Appliance Virtualized Platform is supported on all versions of Oracle Database Appliance hardware. All templates and operating systems supported by Oracle VM are also supported on Oracle Database Appliance Virtualized Platform. Supported operating systems include Linux, Windows, and Solaris/86.
Note:
If you are currently on the nonvirtualized deployment of Oracle Database Appliance (all new systems are currently shipped from the factory with the nonvirtualized ISO image), then you must reimage the servers with the Oracle Database Appliance Virtualized Platform ISO image in order to use Oracle Database Appliance as a virtualized platform. Refer to MOS Note 888888.1 for a link to download the Oracle Database Appliance Virtualized Platform ISO image.Oracle Database Appliance Virtualized Platform Architecture
Oracle Database Appliance Virtualized Platform provides virtualization technology that enables multiple isolated databases and applications to share the same physical server. The Oracle Database Appliance Virtualized Platform ISO image is engineered specifically to leverage the Oracle Database Appliance hardware capabilities.
The Oracle Database Appliance Virtualized Platform architecture uses the following virtual machine components as illustrated in Figure 3-1:
-
Oracle Database Appliance Base Domain (ODA_BASE): A privileged virtual machine domain, specifically for databases, that provides database performance similar to bare metal deployments. A PCI pass-through driver provides ODA_BASE direct access to the shared storage.
-
Domain 0 (Dom0): Default domain that initiates Oracle Database Appliance Virtualized Platform provisioning processes and hosts virtual machine templates. Most of the responsibility of hardware detection in an Oracle Database Appliance Virtualized Platform environment is passed to the management domain, referred to as domain zero (or Dom0). On x86-based servers, the Dom0 kernel is actually a small-footprint Linux kernel with support for a broad array of devices, file systems, and software RAID and volume management. In Oracle Database Appliance Virtualized Platform, Dom0 provides access to much of the system hardware, creating, deleting and controlling guest operating systems, and presenting those guests with a set of common virtual hardware.
-
Guest Domains (Domain U): Virtual machines which are provisioned to host non-database workloads such as applications and middleware. Guest operating systems each have their own management domain called a user domain, abbreviated to "Domain U". These domains are unprivileged domains with no direct access to the hardware or device drivers. Each Domain U starts after Dom0 is running on Oracle Database Appliance Virtualized Platform.
Figure 3-1 Oracle Database Appliance Virtualized Platform Architecture
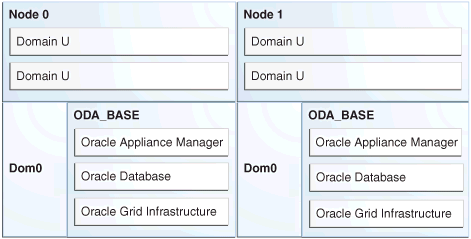
Description of ''Figure 3-1 Oracle Database Appliance Virtualized Platform Architecture''
Virtual Machine Templates
Virtual machines can be created from a template or assembly containing preconfigured virtual machines. The creation of a virtual machine from a template is based on cloning: the template is imported as an archive, unpacked, and stored as a virtual machine configuration file with disk images. These disk images are cloned to create a new instance in the form of a virtual machine. In the same way, an existing virtual machine can be cloned to create a new virtual machine, or cloned to create a new template.
Virtual Machines
Oracle Database Appliance Virtualized Platform is designed to run and deploy virtual machines. Virtual machines can be configured to use CPU pool, memory, and shared repository resources.
Shared Repositories
A shared repository is a central location for storing resources that are essential to creating and managing virtual machines. These resources include virtual machine templates and assemblies, ISO files (virtual DVD images), virtual machine configuration files, and virtual disks. Shared repositories are configured on an Oracle Automatic Storage Management Cluster File System (Oracle ACFS) and then presented to the Oracle Database Appliance nodes that need access to those resources.Oracle Database Appliance Virtualized Platform uses shared repositories to optimize available disk space usage in the environment, and for easy reallocation of virtual machines if a physical server fails. The virtual machine files can be stored on shared disks, providing shared storage for the virtual machines. Additionally, you can configure CPU pools and a resizeable Oracle Database domain (ODA_BASE) to ensure that the virtual machines do not consume cycles from each other or from your assigned database CPU cores.
Figure 3-2 illustrates the Oracle Database Appliance shared repository architecture as follows:
-
The shared disks on Oracle Database Appliance Virtualized Platform are connected directly to ODA_BASE.
-
ODA_BASE contains three shared repositories named fs1, fs2, and fs3.
-
Each shared repository is an Oracle ACFS in ODA_BASE created on top of the Oracle Automatic Storage Management (Oracle ASM) disk group (DATA or RECO) chosen by the user when creating the shared repository.
-
The process that creates a shared repository also performs a network file system (NFS) export of the shared repository to the respective Dom0 by using the private network.
-
The export enables shared storage for the virtual machine files.
Figure 3-2 Architecture Overview of Oracle Database Appliance Virtualized Platform Shared Repositories
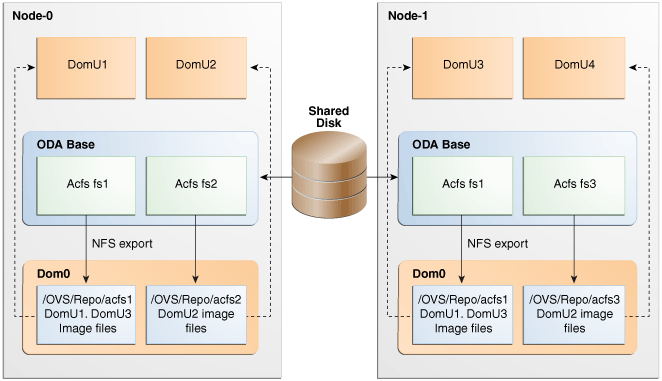
Description of ''Figure 3-2 Architecture Overview of Oracle Database Appliance Virtualized Platform Shared Repositories''
With the configuration shown in the illustration, you can:
-
Create multiple repositories.
-
Mount these repositories either on the nodes where the virtual machine needs to run (such as fs2 and fs3 in the illustration), or on both the nodes (such as fs1 in the illustration).
-
Create one or more virtual machines or virtual machine templates on the shared repositories.
-
Use OAKCLI commands to create and manage shared repositories, virtual disks, and their virtual machines, and the underlying architecture shown in the illustration.
For more information, see "Creating and Managing Shared Repositories."
Virtual Disks
In addition to virtual machines, you can create virtual disks in shared repositories. Virtual disks provide additional storage options for virtual machines by allowing you to attach additional block storage to your virtual machines. Similarly, you can detach the storage if you no longer need the additional space. You can use virtual disks to expand existing file system storage inside the virtual machine by extending the storage volume onto a virtual disk or by creating a new file system on a virtual disk. Your virtual disks can also share multiple virtual machines running on the same shared repository.
Domains
The terms domain, guest, and virtual machine are often used interchangeably, but they have subtle differences. A domain is a configurable set of resources, including memory, virtual CPUs, network devices, and disk devices, in which virtual machines run. A guest is a virtualized operating system running within a domain. Multiple guests can run on the same instance of Oracle Database Appliance Virtualized Platform, each within its own domain. A virtual machine is granted virtual resources and can be started, stopped, and restarted independently.
Deploying Oracle Database Appliance Virtualized Platform
When you deploy Oracle Database Appliance Virtualized Platform, your system will have two domains on each server node: Dom0 and ODA_BASE (also known as Dom1). You can use the CPU cores not assigned to Oracle Database (ODA_BASE) for virtual machines, each of which is referred to as a Domain U.
Overview of Guest Virtual Machine Deployments
Here are the main steps to deploy a guest virtual machine:
-
Create a new repository, if necessary. See "Creating and Managing Shared Repositories."
-
Import the required template or assembly. See "Managing Virtual Machine Templates."
-
Configure the template or assembly. See "Configuring a Virtual Machine Template."
-
Clone the template or assembly. See "Creating Clones and Snap Clones of a Template."
-
Update the virtual machine as required. See "Modifying a Virtual Machine Template Configuration."
-
Start the virtual machine. See "oakcli start commands."
-
Manage the virtual machine using the virtual machine console. See
"oakcli show vmconsole."
Oracle Appliance Manager Command-Line Interface
The Oracle Appliance Kit Command-Line Interface, also known as OAKCLI, is used when deploying Oracle Database Appliance Virtualized Platform. See "Oracle Appliance Manager Command-Line Interface" for the current set of OAKCLI commands along with their syntax and usage notes.
Creating and Managing Shared Repositories
Use the oakcli create repo command to create a shared repository. This command identifies the repository name, the disk group to use for its storage (DATA or RECO), and its size in gigabytes or megabytes (the default size unit is gigabytes.)
Other Oracle Appliance Manager shared repository commands, including commands to show and to stop (dismount) existing repositories, are similar to those used for nonshared repositories. Unlike the default repositories, which are permanent, you can delete a shared repository that has no active (mounted) virtual machines.
The following command creates a shared repository named repo1 in the ASM DATA disk group with 30 gigabytes of available storage:
oakcli create repo repo1 -dg data -size 30
Showing the Status of Shared Repositories
Use the oakcli show repo command to display information about virtual machine repositories. To see all repositories, omit the repository name and node number. To see a specific shared repository, include the repository name and node number.
Showing the Status of All Shared Repositories
To show the status of all shared repositories, use the oakcli show repo command:
oakcli show repo
      NAME                      TYPE          NODENUM  FREE SPACE     STATE
      ----                      ----          -------  ---------      -----
      odarepo1                  local          0              N/A     N/A
      odarepo2                  local          1              N/A     N/A
      repo1                     shared         0           68.25%     ONLINE
      repo1                     shared         1           68.25%     ONLINE
      repo2                     shared         0              N/A     OFFLINE
      repo2                     shared         1           89.83%     ONLINE
Showing the Status of a Selected Shared Repository
To display information for a particular node in a shared repository, specify the repository name and node number as part of the command syntax. In the following example, information is displayed for Node 1 in the repo1 shared repository:
oakcli show repo repo1 -node 1

Resource: repo1_1
        AutoStart       :       restore
        DG              :       DATA
        Device          :       /dev/asm/repo1-286
        ExpectedState   :       Online
        FreeSpace       :       87.703125M
        MountPoint      :       /u01/app/repo1
        Name            :       repo1_0
        Node            :       all
        RepoType        :       shared
        Size            :       30720
        State           :       Online
        Version         :       2
Starting a Shared Repository
Before you can assign a virtual machine to a shared repository, use the oakcli start repo command to start the repository and make the storage available. Note that the oakcli start repo command will also start any virtual machines assigned to the repository that are defined to be automatically started.
Start the shared repository named repo1 on Node 1:
oakcli start repo repo1 -node 1
Stopping a Shared Repository
Use the oakcli stop repo command to stop a shared repository on a node.
Stop the shared repository named repo1 on Node 0:
oakcli stop repo repo1 -node 0
Note:
Do not issue anoakcli stop repo command while virtual machines are still active in the repository for the selected node.Deleting a Shared Repository
Use the oakcli delete repo command to delete a shared repository. The shared repository must be offline (stopped) on both nodes before it can be deleted.
Delete the shared repository named repo1 nodes:
oakcli delete repo repo1
Increasing the Size of a Shared Repository
Use the oakcli configure repo command to increase the size of a shared repository.
Change the size of the repo1 shared repository by 2 gigabytes:
# oakcli configure repo repo1 -incsize 2G

Configured Shared Repo : repo1 with new size 3712.0.
Managing Virtual Disks in Shared Repositories
Use the OAKCLI commands to create, view, clone, attach, and delete virtual disks.
Creating a Virtual Disk for Use in a Shared Repository
Use the oakcli create vdisk command to create a virtual disk within a shared repository. The command defines the size of the virtual disk, the shared repository in which it will reside, a unique name within that shared repository, and whether the virtual disk can be shared by multiple virtual machines.
Create a virtual disk named sdisk1 in the repo2 shared repository with a size of 1 gigabyte and the ability to be shared by virtual machines:
oakcli create vdisk sdisk1 -repo repo2 -size 1G -type shared
Viewing Information About Virtual Disks
Use the oakcli show vdisk command to view information about virtual disks. To see details about an individual virtual disk, include the virtual disk name and a -repo repository_name clause to name the shared repository where you created the virtual disk.
Display the Information for All Vdisks
Display information about all virtual disks on Oracle Database Appliance:
# oakcli show vdisk

    NAME                         SIZE     TYPE    REPOSITORY
    ----                         ----     ----    ----------
    myvdisk                      10G      local   vdiskrepo
    newv                         1G       local   vdiskrepo
Display Information for a Single Vdisk
Display information for the virtual disk named myvdisk1:
# oakcli show vdisk myvdisk1
Resource: myvdisk_vdiskrepo
        Name         :     myvdisk_vdiskrepo
        RepoName     :     vdiskrepo
        Size         :     10G
        Type         :     local
        VmAttached   :     0
Cloning Virtual Disks
Use the oakcli clone vdisk command to create clones of virtual disks.
oakcli clone vdisk new_vdisk_name -repo repo_name -src source_vdisk_name [-h]
new_vdisk_name is the name to assign to the cloned virtual disk.
repo_name is the repository where the original virtual disk resides.
src_vdisk_name is the name of the virtual disk that you are cloning.
Clone a virtual disk named my_vdisk2 from an existing virtual disk named vdisk1 that is stored in the repository named vrepo1:
oakcli clone vdisk my_vdisk2 -repo vrepo1 -src vdisk1
Attaching a Virtual Disk to a Virtual Machine
Use the oakcli modify vm command to attach a virtual disk to a virtual machine.
Attach the virtual disk named sdisk1 to the virtual machine named myol6u_test:
oakcli modify vm myo16u_test -attachvdisk sdisk1
Deleting a Virtual Disk
Use the oakcli delete vdisk command to remove a virtual disk from a shared repository.
Remove a virtual disk named t2g from the shared repository named repoprod1:
oakcli delete vdisk t2g -repo repoprod1
Managing Virtual Machine Templates
Import and configure virtual machine templates as the source for the virtual machines deployed on Oracle Database Appliance Virtualized Platform. If you have created shared repositories, then import templates into the desired repository. Otherwise, import templates into the local repository on the desired node.
You can import assemblies that contain one or more templates. When you import a template or assembly into a shared repository, identify the node that will perform the operation. Select the node carefully to avoid overloading. The repository will be available to both nodes no matter which node performs the import.
Templates imported into local nodes use the repository name supplied in the import command to identify the node that will complete the import and provide the storage. On Node 0, the local repository is named odarepo1 and on Node 1, the local repository is named odarepo2. If you want to import a template to both local repositories, then you must provide a different template name when you import the template into the second node.
Note:
You cannot create or clone templates directly on Oracle Database Appliance Virtualized Platform. Find virtual machine templates athttp://edelivery.oracle.com/linux.If you import an assembly that contains more than one template, then the command automatically modifies the template name that you provide so that all template names remain unique. The first template will have the number "1" appended to the name, the second template will have the number "2" appended, and so on.
After you import a virtual machine template, you can customize the template with OAKCLI commands.
Listing Virtual Machine Templates
Use the oakcli show vmtemplate command to display the name and repository for each virtual machine template as well as the default number of CPUs and default amount of memory that Oracle Database Appliance Virtualized Platform would assign to a virtual machine created from the template.
Display information about the sample1_odarepo1 virtual template:
oakcli show vmtemplate sample_odarepo1
Resource: sample1_odarepo1
        CPUPriority     :       100
        Disks           :       |file:/OVS/Repositories/odarepo1/Te
                                mplates/otml_sample1_odarepo1/Syste
                                m.img,xvda,w||file:/OVS/Repositorie
                                s/odarepo1/Templates/otml_sample1_o
                                darepo1/u01.img,xvdb,w|
        Domain          :       XEN_PVM
        Keyboard        :       en-us
        MaxMemory       :       2048
        MaxVcpu         :       2
        Memory          :       2048
        Mouse           :       OS_DEFAULT
        Name            :       sample1_odarepo1
        Networks        :       |bridge=priv1||bridge=net1||bridge=
                                net2|
        NodeNum         :       0
        OS              :       OL_5
        ProcessorCap    :       100
        RepoName        :       odarepo1
        Vcpu            :       2
Importing Virtual Machine Templates
Use the oakcli import vmtemplate command to import virtual machine templates and assemblies contained in an external repository assembly file. Use the name of the shared repository and include a clause to identify the node where you want to import a template or an assembly.
oakcli import vmtemplate vmtemplatename -files image_files | -assembly assembly_file -repo repo_name [- node 0 | 1 ]
You can import virtual machine templates and assemblies directly from a remote repository using a URL to identify the source of the files. Optionally, use a remote copy command to copy files from the remote repository into your Dom0 /OVS directory and then import the files using the path and names to identify the downloaded files.
Note:
When importing templates or assemblies to a local repository, do not use the-node clause. The target node is implicit in the name of the repository.Importing Virtual Machine Templates from an External Repository Assembly File
Use the oakcli import vmtemplate vmtemplatename -assembly assembly_file -repo repo_name command to import virtual machine templates contained in an external template repository assembly file.
Import the template in an external template repository assembly file located at the URL 'http://example.com/assemblies/OEL6/OVM_OL6U1_x86_PVHVM.ova' to a new template named OL6U1 in a new repository named odarepo1.
oakcli import vmtemplate OL6U1 -assembly 'http://example.com/assemblies/OEL6/OVM_OL6U1_x86_PVHVM.ova' -repo odarepo1
Note the single quotation marks that enclose the URL.
Importing a Virtual Machine Template from Dom0
Use the command to import a virtual machine template from the /OVS file system on Dom0.
oakcli import vmtemplate vmtemplatename -files image_files -repo repo_name
Import the virtual machine template named OVM_OL5U7_X86_64_PVM_10GB.tgz from the /OVS directory in Dom0 into the odarepo1 repository. The template is assigned the name OL5U7.
oakcli import vmtemplate OL5U7 -files /OVS/OVM_OL5U7_X86_64_PVM_10GB.tgz -repo odarepo1
Importing a Virtual Machine Template Using an External Repository URL
Use the oakcli import vmtemplate vmtemplatename -files image_files -repo repo_name command to import a virtual machine template file from an external template repository.
Import a virtual machine template named OVM_OL5U7_X86_64_PVM_10GB.tgz from an external template repository at the URL 'http://example.com/assemblies/OEL6/OVM_OL6U1_x86_PVHVM.tgz'. Note the single quotation marks that enclose the URL. The template is assigned the name OL5U7 and is imported into the odarpo1 repository.
oakcli import vmtemplate OL5U7 -files 'http://example.com/assemblies/OEL6/OVM_OL6U1_x86_PVHVM.tgz'-repo odarepo1
Configuring a Virtual Machine Template
Use the oakcli configure vmtemplate command to configure a virtual machine template on Oracle Database Appliance Virtualized Platform. These values will become the default values for any virtual machine cloned from this template. You can change any or all them later with the oakcli configure vm command.
Set values for the virtual machine template named myol5u7_10gb:
oakcli configure vmtemplate myol5u7_10gb -vcpu 2 -maxvcpu 4 -cpucap 40
-memory 1536M -maxmemory 2G -os OTHER_LINUX
-
-vcpu 2sets the number of CPUs to be assigned when the virtual machine starts up to 2. -
-maxvcpu 4sets the maximum number of CPUs that can be assigned to the virtual machine to 4. -
-cpucap 40sets the maximum percentage of a CPU's capacity that can be assigned to the virtual machine to 40%. -
-memory 1536Msets the amount of memory to be assigned when the virtual machine starts up to 1536 MB. -
-maxmemory 2Gsets the maximum amount of memory that can be assigned to the virtual machine to 2GB. -
-os OTHER_LINUXsets OTHER_LINUX as the operating system used by the virtual machine.
Showing Configured Values for a Virtual Machine Template
Use the oakcli show vmtemplate command to show values for the configurable options in a virtual machine template.
Display information about the sample1_odarepo1 virtual template:
oakcli show vmtemplate sample_odarepo1
Resource: sample1_odarepo1
        CPUPriority     :       100
        Disks           :       |file:/OVS/Repositories/odarepo1/Te
                                mplates/otml_sample1_odarepo1/Syste
                                m.img,xvda,w||file:/OVS/Repositorie
                                s/odarepo1/Templates/otml_sample1_o
                                darepo1/u01.img,xvdb,w|
        Domain          :       XEN_PVM
        Keyboard        :       en-us
        MaxMemory       :       2048
        MaxVcpu         :       2
        Memory          :       2048
        Mouse           :       OS_DEFAULT
        Name            :       sample1_odarepo1
        Networks        :       |bridge=priv1||bridge=net1||bridge=
                                net2|
        NodeNum         :       0
        OS              :       OL_5
        ProcessorCap    :       100
        RepoName        :       odarepo1
        Vcpu            :       2
Modifying a Virtual Machine Template Configuration
After you import a virtual machine template to a storage repository, examine the template configuration parameters with the oakcli show vmtemplate command. If you need to reconfigure the template for specific requirements, then use the oakcli configure vmtemplate command. This is useful if you plan to deploy multiple virtual machines with the same characteristics from a single template. If you will be deploying only one virtual machine or many virtual machines but with different characteristics, then set required values in the virtual machines with the oakcli configure vm command after you deploy the template.
When you are satisfied with the configuration of your virtual machine template, use the oakcli modify command to assign a new network to the virtual machine template.
Replace the network assigned to the gc_11g virtual machine template with the net1 network:
oakcli modify vmtemplate gc_11g -addnetwork net1
Removing a Virtual Machine Template
If you no longer need a template that you previously stored, then remove the template from the repository with the oakcli delete vmtemplate command.
Remove the virtual machine template named myol6u_15gb3 from Oracle Database Appliance Virtualized Platform:
oakcli delete vmtemplate my0l6u_15gb3
Creating Clones and Snap Clones of a Template
You can create or clone virtual machines from imported templates (or assemblies) or from an existing virtual machine. A virtual machine can be a complete clone of the template or assembly, or it can be a snap clone, which contains only the metadata defined for the virtual machine.
Note:
Creating snap clones is a very fast operation compared to cloning the entire template or assembly. However, if you update the contents of a snap clone, your system will require additional storage for the clone to retain the original content as well as the changed content, unless the changes are on shared virtual disks.Cloning a Template
You can clone virtual machines that have attached virtual disks. In such cases, a clone of a virtual machine will contain the contents of virtual disks attached locally but not of virtual disks attached in shared mode. If needed, clone the virtual disks required by a cloned virtual machine in a separate step.
Use the oakcli clone vm command to create a virtual machine from a virtual machine template. Use the name of the shared repository in the -repo clause and include a -node clause to identify the node on which you want to perform the cloning process.
Create a virtual machine named myol6u_test from the virtual machine template named myol6u_15gb1, which is stored in shared repository named repo2 on Node 0.
oakcli clone vm myol6u_test -vmtemplate myol6u_15gb1 -repo repo2 -node 0
Note:
The-node clause identifies the node where the cloning activity will occur. Also, the node value does not assign the default startup node for the virtual machine. This assignment is set by the oakcli configure vm command.Creating a Snap Clone from a Template
Use the oakcli clone vm command to create a snap clone of a virtual machine template.
Create a snap clone named myol15u_snap from the virtual machine template named myol5u:
oakcli clone vm myol15u_snap -vmtemplate myol5u -snap
Creating a Snap Clone of an Existing Virtual Machine
Use the oakcli clone vm command to create a snap clone of an existing virtual machine.
Create a snap clone named myol15u_test1 from a virtual machine named myol15u_test:
oakcli clone vm myol15u_test1 -vm myol15u_test1 -snap
Managing Virtual Machines
Deploy virtual machines on Oracle Database Appliance Virtualized Platform to run other workloads that are independent of databases running in ODA_BASE. Use OAKCLI commands to create and manage virtual machines, including starting and stopping them, and opening consoles for graphical user interface (GUI) access.
Note:
You can use a Virtual Network Computing (VNC) session to open a GUI console for a virtual machine.Although it is possible to reconfigure an active virtual machine, your changes will not take effect until you stop and restart the virtual machine. You can display high-level information about all of your virtual machines or detailed information about the configuration of single virtual machines. When you no longer have use for a particular virtual machine, delete the virtual machine to regain storage.
Listing the Virtual Machines in Your Repositories
Use the oakcli show vm command to display a list of your existing virtual machines.
The command displays the name, the repository, and the current state (online or offline) for each virtual machine. The output also contains the default number of CPUs and default amount of memory that Oracle Database Appliance Virtualized Platform will assign to each virtual machine.
Displaying Details for All Virtual Machines
Display the virtual machine names, memory and vCPU allocations, status, virtual disks, and repository name for all virtual machines:
oakcli show vm
NAME                    MEMORY          VCPU         STATE           REPOSITORY
----                    ------          ----         -----           ----------
sample5_odarepo1          2048             2         OFFLINE         odarepo1
sample6_odarepo1          2048             2         OFFLINE         odarepo2
test1_odarepo1            2048             2         OFFLINE         odarepo1
test2_odarepo2            2048             2         OFFLINE         odarepo2
vm1_odarepo1              4096             4         ONLINE          odarepo1
vm2_odarepo2              2048             2         OFFLINE         odarepo2
win_vm1                   1500             1         ONLINE          odarepo1
Displaying Information for a Single Virtual Machine
Display information about the vm1_odarepo1 virtual machine:
oakcli show vm vm1_odarepo1
Resource: vm1_odarepo1
        AutoStart       :       restore
        CPUPriority     :       100
        Disks           :       |file:/OVS/Repositories/odarepo1/Vi
                                rtualMachines/vm1_odarepo1/System.i
                                mg,xvda,w||file:/OVS/Repositories/o
                                darepo1/VirtualMachines/vm1_odarepo
                                1/u01.img,xvdb,w|
        Domain          :       XEN_PVM
        ExpectedState   :       online
        FailOver        :       false
        IsSharedRepo    :       false
        Keyboard        :       en-us
        MaxMemory       :       3000
        MaxVcpu         :       4
        Memory          :       4096
        Mouse           :       OS_DEFAULT
        Name            :       vm1_odarepo1
        Networks        :       |mac=00:21:F6:00:00:E4|
        NodeNum         :       0
        NodeNumStart    :
        OS              :       OL_5
        PrivateIP       :       None
        ProcessorCap    :       100
        RepoName        :       odarepo1
        State           :       Online
        TemplateName    :       otml_sample1_odarepo1
        Vcpu            :       4
        cpupool         :       twocpu
        vncport         :       5901
Creating a Virtual Machine
You can create or clone virtual machines from imported templates (or assemblies) or from an existing virtual machine. A virtual machine can be a complete clone of the template or assembly, or it can be a snap clone, which contains only the metadata defined for the virtual machine.
See "Creating Clones and Snap Clones of a Template" for more details.
Configuring a Virtual Machine
Use the oakcli configure vm command to configure a virtual machine on Oracle Database Appliance Virtualized Platform.
Include a -prefnode clause, to identify the node where you want the virtual machine to run by default and a -failover clause to indicate if you want the virtual machine to use the other node when the preferred node is not available (either at startup or while already active).
If you reconfigure a virtual machine that is currently running, then your changes will not take effect until you stop and restart the virtual machine. See "Starting and Stopping a Virtual Machine."
For the complete command syntax, see oakcli configure vm.
Set values for specific resources in the virtual machine named myol15u_test:
oakcli configure vm myol5u_test
-vcpu 2 -cpuprio 150 -cpucap 20 -memory 1G
-cpupool linpool -keyboard en-us -mouse USB_MOUSE
| Parameter | Description |
|---|---|
-vcpu 2 |
Sets two (2) as the number of CPUs to be assigned to the virtual machine when started |
-cpuprio 150 |
Sets the CPU access priority to 150 |
-cpucap 20 |
Sets the maximum percentage of a CPU's capacity that will be assigned to the virtual machine to 20% |
-memory 1G |
Sets the amount of memory assigned when the virtual machine starts to1 GB |
-cpupool linpool |
Specifies linpool as the CPU pool to be assigned to the virtual machine |
-keyboard en-us |
Defines the keyboard type used to access the virtual machine as en-us |
-mouse USB_MOUSE |
Defines the mouse type used to access the virtual machine as a USB mouse |
These values will override values assigned to these same parameters in the virtual machine template from which this virtual machine was derived. The virtual machine will use default values for parameters that are not defined in either the parent template or in a configuration command.
Note:
CPU capacity is controlled by the CPU pool assigned to a virtual machine by either the-cpupool parameter or by the default_unpinned_pool (if the virtual machine is not configured with a -cpupool parameter). Values for -vcpu and -maxvcpu parameters that are larger than the number of CPUs in the assigned CPU pool are ignored.
See "Managing CPU Pools on Oracle Database Appliance Virtualized Platform" for more details.
Starting and Stopping a Virtual Machine
Use the oakcli start vm command to start a virtual machine on Oracle Database Appliance Virtualized Platform. Similarly, use the oakcli stop vm command to stop a virtual machine.
Note:
If you reconfigure a virtual machine that is currently running, then your changes will not be effective until you stop and restart the virtual machine.Externally Configuring a Virtual Machine
You can initially configure your virtual machines externally without connecting to the virtual machine console. This is done using Oracle VM Guest Additions by passing key-value pairs to the virtual machine. Use the oakcli modify vm -s command to pass parameters to the virtual machine:
# oakcli modify vm vmname-s 'key1:value1;key2:value2...'
The following example has two value pairs:
oakcli modify vm vmo16u3 -s 'com.oracle.linux.network.device.0:eth0;com.oracle.linux.network.ipaddr.0:192.1.2.18'
-
Refer to the section "Using the Oracle VM Guest Additions" in the Oracle VM Utilities Guide for x86 for more information about Oracle VM Guest Additions.
-
Refer to the whitepaper Oracle Database Appliance: Automated Virtual Machine Provisioningfor more information.
http://www.oracle.com/technetwork/database/database-appliance/overview/oda-automatedvmprovisioning-2348232.pdf
Opening a Virtual Machine Console for a Virtual Machine
To open a virtual machine console window for an active virtual machine, run the Oracle Appliance Manager oakcli show vmconsole command. If the console does not display correctly, then close the console, set the DISPLAY environment variable to an appropriate value for your monitor, and then rerun the oakcli show vmconsole command.
You can also configure your virtual machine (using oakcli modify vm command with the -s parameter) to allow access from the OAKCLI command line instead of a GUI virtual machine console.
Open a console for the virtual machine named vm1_odarepo1:
oakcli show vmconsole vm1_odarepo1
Creating an Image for a New Virtual Machine
Use the oakcli clone vm command to create an image for a new virtual machine on Oracle Database Appliance Virtualized Platform. By default, the image inherits the content and configuration information from the template or from the virtual machine that you are cloning and resides in the same repository as the source. Unless you are using local repositories for your virtual machines, include the -node clause in the oakcli clone command to identify the node that should run the cloning process. To create a snap clone, which will only contain the configuration metadata, include the -snap clause in the oakcli clone command.
Setting Up a Virtual Machine for Access from eth0 Using an IP Address
The following set of commands configures the virtual machine vmol6u3 (which has ovmd) with the IP address 192.168.16.51 for the eth0 interface and sets the root password to password123a.
oakcli clone vm vmol6u3 -vmtemplate ol6u3 -repo shrepo -node 0
oakcli modify vm vmol6u3 -addnetwork priv1
oakcli start vm vmol6u3
oakcli modify vm vmol6u3 -s 'com.oracle.linux.network.device.0:eth0'
oakcli modify vm vmol6u3 -s 'com.oracle.linux.network.onboot.0:yes'
oakcli modify vm vmol6u3 -s 'com.oracle.linux.network.bootproto.0:static'
oakcli modify vm vmol6u3 -s 'com.oracle.linux.network.ipaddr.0:192.168.16.51'
oakcli modify vm vmol6u3 -s 'com.oracle.linux.network.netmask.0:255.255.255.0'
oakcli modify vm vmol6u3 -s 'com.oracle.linux.root-password:password123'
oakcli modify vm myol5u_test -attachvdisk sdisk1
oakcli delete vm my0l5u_test
Adding or Removing a Virtual Disk to or from a Virtual Machine
To add or remove a virtual disk, use the oakcli modify vm vm_name command with an -attachvdisk or a -detachvdisk clause that names the virtual disk.
Removing a Virtual Machine from a Shared Repository
When you no longer have use for a particular virtual machine, use the oakcli delete vm command to delete the virtual machine to reclaim storage and resources.
Delete the ovu22 virtual machine from node 1:
oakcli delete vm ovu22 -server 1
Performing a Live Migration for an Oracle Database Appliance Virtual Machine
Live Migration refers to the process of moving a running virtual machine between physical machines without disconnecting the client or application running in the virtual machine. Memory, storage, and network connectivity of the virtual machine are transferred from the original host machine to the destination.
Here are the requirements for performing a live migration:
-
The virtual machine must be on a shared repository and the repository must be online on both nodes.
-
The virtual machine must be running.
-
The destination host must have the required resources (memory, CPUs and so on) for successful migration.
-
The destination host must have a CPU pool with the same name as the CPU pool of the virtual machine that is being migrated.
Migrating a Virtual Machine from the Currently Running Node to Another Node
Use the oakcli migrate vm vmname command to migrate a virtual machine from the currently running node to another node. vname is the name of the virtual machine to be migrated.
When you run this command, the virtual machine must be online and corresponding, and the shared repository must be online on both nodes. If a virtual machine is in the migration process, then OAKCLI will display the virtual machine state as MIGRATING.
Managing High Availability on Oracle Database Appliance Virtualized Platform
A system that is highly available is designed to provide uninterrupted computing services during essential time periods, during most hours of the day, and during most days of the week throughout the year. Reliability, recoverability, timely error detection, and continuous operations are primary characteristics of a highly available solution. Two essential parts of high availability are automatic restart and failover.
Unless you are using local repositories, you can set high availability options for your virtual machines. High availability options identify the node where the virtual machine should be started by default and whether the virtual machine should be failed over to the other node. Failover can occur if the node where the virtual machine is already running fails or if the preferred node is not available when the virtual machines attempt to start.
Configuring Automatic Restart for High Availability
A virtual machine automatically restarts after a hardware or software failure or whenever your database host computer restarts. Use the oakcli configure vm command to start a virtual machine on a preferred node by setting the -prefnode parameter.
Configuring Failover for High Availability
Failover lets the virtual machine be restarted on the other node with no manual intervention in the event of an unplanned node failure. Use the -failover parameter with the oakcli configure vm command to enable a virtual machine to fail over from one node to another.
Managing CPU Pools on Oracle Database Appliance Virtualized Platform
Workloads are isolated by creating CPU pools and assigning (pinning) virtual machines to a specific CPU pool. When you pin a virtual machine to a CPU pool, you ensure that the virtual machine will use CPUs in only that CPU pool.
When you initially configure Oracle Database Appliance Virtualized Platform, a default-unpinned-pool is created on each node. The size of this pool depends on the hardware model as follows:
-
On Oracle Database Appliance X5-2 Virtualized Platform, the default-unpinned-pool contains 72 CPUs.
-
On Oracle Database Appliance X4-2 Virtualized Platform, the default-unpinned-pool contains 48 CPUs.
-
On Oracle Database Appliance X3-2 Virtualized Platform, the default-unpinned-pool contains 32 CPUs.
-
On Oracle Database Appliance Version 1 Virtualized Platform, the default-unpinned-pool contains 24 CPUs.
When you create the ODA_BASE domain, a new CPU pool, named odaBaseCpuPool, is created on both nodes and the required CPUs are removed from the default-unpinned-pool. ODA_BASE is the only domain allowed to use the CPUs in the odaBaseCpuPool. When you start other virtual machines, they run on CPUs that were left in the default-unpinned-pool, effectively removing ODA_BASE from the work being done by other virtual machines.
You might also cage groups of virtual machines by creating additional CPU pools. These additional pools enable you to pin a virtual machine, or a set of virtual machines, to its own CPU pool. Virtual machines running in a specific CPU pool do not share CPU cycles with virtual machines running in other CPU pools. Define as many CPU pools as you want, up to the number of available CPUs on your system.
If your application requirements change over time, then you should resize, add, or drop CPU pools as needed. Resize ODA_BASE if necessary, although this requires a special command that also updates your Oracle Database Appliance Virtualized Platform license. See "Resizing ODA_BASE" for details.
A CPU pool can have a different size on each node (except for the odaBaseCpuPool), as shown by the following oakcli show cpupool commands, one for each node:
oakcli show cpupool -node 0
                 Pool                         Cpu List
default-unpinned-pool   [14, 15, 16, 17, 18, 19, 20, 2
                                            1, 22, 23]
               twocpu                         [12, 13]
       odaBaseCpuPool   [0, 1, 2, 3, 4, 5, 6, 7, 8, 9,
                                               10, 11]
oakcli show cpupool -node 1
                 Pool                         Cpu List
default-unpinned-pool   [12, 13, 14, 15, 16, 17, 18, 1
                                    9, 20, 21, 22, 23]
       odaBaseCpuPool   [0, 1, 2, 3, 4, 5, 6, 7, 8, 9,
                                                10,11]
For commands to manage CPU pools, other than odaBaseCpuPool, see "Creating a New CPU Pool on Oracle Database Appliance Virtualized Platform Nodes."
Over-Subscribing CPU Pools
A CPU can belong to one and only one CPU pool, although you can assign multiple virtual machines to a CPU pool. A CPU pool becomes oversubscribed when the virtual machines that are active in the pool require more CPUs than you configured for the pool. For example, if a CPU pool has four CPUs, then you might start two virtual machines that have been defined to use four CPUs each. In this case, the CPU pool is oversubscribed because each of the four CPUs is supporting two virtual machines. Similarly, if you stop one of those virtual machines but start another one that requires two CPUs, then the CPU pool is still oversubscribed because two of the CPUs are supporting both virtual machines. When oversubscribing a CPU pool, you need to assess the performance of the virtual machines in that pool. You should be prepared to reassign one or more virtual machines to a different CPU pool if sharing an oversubscribed pool degrades performance to unacceptable levels.
Creating a New CPU Pool on Oracle Database Appliance Virtualized Platform Nodes
Use the oakcli create cpupool command to create a CPU pool.
Create a CPU pool named winpool with 4 CPUs on Node 0:
oakcli create cpupool winpool -numcpu 4 -node 0
Changing the Number of CPUs Assigned to a CPU Pool on Oracle Database Appliance Virtualized Platform Nodes
Use the oakcli configure cpupool command to change the number of CPUs assigned to a CPU pool.
Change the number of CPUs assigned to the CPU pool named linpool on Node 1. After the command runs, the new number of CPUs will be six.
oakcli configure cpupool linpool -numcpu 6 -node 1
Showing the CPU Pools Configured on Oracle Database Appliance Virtualized Platform Nodes
Use the oakcli show cpupoolcommand to display the CPUs assigned to each defined CPU pool. The command also lists the virtual machines, if any, assigned to each CPU pool.
Show the CPUs assigned to each defined CPU pool on Node 0.
oakcli show cpupool -node 0
Assigning a Virtual Machine to a CPU Pool on Oracle Database Appliance Virtualized Platform
Use the ooakcli configure vm command to assign a virtual machine to a CPU pool.
Pin the virtual machine named wintest to the CPU pool named winpool:
oakcli configure vm wintest -cpupool winpool
Note:
If your virtual machine is assigned to a specific CPU pool and is allowed to fail over, then the virtual machine will try to use the same CPU pool on the secondary node. If the CPU pool exists but is a different size, then the performance of your virtual machine might be affected when it runs on the secondary node. If the assigned CPU pool does not exist on the secondary node, then the virtual machine will not fail over.Note:
Do not manageodaBaseCpuPool with oakcli cpupool commands. Instead, use commands that configure ODA_BASE, as discussed in "Resizing ODA_BASE."About Network Infrastructure and Virtual Local Area Networks on Oracle Database Appliance Virtualized Platform
To specify which network should access a virtual machine, you employ network infrastructure components of Oracle Database Appliance Virtualized Platform. This section describes these infrastructure components.
Oracle Database Appliance Virtualized Platform manages all the high-level network infrastructure components for you by precreating the bonds and bridges for all networks. The front-end point for accessing a virtual machine will be one of the bridges defined for Dom0.
The following tables show the default network interfaces categorized by hardware as listed here:
-
Table 3-1 and Table 3-2 list the default network interfaces for Oracle Database Appliance Virtualized Platform on Oracle Database Appliance X3-2 and later (systems with an external storage shelf).
-
Table 3-3 lists the default network interfaces for Oracle Database Appliance Virtualized Platform on Oracle Database Appliance version 1 (systems without an external storage shelf).
In all cases, connections to user domains are through the selected interfaces.
Table 3-1 Oracle Database Appliance Virtualized Platform Dual Port 10-GbE Network Interfaces (Oracle Database Appliance X3-2 and later)
| Interfaces at Dom0 | Bond Devices at Dom0 | Bridge in Dom0 | Interfaces in ODA_BASE Domain |
|---|---|---|---|
|
icbond0 |
priv1 |
eth0 |
Table 3-2 Oracle Database Appliance Virtualized Platform On Board Quad Port 10-GbE Network Interfaces (Oracle Database Appliance X3-2 and Later)
| Interfaces at Dom0 | Bond Devices at Dom0 | Bridge in Dom0 | Interfaces in ODA_BASE Domain |
|---|---|---|---|
|
bond0 |
net1 |
eth1 |
|
bond1 |
net2 |
eth2 |
Note:
If you define a fiber (instead of copper) public network connection, then bond0 is configured on PCIe boards.Table 3-3 Oracle Database Appliance Version 1 Virtualized Platform Network Interfaces
| Type | Interfaces at Dom0 | Bond Devices at Dom0 | Bridge in Dom0 | Interfaces in ODA_BASE Domain |
|---|---|---|---|---|
|
Private |
eth0 eth1 |
bond0 |
priv1 |
eth0 |
|
On Board Public |
eth2 eth3 |
bond1 |
net1 |
eth1 |
|
1st Pair Quad Port |
eth4 eth5 |
bond2 |
net2 |
eth2 |
|
2nd Pair Quad Port |
eth6 eth7 |
bond3 |
net3 |
eth3 |
|
eth8 eth9 |
xbond0 |
net4 |
eth4 |
Note:
If you define a fiber (instead of copper) public network connection, then bond0 is configured on PCIe boards.When you configure a virtual machine, you define which network the virtual machine should use by identifying the related bridge. For example, to connect a virtual machine named myvm1 to the net1 network, you would use the following command:
oakcli modify vm myvm1 -addnetwork net1
Figure 3-3 shows a typical Oracle Database Appliance configuration based on the preceding information.
Figure 3-3 Basic Virtual Machine Local Area Network
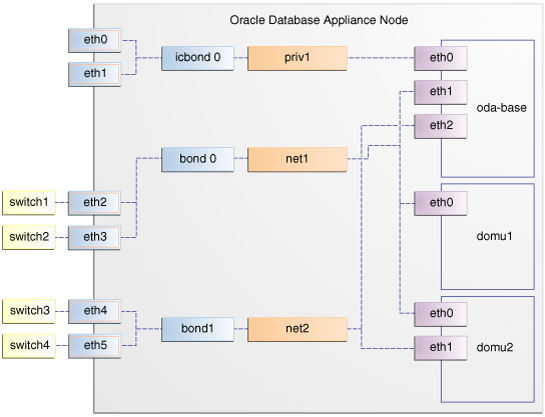
Description of ''Figure 3-3 Basic Virtual Machine Local Area Network''
You assign default Virtual Local Area Networks (VLANs) to ODA_BASE during the installation and configuration of Oracle Database Appliance Virtualized Platform. Figure 3-4 shows a typical Oracle Database Appliance configuration using VLANs. The illustration shows the same configuration as Figure 3-3 but with three tagged VLANs added for backups (backup), for applications (application), and for management (mgnt).
Figure 3-4 Oracle Database Appliance Virtualized Platform with Virtual Local Area Networks
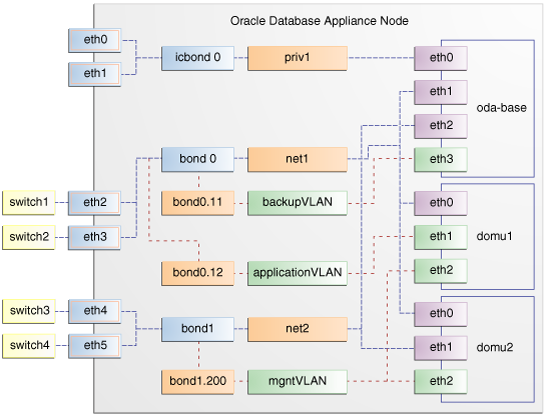
Description of ''Figure 3-4 Oracle Database Appliance Virtualized Platform with Virtual Local Area Networks''
See "Managing Virtual Local Area Networks on User Domains and on ODA_BASE," for instructions on how to create new or remove existing VLANs in ODA_BASE and in your user domains respectively.
Managing Virtual Local Area Networks on User Domains and on ODA_BASE
To manage VLANs for user domains, log in to ODA_BASE; to manage VLANs for ODA_BASE, log in to Dom0. The examples in this section use a VLAN named sample10.
Note:
You can create VLANs from Dom0 only before your deployment of Oracle Database Appliance or Oracle Database Appliance Virtualized Platform.Creating a Virtual Local Area Network
Use the oakcli create vlan command to create a VLAN. Provide the following information:
-
A VLAN name that is unique on the node where the VLAN is created (but which can be the same as a VLAN name on the other node of Oracle Database Appliance Virtualized Platform).
-
A VLAN tag number between 2 to 4096 inclusive that is unique on the node where the VLAN is created (but which can be the same as a VLAN tag number on the other node of Oracle Database Appliance Virtualized Platform).
-
The name of the interface on which the VLAN is to be created. Find the available interfaces for your hardware listed in the Bond Devices at Dom0 column in either Table 3-2 or Table 3-3.
-
The node on which to create the VLAN
Note:
Create the same VLAN on both nodes, if needed, by issuing theoakcli create vlan command twice, once for node 0 and once for node 1.Create the sample10 VLAN on node 0:
oakcli create vlan sample10 -vlanid 10 -if bond0 -node 0
Caution:
If you are planning to use a VLAN with a virtual machine created in a shared repository, then you should create that VLAN on both nodes. A virtual machine fails if an assigned network is not available on the node where the virtual machine is trying to run by default or following a failover.Assigning and Removing a Virtual Local Area Network for a User Domain
Use the oakcli modify vm command with an -addnetwork clause to assign an existing VLAN to a virtual machine and with a -deletenetwork clause to remove a VLAN from a virtual machine. The clauses must also contain the name of the VLAN.
Assign the sample10 VLAN to the myol5u_test virtual machine:
oakcli modify vm myol5u_test -addnetwork sample10
Assigning and Removing a Virtual Local Area Network for ODA_BASE
Use the oakcli configure oda_base command to add an existing VLAN to ODA_BASE or to remove a VLAN from ODA_BASE. Note that this command will also let you resize ODA_BASE and domain memory size. If you only want to manage VLANs, then enter the number that corresponds to the number of your current CPU cores and the current number for your memory.
In the following partial example, the CPU core count and default memory values are left unchanged, while the test01 VLAN is assigned to ODA_BASE. Note that the current CPU core count, 6, corresponds to selection number 3 in the Core Licensing Options list of values.
# oakcli configure oda_base
Core Licensing Options:
        1. 2 CPU Cores
        2. 4 CPU Cores
        3. 6 CPU Cores
        4. 8 CPU Cores
        5. 10 CPU Cores
        6. 12 CPU Cores
        Current CPU Cores       :6
        Selection[1 : 6](default 12 CPU Cores) : 3
        ODA base domain memory in GB(min 8, max 88)(Current Memory 48G)[default 64]     : 48
INFO: Using default memory size i.e. 64 GB
Additional vlan networks to be assigned to oda_base? (y/n) [n]: y
Select the network to assign (test00,test01,test02,test03): test01
Additional vlan networks to be assigned to oda_base? (y/n) [n]:
Vlan network to be removed from oda_base (y/n) [n]:
INFO: . . .
Viewing Virtual Local Area Networks
To see what VLANs currently exist in ODA_BASE, run the oakcli show vlan command.
Show VLANs in addition to the sample10 VLAN used in previous examples:
oakcli show vlan

NAME                  ID    INTERFACE   NODENUM
----                  --    ---------   -------
net1                  1     bond0       0
net1                  1     bond0       1
net2                  1     bond1       0
net2                  1     bond1       1
net3                  2     bond1       0
net3                  4     bond0       1
net10                 20    bond1       0
net10                 20    bond1       1
Deleting Virtual Local Area Networks
To remove an unwanted VLAN from a node, use the oakcli delete vlan command and provide the VLAN name and the node number.
Remove the sample10 VLAN from node 0 (where the VLAN was assigned in the earlier oakcli create vlan example):
oakcli delete vlan sample10 -node 0
Resizing ODA_BASE
Increase the number of CPU cores assigned to the ODA_BASE domain on Oracle Database Appliance Virtualized Platform if you need more computing power or memory for your installed Oracle databases. Alternatively, decrease the CPU cores if you need more CPUs assigned to your virtual machine domains. You must increase or decrease the assigned CPU core count on each node by two or multiples of two.
Oracle recommends that you use templates to size the databases that you deploy in ODA_BASE, following the guidelines in Appendix A of the Oracle Database Appliance Getting Started Guide. Sum the number of CPUs that these databases require, using the tables in that appendix, and divide the value by two to determine the number of CPU cores you will need for ODA_BASE.
Plan to change your ODA_BASE core count when there is no critical activity running on your Oracle databases. This is because the ODA_BASE domain shuts down during the resizing process. When you are ready to proceed, complete these steps:
-
Log in to Dom0 and run the
oakcli configure oda_basecommand as shown in this example, which changes the CPU core count from six to eight in ODA_BASE:# oakcli configure oda_base Core Licensing Options: 1. 2 CPU Cores 2. 4 CPU Cores 3. 6 CPU Cores 4. 8 CPU Cores 5. 10 CPU Cores 6. 12 CPU Cores Current CPU Cores :6 Selection[1 : 6](default 12 CPU Cores) : 10 ODA base domain memory in GB(min 8, max 88)(Current Memory 64G)[default 32] : INFO: Using default memory size i.e. 32 GB Additional vlan networks to be assigned to oda_base? (y/n) [n]: Vlan network to be removed from oda_base (y/n) [n] INFO: Node 0:Configured oda base pool INFO: Node 1:Configured oda base pool INFO: Node 0:ODA Base configured with new memory INFO: Node 0:ODA Base configured with new vcpus INFO: Changes will be incorporated after the domain is restarted on Node 0 INFO: Node 1:ODA Base configured with new memory INFO: Node 1:ODA Base configured with new vcpus INFO: Changes will be incorporated after the domain is restarted on Node 1 -
Perform any actions listed in the output from the command. Not all versions of the software, such as the one shown in the preceding example, require any additional actions before restarting ODA_BASE.
-
Restart the domain to implement the changed configuration for ODA_BASE by running the following restart command on Dom0 of both nodes:
oakcli restart oda_base