3 Configuring the Enterprise Data Quality Siebel Connector
This chapter describes how to configure the EDQ Siebel Connector with an existing Siebel server.
This chapter includes the following sections:
-
Section 3.2, "Configuring Siebel to Use Customer Data Services"
-
Section 3.6, "Understanding the Field Mappings for Business Components"
3.1 Configuring the EDQ Siebel Connector
The EDQ Siebel Connector requires a configuration file called dnd.properties, which must be installed in the location specified in the dnd.parms file (installed and configured as part of the EDQ Siebel Connector.) The settings in the dnd.properties file control which EDQ server and project are used to provide data quality services to a Siebel instance, and how to connect to it.
To create this file with the settings needed to use EDQ Siebel Connector, use the following steps:
-
Log in to the Siebel server as the Configuration user (specified during Siebel installation)
-
Change to the directory specified in the
dnd.parmsfile. -
Extract and copy the
dnd.propertiesfile from the EDQ-CDS installation package into the directory. -
Use a text editor to open the
dnd.propertiesfile. -
Edit the properties as required.
3.1.1 Understanding the Settings
The EDQ Siebel Connector settings are in the dnd.properties file and fall into the following categories:
-
CDS Connection Settings
-
Multiple Child Entity groupings
-
Real-Time Service Definitions
-
Batch Job Definitions
3.1.1.1 CDS Connection Settings
These settings are used to connect to an EDQ server for running jobs and for real-time services. When setting these, make sure there are no trailing spaces in the values as these will cause errors when attempting to establish a connection.
-
httpprefix.cds- the hostname, HTTP port and context name of the EDQ server (for examplehttp://hostname:port/edq/webservices).Note :
Although EDQ requires SSL to be used for communication between its own web pages and the server, and therefore redirects any http requests to its web pages to the https port, http can still be used for web service requests if required (and allowed by security standards). If EDQ is installed using the Windows installer, the default http port is 9002. On other installations, the port is specified when EDQ is deployed onto the application server. If the use of https is a requirement, the https prefix and port number (which defaults to 9004 if EDQ is installed using the Windows installer), can be specified here, but in order to establish a trusted connection with EDQ, it is also necessary to import either the certificate, or the certificate's root, from the EDQ application server into the Certificate Store of the JRE used by the EDQ Siebel Connector (using the standard Java
keytoolcommand). -
jmxserver.cds- the hostname and port of the EDQ server's JMX interface (for example,servername:9005).Note:
If EDQ is installed using the Windows installer, the JMX management port defaults to 9005. On other installations, it defaults to 8090. It can be checked by reading the
management.portentry in the filedirector.propertiesin the config directory of the EDQ server. If this entry is not present, the port will be 8090. -
username.cdsandpassword.cds- The EDQ login credentials for a designated JMX and web services user on the EDQ server. This account must have the following EDQ permissions (at minimum):-
System: Connect to Messaging System, which grants access to submit web service requests or JMS messages to EDQ.
-
Server Console: Execute Job and Director: Execute Job, which allows you to execute jobs
-
Permission to the EDQ project stated under
projectnameto verify that the user has project permission, right-click on the project in EDQ's Director application, select Properties, then select the Security tab. Check that the user is a member of a group with access to the project. If the user account previously described was the account used to import the project from a DXI file, it must have permission.
-
-
Staging Database connection details - The connection details and credentials of the Staging Database used to pass data for batch matching jobs between Siebel and EDQ-CDS. For further information, see Section 3.3, "Configuring the Staging Database."
-
projectname.cdsis the name of the EDQ-CDS project on the EDQ server. This setting can be left unchanged if the project has not been renamed. -
projectname.cdshcis the name of the EDQ-CDS Health Check project on the EDQ server. This setting can be left unchanged if the project has not been renamed.
3.1.1.2 Multiple Child Entity Groupings
Hierarchical data in Siebel is transformed by the EDQ Siebel Connector into a flat record structure so that EDQ can match 'parent' records (such as Contacts, Prospects and Accounts) using the details of multiple 'child' records (such as Names, Addresses, Email Addresses, Alternative Phone Numbers etc.)
The Multiple Child Entity settings specify how scalar (single field) and non-scalar (multi-field) child entities are handled by the Siebel Connector.
Note :
These settings are only required if Multiple Child Entities are enabled in EDQ-CDS and supported by the installed version of Siebel (version 8.1.1.10 or later), see Section 3.7, "Understanding the Vendor Parameters" and the Siebel documentation for further details.
Scalar groups are used for Siebel Business Components comprising one field, or for which only one field is mapped in the Data Quality field mappings in Siebel. The connector prepares the values for such groups into a simple delimited list of values in a single input attribute for EDQ.
The required configuration format is:
group.[name] = [BC1],[BC2],...
group.[name].concat = [EDQ-CDS Attribute Name]
group.[name].delimiter = [Delimiter character]
where:
-
name: label applied to the business components. -
BCn: Siebel Business Component name. -
group.[name].concat: the attribute under which the data will be concatenated. -
group.[name].delimiter: the delimiter character used to separate the data.
For example, the following group in the default dnd.properties file sets this configuration for the AlternatePhone business component in Siebel:
group.altphone = AlternatePhone
group.altphone.concat = alternatephone
group.altphone.delimiter = |
So all AlternatePhone values for each parent entity are concatenated into a delimited list.
This means that AlternatePhone values for Contacts in Siebel that are stored in this format:
contact1
    AlternatePhone1
    AlternatePhone2
contact2
    AlternatePhone3
    AlternatePhone4
are transformed into this format:
contact1 AlternatePhone1|AlternatePhone2
contact2 AlternatePhone3|AlternatePhone4
Non-scalar groups are used for more complex child entities comprising multiple fields, such as names and addresses. In this case, the connector prepares multiple records for the same parent to submit to EDQ for matching purposes, each with different child data.
The required configuration format is:
group.[name] = [BC1],[BC2]...
Be sure to replace the following with your information:
-
name: label applied to the business components -
BCn: Siebel Business Component name
For example, the following non-scalar group specifies a list of Siebel Business Components, each storing addresses:
group.address = CUTAddress,PersonalAddress
This setting means that CUTAddress and PersonalAddress records are grouped under the address label by the Connector and expanded into separate records for matching in EDQ-CDS.
The CUTAddress and PersonalAddress values for Contacts format is:
contact1
    CUTAddress1
    PersonalAddress1
contact2
    CUTAddress2
    PersonalAddress2
The values are transformed into this format:
contact1 address1 [CUTAddress1]
contact1 address2 [PersonalAddress1]
contact2 address3 [CUTAddress2]
contact2 address4 [PersonalAddress2]
These properties are used to configure how the Siebel Connector communicates with EDQ-CDS over web services.
Note :
It is not normally necessary to change these properties, as the Global Communication settings are inherited.
The dnd.properties file comes with 10 pre-defined web services configurations, ws1 to ws10. These are pre-configured with some or all of the following parameters, which can be edited if required:
-
type- A tag identifying the Data Quality operation in the Siebel vendor parameters. -
conduit- Specifies how the Siebel Connector communicates with EDQ-CDS. Possible values aresimplews,dbbatch,jmsbatch. -
url- The URL end point of the web service. -
failsafe- Specifies how the Connector behaves in the event of an error:-
true: the Connector fails silently, for example, no error message is generated. -
false: the Connector generates an error message.
-
-
usernameandpassword- The credentials used to connect to the web service. -
parameternames- A comma-separated list of Siebel session parameters to be passed to EDQ-CDS as web service parameters. -
idelement- the name of the XML element generated in the response to Siebel.
3.1.1.3 Batch Job Definitions
The Batch Job Definitions are divided into 5 groups as follows:
-
Account Match
-
Account Health Check
-
Contact Match
-
Contact Health Check
-
Prospect Match
These groups all have properties that control the way Batch operations are run.
These properties control how data flows between the Siebel Connector and EDQ-CDS:
-
type- A tag identifying the Data Quality operation. This must match the in Siebel vendor parameters. -
conduit- Specifies how the Siebel Connector communicates with EDQ-CDS. Possible values aresimplews,dbbatch,jmsbatch. -
failsafe- Specifies how the Connector behaves in the event of an error:-
true: the Connector fails silently, for example, no error message is generated.
-
false: the Connector generates an error message.
-
-
writetable- the Candidates table in the staging database that the Connector writes data to, and that EDQ-CDS reads data from. -
db- The database connection string for the staging database. -
project- CDS project name, which reads from the$projectnamevariable at the start of the dnd.properties file. -
job- The EDQ-CDS job name. -
runlabel- The Run Label for the job. -
overrides- The values of these settings and the Staging Database override the default (externalized) configuration settings in the EDQ-CDS processes. For example, Cluster Level, Match Threshold (2and70respectively, by default.) However, they can in turn be overridden by parameters configured in Siebel, see Section 3.7, "Understanding the Vendor Parameters." -
readtable- Name of the table in the staging database that matches are written to. -
idelement- The identifier element for the Siebel Business Component.
3.2 Configuring Siebel to Use Customer Data Services
The following is a step-by-step guide to configuring Siebel to use EDQ-CDS. Please read the Siebel Data Quality Administration Guide (available as part of Siebel Bookshelf) before attempting to follow these steps.
Note :
Siebel 8.1.1.10 or later is configured by default with all the settings described in this chapter. Therefore, if using this version of Siebel, this chapter can be used as a check list to confirm all the settings are correct. For older versions of Siebel, please use the settings described in this guide except where stated.
The guide is in four sections:
-
Server Configuration
-
Data Quality Administration
-
User Preferences
-
(Optional) Creating Templates to Enable Batch Data Quality Jobs
3.2.1 Server Configuration
-
Log into the Siebel web client as a system administrator.
-
Navigate to Administration - Server Configuration on the Siebel Site Map.
-
Click Enterprises at the top of the page and select the Component Groups tab.
-
Find the Data Quality component group and ensure it is enabled.
-
Check that the component group has been assigned and enabled on the Siebel server,
cai, in the following example: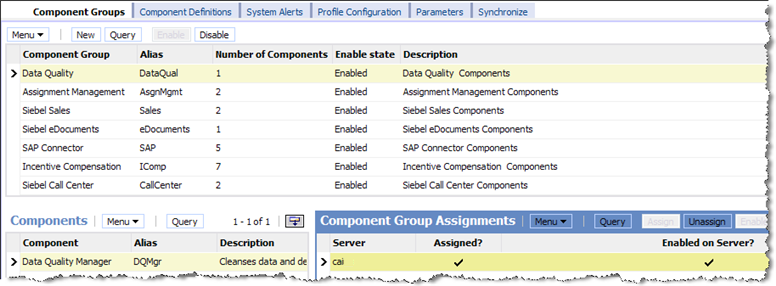
Description of the illustration comp_group_enable.png
-
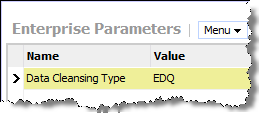
Switch to the Parameters tab and set the Data Cleansing Type parameter to EDQ:
Description of the illustration siebel412.png
-
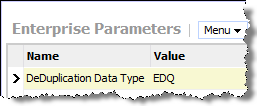
Set the DeDuplication Data Type parameter to EDQ:
Description of the illustration siebel413.png
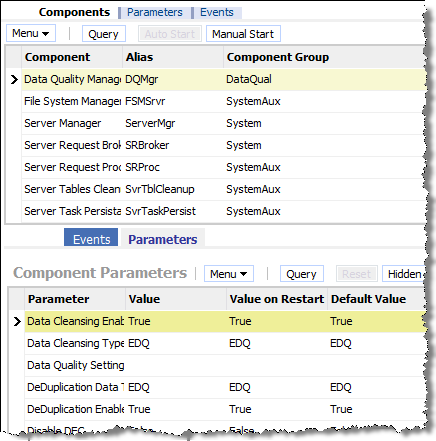
Click Servers at the top of the page, find the Data Quality Manager component and select the Parameters tab.
-
Ensure the following parameter values are set to EDQ:
-
Data Cleansing Type
-
DeDuplication Data Type
-
Set the following parameter values to True:
-
Data Cleansing Enable Flag
-
DeDuplication Enable Flag
Description of the illustration siebel414.png
Note :
The preceding illustration shows the values after a server restart, which is performed when Siebel configuration is completed.
-
-
Repeat steps 8 to 10 for the Siebel application components you want to use with EDQ-CDS. For example:
-
Call Center Object Manager
-
EAI Object Manager
-
Sales Object Manager
Tip:
You can use these steps for any other components that you want to use with EDQ-CDS.
-
3.2.2 Data Quality Administration
To set the Data Quality Administration options, use the following procedure:
-
Log into Siebel as a system administrator.
-
Navigate to Administration - Data Quality on the Siebel Site Map.
-
Click Data Quality Settings and create the following options:
-
Enable DataCleansing = Yes
-
Enable DeDuplication = Yes
Add the following options to enable a pop-up dialog of possible duplicate records for each new record of a given type when the real-time duplicate prevention service is running. If these options are not specified, and the real-time duplicate prevention service is running, the check will still be performed, but you must actively navigate to the Duplicate Accounts, Duplicate Contacts or Duplicate Prospects tab when adding a new record:
-
Force User DeDupe - Account = Yes
-
Force User DeDupe - Contact = Yes
-
Force User DeDupe - List Mgmt = Yes
-
-
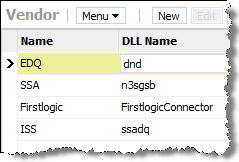
Click Third Party Administration. Add a new Vendor entry with a Name of EDQ, and a DLL Name of dnd:
Description of the illustration siebel4122.png
-
Select the EDQ vendor selected and add BC Operations as follows:
Business Component Name Operations Account
Data Cleansing
Account
DeDuplication
Contact
Data Cleansing
Contact
DeDuplication
CUT Address
Data Cleansing
List Mgmt Prospective Contact
Data Cleansing
List Mgmt Prospective Contact
DeDuplication
Additionally, add the following Business Components to configure matching using multiple child addresses:
Business Component Name Operations CUT Address
DeDuplication
Personal Address
Data Cleansing
Personal Address
DeDuplication
-
Scroll to the bottom of the screen and set the Field Mappings for each BC Operation. These mappings are detailed in Section 3.6, "Understanding the Field Mappings for Business Components."
Note :
If you add or change field mappings, then they must correspond to the configured web services in EDQ (for real-time operations) and the names of the columns in the tables of the staging database (for batch operations). Also, you must modify the relevant DQ Integration Objects and Business Services using Siebel Tools. If you are using Siebel UCM, then the you must modify the data maps between UCM Integration Objects and DQ Integration Objects.
-
With the EDQ vendor selected, select the Vendor Parameter tab in the middle section of the screen and add the parameters specified in Section 3.7, "Understanding the Vendor Parameters."
3.2.3 User Preferences
To enable data quality for any user, use the following procedure:
-
Select User Preferences on the Tools menu.
-
Click Data Quality.
-
Set both the Enable DeDuplication and Enable Data Cleansing options to Yes.
This completes the Siebel configuration. Restart the Siebel server to ensure that all the configuration changes have taken effect.
3.2.4 (Optional) Creating Templates to Enable Batch Data Quality Jobs
Siebel can be configured to run batch data quality jobs from the Server Management UI. Jobs can also be run from the Siebel command line, or job configurations can be stored in files and reused as required.
To do this, some custom Job Templates must be added to Siebel. These templates and the parameters required are listed in Section 3.5, "Understanding the Job Template Configuration."
To add a Job Template:
-
Open the Siebel web client.
-
Navigate to Administration - Server Configuration on the Siebel Site Map.
-
Click Job Templates.
-
Click New to create a new Job Template.
-
Complete the fields in the Job Templates and Job Parameters area using the details provided in Section 3.5, "Understanding the Job Template Configuration."
Note :
Set the Component field to Data Quality Manager for each new Job Template. If there are no options listed in this drop-down field, navigate to the Component Definitions tab on the Enterprise screen, and click Synchronize.
Create a new Job Template for every job listed in Section 3.5, "Understanding the Job Template Configuration."
3.3 Configuring the Staging Database
The Staging Database is used by the Siebel Connector as a staging area for handing over data between Siebel and EDQ when running batch jobs through Siebel's Data Quality Manager.
This batch interface is most commonly used when EDQ is connected to a standalone Siebel CRM system. In Siebel UCM, the 'UCM Batch' flow does not use this interface when matching inbound data against the master data in Siebel UCM. Rather, it calls out to EDQ's real-time matching services.
However, for both CRM and UCM the Siebel Data Quality Manager service can run batch duplicate identification and health check jobs on the master data only.
When such batch jobs are run, driver and candidate records for matching and input records for the Data Quality Health Check service are written to tables in the staging database, to be read by an EDQ job. For the matching service only, EDQ then exports duplicates from the matching process to another table in this staging database to be read back into Siebel.
3.3.1 Creating Tables
The sql folder in the root of the EDQ-CDS distribution contains scripts that can be run to create tables in the staging database as follows:
| SQL Script | Table Created |
|---|---|
|
|
|
|
|
|
|
|
|
|
|
|
|
|
|
|
|
|
|
|
|
|
|
|
|
|
|
3.3.2 Configuring Connections
Both the Siebel Connector and EDQ-CDS itself need to connect to the Staging Database in order to read and write to the Candidate and Match tables when processing Batch jobs. These tables can be created in any schema of a supported database type (Oracle or PostgreSQL). The default connection string is for an Oracle database.
The connection details are specified in the dnd.properties file, see Section 3.1, "Configuring the EDQ Siebel Connector." To configure these, open the dnd.properties file and edit the parameters in the CDS Connection Settings section near the top of the file. These parameters control the database host, port, credentials and other settings used to connect to the Staging Database.
3.4 Finalizing and Verifying the Configuration
The following sections describe how to finalize the system and verify that the EDQ Siebel Connector is installed and configured correctly.
Before starting, ensure that the appropriate real-time jobs are running in EDQ, see Oracle Fusion Middleware Installing and Customizing Enterprise Data Quality Customer Services Data Services Pack.
3.4.1 Generating Cluster Keys
If the Siebel database is already populated with records (Accounts/Contacts/Prospects) then the cluster keys in the system must be generated or refreshed for the new configuration before it is used.
In Siebel, run the following jobs (as defined in Section 3.5, "Understanding the Job Template Configuration") from the Administration > Server page:
-
Generate account keys
-
Generate contact keys
-
Generate prospect keys
Note :
If EDQ is being used for key generation, these jobs will automatically call EDQ clustering web services instead of using the configured Token Expression in Siebel to generate the keys.
3.4.2 Testing the Account Cleaning Service
To test the cleaning service for Account records:
-
Check that data cleansing is enabled for the server by ensuring that Administration - Data Quality > Data Quality Settings > Enable Data Cleansing is set to "Yes".
Note :
If this setting is changed from
NotoYes, it is necessary to restart the Siebel Server. -
Check that data cleansing is enabled for the current user profile by ensuring that Tools > User Preferences > Data Quality > Enable Data Cleansing is set to "Yes".
Note :
If this setting is changed from
NotoYes, it is necessary to exit the current client session and log in again as the same user. -
Enter a new Account record with an Account Name in lower case letters.

Description of the illustration account_before.png
-
Save the record.
-
Check that the Account Name has been converted to upper case to verify that the cleaning service has been called.

Description of the illustration account_after.png
3.4.3 Testing the Batch Matching Service
To test the batch matching service for Contact records:
-
Temporarily disable real-time deduplication for the current user profile by setting Tools > User Preferences > Data Quality > Enable DeDuplication to No.
Note :
If this setting is changed from
NotoYesit is necessary to restart the Siebel Server. -
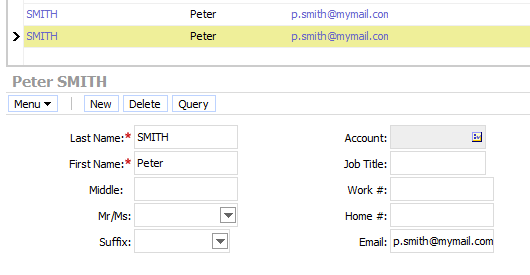
Enter and save two new Contact records with the same name and email address.
Description of the illustration test_batch_cont_match.png
-
Run the Batch contact match job from the Administration - Server page
-
Verify that the records were matched by checking the Administration - Data Quality > Duplicate Contacts page.

Description of the illustration dup_contacts.png
3.4.4 Testing Real-Time Contact Matching
To test the real-time matching service for Contact records:
-
Check that real-time deduplication is enabled for the current user profile by checking that Tools > User Preferences > Data Quality > Enable DeDuplication is set to Yes.
-
Set Administration - Data Quality > Data Quality Settings > Force User DeDupe - Contact to Yes.
-
Enter a new Contact record with the same details as in Section 3.4.3, "Testing the Batch Matching Service."
-
Save the record.
-
Verify that the Possible Matching Contacts dialog is displayed showing matches against the two contact records created previously.

Description of the illustration test_rt_cont_match.png
Note:
An exact name and email match, as in this example, will only match if EDQ is being used for key generation (for Siebel 8.1.1.10 or later), or if the Query and Token expressions used for key generation have been adjusted to use only name, or name and email, attributes.
3.5 Understanding the Job Template Configuration
For clarity, the Data Quality Setting parameter found in most of the Templates listed in the table begins with a single double quote mark (") and two single (') quote marks, and ends with one single quote mark and one double.
| Name | Short Name | Parameters |
|---|---|---|
|
Batch account cleanse |
BatAccClean |
Buscomp Name = Account Business Object Name = Account Operation Type = Data Cleansing |
|
Batch account match |
BatAccMatch |
Buscomp Name = Account Business Object Name = Account Data Quality Setting = "'','Yes','dedupe'" Operation Type = DeDuplication |
|
Batch account health check |
BatAccHealth |
Buscomp Name = Account Business Object Name = Account Data Quality Setting = "'','Yes','healthcheck'" Operation Type = DeDuplication |
|
Batch address cleanse |
BatAddClean |
Buscomp Name = CUT Address Business Object Name = CUT Address Operation Type = Data Cleansing |
|
Batch contact cleanse |
BatConClean |
Buscomp Name = Contact Business Object Name = Contact Operation Type = Data Cleansing |
|
Batch contact match |
BatConMatch |
Buscomp Name = Contact Business Object Name = Contact Data Quality Setting = "'','Yes','dedupe'" Operation Type = DeDuplication |
|
Batch contact health check |
BatConHealth |
Buscomp Name = Contact Business Object Name = Contact Data Quality Setting = "'','Yes','healthcheck'" Operation Type = DeDuplication |
|
Batch prospect cleanse |
BatProClean |
Buscomp Name = List Mgmt Prospective Contact Business Object Name = List Mgmt Prospective Contact Operation Type = Data Cleansing |
|
Batch prospect match |
BatProMatch |
Buscomp Name = List Mgmt Prospective Contact Business Object Name =List Mgmt Prospective Contact Data Quality Setting = "'','Yes','dedupe'" Operation Type = DeDuplication |
|
Generate account keys |
GenAccKey |
Buscomp Name = Account Business Object Name = Account Operation Type = Key Generate |
|
Generate contact keys |
GenConKey |
Buscomp Name = Contact Business Object Name = Contact Operation Type = Key Generate |
|
Generate prospect keys |
GenProKey |
Buscomp Name = List Mgmt Prospective Contact Business Object Name = List Mgmt Prospective Contact Operation Type = Key Generate |
|
Incremental account match |
IncAccMatch |
Buscomp Name = Account B usiness Object Name = Account Data Quality Setting = "'','No','dedupe'" Operation Type = DeDuplication Object Where Clause = [Updated] > '12/18/2007 00:00:00' Note: The preceding Object Where Clause is an example only. |
|
Incremental account health check |
IncAccHealth |
Buscomp Name = Account Business Object Name = Account Data Quality Setting = "'','No','healthcheck'" Operation Type = DeDuplication Object Where Clause = [Updated] > '12/18/2007 00:00:00' |
|
Incremental contact match |
IncConMatch |
Buscomp Name = Contact Business Object Name = Contact Data Quality Setting = "'','No','dedupe'" Operation Type = DeDuplication Object Where Clause = [Updated] > '12/18/2007 00:00:00' Note: The preceding Object Where Clause is an example only |
|
Incremental contact health check |
IncConHealth |
Buscomp Name = Contact Business Object Name = Contact Data Quality Setting = "'','No','healthcheck'" Operation Type = DeDuplication Object Where Clause = [Updated] > '12/18/2007 00:00:00' |
|
Incremental prospect match |
IncProMatch |
Buscomp Name = List Mgmt Prospective Contact Business Object Name = List Mgmt Prospective Contact Data Quality Setting = "'','No','dedupe'" Operation Type = DeDuplication Object Where Clause = [Updated] > '12/18/2007 00:00:00' Note: The preceding Object Where Clause is an example only. |
|
Refresh account keys |
RefAccKey |
Buscomp Name = Account Business Object Name = Account Operation Type = Key Refresh |
|
Refresh contact keys |
RefConKey |
Buscomp Name = Contact Business Object Name = Contact Operation Type = Key Refresh |
|
Refresh prospect keys |
RefProKey |
Buscomp Name = List Mgmt Prospective Contact Business Object Name = List Mgmt Prospective Contact Operation Type = Key Refresh |
3.6 Understanding the Field Mappings for Business Components
The following field mappings work with the provided templates data quality services and the provided example SQL code you can use to create the staging database.
Note :
All fields in these Business Components are drop-down fields, with the exception of Id. This field must be completed manually.
3.6.1 Account - Data Cleansing
| Business Component Field | Mapped Field |
|---|---|
|
Id |
|
|
Language Code |
|
|
Name |
|
|
Location |
|
|
Main Phone Number |
|
|
Tax ID Number |
|
|
Home Page |
|
|
VAT registration number |
|
3.6.2 Account - DeDuplication
| Business Component Field | Mapped Field |
|---|---|
|
Id |
|
|
Language Code |
|
|
Name |
|
|
Location |
|
|
Main Phone Number |
|
|
Tax ID Number |
|
|
VAT registration number |
|
|
Home Page |
|
The following fields are only used if Multiple Child Entities are disabled:
| Business Component Field | Mapped Field |
|---|---|
|
Primary Account Street Address |
|
|
Primary Account Address Street Address2 |
|
|
Primary Account Address Street Address3 |
|
|
Primary Account City |
|
|
Primary Account State |
|
|
Primary Account Postal Code |
|
|
Primary Account Country |
|
3.6.3 CUT Address - Data Cleansing
| Business Component Field | Mapped Field |
|---|---|
|
Street Address |
|
|
Street Address 2 |
|
|
City |
|
|
State |
|
|
Postal Code |
|
|
Country |
|
3.6.4 CUT Address - DeDuplication
Note :
This Business Component is only used if Multiple Child Entities are enabled.
| Business Component Field | Mapped Field |
|---|---|
|
Street Address |
|
|
Street Address 2 |
|
|
City |
|
|
State |
|
|
Postal Code |
|
|
Country |
|
3.6.5 Personal Address - Data Cleansing
Note :
This Business Component is only used if Multiple Child Entities are enabled.
| Business Component Field | Mapped Field |
|---|---|
|
Street Address |
|
|
Street Address 2 |
|
|
City |
|
|
State |
|
|
Postal Code |
|
|
Country |
|
3.6.6 Personal Address - DeDuplication
Note :
This Business Component is only used if Multiple Child Entities are enabled.
| Business Component Field | Mapped Field |
|---|---|
|
Street Address |
|
|
Street Address 2 |
|
|
City |
|
|
State |
|
|
Postal Code |
|
|
Country |
|
3.6.7 Contact - Data Cleansing
| Business Component Field | Mapped Field |
|---|---|
|
Id |
|
|
Language Code |
|
|
M/M |
|
|
M/F |
|
|
First Name |
|
|
Middle Name |
|
|
Last Name |
|
|
Home Phone # |
|
|
Work Phone # |
|
|
Fax Phone # |
|
|
Cellular Phone # |
|
|
Email Address |
|
|
Job Title |
|
|
Social Security Number |
|
|
Birth Date |
|
3.6.8 Contact - DeDuplication
| Business Component Field | Mapped Field |
|---|---|
|
Id |
|
|
Language Code |
|
|
M/M |
|
|
M/F |
|
|
First Name |
|
|
Middle Name |
|
|
Last Name |
|
|
Home Phone # |
|
|
Work Phone # |
|
|
Fax Phone # |
|
|
Cellular Phone # |
|
|
Email Address |
|
|
Job Title |
|
|
Social Security Number |
|
|
Birth Date |
|
|
Primary Account Name |
|
The following fields are only used if Multiple Child Entities are disabled:
| Business Component Field | Mapped Field |
|---|---|
|
Primary Street Address |
|
|
Primary Address Street Address2 |
|
|
Primary Address Street Address3 |
|
|
Primary City |
|
|
Primary State |
|
|
Primary Postal Code |
|
|
Primary Country |
|
3.6.9 List Management Prospective Contact - Data Cleansing
| Business Component Field | Mapped Field |
|---|---|
|
Id |
|
|
M/M |
|
|
M/F |
|
|
First Name |
|
|
Middle Name |
|
|
Last Name |
|
|
Home Phone # |
|
|
Work Phone # |
|
|
Fax Phone # |
|
|
Cellular Phone # |
|
|
Email Address |
|
|
Job Title |
|
|
Social Security Number |
|
|
Birth Date |
|
3.6.10 List Management Prospective Contact - DeDuplication
| Business Component Field | Mapped Field |
|---|---|
|
Id |
|
|
M/M |
|
|
M/F |
|
|
First Name |
|
|
Middle Name |
|
|
Last Name |
|
|
Home Phone # |
|
|
Work Phone # |
|
|
Fax Phone # |
|
|
Cellular Phone # |
|
|
Email Address |
|
|
Job Title |
|
|
Account |
|
|
Social Security Number |
|
|
Birth Date |
|
The following fields are only used if Multiple Child Entities are disabled:
| Business Component Field | Mapped Field |
|---|---|
|
Street Address |
|
|
Street Address 2 |
|
|
City |
|
|
State |
|
|
Postal Code |
|
|
Country |
|
3.7 Understanding the Vendor Parameters
| Name | Value |
|---|---|
|
Key Generation Process by Third Party |
Note: This parameter should be set to "Yes" if external key generation is supported by the installed version of Siebel (version 8.1.1.10 or later). If the parameter is set to |
|
Support Multiple Child Entities Deduplication |
Note: If this parameter is set to |
|
Account DataCleanse Record Type |
|
|
Account DeDup Record Type |
|
|
CUT Address DataCleanse Record Type |
|
|
CUT Address DeDup Record Type |
Note: Only used if multiple child entities are enabled. |
|
Personal Address DataCleanse Record Type |
|
|
Personal Address DeDup Record Type |
Note: Only used if multiple child entities are enabled. |
|
Contact DataCleanse Record Type |
|
|
Contact DeDup Record Type |
|
|
List Mgmt Prospective Contact DataCleanse Record Type |
|
|
List Mgmt Prospective Contact DeDup Record Type |
|
|
Batch Max Num Of Records |
200 |
|
Parameter 1 |
"session", "clusterlevel", "2" Note: There must be a space after each comma. |
|
Parameter 2 |
"session", "matchthreshold", "70" Note: There must be a space after each comma. |
3.7.1 Query and Token Expression Parameters
These parameters should only be configured if keys are generated by Siebel, rather than by calling EDQ key generation services. This applies to versions of Siebel prior to 8.1.1.10.
If the installed version of Siebel supports the use of EDQ services for key generation, then these services should be used to ensure the right balance between performance and match effectiveness.
Note :
The values of these Query and Token parameters are provided as examples only. They assume that there is a good level of completion of address data for individuals, that postal code on the primary address, and that most individuals are assigned to accounts. If this is not the case for the available data, these parameters must be configured to use the most frequently populated identifying data fields. For more information, see Oracle Siebel Data Quality Administration Guide.
| Name | Value |
|---|---|
|
Account Query Expression |
|
|
Account Token Expression |
|
|
Contact Query Expression |
|
|
Contact Token Expression |
|
|
List Mgmt Prospective Contact Query Expression |
|
|
List Mgmt Prospective Contact Token Expression |
|
Note :
The preceding values in the query, token expressions and parameter names are case sensitive. Also, '_____' in the Account Token Expression and Contact Token Expression settings represents five underscore characters in a sequence.