| Oracle® Retail Process Orchestration and Monitoring Security Guide Release 4.0.1 F17860-01 |
|

 Previous |
| Oracle® Retail Process Orchestration and Monitoring Security Guide Release 4.0.1 F17860-01 |
|
Previous |
This chapter covers the administration tasks performed during post installation of RMS application.
Access control of system resources is achieved by requiring users to authenticate at login and by restricting users to only those resources for which they are authorized. A default security configuration is available for immediate use after the Oracle Retail Fusion application is installed and is configured to use the Oracle Fusion Middleware security model. The default configuration includes eleven (11) predefined security roles for application-specific permission grants. Users can be added to predefined groups that are mapped to pre-configured application roles. RMS is pre-configured to grant specific application permissions.
Table 12-1 Privileges
| Name | Description |
|---|---|
|
Maintain Batch Administration Priv |
This privilege provides maintain access to Batch Administration Screen |
|
Maintain Batch Monitoring Priv |
This privilege provides maintain access to Batch Administration Screen as well as Batch Schedule Viewer Screen.This Privilege also allows to use the Action items in the above mentioned Screen. |
|
View Batch Monitoring Priv |
A privilege for viewing Batch Monitoring Screen |
|
View Application Logs Priv |
A privilege for viewing application logs |
|
View Historical Batch Logs Priv |
This privilege provides view access to the Historic Batch Logs stored. |
|
External Configuration Priv |
This privilege provides access to the External System Configuration Screen. |
Table 12-2 Duties
| Duty | Description | List of Privileges |
|---|---|---|
|
Business User Duty |
A duty for monitoring batch as a business user. |
View Batch Monitoring Privilege External Configuration Priv |
|
System Administration Duty |
A duty for maintaining application administration information. |
View Historical Batch Logs Priv Maintain Batch Monitoring Privilege Maintain Batch Administration Privilege View Application Logs Priv |
|
Batch Monitoring User Duty |
A duty for maintaining the batch monitoring screen. |
View Historical Batch Logs Priv Maintain Batch Monitoring Privilege View Application Logs Priv |
|
Batch Administrator Job |
System Administrator Duty |
View Historical Batch Logs Priv Maintain Batch Monitoring Privilege Maintain Batch Administration Privilege View Application Logs Priv |
|
Batch Business Job |
Business User Duty |
View Batch Monitoring Privilege External Configuration Priv |
|
Batch Monitoring Job |
Batch Monitoring User Duty |
View Historical Batch Logs Priv Maintain Batch Monitoring Privilege View Application Logs Priv |
You need to configure the user credentials and other security-related information at the service consumer and the app service provider layers to provide end-to-end security between web service consumer and the provider.
Applying policy A involves the following:
Enabling the HTTPS servers
Creating the Webservice users
Securing services
Updating the Webservice deployment
Webservice Clock Skew setting
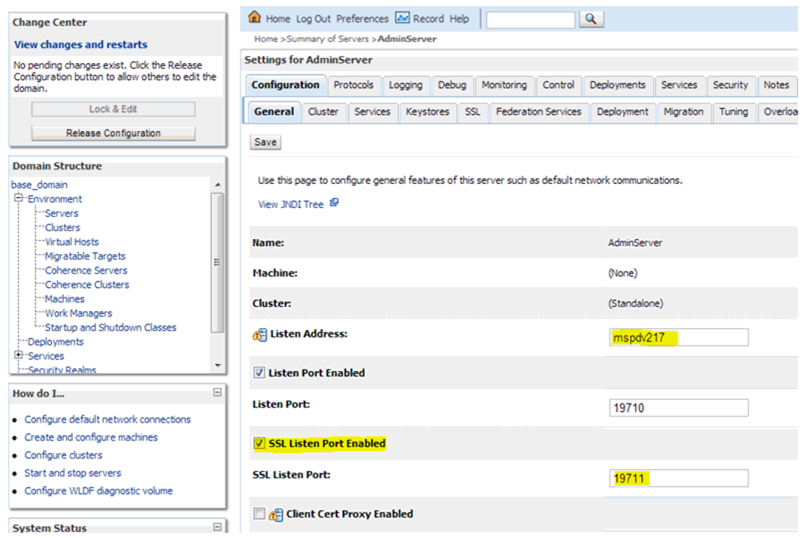
Perform the following steps to enable HTTPS servers:
In WebLogic Admin Console, click Environment > Servers.
Click the server where the web service has been deployed.
Click the General tab.
Check the SSL Listen Port Enabled check box.
Enter a port number for the SSL Listen Port. This is the port number for service end point.
Enter the hostname in Listen Address field.
Click Save.
Perform the following steps to create roles and users who can access the Web services:
In WebLogic Admin Console, click the Domain Structure window, and click the Security Realms link.
The default realm appears.
Click the link on the realm.
Click the Users and Groups tab.
Click New.
Enter the user name and password details on the next screen.
Leave the default value for Provider.
Click OK to save the changes.
The new user is shown in the list of users.
Perform the following steps in WebLogic Admin Console for each of the services to be secured:
Attach the user created in previous step to the service.
Click Deployments.
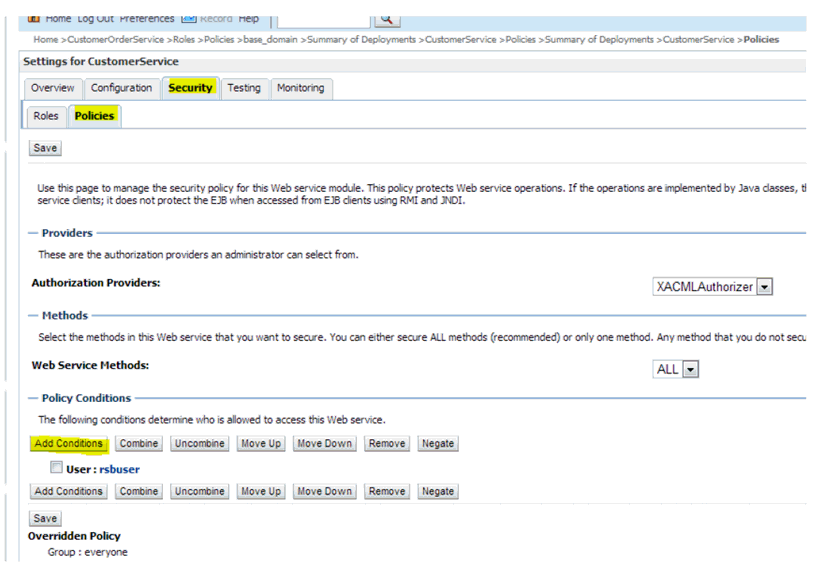
Click the service you want to secure.
Click Securities and then Policies.
Click Add Conditions.
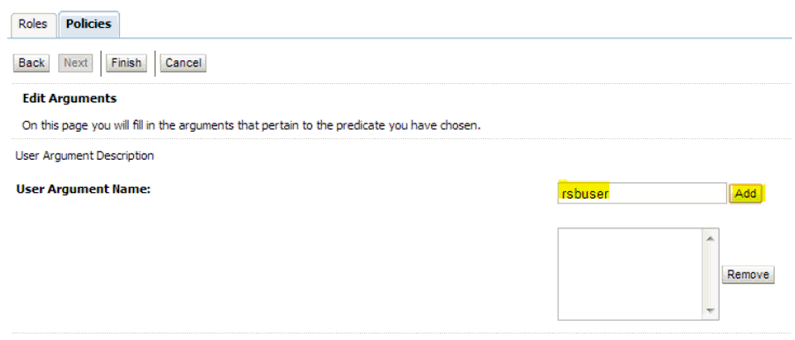
Click Predict List: Pick User from dropdown, then click Next.
Click User Argument Name.
Enter the username you created, then click Add.
Click Finish, then Save.
Attach the policy to the service.
Navigate to Configuration tab.
Click the WSB Policy tab and select the service port.
Click WebLogic, then Next.
Click Service Endpoint Policies.
Select policy:Wssp1.22007HttpsUsernameTokenPlain.xml, then click Finish.
Click OK if WebLogic prompts you to save Plan.xml.
Perform the following steps to update the Webservice deployment:
In WebLogic Admin Console, click Deployments.
Click Lock & Edit and select the deployed application with the Webservices to be secured.
Click Update and select the deployment .ear file, along with the Plan.xml file if it was saved earlier.
Click Finish.
Click Activate Changes to reflect the changes.
Verify the configuration by checking the WSDL of the service.
The WSDL must have the policy information in it.
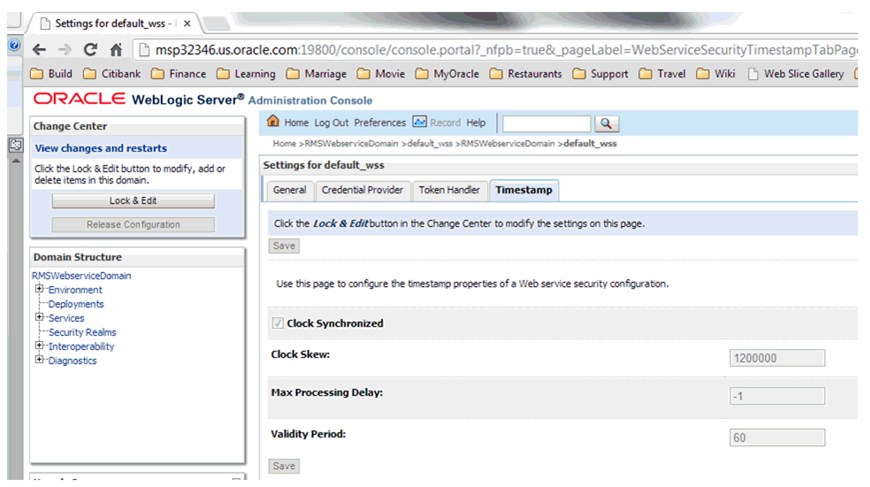
Webservices, when secured, need to be time-synced with providers and consumers. However, for various reasons, the providers and consumers can have different time gaps.
Weblogic can be configured to different tolerance level for webservices to work. Perform the following steps to set the time tolerance level to a different value:
Navigate to WLS Console > Domain > Web Service Security > default_wss > Timestamp.
Click Lock and Edit.
Update the Clock Skew with the new tolerance limit (in milliseconds).
Click Activate Changes.
Restart the managed server hosting Webservice once the changes are implemented.
Applying policy B involves the following:
Creating the Webservice users
Securing services
Updating the Webservice deployment
Perform the following steps to create roles and users who can access the Web services:
In WebLogic Admin Console, click the Domain Structure window, then click the Security Realms link.
The default realm appears.
Click the link on the realm.
Click the Users and Groups tab.
Click New.
Enter the user name and password details on the next screen.
Leave the default value for Provider.
Click OK to save the changes.
The new user is shown in the list of users.
Perform the following steps in WebLogic Admin Console for each of the services to be secured:
Attach the user created in previous step to the service.
Click Deployments.
Click the service you want to secure.
Click Securities, then Policies.
Click Add Conditions > Predict List:.
Pick the User from the dropdown, then click Next
Click User Argument Name.
Type the username you created, then click Add.
Click Finish, then click Save.
Attach policy to the service.
Navigate to the Configuration tab.
Click the WSB Policy tab and select the service port.
Click WebLogic, then click Next.
Click Service Endpoint Policies.
Select policy:Wssp1.22007HttpsUsernameTokenPlain.xml, then click Finish.
Click OK if WebLogic prompts you to save Plan.xml.
Perform the following steps to update the Webservice deployment:
In WebLogic Admin Console, click Deployments.
Click Lock & Edit and select the deployed application with the Webservices to be secured.
Click Update and select the deployment ear along with the Plan.xml if saved in the previous steps.
Click Finish.
Click Activate Changes to reflect the changes.
Verify the configuration by checking the WSDL of the service.
The WSDL must have the policy information in it.