| Oracle® Retail Insights Cloud Service Suite Administration Guide Release 18.0.002.7 F29110-02 |
|

 Previous |
 Next |
| Oracle® Retail Insights Cloud Service Suite Administration Guide Release 18.0.002.7 F29110-02 |
|
Previous |
Next |
This chapter describes the processes for maintaining users and roles as well as batch processes. For information regarding standard end user activities like creating and viewing reports, please see the Oracle Retail Insights User Guide.
It is considered to be a best practice to have all Oracle Retail Insights Cloud Service Suite supports requests submitted through a single point of contact for that customer environment; the client designated administrator is usually designated to perform this role.
The link to use when submitting Service Requests (SR) is:
Oracle Identity Cloud Service (IDCS) is Oracle's cloud native security and identity platform. It provides a powerful set of hybrid identity features to maintain a single identity for each user across cloud, mobile, and on-premises applications. IDCS enables single sign on (SSO) across all applications in a customer's Oracle Cloud tenancy. Customers can also integrate IDCS with other on premise applications to extend the scope of this SSO.
IDCS is available in two tiers: Foundation and Standard.
Oracle Identity Cloud Service Foundation: Oracle provisions this free version of Oracle Identity Cloud Service for customers that subscribe to Oracle Software-as-a-Service (SaaS), Oracle Platform-as-a-Service (PaaS), and Infrastructure-as-a-Service (IaaS) applications. A customer can use this version to provide basic identity management functionalities, including user management, group management, password management, and basic reporting.
Oracle Identity Cloud Service Standard: This licensed edition provides customers with an additional set of Oracle Identity Cloud Service features to integrate with other Oracle Cloud services, including Oracle Cloud SaaS and PaaS, custom applications hosted on-premises, on Oracle Cloud, or on a third-party cloud, as well as third-party SaaS applications. Features listed in this pricing tier are applicable for both Enterprise users and Consumer users.
Details of the specific features available in each tier and IDCS Standard Tier licensing model are available in Administering Oracle Identity Cloud Service. Retail Insights Cloud Service Suite only requires the Foundation Tier, as the Foundation Tier includes key features such as User and Group Management, Self-Service Profile Management and Password Reset, SSO. However, Oracle Retail customers may wish to consider licensing the Standard Tier of IDCS to have access to more advanced identity features including Identity Synchronization with Microsoft Active Directory, SSO for Third Party Cloud Services and Custom Applications, Multi-Factor Authentication and generic SCIM Templates.
When any Oracle Retail cloud service is provisioned, Oracle Retail's Enterprise Roles are seeded into the customer's IDCS instance as Roles. It is expected that customers will also have other roles defined for other cloud services that use this IDCS instance.
Upon provisioning a new cloud service instance, Oracle Retail creates a single delegate customer administrator user. The customer administrator user has the ability to define password complexity and rotation rules. All Application User maintenance is performed by Customer Administrators via IDCS. A key feature of IDCS is that basic user maintenance can be further delegated via identity self-service. When application users are created in IDCS, they must be associated with an appropriate Oracle Retail Enterprise Role to access Retail Insights Cloud Service Suite.
For instructions on managing users and groups in IDCS, follow the Manage Users and Groups IDCS document at the following URL:
https://docs.oracle.com/en/cloud/paas/identity-cloud/index.html
Retail Insights Cloud Services is built with role-based access. Permissions are associated with roles. All roles in this section end with the string ”_JOB” which implies a Production environment role. For Pre-Production environments (also known as Stage or Dev) a duplicate set of roles is available, ending in ”_JOB_PREPROD”. The same instance of IDCS is used to manage both production and pre-production roles.
The following RI application roles are available:
Table 1-1 Retail Insights Cloud Services Default Enterprise Roles
| Application Module | Enterprise Roles/IDCS Groups | Corresponding Application Roles |
|---|---|---|
|
ORMI/ORCI |
AltHierarchyInsights_JOB |
AltHierarchyInsights |
|
ORCI |
ConsumerInsights_JOB |
ConsumerInsights |
|
ORCI |
CustomerInsights_JOB |
CustomerInsights |
|
ORCI |
CustomerDetailInsights_JOB |
CustomerDetailInsights |
|
ORCI |
CustomerLoyaltyInsights_JOB |
CustomerLoyaltyInsights |
|
ORCI |
CustomerOrderInsights_JOB |
CustomerOrderInsights |
|
ORCI |
CustomerSegmentInsights_JOB |
CustomerSegmentInsights |
|
ORMI/ORCI |
EmployeeInsights_JOB |
EmployeeInsights |
|
ORMI |
FranchiseInsights_JOB |
FranchiseInsights |
|
ORMI |
InventoryInsights_JOB |
InventoryInsights |
|
ORMI |
PlanningInsights_JOB |
PlanningInsights |
|
ORMI/ORCI |
PromotionInsights_JOB |
PromotionInsights |
|
ORMI |
PurchaseOrderInsights_JOB |
PurchaseOrderInsights |
|
ORMI/ORCI |
SalesInsights_JOB |
SalesInsights |
|
ORCI |
ScienceInsights_JOB |
ScienceInsights |
|
ORMI |
SupplierInsights_JOB |
SupplierInsights |
|
ORMI/ORCI |
RetailAnalysts_JOB |
RetailAnalyst |
|
ORMI |
TenderInsights_JOB |
TenderInsights |
|
POM |
PROCESS_SERVICE_ADMIN_JOB |
POM Business Role |
Using a combination of the roles above will grant access to sets of metrics and attributes in RI in an additive fashion. One exception is the CustomerDetailInsights role, which is a special role intended to grant access to detailed customer information, such as their name and phone number. This role must be used in combination with the CustomerInsights role to get access to these attributes, and can be limited to a subset of RI users. Without the additional role, the CustomerInsights role only grants access to basic non-identifying customer information such as the customer ID and generic user-defined attributes.
Additionally, the following Oracle Business Intelligence roles are used in combination with the roles above. Assign a combination of these roles depending on the level of access to OBIEE functionality required for each user. For example, a local systems administrator could be granted all of the roles in this table, and the permissions will be additive.
Table 1-2 Retail Insights Cloud Services OBIEE Roles
| Application Module | Enterprise Roles/IDCS Groups | Permissions Level |
|---|---|---|
|
ORMI/ORCI |
BIConsumer_JOB |
Ability to view content created by others. Cannot create new content. |
|
ORMI/ORCI |
BIAuthors_JOB |
Ability to create and share new content, including analyses, dashboards, visual analyzer projects, and XLS uploads to VA. |
|
ORMI/ORCI |
RIApplication Administrator_JOB |
Customer administrator responsible for creating and maintaining Agents, BI Publisher jobs, and Catalog permissions. |
|
Visual Analyzer |
RetailVisualAnalyzer_JOB |
Grants direct access to the Visual Analyzer module in OBI EE, without granting access to any functional modules in RI itself. |
Assign the above roles to the user following the steps mentioned in the previous section as per your requirement. The table below describes some common users and the associated roles they could be granted for RI access.
Table 1-3 Retail Insights Cloud Services OBIEE User Examples
| User Example | Enterprise Roles/IDCS Groups | Description |
|---|---|---|
|
RI Admins |
BIConsumer_JOB BIAuthors_JOB RIApplicationAdministrator_JOB RetailAnalysts_JOB |
This user group has access to all functional areas in RI and will have the ability to manage Agents and modify and delete objects in the /Shared Folders/Custom/ space in the catalog. |
|
Merchandisers |
BIConsumer_JOB BIAuthors_JOB SalesInsights_JOB InventoryInsights_JOB SupplierInsights_JOB |
This user group has access to the Sales, Inventory, and Supplier areas in RI, which are typically required for merchandisers and buying teams. |
|
Store Managers |
BIConsumer_JOB RetailAnalysts_JOB |
This user group has read-only access to RI, meaning they can run any report shared with them but cannot create content themselves. |
The following is the file upload process. For details regarding file contents and formatting please refer to the Oracle Retail Insights Cloud Services Integration Guide. The Private/Public Keys must be generated and the public Key must be associated with your SFTP Account for the file uploads. The Adding Authorized Keys section describes the step-by-step method to generate the Keys (2048 bit RSA Keys).
The following is the process to generate a 2048 bit RSA key and add the same to the SFTP server. This is done with the help of WinSCP tool on Windows. However the same can be done using ssh-keygen on Linux as well.
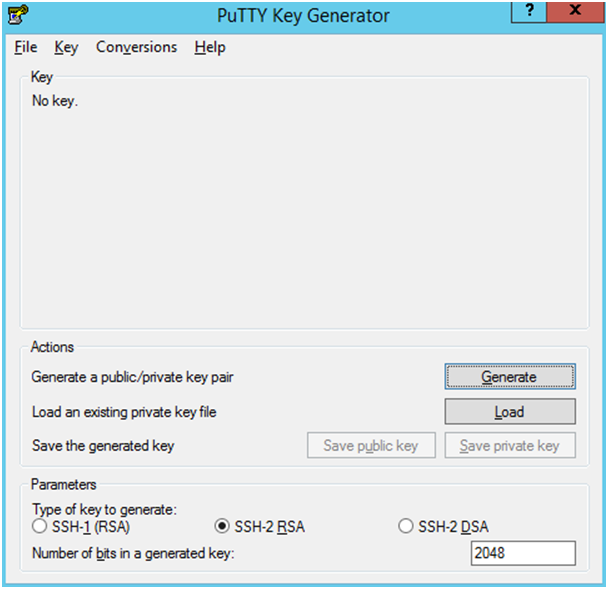
Launch WinSCP and select Tools -> Run PuttyGen.
Select "SSH-2 RSA" for the type of key to generate and enter "2048" for the number of bits in a generated key field and click Generate.
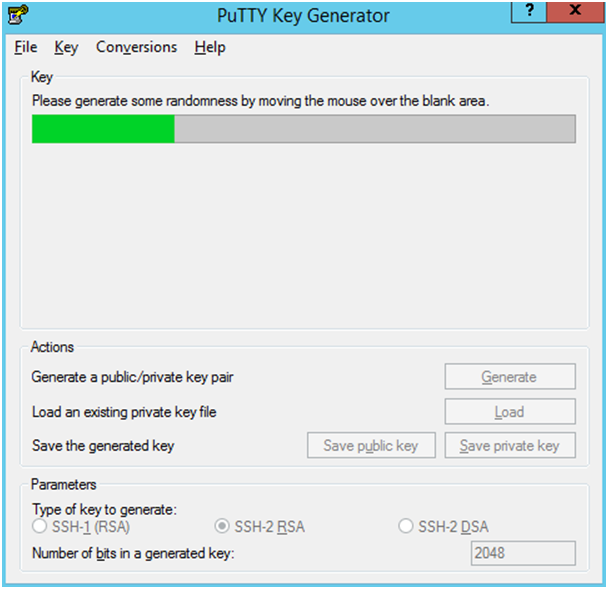
Move the mouse over the blank space in the window until the key is generated.
Once the key is generated, click the Save public key button to save the public key to a file.
Click the Save private key button to save the Private key to a file. Confirm to save it with/without a passphrase.
Open an SR with Oracle Support, to associate the Public half of the Key with your SFTP account (attach the Key with the SR).
The Upload steps uses the private key generated in the earlier section.
Launch WinSCP and connect to <SFTP Server> using port 22.
Enter the username and click Advanced.
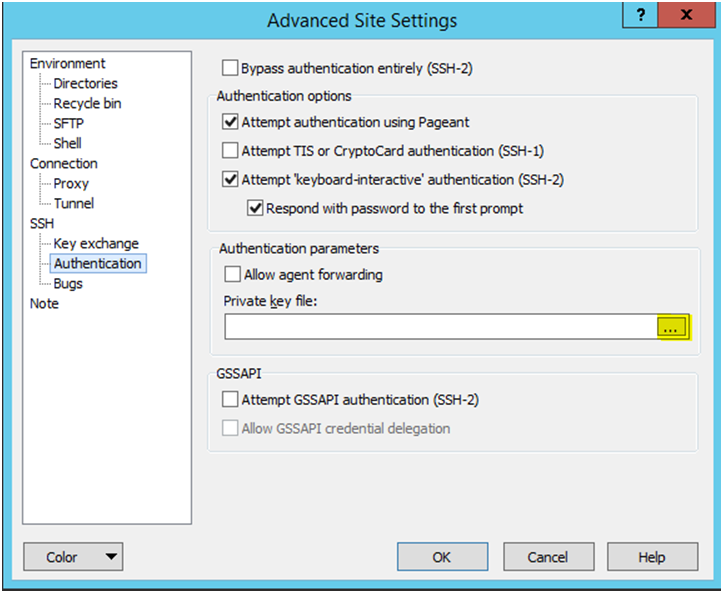
Click Authentication.
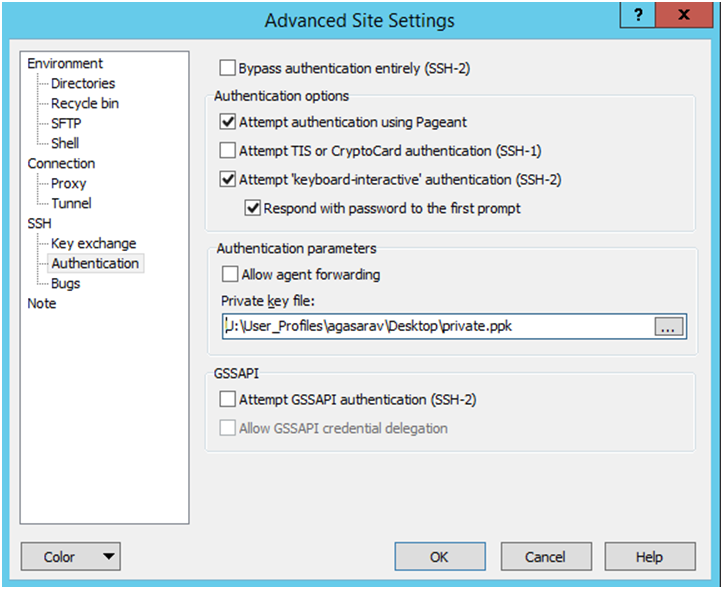
In the Private Key File field, click the Browse button and select the private key created in the earlier section.
After loading the private key file, click OK.
Click Login. The window does not prompt for a password and logs into the SFTP server. Provide a passphrase if one has been set up.
Login to the WinSCP by Following the Steps – Login to WinSCP section.
Transfer all data files to the directory /<SFTP User>.
Create a directory called COMMAND under /<SFTP User>if it does not already exist.
Change to the /<SFTP User>/COMMAND directory.
Transfer an empty file called COMPLETE.
Login to the WinSCP by following the Steps – Login to WinSCP section. The following is the download file process.
Change directory to /<SFTP User>/EXPORT.
Download all data files.
RI application administrators may take advantage of the BI Publisher module in OBIEE to generate data files and reports on the SFTP server. Such files would be made available in the EXPORT directory as described above.
The steps to instruct BI Publisher to send a file to SFTP are as follows:
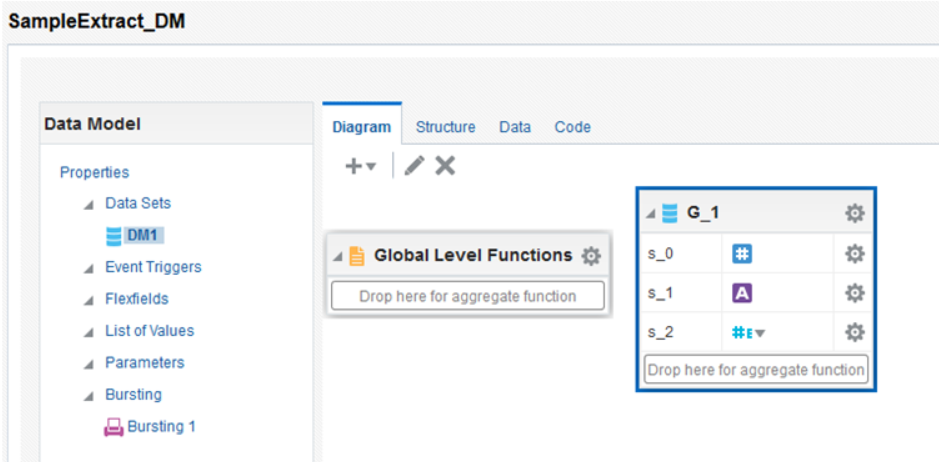
Create a Data Model in OBI EE and setup the desired queries and datasets that will feed your export file.
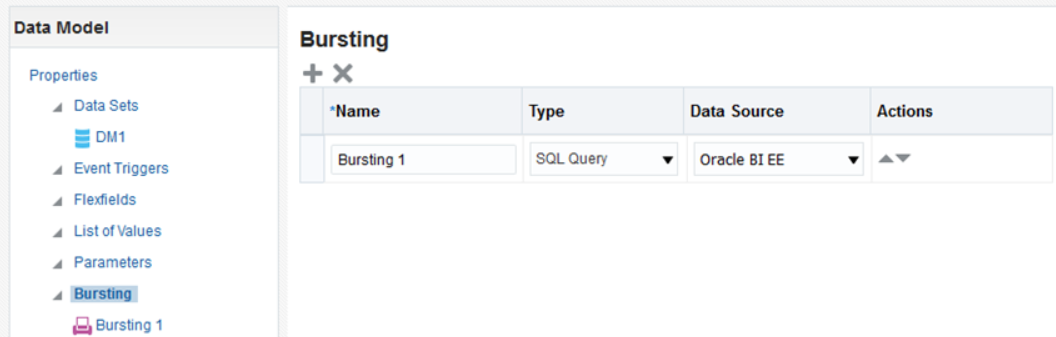
Select the Bursting option from the list of properties in the left pane of the Data Model, and add a new bursting query.
Select SQL Query as the Type, and Oracle BI EE as the Data Source.
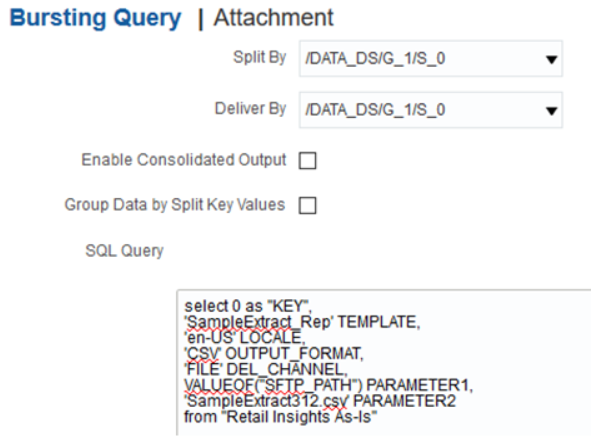
Select the bursting object from the left pane to add a query to it. Below is a sample query which is used to create a CSV file:
select 0 as "KEY",
        'SampleExtract_Rep' TEMPLATE,
        'en-US' LOCALE,
        'CSV' OUTPUT_FORMAT,
        'FILE' DEL_CHANNEL,
        VALUEOF("SFTP_PATH") PARAMETER1,
        'SampleExtract.csv' PARAMETER2
from "Retail Insights As-Is"
Continue to define the rest of the BI Publisher objects (Reports and Jobs) following standard OBI EE procedure. When a Report Job is executed for this Data Model, it will use the values in the bursting query to create the file and write it to the export directory on the SFTP server.
For more information on Bursting queries, refer to the Oracle Fusion Middleware Data Modeling Guide for Oracle Business Intelligence Publisher:
https://docs.oracle.com/middleware/12213/bip/BIPDM/toc.htm
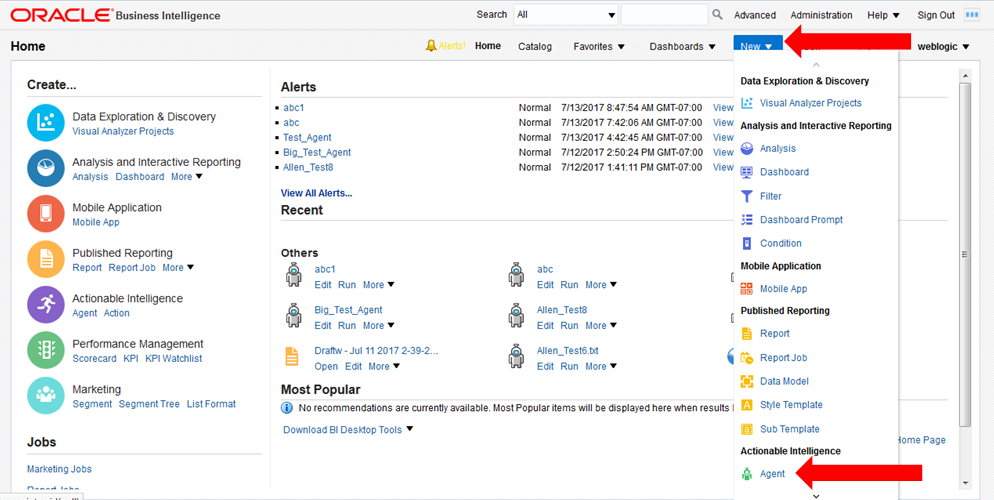
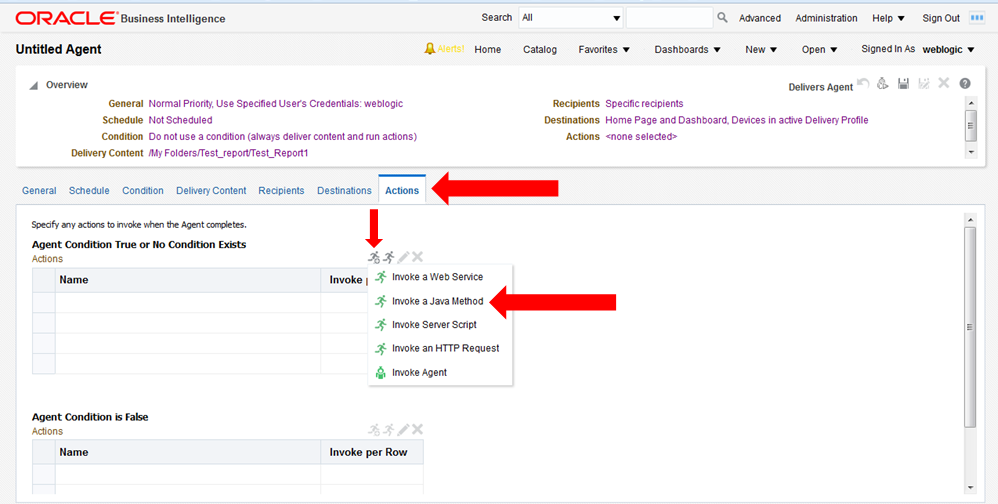
After creating an Analysis (report) that is needed to be refreshed and saved to a file for downloading, from the OBIEE home screen select New -> Agent.
After setting the schedule for the Agent execution, go to the Delivery Content tab and select the analysis report, don't worry about the other settings on this tab such as format because these will be overridden by other selections on the Actions tab.
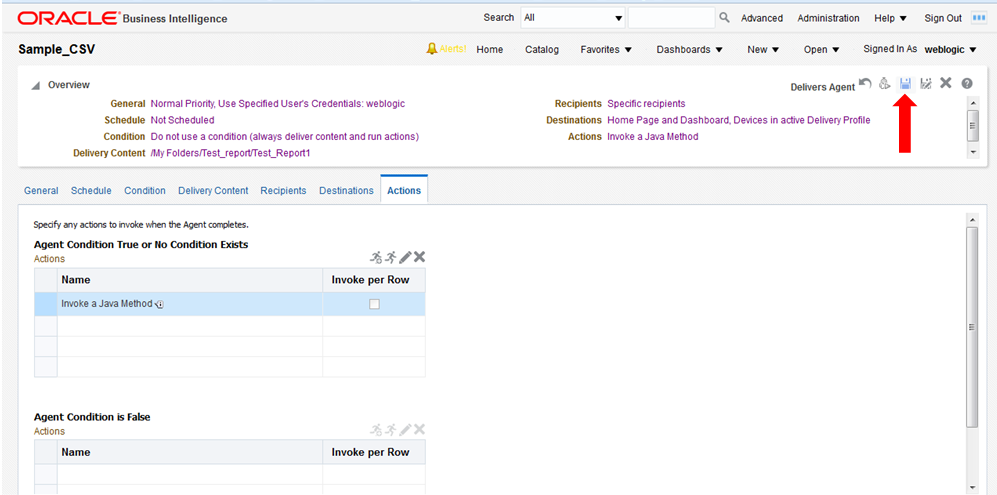
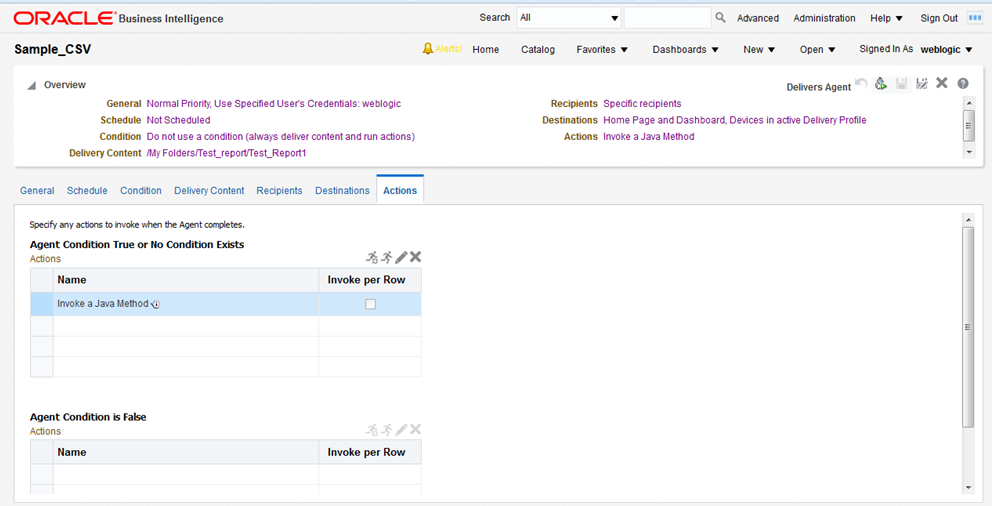
Ignore the Recipients and Destinations tabs, go to the Actions tab and add a new Action that "Invokes a Java Method".
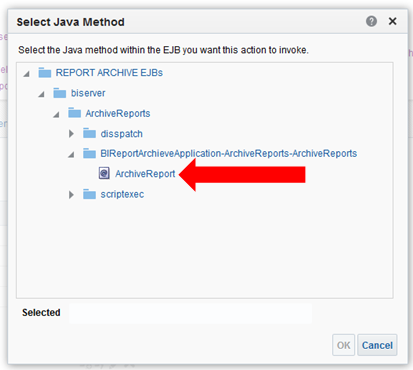
Select "REPORT ARCHIVE EJBs / biserver / ArchiveReports / BIReportArchieveApplication-ArchiveReports-ArchiveReports / ArchiveReport".
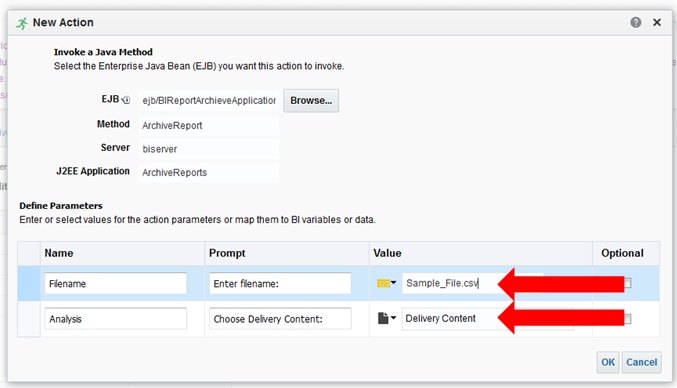
Enter the filename that the report should be written into, and select "Delivery Content".
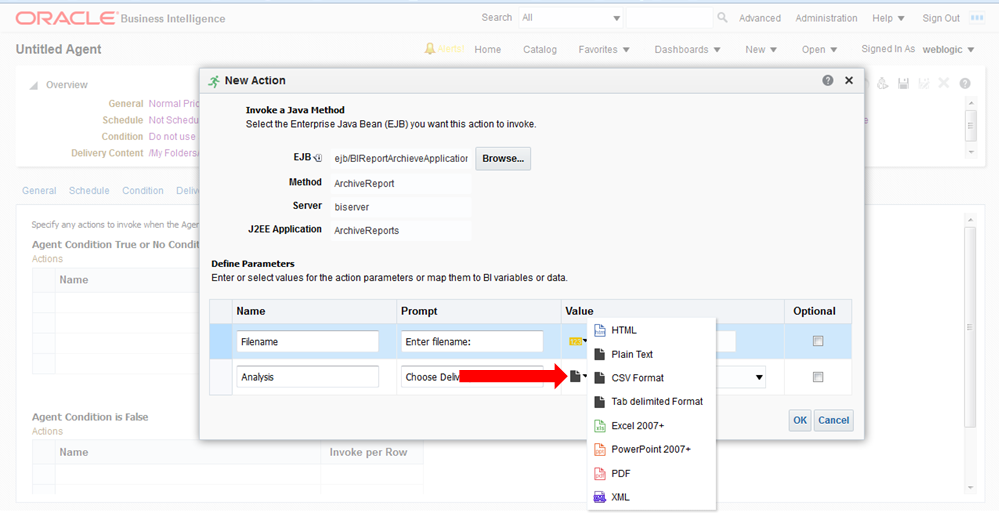
Click the small black page icon with the turned corner and select the file format to be written, then click OK.
Click Save Agent and give the Agent a name. At this point the Agent has been defined and will execute according to the defined schedule.
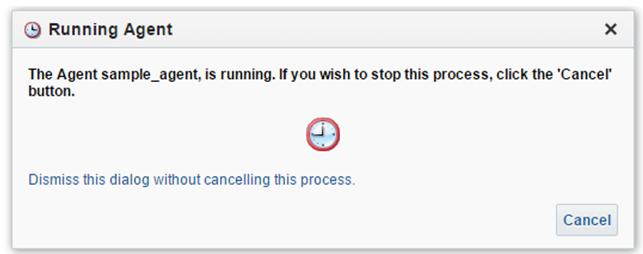
If you would like to do an immediate execution of the Agent you can click Run Agent Now.
The following dialog displays while the agent is running:
All Oracle Retail applications come packaged with resource bundles, files that contain text resources. These text resources appear throughout the Oracle Retail application as instructions, messages, labels, errors, virtually any text that appears in the application comes from a resource bundle.
Many Oracle Retail applications support the ability for retailers to customize the text that appears in the Oracle Retail application to better match that retailer's business language. The capability to change the text for a resource is provided through the Resource Bundles area of Retail Home. Retailers can customize text resources for any Oracle Retail supported language.
All text resources in the Oracle Retail application have the following values:
Base Application Code - This value identifies the Oracle Retail application that owns this text resource.
Language - This value identifies the language of the text resource.
Bundle - This value identifies the bundle file where this text resource resides.
Resource - This value is the unique name that can be used to get the text for this resource.
Base Text - This value is the text provided by the Oracle Retail application. This is the text that will appear in the application by default.
Every text resource in Oracle Retail applications is uniquely identified by the combination of Application Code, Language, Bundle, and Resource.
A resource customization is a change that a retailer made to the text of a resource. In addition to the values above, customizations also have the following values:
Current Text - This is the text that will actually appear in the Oracle Retail application. If a retailer has provided custom text for the resource, then this value will display the retailer's custom text. Otherwise, it will display the base text provided by the Oracle Retail application.
The Resource Bundles area of Retail Home consists of the following task flows:
Resource Text Strings
Imports Management
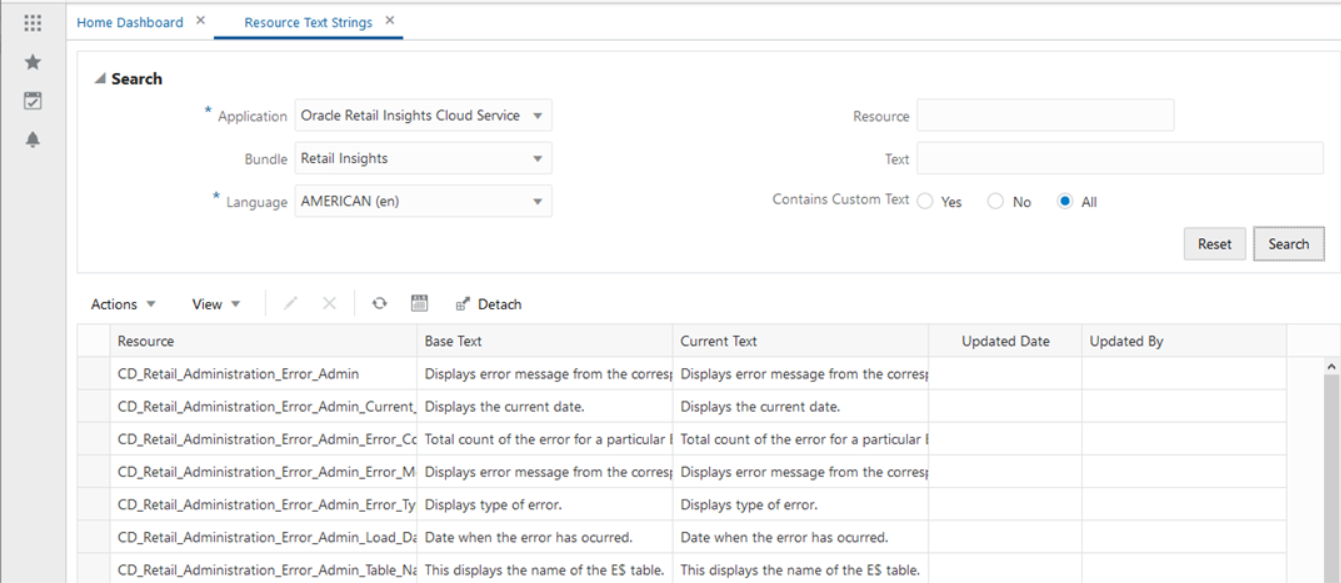
From the Retail Home lower-left hand Settings menu, the user can access the Resource Bundles link. The Resource Text Strings screen provides the capability to customize the resources present in the resource bundles in an application. The user can search the resources in the application using the Bundle, Language, Resource, Contains Custom Text, or Text fields.
The results table in the Resource Text Strings screen will display the Resource, Base Text, Current Text, Contains Custom Text, Updated Date, and Updated By columns for the resources matching the entered search criteria. If there is a custom value present for a resource, it will be displayed in the Text column along with the date and the user who customized that entry. The Contains Custom Text column will display Yes if a custom value is present for a resource. If there is no custom value present for a resource, the Text column will display the base text and the Updated Date and Updated By columns will be displayed empty. The Contains Custom Text column will display No in this scenario. The user can view, add, edit, or remove custom text for a resource using this screen.
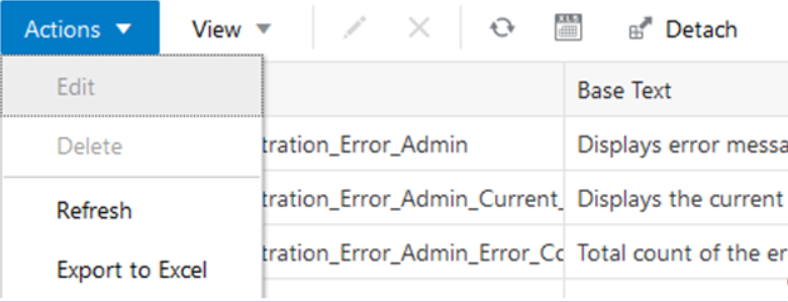
The user can also export the results table to an Excel CSV file using this screen. The export action allow the user to modify custom text for many resources at one time, and upload all the custom values in a single action in Imports Management.
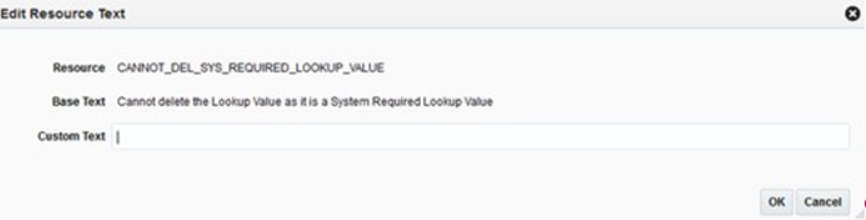
The user can add or edit the custom text for a resource using the Edit menu item or the pencil icon. If no custom text is present for a resource, a new custom text will be added. If a custom text is already present for a resource, it will be modified. The Updated Date and Updated By columns will be changed to reflect the addition or modification. The Edit option opens up a popup showing the resource, its base text and editable custom text. Only one record can be edited at a time in a popup. If more than one record or no record is selected, a warning is displayed to the user. The Edit popup can also be opened by double clicking a record on the results table.
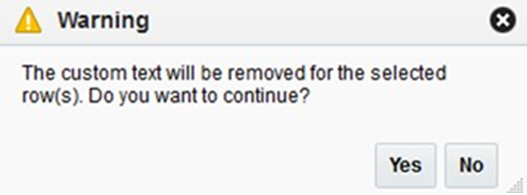
The user can remove the custom text for one, many or all the selected resources using the Remove Customization menu item or the cross icon. The user can select a single or multiple records and remove custom values for the records. The Remove Customization option will give a confirmation warning message before the custom text is removed for the selected records. The base text is not impacted by the Remove Customization operation.
The user can export the details of the resources from the results table to an Excel CSV file. When the user selects the Export to Excel action, the browser will perform its download behavior. Depending on the user's browser preferences, the browser may prompt the user asking whether the exported file should be opened or saved, what program should be used to open the file, or where on the user's computer the file should be saved. Exporting a large number of strings may take some time to complete, during which time the browser may remain in an active/processing state.
The user can change the values in the Text column of an exported CSV, and then import the CSV file from the Imports Management screen. When the user does this, the values of the Text column are imported into the custom text of each newly customized resource. The user can customize multiple rows with a single action by importing a file which contains multiple customized rows. Importing a file that has not been modified will do nothing, since the text for each resource is already exactly the same in Retail Home the Oracle Retail application.
The imported file must meet the following assumptions for the import to succeed:
The imported file must be a well-formed CSV file. The user can use any compatible program to edit the exported CSV file, as long as the program is able to read the CSV file and save it again in CSV format.
The user should only edit values in the Text column. If the user edits any of the values in the Base Application Code, Language, Bundle, or Resource columns, the import may fail, or invalid customizations may be created.
The user can only add or edit customizations in the import. The user cannot remove customizations using import. Deleting the contents of the Text field or copying the Source Text into the Text field will cause the row to be ignored.
The size of the imported file is limited to 2000 KB. Users will not be allowed to upload a file larger than this.
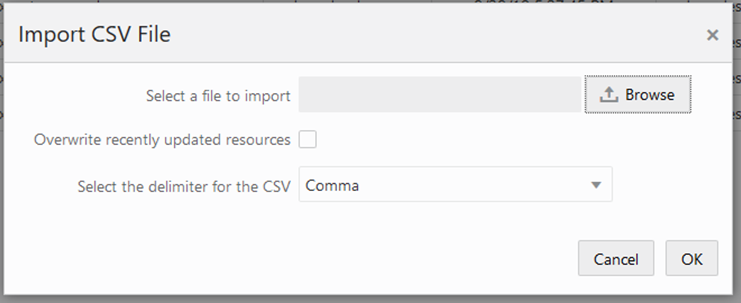
From the Import Management screen, select the relevant application code and click the Create action. When the user selects the Create file action, a popup opens prompting the user to select a file to import.
It is possible that, after a user exports resources to a CSV file, but before the user imports the file into Retail Home, another user may go to Retail Home and customize one or more of the exported resources. In this case, the values of resources in Retail Home would be newer than the values in the exported file. In order to ensure that an import does not inadvertently overwrite these values, the import action will skip resources that have been recently updated in Retail Home, and notify the user. The user can tell the import to instead use the values from the imported file by selecting the "Overwrite recently updated resources" checkbox on the import pop-up.