| Agile Product Lifecycle Management ACS User Guide Release 9.3.5 E61165-01 |
|

 Previous |
 Next |
This chapter includes the following:
Overview
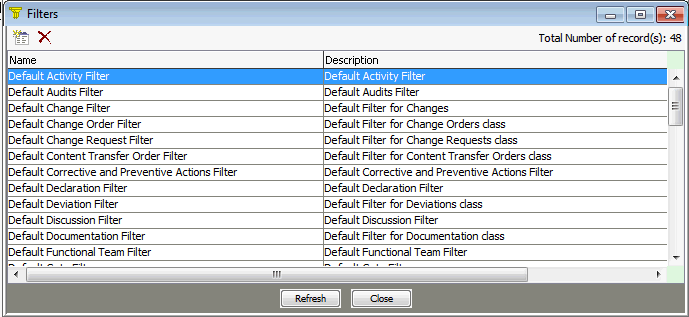
Creating FiltersEditing FiltersDeleting Filters
Filters define the content that is published in the transfer order. These are managed from the Filters node.
|
Note: Filters that you save in the Agile Content Service node are also available for use in the Agile PLM Export wizard. For more information, refer to the Agile PLM Import & Export Guide. |
Filters are limited to the windows t are within base classes. If a filter for a specific class makes a tab visible that a subclass does not have a visible tab, the tab is omitted from the extracted data. For example, the Page Three tab of an ECO are not visible, but the filter for the Change Orders class allows you to extract Page Three tabs. When an ECO is extracted using this filter, the data on Page Three is skipped because it is not visible on the subclass. You can have multiple filters for the same base classes, but with different filter names. Agile Content Service provides default filters for different classes are listed Part , "Agile Content Service Filters."
|
Note: Object classes that are not included in the following list are not supported by Agile Content Service, this includes the entire set of Objects in the Program class |
Filters are grouped by class as follows:
Changes
Change Requests
Deviations
Manufacturer Orders
Price Change Orders
Sites Change Orders
Stop Ships
Declarations
Homogeneous Materials Declarations
IPC 1752-2 Declarations
IPC 1752-2 Declarations
JGP Declarations
Part Declarations
Supplier Declarations of Conformance
Part Declarations
Substance Declarations
Discussions
Items
Parts
Documentation
Manufacturers
Manufacturer PartsPackagesPart GroupsPrices
Published PricesQuote Histories
Product Service Requests
Problem ReportsNon-Conformance Reports
Quality Change Requests
AuditsCorrective and Preventive Actions
Specifications
Substances
SubstancesSubstance GroupsSubpartsMaterials
Suppliers
Transfer Orders
Content Transfer Orders
Users
User Groups
|
Note: A filter for ATO objects is not necessary. To extract data about ATO objects to aXML files, specify a role that includes privilege masks that allow a user to view ATO objects. When the selected role allows access to ATO objects, data about the ATO object itself is extracted and included in the aXML file. This information can be used to troubleshoot delivery issues |
The following paragraphs describe how to create filters and the relevant guidelines. For example, when creating a filter, select your filtering options based on the needs of your integration. Selecting filtering options that result in more data than you need can have an adverse impact on the performance of your extractions. For example, if your integration only needs the details of the affected items of a change and not the full assemblies of those affected items, you should specify an item filter with a BOM option indicating Tab Only
|
Note: You can use any of the default filters when creating a subscriber or CTO if the properties meet your company's needs, or use them as templates when creating new filters. |
To create a filter:
In Java Client, select the Admin > System Settings node..
Select System Settings > Agile Content Services and then double-click the Filters node New button. The Create Event dialog box appears.
Select New button. The Create Filter dialog box appears.
Type a name and a description of the filter in the specified fields.
Select an object class or base class from the Filter Object Type list.
Click the Down Arrow button next to the Viewable Tabs field to display the list of available tabs based on the selected class
|
Note: The first tab (Title Block, General Information, or Cover Page) is required for every filter and is already selected for each object Type. |
Select any additional tabs you want in the filter.
Click OK. Depending on the class that you select and the viewable tabs for in that class, the available tab options in the lower part of the Create Filter dialog box are updated.
Click the Drop down button to display the drop-down list of available tab filter options.
Select one of the following options from the BOM Options list.
Tab Only: extracts only the displayed table values.
Tab and Items: you must provide a numeric value to indicate the number of levels you want extracted from the BOM, or you can check the box to indicate all levels.
|
Note: Fields displayed in the BOM Options are only available for classes if the BOM tab is selected in the Viewable Tabs field for items or item-associated classes. |
Select one of the following options from the Attachments Options list.
Tab Only: only the Attachment information is packaged with the extracted data.
Tab and Files: all attachments are packaged with the extracted data.
|
Note: Options in this field is only available for classes having an Affected Items tab selected in the Viewable Tabs field for changes or ECO, MCO, and SCO classes |
Select one of the following options from the Affected Items Options list.
Tab Only: only the Affected Items information is packaged with the extracted data.
Tab, Redline Content, and Items: all items and redline content are packaged with the extracted data. Redline content includes redline Title Block, BOM, AML, and Attachments data.
Tab and Redline Content: the Affected Items information and redline Title Block, BOM, AML, and Attachments redline data are packaged with the extracted data.
|
Note: Options in this field are only available for classes with a Manufacturers tab selected in the Viewable Tabs field for items or item-associated classes. |
Select one of the following options from the General Info Options list.
Tab Only: only the manufacturer information is packaged with the extracted data.
Tab and Manufacturer: all manufacturers are packaged with the extracted data.
|
Note: Options in this field are available only for the Manufacturer Part class |
Select one of the following options from the Affected Prices Options list.
Tab Only: only the price information is packaged with the extracted data.Tab and Redline Content: all Prices and Redlined Price lines
|
Note: Options in this field are only available for the Prices class or price-associated classes. |
Click OK.
You can change the contents of a filter, if the filter is not assigned to a transfer order, or is not referenced by an enabled subscriber. However, if the filter is assigned to a transfer order, it is editable when the transfer order is completed.
If the filter is referenced by an enabled subscriber, you must disable the subscriber in order to edit the filter. For more information, see "Enabling and Disabling Subscribers."
When you edit a filter, if the attachment option is Tab and Files. Because Tab and Files, you can set the Include File Extensions field. This enables you to indicate the file extensions that you can include in the extract. If an extension is not specified, then all extensions are included. If on the other hand, an extension is specified, you can only include files ending the indicated extension(s).
For example, if you specify.doc as the extension (note that the period is not required), and a part that you are extracting has both a .doc and a .GIF attachment, only the .doc file is included in the extract. This option is not available when you create the filter, only when you are editing the filter.
To edit a filter:
In Java Client, select System Settings > Agile Content Service, and then double-click Filters. The Filters window appears..
Double-click the name of the filter you want to edit.
Edit the Name and Description fields in the General Information tab.
Make changes to filter details on the Filter tab.
Select a workflow from the Workflow list.
|
Note: If you selected the Affected Items tab when you created your filter, you can choose to send only the BOM and AML redline changes from the Redline changes only drop-down list on the Filter tab. If you selected the Attachments tab along with the Tab and Files attachment option when you created your filter, you can choose files of only specific types to be included during export by entering a comma-separated list of file extensions in the Include File Extensions field. |
Click Save.
The Large Text Attribute field enables tracking attributes that contain more than 4000 characters. For example, HTML formatted text that PLM uses to generate data sheets and other similar documents.
These large data fields are generally stored in a separate location in the database and are referred to as CLOBs (character large objects) attribute in the database
|
Note: Oracle and IBM DB2 provide a construct explicitly named CLOB. Other database systems support some form of the concept, labelled differently. |
You can only enable or disable a Large Text Attribute field through its P2 and/or P3 pages in the Edit filter dialog. See "To enable the large text attribute:." You cannot enable or disable these fields in the Filter Creation dialog.
To enable the large text attribute:
In Java Client, select System Settings > Agile Content Service, and then double-click Filters. The Filters window appears.
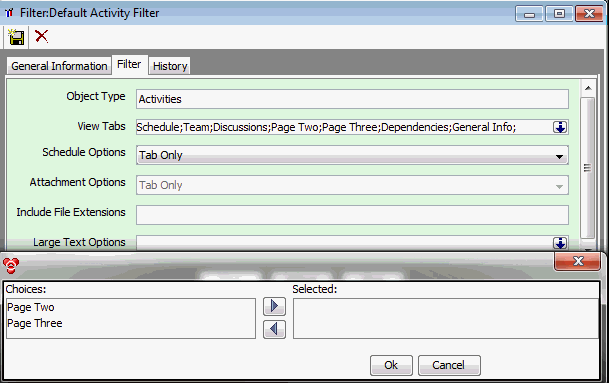
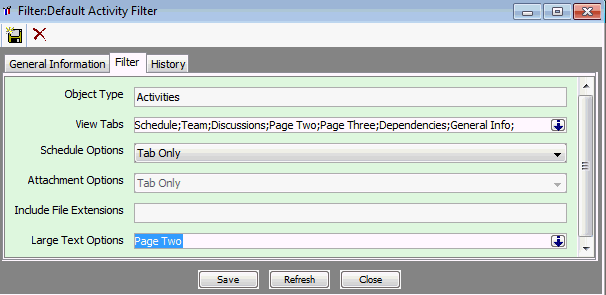
Double-click the name of the filter you want to enable or disable. For example, the Default Activity Filter. The Edit Filter dialog for the selected filter appears.
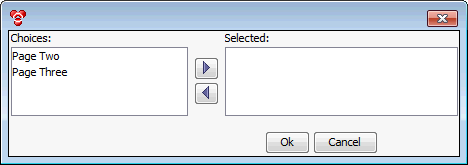
In the Large Text Options field, select the down arrow. The options selection dialog, listing Page Two and/or Page Three appears. See Figure 4-2.
In the options selection dialog, move Page Two and/or Page Three from the Choices list to the Selected list.
Click OK. Depending on the selected option in the Selection list, the selected option would appear in the Large Text Field Options field. For example, if you had moved Page Two, the following would appear in the Large Text Field Option
The Large Text Attribute field enables tracking attributes that contain more than 4000 characters. For example, HTML formatted text that PLM uses to generate data sheets and other similar documents. These large data fields are generally stored in a separate location in the database and are referred to as CLOBs (character large objects) attribute in the database.You can only enable or disable the Large Text Attribute field through its P2 and/or P3 pages in the Edit filter dialog. You cannot enable or disable these fields in the Filter Creation dialog
|
Note: |
The integration of CAD and PLM enables accessing the Affected Files filter and managing its options from the Filter creation and selection window. See Figure 4-1. The following paragraphs list these attributes and available options.
To view this filter's attributes and available options, shown in Figure 4-1. double click Default Change Order Filter, and then select Filter, Figure 4-4 appears. Attributes and available options are described "Object Type: The type of object. In this case, a Change Order..""
You can determine wether the Affected Files table is selected for Export by selecting the Affected Files table from the View Tab. If you want to Export Redline Content, see/use the Affected Files Options
Affected Files tablesRedline Markups tablesTitleblock Redlines tables
Object Type: The type of object. In this case, a Change Order.
View Tabs: Lists options and Choices and Selected lists. To view this list, point to and select the down-arrow. See Figure 4-5.
You can delete Filters only if they are not currently assigned to an existing transfer order or a subscriber.
To delete a Filter:
Under System Settings > Agile Content Service, double-click Filters. The Filters window appears.
Select the Filter that you want to delete.
Click the Delete button.