| Oracle® Retail EFTLink Framework Installation and Configuration Guide Release 19.0 F23641-01 |
|

 Previous |
 Next |
| Oracle® Retail EFTLink Framework Installation and Configuration Guide Release 19.0 F23641-01 |
|
Previous |
Next |
This chapter describes the installation of EFTLink and covers the following topics:
To install EFTLink successfully system implementers must:
Understand the requirements of the specific EFT system being used, and the POS software that will be connecting to EFTLink.
The settings that control how EFTLink and the selected core behave are in property files. System implementers must know how to add or modify properties within property files with their chosen text editor.
Java properties are case sensitive, and never contain spaces in the property name. They usually do not contain spaces in the property value – there are sometimes exceptions in lists.
A space is allowed before and after the = that separates the property from its value.
Case sensitivity does not apply to Boolean values – True is the same as true.
Each property = value is a separate line.
Lines prefixed with # are comments.
EFTLink can be installed on Windows or Linux operating systems, but the procedure will differ accordingly.
|
Note: Oracle Retail assumes that the retailer has ensured its Operating System has been patched with all applicable Windows updates. |
The POS system should meet the following minimum requirements.
256MB RAM
Intel Celeron 1GHz or equivalent CPU
1GB disk space.
EFTLink is supported on the following Operating Systems:
Oracle Enterprise Linux 7
Windows POSReady 7
Windows 7
Windows 10
Windows 10 IOT Enterprise LTSB 2016 (1607)
The EFTLink framework and all strategic cores will run with any version of Java from 1. 7. To check the installed java version, and confirm that java is installed so that java.exe can be found by the operating system at a command prompt \ terminal, use the command:
java -version
For both Windows and Linux this returns the full version, provided that java.exe is on the Windows search path, which normally would be the case.
If the command fails, steps will be needed to configure EFTLink to find java.exe, covered below in Step 3 - Installing as a Service.
This section describes the installation sequence of EFTLink.
EFTLink is supplied as a zip file, eftlink_v19.0.zip, and should be unzipped into the designated folder. All files needed, including the entire set of core files are included.
Once unzipped, the following files and folders should be present in the designated EFTLink folder:
apidocs
cores
lib
linux
linux_64
log
tmp
windows
windows_64
wrapper
CardRange.xml
CreateKeys.bat
CreateKeys.sh
eftlink.bat
eftlink.sh
EftLinkConfig.properties
EftlinkConfig_PED_Pool.properties
EftlinkConfig_Static_Server.properties
EftlinkXstore_Mobile.properties
eftlink-i18n.zip
installcore.bat
installcore.sh
LangCN.properties
LangDE.properties
LangEN.properties
LangES.properties
LangFR.properties
LangIT.properties
LangJP.properties
LangNL.properties
LangPT.properties
LangRU.properties
LangSV.properties
log4j2.xml
Each core sub-directory contains the core jar file, and reference copies of that core's property file(s).
The lib folder contains supporting files for EFTLink.
eftlink.jar is the main executable code of the EFTLink framework.
EftlinkConfig.properties carries the settings for the framework.
CardRange.xml is the default tender mapping and card identification file.
installcore.bat is a batch file to select one of the cores as active for Windows systems.
installcore.sh is a Linux script to select one of the cores as active for Linux.
eftlink.bat is a batch file that can be used to either start EFTLink directly or install EFTLink as a service on Windows.
eftlink.sh is a script file to start EFTLink directly on Linux systems.
Createkeys.bat is a batch file used to create encryption keys to ensure secure communications between POS and EFTLink.
Createkeys.sh is a Linux script used to create encryption keys to ensure secure communications between POS and EFTLink.
For Windows run installcore.bat
For Linux run installcore.sh
 usage: installcore [corename]
available cores:
Adyen           - Adyen
Cayan           - Cayan
FIPay           - AJB FIPay
MerchantLink    - Merchant Link
OciusSentinel   - Verifone Ocius Sentinel
OPIRetail       - OPI Retail
PointUS         - Verifone Point (US)
SixPay          - Six Payment Services MPD
SolveConnect    - The Logic Group SolveConnect
TenderRetail    - Tender Retail
TransaxEFT      - FIS TransaxEFT
WorldPay        - WorldPay
Would set the PointUS core as the active core.
|
Note: The core name is not case sensitive in the batch file or Linux script. |
The batch or script file does two things:
Configures EftlinkConfig.properties:
EPSCore0=manito.eft.pointus.PointUSCore
Copies the selected core property file from the specific core folder to the main EFTLink folder, where it will be the active file, in this instance pointus.properties.
If this is done manually you would need to edit EftLinkConfig.properties.
EPSCore0=
The value is the full classpath to the selected core application. These are the valid classpaths:
Table 2-1 Core Classpath
| Core | Classpath |
|---|---|
|
Adyen |
manito.eft.adyen.AdyenCore |
|
AJB FIPay |
manito.eft.ajb.FIPayCore |
|
Cayan |
manito.eft.cayan.CayanCore |
|
FIS TransaxEFT |
manito.eft.transaxeft.TransaxEFTOPIClient |
|
Merchant Link |
manito.eft.poslynx.PoslynxCore |
|
OPI Retail |
oracle.eftlink.opiretail.OPIRetailCore |
|
Six Payment Services MPD |
manito.eft.sixpay.SixpayMPDOPIClient |
|
Tender Retail |
manito.eft.tenderretail.TenderRetailCore |
|
The Logic Group SolveConnect |
manito.eft.solveconnect.SolveConnectCore |
|
Verifone Ocius Sentinel |
manito.eft.ocius_sentinel.OciusSentinelCore |
|
Verifone Point US |
manito.eft.pointus.PointUSCore |
|
WorldPay |
manito.eft.worldpay.WorldPayCore |
This section describes how to install EFTLink as a service.
It is possible to install EFTLink as a windows service, using a third party wrapper. EFTLink is distributed with a version of Tanuki Software Limited Java Service Wrapper.
Follow the steps below on how to configure EFTLink to run as a Windows service.
Download and install Java.
Ensure you have the correct version of Java installed.
For example: if the target machine has a 64 bit OS with default 64 bit Java active but you want to use a 32 bit service wrapper, then ensure you also have the required 32 bit Java installed.
Installing the Service.
From a command line (with administrative privileges) change to the root directory for EFTLink. For example, type cd /eftlink.
If not already done, run installcore.bat to install the desired core which also creates and copies the necessary wrapper to .\bin. For example, type installcore.bat adyen.
To install EFTLink as a window service, type eftlink install.
If there are problems during install, it is possible to remove the service by typing eftlink remove. This may be necessary if the service is previously installed in a different folder. The service may then be reinstalled at the correct location by entering eftlink install.
Once installed the service can be started and stopped from a command line:
eftlink start
eftlink stop
The service can also be controlled from the Windows Services Control Panel applet ("OPI Server").
Examine the log file ”Wrapper.log”.
The log file can be found in the designated EFTLink folder\log\eftlink_wrapper.log
Installing, starting the service, stopping the service, and uninstalling the service are all briefly logged in wrapper.log, and this can be used to diagnose any problems.
It is possible to run EFTLink as a service, using a third party wrapper. EFTLink is distributed with a version of Tanuki Software Limited Java Service Wrapper.
|
Note: You may be required to give script file(s) execution rights. This can be accomplish by opening a terminal window and typing:
for example, |
Follow the steps below on how to configure EFTLink to run as a service.
Download and install Java:
Ensure you have the correct version of Java installed.
For example: if the target machine has a 64 bit OS with default 64 bit Java active but you want to use a 32 bit service wrapper, then ensure you also have the required 32 bit Java installed.
Running EFTLink.
From a terminal change to the directory for EFTLink.
For example, type cd /opt/eftlink.
If not already done, run installcore.sh to install the desired core which also creates and copies the necessary wrapper to ./bin.
For example, type sudo./installcore.sh/adyen.
To run EFTLink as a service from a terminal type the following command sudo./eftlink.sh start.
To stop, check the status or to restart EFTLink from a terminal, type one of the following commands:
sudo./eftlink.sh stop
sudo./eftlink.sh status
sudo./eftlink.sh restart
sudo./eftlink.sh condrestart
Examine the log file ”Wrapper.log”.
The log file can be found in the designated EFTLink folder\log\eftlink_wrapper.log
Starting the service and stopping the service are all briefly logged in wrapper.log, and this can be used to diagnose any problems.
The EFTLink application does not include default TLS encryption keys for secure communication between POS client and EFTLink server, so these need to be generated as part of the installation procedure. A batch file, CreateKeys.bat, and a Linux script, CreateKeys.sh is included in the EFTLink project to facilitate creation of encryption keys.
Locate the CreateKeys.bat / CreateKeys.sh file in the EFTLink folder
Run the CreateKeys script file with an appropriate set of parameters to create encryption keys. The format of parameters required by the script file are:
CreateKeys.bat  -e <algorithm> <bitlength> <signAlgorithm> <daysValidity>
CreateKeys.sh   -e <algorithm> <bitlength> <signAlgorithm> <daysValidity>
Valid parameters for the createkeys script file are as follows:
-e Generate keys
<algorithm>
Algorithm used for TLS keys encryption
Supported Values: EC,DSA,RSA
<bitlength>
Number of bits – higher values equate to a higher level of encryption.
Supported Values: 256 (when using EC), 1024,2048 (when using DSA),
1024,2048,3072,4096,7680,8192,15360 (when using RSA)
<signAlgorithm>
Signature Algorithm used
Supported Values: SHA256withECDSA, SHA384withECDSA, SHA512withECDSA (when using EC), SHA256withDSA (when using DSA), SHA256withRSA, SHA384withRSA, SHA512withRSA (when using RSA)
<daysValidity>
Number of days after creation that the certificate will remain valid.
Valid Values: 100 to 1100
Once encryption keys are created, four files will be present on the system in the keys subfolder of EFTLink:
pos.private.jks - to be MOVED to the POS client
pos.public.jks - to remain on the EFTLink Server
eftlink.private.jks - to remain on the EFTLink Server
eftlink.public.jks - to be MOVED to the POS client
The following files should be REMOVED from the Eftlink system and placed on the POS in the folder [xstore root]\keys, where xstore root is the main POS client folder, for example: c:\xstore\keys:
pos.private.jks
eftlink.public.jks
This will leave only the following two files on the EFTLink server in the folder [eftlink root]\keys:
eftlink.private.jks
pos.public.jks
The removal of the appropriate files from the EFTLink server is to limit the availability of TLS keys only to where they are required, and in order to reduce the possibility of the keys being obtained and used to monitor traffic between POS and EFTLink server.
These instructions are repeated by the CreateKeys script file when keys are generated.
See the Oracle Retail EFTLink Core Configuration Guide located on OTN and refer to the chapter for the specific core selected.
This section describes how to install EFTLink using the installer jar. Follow the steps below to install EFTLink.
Unzip the installer zip file somewhere other than the desired target directory which is typically C:\eftlink or /opt/eftlink for Linux.
Make sure that Java is on the path of the system. In Linux, JAVA_HOME is also required to be set.
With an elevated privilege (for example, Admin for Windows or root or sudo for Linux), open a terminal.
Navigate to the path where you extracted the installer jar (for example, eftlink-19.0-installer.jar).
Execute the command below.
Command to launch the installer with a GUI:
java -jar eftlink-19.0-installer.jar GUI
Command to perform a silent installation:
java -jar eftlink-19.0-installer.jar
|
Note: in this command, use default values for the target installation directory and port numbers for channel 0 and channel 1. |
Default values:
Installation directory is C:\eftlink for Windows and /opt/eftlink for Linux
Port number 10100 for channel 0 and 10101 for channel 1
You can also specify a different value by updating the entries below in the ant-install.properties file.
installDir = C\:\\eftlink_server
installDir = /opt/eftlink_server
eftlinkChannelZeroPortNumber = 10200
eftlinkChannelOnePortNumber = 10201
selectedCore = manito.eft.cayan.CayanCore
Once installation is done, the OPI Server service is installed.
Make sure to copy the pos.private.jks and eftlink.public.jks file to the POS in C:\xstore\keys for example.
These files are created by the installer and can be found in C:\eftlink\keys folder for example. For Windows, the service is setup to start automatically when you restart the system.
Start Eftlink. In the terminal, navigate to the installation directory, for example, C:\eftlink or /opt/eftlink.
Windows: start eftlink.bat
Linux: ./eftlink.sh start
In Windows, you can also start the OPI Server in the services panel.
By default in Windows, the 'OPI Server' service is using the Local system account user. In order to ensure for EFTLink service to create dynamic key store files, a user with an administrative privilege is needed. This is only applicable for cores like PointUS and Cayan. In the services panel, right click on the OPI Server service. Select the Properties option. Select the Log on tab. Select This account:. Input the user's credentials and select OK.
Adyen: The POS_JNI jar which is provided by Adyen is also required. This needs to be copied to C:\eftlink\cores\Adyen or /opt/eftlink/cores/Adyen for Linux. Refer to the Third Party section of the Adyen core in the Oracle Retail EFTLink Core Configuration Guide located on OTN for more details.
AJB FiPay: The AJBComm.jar component needs to be copied to C:\eftlink\cores\FIPay or /opt/eftlink/cores/FIPay for Linux. Refer to the FileSet section of the AJB core in the Oracle Retail EFTLink Core Configuration Guide located on OTN for more details.
Cayan: The merchant credentials which are supplied by Cayan team are needed to be setup. This can be done in Xstore's back office through the EFTLink Admin functions. Refer to the Account Information Entry section of the Cayan core in the Oracle Retail EFTLink Core Configuration Guide located on OTN for more details.
VerifoneUS: The PED needs to be paired with EFTLink prior to use. This can be done through Xstore's back office in the EFTLink Admin functions. Refer to the Administration Functions section of PointUS core in the Oracle Retail EFTLink Core Configuration Guide located on OTN for more details.
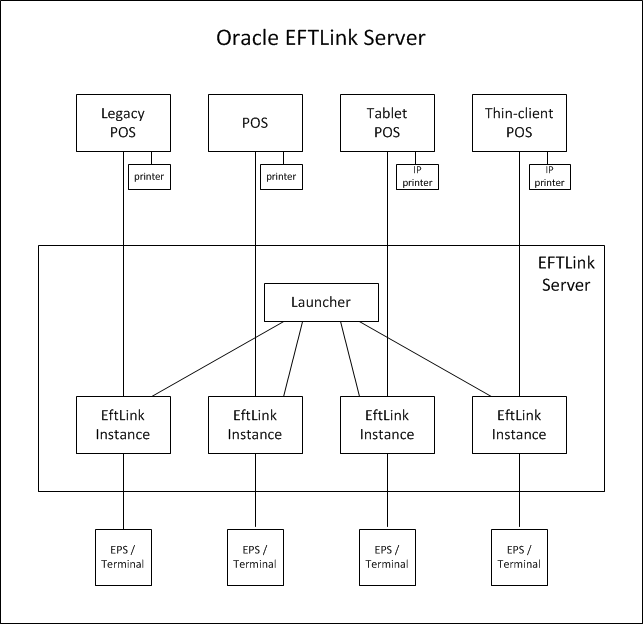
EFTLink is usually deployed as a service application running on each POS and connecting to a single payment device. To support environments where the POS runs as a thin-client application with restricted local device access, or where the hardware has limited processing power or memory, EFTLink can be deployed in Store Server mode. A single EFTLink application runs on a designated server system and all POSs connect to that one server. EFTLink manages the connections to multiple payment terminals and routes payment requests from each POS on to the relevant device.
Generally, using Server mode, there is still a 1-1 logical connection between POS and payment terminal, but it is also possible for EFTLink to make a dynamic selection of payment terminal based on availability and convenience. This is referred to as PED-pooling (PED - PIN entry Device).
Similarly, the EFTLink Server can be used to manage a pool of printers shared between the POSs and allocated dynamically. This is referred to as Print-pooling.
This solution is only really possible with IP-based payment terminals and printers. The server system should be in a secure room, and the terminals/printers spread around the store, so direct wired connections are not practical.
The standard EFTLinkConfig.properties will ensure EFTLink is configured for use as an EFTLink Server.
1-1 mapping between the POS and payment system/terminal. Each POS is allocated a fixed pair of sockets (channel 0/1) that connect to a dedicated EFTLink instance.
Included with EFTLink is an additional file EFTLinkConfig_Static_Server.properties. This is a sample file demonstrating EFTLink configuration in this mode.
EFTLinkConfig_Static_Server.properties can be used in place of the standard EFTLinkConfig.properties by renaming this file to EFTLinkConfig.properties. A manual comparison of the files will be necessary to ensure core configuration which is set during installation is copied over to the RemoteMode configuration.
Many-many mapping between POS and payment system/terminal. Each POS is allocated a fixed pair of sockets (channel 0/1) that connect to a multiplexer/switch. The multiplexer implements rules and/or uses interactive dialogs with the POS operator to determine which EFTLink instance to pass the request on to.
Included with EFTLink is an additional file EFTLinkConfig_PED_Pool.properties. This is a sample file demonstrating EFTLink configuration in this mode.
EFTLinkConfig_PED_Pool.properties can be used in place of the standard EFTLinkConfig.properties by renaming this file to EFTLinkConfig.properties. A manual comparison of the files will be necessary to ensure core configuration which is set during installation is copied over to the PEDPool configuration.
Configuring/deploying EFTLink Server is rather more complicated that standard EFTLink and is currently only possible as a manual procedure.
As a base, EFTLink should first be installed on the chosen server system using the standard installation procedure.
EFTLink Server uses a different main class from normal.
When not using the standard Tanuki wrapper / eftlink.bat file to start eftlink, replace the following lines where applicable in the startup file:
Replace: java manito.eft.opi.server.OPIServer
With: java manito.eft.opi.server.MultiServerLauncher
Replace: java -cp $CLASSPATH manito.eft.opi.server.OPIServer
With: java -cp $CLASSPATH manito.eft.opi.server.MultiServerLauncher
Use a text editor to edit EFTLink folder/wrapper/conf/eftlink.conf.
Replace: wrapper.app.parameter.1=manito.eft.opi.server.OPIServer
With: wrapper.app.parameter.1=manito.eft.opi.server.MultiServerLauncher
This can be sone by commenting out all wrapper.app.parameter.1 and license details for manito.eft.opi.server.OPIServer and uncomment all license details for manito.eft.opi.server.MultiServerLauncher in the section below.
Replace: PEDPoolEnabled = false
With: PEDPoolEnabled = true
Replace: PEDPoolOneCatchAllChannel0 = false
With: PEDPoolOneCatchAllChannel0 = true
See PED Pooling Set Up for more information.
Each instance of EFTLink is identified by a unique sequence number starting from 1.
For each instance of EFTLink required (that is, for each payment terminal):
In the main eftlink folder, run installcore.bat as if configuring standalone EFTLink. This will setup the EftlinkConfig.properties file.
Create a subfolder under the main eftlink folder named serverN, where N is the sequence number.
Copy all properties files (*.properties) from the main eftlink folder into the new serverN folder.
This excludes the sample files EftlinkConfig_PED_Pool.properties, EftlinkConfig_Static_Server.properties and EftlinkConfig_Xstore_Mobile.properties. EFTLink and core specific files are required, including language files. For some cores, additional files may also need to be copied over (such as receipt.txt files) - to see the full list of required files, refer to the cores\[corename] sub-folder.
Using a text editor, edit the core-specific properties file in the subfolder to set any properties that are unique for each core instance for example, the terminal IP.
Using a text editor edit EftlinkConfig.properties in the main eftlink folder:
Find the NumServers setting and change it to be the number of EFTLink instances to be used. Un-comment (that is, remove the leading '#' if present) if necessary. For example, NumServers = 2.
For each EFTLink instance, assign a descriptive title. These are the names that will be presented to the operator and should identify the relevant payment terminal in some way such as by its location, for example:
server1.description = Menswear-suits
server2.description = Menswear-paydesk #2 till 1
|
Note: Spaces are allowed in the descriptive names, but not commas if PED pooling is to be used. |
The Log4j2.xml logging configuration file as standard is delivered configured for Single server mode. Alterations are required to the log4j2.xml file to ensure logging is performed per pos, and per server. To enable full logging, modify the standard log4j2file by performing the following steps:
Alter the <Properties> section, adding in the correct number of servers, and pos, ensuring each has a unique name and filename.
In the <Appenders> section, enable the RollingRandomAccessFile entries for each server/pos by removing the comment start <!-- and comment end --> for the marked MultiServerLauncher/PedPooling section.
Adjust the number of the RollingRandomAccessFile entries in the <Appenders> section by adding the relevant number of server{x}_log and pos{x}_log sections. Ensure each of these maps to the correct filename (defined in point 1) and also adjust the filepattern to use the relevant server folder / server filename. The number of server{x}_log and pos{x}_log entries in the <Appenders> section should match the number of server{x}_log and pos{x}_log entries in the <Properties> section.
Also in the <Appenders> section, enable the Async entries for each server/pos by removing the comment start <!-- and comment end --> for the marked MultiServerLauncher/PedPooling section.
Adjust the number of the Async entries in the <Appenders> section by adding the relevant number of server{x}_log and pos{x}_log sections. Ensure each of these maps to the correct server{x}_log or pos{x}_log (defined in point 3).
In the <Loggers> section, enable the Logger entries for each multifile.server{x}/multifile.pos{x} by removing the comment start <!-- and comment end --> for the marked MultiServerLauncher/PedPooling section.
Adjust the number of the Logger entries in the <Loggers> section by adding the relevant number of multi-file.server{x} and multifile.pos{x} sections. Ensure each of these maps to the correct async_server{x}_log or async_pos{x}_log (defined in point 5).
Once fully configured, each pos request will write to a file in the main eftlink log folder named pos{x}.log. In addition, each server folder will contain its own log file showing server processing of the request - log files for each server will be in the path server{x}/log/server{x}.log.
Each POS client is identified by a unique sequence number starting from 1.
Use a text editor to edit EftlinkConfig.properties in the main eftlink folder:
Find the NumClients setting and change it to be the number of POSs that will be using EFTLink. Un-comment (that is, remove the leading '#' if present) if necessary. For example, NumClients = 2
For each POS, assign a descriptive title. These are the names will be shown in the EFTLink log to ease tracking/debugging, for example:
pos1.description = Menswear-suits
pos2.description = Menswear-mobile#1
EachPOS has to use a unique pair of ports for its connection to EFTLink. These do not need to be further defined within EftlinkConfig.properties, but the ports numbers and EFTLinkServer system IP must be set on each POS. The numbering system is based on EFTLink base address (default 10100, configurable by the ServerChannel0 property) plus 10 x the POS number. Two sequential ports are needed, one for each of channel 0 and 1. This gives a default allocation of:
POS1 - 10110/10111
POS2 - 10120/10121
POS3 - 10130/10131
...
POS9 - 10190/10191
POS10 - 10200/10201
POS11 - 10210/10211
and so on
If this range of ports is not available, the base number can be changed via the ServerChannel0 setting. All POSs must then be changed to match.
If PED pooling has been enabled, the system uses the standard channel 1 display messages to present each POS operator with a list of available payment terminals. By default, the list will include all available terminals, but this can be confusing in a large store, so there is an option to limit each POS to a subset of the full list to show just the terminals in one department. The subset is defined using the descriptive names from EFTLink Instance Set Up, and specified as a comma-separated list. A default association can be set by prefixing the descriptive name with '*'. If that payment terminal is available, it will be automatically used without any operator prompting.
For example:
pos1.subpool = *Menswear-suits
pos2.subpool = Menswear-suits, *Menswear-paydesk #2 till 1, Menswear-paydesk #2 till 2
|
Note: It is important to point out that the EFTLink PED pooling functionality is restricted by Core compatibility. Please note the following restrictions:PED pooling is only applicable within the <CardServiceRequest> context, that is, this is when the actual payment is initiated and finalized. PED pooling is not currently applicable within the <SaleStateNotification> context, that is, if the EPS supports a device that is dependent on a line display, this functionality will need to be suppressed by Xstore or the Core (depending on configuration). PED pooling is not possible where the EPS requires the register to be paired with a single device thereby forcing a one to one relationship between the register and the device. |
As noted above, each POS has to use a unique pair of ports for its connection to EFTLink. Also, the POS is configured to access a remote EFTLink rather than a local one.
There are two different ways that Xstore can be set up to use with EFTLink in Server Mode.
One to One Port Mapping (applies to both Xstore and Xstore Mobile)
One to Many Port Mapping (applies to both Xstore and Xstore Mobile)
All configurations illustrated below are part of the Xstore AuthConfig.xml configuration file.
(Static Server Mode)
This is where there is one Xstore or Xstore Mobile client served from the Jetty instance. It will divert all requests to a single port pairing that is managed inside the EFTLink Server instance. If another POS client is configured to use the same port pairing, it will potentially be blocked out until the port pair becomes free. In this mode, EFTLink Server will allow a single device to use many PEDs through the PED pooling functionality. EFTLink Server does not support load balancing of requests through one port pair so this configuration is not recommended if there are many Xstore mobile clients in the store solution.
If this configuration is suitable then the Xstore Mobile configuration is identical to the standard Xstore configuration. The 'communicatorHosts' parameter is used to set the channel 0 URL and 'deviceCommChannel' is used to set the channel 1 URL, as illustrated below. In this configuration when Xstore or Xstore Mobile starts an authorization request EFTLink will process the authorization request in the expected way, or if PED pooling is enabled, it will send a list of available PEDs for an associate to choose. Once the associate has chosen a PED, the authorization will proceed in the expected way.
<AuthProcess name="EFT_LINK_HOST" Abstract="true">
    <Parameter name="communicatorHosts">
      <param_value dtype="List">
        <Host dtype="String">socket://localhost:10100;timeout=1000</Host>
      </param_value>
    </Parameter>
    <Parameter name="deviceCommChannel" value="socket://localhost:10101" />
...
...
    <Parameter name="additionalWorkstationHostsMap">
      <param_value dtype="Map">
        <MapEntry>
          <key dtype="Integer">1</key> <!-- workstation id -->
          <value dtype="EFTLinkCommunicationChannels">
            <Channel0 dtype="String">socket://localhost:10110</Channel0>
            <Channel1 dtype="String">socket://localhost:10111</Channel1>
          </value>
        </MapEntry>
       <MapEntry>
          <key dtype="Integer">2</key> <!-- workstation id -->
          <value dtype="EFTLinkCommunicationChannels">
            <Channel0 dtype="String">socket://localhost:10120</Channel0>
            <Channel1 dtype="String">socket://localhost:10121</Channel1>
          </value>
        </MapEntry>
      </param_value>
    </Parameter>
  </AuthProcess>
(PED Pooling)
In order to setup Xstore this way, the EftlinkConfig.properties in the main folder in EFTLink (for example, C:\eftlink) should be copied in the working directory of Xstore or Xstore mobile (for example, C:\xstore or C:\xstoremobile). The list of POS should be the same as in the EFTLink server side.
pos1.description = POS 1
pos2.description = POS 2
pos3.description = POS 3
The additional WorkstationHostsMap parameter is not needed anymore. If the default channel zero is used (for example, ServerChannel0 = 10100), then make sure to update the port in the Host section of the communicatorHosts to 10110. If ServerChannel0 is different, simply add 10 to it. Then deviceCommChannel's port is plus 1 of the Host's port.
<AuthProcess name="EFT_LINK_HOST" Abstract="true">
    <Parameter name="communicatorHosts">
      <param_value dtype="List">
        <Host dtype="String">socket://localhost:10110;timeout=1000</Host>
      </param_value>
    </Parameter>
    <Parameter name="deviceCommChannel" value="socket://localhost:10111" />
...
...
  </AuthProcess>
Included with EFTLink is an additional file EFTLinkConfig_XStore_Mobile.properties. This is a sample file demonstrating the required settings for the file EFTLinkConfig.properties on the POS.
This file should be copied over the POS Client as EFTLinkConfig.properties.