1 Cartridge Migration Analysis
Oracle Communications Order and Service Management (OSM) 7.x no longer uses OSM Administrator for developing cartridges. Customers upgrading to OSM 7.x must now use Oracle Communications Design Studio for developing cartridges. The purpose of this document is to help customers migrate their cartridges developed on OSM Administrator to Design Studio.
This document is intended for cartridge developers who used OSM Administration to develop cartridges, and who want to migrate any of their existing cartridges to be compatible with OSM 7.x.
This document provides detailed pre-migration, migration, and post-migration tasks to ensure the successful migration of cartridges to OSM 7.x. This document includes information on the following topics:
-
Features that are no longer supported in OSM 7.x.
-
Modified features that affect cartridge behavior.
-
Common migration problems and their solutions.
Using this document, you will be able to migrate your older cartridges (OSM 6.3.1 or earlier) to comply with OSM 7.x.
Pre-Migration Tasks
This section discusses tasks to undertake before migrating cartridges.
Determine Cartridge Complexity
Oracle provides the OSM Cartridge Complexity Analyzer tool to identify the complexity of the cartridge. This tool is included in osm7_migration_script.zip, and it is part of the Design Studio Software Media Pack. Refer to "Running the Cartridge Complexity Analyzer" for details on using the script.
You should run this tool against the XML model before importing a cartridge into Design Studio. Low-complexity and medium-complexity cartridges can be imported as a whole and need no special care. If the cartridge is a high-complexity cartridge, see "Importing High-Complexity Cartridges" for more information.
Remove Programmatic View Rules
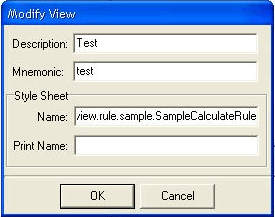
Programmatic view rules are no longer supported and should be deleted. Design Studio ignores programmatic view rules. Removing programmatic view rules from your cartridges makes reading and developing in your cartridges easier.
Search for ”(stylesheet)” in the exported XML output to identify programmatic view rules. Use declarative rules instead. Declarative rules are defined at all levels of Order Definition using XPath or XQuery expressions.
Figure 1-1 shows an Administrator dialog box from OSM 6.3.1 where you would have defined programmatic view rules.
Modify Duplicate Mnemonics
The OSM Administrator allowed you to create duplicate mnemonics for the same category of entities (Order, Task, Workgroup, Process, Flexible Headers, and OLP). Design Studio does not allow for duplicate mnemonics names for the same category. You must find all duplicate mnemonics and, using OSM Administrator, assign them a different mnemonic name.
The following example shows an error message from Design Studio when it encounters a duplicate mnemonic:
BrokenLinkRef - Broken com.mslv.Design Studio.provisioning.queryTask link for "TASKNAME" does not exist.
You must manually identify the duplicate entities using the OSM Administrator or in the exported XML and correct them.
For more information about Design Studio naming conventions, see the Design Studio documentation and Help.
Assign Functions to Workgroups
In previous versions of OSM Administrator, you could choose to not assign functions to workgroups without OSM throwing any errors. Design Studio requires that you assign at least one permission for each workgroup.
Assign tasks, orders, and filters using OSM Administrator to those workgroups for which functions are assigned. Delete any workgroups without tasks, orders, and filters that you do not want to migrate to OSM 7.x.
The following example shows an error message from Design Studio when it encounters undefined or unused workgroups:
Role Model Error - No permission is granted for Role ’ROLE_NAME'.
Add Filters and Rules Data to Order Type Source
In previous versions of OSM Administrator, while creating UI-based rules or filters, elements that are present in the Master Order Template (MOT) are used for defining the rules or filters. But in Design Studio, rules are defined using elements in Order Template.
Identifying the filters-to-order mapping is difficult in OSM Administrator. Therefore, you must manually add the data into the Order Template once the cartridge is imported into Design Studio.
Text-Based Rules Preparation
To import text-based rules into Design Studio, you must preserve the node ID.
The SQL-based rule type in OSM can contain entity IDs (mostly node IDs), which must be replaced with new IDs during data migration. IDs must be exposed as entity attributes, helping the application find them in SQL-based rules, and replace them with new ones while importing them into a fresh environment. Enable this feature by setting exposeEntityID to true in the XML Import/Export application config.xml file.
Please refer to OSM System Administrator's Guide, in the "About Exporting Metadata" section of the "Using the XML Import/Export Application" chapter.
For more information on migrating text-based rules, see "No Access to Node ID in Text-Based Rules".
Mixed Notifications
Design Studio does not support MixedNotification. You can create individual Notifications instead of one MixedNotification. Using OSM Administrator, replace all MixedNotifications with individual notifications.
For example, in OSM 6.3.1 Administrator or earlier versions, if you have created a MixedNotification with 3 different Transitions (Status or State based), you must define 3 individual transitional Notifications.
Set XML Encoding Format
If the language used in OSM Administrator is not English, then set the encoding format to an acceptable export type in the config.xml file. For example, set the export format to UTF-8, a widely used encoding format for extended character sets.
The consequences of not properly setting the export format are explained in the Post Migration common problems & Recommendations (Step E, F, and G).
Migration Procedure and Post Migration Scripts (Design Studio)
This section explains differences between OSM Administrator and Design Studio, with regards to how they reuse processes and tasks across different orders.
In OSM Administrator, processes and tasks are not tied to a particular order. They exist as pool entities, which can be reused across multiple orders. Figure 1-2 shows how OSM Administrator uses processes and tasks in different orders.
Figure 1-2 Process and Task Usage in OSM Administrator
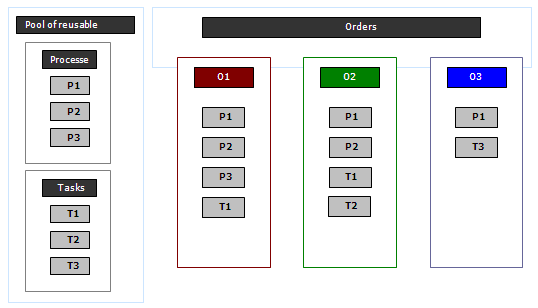
Description of ''Figure 1-2 Process and Task Usage in OSM Administrator''
In Design Studio, processes and tasks do not exist as a pool of reusable entities. Processes and tasks are always created for a particular order. Design Studio uses inheritance to reuse processes and tasks across multiple orders. Figure 1-3 shows how Design Studio reuses processes and tasks.
Figure 1-3 Process and Task Usage in Design Studio
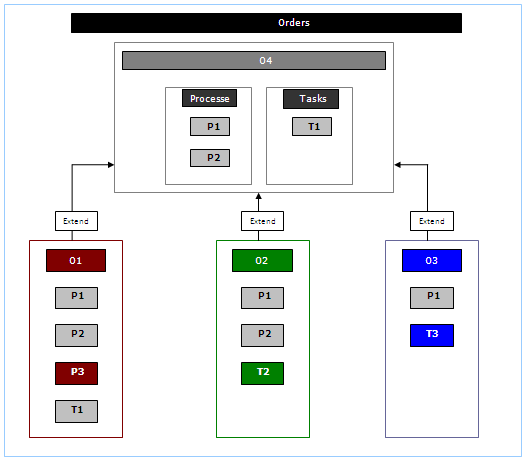
Description of ''Figure 1-3 Process and Task Usage in Design Studio''
In Design Studio, when an order extends another order, the extending order inherits the following entities:
-
Processes
-
Tasks
-
View rules (Behaviors)
-
Rules
Orders inheriting entities can use them as though they own them. For example, Figure 1-3 shows that order O1 extends O4. As a result, O1 can use P1 and P2 as sub-process in any of its process diagrams. Similarly O1 can use T1 in any of its process diagrams or as a creation task or query task.
Problems Importing Cartridges Created With OSM Administrator into Design Studio
OSM Administrator and Design Studio treat entities very differently. When an OSM Administrator cartridge is imported into Design Studio, Design Studio creates duplicate copies of each process and task that is reused across multiple orders. Figure 1-4 shows how Figure 1-3 would be represented if imported into Design Studio.
Figure 1-4 Process and Task Usage After Importing Into Design Studio
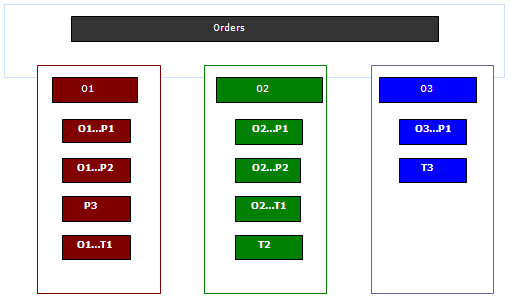
Description of ''Figure 1-4 Process and Task Usage After Importing Into Design Studio''
Figure 1-4 is a valid Design Studio cartridge and it achieves the same thing as Figure 1-2. However, the 6 entities (3 processes + 3 tasks) have become 10 entities. Size of entity growth is proportional to number of orders multiplied by number of entities reused across multiple orders. Ideally you want the cartridge to be in the shape as depicted in diagram 2, that is, have a base order that contains all the reusable entities and make other orders extend this base order to reuse them.
The OSM Cartridge Migration script is designed to migrate your Administrator-built cartridges to resemble the cartridge in Figure 1-3.
About the OSM Cartridge Migration Script
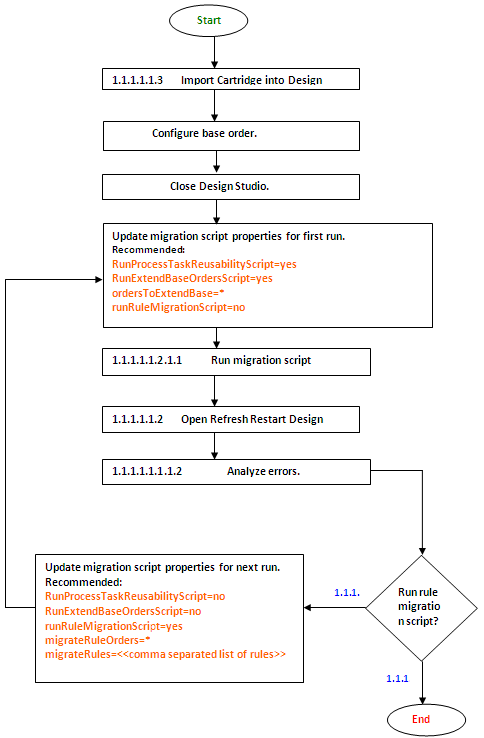
This script performs the following activities on the cartridge imported to Design Studio.
-
Identifies duplicate entities in the imported Design Studio project.
-
Deletes duplicate entities and keeps only one copy of it and assigns the entity to base order. (Creating base order is a manual step)
-
Changes references to the deleted entities to the one assigned to base order.
-
Migrates rules used in entities assigned to base order.
Note:
As project can be modeled as multiple projects, but script can run only on a single project at a time.Cartridge Migration Script is bundled as a ZIP file with name osm7_migration_script.zip, and it is part of the Design Studio Software Media Pack. There is no restriction on where this script needs to be extracted. Refer to the "Run the Cartridge Migration Script" section of the document for details on usage of the script.
Steps to Perform Before Running the Cartridge Migration Script
Perform the following steps before running the Cartridge Migration Script:
-
Import the OSM model into Design Studio.
Typically for cartridges of size <=8MB, it takes approximately 3 to 4 hours for the import to complete. The actual time varies based on size and complexity of the cartridge.
-
Back up the project.
Back up the cartridge project after it is imported to Design Studio. Restore the cartridge from the backup if the script fails to properly migrate it.
-
Turn off build automatically.
On the Project menu, unselect Build Automatically.
-
Configure the base order.
The base order will serve as the ”Master” order template for the cartridge data. All of the child orders will inherit from this base including Order Template data and rules.
Typically it takes 2 to 3 hours to complete this step. Adding data to the base order takes most of this time.
-
Create the base order.
Create an order in Design Studio that serves as a parent order for all other orders. Since Design Studio achieves reusability using inheritance, the script requires an order, which will serve as base order, and it will contain all the reusable processes and tasks.
-
Add data to the base order.
Add the data to the base order required by the entities in the base order and any child orders. Start by adding the data from the data dictionary. You can add non-DD-base type nodes to the base order. DD-base node types must use the ElementName_ddBaseType format. These nodes can be ignored while adding data from data dictionary to base order.
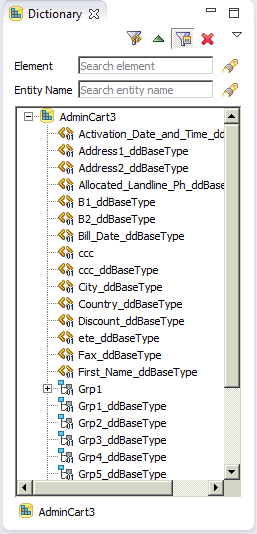
In order to assist with finding the nodes, use the Dictionary view filter to remove any ddBaseType nodes and drag the remaining nodes into the base order template. You can filter the nodes by using a filter such as ”-*ddBaseType” which will only show nodes that do not contain ”ddBaseType” in the name. An Entity filter can be used as well to further limit the visible nodes in the Dictionary view. The following figures show an example of this process.
Figure 1-5 shows the Dictionary view with all of the data elements.
If you type in the filter string, you will see only the elements that you should be copying to the Order, as shown in Figure 1-6.
Then you open the Order editor Order Template tab, and drag the filtered list of data elements to the Order Template field.
Figure 1-7 Dragging and Dropping Filtered Nodes
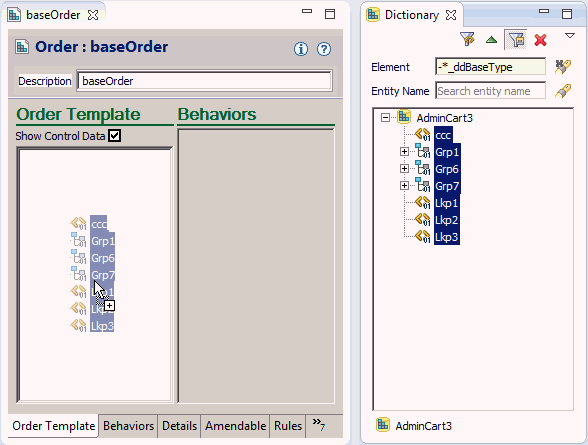
Description of ''Figure 1-7 Dragging and Dropping Filtered Nodes''
Once you have copied the nodes to the order template, make sure that all of the data elements were copied by expanding structure nodes and checking their contents.
Figure 1-8 Expanded Nodes in Order Template
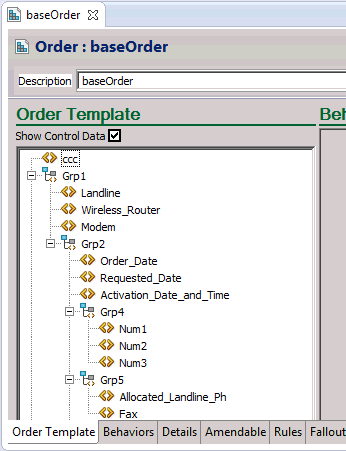
Description of ''Figure 1-8 Expanded Nodes in Order Template''
-
Add permissions to the base order.
Add the roles created to the base order, which ensures that the base order compiles well. Because no actual orders are created for this parent order, adding at least one of the roles, as shown in Figure 1-9, should be fine.
Figure 1-9 Permissions on the Base Order
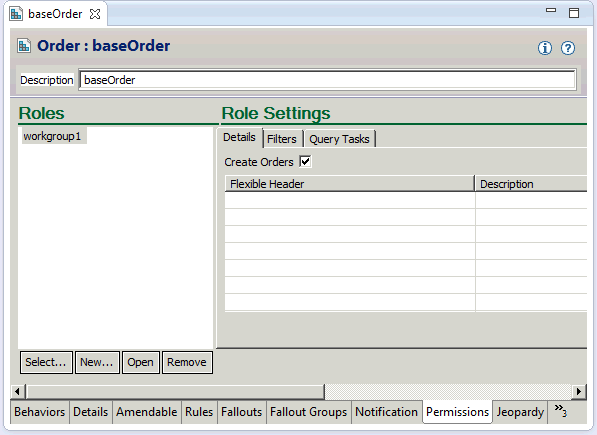
Description of ''Figure 1-9 Permissions on the Base Order''
-
Assign a creation task and default process.
Assigning a creation task and default process is necessary to ensure that the order compiles well. Create a valid task and process, with all necessary values populated. Assign them as a creation task and default process to the base order. This step is optional. This can be done after running process task reusability script. After running process and task reusability script, some of the processes and tasks would have been assigned to base order. Those tasks and processes can be used to select creation task and default process for base order.
-
Close Design Studio.
Save your project and close Design Studio.
-

Run the Cartridge Migration Script
Typically the script does not take more than 5 minutes to run for any given input size.
-
Unzip osm7_migration_script.zip file to the desired location.
After you unzip following files will be extracted:
-
migrationMessages.properties
-
run.bat
-
readMe.txt
-
migration_script.jar
-
analysis.bat
-
-
Set properties in migrationMessages.properties file.
Open migrationMessages.properties and set the following properties:
Table 1-1 Properties in migrationMessages.properties File
Property Description projectPath
Specify the location of the imported cartridge.
To find this value:
-
In the Studio Projects view, right-click on the name of the project and select Properties.
-
In the Resource pane, the value to use for projectPath is found in the Location field.
-
Click Cancel to exit the Properties window.
baseOrderName
Specify the name of the base order. This is the order for which all the reusable processes and tasks are assigned.
Ex: baseOrderName=base_order
baseOrderFolder
Specify the directory where the base order is created. Leave this property blank if the base order is created in the default location of project_path\model\.
For example, if the base order directory is D:\workspace\projectName\model\orders\base\baseOrder.order, set this value to orders\\base.
runProcessTaskReusabilityScript
Set runProcessTaskReusabilityScript to yes to run the process and task reuse script. Set the value to no to not run this script. Default value is yes. We recommend keeping this value as yes when the script is getting run for the first time.
runExtendBaseOrdersScript
Set runExtendBaseOrdersScript to yes to run a script that will make orders specified by theordersToExtendBase property to extend the base order. Set runExtendBaseOrdersScript to no, to not to run the script.
We recommend keeping this value as yes when the script is getting run for the first time.
ordersToExtendBase
Specify all the orders that need to extend the base order. Extending orders reuse entities from the base order. Set this property with an asterisk (*) if all orders extend the base order. All orders are equivalent except with the order specified by the baseOrderName property.
This property is set with a comma separated list of order names. Do not include the .order extension as part of the name.
Ex: odersToExtendBase=p01_adsl_reservation_bpel,p02_adsl_activation_bpel
It is recommended to set this value to * for the sake of simplicity.
runRuleMigrationScript
Set runRuleMigrationScript to yes to run rule migration script. Set runRuleMigrationScript to no to not run the script.
This script removes rules set in the migrateRules property from orders specified in migrateRuleOrders property and adds them to the base order (as set in the baseOrderName property).
Migration rules are not known until the process and task reusability script and the order extension script are run. It is recommended to set this property to no the first time the migration scripts are run.
migrateRuleOrders
Set the migrateRuleOrders property to * if rules from all orders need to be migrated to the base order.
Specify migrateRuleOrders as a comma separated list if rules for these specific orders need to be migrated to base order. Do not include the .order extension as part of the name.
Ex: migrateRuleOrders= p01_adsl_reservation_bpel,p02_adsl_activation_bpel
It is recommended to set this property to *.
migrateRules
Set the migrateRules property to * if all rules needs to be migrated to orders specified in the migrateRuleOrders property to the base order.
Specify migrateRules as a comma separated list to migrate rules selectively.
It is recommended to set this property to *.
-
-
Update run.bat.
Update the run.bat file to include the path for log4j.jar file from the OSM installation directory.
Ex: set LOG4J_JAR=C:\OSM_R702_B468_installation\SDK\automationdeploy_bin\log4j-1.2.13.jar
-
Save run.bat.
-
Run run.bat and enter the required input when prompted.
Steps to Perform After Running the Script
This section explains steps to perform after running the script.
-
Open Design Studio.
-
Refresh the workspace.
-
Close and Restart Design Studio.
-
Assign creation task, default process and order life cycle policy to base order (if not already done).
-
Clean the cartridge project.
-
Analyze cartridge errors and warnings.
Design Studio performs more validations on cartridges than does OSM Administrator. Design Studio will list problem markers for detected errors and warnings. It is essential to fix the errors before deploying the cartridge, but warnings can be ignored. But it is recommended to browse through the warnings and take appropriate action to clear them.
User needs to perform following steps to clean the below mentioned error that may be introduced by process and task reusability script.
Error: Process Model Error - Rule RULE_NAME used in rule task TASK_NAME does not exist.
When duplicate copies of processes and tasks are created for different orders, their rules are also duplicated in all of the orders for which copies are created. After running the process task reusability script (runProcessTaskReusabilityScript=yes) and the order extension script (runExtendBaseOrdersScript=yes), the cartridge is in a state where reused process and tasks are moved to the base order and all other orders extend the base order. But the rules used by these processes and tasks are not migrated to the base order.
Solution:
You must run the script that migrates rules (runRuleMigrationScript=yes, migrateRuleOrders=*) referred by processes and tasks assigned to the base order. These scripts delete rules specified from child orders and move them to the base order.
Getting list of rules to migrate:
-
Select all the errors from the error log of type Process Model Error - Rule RULE_NAME used in rule task TASK_NAME does not exist and copy it to a text file.
-
Open the migrationMessages.properties file and make following changes:
-
Set runExtendBaseOrdersScript=no
-
Set runProcessTaskReusabilityScript=no
-
Set runRuleMigrationScript=yes
-
Set migrateRuleOrders=*
-
Select the RULE_NAME one by one from the text file and add them to the migrateRule property in migrationMessages.properties.
For Ex: migrateRules=servico_iptv_instalado,adsl_residencial_,ativacao_iptv
-
-
Save and close migrationMessages.properties.
Running the script for rule migration:
-
Run run.bat to execute scripts.
-
Open Design Studio. Refresh the Workspace. Close and restart Design Studio. Clean the cartridge project.
-
Analyze cartridge errors.
There should not be any errors of type Process Model Error - Rule RULE_NAME used in rule task TASK_NAME does not exist.
All the errors related to rule migration have been removed.
Note:
Script can be run multiple times for different rules.
Steps to Perform Before Deployment
This section explains the steps to perform before deploying your cartridge.
-
Remove base order from packaging tab.
Base order is created for the sake of reusability of tasks and processes.
When this cartridge is deployed, you should not be able to deploy or create orders for the base order. Therefore, remove the base order from the list of orders sent to server:
-
Open the Project editor.
-
Go to the Packing tab.
-
Uncheck the Include all from Project check box.
-
Click the Select button.
-
Select everything except the base order and click OK.
-
Migration Script Frequently Asked Questions
Question: Why turn off ”Build Automatically” before importing the cartridge?
Answer: A cartridge is deployable only when there are no build errors. Most imported cartridges contain build errors (like duplicate tasks and processes). So it makes sense to turn off Build Automatically until all scripts are run.
Question: Why to ”Refresh” and ”Restart” Design Studio after running the script?
Answer: This is to ensure that all changes done to the project are really reflected.
Question: Why there are some errors left after running the script?
Answer: Script does the job of removing duplicate tasks and processes and things around it like extending base order and rule migration. There might be some errors left due to other problems in cartridge that are not addressed by script.
Question: What are DD base type nodes in data dictionary?
Answer: For each node in the data dictionary of OSM Administrator, Design Studio creates a DD base type as a flattened structure. For each DD base type there can be one or more instances of other nodes of type DD base types. These DD base type nodes are created for separation of definition and usage.
Post-Migration Common Problems & Recommendations
This section describes common post-migration problems and recommendations.
Order Model Error - In rule RULE_NAME
This section describes the error Order Model Error - In rule RULE_NAME: Data element ELEMENT_NAME is not a valid element for order ORDER_NAME.
In OSM Administrator, you create rules on data elements defined in the Master Order Template (MOT). You cannot create rules based on data elements present in a particular Order Type/Source.
In Design Studio, you create rules on data elements defined in the Order Template. You cannot create rules based on data elements present in the Data Dictionary. Since rules can only be defined on the elements present in the Order Template, there will be errors for this kind of scenarios. This is a cartridge design issue and hence should be corrected.
Possible Solutions:
-
Manually correct the cartridge. This solution is the recommended approach.
In Design Studio, add the missing data element(s) to the Order Template from the Data Dictionary.
Or, in OSM Administrator, add the missing elements to the Order Type/Source from MOT and export the XML using XMLIE. Then import the cartridge into Design Studio.
-
Design Studio identifies these kinds of elements (which are defined as rules, but are not present in the Order Template) and adds them to Order Template.
Order Model Error - In Filter Defined for Role FILTER_NAME
This section describes the error Order Model Error - In filter defined for role FILTER_NAME: Data element ELEMENT_NAME is not a valid element for order ORDER_NAME.
In OSM Administrator, create filters on data elements defined in the MOT. You cannot create filters based on data elements present in a particular Order Type/Source.
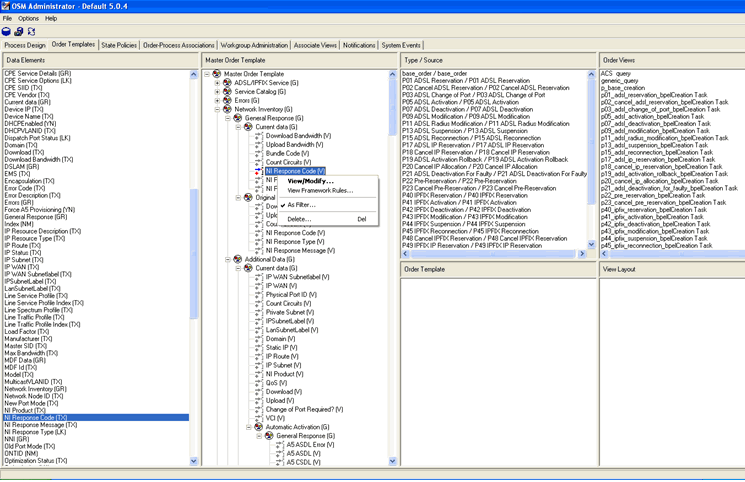
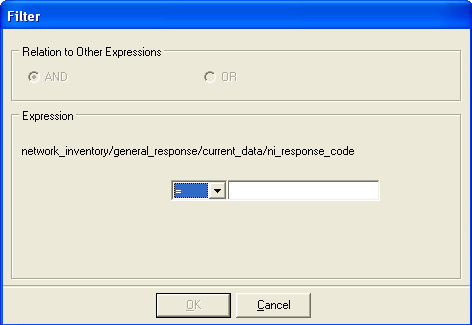
The Order Template in Design Studio is equivalent to Order Type/Source in OSM Administrator.
In Design Studio, you create filters on data elements defined in the Order Template. You cannot create filters based on data elements present in Data Dictionary. Because filters can only be defined on the elements present in the Order Template (unlike with OSM Administrator), there will be errors immediately upon importing such cartridges into Design Studio.
Figure 1-13 Filter Creation in Design Studio

Description of ''Figure 1-13 Filter Creation in Design Studio''
Possible Solutions:
-
Manually correct the cartridge.
In Design Studio, add the missing data elements to the Order Template (from the Data Dictionary).
Or, In OSM Administrator, add the missing elements to the Order Type/Source from MOT and export the XML using XMLIE. Then import the cartridge into Design Studio.
-
Design Studio identifies these kinds of elements (which are defined as part of the filter, but are not present in the Order Template) and adds them to Order Template.
Recommendations:
Option 1 (Manual correction)
Role Model Error - No Permission is Granted for Role ROLE_NAME
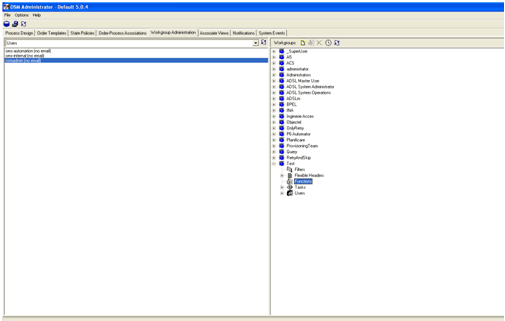
This section describes the error Role Model Error - No permission is granted for Role ROLE_NAME
Details:
In OSM Administrator, you can assign tasks to a workgroup on the Workgroup Administration tab, but you cannot assign any functions to that Workgroup.
In Design Studio, a workgroup is called a Role and Functions are called Permissions.
Design Studio throws the following error if none of the existing permissions are assigned to a role:
Role Model Error - No permission is granted for Role ROLE_NAME
Possible Solutions:
-
Manually correct the cartridge.
In the Design Studio Role editor, assign one or more permissions to the Role, based on cartridge design.
Alternatively, in OSM Administrator, add one or more functions to the Role, based on cartridge design and export the XML using XMLIE. Then import the cartridge into Design Studio.
-
Design Studio will show a warning when a Role is created without an assigned permission.
Recommendations:
Option 1 (Manual correction)
Task Model Error - Permissions Have Not Been Defined for Task TASK_NAME
Details:
In OSM Administrator, Query Views are assigned to Workgroups directly from the Associate Views Tab.
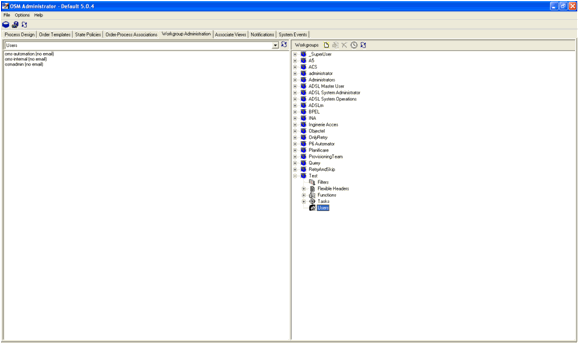
Design Studio may not be able to assign all the Roles to Query Tasks, throwing the following error:
Task Model Error - Permissions have not been defined for task TASK_NAME.
Possible Solutions:
-
Manually correct the cartridge.
In Design Studio, assign one or more Roles to the Query Task, based on cartridge design.
Or, in OSM 6.3.1 Administrator or earlier versions, add one or more functions to the Role, based on cartridge design and export the XML using XMLIE. Then import the cartridge onto Design Studio.
Data Dictionary Model Error - Embedded XML Not Well Formed
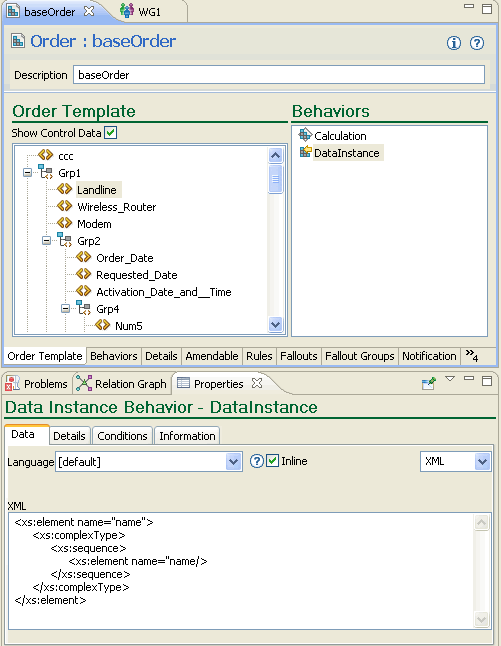
This section describes the error Data Dictionary Model Error - Embedded XML supplied for instance data in BEHAVIOUR_NAME is not well formed: Content is not allowed in prolog.
If the XQuery content (on the Data Tab of Properties View for a Data Instance Behavior) is not well-formed, Design Studio throws the error.
In the below cartridge, the specified namespace (XQuery namespace) is not present in Design Studio, causing the error.
Possible Solutions:
-
Manually correct the cartridge.
In Design Studio, modify the XQuery to be well-formed.
Data Dictionary Model Error - XPath Expression Error for Calculation behavior
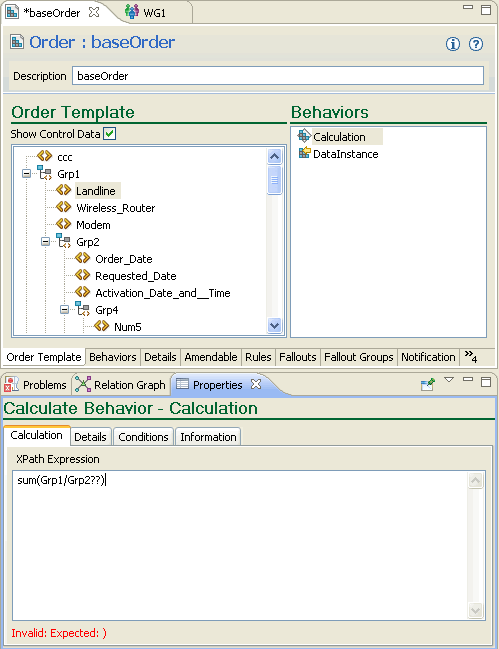
This section explains the error Data Dictionary Model Error - XPath Expression error for Calculation behavior BEHAVIOUR_NAME. Invalid: Expected.
If the XPath expression (in the Calculation Tab of Properties View for a Calculate Behavior) is not well-formed (an invalid XPath expression), Design Studio throws the error. This is an encoding Issue.
For non-English cartridges, set the encoding format to UTF-8 in config.xml.
Possible Solutions:
-
Before exporting the cartridge with OSM Administrator, modify the encoding to UTF-8 in the config.xml file and export the XML file. Then import the cartridge into Design Studio.
Data Dictionary Validation Error - XSD
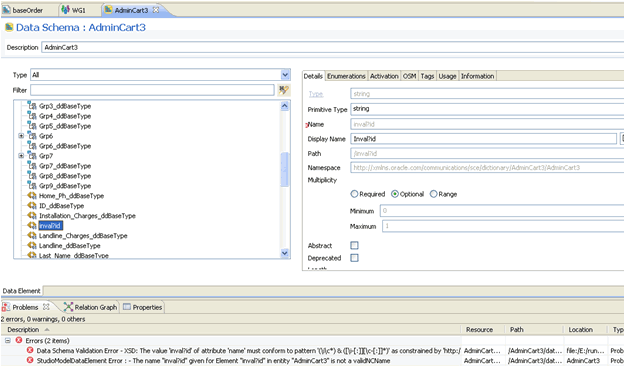
This section explains the error Data Dictionary Validation Error - XSD: The value ELEMENT_ddBaseType of attribute attribute_name must conform to pattern '(\i\c*) & ([\i-[:]][\c-[:]]*)' as constrained by 'http://www.w3.org/2001/XMLSchema#NCName
Some of the Data elements defined using non-English characters are not encoded properly. This is an encoding Issue. Set the encoding format to UTF-8 in the config.xml file and export the XML file. Then import the cartridge into Design Studio.
Some of the elements defined in data dictionary do not follow standard mnemonic pattern. Manually modify them in OSM Administrator before exporting the cartridge, or manually correct them in Design Studio.
Standard Pattern: First character must be Upper-Case, Lower-Case or Underscore (_). Subsequent characters must be Upper-Case, Lower-Case, number, dot (.), hyphen (-) or Underscore (_).
Possible Solutions:
-
Before exporting the cartridge from OSM Administrator, set the encoding to UTF-8 in the config.xml file and export the XML file. Then import the cartridge into Design Studio. This is the recommended solution.
Process Model Error - Duplicate Event Name EVENT_NAME.
Details:
Notifications with Duplicate Names defined for the same transition or task.
Possible Solutions:
-
OSM Administrator does not allow you to create Notifications with the same name. After importing the cartridge into Design Studio, you must manually correct duplicate event names.
Process Model Error - Event Notify Roles Not Specified for Event on Activity ACTIVITY_NAME.
Details:
An Event is assigned to an activity, but a Role is not assigned to the Event.
Possible Solutions:
-
After importing the cartridge into Design Studio, manually assign the Role to the Event.
Duplicate Flex Header – HEADER_NAME is a Duplicate Flex Header for the Role ROLE_NAME.
Details:
Duplicate Flexible Headers are defined for the same role.
Possible Solutions:
-
After importing the cartridge into Design Studio, manually modify duplicate flexible headers on the same role.
Order Lifecycle Policy Error - Event interval
This section explains the error Order Lifecycle Policy Error - Event interval cannot be bigger than maximum wait duration - Cancel Order transaction for "Suspended" order state in Order Lifecycle Policy ORDER_LIFECYCLE_NAME.
Design Studio does not allow the ”Cancel/Suspend Order” event interval to be bigger than the maximum wait duration in Order Lifecycle Policy.
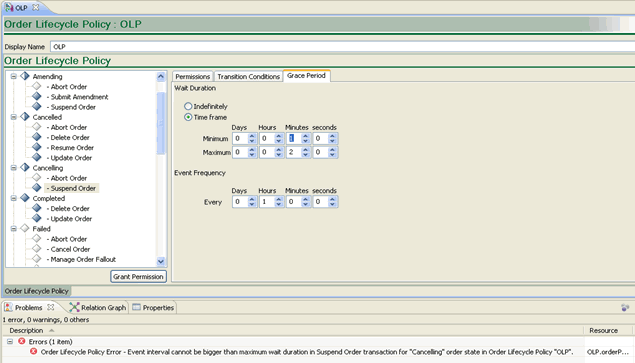
Possible Solutions:
-
Manually correct the cartridge. In Design Studio, modify the Order Lifecycle Policy so that event interval is within the maximum wait duration.
No Access to Node ID in Text-Based Rules
Details:
There is capability in the Design Studio to preserve the text-based rules. See Pre-Migration Tasks in this document for more information.
Import the XML Model into Design Studio. If the Node IDs are defined in the XML Model then they will be imported into Design Studio. These Node IDs are found in the Order Template node properties, as shown in the following graphic. The OSM Entity ID (10948) corresponds to the node ID exported from OSM Administrator.
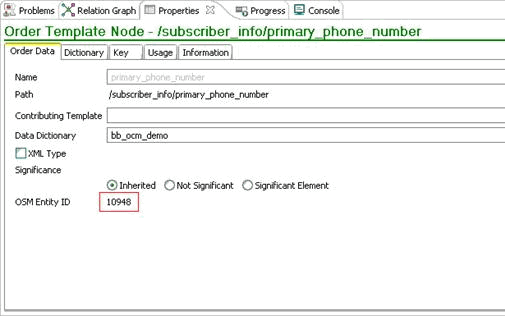
Possible Solutions:
-
Update the SQL-based rules in Design Studio as shown in the following example:
declare val1 date;
delay_flag    varchar2(10);
begin
select timestamp_out into val1
from om_hist$order_header hist, om_task task, om_state st
where hist.task_id = task.task_id
and node_id = /*$dataNode*/10948
and hist.hist_order_state_id = st.state_id and st.state_mnemonic = 'completed'
and hist.order_seq_id = :order_seq_id;

delay_flag := om_ordinst_value_pkg.get_node_value_like(:order_seq_id,10948,:coord_set_id);
if  ( rtrim(delay_flag)='yes' ) or (val1 <= (sysdate - 2/24)) then
:rule_result := 'true';
else
:rule_result := 'false';
end if;
end;
For example:
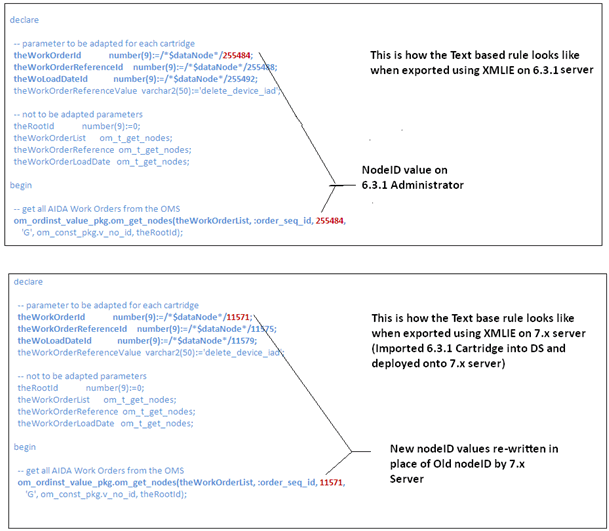
As shown above, OSM 7.x is not consistently preserving the original IDs. But any existing node ID references are maintained properly.
This approach will preserve existing functionality while providing an easier migration to XPath based rules for any new/modified scripts.
Task Model Error - Task Data Node [node_name] Cannot be Resolved
Details:
Some of the data elements are not copied correctly to the task.
Recommendations:
This error is corrected by running the post-migration scripts, provided all data dictionary elements have been properly copied to the base order.
Naming Conflict - Entity Names Must Be Unique
This section explains the error:
Naming Conflict - Entity names must be unique (case-insensitively) amongst other entities of the same or similar types within a workspace.
Entities must be defined with a different name if the entities are of same type in Design Studio. For example, if there are two tasks defined with same name (mnemonic), Design Studio throws the error.
Automation and Manual tasks are of same type in Design Studio and cannot be given with same name.
Possible Solutions:
-
A possible solution is to manually correct the cartridge in Design Studio.
Importing High-Complexity Cartridges
Importing high-complexity cartridges in Design Studio can take a long time and require large JVM settings.
To avoid these problems, Oracle recommends that high-complexity cartridges are split into multiple cartridges when being imported by importing the orders in the cartridge in batches. These multiple cartridges can then be tied together using OSM's composite cartridge feature (recommended) or they can be moved back into a single cartridge in Design Studio.
This section provides information about analyzing whether a cartridge is high complexity, splitting and importing a cartridge, and then recombining the cartridges.
The time taken by Design Studio to import a cartridge depends on the complexity of the cartridge. Table 1-2 shows how import times vary based on cartridge complexity.
Table 1-2 Cartridge Complexity
| Complexity | Approximate Import Time | Needs To Be Split? |
|---|---|---|
|
Low |
Up to 4 hours |
No |
|
Medium |
Between 4 and 8 hours |
No |
|
High |
Over 8 hours |
Yes |
Running the Cartridge Complexity Analyzer
To run the cartridge complexity analyzer:
-
Unzip the osm7_migration_script.zip file.
The following files will be extracted from the zip file.
-
migrationMessages.properties
-
run.bat
-
readMe.txt
-
migration_script.jar
-
analysis.bat
-
-
Edit the analysis.bat file with the path and name for the model file to be analyzed. For example, if the model file is named osm631model.xml and is located in D:\model:
set JDK6_TOOLS_JAR=%JAVA_HOME%\tools.jar SET CLASSPATH=%CLASSPATH%;%JDK6_TOOLS_JAR%;%MIGRATION_SCRIPT_JAR%; java oracle.communications.sce.osm.tools.cartridgeanalyzer.LaunchAnalyzer -model "D:\model\osm631model.xml" -
Run analysis.bat and verify the output.
The output for a high-complexity cartridge looks similar to this:
-------------------------
Complexity
-------------------------
Low     - [1  - 49]
Medium  - [50 - 79]
High    - [80 - 100]
-------------------------

Analysis for cartridge: D:\OSMCarts\Mobile_Cartridge.xml

*************************
Complexity = High 92.0
*************************

Next Steps:
#########################
Cartridge needs to be spilt before being imported into Design Studio.
See the OSM Cartridge Migration Guide for more details.
The output from a low-complexity or medium-complexity cartridge looks similar to this:
-------------------------
Complexity
-------------------------
Low     - [1  - 49]
Medium  - [50 - 79]
High    - [80 - 100]
-------------------------

Analysis for cartridge: D:\OSMCarts\BBand_Cartridge.xml

*************************
Complexity = Low 42.0
*************************

Next Steps:
#########################
Cartridge can be imported whole. See the OSM Cartridge Migration Guide for more details.
Importing High-Complexity Cartridges
This section contains information about how to import a cartridge if the Cartridge Complexity Analyzer tool has determined that your cartridge is a high-complexity cartridge.
Pre-Requisites for Importing
Before importing any cartridges, you should perform all of the steps in the "Pre-Migration Tasks" section.
Importing a Subset of the Orders in a Complex Cartridge
To split cartridges into manageable pieces, you import the orders from the cartridge in batches. The way you choose to divide the orders depends on your business needs. For example, you might group your orders by service type: VoIP orders in one set and Mobile orders in another set. For best performance, import only one or a few orders at a time.
To import a subset of the orders in the cartridge:
-
In the Project menu, deselect Build Automatically if it is selected.
-
In the Studio Projects view, select Import and then Import Order and Service Management Model.
-
In the Order and Service Management Model Import window, browse to the XML file for the model you would like to import. Click Next.
-
In the Order and Service Management Model Import window, do the following:
-
In the Target Project Name field, enter the name for the new project to create in Design Studio.
-
Set the Target Version field to 7.2.0.
-
Ensure that Create a new data schema is selected.
-
Select a project name in the Model Project field. This name can be the same name you entered in the Target Project Name field.
-
Enter a name for the data schema in the Data Schema Name field. This name can be the same name you entered in the Target Project Name field.
-
Click Next.
-
-
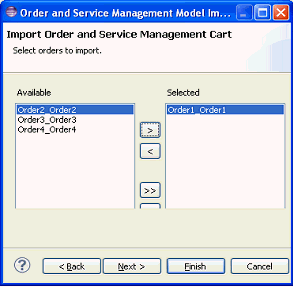
Select the orders to import. Use the arrow buttons to move the desired orders to the Selected box. In Figure 1-22 only one order is selected.
-
Click Finish to begin the import.
-
To start importing the second batch of orders, in the Studio Projects view, select Import and then Import Order and Service Management Model.
-
In the Order and Service Management Model Import window, browse to the XML file for the model you would like to import. Click Next.
-
In the Order and Service Management Model Import window, do the following:
-
In the Target Project Name field, enter the name for the new project to create in Design Studio. This name should be different than the one you used for the first set of orders.
-
Set the Target Version field to 7.2.0.
-
Select Use an existing data schema.
-
In the Data Schema field, select the name of the data schema you created for the first set of orders.
-
Click Next.
-
-
Select the orders to import. Use the arrow buttons to move the desired orders to the Selected box.
-
Click Finish to begin the import.
The new orders are imported into a new cartridge project.
-
To import further sets of orders, repeat steps 7 through 11, making sure to use a different value for Target Project Name each time.
Configuring Projects to Contain Reused Entities
After all the orders are imported there will be some build errors related to entity name conflicts. These errors are expected, because there might have been processes and tasks with the same name used across different orders. These processes and tasks need to be moved to a different project in order to fix the build errors.
After all the orders are imported, there will be some build errors related to entity name conflicts. These errors are expected, as there might have been processes and tasks with the same name used across different orders. These processes and tasks need to be moved to a different project in order to fix the build errors.
To configure a project to contain the reused entities:
-
From the Studio menu, select, Project and then Order and Service Management Project.
-
In the New Order and Service Management Project window, enter a name for the project to contain the reused entities into the Project name field. Leave the other fields with the default values and click Finish.
For the rest of this section, this new project will be referred to as the Base Project.
-
Open the Package Explorer view. In the first cartridge that you imported, in the dataDictionary folder, you will find a file with an .xsd extension and a file with an .xdsc extension. Drag and drop these files to the dataDictionary folder of the Base Project.
-
In the Studio Projects view, right-click each of the order lifecycle policies (located under Orders for the cartridge) for the first imported cartridge and select Move. When prompted for a destination, select the Base Project. Repeat for all of the imported cartridges.
-
In the Studio Projects view, right-click each of the roles for the first imported cartridge and select Move. When prompted for a destination, select the Base Project. Repeat for all of the imported cartridges.
-
For each of the imported projects, open the Project editor and click the Dependency tab. Add a dependency on the Base Project for the cartridge. Set the Dependency Violation Diagnostic Level to Warning.
-
Build the cartridges in the workspace. Look through the errors generated to find any errors that are in the following format relating to tasks or processes:
Entity names must be unique (case-insensitively) amongst other entities of the same or similar types within a workspace. The conflicts are: [Duplicate element path and name]One of the conflicting elements is indicated in the error message. The other element is the Resource for the error.
To resolve these errors, right-click the element and select Move to move one instance of the duplicate element to the Base Project and delete the other instance.
-
Create a new order in the Base Project. To do this, follow the instructions in step 4 in "Steps to Perform Before Running the Cartridge Migration Script".
For the rest of this section, this new order will be referred to as the Base Order.
-
Open the editor for each manual task and automated task in all of the cartridges (the Base Project and all of the imported cartridges) and set the order for the task to the Base Order. Figure 1-23 depicts setting the order in a manual task. The order is set for an automated task in the same way as for a manual task.
Figure 1-23 Manual Task Editor Details Tab
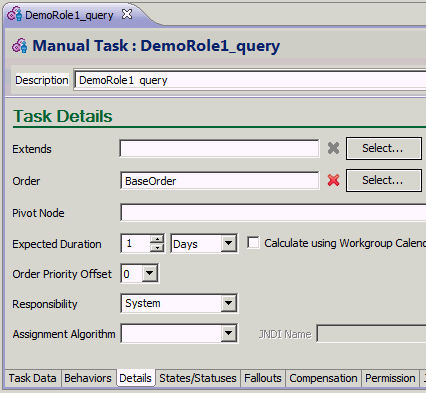
Description of ''Figure 1-23 Manual Task Editor Details Tab''
-
Open the editor for each process in all of the cartridges (the Base Project and all of the imported cartridges) and set the order for the process to the Base Order. To see the properties, click the Start circle. Set the order name in the Reference property by clicking on the ellipsis (...) button as depicted in Figure 1-24.
Figure 1-24 Process Editor Properties View
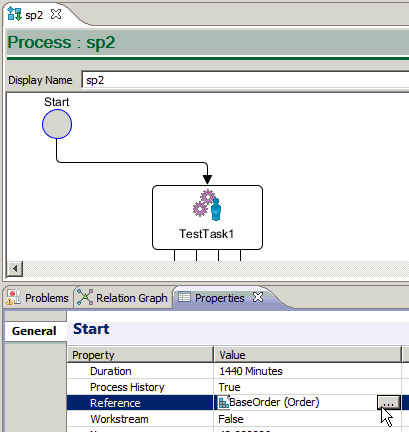
Description of ''Figure 1-24 Process Editor Properties View''
Merging Projects into a Single Project (Not Recommended)
Oracle recommends keeping your projects separate for performance reasons. However, if your business needs require it, you can merge them into a single project.
To merge the projects into a single project:
-
Open the Package Explorer view.
-
Expand the model directory for the first imported cartridge. Select all of the contents and drag and drop them into the model directory of the Base Project that you created in "Configuring Projects to Contain Reused Entities". Repeat for all of the imported cartridges.
-
Expand the resources directory for the first imported cartridge. Select all of the contents and drag and drop them into the resources directory of the Base Project. Repeat for all of the imported cartridges.
-
Remove all of the imported cartridges from the workspace, leaving only the Base Project.
-
Continue to the instructions for running the cartridge migration script. These steps should be performed before attempting to deploy the cartridge.
Running the Cartridge Migration Script and Performing Post-Migration Tasks
Run the cartridge migration script. It will perform the following functions:
-
Set all orders to extend the Base Order
-
Handle Process and Task reusability
-
Migrate rules to the Base Order
To run the cartridge migration script and perform post-migration tasks:
-
Perform the steps in the "Run the Cartridge Migration Script" section of this document for each cartridge in your workspace.
-
Perform the steps in the "Steps to Perform After Running the Script" section of this document.
-
Perform the steps in the "Steps to Perform Before Deployment" section of this document.
-
Perform the steps in the "Post-Migration Common Problems & Recommendations" section of this document.
Adding a Composite Cartridge (Optional)
This process is optional. Each project can be deployed independently without combining them to a single composite cartridge. However, for ease of deployment and future extensibility, you may wish to use a composite cartridge.
If you merged all of your projects into a single project (see "Merging Projects into a Single Project (Not Recommended)"), you should not perform the steps in this section.
To add a composite cartridge for your projects:
-
From the Studio menu select New, then Project, and then Order and Service Management Composite Project.
-
In the New Order and Service Management Composite Project window, enter a name for the project in the Project name field. Leave the other fields with the default values and click Finish.
-
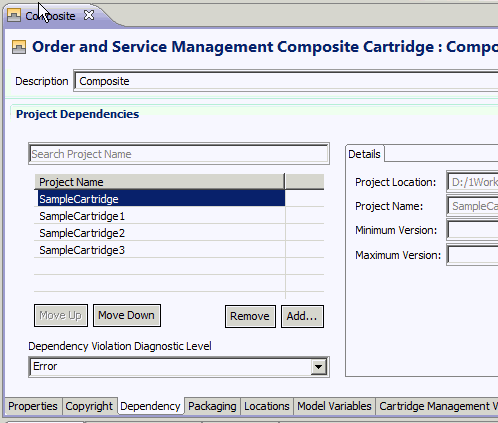
In the Composite Cartridge editor, select the Dependency tab. Add all of the imported cartridges in the Project Dependencies list as depicted in Figure 1-25. Do not add the Base Project that you created in "Configuring Projects to Contain Reused Entities".
-
Open the Project editor for each of the imported cartridges and deselect the Standalone box in the Details tab.
Deploying the Cartridges
Once you have resolved all of the build errors as instructed in the previous sections, you can deploy the cartridges in your solution.
If you have created a composite cartridge, you can just deploy the composite cartridge. If you have not created a composite cartridge, deploy the cartridges individually.
Once the cartridges have been deployed, they are ready for use and orders can be submitted for the order specifications in the cartridges.