| Oracle Product Lifecycle Analytics Installation and Setup Guide Release 3.5 E70274-03 |
|

 Previous |
 Next |
| Oracle Product Lifecycle Analytics Installation and Setup Guide Release 3.5 E70274-03 |
|
Previous |
Next |
This section lists the prerequisites for installation, the installation procedure, the post-installation guidelines and uninstallation of the OPLA application. In addition, this section describes the execution of ETL after you complete the installation.
Verify the prerequisites for the installation of OPLA using the following preinstallation checklist:
| # |
Check point | Done |
|---|---|---|
| 1 | Make sure the Database Server and Listener services are running. You can check this by using Oracle Database tools, such as Connection Manager, SQL Plus, or tnsping.
Note All database instances hosting the OPLA schema components should support NLS_CHARACTERSET as UFT8/AL32UFT8 and NLS_LENGTH_SEMANTICS as CHAR/BYTE. |
|
| 2 | Install and configure Oracle Data Integrator.
For information on installation and configuration of ODI, refer to the Oracle Data IntegratorInstallation and Configuration Guide. |
|
| 3 | Install and configure Oracle Business Intelligence Enterprise Edition.
For information on installation and configuration of OBIEE, refer to the Oracle Business Intelligence Infrastructure Installation and Configuration Guide |
|
| 4 | Make sure the Oracle BI Server and Presentation Services are running. | |
| 5 | Install American English Unicode (en_US.UTF-8) Full Locale package in Solaris system to ensure successful installation and allow the complete functionality of OPLA application. | |
| 6 | For Agile PLM for Process ETL: If the source is Microsoft SQL Server, download Microsoft SQL Server JDBC Driver 3.0 from the Microsoft website, Microsoft Download Centerhttp://www.microsoft.com/downloads/en/details.aspx?FamilyID=a737000d-68d0-4531-b65d-da0f2a735707. If you are using ODI 11g, follow the installation instructions and then copy the sqljdbc4.jar file to the C:\Documents and Settings\<User>\Application Data\odi\oracledi\userlib directory (in Windows), and to the <User HOME>/.odi/oracledi/userlib directory in (Linux/Solaris). |
|
| For Agile PLM for Process: Create views on the PLM for Process (PLM4P) source schema, if the source is an Oracle DB server.
Using the command prompt or shell, login to the source schema and create the following views: CREATE OR REPLACE FORCE VIEW VWBINPDUNINITIATEDACT1 (PKID, FKACTIVITYTEMPLATE, FKPARENT, PRJPKID, REQUIRED, HASPARENTWORKFLOWDEPENDENCY) AS SELECT ata.fkactivitytemplate || '|' || prj.pkid pkid, ata.fkactivitytemplate, ata.fkParent, prj.pkid AS prjpkid, ata.required, ata.hasparentworkflowdependency FROM npdacttemplateassociations ata INNER JOIN NPDSTAGETEMPLATES STEMP ON STEMP.PKID = ATA.FKPARENT INNER JOIN NPDPROJECTS PRJ ON PRJ.FKPROJECTTEMPLATE = STEMP.FKPROJECTTEMPLATE; CREATE OR REPLACE FORCE VIEW VWBINPDUNINITIATEDACT2 (PKID, FKMASTERACTIVITYTEMPLATE, FKPROJECT) AS SELECT DISTINCT acttemp.fkmasteractivitytemplate || '|' || act.fkproject pkid, acttemp.fkmasteractivitytemplate, act.fkproject FROM NPDACTIVITIES ACT INNER JOIN npdactivitytemplates acttemp ON act.fkactivitytemplate = acttemp.pkid; |
||
| 7 | For Agile PLM: Create TNS entry for the source (PLM) database on the target database machine.
If you are creating a new OPLA Data Mart database instance, refer to Adding Database Services to the Listener on page 38. |
|
| 8 | Make sure you log in with a userid that has administrative privileges on the machine where OPLA components are to be installed. | |
| 9 | Make sure you can connect to the Agile PLM or Agile PLM for Process source database. | |
| 10 | The ODI_JAVA_HOME environment variable contains the path to the supported JDK installation directory. | |
| 11 | The JAVA_HOME environment variable contains the path to the supported JDK installation directory and is added to the PATH environment variable. | |
| 12 | Before creating an Oracle 12c database instance using the OPLA installer on a non-Windows platform, add the following entry to the sqlnet.ora file:
SQLNET.ALLOWED_LOGON_VERSION=8 |
It is important to gather the following information before you begin the installation:
Deployment Configuration specification determined based on ETL and BI Reports performance criteria
Start date of the Fiscal year for your business
Name of the email server specific to your email configuration
Location of the ODI details
Location of the RDBMS and database details
Names of the tablespaces to be used during the installation
Name and location of the Oracle BI (OBIEE) Server
Name and location of the Oracle BI (OBIEE) Presentation Server
|
Important: Install and test this release on a designated test server before installing it on your production environment. Resolve the issues or questions that you might observe during the system testing before you install this software on your production environment. |
The OPLA installation process includes the following steps:
Installing the Data Mart Schema and ETL Components
Installing BI components
|
Note: You must start the installer twice to complete the installation process. In some implementation scenarios, there is a need to manually install the Data Mart schema. This section also describes the steps involved in the manual installation of the Data Mart Schema. For more information, refer to Manually Installing the Data Mart Components. |
|
Note: If you want to use Data Mart only, you do not need to install BI components and you are not required to run ETL for MDS. Refer to the Oracle Product Lifecycle Analytics Configurator and Data Mapping Guide for information on how to disable MDS in the section, ”ETL Run Time Property Names.” |
The installer launches an installation wizard powered by InstallAnywhere to install OPLA.
|
Note: Click Help in the wizard windows for information about each step. You can keep the Help window open during the installation. The content in the Help window is refreshed dynamically as you progress with the installation. |
To start the OPLA installer in Windows:
Double-click Windows\OPLASetup.exe in the list of files available as part of the Installer kit.
To start the Oracle Product Lifecycle Analytics installer in UNIX:
Navigate to the folder where the file exists, in your UNIX terminal.
Provide full (Read, Write, Execute) permissions to the setup file:
AIX: OPLASetup.bin
HPUX: OPLASetup.bin
Linux: OPLASetup.bin
Solaris: OPLASetup.bin
Enter the following command on your UNIX prompt:
AIX: ./OPLASetup.bin
HP-UX: ./OPLASetup.bin
Linux: ./OPLASetup.bin
Solaris: ./OPLASetup.bin
Important Install Oracle Product Lifecycle Analytics in Linux as a non-root user.
To select the Agile PLM Source Database:
Start the OPLASetup.exe installer.
For more information, refer to Starting the Oracle Product Lifecycle Analytics Installer.
In the Welcome to Oracle Product Lifecycle Analytics Installation dialog box click Next.
In the Choose Agile PLM Source dialog box click Agile PLM. Click Next. The Choose Install Set dialog box is displayed.
In the Choose Install Set dialog-box, click Data Mart Database and ETL. Click Next. The Install Data Mart Components dialog box is displayed.
There are two options in the Choose Install Set dialog box. When running the OPLASetup.exe installer for the first time you must select the Data Mart Database and ETL option.
The second time you run the OPLASetup.exe select the Business Intelligence option.
|
Important: You must select Agile PLM if you plan to install database components by generating SQL scripts. |
|
Important: Database instance creation is not supported on Oracle Exadata. OPLA works on existing database instances of Exadata only if the value of NLS_CHARACTERSET is UFT8/AL32UFT8 and NLS_LENGTH_SEMANTICS is CHAR/BYTE. |
Next you must choose which Data Mart components to install. The OPLA installer provides the following installation options:
Install Database Components only
Install ETL Components only
Both (Database and ETL components)
If you plan to install the Database and ETL components separately you must install the Database first. Install the ETL components after the Database is installed and successfully configured.
To install database components by generating SQL scripts, select Install Database Components only --> Generate SQL Scripts.
If you plan to install the Database and ETL components separately you must install the Database first. Install the ETL components after the Database is installed and successfully configured.
When installing database components note down the options selected and any paths and information given. You will need this information when installing ETL components.
To install database components only:
In the Install Data Mart Components dialog box, select the component that you want to install. In this case, click Install Database Components only. Click Next. The Data Mart Destination Location dialog box is displayed.
In the Destination Location box type the location for the database components. To navigate to the destination location click Choose. In the Browse For Folder window navigate to the home directory location and click OK. Click Next. The Schema Creation Options dialog box is displayed.
In the Schema Creation Options dialog box you must choose between:
Create New Database
Use Existing Database and Table space
Generate SQL Scripts
Select the schema creation option you require and click Next.
Depending on the option you chose in Step 3 and the option you choose in Step 6 you will be asked to enter the Oracle home directory location and/or the Database Datafile directory location.
If you chose "Generate SQL Scripts", a screen appears with an option to choose Service or SID to connect to the database, only if the database is ORACLE.
For any of the options you chose in Step 3 you will be asked to choose a schema option:
Default
Single Schema Installation
Choose Default to install data mart, MDS, ODI work repository, and ODI master repository in different database schemas. Choose Single Schema Installation to install data mart, MDS, ODI work repository, and ODI master repository in a single database schema. To continue with the installation see Note.
If you choose the Single Schema Installation option, there will be no more options to select. Continue entering information and locations for database, datafile, tablespace and so on. Remember to note down the options you choose and the information you enter! You will need this information when installing ETL components.
If you choose to install the Default schema option, you must choose between:
Create ODM and MDS on a Single Schema
Create ODM and MDS on Different Schema
Choose Create ODM and MDS on a Single Schema to create data mart and MDS on a single schema. Choose Create ODM and MDS on Different Schema to create data mart and MDS on two different database schemas.
Continue entering information and locations for database, datafile, ODI repository, tablespace and so on.
Review all the information in the Pre-Installation Summary dialog box.
If there are any mistakes or changes you need to make:
a. Click Previous until you reach the dialog box where you need to make changes.
b. Make the required changes.
c. Click Next until you come back to the Pre-Installation Summary dialog box.
d. Click Install.
If you do not need to make any changes:
In the Pre-Installation Summary dialog box click Install.
If you selected the option Generate SQL scripts in the Select schema creation window during the installation of the Data Mart module, the installer generates a set of SQL files and stores them in Schema folder in the Install Directory. This option involves running these scripts in SQL*Plus to manually create Data Mart schema components.
Step 1: Run the Installer using the Generate Scripts Option
Step 2: Run the Generated SQL Scripts
Go to the directory where the installation files are located.
Change to the schema directory.
The directory contains one of the following subdirectories, based on the schema option chosen during installation:
Analytics_A9_Script_Single_Schema, if the Single Schema option was chosen.
Analytics_A9_Script_Default1_Schema, if the Default Schema - ODM and MDS in Same Schema option was chosen.
Analytics_A9_Script_Default2_Schema, if the Default Schema - ODM and MDS in Different Schema option was chosen.
If the machine where the scripts are generated is different from the machine where the schema is created, then copy the entire schema directory to the location where you want to create the Data Mart schema.
Open a Command window and change to the directory based on the selected schema option.
In the Command window, run the following commands:
(Windows) set ORACLE_SID=<SID_NAME>
(UNIX) export ORACLE_SID=<SID_NAME>
sqlplus sys/<password> as sysdba
@ExecuteScript.sql
The script prompts for tablespace names, schema usernames, and schema passwords. The schema users and schema components are created.
If you plan to install the Database and ETL components separately you must install the Database first. Install the ETL components after the Database is installed and successfully configured.
|
Caution: When installing ETL components only it is critical that you enter the same information you gave when you installed database components only!Do not use ODI repository IDs 102 and 103 for MASTER and WORK repositories during ETL Components Only installation! |
To install ETL components only:
In the Install Data Mart Components dialog box, select the component that you want to install. In this case, click Install ETL Components only. Click Next. The Data Mart Destination Location dialog box is displayed.
In the Destination Location box type the location for the ETL components. To navigate to the destination location click Choose. In the Browse For Folder window navigate to the home directory location and click OK. Click Next. The Oracle Home Directory dialog box opens.
In the Oracle Home Directory box, enter Oracle Database Home Directory path. Click Next. The Oracle Data Integrator Home Directory dialog opens
In the Oracle Data Integrator Home Directory box enter the ODI path. Click Next. The PLM Database Details dialog box opens.
Verify that the information in the PLM Database Details dialog box is correct. If not, simply edit the respective fields. Click Next. The Choose Schema Option dialog box opens.
Select the same options and enter the same information you gave when installing database components only.
Review all the information in the Pre-Installation Summary dialog box.
If there are any mistakes or changes you need to make:
Click Previous till you arrive at the dialog box where you need to make changes.
Make the required changes.
Click Next till you come back to the Pre-Installation Summary dialog box.
Click Install.
If you do not need to make any changes:
In the Pre-Installation Summary dialog box click Install.
|
Caution: Do not use ODI repository IDs 102 and 103 for MASTER and WORK repositories during both Database and ETL Component installation |
To install both database and ETL components:
In the Install Data Mart Components dialog box, select the component that you want to install. In this case, click Both (Database and ETL components). Click Next. The Data Mart Destination Location dialog box is displayed.
In the Destination Location box type the location for the Database and ETL components. To navigate to the destination location click Choose. In the Browse For Folder window navigate to the home directory location and click OK. Click Next. The Schema Creation Options dialog box is displayed.
In the Schema Creation Options dialog box you must choose between:
Create New Database
Use Existing Database and Table space
Select the schema creation option you require and click Next.
Depending on the option you chose in Step 3 you will be asked to enter the Oracle home directory location and/or the Database Datafile directory location.
In the Oracle Data Integrator Home Directory dialog box enter the ODI path. Click Next. The PLM Database Details dialog box opens.
Verify that the information is correct. Click Next. The Choose Schema Option dialog box opens.
For any of the options you chose in Step 3 you will be asked to choose a schema option:
Default
Single Schema Installation Click Next.
Choose Default to install data mart, MDS, ODI work repository, and ODI master repository in different database schemas. To continue with the installation go to Step 7. Choose Single Schema Installation to install data mart, MDS, ODI work repository, and ODI master repository in a single database schema. To continue with the installation see Note.
If you choose the Single Schema Installation option, there will be no more options to select. Continue entering information and locations for database, datafile, tablespace and so on.
If you choose to install the Default schema option, you must choose between:
Create ODM and MDS on a Single Schema
Create ODM and MDS on Different Schema Click Next.
Choose Create ODM and MDS on a Single Schema to create data mart and MDS on a single schema. Choose Create ODM and MDS on Different Schema to create data mart and MDS on two different database schemas.
Continue entering information and locations for database, datafile, ODI repository, tablespace and so on.
Review all the information in the Pre-Installation Summary dialog box.
If there are any mistakes or changes you need to make:
Click Previous till you arrive at the dialog box where you need to make changes.
Make the required changes.
Click Next till you come back to the Pre-Installation Summary dialog box.
Click Install.
If you do not need to make any changes:
In the Pre-Installation Summary dialog box click Install.
To select the Agile PLM Source Database:
Start the OPLASetup.exe installer.
In the Welcome to Oracle Product Lifecycle Analytics Installation dialog box click Next.
In the Choose Agile PLM Source dialog box click Agile PLM for Process. Click Next. The Choose Install Set dialog box is displayed.
In the Choose Install Set dialog-box, click Data Mart Database and ETL. Click Next. The Install Data Mart Components dialog box is displayed.
There are two options in the Choose Install Set dialog box. When running the OPLASetup.exe installer for the first time you must select the Data Mart Database and ETL option.
The second time you run the OPLASetup.exe select the Business Intelligence option.
Next you must choose which Data Mart components to install. The OPLA installer provides the following installation options:
Install Database Components only
Install ETL Components only
Both (Database and ETL components)
If you plan to install the Database and ETL components separately you must install the Database first. Install the ETL components after the Database is installed and successfully configured.
If you plan to install the Database and ETL components separately you must install the Database first. Install the ETL components after the Database is installed and successfully configured.
When installing database components note down the options selected and any paths and information given. You will need this information when installing ETL components.
To install database components only:
In the Install Data Mart Components dialog box, select the component that you want to install. In this case, click Install Database Components only. Click Next. The Data Mart Destination Location dialog box is displayed.
In the Destination Location box type the location for the database. To navigate to the destination location click Choose. In the Browse For Folder window navigate to the home directory location and click OK. Click Next. The Schema Creation Options dialog box is displayed.
In the Schema Creation Options dialog box you must choose between:
Create New Database
Use Existing Database and Table space
The option of selecting Generate SQL scripts in the Select schema creation window is not available if you are installing Agile PLM for Process.
Select the schema creation option you require and click Next.
Depending on the option you chose in Step 3 you will be asked to enter the Oracle home directory location and/or the Database Datafile directory location.
5. For any of the options you chose in Step 3 you will be asked to choose a schema option:
Default
Single Schema Installation Click Next.
Choose Default to create three different database schemas. The first database schema for data mart and MDS, the second database schema for ODI work repository, and the third database schema for ODI Master repository. Choose Single Schema Installation to install data mart, MDS, ODI work repository, and ODI master repository in a single database schema.
Continue entering information and locations for database, datafile, ODI repository, tablespace and so on.
Review all the information in the Pre-Installation Summary dialog box.
If there are any mistakes or changes you need to make:
Click Previous till you arrive at the dialog box where you need to make changes.
Make the required changes.
Click Next till you come back to the Pre-Installation Summary dialog box.
Click Install.
If you do not need to make any changes:
In the Pre-Installation Summary dialog box click Install.
If you plan to install the Database and ETL components separately you must install the Database first. Install the ETL components after the Database is installed and successfully configured.
|
Caution: When installing ETL components only it is critical that you enter the same information you gave when you installed database components only!Do not use ODI repository IDs 102 and 103 for MASTER and WORK repositories during ETL Components Only installation! |
To install ETL components only:
In the Install Data Mart Components dialog box, select the component that you want to install. In this case, click Install ETL Components only. Click Next. The Data Mart Destination Location dialog box is displayed.
In the Destination Location box type the location for the ETL components. To navigate to the destination location click Choose. In the Browse For Folder window navigate to the home directory location and click OK. Click Next. The Oracle Database Home Directory dialog box is displayed.
In the Oracle Home Directory box enter the home directory's location. Click Next. The Oracle Data Integrator Home Directory dialog box opens.
In the Oracle Data Integrator Home Directory box enter the home directory's location. Click Next. The PLM Database Details dialog box opens.
In the Source Type list, choose between:
Oracle
MSSQLServer
Verify that the rest of the information in the PLM Database Details dialog box is correct. If not, simply edit the respective fields. Click Next. The Choose Schema Option dialog box opens.
For the rest of the installation select the same options and enter the same information you gave when installing database components only.
Review all the information in the Pre-Installation Summary dialog box.
If there are any mistakes or changes you need to make:
Click Previous till you arrive at the dialog box where you need to make changes.
Make the required changes.
Click Next till you come back to the Pre-Installation Summary dialog box.
Click Install.
If you do not need to make any changes:
In the Pre-Installation Summary dialog box click Install.
|
Caution: Do not use ODI repository IDs 102 and 103 for MASTER and WORK repositories during both Database and ETL Component installation! |
To install both the database and ETL components:
In the Install Data Mart Components dialog box, select the component that you want to install. In this case, click Both (Database and ETL components). Click Next. The Data Mart Destination Location dialog box is displayed.
In the Destination Location box type the location for the Database and ETL components. To navigate to the destination location click Choose. In the Browse For Folder window navigate to the home directory location and click OK. Click Next. The Schema Creation Options dialog box is displayed.
In the Schema Creation Options dialog box you must choose between:
Create New Database
Use Existing Database and Table Space
The rest of the installation depends on which schema option you choose. See the following section for installing both the database and ETL components using the Create New Database option, and for installing both the database and ETL components using the Use Existing Database and Table Space option.
To install both the database and ETL components using the create new database option:
In the Schema Creation Options dialog box choose Create New Database. Click Next. The Oracle Database Home & Default Tablespace Directory dialog box is displayed.
In the Oracle Home Directory box enter the Oracle home directory's location. To navigate to the home directory location click Choose. In the Browse For Folder window navigate to the home directory location and click OK.
In the Database Datafile Directory box enter the database datafile directory's location. Click Next. The Oracle Data Integrator Home Directory dialog box opens.
In the Oracle Data Integrator Home Directory box enter the home directory's location. Click Next. The PLM Database Details dialog box opens.
In the Source Type list, choose between:
Oracle
MSSQLServer
Verify that the rest of the information in the PLM Database Details dialog box is correct. If not, simply edit the respective fields. Click Next. The Choose Schema Option dialog box opens.
Choose Default to create three different database schemas. The first database schema for data mart and MDS, the second database schema for ODI work repository, and the third database schema for ODI Master repository. Choose Single Schema Installation to install data mart, MDS, ODI work repository, and ODI master repository in a single database schema. Click Next.
Continue entering information and locations for database, datafile, ODI repository, tablespace and so on.
Review all the information in the Pre-Installation Summary dialog box.
If there are any mistakes or changes you need to make:
Click Previous till you arrive at the dialog box where you need to make changes.
Make the required changes.
Click Next till you come back to the Pre-Installation Summary dialog box.
Click Install.
If you do not need to make any changes:
In the Pre-Installation Summary dialog box click Install.
To install both the database and ETL components by using the existing database and tablespace option:
In the Schema Creation Options dialog box choose Use Existing Database and Table Space. Click Next. The Oracle Database Home Directory dialog box is displayed.
In the Oracle Home Directory box enter the home directory's location. To navigate to the home directory location click Choose. In the Browse For Folder window navigate to the home directory location and click OK. Click Next. The Oracle Data Integrator Home Directory dialog box opens.
In the Oracle Data Integrator Home Directory box enter the home directory's location. Click Next. The PLM Database Details dialog box opens.
In the Source Type list, choose between:
Oracle
MSSQLServer
Verify that the rest of the information in the PLM Database Details dialog box is correct. If not, simply edit the respective fields. Click Next. The Choose Schema Option dialog box opens.
Choose Default to create three different database schemas. The first database schema for data mart and MDS, the second database schema for ODI work repository, and the third database schema for ODI Master repository. Choose Single Schema Installation to install data mart, MDS, ODI work repository, and ODI master repository in a single database schema. Click Next.
Continue entering information and locations for database, datafile, ODI repository, tablespace and so on.
Review all the information in the Pre-Installation Summary dialog box.
If there are any mistakes or changes you need to make:
Click Previous till you arrive at the dialog box where you need to make changes.
Make the required changes.
Click Next till you come back to the Pre-Installation Summary dialog box.
Click Install.
If you do not need to make any changes:
In the Pre-Installation Summary dialog box click Install.
After you complete the installation of Data Mart Schema and ETL components, you need to install the BI components.
To install the BI Components:
Start the installer.
In the Welcome window, click Next.
In the Choose Agile PLM Source window, select either Agile PLM or Agile PLM for Process. Click Next.
In the Choose Install Set window, select the PLM Business Intelligence option.
In the Business Intelligence Application Temp Directory window, enter the path to a folder or use the Choose button to select a folder as the Business Intelligence Application Temp Directory. The next steps vary based on your selection. Click Help on the wizard window for details on values to be entered in each step of the installation wizard.
Verify the installation details of the selected component that appear in the Pre-installation Summary window.
Click Install.
In the Installation Completed window, click Done.
To deploy the OBIEE 11g RPD and Webcatalog, follow all the steps shown in Deploying Oracle PLA Model (PLMA RPD) and Web Catalog in OBIEE on page 40 before proceeding to the next step.
Restart BI Services.
This section describes the post-installation tasks and recommendations.
After you complete the installation of Oracle Product Lifecycle Analytics, the installation directory should contain the following subfolders:
| Name of the Folder | Description |
|---|---|
| \ant | Used to execute ANT scripts |
| \bin | Configuration tools and Miscellaneous entities |
| \common | Common Components such as PL/SQL logging libraries |
| \config | All Oracle Product Lifecycle Analytics configurations including the ANT install configuration file |
| \images | Contains images used in the Configurator tool. |
| \install | Installation components such as SQL scripts, ETL objects, and Java classes |
| \jdk | Contains JRE 1.5, used to install ETL components and to launch Configurator. |
| \lib | Dependent libraries that the OPLA installer and Configurator uses. |
| \logs | Centralized location for logs specific to Oracle Product Lifecycle Analytics. |
| \ETL_logs
This folder is not created if only the database is installed. |
Contains the log file for every ETL run. |
| \Schema
This folder is created only for the Generate SQL option that you select during the installation of Data Mart DB Schema and ETL components. |
SQL scripts to
Create, update or delete schema Create pre and post-populate scripts |
| \olap
This folder is created only for the OBIEE Privilege Issue, RPD and Web Catalog installation. |
BI Repository and Web Catalog |
| \uninstaller | Executable files to uninstall the software. This folder also includes executable file to remove any installed Hot Fix or Service Pack for Analytics. |
|
Note: This is only applicable for Agile PLM deployments creating a new Oracle PLA Data Mart database instance. |
Upon completion of the Installation process, you are required to add database services to the Listener. Use the Oracle Net Manager to specify:
Global Database Name [eg, PLMDM]
Oracle Home Directory [eg, D:\ORACLE\product\11.2.0\db_1]
SID [eg, PLMDM]
Stop and restart the Listener after you have added the services.
The ECO Cumulative fact table population task is disabled by default. CUMULATIVE column in the ETL_PARAMETER table will populate to the default value 0.
To enable the ECO Cumulative fact table population task, update the CUMULATIVE column in the ETL_PARAMETER table to 1.
Log in to ODI Designer to verify the following:
Projects tab lists the AGILE_PLM_ANALYTICS project for Agile PLM and AGILE_PLM4P_ANALYTICS project for Agile PLM for Process.
Open ODI Topology Manager and make sure the Source PLM Database SID and schema user details are populated:
Double-click Physical Architecture tab > Technologies > Oracle > SRC_CONN_PHYSICAL and verify the Instance and Schema name details in the Definition tab.
Click the JDBC tab and verify that the JDBC URL is pointing to the correct SID on the Source PLM Database machine.
Open ODI Topology Manager and make sure the Data Mart Database SID and schema user (default: MDS) details are populated:
Double-click Physical Architecture tab > Technologies > Oracle > TRG_BI_PHYSICAL and verify the Instance and Schema name details in the Definition tab.
Click the JDBC tab and verify that the JDBC URL is pointing to the correct SID on the Target MDS Database machine.
(Optional) Open ODI Topology Manager and make sure the Staging Database SID and schema user (default: ODM) details are populated, if installed as a separate schema:
Double-click Physical Architecture tab > Technologies > Oracle > TRG_ODMCONN_PHYSICAL and verify the Instance and Schema name details in the Definition tab.
Click the JDBC tab and verify that the JDBC URL is pointing to the correct SID on the Staging Database machine.
Make sure to start the following services or processes in the listed order:
Oracle BI Java Host
Oracle BI Server
Oracle BI Presentation Server
For OBIEE 11g, start the BI server, which will in turn start the WebLogic Admin Server, WebLogic Managed Server, and Oracle Process Manager (OPMN).
User names and passwords are used to log in and authenticate with OPLA and OBIEE components. In order to administer the OPLA system, you should be aware of the various users and passwords in OBIEE. For 11g, you will have to provide both Administrator and Repository passwords.
For more information on administering users and passwords, see the Oracle Business Intelligence Enterprise Edition Deployment Guide.
Following table provides the naming conventions for OBIEE 11g RPD and Webcatalog files:
| Agile PLM | Agile PLM for Process | ||
|---|---|---|---|
| Oracle PLA Model (PLMA RPD) | PLMA9_11g.rpd | Oracle PLA Model (PLMA RPD) | P4P_11g.rpd |
| Oracle PLA Web Catalog | PLMA_11g | Oracle PLA Web Catalog | PLMA_11g |
You can find the above files in the location:For Oracle PLA Installer:<PLMBI>\olap\rpd and <PLMBI>\olap\webcatalog. If <PLMBI> is not set as the temporary installation location, i.e., if you have installed the Oracle PLA BI RPD and Web catalog files in a different location, replace <PLMBI> with the location you have specified.
To deploy OBIEE11g RPD and Webcatalog:
Copy the 11g RPD file from the install location to: <OBIEEHomeDirectory>\instances\instance1\bifoundation\OracleBIServerComponent\coreapplication_obis1\repository
Check for TNS entries in the tnsnames file located at <OBIEEHomeDirectory>\Oracle_BI1\network\admin to connect RPD without errors. Add the entries if you do not find the SID entries.
Open the RPD file that you have copied to connect to the database. Set the MDS user name, password, and TNSNAME instance to connect to SID.
Note The default password for RPD is oracle123.
Save and close the RPD file after changing the two connection details.
Select No in the Check Global Consistency window.
Copy PLMA_11g (11g catalog) to the location<OBIEEHomeDirectory>\instances\instance1\bifoundation\OracleBIPresentationServicesComponent\coreapplication_obips1\catalog
If you are using Windows 2008, follow this step: Cut PLMA_11g (11g catalog) to the location <OBIEEHomeDirectory>\instances\instance1\bifoundation\OracleBIPresentationServicesComponent\coreapplication_obips1\catalog
Note Make sure you check the status of the BI services by opening the Enterprise Manager using the URL http://localhost:7001/em.
Open the Enterprise Manager and enter the WebLogic username and password.
Click on Business Intelligence and select Coreapplication.
Click on the Lock and Edit Configuration tab. You will notice the Deployment tab displayed.
Close the confirmation window that displays a messageLock and Edit Configuration - Completed Successfully.
Select Deployment > Repository and click Browse in the Upload BI Server Repository section.
Navigate to the location where 11g RPD has been copied as shown in step 1 and click Open.
Enter the password in the Repository Password and Confirm Password fields.
Enter the following location for PLMA_11g in the Catalog Location field located in the BI presentation Catalog section. $ORACLE_INSTANCE/bifoundation/OracleBIPresentationServiceComponent/$COMPONENT_NAME/catalog/.
Click on Apply displayed at the top right corner of the screen.
Select Change Center and click Activate Changes.
Close the confirmation window that displays a message Activate Changes - Completed Successfully.
In the Overview page, select Restart to restart the services and apply the changes.
After completing the restart process, check the status of the presentation services using the URL http://localhost:9704/analytics.
Check NQSConfig.ini file located in <OBIEEHomeDirectory>\instances\instance1\config\OracleBIServerComponent\coreapplication_obis1 to confirm if all the changes have been configured.
The uninstaller application is available in the Uninstaller folder within the installation base directory for Windows installer.
Example:
<Oracle_PLA_Home>\Uninstaller
It is recommended that you create a backup copy of the folder before you begin the un-installation of the application.
For Windows, double-click the file named UninstallOracle Product Lifecycle Analytics.exe to uninstall the Oracle Product Lifecycle Analytics application.
For Linux, run the script UninstallOracle_Product_Lifecycle_Analytics.sh to uninstall the Oracle Product Lifecycle Analytics application.
You must manually remove the schemas after uninstalling the Oracle Product Lifecycle Analytics application.
If the install folder is not deleted automatically after you uninstall the application, you need to manually delete the <Oracle_PLA_Home> folder.
The following sections provide information on executing ETL.
Before you execute ETL, it is recommended that you configure the following parameters to optimize ETL performance:
DB Session and process parameters
Heap Size in ODI
ODITimeOut Parameter in ODI
Verify that the database has enough database sessions (>500) to execute ETL in ODI.
To verify the DB session and process parameters:
Login using sys as sysdba in command prompt using SQLPlus
Execute SHOW PARAMETER SESSIONS
Execute SHOW PARAMETER PROCESSES
Execute 'Alter system set processes=1000 scope=spfile
Alternatively,
Execute 'Alter system set processes=1000 scope=both
Restart the instance. For more information, see the Oracle Database documentation.
The recommended sort_area_size is 209715200.
The heap size in ODI should be modified to enhance the ETL performance by updating the odi_init_heap and odi_max_heap parameters in the odi.conf and ide.conf files. The optimal value of the heap size depends on the source database size and the total amount of memory available on the ODI server. The default values are:
ODI_INIT_HEAP: 32M
ODI_MAX_HEAP: 256M
The recommended settings are:
ODI_INIT_HEAP: 256M
ODI_MAX_HEAP: 1024M
Depending on the available memory in the ODI server, odi_max_heap size can be increased, but it should not be greater than or close to the available memory size.
To increase the heap size:
Navigate to <ODI Home>/oracledi/client/odi/bin/ and change the odi_init_heap and odi_max_heap parameters in the odi.conf file.
Navigate to <ODI Home>/oracledi/client/ide/bin/ and change the odi_init_heap and odi_max_heap parameters in the ide.conf file.
Set the ODITimeOut Parameter to 180 seconds. Use File > User Parameters in the ODI Designer Tool Menu Bar to modify this value. The default value is 30 seconds.
To run ETL tasks and operate on data, you can use ODI.
ODI User setup requires the information entered during installation, such as, user names and passwords.
To configure a user:
On Windows, run the program from Start > Programs > Oracle > Oracle Data Integrator > ODI Studio.
The Oracle Data Integrator Start Page appears.
Click the Connect to Repository... icon
The Oracle Data Integrator Login dialog box is displayed.
Click the + icon to create a new Work Repository Connection.
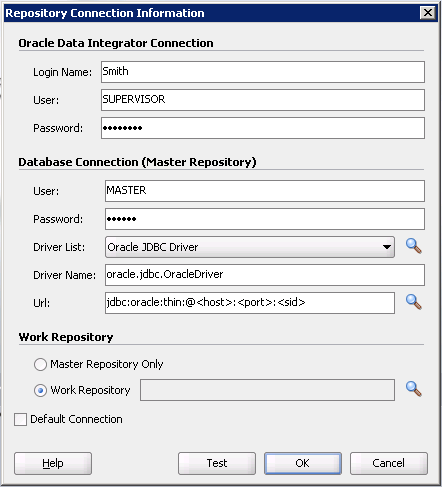
The Repository Connection Information screen appears.
Enter Login Name, User (name) and password for ODI connection.
These can be of your choice. The default User Name is SUPERVISOR and the password is SUNOPSIS (case sensitive).
The default password for the SUPERVISOR account is SUNOPSIS. You should change this password immediately. To configure additional users or change the password for SUPERVISOR, refer to the ODI documentation.
Enter the User name and password for Master Repository DB connection that you specified during installation.
Select Oracle JDBC Driver from Driver List.
The Driver Name field is automatically filled with oracle.jdbc.driver.OracleDriver.
Enter the following URL:
jdbc:oracle:thin:@<host>:<port>:<sid>
where
| <host> | Host name of Oracle Product Lifecycle Analytics DB Server |
| <port> | Port Number of Oracle Product Lifecycle Analytics DB Server |
| <sid> | SID or the Instance name of Oracle Product Lifecycle Analytics DB |
Enter the Repository Name for Work Repository.
Click Test button to verify the connection works.
Click OK. You are prompted to enter the Work Repository Password.
Enter the Work Repository Password that was assigned during installation and click OK.
Click OK to finish.
For complete information on installation and usage of ODI, refer to its documentation available at the Oracle Technology Network (OTN) Web site http://www.oracle.com/technology/documentation.
After the Installation of OPLA is complete and ODI users are configured, execute the Data integration task using the ODI Operator to load data into Data Mart. You can also execute ETL from the command prompt. Before you execute the ETL, it is recommended that you follow the guidelines mentioned in the section Optimizing ETL Performance.
ETL loads data in batches into target tables independently. It is likely that the queries executed by the server or any other downstream application may find that the data in these tables is not available or the data is inconsistent during ETL loads. For consistent and high availability of data during the ETL load windows, refer to and leverage various Oracle database technology options to enable maximum data availability solutions.
If you want to see the status of all the tasks that are under execution, increase the Operator Display Limit to 1000 (the default value is 100). Click ODI > User parameter >Setoperator Display limit to change the operator display limit.
To execute ETL from ODI:
On Windows, run the program from Start > Programs > Oracle > Oracle Data Integrator > ODI Studio.
The Oracle Data Integrator 11g Start Page appears.
Click the Connect to Repository... icon
The Oracle Data Integrator Login dialog box is displayed.
Click the + icon to create a new Work Repository Connection.
The Work Repository Connection screen appears.
Enter Login Name, User (name) and password for ODI connection.
These can be of your choice. The default User Name is SUPERVISOR and the password is SUNOPSIS (case sensitive).
The default password for the SUPERVISOR account is SUNOPSIS. You should change this password immediately. To configure additional users or change the password for SUPERVISOR, refer to the ODI documentation.
Enter the User name and password for Master Repository DB connection that you specified during installation.
Select the Operator tab, and navigate to Load Plans and Scenarios section.
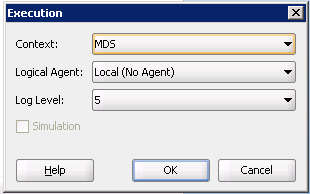
Right-click the ANALYTICS_ETL Version 001 component for Agile PLM or the AGILEP4P_ETL_LOAD component for Agile PLM for Process and select Execute. The Execution window appears.
Select MDS as Context.
Click OK. The Information window stating that the message Session started appears.
Click OK. The ETL process begins.
After ETL is executed, ODI sends a success or failure notification to the email users configured during installation. Email user configurations can be changed in the ETL_PARAMETER table in the MDS schema. The ETL_PARAMETER table is in the ODM schema if ODM and MDS were installed in separate schemas. These parameters can also be changed using the Configurator for Agile PLM deployments only.
To execute ETL from command prompt:
Modify "update Repository Connection Information" ," User credentials for agent startup program" and "Work Repository Name" details in the below mentioned files. On Windows: odiparams.batOn UNIX: odiparams.sh
Open a Command Prompt window, change to the <ODI_HOME> \oracledi\agent\bin directory.
Type the following command: On Windows: startscen.bat ANALYTICS_ETL 001 MDS 5On UNIX: sh startscen.sh ANALYTICS_ETL 001 MDS 5wherestartscen is the batch/shell file that executes ODI tasksANALYTICS_ETL is the ETL Package001 is the version number associated with the ETL PackageMDS is the ETL Context.
To view the ETL process status:
Launch the ODI Studio and select Login.
Enter the user name and password. Click OK.
The user name and password populate automatically on subsequent launches.
In the Operator > Sessions List tab, select All Executions in the left frame which shows all running tasks.
Alternately, in the Hierarchical Operator > Sessions list tab, select Status or All Executions in the left frame to check overall progress.
After ETL is executed, ODI sends a success or failure notification to the e-mail users configured during installation. E-mail user configurations can be changed in the ETL_PARAMETER table in the MDS schema. The ETL_PARAMETER table is in the ODM schema if ODM and MDS were installed in separate schemas. These parameters can also be changed using the Configurator for Agile PLM deployments only.