| Oracle® Retail Brand Compliance Management Cloud Service Project User Guide Release 19.0 F31423-01 |
|

 Previous |
 Next |
| Oracle® Retail Brand Compliance Management Cloud Service Project User Guide Release 19.0 F31423-01 |
|
Previous |
Next |
This chapter describes how the Project options are used by Retailer users. For information on each option, see the following section:
For users with Administrator access for Project, see the Oracle Retail Brand Compliance Management Cloud Service Administration Guide.
The list views have the following options in the View Selector drop-down list:
Associated: You can select to see entries for which you have been assigned as Owner, Responsible, or Viewer.
Owner: You can select to see only the entries for which you have been assigned as Owner.
Responsible: You can select to see only the entries for which you have been assigned as Responsible.
Some lists include Key and Gate columns. These are used within an Activity to force completion of previous activities so that the activities adhere to the critical path. An Activity Gate can be locked, that is, cannot be completed without previous Activity (key or keys) being completed.
Table 2-1 describes the icons in those columns.
Table 2-1 Icons for Key and Gate Columns
| Icons | Description |
|---|---|
|
|
Indicates this is a Project record. |
|
|
Indicates this is a Product record. |
|
|
Indicates the Activity Key field is set to Yes. |
|
|
Indicates that the Activity Gate field is set to Yes and preceding keys are complete. |
|
|
Indicates that the Activity Gate field is set to Yes and preceding keys are not all complete. |
To navigate to the activities you need to complete, select the Activities option. When you select this option, a tab opens with a default list view of Activities for which you have been assigned as being Responsible. For each activity, the following information is shown:
Proposed End Date
Activity Name
Project Title
Description
Project
Sequence
Proposed Start Date
Actual Start Date
Duration
Status
Sub Status
Critical Path
Key
Gate
The following actions are available on this page:
View: Select an activity from the list. The Activity record opens in read only mode.
Edit: Select an activity from the list. The Activity record opens in edit mode.
Change Status and Exit
There are two ways to update the status for activities:
Select multiple entries in the list. Select the Change Status and Exit action by either right-clicking or selecting it from the Actions menu. Then, select the status change from the list.
Open an activity in edit mode. Select the Change Status and Exit action by either right-clicking or selecting it from the Actions menu. Then, select the status change from the list.
To navigate to the activities you need to complete, you can also use the Task App and Urgent Items Manager on the Home page. For more information, see the Oracle Retail Brand Compliance Management Cloud Service User Guide.
When you select this option, a tab opens with a default list view of Projects that meet the following requirements:
The Project has activities that have not been completed.
You have been assigned as being Responsible.
The Project has not been cancelled or completed.
For each project, the following information is shown:
Parent Project
Project Title
Project Type
Template Type
Proposed Start Date
Actual Start Date
Proposed End Date
Proposed Launch Date
The following actions are available on this page:
New Project: See "Creating a New Project."
Add Project: See "Adding a Project to an Existing Project."
Add Activity & Schedule: See "Adding an Activity and Schedule."
Edit: See "Editing an Existing Project."
For information on creating Project Templates, see the Oracle Retail Brand Compliance Management Cloud Service Administration Guide.
To create a new project:
Select the New Project action. The Create Project dialog box opens:
Select the folder containing the relevant project templates. Click the icon. In the Select Folder dialog box, select a folder from the list and click Ok.
Choose the template from the selected folder. Click the icon. In the Select Template dialog box, select the project template and click Ok.
The list of activities from the selected template are shown. Click Ok. The New Project tab opens.
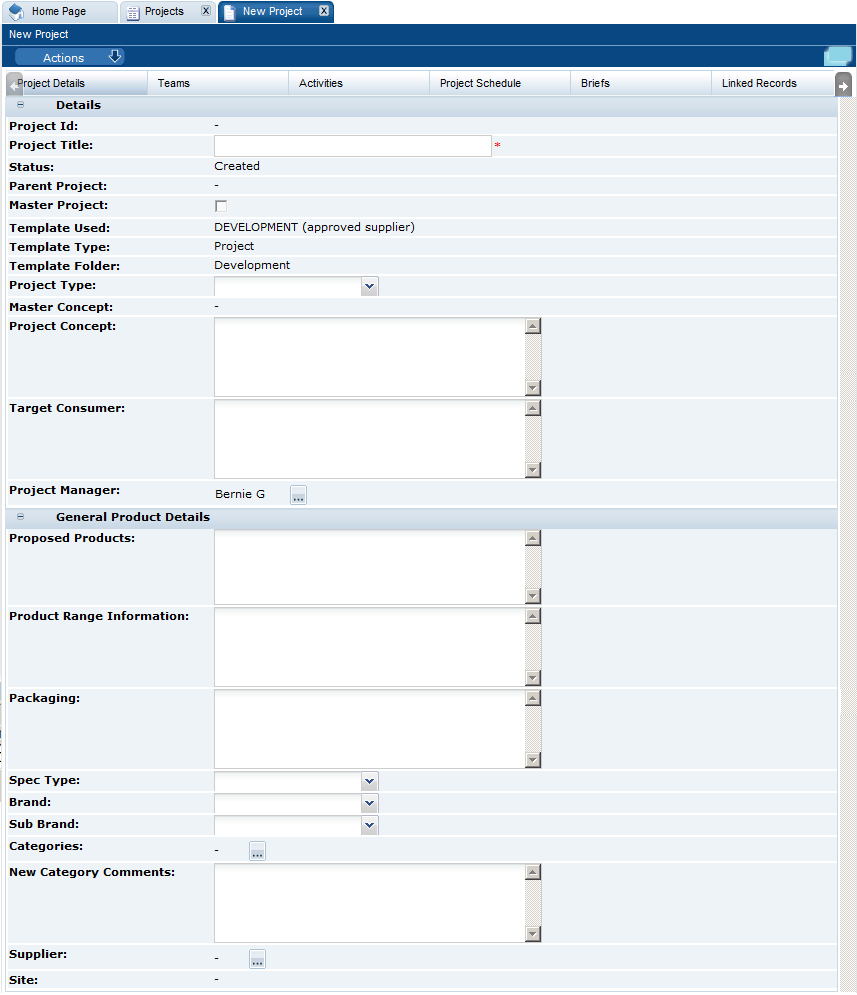
Enter the project details:
Project Id: The system assigns this ID when the project is created.
Project Title: The title must be unique within the system. This field is mandatory.
Status: The Status is set to Created.
Parent Project: If this new project is being added to an existing project, the parent project is shown here. The Parent Concept field is also shown.
Master Project: If this project is a master project within a hierarchy of projects, check the box.
Template Used: This is the name of the template that was selected for this project in Step 1.
Template Type: This is the type assigned to that template, that is, Product or Project.
Template Folder: Location of the template.
Project Type: Select the type from the drop-down list.
Master Concept: If this project is selected to be a master project, enter an overview of the concept in this field.
Project Concept: Enter an overview of this project concept.
Target Consumer: Enter a description of the target consumer for this project.
Project Manager: This is initially set to the user who is creating the project. To change a project manager, click the icon.
Enter the general product details. These fields are not mandatory:
Proposed Products
Product Range Information
Packaging
Spec Type
Brand
Sub Brand
Categories
New Category Comments
Supplier
Site
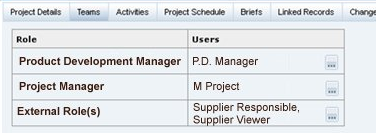
Open the Teams page.
If the project template used to create this project had any activities specified, all the user roles specified in the activities linked to the project template are shown here.
To select users for each role, click the icon. The Select Users dialog box opens. Select the users from the list and click Ok.
Open the Activities page. Activities that were set up for the template are shown here.
You can add and remove activities from the list:
To add activities, select the Add Activity action. The Add Activity dialog box opens. Select the activities from the list and click Ok.
To remove activities, select the entries in the list and then select the Remove Activity action. The Confirmation dialog appears. Click Ok.
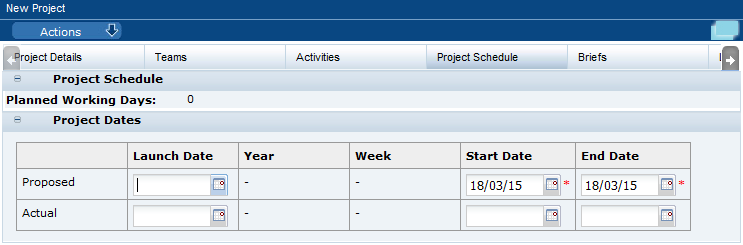
Open the Project Schedule page.
The Start and End dates are mandatory fields. These dates are used for scheduling activities:
Planned Working Days is initially set to zero. To calculate the number of working days, select the Schedule action. The number of planned days for activities on the critical path are added up and shown here.
When a launch date is selected, the year and week are shown here based on the system calendar.
Open the Briefs page. Briefs that were set up for the project template are shown here. If additional activity briefs need to be added to the project, this can be done by adding an activity to the project which contains the additional briefs.
Open the Linked Records page. This page lists any links the project has with any records within the system. For information on adding and deleting linked records, see "Adding and Removing Links to Records."
Open the Attachments page. This page shows a list of documents that are attached to a project. Table 2-2 describes the columns on this page.
Table 2-2 Columns for Attachments
| Column | Description |
|---|---|
|
Download |
Double-click the icon to download the file. The icon indicates the type of file, for example, Microsoft Excel spreadsheet or Word document. |
|
File Name or URL |
File name or the URL to the file. |
|
Description |
Description of the file. |
|
Bytes |
Number of bytes in the file. |
|
Attached By Id |
Name of the person who attached the file. |
|
Attached On |
Date and time the file was attached. |
You can add, delete, and edit the list:
To add an attachment, select the New Attachment action. The Add/Edit Attachment dialog box appears. Enter the information about the file and click Save.
To edit an attachment, select the entry in the list and then select the Edit action. The Add/Edit Attachment dialog box appears. The information for the selected file is shown. Make any changes and click Save.
To delete an attachment, select the entry in the list and then select the Delete action. The Confirm Delete Attachment dialog box appears. Click Ok.
Open the Template Attachments page. This is a list of files attached to the template being used to create this project. For a description of the columns on this page, see Table 2-2. The same options are available to add, delete, and edit the list as provided on the Attachments page.
When you have made all your entries for the new project, select the Save action. The new project is added to the project hierarchy at the root level.
A project can be added under an existing project. To add a project, select the parent project in the left pane and then select the Add Project action. A tab opens to enable you to create the project. For information on completing this page, see "Creating a New Project." The new project is added to the project hierarchy under the selected parent project.
To schedule or reschedule activities:
Select the projects and then select the Add Activity & Schedule action. The Add Activity dialog box opens.
Select the activities and then click Ok. The Schedule Activities dialog box opens.
Select the scheduling method. The following choices are available:
Forwards from the Start Date (with non-critical Activities Starting on same date)
Forwards from the Start Date (with non-critical Activities Ending on same date)
Backwards from the end date (with non-critical Activities Starting on same date)
Backwards from the end date (with non-critical Activities Ending on same date)
Forwards from Last Completed Activity Date (with non-critical Activities Starting on same date)
Forwards from Last Completed Activity Date (with non-critical Activities Ending on same date)
Click Ok. A Confirmation dialog box appears.
Click Ok. The selected activities are added to the projects . The system calculates the start and end dates for each activity.
Select the project and then select the Edit action. The project records open in edit mode. The following options are available:
If additional users are required for a project, you can add them. Open the Teams page. On the Teams page, select the Add Team action from the main actions menu. The Select Team dialog box opens. Select a team, click Ok, and then save the project:
If you select a team that contains additional users to those users already in your project, these users are added to the relevant role within your project.
If you add a team which does not contain roles used by your project, there is no effect on the project.
If you add or remove a user, the user is added or removed from all the underlying activities of your project.
If a different set of users is required for a project, you can replace the team. Open the Teams page. On the Teams page, select the Replace Team action from the main actions menu. The Select Team dialog box opens. Select a team from the available teams, click Ok, and then save the project:
All current users are replaced with the users specified by the selected team. However, current users assigned to user roles not contained within the selected team are retained.
If you add or remove a user, the user is added or removed from all the underlying activities of the project.
If additional activities are needed for a project, you can add them. Open the Activities page. From the Activities page, select the Add Activity action from the main actions menu. The Add Activity dialog box. Select the activities, click Ok, and then save the project.
If activities are no longer required, you can remove them from a project. Only activities at Not Started status can be removed.
Open the Activities page. On the Activities page, select the activities to be removed and then select the Remove Activity action. Save the project.
A project can be moved to a different parent project. To move a sub-project, open the sub-project in edit mode. Select the Change Parent Project action. The Select Parent Project dialog box appears. Select the new parent project, click Ok, and save the project.
Apart from the project name, the original data is retained. If you need to adopt information from the new parent, see "Adopting Information from a Parent Project."
You can replace project information for a sub-project from its parent project. Open the sub-project in edit mode. Select the Adopt Parent Information action and save the project. The following information is replaced from the parent project:
Project Details:
Project Concept
Target Consumer
Proposed Products
Product Range Information
Packaging
Spec Type
Brand
Sub Brand
Business Category
Project Schedule:
Proposed Launch Date
Proposed Year
Proposed Week (of period)
You can distribute information from a parent project to projects. To distribute the information, open the parent project in edit mode. Select the Distribute Parent Project. It will distribute the information to all projects that are one level down from the parent project. For the list of information that is distributed, see "Adopting Information from a Parent Project."
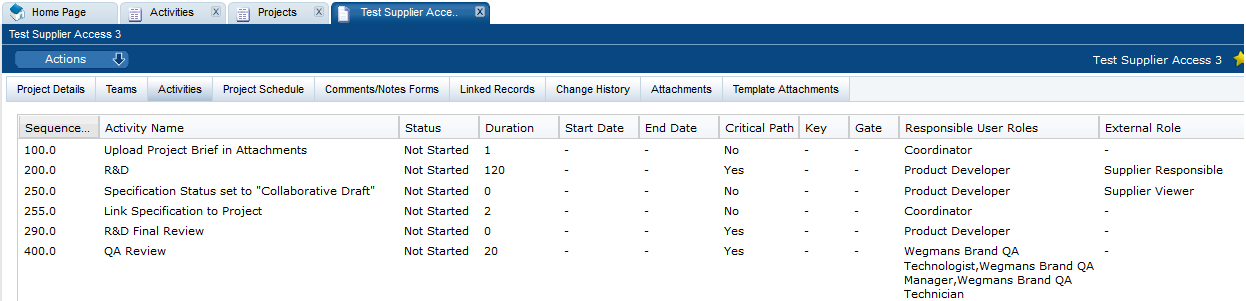
The system allows activities (through setting an Activity Type) to be linked to a number of different records, which can be used to control the activity status, including the following:
Sites
Audits
Scorecards
Product Records
Product Specifications
To link an activity to a record:
Open the activity in edit mode.
Select the Go to for the record. The record opens in edit mode.
Select the Link to Project action. The Create Activity Link dialog box appears. It lists the project title, activity name, and linked record name.
Click Ok.
To remove a link to an activity:
Open the Linked Records page.
Select the linked records in the list to be removed.
Select the Unlink action.
Users with the Project Manager or Project Administrator Authority Profile can select a number of projects in the view and then, either by right-clicking or by selecting a status from the Actions menu, change the status of the projects. A confirmation dialog must be accepted in order for the updates to be submitted.
When you select this option, a tab opens with a default list view showing Products that have activities that meet the following requirements:
The Project Type set to Product.
The Project has activities that have not been completed.
You have been assigned as being Responsible.
The Project has not been cancelled or completed.
For each product, the following information is shown:
Parent Project
Project Title
Project Type
Proposed Start Date
Actual Start Date
Proposed End Date
Proposed Launch Date
The following actions are available on this page:
New Project: See "Creating a New Project."
Add Project: See "Adding a Project to an Existing Project."
Add Activity & Schedule: "Adding an Activity and Schedule."
Edit: See "Editing an Existing Project."
When you select this option, a tab opens with a three panel view showing a list of Projects in the left pane that meet the following requirements:
You have been assigned as being either Responsible, Owner, or Viewer.
The Project has activities that have not been completed.
The Project has not been cancelled or completed.
For an example of this page, see Figure 2-5.
The following actions are available on this page:
New Project: See "Creating a New Project."
Add Project: See "Adding a Project to an Existing Project."
Edit: See "Editing an Existing Project."
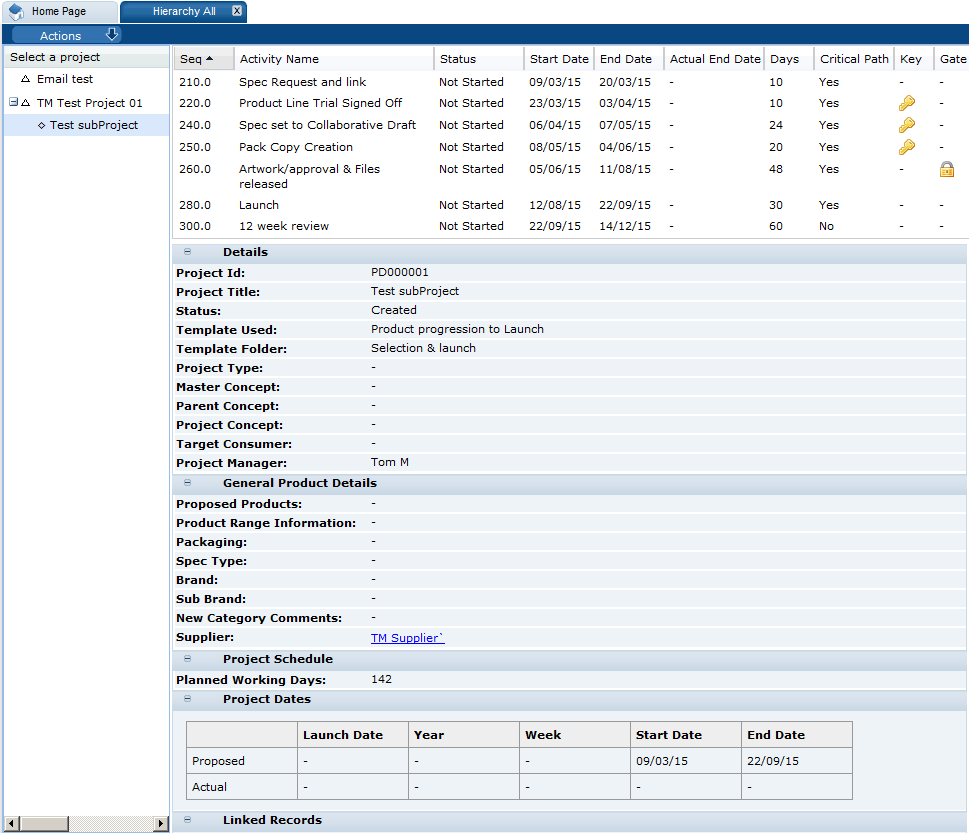
For Project Managers or Project Administrators, when you select this option, a tab opens with a three panel view showing all Projects. The left panel displays a hierarchial list of the projects. The top right panel shows the activities for the project selected in the left pane. The bottom right panel shows the project details.
The following actions are available on this page:
New Project: See "Creating a New Project."
Add Project: See "Adding a Project to an Existing Project."
Edit: See "Editing an Existing Project."
Copy a Project
To copy a project:
Select the project in the left panel and select the Copy action. The Copy Project dialog box appears.
Enter the number of copies that are required. Click Ok. The dialog box is updated with a Project Title field for each copy.
Enter the titles and click Ok. A tab is opened for each new project.
For each new project, make updates as needed and then select the Save action. A new project is created at the same hierarchy level as the project being copied.