3 Configuring Storage Hosts and Devices
Carry out the storage configuration tasks outlined in this chapter before proceeding further with Oracle HSM installation and configuration:
-
Then, if you are creating Oracle HSM archiving file systems, configure archival storage.
-
Finally, if you are creating a clustered solution, configure storage for high-availability.
Configuring Primary Storage
In an Oracle HSM file system, primary disk or solid-state disk devices store files that are being actively used and modified. Follow the guidelines below when configuring disk or solid-state disk devices for the cache.
Configure Devices for the Primary Cache
-
To estimate a starting capacity for the primary cache, decide how much data each file system will hold when full.
-
Increase this starting capacity by 10% to allow for file-system metadata.
-
If you are preparing for a high-performance
ma-type file system, configure hardware for themmmetadata devices. One, hardware-controlled, four-disk, RAID 10 (1+0) volume group permmmetadata device is ideal. Consider using solid-state disk devices for maximum performance.The characteristics of striped-mirror, RAID 10 arrays are ideal for storing Oracle HSM metadata. RAID 10 storage hardware is highly redundant, so critical metadata is protected. Throughput is higher and latency is lower than in most other RAID configurations.
An array that is controlled by dedicated controller hardware generally offers higher performance than an array controlled by software running on a shared, general-purpose processor.
Solid-state devices are particularly useful for storing metadata that is, by its nature, frequently updated and frequently read.
-
If you are using an external disk array for primary cache storage, configure 3+1 or 4+1 RAID 5 volume groups for each
mdormrdevice in the file-system configuration. Configure one logical volume (LUN) on each volume group.For a given number of disks, smaller, 3+1 and 4+1 RAID 5 volume groups provide greater parallelism and thus higher input/output (I/O) performance than larger volume groups. The individual disk devices in RAID 5 volume groups do not operate independently—from an I/O perspective, each volume group acts much like a single device. So dividing a given number of disks into 3+1 and 4+1 volume groups creates more independent devices, better parallelism, and less I/O contention than otherwise equivalent, larger configurations.
Smaller RAID groups offer less capacity, due to the higher ratio of parity to storage. But, for most users, this is more than offset by the performance gains. In an archiving file system, the small reduction in disk cache capacity is often completely offset by the comparatively unlimited capacity available in the archive.
Configuring multiple logical volumes (LUNs) on a volume group makes I/O to the logically separate volumes contend for a set of resources that can service only one I/O at a time. This increases I/O-related overhead and reduces throughput.
-
Next, start configuring archival storage.
Configuring Archival Storage
Carry out the tasks that your planned archiving configuration requires:
Zone SAN-attached Devices
Make sure that the storage area network (SAN) is zoned to allow communication between the drive and the host bus adapters on the Oracle HSM host(s). To check zoning, proceed as follows:
-
Make sure that the host can see the devices on the SAN. Enter the Solaris configuration administration command
cfgadmwith the-al(attachment-points list) and-o show_SCSI_LUNoptions. Examine the output for the World Wide Name (WWN) of the drive port.The first column of the output displays the attachment-point ID (
Ap_id), which consists of the controller number of the host bus adapter and the WWN, separated by colons. The-o show_SCSI_LUNoption displays all LUNs on the node if the node is the bridged drive controlling a media changer via an ADI interface.root@solaris:~# cfgadm -al -o show_SCSI_LUN Ap_Id Type Receptacle Occupant Condition c2::500104f000937528 tape connected configured unknown c3::50060160082006e2,0 tape connected unconfigured unknown
-
If the drive's WWN is not listed in the output of
cfgadm -al-o show_SCSI_LUN, the drive is not visible. Something is wrong with the SAN configuration. So recheck SAN connections and the zoning configuration. Then repeat the preceding step. -
If the output of the
cfgadm -alcommand shows that a drive is unconfigured, run the command again, this time using the-c(configure) switch.The command builds the necessary device files in
/dev/rmt:root@solaris:~# cfgadm -al Ap_Id Type Receptacle Occupant Condition c2::500104f000937528 tape connected configured unknown c3::50060160082006e2,0 tape connected unconfigured unknown root@solaris:~# cfgadm -c configure 50060160082006e2,0
-
Verify the association between the device name and the World Wide Name. Use the command
ls-al/dev/rmt | grepWWN, whereWWNis the World Wide Name.root@solaris:~# ls -al /dev/rmt | grep 50060160082006e2,0 lrwxrwxrwx 1 root root 94 May 20 05:05 3un -> \ ../../devices/pci@1f,700000/SUNW,qlc@2/fp@0,0/st@w50060160082006e2,0:
-
If you have the recommended minimum Solaris patch level, configure disk storage now.
-
Otherwise, get the target ID for your device.
-
Edit
/kernel/drv/st.conf. Add the vendor-specified entry to thetape-config-list, specifying the target ID determined above. -
Force reload the
stmodule. Use the commandupdate_drv -f st.root@solaris:~# update_drv -f st root@solaris:~# -
Next, configure disk storage.
Configure Archival Disk Storage
Oracle HSM archiving file systems can archive files to disk as well as to tape media. When a disk file system is configured as a disk archive, the software uses the file system more or less as it would a tape cartridge. It addresses the file system by volume serial number (VSN) and stores file copies in tape archive (tar) files.
Disk-based archival storage can increase the flexibility and redundancy of an archiving solution. Random-access disk devices do not incur the mounting and positioning overhead associated with sequential-access tape devices. So solutions that archive and retrieve proportionately large numbers of small files may be able do so more rapidly and reliably when they store the first copy of each file on disk. Archiving solutions that must maintain copies on off-site media can often do so simply by writing a copy to NFS-mounted, disk-resident file systems on remote hosts.
You can use ZFS, UFS, NFS, or StorageTek QFS file systems for the volumes in a disk archive. For best archiving and staging performance, configure file systems and underlying storage to maximize the bandwidth available for archiving and staging, while minimizing I/O contention between archiving and staging jobs and between Oracle HSM and other applications. Plan for enough hardware resources to handle the anticipated workload.
Proceed as follows:
-
Estimate the number of archive volumes that you require and the capacity of each.
Each Oracle HSM process performs I/O to one archive volume at a time. So the number of available volumes is proportional to the number of archiving and staging operations that can be carried out in parallel. In general, a larger number of lower capacity volumes performs better than a smaller number of higher capacity volumes, as long as each volume has enough capacity to store a reasonable number of archive files.
-
Allocate enough direct-attached and/or network-accessible hardware to provide the required number of volumes.
You can use local disk, SAN-attached RAID storage, and/or NSF-mounted remote resources as archival volumes.
-
Dedicate a set of independent storage devices to each archival volume.
Volumes should never share a set of physical disks or RAID groups with other archival volumes. If you configure LUNs (logical devices) that reside on a single set of physical devices as volumes, archiving and staging processes will contend for access to a single set of hardware, and switching losses will significantly degrade performance.
-
For each required volume, create one ZFS, UFS, or QFS file system on one independent set of devices, using the procedures specified for the chosen file-system type (for QFS file systems, see "Configuring QFS File Systems").
Each file system should function as a single archival volume. If you configure subdirectories of a file system as volumes, archiving and staging processes will contend for access to a single set of hardware, and switching losses will significantly degrade performance.
For the examples in this section, we create fifteen file systems:
-
DISKVOL1is a local QFS file system that we create specifically for use as archival storage. -
DISKVOL2toDISKVOL15are ZFS file systems mounted on a remote server namedserver.
-
-
Log in to the Oracle HSM metadata server host as
root.root@solaris:~# mkdir /diskvols root@solaris:~#
-
On the Oracle HSM metadata server host, create a single parent directory to hold the mount points for all archival disk volumes.
This parent directory is analogous to the physical tape library that holds archival tape volumes. In the example, we create the directory
/diskvols:root@solaris:~# mkdir /diskvols root@solaris:~#
-
In the parent directory, create a mount-point directory for each archival file system.
In the example, we create the mount-point directories
DISKVOL1andDISKVOL2toDISKVOL15:root@solaris:~# mkdir /diskvols/DISKVOL1 root@solaris:~# mkdir /diskvols/DISKVOL2 ... root@solaris:~# mkdir /diskvols/DISKVOL15 root@solaris:~#
-
Oracle HSM metadata server host, back up the
/etc/vfstabfile.root@solaris:~# cp /etc/vfstab /etc/vfstab.backup root@solaris:~# -
Open the
/etc/vfstabfile in an editor, add entries for each archival file system, and add the mount optionnosamto the entries for any QFS file system. Save the file, and close the editor.The
nosammount option makes sure that archival copies stored on a QFS file system are not themselves archived.In the example, we use the
vieditor to add entries forDISKVOL1andDISKVOL2toDISKVOL15.root@solaris:~# vi /etc/vfstab #File #Device Device Mount System fsck Mount Mount #to Mount to fsck Point Type Pass at Boot Options #-------- ------- ------------------ ------ ---- ------- --------- /devices - /devices devfs - no - ... DISKVOL1 - /diskvols/DISKVOL1 samfs - yes nosam server:/DISKVOL2 - /diskvols/DISKVOL2 nfs - yes server:/DISKVOL3 - /diskvols/DISKVOL3 nfs - yes ... server:/DISKVOL15 - /diskvols/DISKVOL15 nfs - yes :wq root@solaris:~#
-
Mount the archival file system(s) on the Oracle HSM metadata server host.
In the example, we mount
DISKVOL1andDISKVOL2toDISKVOL15:root@solaris:~# mount /diskvols/DISKVOL1 root@solaris:~# mount /diskvols/DISKVOL2 ... root@solaris:~# mount /diskvols/DISKVOL15
-
If the storage space for an archive volume will be dynamically allocated from a pool of shared disk devices, make sure that the underlying physical storage is not oversubscribed. Set quotas.
Quotas help to keep Oracle HSM archiving processes from trying to use more of the aggregate storage than it has available.
-
Plan to use each new file system exclusively as an Oracle HSM archival volume.
If other applications use an Oracle HSM archival volume as a general-purpose file system, Oracle HSM and application processes will contend for access to a single set of hardware, and switching losses will significantly degrade performance.
-
If file systems have been configured on remote hosts, share them using the Network File System (NFS), and NFS mount them on the Oracle HSM metadata server.
-
If you plan to archive files to the cloud, configure cloud resources now.
-
Otherwise, configure archival tape storage.
Provide Storage Cloud Resources
If you plan to archive files in a public or private storage cloud, provide the required cloud resources. There are two approaches that you can take:
-
You can use Oracle Storage Cloud services for a ready-made solution.
-
You can use another Solaris 11.3 system with Oracle OpenStack Swift running on top of another instance of Oracle HSM. This will provide another (possibly remote) tier of storage for archiving.
Use the Oracle Storage Cloud
Carry out the following tasks:
Subscribe to Oracle Storage Cloud Services
To set up domains and user accounts for an Oracle Storage Cloud solution, proceed as follows:
-
Consult the Oracle Storage Cloud documentation for descriptions of service levels and instructions for subscribing.
See Getting Started with Oracle Cloud at
http://docs.oracle.com/en/cloud/. -
Provide an unmetered Oracle Storage Cloud account for files that users frequently access following archiving. Follow the instructions in "Buying a Nonmetered Subscription to an Oracle Cloud Service", Chapter 4 of Getting Started with Oracle Cloud.
Users generally request files of this kind within a more or less predictable interval following archiving—often 30 days. So a tiered approach to cloud provisioning makes sense. Size the unmetered account to hold one copy of each newly archived file for the duration of this initial, high-access period. Thereafter, the copy can be released.
Compared to metered accounts, unmetered Oracle Storage Cloud Standard Service accounts are more expensive for a given capacity and significantly less expensive per I/O operation. So using an unmetered account is ideal for archiving files for the near term, during the period when they are most likely to be read and updated.
-
Provide a metered Oracle Storage Cloud account for files that users access less often. Follow the instructions in "Buying a Metered Subscription to an Oracle Cloud Service", Chapter 5 of Getting Started with Oracle Cloud.
For a given capacity, metered Oracle Storage Cloud accounts are less expensive than unmetered accounts and more expensive per I/O operation.
-
For files that users continue to access following archiving, plan to configure an Oracle HSM cloud library with Oracle Storage Cloud Standard containers.
Users generally request files within a more or less predictable period following archiving—often 60 to 90 days. For a given capacity, Standard containers are more expensive than Archive containers but less expensive per I/O operation. So archiving sporadically accessed files to a cloud library configured for Standard containers best balances the cost of occasional file I/O against the cost of the storage.
-
For long-term storage of files that users will access rarely, if ever following archiving, plan to configure an Oracle HSM cloud library with Oracle Storage Cloud Archive containers.
Users seldom request files that have been archived for 90 days or more, and many files are never requested at all. Yet, in most cases, every archived file has to be retained for some specified period. Archive containers are expensive on a per I/O basis. But, for a given capacity, they are the least expensive option. So archiving little used files to a cloud library configured for Archive containers minimizes the overall cost of archiving.
-
Next, gather Oracle Storage Cloud authentication information.
Gather Oracle Storage Cloud Authentication Information
-
Log in to the Oracle Cloud My Account page, if you have not already done so.
-
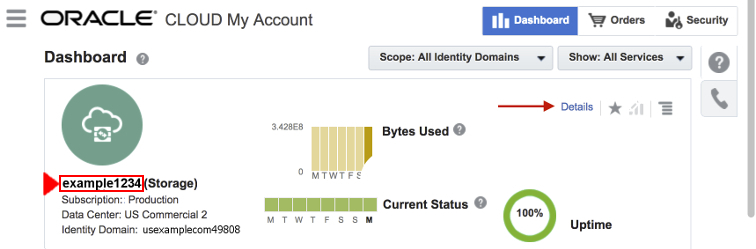
On the Dashboard, locate the listing for the Oracle Storage Cloud service that will provide the storage, and make a note of the service name.
Services are identified by a string of the form service_name (service_type). In the example, the service name is example1234 and the service type is Storage (displayed in parentheses). Under the service name and type, a Subscription field shows that this is a production service, a Data Center field shows that it is hosted in the US Commercial 2 datacenter, and an Identity Domain field displays the Identity Domain ID.
We use the
vitext editor to create a text file calledhsm-ocloud-info.txtand make a note of the service name:hsmadm@wrkstn:~# vi hsm-ocloud-info.txt user name: hsmlibrary800 service name: example1234 :w
-
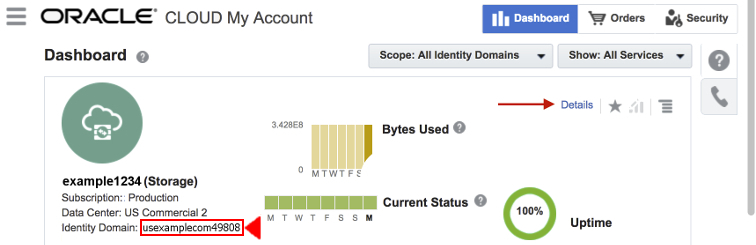
Make a note of the Identity Domain ID displayed in the Identity Domain field.
In the example, the Identity Domain field displays the Identity Domain ID usexamplecom49808. We note this in the
hsm-ocloud-info.txttext file:hsmadm@wrkstn:~# vi hsm-ocloud-info.txt service name: example1234 identity domain id: usexamplecom49808 :w
-
Next, create administrative user accounts for Oracle HSM in this identity domain.
Create Oracle Storage Cloud Service User Accounts for Oracle HSM
For each Oracle HSM cloud library that you plan to configure, create an Oracle Storage Cloud storage administrative user account. The account lets Oracle HSM log in to the Identity Domain that governs the service and authorizes creation, use, and deletion of cloud-based storage media. Proceed as follows:
-
Consult Chapter 6 of Getting Started with Oracle Cloud, "Adding Users and Assigning Roles".
-
In the same document, review the background information in "Oracle Cloud User Roles and Privileges" and "About Adding Users".
-
Make a note of the first name, last name, and email address of the person in your organization that will be responsible for the Oracle HSM software's use of the Oracle Storage Cloud service.
The email address can be the named individual's address or, optionally, a valid administrative alias used by the individual, as shown in the examples:
John Doe, jdoe@example.com
John Doe, hsmadms@example.com
-
Create a service user account for Oracle HSM. Follow the instructions in the "Creating a User and Assigning a Role" section of Getting Started with Oracle Cloud, and make a note of the particulars.
You can use the responsible party's email address as the user name, if desired. But in the example, we create a new user name,
hsmlibrary800, instead of usingjdoe@example.comorhsmadms@example.com. We make a note of this choice in the text filehsm-cloud-info.txt, save the file, and close the editor:hsmadm@wrkstn:~# vi hsm-ocloud-info.txt service name: example1234 identity domain id: usexamplecom49808 user name: hsmlibrary800 :wq hsmadm@wrkstn:~#
-
If the Oracle Storage Cloud service is metered, assign the Oracle HSM user the
service-name.Storage_Administratorrole. -
If the Oracle Storage Cloud service is not metered, assign the Oracle HSM user the
service-instance-name.Storage_Administratorrole. -
Save the information that you have recorded. You will need it when you configure archival storage in Chapter 6, "Configuring the Basic File System".
Backing up this information for the long term is also a good idea. So, in the example, we copy the file to a backup Oracle HSM configuration repository that we have configured on a file system that can be mounted from the Oracle HSM hosts (for more information on creating such a repository, see "Create a Backup Location for Your Oracle HSM Configuration"):
hsmadm@wrkstn:~# cp hsm-ocloud-info.txt /sam_config/cloud/hsm-cloud-info.txt
hsmadm@wrkstn:~#
-
If your configuration includes archival tape storage, configure it now.
-
If you are configuring a high-availability file system, see "Configuring Storage for High-Availability File Systems".
-
Otherwise, go to "Installing Oracle HSM and QFS Software".
Use Oracle OpenStack Swift with Another Instance of Oracle HSM
Setting up OpenStack Swift on Solaris is outside the scope of this document (for full information consult the documentation published at:
https://docs.oracle.com/cd/E65465_01/index.html). But Oracle HSM will be able to use Solaris OpenStack cloud storage once your administrator configures domains, user accounts, and URLs to suit your requirements.
-
Have your OpenStack Swift administrator set up Oracle OpenStack Swift on another system.
-
Install Oracle HSM on that system and configure file systems for OpenStack to use. See Appendix D, "OpenStack Swift on Oracle HSM File Systems" for more details.
-
Have your OpenStack Swift administrator set up a URL and administrative user account for each cloud library that you plan to configure.
-
Make a note of the domain ID of the assigned domain.
In the example, the domain ID is
ohsm. We use the vi text editor to make a note of the ID value in a text file calledhsm-pcloud-info.txt:hsmadm@wrkstn:~# vi hsm-pcloud-info.txt domain id: ohsm :w
-
Make a note of the administrative user ID assigned to each cloud library.
In the example, the user ID for the cloud library is
hsmlibrary810:hsmadm@wrkstn:~# vi hsm-pcloud-info.txt domainID: ohsm userID: hsmlibrary810 :w
-
Make a note of the Uniform Resource Locator (URI) where the Oracle HSM user will log in to the domain.
In the example, the URL is
https://ohsmcl810.pcloud.example.com:hsmadm@wrkstn:~# vi hsm-pcloud-info.txt domainID: ohsm userID: hsmlibrary810 url: https://ohsmcl810.cloud.example.com :wq hsmadm@wrkstn:~#
-
Save the information that you have recorded. You will need it when you configure archival storage in Chapter 6, "Configuring the Basic File System".
Backing up this information for the long term is also a good idea. So, in the example, we copy the file to a backup Oracle HSM configuration repository that we have configured on a file system that can be mounted from the Oracle HSM hosts (for more information on creating such a repository, see "Create a Backup Location for Your Oracle HSM Configuration"):
hsmadm@wrkstn:~# cp hsm-pcloud-info.txt /sam_config/cloud/hsm-pcloud-info.txt hsmadm@wrkstn:~# -
If your configuration includes archival tape storage, configure it now.
-
If you are configuring a high-availability file system, see "Configuring Storage for High-Availability File Systems".
-
Otherwise, go to Chapter 4, "Installing Oracle HSM and QFS Software".
Configure Archival Tape Storage
Carry out the following tasks:
-
Determine the order in which drives are installed in the library.
-
Configure any direct-attached libraries that are included in the Oracle HSM configuration.
Determine the Order in Which Drives are Installed in the Library
If your automated library contains more than one drive, the order of the drives in the Oracle HSM master configuration file (mcf) file must be the same as the order in which the drives are seen by the library controller. This order can be different from the order in which devices are seen on the host and reported in the host /var/adm/messages file.
For each Oracle HSM metadata server and datamover host, determine the drive order by carrying out the tasks listed below:
-
Gather identifying information for the drives from both the library and the Solaris host.
-
Then map the drives to Solaris device names, following the procedure appropriate for either a direct- or ACSLS-attached library.
Gather Drive Information for the Library and the Solaris Host
-
Consult the library documentation. Note how drives and targets are identified. If there is a local operator panel, see how it can be used to determine drive order.
-
If the library has a local operator panel mounted on the library, use it to determine the order in which drives attach to the controller. Determine the SCSI target identifier or World Wide Name of each drive.
-
Log in to the Solaris host as
root.root@solaris:~#
-
List the Solaris logical device names in
/dev/scsi/changer/, redirecting the output to a text file.In the example, we redirect the listings for
/dev/rmt/to the filedevice-mappings.txtin therootuser's home directory:root@solaris:~# ls -l /dev/rmt/ > /root/device-mappings.txt
-
Now, map the Solaris device names to the drives in your direct- or ACSLS-attached library.
Map the Drives in a Direct-Attached Library to Solaris Device Names
For each Solaris logical drive name listed in /dev/rmt/ and each drive that the library assigns to the Oracle HSM server host, carry out the following procedure:
-
If you are not already logged in to the Oracle HSM Solaris host, log in as
root.root@solaris:~#
-
In a text editor, open the device mappings file that you created in the procedure "Gather Drive Information for the Library and the Solaris Host", and organize it into a simple table.
You will need to refer to this information in subsequent steps. In the example, we are using the
vieditor to delete the permissions, ownership, and date attributes from the/dev/rmt/list, while adding headers and space for library device information:root@solaris:~# vi /root/device-mappings.txt LIBRARY SOLARIS SOLARIS DEVICE LOGICAL PHYSICAL NUMBER DEVICE DEVICE ------- ---------- ------------------------------------------- /dev/rmt/0 -> ../../devices/pci@1f,4000/scsi@2,1/st@2,0: /dev/rmt/1 -> ../../devices/pci@1f,4000/scsi@4,1/st@5,0: /dev/rmt/2 -> ../../devices/pci@1f,4000/scsi@4,1/st@6,0: /dev/rmt/3 -> ../../devices/pci@1f,4000/scsi@4/st@1,0: lrwxrwxrwx 1 root root 40 Mar 18 2014 /dev/rmt/4 -> ../../devices/pci@1f,4000/scsi@4/st@2,0:
-
On the library, make sure that all drives are empty.
-
Load a tape into the first drive in the library that you have not yet mapped to a Solaris logical device name.
For the purposes of the examples below, we load an LTO4 tape into an HP Ultrium LTO4 tape drive.
-
Identify the Solaris
/dev/rmt/entry that corresponds to the drive that mounts the tape. Until you identify the drive, run the commandmt-f/dev/rmt/numberstatuswherenumberidentifies the drive in/dev/rmt/.In the example, the drive at
/dev/rmt/0is empty, but the drive at/dev/rmt/1holds the tape. So the drive that the library identifies as drive 1 corresponds to Solaris/dev/rmt/1:root@solaris:~# mt -f /dev/rmt/0 status /dev/rmt/0: no tape loaded or drive offline root@solaris:~# mt -f /dev/rmt/1 status HP Ultrium LTO 4 tape drive: sense key(0x0)= No Additional Sense residual= 0 retries= 0 file no= 0 block no= 3
-
In the device-mappings file, locate the entry for the Solaris device that holds the tape, and enter the library's device identifier in the space provided. Then save the file.
In the example, enter
1in theLIBRARY DEVICE NUMBERfield of the row for/dev/rmt/1:root@solaris:~# vi /root/device-mappings.txt LIBRARY SOLARIS SOLARIS DEVICE LOGICAL PHYSICAL NUMBER DEVICE DEVICE ------- ---------- ------------------------------------------- /dev/rmt/0 -> ../../devices/pci@1f,4000/scsi@2,1/st@2,0: 1 /dev/rmt/1 -> ../../devices/pci@1f,4000/scsi@4,1/st@5,0: /dev/rmt/2 -> ../../devices/pci@1f,4000/scsi@4,1/st@6,0: /dev/rmt/3 -> ../../devices/pci@1f,4000/scsi@4/st@1,0: :w -
Unload the tape.
-
Repeat this procedure until the device-mappings file holds Solaris logical device names for all devices that the library assigns to the Oracle HSM host. Then save the file and close the editor.
root@solaris:~# vi /root/device-mappings.txt
LIBRARY SOLARIS      SOLARIS
DEVICE  LOGICAL      PHYSICAL
NUMBER  DEVICE       DEVICE
------- ----------   -------------------------------------------
   2    /dev/rmt/0 -> ../../devices/pci@1f,4000/scsi@2,1/st@2,0:
   1    /dev/rmt/1 -> ../../devices/pci@1f,4000/scsi@4,1/st@5,0:
   3    /dev/rmt/2 -> ../../devices/pci@1f,4000/scsi@4,1/st@6,0:
   4    /dev/rmt/3 -> ../../devices/pci@1f,4000/scsi@4/st@1,0:
:wq
root@solaris:~#
-
Keep the mappings file.
You will need the information when you configure file systems, and you may wish to include it when you back up the finished Oracle HSM configuration.
-
Next, go to "Configure Direct-Attached Libraries".
Map the Drives in an ACSLS-Attached Library to Solaris Device Names
-
If you are not already logged in to the Oracle HSM Solaris host, log in as
root.root@solaris:~#
-
In a text editor, open the device mappings file that you created in the procedure "Gather Drive Information for the Library and the Solaris Host", and organize it into a simple table.
You will need to refer to this information in subsequent steps. In the example, we are using the
vieditor to delete the permissions, ownership, and date attributes from the/dev/rmt/list, while adding headers and space for library device information:root@solaris:~# vi /root/device-mappings.txt LOGICAL DEVICE DEVICE SERIAL NUMBER ACSLS DEVICE ADDRESS -------------- -------------------- ---------------------------------- /dev/rmt/0 /dev/rmt/1 /dev/rmt/2 /dev/rmt/3 -
For each logical device name listed in
/dev/rmt/, display the device serial number. Use the commandluxadmdisplay/dev/rmt/number, wherenumberidentifies the drive in/dev/rmt/.In the example, we obtain the serial number
HU92K00200for device/dev/rmt/0:root@solaris:~# luxadm display /dev/rmt/0 DEVICE PROPERTIES for tape: /dev/rmt/0 Vendor: HP Product ID: Ultrium 4-SCSI Revision: G25W Serial Num: HU92K00200 ... Path status: Ready root@solaris:~#
-
Enter the serial number in the corresponding row of the
device-mappings.txtfile.In the example, we record the serial number of device
/dev/rmt/0,HU92K00200in the row for logical device/dev/rmt/0.root@solaris:~# vi /root/device-mappings.txt LOGICAL DEVICE DEVICE SERIAL NUMBER ACSLS DEVICE ADDRESS -------------- -------------------- ---------------------------------- /dev/rmt/0 HU92K00200 /dev/rmt/1 /dev/rmt/2 /dev/rmt/3 :wq root@solaris:~#
-
Repeat the two preceding steps until you have identified the device serial numbers for all logical devices listed in
/dev/rmt/and recorded the results in thedevice-mappings.txtfile.In the example, there are four logical devices:
root@solaris:~# vi /root/device-mappings.txt LOGICAL DEVICE DEVICE SERIAL NUMBER ACSLS DEVICE ADDRESS -------------- -------------------- ---------------------------------- /dev/rmt/0 HU92K00200 /dev/rmt/1 HU92K00208 /dev/rmt/2 HU92K00339 /dev/rmt/3 HU92K00289 :w root@solaris:~# -
For each device serial number mapped to
/dev/rmt/, obtain the corresponding ACSLS drive address. Use the ACSLS commanddisplaydrive*-fserial_num.In the example, we obtain the ACSLS addresses of devices
HU92K00200(/dev/rmt/0),HU92K00208(/dev/rmt/1),HU92K00339(/dev/rmt/2),HU92K00289(/dev/rmt/3):ACSSA> display drive * -f serial_num 2014-03-29 10:49:12 Display Drive Acs Lsm Panel Drive Serial_num 0 2 10 12 331000049255 0 2 10 16 331002031352 0 2 10 17 HU92K00200 0 2 10 18 HU92K00208 0 3 10 10 HU92K00339 0 3 10 11 HU92K00189 0 3 10 12 HU92K00289
-
Record each ACSLS drive address in the corresponding row of the
device-mappings.txtfile. Save the file, and close the text editor.root@solaris:~# vi /root/device-mappings.txt LOGICAL DEVICE DEVICE SERIAL NUMBER ACSLS DEVICE ADDRESS -------------- -------------------- ---------------------------------- /dev/rmt/0 HU92K00200 (acs=0, lsm=2, panel=10, drive=17) /dev/rmt/1 HU92K00208 (acs=0, lsm=2, panel=10, drive=18) /dev/rmt/2 HU92K00339 (acs=0, lsm=2, panel=10, drive=10) /dev/rmt/3 HU92K00289 (acs=0, lsm=2, panel=10, drive=12) :wq
-
Keep the mappings file.
You will need the information for configuring the file systems (Chapter 6), and you may wish to include it when you back up the Oracle HSM configuration (Chapter 13).
-
You configure Oracle StorageTek ACSLS network-attached libraries when you configure archiving file systems. So, if you are planning a high-availability file system, go to "Configuring Storage for High-Availability File Systems". Otherwise, go to "Installing Oracle HSM and QFS Software".
Configure Direct-Attached Libraries
To configure a direct-attached tape library, you must physically connect the hardware and, in some cases, configure the SCSI driver (Oracle HSM controls library robotics via the generic sgen driver rather than the samst driver used by SAM-QFS prior to release 5.4). Proceed as follows:
-
Physically connect the library and drives to the Oracle HSM server host.
-
If you are installing Oracle HSM for the first time or upgrading an Oracle HSM or SAM-QFS 5.4 configuration on Solaris 11, stop once the hardware has been physically connected.
Under Solaris 11,
sgenis the default SCSI driver, so the Oracle HSM installation software can automatically update driver aliases and configuration files. -
If you are installing Oracle HSM on a Solaris 10 system, see if one of the driver aliases in the list below is assigned to the
sgendriver. Use the commandgrepscs.*,08/etc/driver_aliases.The
sgendriver may be assigned any of the following aliases:-
scsa,08.bfcp"and/orscsa,08.bvhci -
scsiclass,08
In the example, Solaris is using the
scsiclass,08alias for thesgendriver:root@solaris:~# grep scs.*,08 /etc/driver_aliases sgen "scsiclass,08" root@solaris:~#
-
-
If the
grepcommand returnssgen"alias", wherealiasis an alias in the list above, thesgendriver is installed and correctly assigned to the alias. So, if you are configuring a high-availability file system, see Configuring Storage for High-Availability File Systems. Otherwise go to "Installing Oracle HSM and QFS Software". -
If the
grepcommand returnssome-driver"alias", wheresome-driveris some driver other thansgenand wherealiasis one of the aliases listed above, then the alias is already assigned to the other driver. So create a path-oriented alias for thesgendriver. -
If the command
grepscs.*,08/etc/driver_aliasesdoes not return any output, thesgendriver is not installed. So install it. Use the commandadd_drv-iscsiclass,08sgen.In the example, the
grepcommand does not return anything. So we install thesgendriver:root@solaris:~# grep scs.*,08 /etc/driver_aliases root@solaris:~# add_drv -i scsiclass,08 sgen
-
If the command
add_drv-iscsiclass,08sgenreturns the messageDriver (sgen) is already installed, the driver is already installed but not attached. So attach it now. Use the commandupdate_drv-a-iscsiclass,08 sgen.In the example, the
add_drvcommand indicates that the driver is already installed. So we attach the driver:root@solaris:~# add_drv -i scsiclass,08 sgen Driver (sgen) is already installed. root@solaris:~# update_drv -a -i scsiclass,08 sgen
-
If the command
grepscs.*,08/etc/driver_aliasesshows that the aliasscsiclass,08is assigned to thesgendriver, the driver is properly configured.root@solaris:~# grep scs.*,08 /etc/driver_aliases sgen "scsiclass,08" root@solaris:~#
-
If you are configuring a high-availability file system, see "Configuring Storage for High-Availability File Systems".
-
Otherwise, go to "Installing Oracle HSM and QFS Software".
Create a Path-Oriented Alias for the sgen Driver
If the expected sgen alias is already assigned to another driver, you need to create a path-oriented alias that attaches the specified library using sgen, without interfering with existing driver assignments. Proceed as follows:
-
Log in to the Oracle HSM server host as
root.root@solaris:~#
-
Display the system configuration. Use the command
cfgadm-vl.Note that
cfgadmoutput is formatted using a two-row header and two rows per record:root@solaris:~# cfgadm -vl Ap_Id Receptacle Occupant Condition Information When Type Busy Phys_Id c3 connected configured unknown unavailable scsi-sas n /devices/pci@0/pci@0/pci@2/scsi@0:scsi c5::500104f0008e6d78 connected configured unknown unavailable med-changer y /devices/pci@0/.../SUNW,qlc@0,1/fp@0,0:fc::500104f0008e6d78 ... root@solaris:~#
-
In the output of
cfgadm-vl, find the record for the library. Look formed-changerin theTypecolumn of the second row of each record.In the example, we find the library in the second record:
root@solaris:~# cfgadm -vl Ap_Id Receptacle Occupant Condition Information When Type Busy Phys_Id c3 connected configured unknown unavailable scsi-sas n /devices/pci@0/pci@0/pci@2/scsi@0:scsi c5::500104f0008e6d78 connected configured unknown unavailable med-changer y /devices/pci@0/.../SUNW,qlc@0,1/fp@0,0:fc::500104f0008e6d78 ... root@solaris:~# -
Get the physical path that will serve as the new path-oriented alias. Remove the substring
/devicesfrom the entry in thePhys_Idcolumn in the output ofcfgadm-vl.In the example, the
Phys_Idcolumn of the media changer record contains the path/devices/pci@0/pci@0/pci@9/SUNW,qlc@0,1/fp@0,0:fc::500104f0008e6d78, so we select the portion of the string following/devices/as the alias (note that this physical path has been abbreviated to fit the space available below):root@solaris:~# grep scsiclass,08 /etc/driver_aliases sdrv "scsiclass,08" root@solaris:~# cfgadm -vl Ap_Id Receptacle Occupant Condition Information When Type Busy Phys_Id c3 connected configured unknown unavailable scsi-sas n /devices/pci@0/pci@0/pci@2/scsi@0:scsi c5::500104f0008e6d78 connected configured unknown unavailable med-changer y /devices/pci@0/.../SUNW,qlc@0,1/fp@0,0:fc::500104f0008e6d78 ... root@solaris:~# -
Create the path-oriented alias and assign it to the
sgendriver. Use the commandupdate_drv-d-i'"/path-to-library"'sgen, wherepath-to-libraryis the path that you identified in the preceding step.In the example, we use the library path to create the path-oriented alias
'"/pci@0/pci@0/pci@9/SUNW,qlc@0,1/fp@0,0:fc::500104f0008e6d78"'(note the single and double quotation marks):root@solaris:~# update_drv -d -i '"/pci@0/pci@0/pci@9/SUNW,qlc@0,1/fp@0,0:fc::500104f0008e6d78"' sgen root@solaris:~#
The library has now been configured using the
sgendriver -
If you are configuring a high-availability file system, configure the storage now.
-
Otherwise, go to "Installing Oracle HSM and QFS Software".
Configuring Storage for High-Availability File Systems
High-availability file systems require redundant hardware and multiple, independent I/O paths, so that single-point hardware failures do not leave the file system unreachable. Carry out the following tasks:
Configure Solaris Cluster Nodes for Multipath I/O
To configure a high-availability shared file system, you must take care to follow the recommendations in the hardware administration manual for your version of the Solaris Cluster software. Provide both redundant primary storage devices and redundant I/O paths.
Store file system data and metadata on hardware RAID devices or on Solaris Volume Manager (SVM) software RAID volumes, as specified in the documentation for the Solaris Cluster SUNW.HAStoragePlus resource type (SUNW.HAStoragePlus does not support ZFS zvols). Place Oracle HSM metadata and configuration files on RAID-10 volume groups or mirrored SVM volumes. Place file-system data on hardware-controlled RAID-10 or RAID-5 volume groups or on mirrored SVM volumes. If you plan on using SVM volumes, you should note that, starting with Solaris 11, Solaris Volume Manager is no longer included with the Solaris operating system and is no longer installed by default. So you must download and install the SVM software packages separately.
Make sure that Storage Area Network connections cannot suffer single-point failures. Install multiple host bus adapters (HBAs) on each cluster node. Configure the Storage Area Network (SAN) with multiple interconnects and redundant switches. Manage path failover with Oracle Solaris I/O multipathing software (for additional details, see the Oracle Solaris SAN Configuration and Multipathing Guide in the Oracle Solaris customer documentation library and the stmsboot man page).
Configure Linux Clients for Multipath I/O
On Linux clients, configure redundant storage devices for path failover using the Device Mapper Multipath (DMM) software package. The DMM software manages all of the host bus adapters, cables, switches, and controllers that link a host and a storage device as a single, virtual I/O device, the multipath.
Install the Device Mapper Multipath Software Package
Follow the instructions below to configure a client that runs Oracle Linux 6.x (for other versions of Linux, consult the vendor's documentation).
-
Log in to the Linux host as
root.[root@linux ~]#
-
Change to the
/etc/yum.repos.dsubdirectory and list the directory contents.[root@linux ~]# cd /etc/yum.repos.d [root@linux ~]# ls -l total 4 -rw-r--r--. 1 root root 1707 Jun 25 2012 public-yum-ol6.repo [root@linux ~]#
-
If the
/etc/yum.repos.dsubdirectory does not contain apublic-yum-ol6.repofile, download one from the Oracle YUM repository using thewgetcommand.[root@linux ~]# wget http://public-yum.oracle.com/public-yum-ol6.repo -- 2013-02-25 12:50:32 -- http://public-yum.oracle.com/public-yum-ol6.repo Resolving public-yum.oracle.com... 14 1.146.44.34 Connecting to public-yum.oracle.com|141.146.44.34|:80... connected. HTTP request sent, awaiting response... 200 OK Length: 2411 (2.4K) [text/plain] Saving to: ”public-yum-ol6.repo” 100%[======================================>] 2,411 -- . - K/s in 0.001s 2013-02-25 12:50:32 (3.80 MB/s) - ”public-yum-ol6.repo” saved [2411/2411] [root@linux ~]#
-
Using a text editor, open the
public-yum-ol6.repofile. Make sure that the first entry,[ol6_latest], contains the lineenabled=1.In the example, we use the
vieditor. The required line is present, so we close the file:[root@linux ~]# vi public-yum-ol6.repo [ol6_latest] name=Oracle Linux $releasever Latest ($basearch) baseurl=http://public-yum.oracle.com/repo/OracleLinux/OL6/latest/$basearch/ gpgkey=http://public-yum.oracle.com/RPM-GPG-KEY-oracle-ol6 gpgcheck=1 enabled=1 ... :q [root@linux ~]#
-
Find the device mapper multipath software packages. Use the command
yumsearchmultipath.[root@linux ~]# yum search multipath Loaded plugins: refresh-packagekit, security ========================== N/S Matched: multipath ========================== device-mapper-multipath.x86_64 : Tools to manage multipath devices using : device-mapper device-mapper-multipath-libs.x86_64 : The device-mapper-multipath modules and : shared library Name and summary matches only, use "search all" for everything. [root@linux ~]#
-
Install the device mapper multipath software. Use the command
yuminstalldevice-mapper-multipath. When prompted, entery(yes) to accept the listed package and its dependencies.[root@linux ~]# yum install device-mapper-multipath Loaded plugins: refresh-packagekit, security Setting up Install Process Resolving Dependencies --> Running transaction check ---> Package device-mapper-multipath.x86_64 0:0.4.9-56.el6_3.1 will be installed --> Processing Dependency: device-mapper-multipath-libs = 0.4.9-56.el6_3.1 for package: device-mapper-multipath-0.4.9-56.el6_3.1.x86_64 --> Processing Dependency: libmultipath.so()(64bit) for package: device-mapper-multipath-0.4.9-56.el6_3.1.x86_64 --> Running transaction check ---> Package device-mapper-multipath-libs.x86_64 0:0.4.9-56.el6_3.1 will be installed --> Finished Dependency Resolution Dependencies Resolved ============================================================================ Package Arch Version Repository Size ============================================================================ Installing: device-mapper-multipath x86_64 0.4.9-56.el6_3.1 ol6_latest 96 k Installing for dependencies: device-mapper-multipath-libs x86_64 0.4.9-56.el6_3.1 ol6_latest 158 k Transaction Summary ============================================================================ Install 2 Package(s) Total download size: 254 k Installed size: 576 k Is this ok [y/N]: y Downloading Packages: (1/2): device-mapper-multipath-0.4.9-56.el6_3.1.x86_64.r | 96 kB 00:00 (2/2): device-map per-multipath-libs-0.4.9-56.el6_3.1.x86 | 158 kB 00:00 ---------------------------------------------------------------------------- Total 104 kB/s | 254 kB 00:02 Running rpm_check_debug Running Transaction Test Transaction Test Succeeded Running Transaction Installing : device-mapper-multipath-libs-0.4.9-56.el6_3.1.x86_64 1/2 Installing : device-mapper-multipath-0.4.9-56.el6_3.1.x86_64 2/2 Verifying : device-mapper-multipath-0.4.9-56.el6_3.1.x86_64 1/2 Verifying : device-mapper-multipath-libs-0.4.9-56.el6_3.1.x86_64 2/2 Installed: device-mapper-multipath.x86_64 0:0.4.9-56.el6_3.1 Dependency Installed: device-mapper-multipath-libs.x86_64 0:0.4.9-56.el6_3.1 Complete! [root@linux ~]#
-
Start the multipath daemon. Use the command
chkconfigmultipathdon.[root@linux ~]# chkconfig multipathd on [root@linux ~]#
Configure the Device Mapper Multipath Software
You configure the Device Mapper Multipath software by editing the /etc/multipath.conf file. The file consists of a series of sections, each section contains a set of related attributes, values, and subsections:
-
The
defaultsection configures the multipath software itself. It specifies the level of detail logged, defines failover behavior, and specifies the locations of required operating-system commands and directories. -
The
blacklistsection identifies devices that you need to exclude from the multipath configurations, such as local system disks. You can identify devices by World Wide Name/World Wide Identifier (WWN/WID) or by regular expressions that specify device node names or vendor and product device strings. -
The
blacklist_exceptionssection lets you specifically include devices in the multipath configuration when general rules in theblacklistsection would otherwise exclude them. -
The
multipathssection lets you define one or moremultipathsubsections, each of which applies a special configuration to a multipath that you specify by World Wide Name. -
The
devicessection lets you define one or moredevicesubsections, each of which applies a special multipath configuration to a device
For detailed descriptions of the individual defaults, see the annotated, sample file /usr/share/doc/device-mapper-multipath-0.4.9/multipath.conf.annotated.