| Oracle® Healthcare Master Person Index User's Guide Release 4.0 E68430-01 |
|
|
PDF · Mobi · ePub |
| Oracle® Healthcare Master Person Index User's Guide Release 4.0 E68430-01 |
|
|
PDF · Mobi · ePub |
You can deploy the Oracle Healthcare Master Person Index (OHMPI) application on a WebLogic cluster with preconfigured managed servers. The Person Template MPI application is used as an example here to describe the process of configuring the WebLogic server and deploying the Person MPI application to a WebLogic cluster. Deploy the complete MPI application to a single WebLogic cluster. These instructions are applicable to OHMPI 4.0 and WebLogic 12c.
For detailed information on WebLogic clustering feature and capabilities, see Oracle Fusion Middleware Using Clusters for Oracle WebLogic Server Guide.
This chapter contains the following sections:
Creating and Configuring a WebLogic Machine and Node Manager
Creating Application Server Resources to Target to the OHMPI Cluster
Deploying a Proxy Web Application for Balancing HTTP Requests
Modifying the EJB Client-Side JNDI Properties to Point to the Cluster Provider URL
You can install OHMPI using the OHMPI installer by following the instructions in the OHMPI Installation Guide. Use the platform-specific installer appropriate to the operating system.
To create and configure WebLogic machine and node manager:
Log in to the WebLogic administration console.
In the left pane, click on your domain (for example, domain1212) and expand Environment.
Click Machines and then click Lock & Edit.
Click New.
The Create a New Machine screen appears.
Enter ohmpi_machine (or any other preferred name) in the Name field.
Click Next.
Specify the node manager properties.
The node manager runs on localhost with SSL port 5556.
Click Finish.
Click Activate Changes.
You can create and configure the OHMPI cluster in the following ways:
To create and configure a standard cluster:
Log in to the WebLogic administration console.
In the left pane, click on your domain (for example, domain1212) and expand Environment.
Click Clusters.
Click Lock & Edit.
From the New drop-down list, select Cluster.
The Create a New Cluster screen appears.
Enter cluster name in the Name field.
For example, ohmpi_cluster.
From the Messaging Mode drop-down list, select Unicast.
Click OK.
In the Summary of Clusters pane, click ohmpi_cluster.
In the Settings for ohmpi_cluster screen, click the Servers tab.
Scroll down to the Servers table and click Add.
Enter server name in the Server Name field.
For example, ohmpi_server-1.
Enter server listen address in the Server Listen Address field.
For example, localhost.
Enter listen port for the first server in the Server Listen Port field.
For example, 8001.
Click Finish.
Click ohmpi_server-1 to configure the server.
The Settings for ohmpi_server-1 screen appears.
From the Machine drop-down list, select ohmpi_machine.
Select Listen Port Enabled and SSL Listen Port Enabled and enter the SSL listen port in the SSL Listen Port field.
For example, 8101.
Click Save.
Repeat steps 15 through 18 to specify settings for ohmpi_server-2.
Note:
Specify 8002 as the Server Listen Port and 8102 as the SSL listen port for ohmpi_server-2.Click Activate Changes.
To create and configure a dynamic cluster:
Log in to the WebLogic administration console.
In the left pane, click on your domain (for example, domain1212) and expand Environment.
Click Clusters.
Click Lock & Edit.
From the New drop-down list, select Dynamic Cluster.
The Create a New Dynamic Cluster screen appears.
Enter cluster name in the Name field.
For example, ohmpi_cluster.
From the Messaging Mode drop-down list, select Unicast.
Click Next.
Enter 2 in the Number of Dynamic Servers field.
Note:
Do not change the default values.Click Next.
Select the required machine configuration. In this example, select Use a single machine for all dynamic servers.
Click Next.
Enter 8000 in the Listen Port for First Server field.
Enter 8100 in the SSL Listen Port for First Server field.
Click Next.
Review the configurations you have selected.
Click Finish.
Click Activate Changes.
To create a JDBC data source:
Log in to the WebLogic administration console.
Click Lock & Edit.
In the left pane, click on your domain (for example, domain1212) and expand Services.
Select Data Sources.
Note:
For the Person MPI application, you must create the following data sources: <Application>DataSource and <Application>SequenceDataSource.For information on how to create the JDBC data sources for an MPI application project, see To Create JDBC Data Resources for an MPI Application Project for Oracle.
In the Select Targets section, select the ohmpi_cluster check box.
Select the All servers in the cluster option.
Click Finish.
To create a JMS data source:
In the Summary of JDBC Data Sources screen, select Generic Data Source from the New drop-down list.
The Create a New JDBC Data Source screen appears.
Enter a data source name in the Name field.
For example, PersonJMSDataSource.
Enter JNDI name in the JNDI Name field.
For example, jdbc/PersonJMSDataSource.
Click Next.
Under JDBC Data Source Properties, select Oracle's Driver (Thin) for Service connections; Versions: 9.0.1 and later from the Database Driver drop-down list.
Click Next.
Deselect the Supports Global Transactions check box.
Click Next.
Enter values in the Database Name, Host Name, Port, Database User Name, and Password fields for the new JDBC data source.
Click Next.
Click Test Configuration to ensure that the connection is good.
Click Next.
In the Select Targets section, select the ohmpi_cluster check box.
Select the All servers in the cluster option.
Click Finish.
To create a data store:
Log in to the WebLogic administration console.
In the left pane, click on your domain (for example, domain1212) and expand Services.
Click Persistent Stores.
The Summary of Persistent Stores screen appears.
From the New drop-down list, select Create JDBCStore.
The Create a New JDBC Data Source screen appears.
Enter a name for the JDBC Data Source in the Name field.
For example, PersonJMSJDBCStore.
From the Target drop-down list, select ohmpi_server-1 (migratable).
Note:
If you use a dynamic cluster, the Target is the entire cluster (ohmpi_cluster).From the Data Source drop-down list, select PersonJMSDataSource.
Click OK.
Click Activate Changes.
To create a JMS module with JMS connection factory and JMS topic:
Log in to the WebLogic administration console.
In the left pane, click on your domain (for example, domain1212) and expand Services.
Expand Messaging and click JMS Modules.
Click Lock & Edit.
Click New.
The Create JMS System Module screen appears.
Enter JMS server name in the Name field.
For example, PersonJMSModule.
Click Next.
In the Targets section, select the ohmpi_cluster check box.
Select the All servers in the cluster option.
Click Next.
Select the Would you like to add resource to this JMS system module? check box.
Click Finish.
In the Summary of Resources table, click New.
Select the Connection Factory option.
Click Next.
The Connection Factory is created successfully.
Enter connection factory name in the Name field.
For example, PersonOutBoundSender.
Enter JNDI Name in the JNDI Name field.
For example, jms/PersonOutBoundSender.
Click Next.
Note:
Do not change the default values.Click Finish.
To create a JMS topic:
In the Create a New JMS System Module Resource screen, select the Distributed Topic option.
Click Next.
Enter JMS Topic name in the Name field.
For example, PersonTopic.
Enter JNDI Name in the JNDI Name field.
For example, jms/PersonTopic.
Click Next.
Note:
Do not change the default values.Click Finish.
The JMS distributed topic is created successfully.
Click Activate Changes.
To start node manager and managed servers:
From the operating system prompt, start node manager by executing the following commands:
<prompt>./startNodeManager.sh
or
<prompt>startNodeManager.cmd
Note:
The command is located in the WebLogic domains/<your domain>/bin directory.Start all managed servers from the WebLogic administration console.
Expand Environment.
Select Cluster and then select ohmpi_cluster.
Click Control and select all the managed server instances.
For example, ohmpi_server-1 and ohmpi_server-2.
Click Start.
Click Yes.
Wait until all the managed servers are in the Running state.
Note:
The page does not refresh automatically.To deploy the MPI application to the OHMPI cluster:
Under Deployments, click Install.
Browse the MPI Application's deployable EAR file (for example, C:/NetBeansProjects/Person/dist/Person.ear).
Click Next.
Select the Install this deployment as an application option.
Click Next.
In the Select deployment targets section, select the ohmpi_cluster check box.
Select the All servers in the cluster option as the deployment target.
Click Next.
Select the Copy this application onto every target for me option.
Click Finish.
Click Activate Changes.
Note:
The deployed application must be in the Prepared state.Click Lock & Edit.
Select the application you deployed and click Start.
Select Servicing All Requests.
Click Yes to confirm.
Wait until the state changes to Active.
To deploy a proxy web application for balancing HTTP requests:
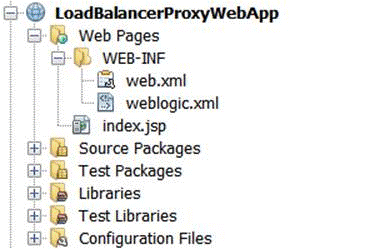
Create a web application (for example, LoadBalancerProxyWebApp) in NetBeans for the WebLogic server with the following folder structure:
Figure 7-1 Folder Structure of LoadBalancerProxyWebApp
Modify the weblogic.xml file:
<?xml version="1.0" encoding="UTF-8"?>
<weblogic-web-app xmlns="http://www.bea.com/ns/weblogic/90">
<context-root>/</context-root>
</weblogic-web-app>
Note:
The<context-root> deployment parameter is set to /. This makes the proxy servlet as the default web application for the proxy server.Modify the web.xml file.
Note:
Inside the web.xml file, the parameter value for WebLogicCluster must include all the servers on which the MIDM web application is deployed. The parameter value takes the format of <host1>:<port1>|<host2>:<port2>|…, where:host1 and host2 are the host names of servers in the cluster.
port1 and port2 are the ports where the corresponding host is listening for HTTP requests.
<?xml version="1.0" encoding="UTF-8"?>
<web-app version="2.5" xmlns="http://java.sun.com/xml/ns/javaee"
 xmlns:xsi="http://www.w3.org/2001/XMLSchema-instance"
 xsi:schemaLocation="http://java.sun.com/xml/ns/javaee
 http://java.sun.com/xml/ns/javaee/web-app_2_5.xsd">
    <servlet>
        <servlet-name>HttpClusterServlet</servlet-name>
        <servlet-class>weblogic.servlet.proxy.HttpClusterServlet</servlet-class>
        <init-param>
            <param-name>WebLogicCluster</param-name>
            <param-value>localhost:8001|localhost:8002</param-value>
        </init-param>
        <init-param>
            <param-name>verbose</param-name>
            <param-value>true</param-value>
        </init-param>
        <init-param>
            <param-name>DebugConfigInfo</param-name>
            <param-value>ON</param-value>
        </init-param>
    </servlet>
    <servlet-mapping>
        <servlet-name>HttpClusterServlet</servlet-name>
        <url-pattern>/</url-pattern>
        <url-pattern>*.jsp</url-pattern>
        <url-pattern>*.jspf</url-pattern>
        <url-pattern>*.jsf</url-pattern>
        <url-pattern>*.htm</url-pattern>
        <url-pattern>*.html</url-pattern>
        <url-pattern>*.do</url-pattern>
        <url-pattern>*.jpg</url-pattern>
        <url-pattern>*.gif</url-pattern>
        <url-pattern>*.css</url-pattern>
        <url-pattern>*.js</url-pattern>
        <url-pattern>*.png</url-pattern>
        <url-pattern>*.action</url-pattern>
    </servlet-mapping>
</web-app>
Build the LoadBalancerProxyWebApp project.
Deploy LoadBalancerProxyWebApp on the system acting as the load balancer. (For example, AdminServer).
Access the MIDM application using the following URL:
http://<LoadBalancer_IP_Address>:7001/PersonMIDM.
To modify the EJB client-side JNDI properties to point to the cluster provider URL:
If there is an OHMPI client application, change its JNDI properties to use the new cluster provider URL. List all host and port numbers for all the managed servers in the cluster as a comma separated value.
For example:
java.naming.provider.url=t3://<host1>:<port1>,<host2>:<port2>,<host3>:<port3>
OHMPI provides Real-Time Loader, a Java EJB client, that takes advantage of the clustered EJBs for balancing load. To use a cluster provider URL, you can define the following property in the Real-time Loader's batch file (for example, run-realtime-loader.bat):
set JAVA_NAMING_PROVIDER_URL=t3://<host1>:<port1>,<host2>:<port2>,<host3>:<port3>
|
Copyright © 2011, 2016, Oracle and/or its affiliates. All rights reserved. Legal Notices |
|