5 Extending the Network Service Orchestration Solution
This chapter describes how you can customize and extend Oracle Communications Network Service Orchestration Solution to meet the business needs of your organization.
You can extend the functionality of the solution by:
-
Designing cartridges in Oracle Communications Design Studio. See "Designing Cartridges for Custom VNFs and Network Services".
For more information about designing cartridges:
-
See UIM Concepts to understand the concept of extending cartridge packs and the impact of doing so.
-
See UIM Cartridge Guide for information about the leading practices for extending cartridge packs.
-
See UIM Developer's Guide for information about how to extend cartridge packs.
-
See Design Studio Help for instructions on how to extend cartridge packs through specifications, characteristics, and rulesets.
Important:
To ensure that your extensions can be upgraded and supported, you must follow the guidelines and policies described in UIM Concepts. -
-
Using extension points and Java interface extensions. See "Using Extension Points and Java Interface Extensions to Extend the Solution".
Setting Up Design Studio for the Network Service Orchestration Solution Cartridges
Before you design and work with cartridges for VNFs and network services, you must set up Design Studio.
To set up Design Studio for the Network Service Orchestration solution:
-
Create a local directory (UIM_SDK_Home).
-
Locate the UIM_SDK.zip folder in the UIM software pack and extract it into the UIM_SDK_Home local directory.
-
Create another local directory (NSO_SDK_Home).
-
Locate the OracleComms_NSO_1.1.1.0.0.build_number.zip file and extract it into the NSO_SDK_Home local directory.
-
Create another local directory (OTHER_LIB_Home) and copy the following WebLogic libraries from your WebLogic installation into the OTHER_LIB_Home local directory:
-
WL_Home/oracle_common/modules/groovy-all-2.0.5.jar
-
WL_Home/oracle_common/modules/jersey-client-1.18.jar
-
WL_Home/oracle_common/modules/jettison-1.1.jar
-
WL_Home/wlserver/modules/features/weblogic.server.merged.jar
-
-
Copy other UIM-specific JAR files to the OTHER_LIB_Home directory. See UIM 7.3.3 Installation Guide for information about UIM-specific JAR files.
-
In Design Studio, open a new workspace.
-
Navigate to UIM_SDK_Home/cartridges and import the following UIM base cartridges into Design Studio:
-
ora_uim_baseextpts
-
ora_uim_basemeasurements
-
ora_uim_basespecifications
-
ora_uim_basetechnologies
-
ora_uim_common
-
ora_uim_mds
-
ora_uim_model
-
-
Navigate to NSO_SDK_Home/designStudio/cartridgeZips and import the following Network Service Orchestration solution cartridges into Design Studio:
-
OracleComms_NSO_BaseCartridge
-
NPaaS_NetworkService
-
Checkpoint_NG_FW_VNF
-
Juniper_vSRX_VNF
-
-
In Design Studio, for the Network Service Orchestration Solution cartridge projects, configure the following Java build path classpath variables:
-
UIM_LIB. Specify the path as UIM_SDK_Home/lib
-
OTHER_LIB. Specify the path as OTHER_LIB_Home
-
NSO_LIB. Specify the path as NSO_SDK_Home/designStudio/nso_lib
-
Designing Cartridges for Custom VNFs and Network Services
To design cartridges for custom VNFs and network services:
-
In Design Studio, create new Inventory projects for the VNFs and the network service that you want to design.
See Design Studio Help for instructions about creating cartridge projects.
-
For each VNF and network service Inventory project, create specifications, metadata, and technical action files by referring to the solution's sample cartridges.
-
For each service specification, create a technical action XML file. See "About the Technical Actions File" for more information.
-
If required, write custom ruleset extension points. See "Writing a Custom Ruleset Extension Point"for more information.
-
If required, extend the core functionality by using Java interface extensions. See "Using Java Interface Extensions" for more information.
Using Extension Points and Java Interface Extensions to Extend the Solution
You can extend the core functionality of the Network Service Orchestration solution by:
-
Writing a custom rule set extension point. See "Writing a Custom Ruleset Extension Point".
-
Using Java interface extensions. See "Using Java Interface Extensions".
Writing a Custom Ruleset Extension Point
You can extend the solution's core functionality by writing a custom rule set extension point and associating the extension point with the rule set in Design Studio.
To extend the solution's core functionality by using the base extension points:
-
In Groovy or Drools, write a ruleset that provides the additional functionality that you want to implement.
-
Write a rule set extension point by integrating the extension point and the ruleset with a placement of BEFORE, INSTEAD, or AFTER.
-
In Design Studio, relate the rule set extension point to the relevant specification.
Table 5-1 describes the Network Service Orchestration solution core APIs that can be extended by using the extension points in the solution.
Table 5-1 Network Service Orchestration Solution Core APIs and Extension Points
| API | Extension Point | Description |
|---|---|---|
|
NetworkServiceDesignManager.processCreate |
NetworkServiceDesignManager_processCreate |
Implements the design-and-assign logic for a network service when the network service is instantiated. |
|
NetworkServiceDesignManager.processDisconnect |
NetworkServiceDesignManager_processDisconnect |
Cleans up the network service resources when the network service is terminated. |
|
NetworkServiceDesignManager.processChange |
NetworkServiceDesignManager_processChange |
Implements the design-and-assign logic or cleans up the resources when a network service is updated. |
|
VNFServiceDesignManager.processCreate |
VNFServiceDesignManager_processCreate |
Implements the design-and-assign logic for the VNF service when a network service is instantiated with a VNF. |
|
VNFServiceDesignManager.processDisconnect |
VNFServiceDesignManager_processDisconnect |
Cleans up the VNF service resources when a network service is terminated. |
|
VNFServiceDesignManager.processChange |
VNFServiceDesignManager_processChange |
Implements the design-and-assign logic for a VNF service when the network service is updated. |
|
VNFServiceManager.processTechnicalActions |
VNFServiceManager_processTechnicalActions |
Activates or removes the resources in a VIM for each VNF service. |
|
NetworkServiceManager.processTechnicalActions |
NetworkServiceManager_processTechnicalActions |
Activates or removes the resources in a VIM for each network service. |
|
ConsumerHelper.getDataCenterForConsumer |
ConsumerHelper_getDataCenterForConsumer |
Looks up the data center based on the NS endpoint. |
|
VNFServiceHelper.createVNF |
VNFServiceHelper_createVNF |
Creates a VNF. |
|
ConsumerHelper.getDataCenterLookupIdentifier |
ConsumerHelper_getDataCenterLookupIdentifier |
Returns the string representation of the dynamic property in the JSON request for NS instantiation. |
|
NetworkServiceManager.designInstantiate |
NetworkServiceManager_designInstantiate_Global |
Used to design the network service for instantiation. |
|
NetworkServiceManager.designUpdate |
NetworkServiceManager_designUpdate_Global |
Used to design the network service for update. |
Using Java Interface Extensions
You can extend the solution's core functionality by using Java interface extensions. You write a new Java implementation class for a core interface and implement the core interface for a specific network service or VNF descriptor.
The solution supports the following functionality through custom Java implementation classes:
-
Implementation of a custom SDN controller. See "Implementing a Custom SDN Controller".
-
Implementation of a custom VNF monitoring engine. See "Implementing a Custom Monitoring Engine".
-
Implementation of a custom VIM. See "Implementing a Custom VIM".
-
Implementation of a custom VNF manager. See "Implementing a Custom VNF Lifecycle Manager".
-
Implementation of a custom VNF connection manager. See "Implementing a Custom VNF Connection Manager".
-
Implementation of a custom VNF configuration manager. See "Implementing a Custom VNF Configuration Manager".
-
Implementation of a custom response manager. See "Implementing a Custom Response Manager" for more information.
Note:
If you change any keys in the nso.properties file and the nfvi.properties file, before redeploying the solution's core cartridges or upgrading the solution, take a backup of these files and use the latest files.Implementing a Custom SDN Controller
By default, the solution supports integration with OpenDaylight, but you can also implement a custom SDN controller.
Figure 5-1 shows a model diagram that depicts how you can write an extension for an SDN controller in Design Studio.
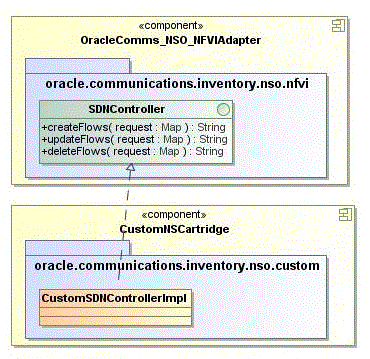
To implement a custom SDN controller:
-
In the custom Network Service descriptor cartridge, create a Java implementation class for the SDN controller.
-
Configure the custom SDN controller class to implement the oracle.communications.inventory.nso.nfvi.SDNController interface, which is provided in the OracleComms_NSO_NFVIAdapter cartridge.
-
Override the following methods in the custom SDN controller Java implementation class:
public String createFlows(Map request) throws Exception
public String deleteFlows(Map request) throws Exception
public String updateFlows(Map request) throws Exception
-
In your Network Service descriptor cartridge, create or update the network service properties file and add the following entry:
sdnController.NSD_Name=SDNController_ImplementationClassPath
where:
-
NSD_Name is the name of the network service descriptor
-
SDNController_ImplementationClassPath is the path of the implementation class of your custom SDN controller
-
-
Redeploy the cartridge.
Note:
If the sdnController.NSD_Name key is commented out or if the path of the implementation class is not specified, the solution does not perform the network flow operations such as creation of flows, deletion of flows, and update of flows for the network service.Implementing a Custom Monitoring Engine
By default, the solution supports integration with OpenStack Ceilometer, but you can also implement and use a custom monitoring engine with the solution.
Figure 5-2 shows a model diagram that depicts how you can write an extension for a custom VNF monitoring engine in Design Studio.
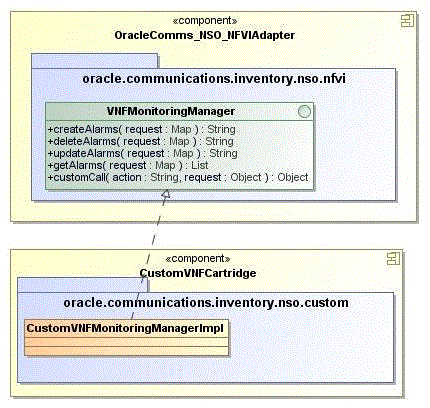
To implement a custom monitoring engine:
-
In the custom VNF descriptor cartridge, create a Java implementation class for the VNF monitoring manager.
-
Configure the VNFMonitoringManager class to implement the oracle.communications.inventory.nso.nfvi.VNFMonitoringManager interface, which is provided in the OracleComms_NSO_NFVIAdapter cartridge.
-
Override the following methods in the custom VNF monitoring engine Java implementation class:
public String createAlarms(Map request) throws Exception
public String deleteAlarms(Map request) throws Exception
public String updateAlarms(Map request) throws Exception
public String getAlarms(Map request) throws Exception
public String customCall(Map request) throws Exception
-
In the VNF descriptor cartridge, create or update the VNF properties file and add the following entry:
vnfMonitor.VNFD_Name=MonitoringEngine_ImplementationClassPath
where:
-
VNFD_Name is the name of the VNF descriptor
-
MonitoringEngine_ImplementationClassPath is the path of the implementation class of your monitoring engine
-
-
Redeploy the cartridge.
Note:
If the vnfMonitor.VNFD_Name key is commented out or if the path of the implementation class is not specified, the solution does not perform monitoring operations such as creation, deletion, and update of alarms for the network service.Implementing a Custom VIM
By default, the solution supports integration with OpenStack, but you can also implement a custom VIM.
Figure 5-3 shows a model diagram that depicts how you can write an extension for a custom VIM in Design Studio.
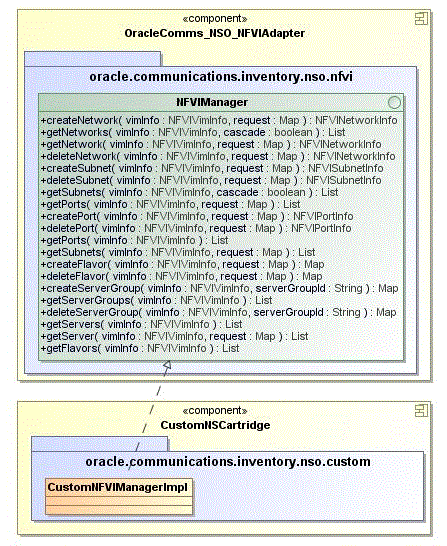
To implement a custom VIM:
-
In your custom cartridge, create a Java implementation class for the NFVIManager interface.
-
Configure the NFVIManager class to implement the oracle.communications.inventory.nso.nfvi.NFVIManager interface, which is provided in the OracleComms_NSO_NFVIAdapter cartridge.
-
Override the methods in the custom NFVI manager Java implementation class.
-
Open the UIM_Home/config/nfvi.properties file, and add or update the following entry:
nfviMgr.nfviType=VIM_ImplementationClassPath
where:
-
nfviType is the type of VIM. For example, OpenStack or VMware.
-
VIM_ImplementationClassPath is the path of the implementation class of your VIM
Note:
If you change any keys in the nfvi.properties file, before redeploying the solution's core cartridges or upgrading the solution, take a backup of the nfvi.properties file and use the latest file. -
-
Redeploy the cartridge.
Implementing a Custom VNF Lifecycle Manager
By default, the solution manages the VNF lifecycle operations by using OpenStack Compute services (referred to as Nova), but you can also implement and use a custom VNF lifecycle manager with the solution.
Figure 5-4 shows a model diagram that depicts how you can write an extension for a custom VNF lifecycle manager in Design Studio.
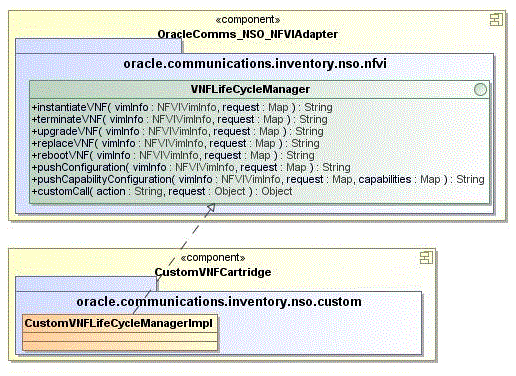
To implement a custom VNF lifecycle manager:
-
In your custom cartridge, create a Java implementation class for the VNF lifecycle manager.
-
Configure the custom VNF lifecycle manager class to implement the oracle.communications.inventory.nso.nfvi.VNFLifeCycleManager interface, which is provided in the OracleComms_NSO_NFVIAdapter cartridge.
-
Override the methods in the custom VNF lifecycle manager Java implementation class.
-
Open the UIM_Home/config/nfvi.properties file, and add or update the following entry:
vnflcMgr.vimType=VNFLifecycleManager_ImplementationClassPath
where:
-
vimType is the type of VIM
-
VNFLifecycleManager_ImplementationClassPath is the path of the implementation class of your custom VNF lifecycle manager
Note:
If you change any keys in the nfvi.properties file, before redeploying the solution's core cartridges or upgrading the solution, take a backup of the nfvi.properties file and use the latest file. -
-
Redeploy the cartridge.
Implementing a Custom VNF Connection Manager
The Network Service Orchestration solution includes a VNF connection manager that enables the solution to establish a communication channel with VNFs for deploying configurations during the VNF lifecycle operations. You can also implement a custom VNF connection manager for the solution by writing an extension.
Figure 5-5 shows a model diagram that depicts how you can write an extension for a custom VNF connection manager in Design Studio.
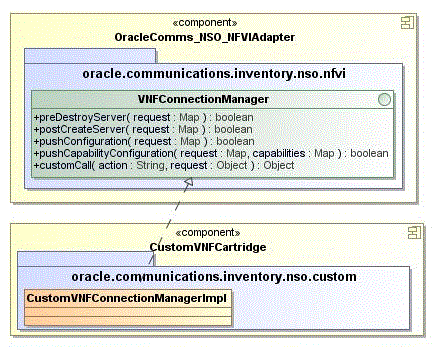
To implement a custom VNF connection manager:
-
In the custom VNF descriptor cartridge, create a Java implementation class for the custom VNF connection manager.
-
Configure the custom VNF connection manager class to implement the oracle.communications.inventory.nso.nfvi.VNFConnectionManager interface, which is provided in the OracleComms_NSO_NFVIAdapter cartridge.
-
Override the methods in the custom VNF connection manager Java implementation class.
-
In the VNF descriptor cartridge, create or update the VNF properties file and add the following entry:
vnfConnectionMgr.VNFD_Name=VNFConnectionManager_ImplementationClassPath
where:
-
VNFD_Name is the name of the VNF descriptor
-
VNFConnectionManager_ImplementationClassPath is the path of the implementation class of your custom VNF connection manager
-
-
Redeploy the cartridge.
Note:
If the vnfConnectionMgr.VNFD_Name key is commented out or if the path of the implementation class is not specified, the solution does not run configurations on the virtual machines on which the VNFs are deployed.Implementing a Custom VNF Configuration Manager
The Network Service Orchestration solution includes a VNF configuration manager that generates configuration content for VNF configuration. You can also implement a custom VNF configuration manager for the solution by writing an extension.
Figure 5-6 shows a model diagram that depicts how you can write an extension for a custom VNF configuration manager in Design Studio.
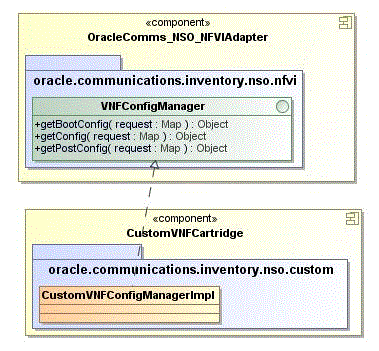
To implement a custom VNF configuration manager:
-
In the custom VNF descriptor cartridge, create a Java implementation class for the custom VNF configuration manager.
-
Configure the custom VNF configuration manager class to implement the oracle.communications.inventory.nso.nfvi.VNFConfigManager interface, which is provided in the OracleComms_NSO_NFVIAdapter cartridge.
-
Override the methods in the custom VNF configuration manager Java implementation class.
-
In the VNF descriptor cartridge, create or update the VNF properties file and add the following entry:
vnfConfigMgr.VNFD_Name=VNFConfigurationManager_ImplementationClassPath
where:
-
VNFD_Name is the name of the VNF descriptor
-
VNFConfigurationManager_ImplementationClassPath is the path of the implementation class of your custom VNF configuration manager
-
-
Redeploy the cartridge.
Note:
If the vnfConfigMgr.VNFD_Name key is commented out or if the path of the implementation class is not specified, the solution does not generate configurations for the VNF.Implementing a Custom Response Manager
By default, the solution includes a response manager that publishes the status of the VNF and network service life-cycle operations to a topic in the WebLogic server. You can also implement a custom response manager by writing an extension.
To implement a custom response manager:
-
In your custom cartridge, create a Java implementation class for the custom response manager.
-
Configure the custom response manager class to implement the oracle.communications.inventory.nso.nfvi.NSOResponseManager interface, which is provided in the OracleComms_NSO_Common cartridge.
-
Override the following method in the custom response manager Java implementation class:
public void processRequest(NSResponseInfo response) throws ValidationException
-
Open the UIM_Home/config/nso.properties file, and add or update the following entry:
nso.ResponseManager.list.1=ResponseManager_ImplementationClassPath
where ResponseManager_ImplementationClassPath is the path of the implementation class of your custom response manager.
The solution supports multiple implementations of response manager.
Note:
If you change any keys in the nso.properties file, before redeploying the solution's core cartridges or upgrading the solution, take a backup of the nso.properties file and use the latest file. -
Redeploy the cartridge.
Localizing the Network Service Orchestration Solution
You can localize the UIM user interface, UIM Help, and the responses that the REST APIs return into your local language. If you have deployed the NSOBranding cartridge, you can also localize the UI labels of the NFV entities that are displayed in the UIM user interface.
To localize the Network Service Orchestration Solution:
-
Localize the UIM user interface and UIM Help. See the chapter about localizing UIM in UIM 7.3.3 Developer's Guide.
-
Localize the NFV entities in the UIM user interface. See "Localizing the NFV Entities in the UIM User Interface" for instructions.
-
Localize the responses that the RESTful APIs return. See "Localizing the Responses in RESTful APIs" for instructions.
Localizing the NFV Entities in the UIM User Interface
To localize the NFV entities in the UIM user interface:
-
Navigate to designStudio\cartridgeZips and import the NSOBranding sample cartridge into Design Studio.
-
Make a copy of the model\content\inventory.ear\WEB-INF\classes\oracle\communciations\inventory\common\bundle\InventoryUIBundle.xlf file and rename it as InventoryUIBundle_localeID_.xlf, where localeID is the locale ID of the language into which you want to localize the UI labels of the NFV entities.
For example, if you want to localize the UI labels into French, rename the file to InventoryUIBundle_fr_FR_.xlf.
-
Open the file and replace the text in the <source> tags with the corresponding text in your local language.
For example, to localize the Network Services label into French, change:
 <trans-unit id="MENU_NETWORK_SERVICES">
        <source>Network Services</source>
        <target/>
      </trans-unit>
to
<trans-unit id="MENU_NETWORK_SERVICES"> <source>Services réseau</source> <target/> </trans-unit> -
Compile and deploy the cartridge into UIM and restart the UIM server.
Localizing the Responses in RESTful APIs
To localize the responses in the Network Service Orchestration solution RESTful APIs:
-
Make a copy of the UIM_Home/config/resources/logging/nsoresourcebundle.properties file in the same directory and rename it as nsoresourcebundle_localeID.properties, where localeID is the locale ID of your local language. For example, rename it to nsoresourcebundle_fr_FR.properties to localize the responses into French.
-
Open the nsoresourcebundle_localeID.properties file and localize the messages.
-
(Optional) If you want to implement the sample Network Protection service by using the sample cartridges, make a copy of the UIM_Home/config/resources/logging/npassresourcebundle.properties file in the same directory and name it as npaasresourcebundle_localeID.properties and localize the messages.
-
Restart the UIM server.
-
In your RESTful API client, update the Accept-Language header with the locale ID. For example, for French, specify fr-FR.