| Oracle® Application Integration Architecture Agile Product Lifecycle Management for SAP: Design to Release Install Guide Release 3.5 E73101-01 |
|

 Previous |
| Oracle® Application Integration Architecture Agile Product Lifecycle Management for SAP: Design to Release Install Guide Release 3.5 E73101-01 |
|
Previous |
This chapter discusses how to configure and deploy the Agile Product Lifecycle Management for SAP: Design to Release (Design to Release: Agile - SAP) pre-built Integration.
The Web Services Security (WSS) Configurator integrates the Design to Release: Agile - SAP pre-built integration with the Agile PLM 9.3.5 security environment. If you are running Agile PLM 9.3.3, 9.3.4, or 9.3.5 in a non-WSS environment, the Web Services Security Configurator does not need to be run.
After you install the Agile PLM PIP, the Web Services Security Configurator files are located in the $SERVICES_LOCATION/pips/AgileToSAP/Tool directory.
Make sure that the WebLogic Server is started and that the WebLogic console is accessible before running the configurator tool.
To start the Web Services Security Configurator:
Open a Command Prompt window.
Make sure the JAVA_HOME and WLS_HOME environment variables point to the correct locations.
Change to the $SERVICES_LOCATION/pips/AgileToSAP/Tool directory.
Open the wssconfig-d2rpip file and update the value of the wlstlocation variable, based on the example path in the file.
Run the wssconfig-d2rpip script.
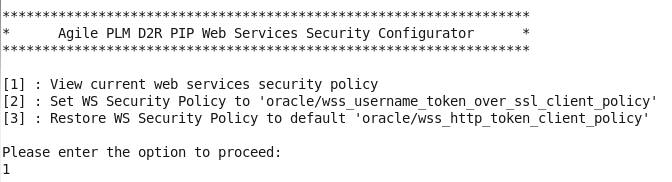
When the Web Services Security Configurator initializes, you have the option to review your current security policy, to support the Agile PLM 9.3.5 security policy, or to restore the security policy to the default policy (oracle/wss_http_token_client_policy).
For more information on the Agile PLM 9.3.5 security policy, see the Agile Product Lifecycle Management Security Guide.
To view the current web services security policy:
Enter 1 at the prompt.
Enter your SOA server URL, username, and password ad the designated prompts.
|
Note: If you are running a standalone server, the SOA server URL should be the URL of the Admin Server. If you are running a cluster environment, the SOA server URL should be the URL of one of the Managed SOA servers. |
Press Enter.
The current web services security policy displays and the configurator tool closes. If you need to update or rollback your security policy, you must restart the tool.
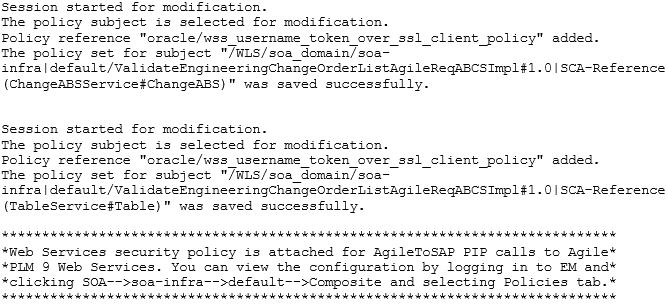
Enter option 2 on the Web Services Security Configurator to update your security policy to the Agile PLM 9.3.5 policy (oracle/wss_username_token_over_ssl_client_policy). After enter the required information, the updated policy is attached and the endpoint address is updated for the related web services.
You can validate the updated policy with Oracle Enterprise Manager.
To update MDS:
Download the Configuration File from MDS
Update $DOMAIN_LOCATION/soa/aia/MDSUtils/DownloadMetaDataFileDP.xml content:
<?xml version="1.0" standalone="yes"?>
<DeploymentPlan>
    <Configurations>
        <DownloadMetadataFile downloadLocation="${env.DOMAIN_LOCATION}/soa/aia/bin/" fileToDownload = "/soa/configuration/default/AIAConfigurationProperties.xml" wlserver="fp" />
    </Configurations>
</DeploymentPlan>

source <DOMAIN_LOCATION>/soa/aia/bin/aiaenv.sh
ant -f $SOA_HOME/aiafp/Install/AID/AIAInstallDriver.xml -DPropertiesFile=$DOMAIN_LOCATION/soa/aia/bin/AIAInstallProperties.xml -DDeploymentPlan=$DOMAIN_LOCATION/soa/aia/MDSUtils/DownloadMetaDataFileDP.xml
Update AIAConfigurationProperties.xml and AIAInstallProperties.xml in $DOMAIN_LOCATION/soa/aia/bin.
If you are updating to the Agile PLM 9.3.5 security policy with web service security configurator:
In /properties/participatingapplicatons/agile of AIAInstallProperties.xml, update port to https port and update protocol to https.
In AIAConfigurationProperties.xml, replace all Agile URLs from http to https. Fourteen (14) locations should be replaced.
If you are restoring the web service security policy with Web Service Security Configurator:
In /properties/participatingapplicatons/agile of AIAInstallProperties.xml, update port to http port and update protocol to http.
In AIAConfigurationProperties.xml, replace all Agile URLs from https to http. Fourteen (14) locations should be replaced.
Upload into MDS.
Update $DOMAIN_LOCATION/soa/aia/MDSUtils/UpdateMetaDataFileDL.xml content:
<?xml version="1.0" standalone="yes"?>
<DeploymentPlan>
    <Configurations>
        <UpdateMetadataFile wlserver="fp" mdslocation="apps/AIAMetaData/config">
            <fileset dir="${env.DOMAIN_LOCATION}/soa/aia/bin">
                <include name="AIAInstallProperties.xml" />
            </fileset>
        </UpdateMetadataFile>
        <UpdateMetadataFile wlserver="fp" mdslocation="/soa/configuration/default">
            <fileset dir="${env.DOMAIN_LOCATION}/soa/aia/bin">
                <include name="AIAConfigurationProperties.xml" />
            </fileset>
        </UpdateMetadataFile>
    </Configurations>
</DeploymentPlan>

source <DOMAIN_LOCATION>/soa/aia/bin/aiaenv.sh
cd $DOMAIN_LOCATION/soa/aia/MDSUtils/
ant -f $SOA_HOME/aiafp/Install/AID/AIAInstallDriver.xml -DPropertiesFile=$DOMAIN_LOCATION/soa/aia/bin/AIAInstallProperties.xml -DDeploymentPlan=$DOMAIN_LOCATION/soa/aia/MDSUtils/UpdateMetaDataFileDP.xml
After updating the security policy, you must set the SSL environment between Agile PLM 9.3.5 and the Design to Release: Agile - SAP pre-built Integration. For more information on installing Agile PLM 9.3.5, see Agile Product Lifecycle Management Application Installation Guide, Release 9.3.5.
Here's an example of how to set the SSL environment between Agile PLM 9.3.5 and the Design to Release PIP with self-signed certificates.
To set the SSL environment for Agile PLM 9.3.5:
Create a directory named agile-keystore935 on the machine where the WebLogic files are located.
Change to the newly created directory and run the following command to create the agile-keystore.jks file:
keytool -genkey -keyalg RSA -alias ssl -keystore agile-keystore.jks -keysize 2048 -storepass <password>
Enter the following information for the key generation command:
CN=<Weblogic hostname>, OU=<organizationUnit>,O=<organizationName>, L=<localityName>, ST=<stateName>, C=<countryName>
Run the following command to create and export the SSL certificate, agile-ssl-cert:
keytool -export -file agile-ssl-cert.cer keystore agile-keystore.jks -storepass <password> -alias ssl
Run the following command to import the SSL certificate and create the Trust store:
keytool -import -file agile-ssl-cert.cer keystore agile-trust-store.jks -storepass <password>
In a web browser, go to http://<Weblogic_hostname:portnumber>/console to open the WebLogic Console.
In the left pane of the Console, select Environment>Servers, then click the Server name on the right pane.
From ServerName>Configuration>General, check SSL Listen Port Enabled.The default port is 7002.
Select Configuration>Keystores, choose Custom Identity and Custom Trust.
In the Identity section, define the following attributes for the identity keystore:
Custom Identity Keystore: (Windows example) C:\agile-keystore-935\agile-keystore.jks
Custom Identity Keystore Type: JKS
Custom Identity Keystore Passphrase: <password>
In the Trust section, define the following properties for the trust keystore:
Custom Trust Keystore: (Windows example)
C:\agile-keystore-935\agile-trust-store.jks
Custom Trust Keystore Type: JKS
Custom Trust Keystore Passphrase: <password>
Activate the changes in the WebLogic Console.
Connect to the Agile PLM system.
After you have configured SSL on the Agile PLM system, you must make the Integration Server trust the Agile Server.
To make the Integration server trust the Agile Server:
Open a command prompt window and change to the %MW_HOME%/wlserver/server/lib directory.
Copy the agile-ssl-cert.cer file from the Agile PLM server to the Integration server.
Run the following command to import agile-ssl-cert.cer in the Integration server's key store using the DemoTrust keystore:
keytool -import -file agile-ssl-cert.cer -alias a9-ssl-cert -keystore DemoTrust.jks -storepass DemoTrustKeyStorePassPhrase
In a web browser, go to http://<Weblogic_hostname:portnumber>/console to open the WebLogic Console.
In the left pane of the Console, select Environment>Servers, then click the Server name on the right pane.
Select Configuration>Keystores, choose Custom Identity and Custom Trust.
In the Trust section, define the following properties for the trust keystore:
Custom Trust Keystore:%MW_Home%/wlserver/server/lib/DemoTrust.jks
Custom Trust Keystore Type: JKS
Custom Trust Keystore Passphrase: DemoTrustKeyStorePassPhrase
Save changes.
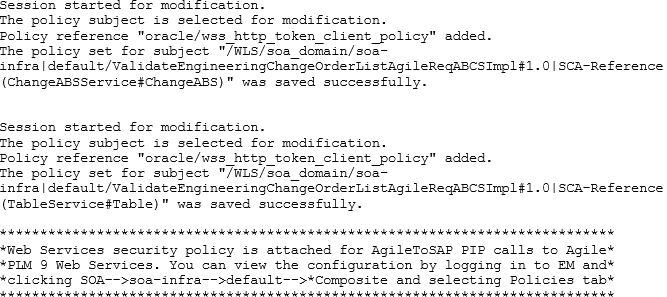
If there is a need to restore the default web services security policy (oracle/wss_http_token_client_policy), enter option 3 on the Web Services Security Configurator. After entering the required information, the default policy is attached and the endpoint address is updated for the related web services.
This section discusses the integration configuration and deployment process. There are two steps:
Install Design to Release: Agile - SAP Pre-built Integration using the Oracle Agile PLM PIP Installer.
Deploy the integration to the Fusion Middleware server.
The screens that appear prompt you to enter the data that is required for successful configuration of the Design to Release: Agile - SAP Pre-Built Integration. Keep the completed worksheet of the Design to Release: Agile - SAP Pre-Built Integration screens ready before you launch the Oracle Agile PLM PIP Installer.
|
Note: If you are harvesting content to OER, perform the first three steps. Else start from step 4. |
To install the Design to Release: Agile - SAP Pre-Built Integration:
Navigate to /slot/emsxxxx/oracle/Middleware/user_projects/domains/soa_domain/bin/ and open setDomainEnv.sh for Linux based systems and setDomainEnv.bat for Microsoft Windows.
In the setDomainEnv.sh (or .bat) file, replace the following line:
WLS_JDBC_REMOTE_ENABLED="-Dweblogic.jdbc.remoteEnabled=false"
with the following changes
WLS_JDBC_REMOTE_ENABLED="-Dweblogic.jdbc.remoteEnabled=true".
|
Note: The values specified are baseline values. You can modify the values to improve performance. Your server class machines must have 8GB RAM or more of available space for the above memory settings to be valid. |
Restart the server.
Follow the instructions in "Downloading and Starting the Agile PLM for SAP: Design to Release Installer" to launch the PIP 3.5 Installer.
Click Next.
To specify SOA Admin server details:
Enter information related to your integration server in the SOA Admin Server Details screen as described in "SOA Admin Server Details Screen."
Click Next.
To specify SOA Server details:
Enter information about your SOA Server in the SOA Server Details screen as described in "SOA Server Details Screen."
Click Next.
To specify SOA Server Cluster details:
Enter information about your SOA Server Cluster, if installed, in the SOA Server Cluster Details screen as described in "SOA Server Details Screen."
Click Next.
To specify SAP Application Server details:
Enter information about your SAP Application Server installation in the SAP Application Server Details screen as described in "SAP Application Server Details Screen."
Click Next.
To specify Agile PLM Server Connect details:
Enter information about your Agile PLM installation in the Agile PLM Server Connect Details screen as described in "Agile PLM Server Connect Details Screen."
Click Next.
To specify Agile PLM Server details:
Enter information about your Agile PLM server version in the Agile PLM Server Details screen as described in "Agile PLM Server Details Screen."
Click Next.
To specify PIP Database details:
Enter information about your pre-built integration database instance in the PIP Database Connect Details screen as described in "PIP Database Connect Details Screen."
Click Next.
To specify PIP Schema details:
Enter information about your PIP Schema details in the PIP Schema Details screen as described in "PIP Schema Details Screen."
Click Next.
To specify PIP Item Initial Load Data Location details:
Enter information about your initial load instance in the PIP Item Initial Load Data Location Details screen as described in "PIP Item Initial Load Data Location Details Screen."
Click Next.
To complete installation:
Review the configuration information on the Pre-Installation Summary screen.
|
Note: If you want to make changes to the configuration, click the Back button to go to the screen you want to edit. You can create a response file based on the input provided in the Installer and use it in future when you want to deploy the integration.Start the Installer with the -r option to create a response file. On Windows: setup_win.exe -r <response file path and name>. On Linux: ./setup_lin.bin -r <response file path and name>. You can install using the steps described in Section 3.2.2, "Installing using the Response File." |
Click Install to start the installation.
The system displays progress of the configuration in the Installation Progress screen.
The system displays any warnings or errors as necessary. You can review the configuration log for additional details.
When the configuration process completes without errors, the Installer displays the Install Complete screen.
Click Done to close the Installer.
To install using the response file:
Navigate to $DOMAIN_LOCATION/soa/aia/bin and run the command source aiaenv.sh for Linux based systems and aiaenv.bat for Microsoft Windows to configure the environment.
Navigate to PIP 3.5 Installer folder and run the command./setup_lin.bin-f <Response File Location and Name> for Linux based systems and ./setup_win.exe -f <Response File Location and Name> for Microsoft Windows.
To deploy the integration to Fusion Middleware server:
Navigate to $DOMAIN_LOCATION/soa/aia/bin and run the command source aiaenv.sh for Linux based systems and aiaenv.bat for Microsoft Windows to configure the environment.
Run the command for your platform.
Table 3-1 Deployment Command for the Design to Release: Agile - SAP Pre-Built Integration
| Platform | Deployment Command |
|---|---|
|
Linux x86-64 |
sh $SERVICES_LOCATION/pips/AgileToSAP/DeploymentPlans/AgileToSAPDP.sh |
|
Microsoft Windows x64 (64-bit) |
%SERVICES_LOCATION%\pips\AgileToSAP\DeploymentPlans\AgileToSAPDP.bat |
|
Note: In Windows 2008, 2008 R2 and Vista, run the command prompt as an administrator (elevated mode). If the command prompt is invoked in normal mode, the integrations are not displayed. |
Review the log file in the location specified in the command to verify successful deployment.
Oracle AIA ships artifacts in AIA Lifecycle Workbench which can be used in your integrations. These artifacts are created using FMW technologies such as BPEL and Mediator and are natively supported by SOA Core Extension tools such as Project Lifecycle Workbench, Harvester, Deployment Generator, AIA Deployment Driver (ADD). These are called native artifacts and they include SOA artifact types such as composites, DataSources, DVM, xRef, and so on. These artifacts can be modified or new natively supported artifacts can be added using the AIA Lifecyle Workbench and a BOM.xml file can be generated.
AIA integration development teams, most often, also require deployment of artifact types that are beyond what is supported by the Project Lifecycle Workbench and AIA Harvester. For instance, integration may require artifacts such as, Java applications, Shell Scripts, ANT based build scripts which constitute part of integration landscape in addition to the artifacts that are delivered by AIA. AIA also supports deployment of these supplementary artifacts. However, you must modify and add new non native artifacts outside AIA Lifecycle Workbench.
For more information on deploying artifacts, see Oracle Fusion Middleware Developer's Guide for Oracle Application Integration Architecture Foundation Pack, "Generating Deployment Plans and Deploying Artifacts".
To verify the Design to Release: Agile - SAP Pre-Built Integration deployment:
Open the log files from the following location and look for warnings and error messages:
For Linux Based Systems: Review the install log located at <DOMAIN_LOCATION>/soa/aia/logs to verify that the integration is successfully installed.
For Microsoft Windows: Review the install log located at <DOMAIN_LOCATION>\soa\aia\logs to verify that the integration is successfully installed.
Confirm that the Design to Release: Agile - SAP Pre-Built Integration queue was installed.
Navigate to the PLM integration Queue Management console (http://<server name>:<port number>/queue).
Log in with the server admin user name. For access details, contact the system administrator.
Confirm that the Design to Release: Agile - SAP / PIM Pre-Built Integration processes were installed.
Navigate to the Oracle Enterprise Manager Fusion Middleware Control (http://<server name>:<port number>/em/).
Log in with the server admin user name. For access details, contact the system administrator.
Expand Farm_soa_domain, SOA, soa-infra, Default and look for the following items}
Design to Release Agile-SAP integrations services
Agile Services
ACSAXMLJMSConsumer
ChangeStatusDBAdapter
RequesterABCS
CreateItemAgileReqABCS
CreateItemAgileReqABSCImpl
ProcessEngineeringChangeOrderAgileReqABCSImpl
ProviderABCS
UpdateItemListAgileProvABCSImpl
Utility Services
CreateQueueControlService
CreateQueueService
QueueProcessorService
QueueProcessorServiceImpl
SAP Services
Adapter Services
BOMServiceESB
ECOService
ItemServiceESB
ReserveItemService
EBF
CreateEngineeringChangeOrderListEBF
EBS
EngineeringChangeOrderEBS
EngineeringChangeOrderResponseEBS
ItemEBSV2
ItemResponseEBSV2
BillOfMaterialsEBS
BillOfMaterialsResponseEBS
ProviderABCS
CreateBillofMaterialsListSAPProvABCSImpl
CreateEngineeringChangeOrderListSAPProvABCS
ProcessBillOfMaterialsListSAPProvABCS
ProcessBillOfMaterialsListSAPProvABCSImpl
ReserveItemsSAPProvABCS
SyncItemListSAPProvABCS
UpdateBillOfMaterialsListSAPProvABCSImpl
RequesterABCS
UpdateItemListSAPReqABCS
UpdateItemListSAPReqABCSImpl
Confirm that the SOA Core Extension Manager components were successfully installed.
Navigate to the AIA Console URL: http://<server name>:<port number>/sce.
Log in with server admin user name.
Navigate to Setup, System to access the Application Registry page.
Check the rows for the following sets of values:
Table 3-2 Application Registry Values for Agile
| Field | Value |
|---|---|
|
Internal ID |
AGILE_01 |
|
System Code |
AGILE_01 |
|
System Description |
Agile PLM Instance 01 |
|
IP Address |
IP address of the Agile PLM system |
|
URL |
URL of the Agile PLM system |
|
System Type |
Agile |
|
Application Type |
PLM |
|
Version |
9.3.5 (Out of the Box) This can be edited to appropriate version of Agile PLM. |
For information on validating security policies for the Design to Release: Agile-SAP Pre-built Integration, see Agile Product Lifecycle Management Integration Pack for SAP: Design to Release Implementation Guide, "Security Policies Validation."
For more information about security validation, see Oracle Fusion Middleware Developer's Guide for Oracle Application Integration Architecture Foundation Pack, "Working with Security."
For integration Implementation, see Agile Product Lifecycle Management Integration Pack for SAP: Design to Release Implementation Guide.
To undeploy the integration from Fusion Middleware Server:
Navigate to $DOMAIN_LOCATION/soa/aia/bin and run the command source aiaenv.sh for Linux based systems and aiaenv.bat for Microsoft Windows to configure the environment.
Run the command for your platform.
Table 3-3 Undeployment Command for the Design to Release: Agile - SAP Pre-Built Integration
| Platform | Undeployment Command |
|---|---|
|
Linux |
ant Uninstall -f $SOA_HOME/aiafp/Install/AID/AIAInstallDriver.xml -DPropertiesFile=$DOMAIN_LOCATION/soa/aia/bin/AIAInstallProperties.xml -DDeploymentPlan=$SERVICES_LOCATION/pips/AgileToSAP/DeploymentPlans/AgileToSAPDPUndeployDP.xml -DDeploymentPolicyFile=$SERVICES_LOCATION/pips/AgileToSAP/DeploymentPlans/AgileToSAPConditionalPolicyUndeploy.xml -DSupplementaryDeploymentPlan=$SERVICES_LOCATION/pips/AgileToSAP/DeploymentPlans/AgileToSAPSupplementaryUndeployDP.xml -l $SERVICES_LOCATION/pips/AgileToSAP/DeploymentPlans/AgileToSAPUndeployDP.log |
|
Microsoft Windows |
ant Uninstall -f %SOA_HOME%\aiafp\Install\AID\AIAInstallDriver.xml -DPropertiesFile=%DOMAIN_LOCATION%\soa\aia\bin\AIAInstallProperties.xml -DDeploymentPlan=%SERVICES_LOCATION%\pips\AgileToSAP\DeploymentPlans\AgileToSAPDPUndeployDP.xml -DDeploymentPolicyFile=%SERVICES_LOCATION%\pips\AgileToSAP\DeploymentPlans\AgileToSAPConditionalPolicyUndeploy.xml -DSupplementaryDeploymentPlan=%SERVICES_LOCATION%\pips\AgileToSAP\DeploymentPlans\AgileToSAPSupplementaryUndeployDP.xml -l %SERVICES_LOCATION%\pips\AgileToSAPDeploymentPlans\AgileToSAPUndeployDP.log |
Restart the SOA server.
Uninstall the integration.