36.7 Placing Targets in the Rack
After the rack is created, you can place (add) hardware targets in the rack. A photorealistic image of the empty rack is displayed with front and rear views. There are two types of slots in the rack, rack slot and PDU slot. In the rack slot, you can place switches, servers, ZFS appliances, storage cells, and other targets that can be placed into a rack. In the PDU slots, you can place the PDU.
You can invoke the action menu by right clicking on the empty or occupied rack or the PDU slot.
36.7.1 Place a Target in the Rack
To place a target in the rack, perform the following steps:
-
Right click on an empty slot in the rack and click Place Target. The Place Target into Rack wizard opens.
-
In the Selected Target field, click the search icon to find the target that you want to add.
-
In the Target Type field, select the check box against the type of target that you want to add. The discovered targets are listed.
-
Select a target from the list, then click Select.
-
-
In the Position field, the value is automatically filled from the slot position you clicked. If you want to place the target in a different slot, enter the position of the empty slot where you want the target to be placed.
-
In the Height field, specify the height of the target. The suggested height displayed is based on the type of the target that you selected.
-
In the Facing field, specify the orientation of that target such as Full, Front, or Rear. (Some targets might occupy only half of the slot, for example, switches).
-
In the Horizontal position field, specify whether Full, Left, or Right. This is based on the occupancy of that target. Some targets might occupy the full slot, some might occupy either the left or right side of the slot.
-
Click OK. The target is placed into the rack.
36.7.2 Edit Target Placement in the Rack
You can edit the target position in the rack and place it to a different slot if needed.
To edit a target position, perform the following steps:
- Right click on the target, then select Edit Target.
- Edit the corresponding values and click OK.
36.7.3 Remove a Target from the Rack
You can delete targets placed in the rack.
Perform the following steps to remove a target from the rack.
- Navigate to Physical View of the Rack.
- Right click on the target that you want to delete, then click Remove Target.
- Click OK to confirm. The target is removed from the rack.
Note:
Though the target is removed from the rack, Enterprise Manager continues to monitor the target.
36.7.4 Delete a Rack
The rack can be removed in Enterprise Manager without targets placed in it. If the rack target is deleted and the rack contains targets placed in it, you will be asked if you want to remove the targets from Enterprise Manager.
Perform the following steps to delete a rack:
-
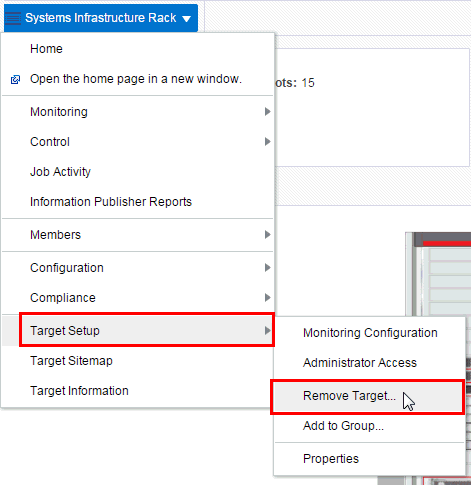
In the rack landing page, click the Target menu drop-down list.
-
Click Target Setup, then click Remove Target.
-
If you want remove targets placed in rack along with the removed rack, select “Remove all targets associated to target Rack”. List of targets placed in rack will be shown.
-
Some targets cannot be removed. Such targets have a red cross in the column Removal Details including a reason as to why target cannot be removed. Unremovable targets will not be removed when rack target is removed.
-
Some targets provide a custom removal flow (like SNMP monitoring unsubscription). Such targets have a yellow exclamation mark in the column Removal Details. If you want to remove a target with a custom removal flow, go to the target’s landing page and remove the target from there. If you don't remove targets with a custom removal flow, they will be removed along with rack without custom removal options available in their removal flows.
-
Click Yes to confirm. The rack is deleted with or without the assigned targets depending on your selection.
