2. Defining MIS Class Codes
In simple terms, an MIS Class represents a type of entity based on which you want your reporting to be done. An MIS Class will be the most general definition for MIS reporting, under which you can have several entities.
For example, if you want reports on the profitability of accounts officers, you would define Accounts Officer as an MIS Class. Accounts Officers in your bank would report to this MIS Class. Similarly, you define Cost Center as an MIS Class if you want reports based on the cost centers in your bank. You can have the various cost centers in your bank linked to the MIS Class of Cost Center. Business Segment, Industry Segments are other examples of an MIS Class.
The definition of MIS Class renders the entire MIS reporting absolutely flexible. By defining a class of your choice, and linking several entities to it, you can generate management information as per your requirement.
In a centralized database architecture, an MIS Class is defined in the Head Office branch of your bank, and is used by all the branches on the database.
This chapter contains the following section:
2.1 MIS Class Maintenance
This section contains the following topics:
2.1.1 Invoking the MIS Class Screen
You can invoke the ‘MIS Class Maintenance’ screen by typing ‘GLDCLSMT’ in the field at the top right corner of the Application tool bar and clicking on the adjoining arrow button.
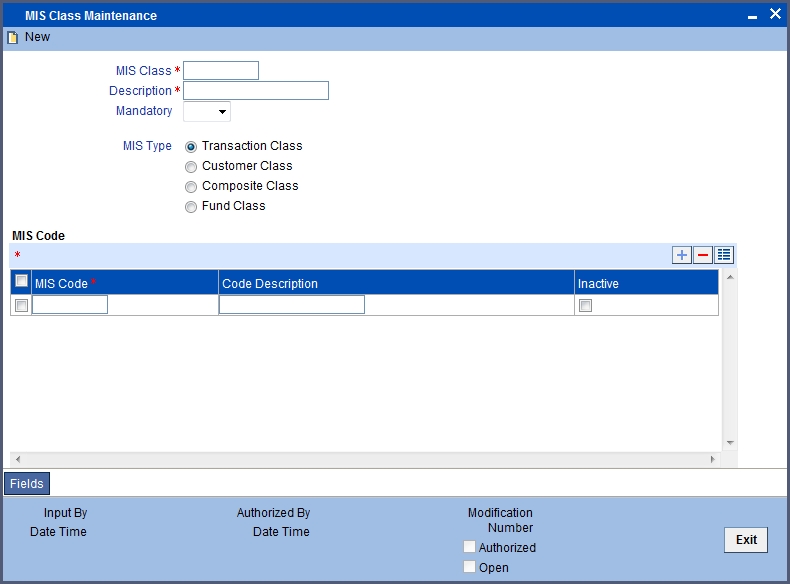
If you are creating a new MIS Class, select ‘New’ from the Actions Menu in the Application toolbar or click new icon. The ‘MIS Class Maintenance’ screen is displayed without any details.
If you are calling an MIS Class that has already been defined, double-click on an MIS Class from the summary screen.
MIS Type
The most basic attribute of an MIS class is the ‘type’ of its class. An MIS class can belong to one of the following types:
- Transaction Class
- Customer Class
- Composite Class
- Fund Class
- Allocation Class
The MIS type helps you classify your reporting based on either, a customer or a transaction. An MIS Class belonging to the Customer class type helps you generate your profitability for a customer. Similarly, MIS Class belonging to the Transaction class type helps you generate your profitability report based on transactions. A Composite class type, as the name indicates, would help you group a Customer and Transaction type classes. Choose an MIS Type for an MIS Class using the option button beside it.
Transaction Class
A Cost Centre would be a typical transaction type of MIS class. For a cost centre, you would want to generate reports for the kind of costs incurred for processing a transaction. For example, ‘short term loans’ may be a cost centre. For this cost centre, you can generate a report that gives the details of the cost of processing each transaction.
All the cost centres of your bank, would ideally be the different departments of your bank like short term loans, long term loans, teller, bills, etc. Each of these can be defined as MIS Codes, and linked to it.
Customer Class
You may want a profitability report based on the type of industry (manufacturing, agriculture, mining, financial institutions, etc.) to which a customer belongs. For achieving this, you would define Industries as an MIS class, and have various MIS codes linked to the class for each type of industry: manufacturing, agriculture, mining, financial institution, etc. This MIS class would be of Customer class type.
Composite Class
A ‘composite’ class is simply, a combination of a customer and a transaction type of MIS class. Typically, an Accounts Officer would be handling several customers, and you would want a report of the profitability of each customer. Occasionally, a customer may begin with one Accounts Officer and use a product or service that folds under some other Accounts Officer.
In such a requirement, you work backwards and create an MIS Class called Accounts Officer. All the accounts officers of your bank will be created as MIS Codes under this MIS Class. When you are generating your profitability reports, you can choose to get the figures for all the accounts officers, or for a selected few. Also, you can change the Accounts Officer that is picked up by default.
Allocation Class
You may want to view details of the expenses incurred by your bank. To do this, you can maintain Allocation Classes by which you can allocate the various expenses to different entities within your bank.
For instance, let us assume that your organization has over 2000 employees spread across four different locations (Delhi, Mumbai, Chennai, and Calcutta) in India. You would like to have a location-wise break-up of the salary amount disbursed to each of these locations. Additionally, you would also like to view a break-up of balances for individual departments within each location.
To meet these requirements in Oracle FLEXCUBE firstly, define an MIS Class called Locations. All the four location of your organization - Delhi, Mumbai, Chennai, Calcutta, will be created as MIS Codes under this MIS Class.
Similarly, create another MIS Class called Departments. All the departments within your organization (Administration, Financial Control, Products Division, IT Solutions etc) will be created as MIS Codes under this MIS Class.
Consequently, details of salary expenses incurred across-locations will be available under the MIS Class called Locations. The department-wise salary disbursement details will be available under the MIS Class called Departments. Both these MIS classes will be of the Allocation Class type.
Fund Class
Your bank may float a number of funds like Mutual Funds, Growth Funds, and Income Funds etc. You may want to view details on each of the funds. You can achieve this by defining Funds as an MIS Class and have the various funds reporting to it. Each of these funds would be defined as an MIS Code and then linked to the MIS Class ‘Funds’. This is a Fund type of MIS Class.
MIS Code
An MIS Code can be called an entity for which you want profitability reports. Each MIS Code will report to an MIS Class. Consider the following examples:
- Accounts Officer is an MIS Class. To this MIS Class will report all the Accounts Officers of your bank. With this structure, you can generate profitability reports for each Accounts Officer. Elizabeth Towers, Sam Brown, and Connie Beckwith, are some of your accounts officers.
- Cost Centre is an MIS Class. The various cost centres in your bank will be classified under this MIS Class. Thus, the various departments in your bank will report to this Cost Centre, so that you can generate profitability reports for each cost centre. Short Term Loans, Incoming Bills, and Import Letters of Credit can be some of your cost centres.
- Industry Segments is an MIS Class. The various industries to which your customers belong will report to this MIS Class. Manufacturing, agriculture (cash crops) and financial institutions can be some of your industry segments.
In these examples, Elizabeth Towers, Sam Brown, and Connie Beckwith will each have an MIS Code, all under the MIS Class 'Accounts Officer'.
Similarly, Short Term Loans, Incoming Bills, and Import Letters of Credit will have an MIS Code each, under the MIS Class 'Cost Centre'. The same concept applies to Industry Segments also.
An MIS Code is added on to an MIS Class either through the New operation on the MIS Class screen or through the ‘Amend’ option on an existing MIS Class record. Once an MIS Class has been stored, you can add MIS Codes to it by unlocking the MIS Class record and adding the required MIS Code.
The ‘MIS Code’ list contains the MIS Codes attached to the selected MIS Class. To add a new record to the ‘MIS Code’ list, click add icon.
To delete an MIS Code(s) from the list, choose the MIS code(s) using the checkbox next to it and then click delete icon.
2.1.2 Operations on the MIS Class Record
On an existing MIS Class record, you can perform the following operations (if any function under the Actions Menu is disabled, it means that the function is not allowed for the record):
- Amend the details of an MIS Class
- Authorize an MIS Class
- Copy the details of an MIS Class on to a new one
- Print the details of an MIS Class
- Delete an MIS Class
Please refer to the manual on common procedures for details of these operations.
2.2 MIS Code Restriction Maintenance
You can maintain MIS Code restriction maintenance for MIS Class, Product or Account Class, and Branch.
This section contains the following topic:
- Section 2.2.1, "Maintaining Allowed List of MIS Codes"
- Section 2.2.2, "Viewing MIS Code Restriction Summary"
2.2.1 Maintaining Allowed List of MIS Codes
You can maintain a list of allowed MIS codes for a given MIS class, product or account class combination for a branch in the ‘MIS Code Allowed For MIS Class and Product/Account Class’ screen.The MIS call forms would pick only the MIS codes that are allowed for the product or account class and MIS class combination. You can invoke the 'MIS Code Restriction Maintenance' screen by typing ‘MIDPRDMN’ in the field at the top right corner of the Application tool bar and clicking on the adjoining arrow button.

You can specify the following details:
Branch Code
Specify the branch code. Alternatively, you can select the branch code from the option list. The list displays all the branch code for which the MIS code restrictions are maintained.
Branch Name
The system displays the name of the branch maintained in the system.
MIS Class
Specify the MIS class for which the allowed list of MIS codes are maintained. Alternatively, you can select the class code from the option list. The list displays all the MIS classes maintained in the system. The customer MIS classes are not part of the list.
MIS Class Description
The system displays the MIS class description maintained in the system.
Product / Account Class Code
Specify the product code or account class code for which the allowed lists are maintained. Alternatively, you can select the code from the option list. The list displays all the products or account class code maintained in the system.
Product Or Account Class Description
The system displays the product or account class description respectively maintained in the system.
MIS Codes
MIS Code
Specify the MIS code maintained. Alternatively, you can select the MIS code from the option list. The list displays all the MIS codes maintained in the system.
MIS Code Description
The system displays the MIS code description maintained in the system.
Allowed
Check this box to allow the MIS code for a given MIS class, product or account class combination for a branch.
Note
The MIS call forms attached to a transaction input or an account creation screen populates the MIS codes that are allowed for a given MIS class, product or account class combination for a branch. If you do not perform maintenance for a given branch, account class/product code and MIS class combination, then all MIS Classes linked to the account class/product code will be available.
2.2.2 Viewing MIS Code Restriction Summary
You can view the MIS code restriction summary in the ‘MIS Code Restriction Summary’ screen. It displays the status of the records maintained, whether it is authorized, unauthorized or rejected.
You can invoke this screen by typing ‘MISPRDMN’ in the field at the top right corner of the Application tool bar and clicking on the adjoining arrow button.
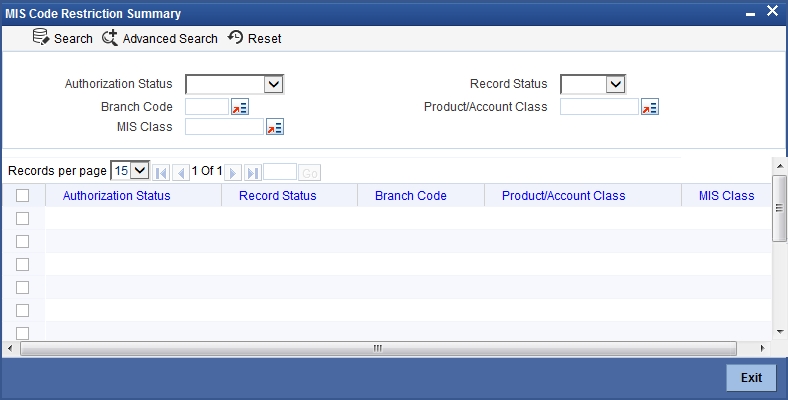
In the above screen, you can base your queries on any or all of the following parameters and fetch records:
- Authorization Status
- Branch Code
- MIS Class
- Record Status
- Product/Account Class
Click ‘Search’ button. The system identifies all records satisfying the specified criteria and displays the following details for each one of them:
- Authorization Status
- Record Status
- Branch Code
- Product/Account Class
- MIS Class