| Oracle® Retail Predictive Application Server Cloud Edition Administration Guide Release 19.0 F25569-31 |
|

 Previous |
 Next |
| Oracle® Retail Predictive Application Server Cloud Edition Administration Guide Release 19.0 F25569-31 |
|
Previous |
Next |
This chapter provides details about additional configuration for RPASCE.
A notification app code is assigned to the RPASCE Client application during installation. In the 17.0 version, this is hard-coded to MFP. Starting with 17.1, the installer user can select the notification app code.
During RPASCE Client installation, starting with 17.1, you must choose a notification app code. It is typically the code corresponding to the RPASCE application that you are installing. Table 15-1 lists some typical RPASCE applications.
Table 15-1 Typical RPASCE Applications
| Application Name | Application Code |
|---|---|
|
MFP (Retail) Cloud Service |
MFPRCS |
|
MFP (Cost) Cloud Service |
MFPCCS |
|
MFP Enterprise Edition Cloud Service |
MFPEECS |
|
Item Planning Cloud Service |
IPCS |
|
Assortment Planning and Optimization (Fashion) Cloud Service |
APOFSLCS |
|
Assortment Planning Enterprise Edition Cloud Service |
APEECS |
Whichever option you pick, the corresponding app code is inserted into a property in <RPASCE-Client-Config-Dir>/config.properties.
For example, if you select MFP (Retail) Cloud Service, then you have the following property setting:
platform.appcode=MFPRCS
|
Note: This is a 17.1.* property. The 17.0.* versions do not have this property (since it is hard-coded to MFP and is not configurable). |
In order to ensure that images are exported to Excel, complete the following:
Verify that the image host is accessible from the JET UI staging and production servers by using wget -v <<image_url>> from the JET UI servers.
If not, make sure the image cache host is white-listed on the OCI environments.
Valid Hosts: Users can specify a web URL as the source of an image(s) (typically the content management server) or source for contextual help. Due to security reasons, the RPASCE client will only use images or contextual help links from these configured hosts. Users are only allowed to enter URLs from the hosts defined by this setting in config.properties:
These should be separated by commas. Enter only hostname and not the http protocol. For example, xyz.com. Note that the hostname is not case sensitive. The dimension for which the images are to be displayed should have a dimension attribute measure registered which of type string and has "UI Type" property set to media. For example consider the name of the dimension attribute measure is addvskupimgt for dimension skup. The measure should be loaded with the content similar to below. Each record in the input file is a position id followed by the image URL wrapped in <image> tag. The example input file below is in the csv format and hence named addvskupimgt.csv.ovr.
   70063172,"<image id=""main"" label=""Front""><url
size=""thumb"">http://127.0.0.1:7001/contentserver/imgfetch/1000396_Front_full.jpg</url></image>"
   73137693,"<image id=""main"" label=""Front""><url
size=""thumb"">http://127.0.0.1:7001/contentserver/imgfetch/CardiganLS.jpg</url></image>"
   96880516,"<image id=""main"" label=""Front""><url
size=""thumb"">http://127.0.0.1:7001/contentserver/imgfetch/1000399_Front_full.jpg</url></image>"
   88805005,"<image id=""main"" label=""Front""><url
size=""thumb"">http://127.0.0.1:7001/contentserver/imgfetch/1000378_Front_full.jpg</url></image>"
   72939751,"<image id=""main"" label=""Front""><url
size=""thumb"">http://127.0.0.1:7001/contentserver/imgfetch/1000439_Front_full.jpg</url></image>"
   96666402,"<image id=""main"" label=""Front""><url
size=""thumb"">http://127.0.0.1:7001/contentserver/imgfetch/1000440_Back_full.jpg</url></image>"
The use of the double double quotes in the lines above is the standard way of escaping double quotes in any RPASCE measure's csv input files.
Users can specify the maximum number of data points on the chart representation of data by setting them in config.properties. Note that setting the maximum values higher will degrade charting performance.
charts.maxSeries: Enter the maximum number of series. The default value is 175.
charts.maxGroups: Enter the maximum number of groups. The default value is 175.
The maxSeries setting determines how many rows (starting at row 1) are displayed in the chart. The maxGroups setting determines the max column count on the chart. As shown in the highlighted boxes in Figure 15-1, all the series data is shown together (hence the term group for x-axis).
In alert navigation mode, there is a configurable limit on the number of alert hits that are visible in the view that can navigated over. If there are more visible hits, the navigation control will display the hit number of the maximum in the form n of l+, where n is the hit number and l is the navigation limit. For example: 1 of 999+.This limit is configurable in the real.time.alerts.max.block.size property in config.properties. The default value is 5001. The minimum value is 1000. Values lower than 1000 will be set to the minimum of 1000, as there is no practical reason to configure lower values. Non-numeric values will log an error and use the default value of 5001.real.time.alerts.max.block.size=5000
This section provides a discussion of local domain indexing.
When rpas executes a batch rule group in local domains, RPASCE first generates a batch execution plan and then submits the plan to the middle tier infrastructure to carry out the evaluation. Currently, the execution plan is very straightforward: to evaluate a rule group in all local domains, rpas generates an execution plan with a list of rule group evaluation tasks, with one task for each local domain. The tasks are not ordered in anyway, and are handed directly to middle tier for execution. Middle-tier, having no indication regarding which task may take longer than others, simply executes the list of tasks in parallel, based on the order generated and the number of parallel processes allowed.
This simplified approach is not optimized for performance when the rule group execution time varies largely among local domains. For example, if execution takes much longer for one local domain, executing the rule group in this long running local domain first will reduce the total runtime in parallel execution.
Local Domain Indexing allows applications or administrators to assign a relative weight for each local domain, and stores the weight as a domain property in the master domain. When a batch plan is generated to execute a rule group across local domains, the plan is generated based on this local domain weight, such that the execution tasks are ordered by the local domain weight to achieve better parallel performance.
The most important aspect of the domain ordering is the domain weight. However, it is not possible to assume a single weight will work for all possible situations. The most flexible and meaningful approach is to allow each application to define the weight based on its own knowledge and pass the information to rpas using a new Domain Property. Applications can configure OAT tasks to either measure the disk size of the domain or extract the population size of a particular mask measure. Then, the information can be converted to a real number as the local domain weight and store that value as the domain property in the below format:
sub_domain_weight = ldom0:0.2, ldom1:0.5, ldom2: 0.3 ...
The name of the property is "sub_domain_weight". It must be stored as the master domain's property. It will be ignored if stored as the local domain's property.
The value of the property is a comma separated list of local domain name and a real number. The local domain name must be the same domain name as used in the configmeasdata.r_subdomainindex. The real number is the corresponding domain weight and must be within the range of [0.0, 1.0]. A subdomain with weight of 1.0 is considered the most weighted domain and must be executed first.
Duplicated values are allowed. If two subdomains have the same weight, they are treated equally.
Missing values are allowed. If a subdomain is missing from the sub_domain_weight property, the subdomain must assume a weight of 0.0 and must be considered the least weighted subdomain. If more than one subdomain has weight of 0, each will be treated the same way during task execution.
If the domain property is not set, then the current behavior will be assumed.
When executing a batch rule group in all local domains, rpas first generates an execution plan with a list of tasks and each task executes the rule group in a single local domain. The plan is passed alone to the middle tier for execution. The middle tier will pick up the list of tasks, based on number of parallel tasks allowed (for example N) and take the first N tasks from the list and execute. Whenever a task is complete, the next task in the list is started, until all tasks in the list are finished. Without domain index ordering, the execution plan will include the list of tasks, with the local domain ordered the same way as the subdomain index stored in the configmeasdata.r_subdomainindex array.
For example:
If the existing local domains are:
(1) : "ldom0"
(2) : "ldom1"
(3) : "ldom2"
(4) : "ldom3"
The execution plan generated, by default, will be:
(task 1) : run rule group batch_agg in ldom0
(task 2) : run rule group batch_agg in ldom1
(task 3) : run rule group batch_agg in ldom2
(task 4) : run rule group batch_agg in ldom3
With domain index ordering, if application / admin has the sub_domain_weight domain property set up as follows:
sub_domain_weight = ldom0: 0.2, ldom1: 0.5, ldom2: 0.3, ldom3: 0.9
The execution plan generated will be ordered based on the descending order of the subdomain weight, and the local domain with the largest weight will be placed at the beginning of the list:
(task 1) : run rule group batch_agg in ldom3
(task 2) : run rule group batch_agg in ldom1
(task 3) : run rule group batch_agg in ldom2
(task 4) : run rule group batch_agg in ldom0
If the execution plan is generated based on the descending order of the subdomain weight as illustrated above:
(task 1) : run rule group batch_agg in ldom3
(task 2) : run rule group batch_agg in ldom1
(task 3) : run rule group batch_agg in ldom2
(task 4) : run rule group batch_agg in ldom0
When the above plan is submitted to the middle-tier for parallel execution, the middle tier will first check the number of parallel processes allowed. For easy of illustration, assume two parallel processes are allowed. The middle tier will start two parallel processes at the same time, selected from the beginning of the task list in the plan, at time t0:
t0:
(task 1) : run rule group batch_agg in ldom3
(task 2) : run rule group batch_agg in ldom1
The ldom1 has a weight of 0.9 and ldom1 has a weight of 0.5. If, in perfect condition, the tasks take the same amount of seconds as the weight to finish, then the task 1 requires 0.9 seconds and the task 2 should finish in 0.5 seconds. After t0+0.5, task 2 should be finished and the middle tier should have picked the next task in the plan: task 3, to execute, assuming no middle tier overhead:
t0+0.5:
(task 1) : run rule group batch_agg in ldom3
(task 3) : run rule group batch_agg in ldom2
Now assume task 3 will take 0.3 seconds, so at t0+0.8, task 3 will finish, and the task 4 should be started:
t0+0.8:
(task 1) : run rule group batch_agg in ldom3
(task 4) : run rule group batch_agg in ldom0
At t0+0.9, task 1 will finish, but task 4 is still running:
t0+0.9:
(task 4) : run rule group batch_agg in ldom0
Eventually, at t0 + 1.0 second, all four tasks will be finished.
If the tasks are not ordered based on the subdomain weights, the ldom0 and ldom1 will be executed first, then ldom2, and eventually ldom3. The calculation shows this execution sequence will use 1.4 seconds, given that the last task takes the longest time: 0.9 seconds to finish. So a precise estimate of the local domain weight and generating / executing the plan accordingly will optimize performance.
Assume that the application can make a practically "good enough" estimate for the relative weight of the local domains for the rule group it plans to execute. This estimated weight will guide the plan generation / execution to achieve better parallel processing time.
It is possible that the subdomain weight may change between rule groups. For example, for batch_rule_group1 the ldom0 may take the longest to finish, but for batch_rule_group2, it is possible that the ldom3 may take the longest. Since the weight is managed by the domain property, it is possible that the domain property can be reset before the batch can be started. So the process of resetting the domain property for a particular batch run can be inserted into the OAT tasks before the batch run. In this way, the batch run can be optimized individually. After the batch run, the domain property sub_domain_weight must be cleaned out to prevent it from affecting performance in an unintended way.
The domain weight affects only the plan generation part. Rpas generates the plan based on the information at the time of the plan generation. Therefore, the assumption is that the domain character does not change largely after the plan is generated.
Workbook builds, refreshes, and commits are not impacted by the Domain Index Ordering functionality. For Workbook build and refresh, the plan cannot be executed in parallel among multiple local domains as the target to write into is the workbook itself and cannot be write accessed in parallel. For workbook commit, currently the commit plan involves a single commit task, and is not split among local domains.
You can configure the number of recent plans that are displayed in the dashboard using the following config.properties setting. The value you assign to the property sets the maximum number of recent plans that will be displayed. The default value is 10.
dashboard.plans.max=10
You can set auto-refresh for the task status dashboard (default value = 10000) and the live log interval (default value = 5000). Values are in milliseconds.
autorefresh.taskstatus.dashboard.interval=10000
autorefresh.livelog.interval=5000
When multiple measures are copied, only the error messages for the number of measures set by the domain property paste_error_limit will be displayed in the UI. When the number of errors exceeds that limit, the error messages for individual measures will not be displayed; a global error message will be displayed instead. The default value is 20. There is no range check on the property; the value must be a positive integer.
paste_error_limit = 20
This threshold value sets a trigger for the display of an alert icon for a wizard. The alert icon is shown when the positions for a level are above the value set for the threshold. This indicates that the number of positions that the user has selected may impact the performance of the wizard loading the positions.
position.count.threshold = 50,000
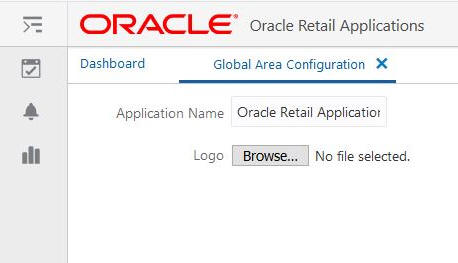
The Global Area Configuration page allows an administration user to configure certain components of the branding area, including the application name and the logo.
|
Note: The PLATFORM_SERVICES_ADMINISTRATOR_ABSTRACT group must be assigned to the user in IDCS or OCI IAM or the user will experience a 403 forbidden error after selecting to save. |
The Global Area Configuration page can be reached through the Settings menu (Settings > User Interface > Global Area Configuration).
After making changes, which include updating the application name and uploading the logo, on this page, click Save or Save and Close to apply the new settings.
To revert to the default settings simply remove the custom value and save.
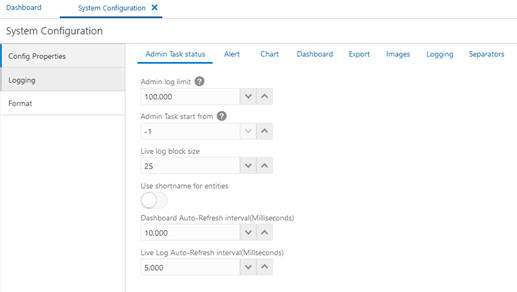
Self-Service System Configuration provides administrators with the capability to update client-side system properties from the application. The administrator can now update various properties relating to administration status tasks, alert, chart, dashboard, export, image, logging, and separators, and format properties from the application. This feature lets you manage and support your team's operational needs.
The admin user can access the self-service feature from the Settings icon available at the bottom of the left sidebar menu.
You can use the system configuration to manage the following:
Config Properties
Use this tab to manage the system parameters saved in the config.properties file for various functions such as administration status tasks, alert, chart, dashboard, export, image, logging, and separators. A form-based interface is displayed for updating the properties. Indicators for certain properties give a brief description of property.
All the numeric value property field indicate the allowed range of values for each property. The tab name appears in italics to show where the changes have be made.
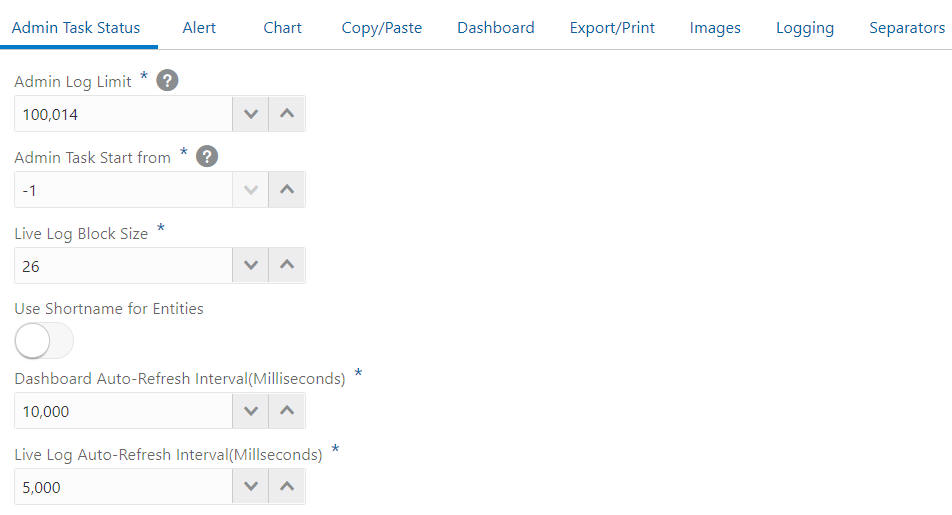
Admin Task Status
Use this tab to update the properties related to admin task status. The following properties can be updated:
Admin log Limit - Specify the number of lines in the admin logs. The range of permitted values is between 5,000 and 200,000.
Admin Task start from - Define the logging start from start (0) or end (-1) of the file.
Live Log Block Size - Enter the block size of the live log. The range of permitted values is between 20 and 30.
Use short name for entities - Toggle button to indicate whether you require short names for the entities in the status.
Dashboard Auto-Refresh interval - Update the auto-refresh interval time for the admin dashboard in milliseconds. The range of permitted values is between 1,000 and 86,400,000.
Live Log Auto-Refresh interval - Update the auto-refresh interval time for the live log. This is in milliseconds. The range of permitted values is between 1,000 and 86,400,000.
Alert
Use this tab to update the alert properties. You can update the maximum number of alerts allowed. The range of permitted values is between 1,000 and 10,000 alerts.
Chart
Use this tab to update the chart properties. The following properties can be updated:
Maximum chart series - The maximum number of series allowed in charts. The range of permitted values is between 100 and 200.
Maximum chart group - The maximum number of groups allowed to plot in charts. The range of permitted values is between 100 and 200.
X-axis Label Orientation - Select x-axis label orientation. The auto-rotate option is used to select the orientation of the x-axis labels, depending on the number of items in charts. The horizontal orientation option is used to display the x-axis label horizontally.
Copy/Paste
Use this tab to update the copy/paste properties. The following property can be updated:
Maximum selection size for Cut/Copy/Paste - Set the maximum selection size for cut, copy, paste, fill, or clear operations. The range of permitted values is between 5,000 and 15,000.
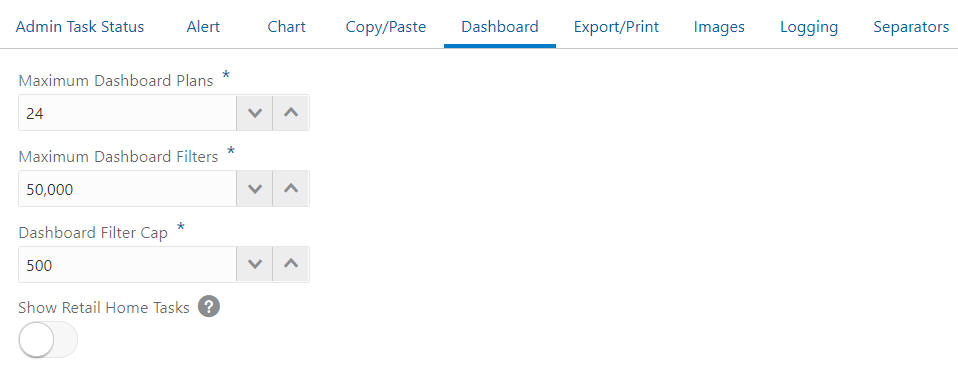
Dashboard
Use this tab to update the properties related to dashboards.
Maximum Dashboard Plans - The maximum number of plans for a dashboard. The range of permitted values is between 0 and 50.
Maximum Dashboard Filter - The maximum number of filters permitted in dashboard. The range of permitted values is between 0 and 100,000.
Dashboard Filter Cap - The filter cap for dashboard. The range of permitted values is between 0 and 1,000.
Show Retail Home Tasks - Toggle button used to show/hide retail home tasks.
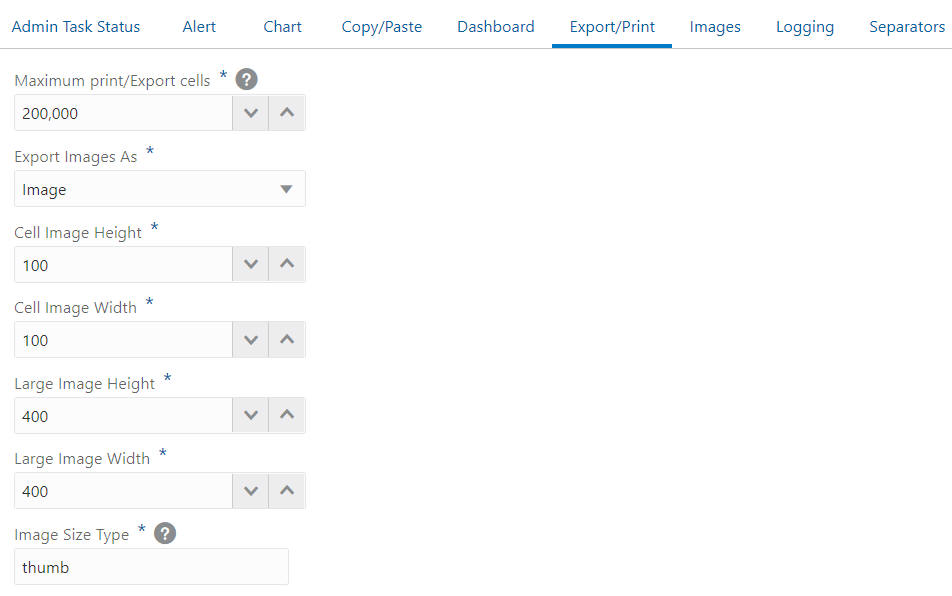
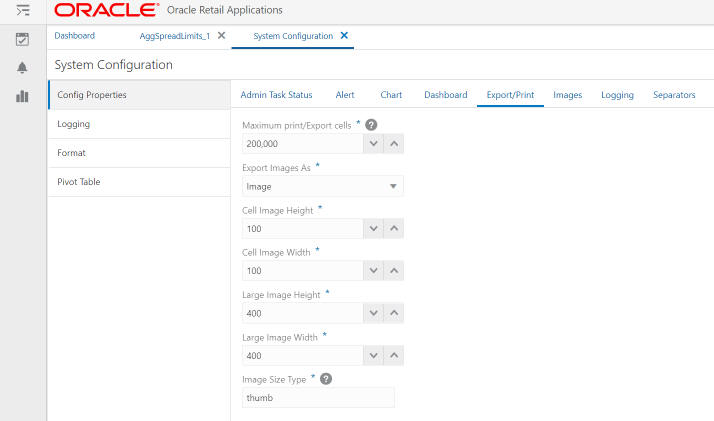
Export/Print
Use this tab to update the properties related to export and print functionality. The following properties can be updated
Maximum print/Export cells - The number of cells that can be exported from the system. The range of permitted values is between 0 and 5,000,000.
Note that in the Export/Print tab, you can set the property for the maximum print/export cells. If this property is set to 0, all the cells are exported. However, an out of memory error may occur on the server, depending on the size of the data being exported. Use this setting with caution. Users can use the export All slice feature for exporting a large amount of data.
Even if the property is set to 0 to export all the cells, the export will comply with the Excel limit. Excel supports only 1048576 rows and 16384 columns. If the data you are exporting exceeds this limit, you will see one of the following failure messages:
-There are too many rows in the view. The file cannot be exported with more than 1,048,576 rows and 16384 columns. Please reduce the amount of rows and try again.
There are too many columns in the view. The file cannot be exported with more than 1,048,576 rows and 16384 columns. Please reduce the amount of columns and try again.
Cell Image height and width - Use this to provide the cell image height and width allowed during export. The range of permitted values is between 50 and 200.
Large Image height and width - Use this to provide the large image height and width allowed during export. The range of permitted values is between 100 and 500.
Image Type - Specify the type of image to be exported in the output file.
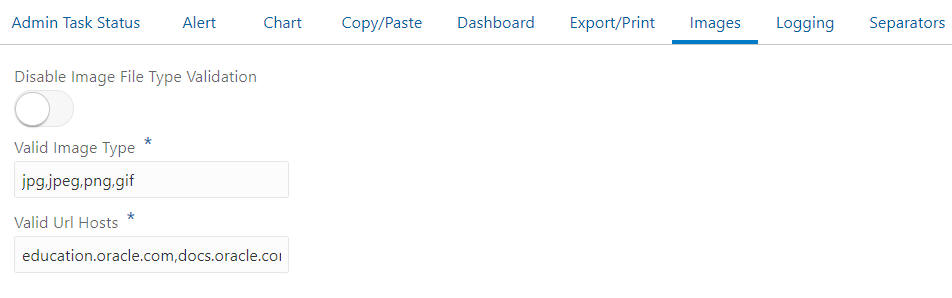
Images
Use this tab to update the following image-related properties.
Disable Image file type Validation - Toggle button to indicate whether or not you need file type validation for the images in you system.
Valid image type - The image file types that are valid for your application.
Valid Image URL hosts - The valid URL hosts for your application.
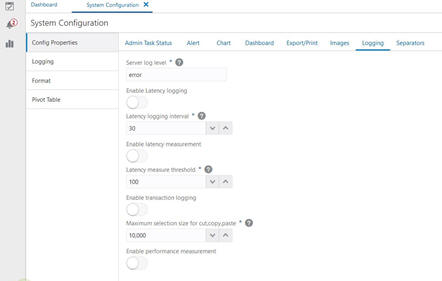
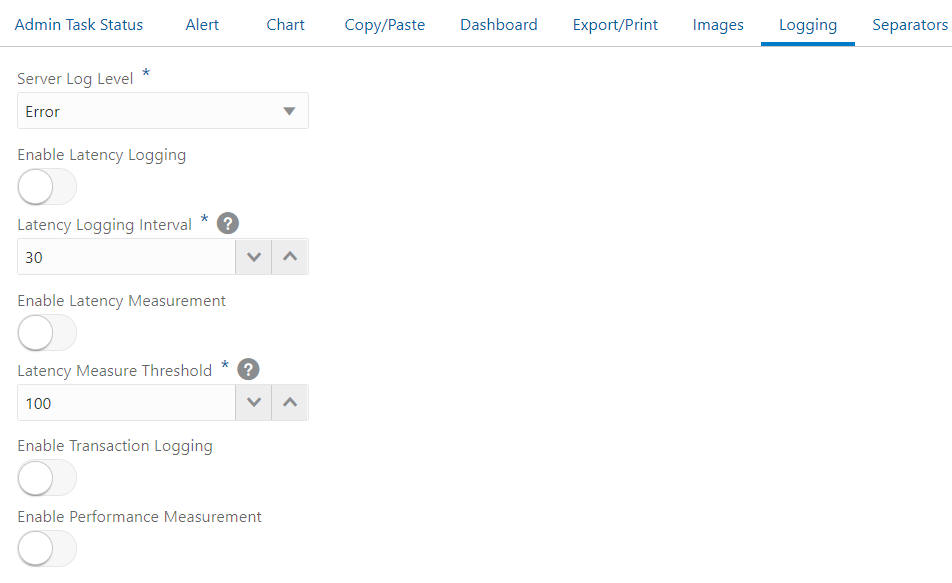
Logging Properties
Use this tab to specify the logging properties. You can update the following:
Server log levels - Update the log levels as per the requirement (i.e., info, debug, error).
Enable Latency logging - Toggle button to enable or disable latency logging.
Latency Logging interval - Set the latency logging interval between the server and browser. The range of permitted values is between 15 and 900 milliseconds.
Enable latency measurement - Toggle button to enable or disable the latency measurement.
Latency Measurement Threshold - Set the value for the maximum tolerable latency in milliseconds. The range of permitted values is between 50 and 400.
Enable transaction logging - Toggle button to enable or disable transaction logging
Enable Performance Measurement - Toggle button to enable or disable the performance measurement.
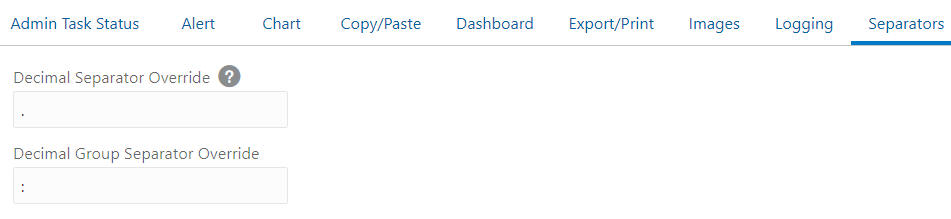
Separators
Use this tab to set the separators.
Decimal separator override
Decimal group separator override
Note the following:
Either both or neither of the separators must be defined.
The value of both the separators must be unique.
If a decimal group separator override must be a space, then you must enter the word "space" instead of the character space.
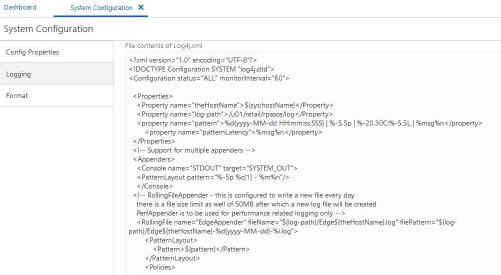
Logging Level
You can edit the log4jconfig.xml file. This file is mainly used to change the logging level of the application as needed. You can update the following:
|
Note: It is advised to only change the logging level attributes in the loggers tag and not change any other parameters. |
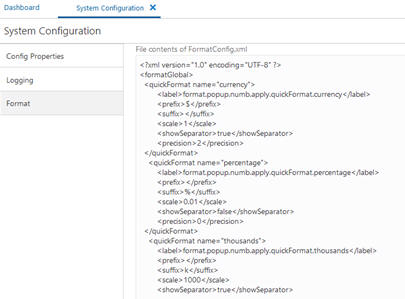
Format
Use this tab to change the FormatConfig.xml file, which controls the formatting properties for the application (that is, currency, percentage, and millions separator).
To save your changes, click Save or Save & Close.
|
Note: To apply the saved changes, you must re-log into the application. |
Figure 15-15 File Contents of FormatConfig.xml
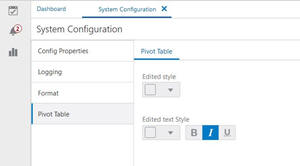
Pivot Table
Use this tab to change edited uncalculated cells format style. You can update the color of the edited cell background, edited cell text color, and style.
Note the following:
The system configuration can be edited only by one admin user at a time. If a second admin user tries to edit the configuration, the following message is displayed: "Configuration is currently being edited by <username>".
You cannot navigate to another tab if an error occurs on the current tab.
You cannot submit the page if errors occur until those errors are resolved.
The property not exposed through the Self-Service system will go through the regular service request process.
For more details about property files, refer to the sections of this chapter.
For more details about logging properties, refer to Appendix: RPASCE Client Logging Configuration.
In order to download images with Tomcat, update rpasce.properties as follows:
export CATALINA_OPTS="-Xms8g -Xmx12g
-Dhttps.proxyHost=proxyhost.int.oracleindustry.com -Dhttps.proxyPort=8081
-Dhttps.nonProxyHosts=\*.icprod.oracleindustry.com\|localhost"
Here the proxy host is proxyhost.int.oracleindustry.com and the proxy portis 8081. Further, it indicates that no proxy is required to access the localhost andany host in the icprod.oracleindustry.comdomain.
Workbook images can be exported either as Apache POI Excel images embedded into an Excel spreadsheet or as an image url link. Access Export Images As via System Configuration > Export/Print, as shown in Figure 15-17.
Each option provides a drop-down list of values for the url and the image. When the Export Image As is set to URL, the Include Images check box label will be displayed as Include Image URL in the export dialog box and the image related fields such as image width/height and maintain aspect ratio will not be displayed.
On export:
If no images are available, the link will be empty.
If the url is invalid, the link will be empty.
If the url is valid but the image is missing, the link will be shown as is.