| Oracle® Retail Predictive Application Server Cloud Edition Administration Guide Release 22.2.401.0 F72005-01 |
|

 Previous |
 Next |
| Oracle® Retail Predictive Application Server Cloud Edition Administration Guide Release 22.2.401.0 F72005-01 |
|
Previous |
Next |
This chapter details the following operational utilities of RPASCE:
This section describes the PDS Property Service task.
The PDS Property Utility service is used by the administrator to inspect and reset the properties of a PDS. The supported functions include:
Display the current value of named PDS properties
Update the property to the value provided (name=value)
To submit a task for the PDS property utility, complete the following steps:
From Administration > Online Administration Tools > Submit an New Admin Task select System Admin Tasks, as shown in Figure 12-1, and click Next.
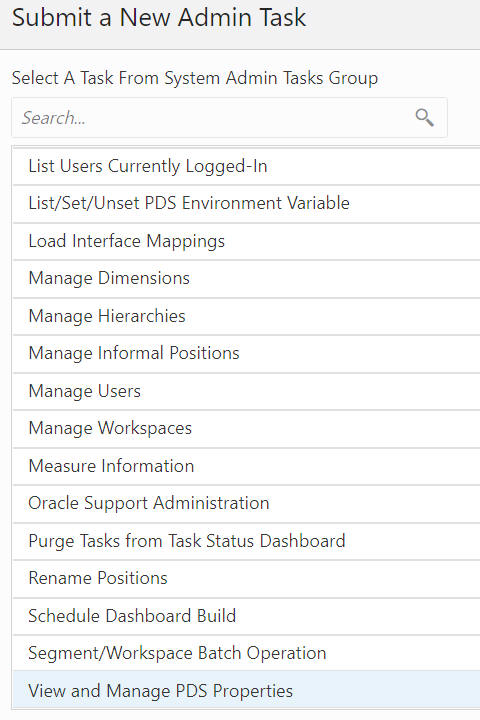
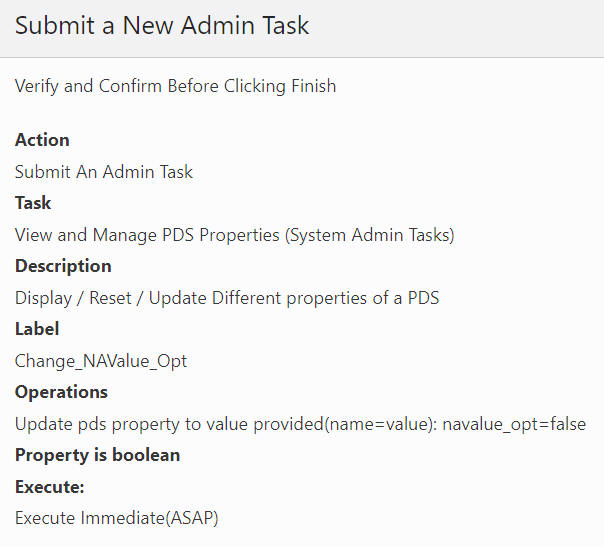
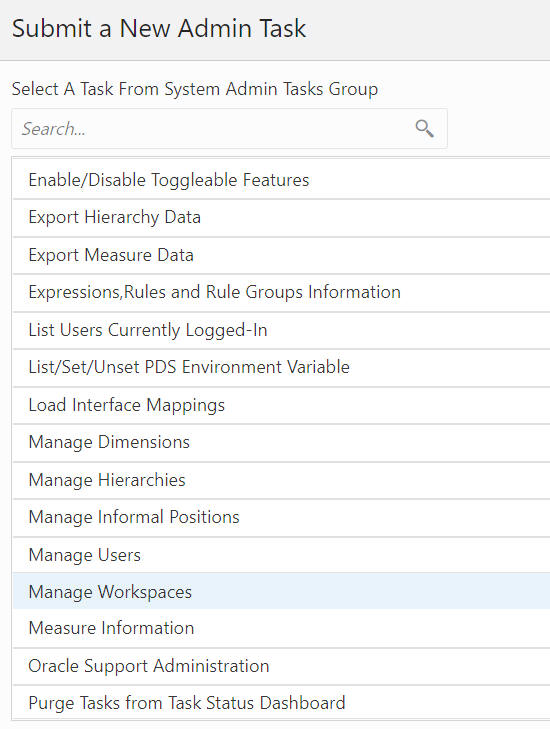
From the list of all available system administration tasks shown in Figure 12-2, select View and Manage PDS Properties and click Next.
Enter a descriptive label in the Task Label text box.
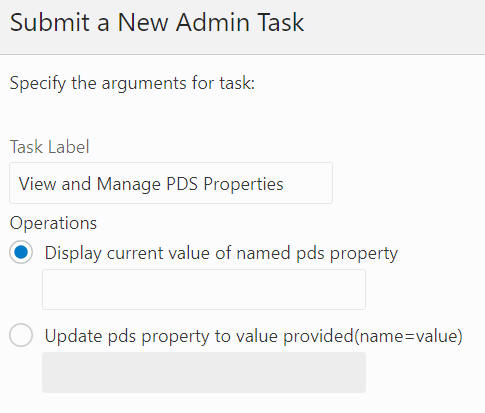
Select from the following operations shown in Figure 12-3:
Each available task may also have extra input boxes for the administrator to provide arguments for that task.
To display the current value of a particular PDS property, complete the following steps.
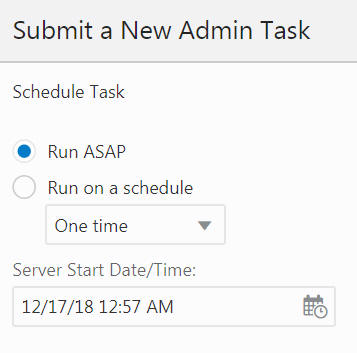
Once you have entered the task label and selected Display current value of named PDS property, you see Schedule Task shown in Figure 12-4, where you can run the task ASAP or on a schedule. If you choose to run on a schedule, you can select a frequency or a specific start and stop date and time.
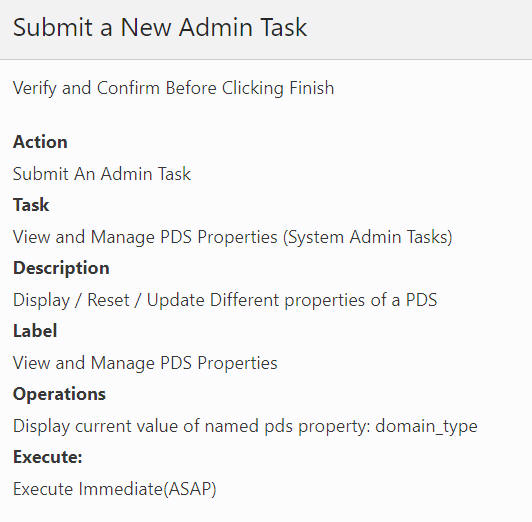
Click Next to navigate to the next page shown in Figure 12-5, where you verify and confirm the task information entered.
Click Previous to make changes or Finish to submit the task.
You see the just-scheduled task in the dashboard shown in Figure 12-6.
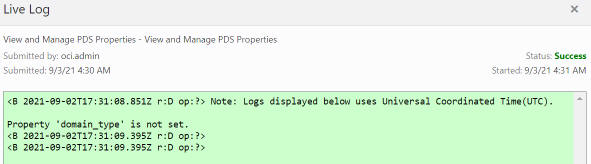
Select the task and click Watch Live Log to view the logs, as shown in Figure 12-7. Alternatively, click Download Log to download the log file.
To update the value of a particular PDS property, complete the following steps.
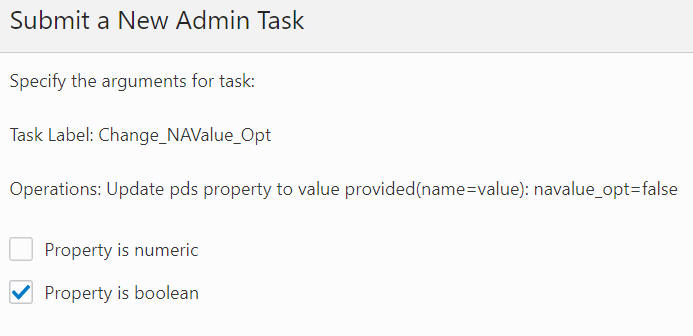
Once you have entered the task label, select Update property to value provided and type in the name=value expression in the input box right beneath it.
Click Next. Specify the value type of the property. For the property navalue_opt, select boolean or numeric, as shown in Figure 12-8.
You see Schedule Task as shown in Figure 12-9, where you can run the task ASAP or on a schedule. If you choose to run on a schedule, you can select a frequency or a specific start and stop date and time.
Click Next to navigate to the next page, where you verify and confirm the task information entered, as shown in Figure 12-10.
Click Previous to make changes or Finish to submit the task.
You see the just-scheduled task in the dashboard, as shown in Figure 12-11.
Click the task to see the log.
Available PDS Properties
Table 12-1 Available PDS Properties
| Property Name | Type | Description |
|---|---|---|
|
commit_asap_deadline |
Time |
Indicates the time of the day when a timeout has occurred for all outstanding commit ASAP operations.If a commit ASAP operation is submitted after this time, a timeout will not occur until the deadline on the next day.This string must have the following format:HH:MMFor example, 13:30 refers to 1:30 PM. The default value is 00:01 in GMT. |
|
max_active_wb_per_user |
Integer |
The maximum number of workbooks that can be opened simultaneously for a user is determined by this PDS property. The actual count is one more than the value for the property to account for dashboard workbooks that are automatically opened when the user logs in. |
|
ovr_def_admin_privileges |
Boolean |
Using the Security Administration workbook, administrators can set workbook template access for every user in the system. Non-administrative users cannot access the workbook templates to which they have not explicitly been given access. However, if a user is an administrator, by default, that user can see all the workbooks in the system. Some retailers want to prevent this from happening. Reasons for this include reducing clutter and having different kind of administrators manage different administrative tasks in their RPASCE systems. The ability to control template access for administrators from the Security Administration workbook is made possible by setting this PDS property to true. By default, this property is false. |
|
subgroup_max_parallel |
Integer |
The mace utiltiy runs in parallel, using up to the given value of subgroup_max_parallel where its value is an integer greater than 0. |
Customers previously set the RPAS_TODAY and RPAS_LOG_LEVEL environment variables as global settings. These settings were then applied to all their tasks and operations scheduled through OAT. In order to accomplish this, customers contacted a cloud administrator (or raise an SR); the administrator would then set these environment variables and restart all services.
Now, the RPAS_PDS_TIMEZONE setting helps customers whose home time zone is distant from Greenwich Mean Time to set their chosen local time zone. All Oracle servers are required to run using the GMT time zone setting for the server. For customers who want to have the batches, system downtime, system availability, and RPASCE values such as today and now to be calculated based on their own chosen time zone rather than GMT, this setting may be used.
Customers themselves can set these variables using the OAT task (as a PDS property and not as an environment variable). They do not need to call a cloud administrator or raise an SR. Once the customer has set the variables, these properties are applied to all processes. In order for the RPAS_PDS_TIMEZONE time change to take effect, ldip must be restarted after changing RPAS_PDS_TIMEZONE.
|
Note: The following priority order list is adhered to by these settings:
|
You can access the List/Set/Unset PDS Environment Variables task by selecting the option List/Set/Unset PDS Environment Variables from System Admin Tasks. You see the Submit An Admin Task dialog box, as shown in Figure 12-12.
Figure 12-12 List/Set/Unset PDS Environment Variables Task
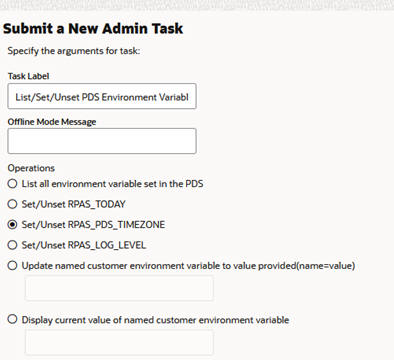
The following options are available:
List all environment variable set in the application. Use this option to see the current values for the RPAS_TODAY and or RPAS_LOG_LEVEL. This also lists the timezone property, if set.
Set/Unset RPAS_TODAY. Use this option to manage the RPAS_TODAY application property.
Set/Unset RPAS_LOG_LEVEL. Use this option to manage the RPAS_LOG_LEVEL PDS property.
Set/Unset RPAS_PDS_TIMEZONE. Use this option to manage the RPAS_PDS_TIMEZONE property.
When you select Set/Unset RPAS_TODAY and click Next, you see the dialog box shown in Figure 12-13.
Figure 12-13 RPAS_TODAY Additional Options
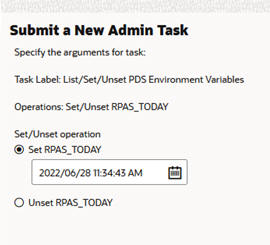
The following additional options are available:
Set RPAS_TODAY. With this option and with the date selection, you can set the RPAS_TODAY PDS property.
Unset RPAS_TODAY. Use this option to clear the RPAS_TODAY PDS property.
If you selected Set/Unset RPAS_LOG_LEVEL in the first option page, you see the dialog box shown in Figure 12-14.
Figure 12-14 RPAS_LOG_LEVEL Additional Options
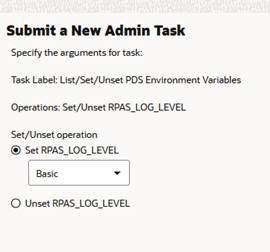
The following additional options are available:
Set RPAS_LOG_LEVEL. With this option and the level drop-down list, you can set the RPAS_LOG_LEVEL application property.
Unset RPAS_LOG_LEVEL. Use this option to clear the RPAS_LOG_LEVEL application property.
Note that this task is automatically run in offline mode. As a result, all non-administrative users will be logged off and the task will be executed. This prevents users from running any batch or workbook operations while these settings are updated in the application.
If you selected Set/Unset RPAS_PDS_TIMEZONE in the first option page, you see the dialog box shown in Figure 12-15.
Figure 12-15 RPAS_PDS_TIMEZONE Additional Options
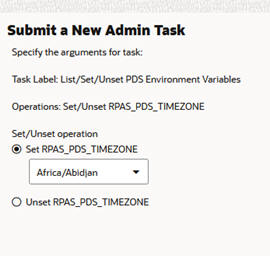
The following additional options are available:
Set RPAS_PDS_TIMEZONE. With this option and the timezone drop-down list, you can set the RPAS_PDS_TIMEZONE. The values shown in the drop-down list are all the standard timezone names recognized by the system.
Unset RPAS_PDS_TIMEZONE.Clear the RPAS_PDS_TIMEZONE PDS property using this option.
The mace service (Multi-Dimensional Array Calculation Engine) is for informational use only. The administrator can use the service to inspect the rule and rule group information currently configured in the application. It does not allow the administrator to modify any existing rule or rule groups or run any expressions or rule groups in the application to modify application measure data. The supported functions include:
Search for a specific string
Print the specified rule
Print the specified rule group
Print all rule and rule groups
To submit a mace service task, complete the following steps:
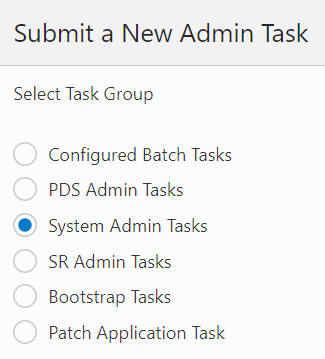
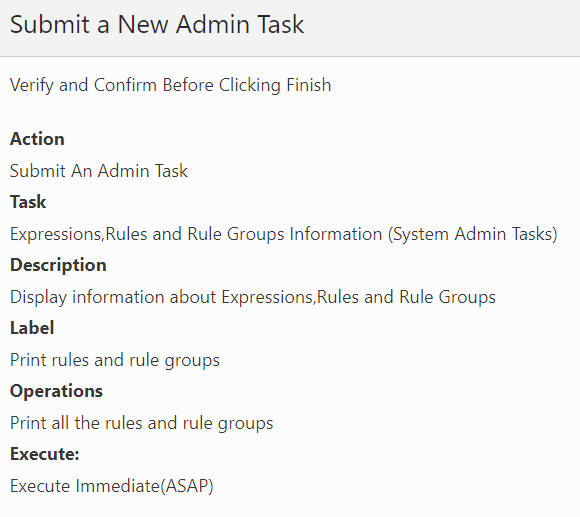
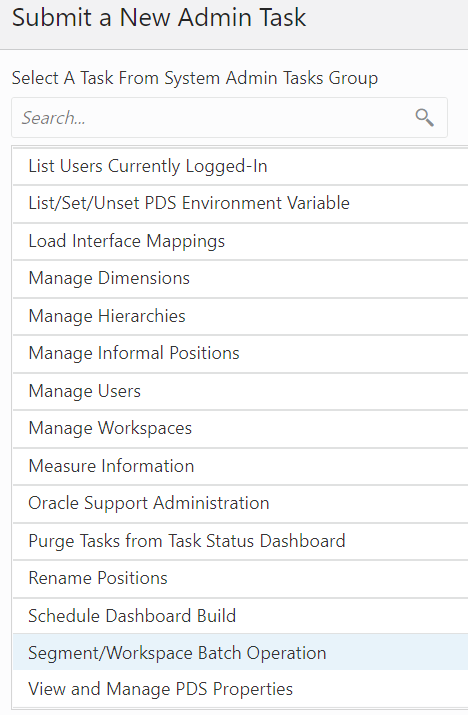
From Administration > Online Admin Tools > Submit a New Admin Task, select System Admin Tasks, as shown in Figure 12-16, and click Next.
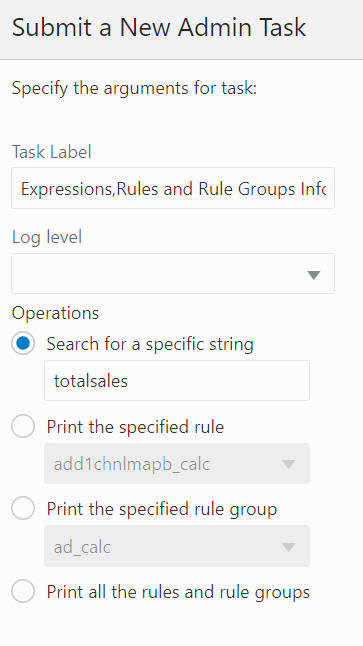
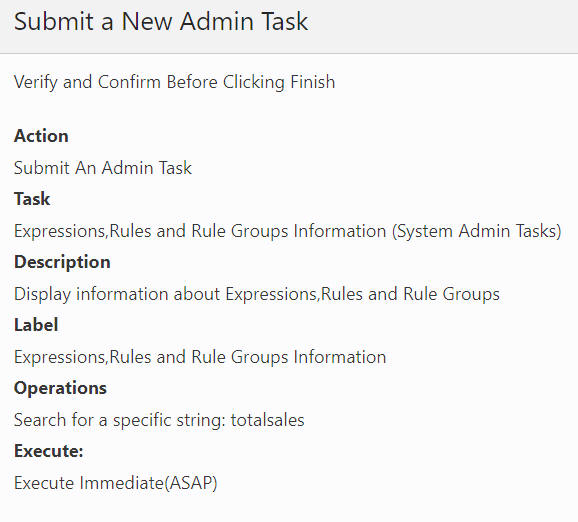
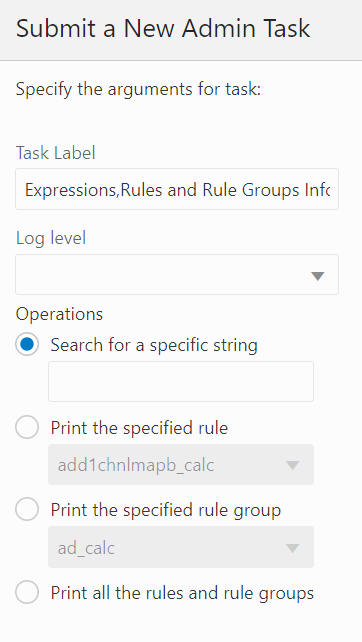
From the list of all available system administration tasks shown in Figure 12-17, select Expressions, Rules, and Rule Groups Information and click Next.
Figure 12-17 System Administration Tasks

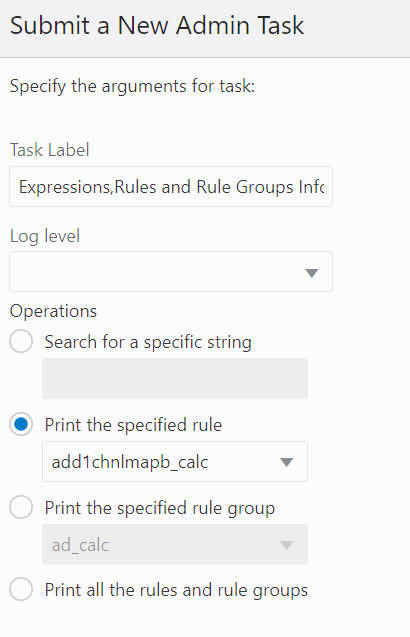
Enter a descriptive label in the Task Label text box.
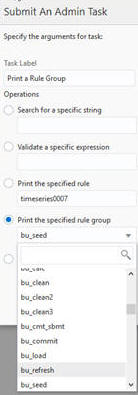
Select an operation from the following list of operations., as shown in Figure 12-18.
Search for a specific string
Print the specified rule
Print the specified rule group
Print all the rules and rule groups
Figure 12-18 Search for a Specific String Operation
This service finds all occurrences of a user-specified string in all the expressions configured in the application. The string search is case insensitive. If a user searches for "ttlsales", expressions such as "TtlSales=..." and "TTLSALES = ..." will be identified. A user can search for any meaningful text in the expressions, not just measure names. For example, a user can search for function names to show all expressions configured to evaluate that function. Or a user can search for a modifier such as "level([clnd].[week])" to show all expressions that used that modifier.
The most common use for this function is to discover how a certain measure is calculated or referenced by rules configured in the application. In this case, the administrator can search for the measure name as a string. Mace will return all rules that reference the measure.
Select Search for a specific string, enter the search term (here, TotalSales) in the Search for a specific string text box, as shown in Figure 12-19, and click Next.
You see Schedule Task, shown in Figure 12-20, where you can run the task ASAP or on a schedule. If you choose to run on a schedule, you can select a frequency or a specific start and stop date and time.
Click Next to navigate to the next page, where you verify and confirm the task information entered, as shown in Figure 12-21.
Click Previous to make changes or Finish to submit the task.
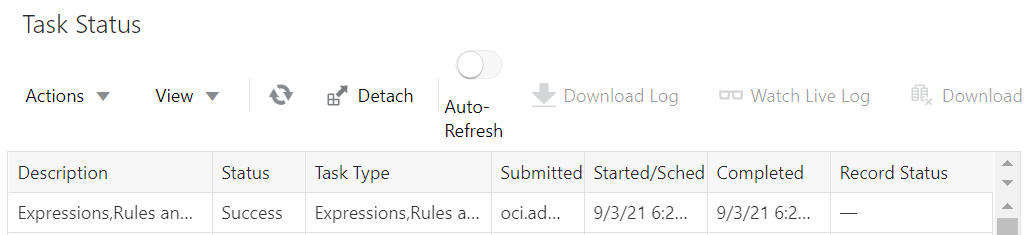
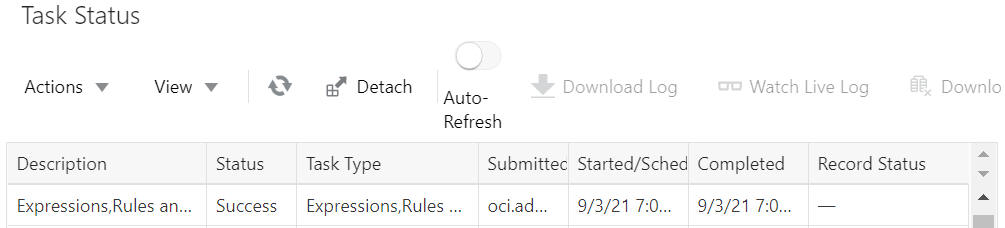
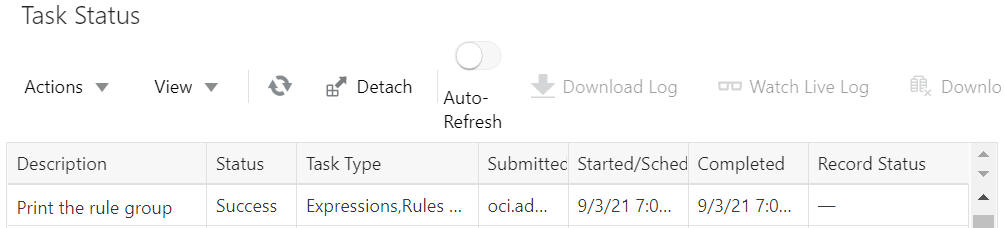
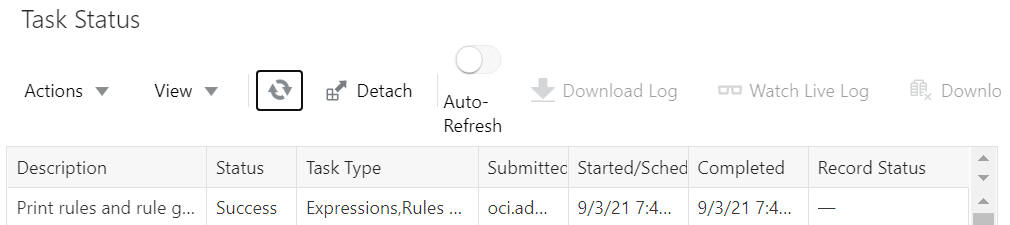
You see the just-scheduled task in the dashboard, as shown in Figure 12-22.
Select the task and click Watch Live Log to view the logs. Alternatively, click Download Log to download the log file and search for measure name totalsales in the log file that is named after the task type.
This service prints out all the configured expressions in the user-specified rule. The administrator can use this service to inspect the content of the rule.
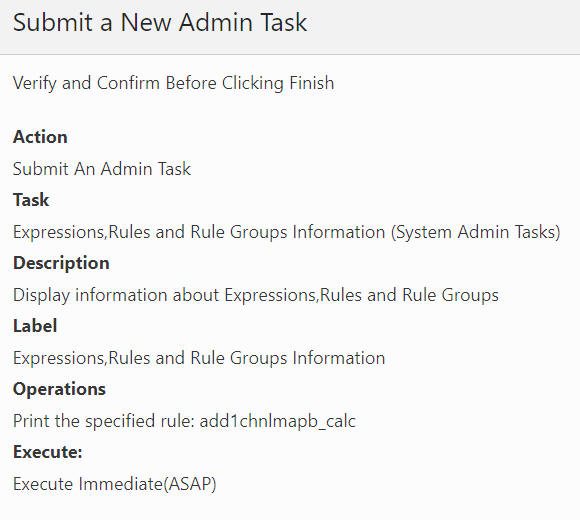
Select Print the specified rule, enter the rule name to be printed, as shown in Figure 12-23, and click Next.
Figure 12-23 Print Operation for Specified Rule
You see Schedule Task, shown in Figure 12-24, where you can run the task ASAP or on a schedule. If you choose to run on a schedule, you can select a frequency or a specific start and stop date and time.
Click Next to navigate to the next page, where you verify and confirm the task information entered, as shown in Figure 12-25.
Click Previous to make changes or Finish to submit the task.
You see the just scheduled task in the dashboard, as shown in Figure 12-26.
Select the task and click Watch Live Log to view the logs. Alternatively, click Download Log to download the log file.
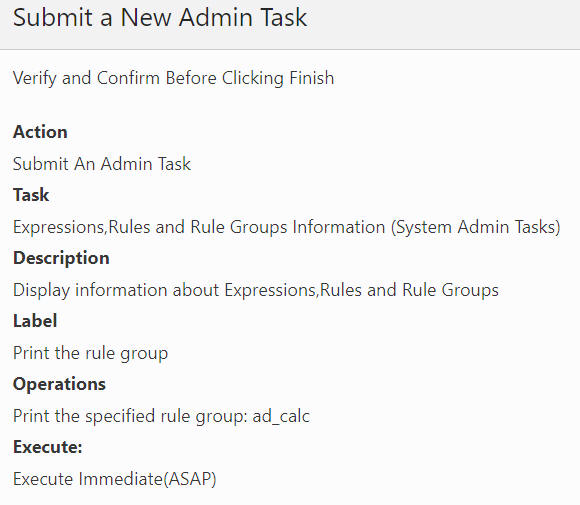
This mace service prints out all rules and the expressions configured for a particular rule group. The administrator can use this service to inspect the content of a complete rule group.
Select Print the specified rule group, enter the rule group name to be printed, and click Next, as shown in Figure 12-27.
You see Schedule Task, shown in Figure 12-28, where you can run the task ASAP or on a schedule. If you choose to run on a schedule, you can select a frequency or a specific start and stop date and time.
Click Next to navigate to the next page, where you verify and confirm the task information entered, as shown in Figure 12-29.
Click Previous to make changes or Finish to submit the task.
You see the just-scheduled task in the dashboard, as shown in Figure 12-30.
Select the task and click Watch Live Log to view the logs. Alternatively, click Download Log to download the log file.
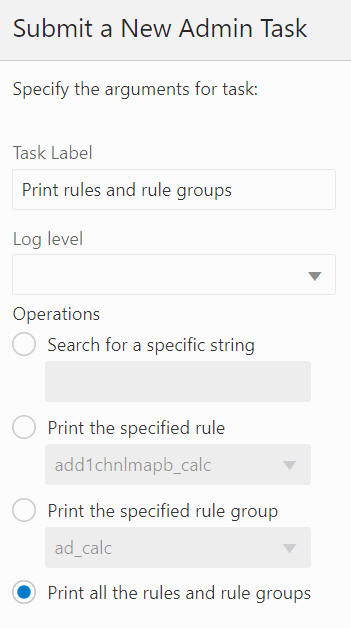
This mace service prints out all the expressions configured for all rule groups in the application. The administrator can use this service to inspect the content of all rule groups.
Select Print all the rules and rule groups, as shown in Figure 12-31, and click Next.
Figure 12-31 Print All Rule Groups Arguments
You see Schedule Task, shown in Figure 12-32, where you can run the task ASAP or on a schedule. If you choose to run on a schedule, you can select a frequency or a specific start and stop date and time.
Click Next to navigate to the next page, where you verify and confirm the task information entered, as shown in Figure 12-33.
Click Previous to make changes or Finish to submit the task.
You see the just-scheduled task in the dashboard, as shown in Figure 12-34.
Select the task and click Watch Live Log to view the log. Alternatively, click Download Log to download the log file.
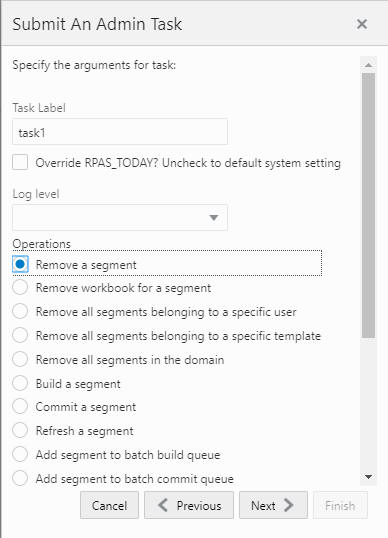
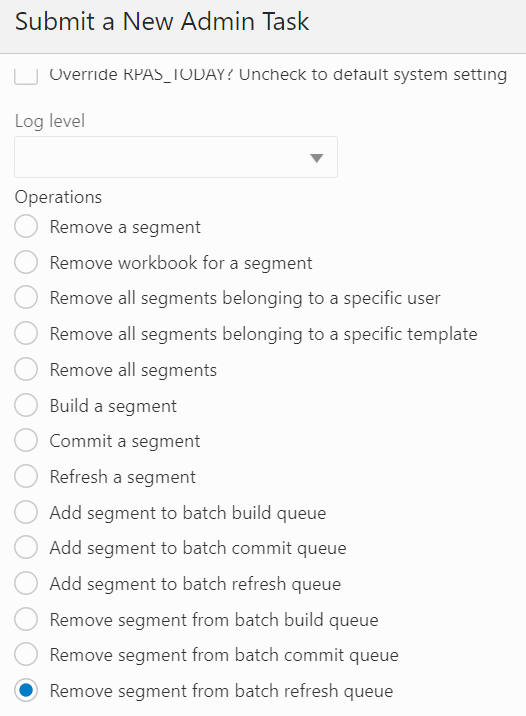
The Segment/Workspace Batch Operation Task, highlighted in Figure 12-35, is used by the administrator to perform the following operations.
Figure 12-35 Segment/Workspace Batch Operation Task
Remove a segment
Remove a workbook for a segment
Remove all segments belonging to a specific user
Remove all segments belonging to a specific template
Remove all segments
Build a Segment
Commit a segment
Refresh a segment
Add a segment to the batch build queue
Add a segment to the batch commit queue
Add a segment to the batch refresh queue
Remove a segment from the batch build queue
Remove a segment from the batch commit queue
Remove a segment from the batch refresh queue
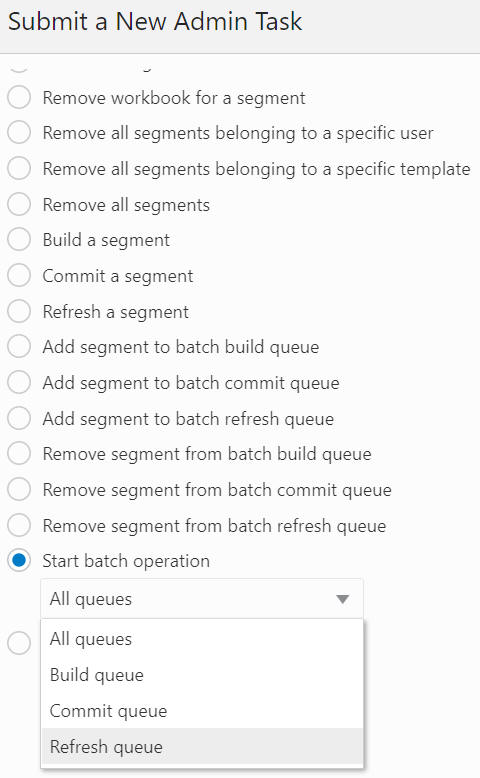
Start a batch operation on all/build/commit/refresh queues
Print a segment in all/build/commit/refresh queues
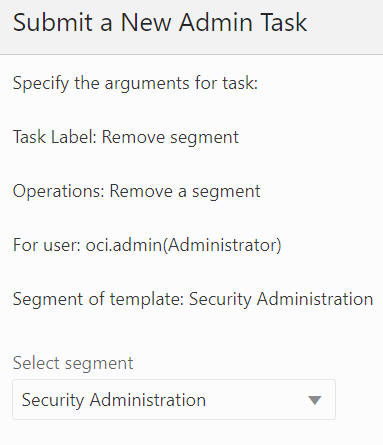
Remove a Segment
The Remove Segment option, shown in Figure 12-36, is used to select the segment from the drop-down list and remove the segment from the application, as shown in Figure 12-37 and Figure 12-38. It also deletes all the workbooks that are built based on this segment.
Figure 12-37 Remove a Segment Argument: Select User and Template
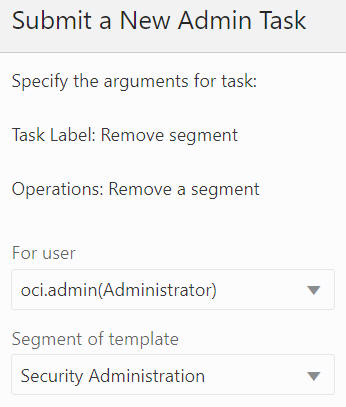
Figure 12-38 Remove a Segment Task Argument: Select Segment
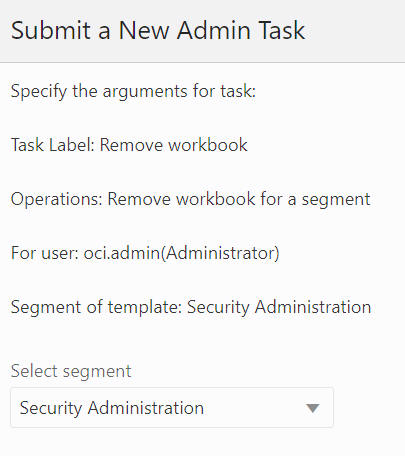
Remove Workbook for a Segment
The Remove Workbook for a Segment option, shown in Figure 12-39, is used to select the segment and delete its workbook, as shown in Figure 12-40 and Figure 12-41, built based on this selected segment, while this segment remains.
Figure 12-39 Remove Workbook for a Segment
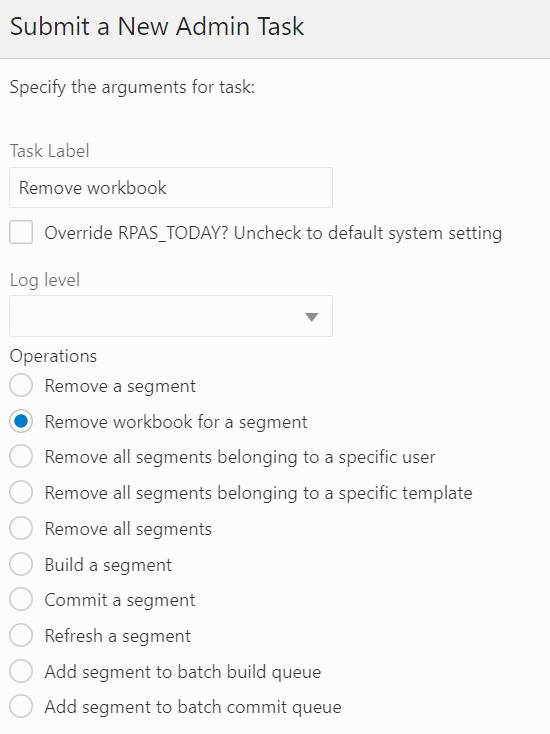
Figure 12-40 Remove Workbook for a Segment: Select User and Template
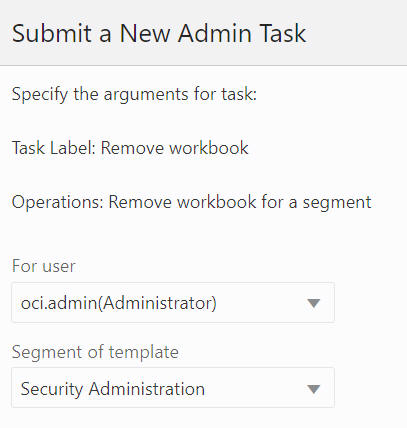
Figure 12-41 Remove Segment Task Argument: Select Segment
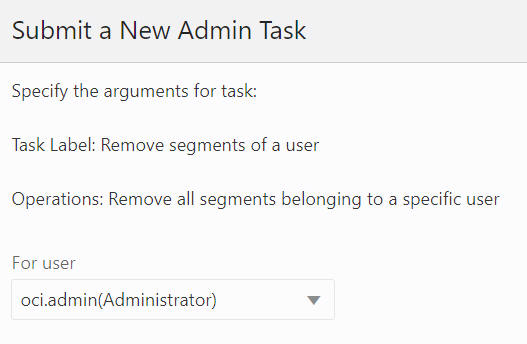
Remove All Segments Belonging to a Specific User
The Remove All Segments Belong to a specific User, shown in Figure 12-42 and Figure 12-43, option is used to select the user from the drop-down list and remove all the segments belonging to that specific user from the application.
Figure 12-42 Remove All Segments Belonging to Specific User
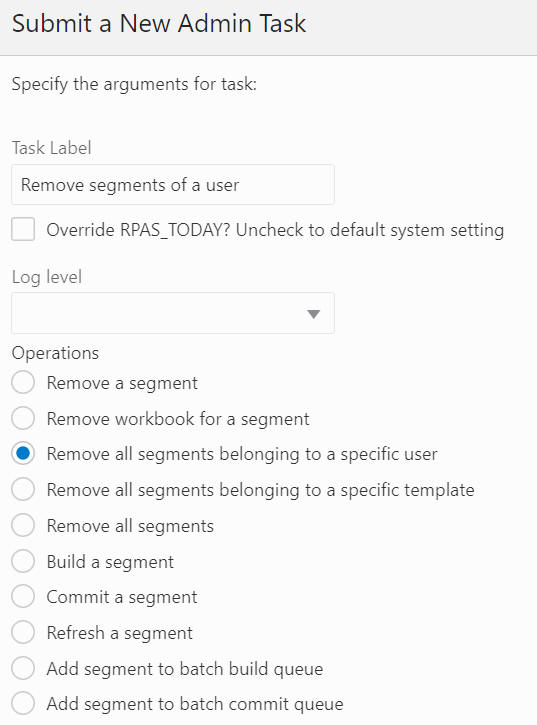
Figure 12-43 Remove All Segments Belonging to a Specific User Task Argument: Select User
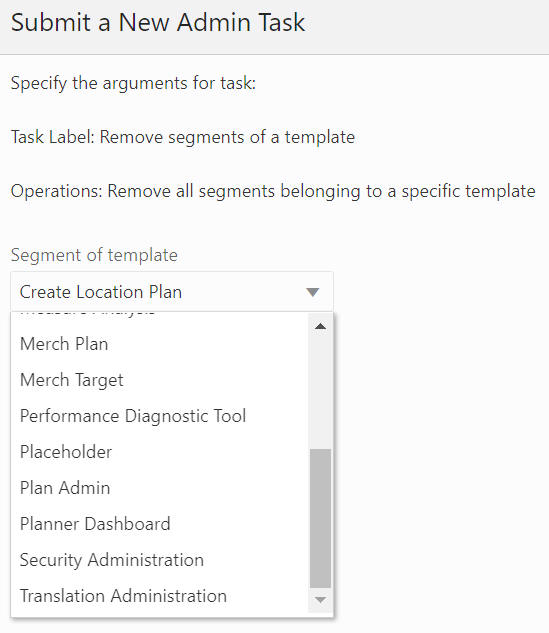
Remove All Segments Belonging to a Specific Template
The Remove All Segments Belonging to a Specific Template option, shown in Figure 12-44 and Figure 12-45, is used to select the template from the drop-down list and remove all the segments belonging to that specific template from the application.
Figure 12-44 Remove Segments Belonging to Specific Template
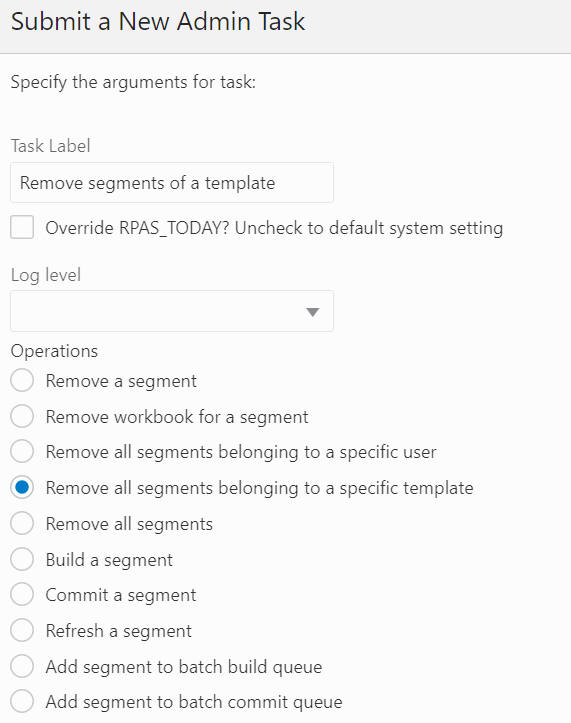
Figure 12-45 Remove All Segments Belonging to a Specific Template Task Argument: Select Template
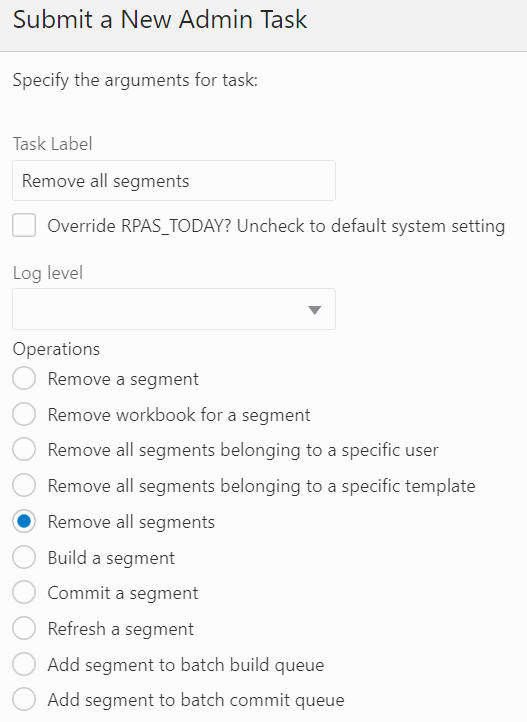
Remove All Segments
The Remove All Segments option, shown in Figure 12-46, is used to remove all the segments in the application.
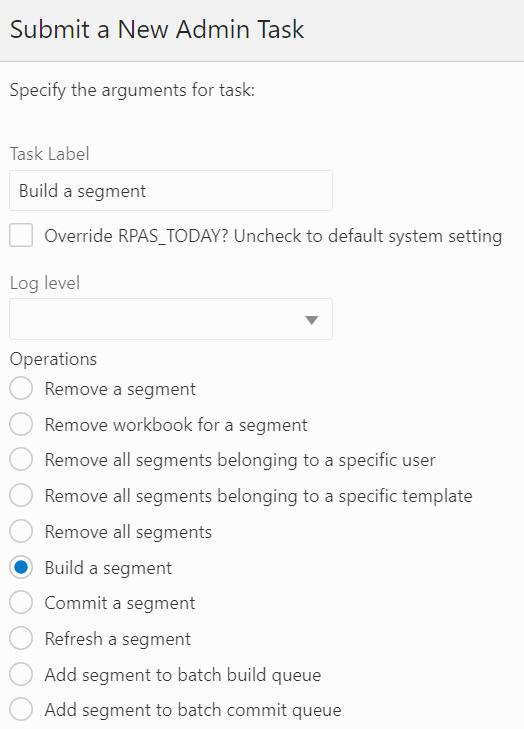
Build a Segment
The Build a Segment option, shwon in Figure 12-47 and Figure 12-48, is used to select a segment from the segment drop-down list and build a workbook based on it. The segments that already have their associated workbook are filtered from this drop-down list.
|
Note: This online administration task can also be used to schedule all the administration templates (for example, Performance Diagnostic Tools, Security Administration, Translation Administration, and Measure Analysis). |
If the user defines a segment by specifying Rolling Calendar PQD on the calendar wizard, and then uses OAT to schedule a segment build, the actual calendar positions included in the built segment will be the result of the evaluation of the Rolling Calendar PQD at the time of the actual segment build. For example, the user defines the segment at the time 2020 Jan 01, and specifies that two days after the day must be included in the segment, (assuming the calendar wizard is at DAY) level. Then, the user schedules the segment to be rebuilt on 2020 March 1st. The actual days included in the built segment in this case would be March 1st, 2nd, 3rd of 2020.
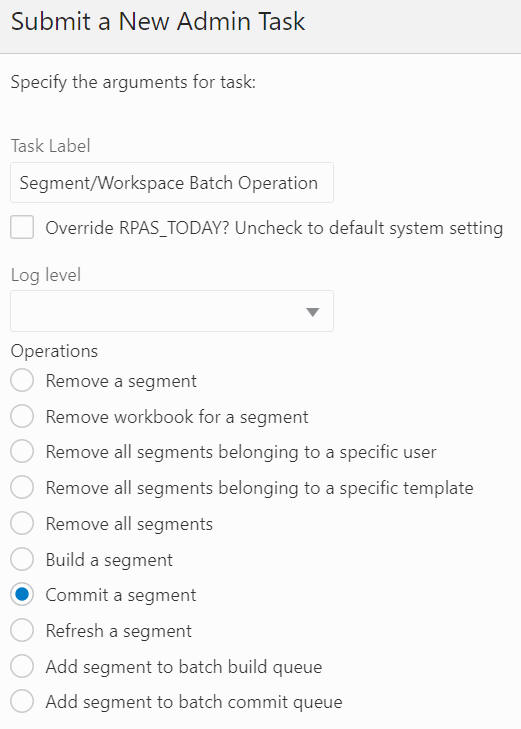
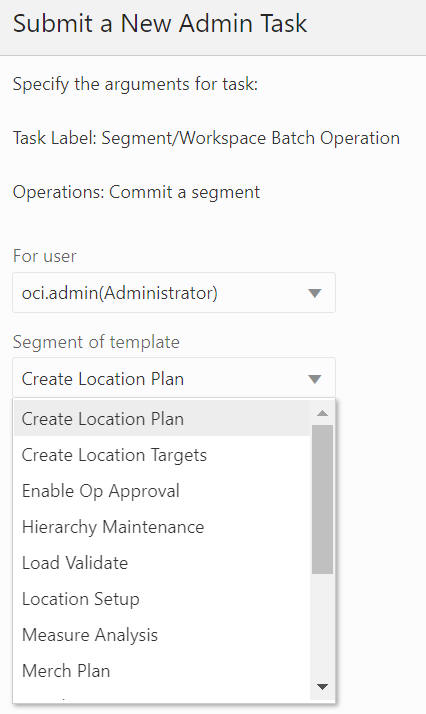
Commit a Segment
The Commit Segment option, shown in Figure 12-49 and Figure 12-50, is used to select a segment and commit its change in the workbook to the application. The drop-down list only retains those segments that have their associated workbooks in the application. If this segment is in the commit queue, it will be taken out once this commit operation completes.
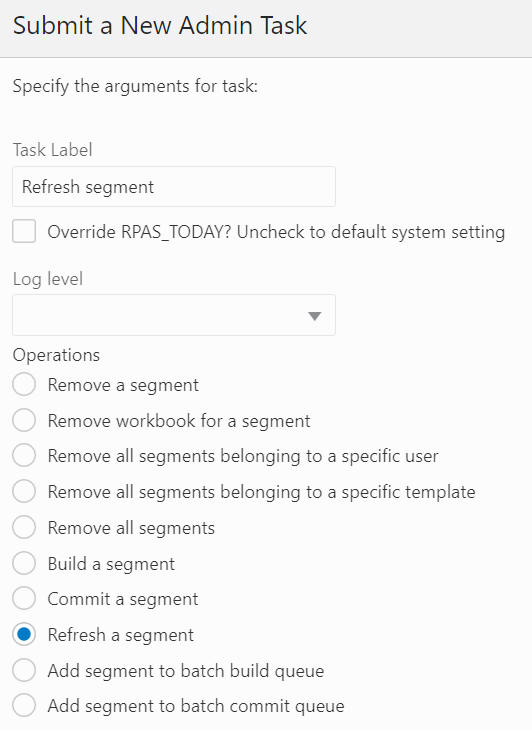
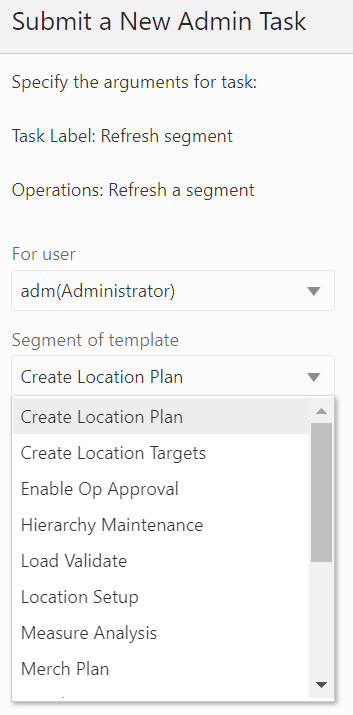
Refresh a Segment
The Refresh a Segment option, shown in Figure 12-51 and Figure 12-52, is used to select a segment and refresh its workbook data from the application. The drop-down list only retains those segments that have their associated workbooks in the application.
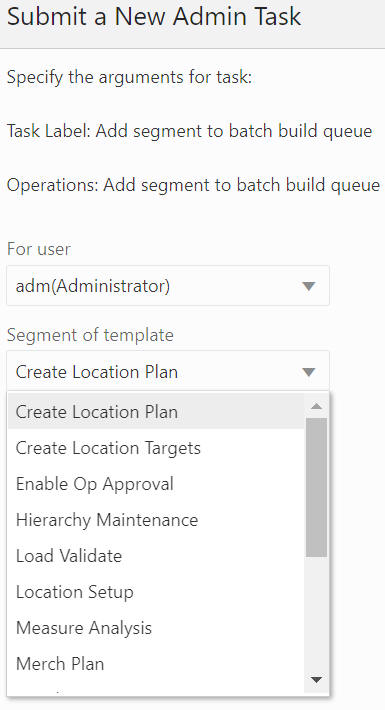
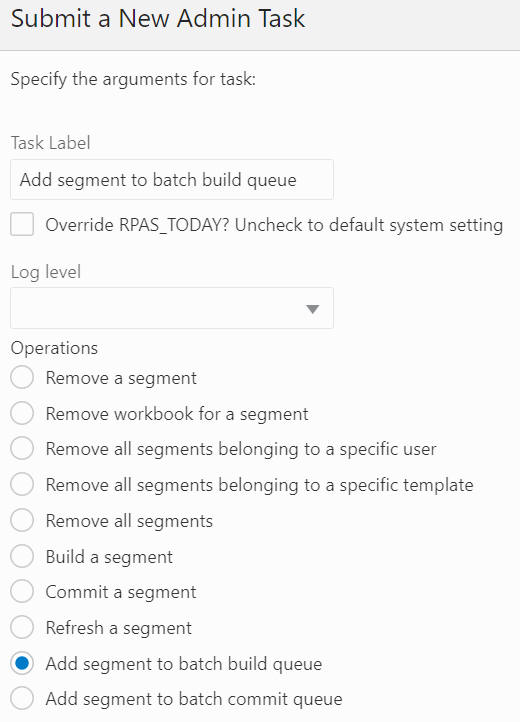
Add Segment to Batch Build Queue
The Add Segment to Batch Build Queue option, shown in Figure 12-53 and Figure 12-54, is used to add the selected segments to the build queue. The segment list includes all the segments in the application, and it supports multiple segment selection operation.
Figure 12-53 Add Segment to Batch Build Queue
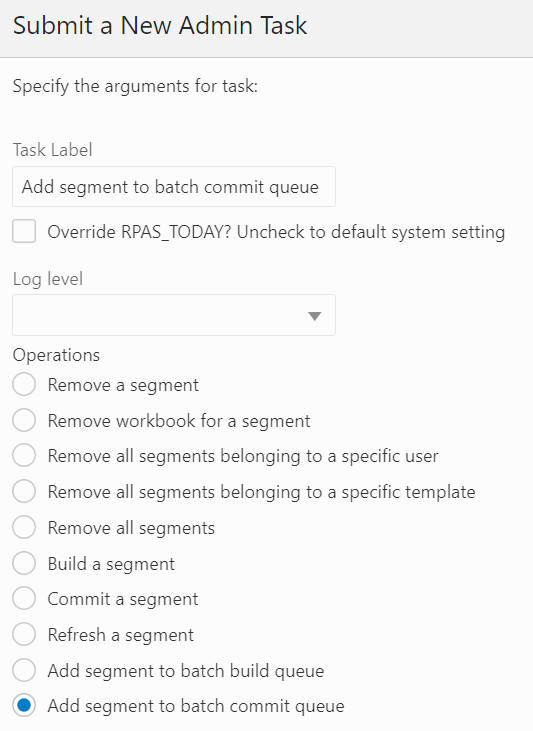
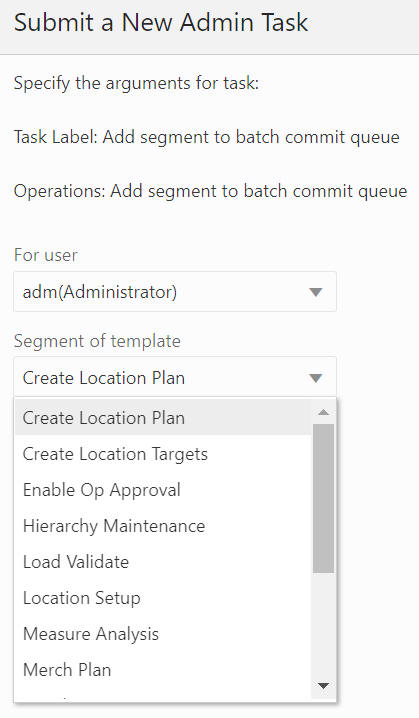
Add Segment to Batch Commit Queue
The Add Segment to Batch Commit Queue option, shown in Figure 12-55 and Figure 12-56, is used to add the selected segments to the commit queue. The segment list includes all the segments that have their associated workbook in the application, and it supports multiple segment selection operation.
Figure 12-56 Segment Batch Commit Queue Arguments
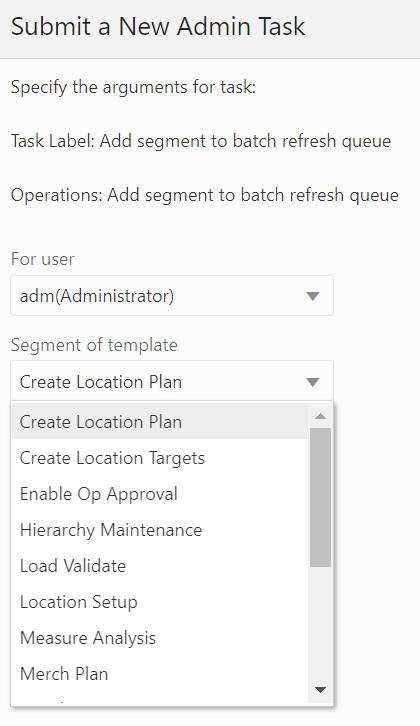
Add Segment to Batch Refresh Queue
The Add Segment to Batch Refresh Queue option, shown in Figure 12-57 and Figure 12-58, is used to add the selected segments to the refresh queue. The segment list includes all the segments that have their associated workbook in the application, and it supports multiple segment selection operations.
Figure 12-57 Add Segment to Batch Refresh Queue
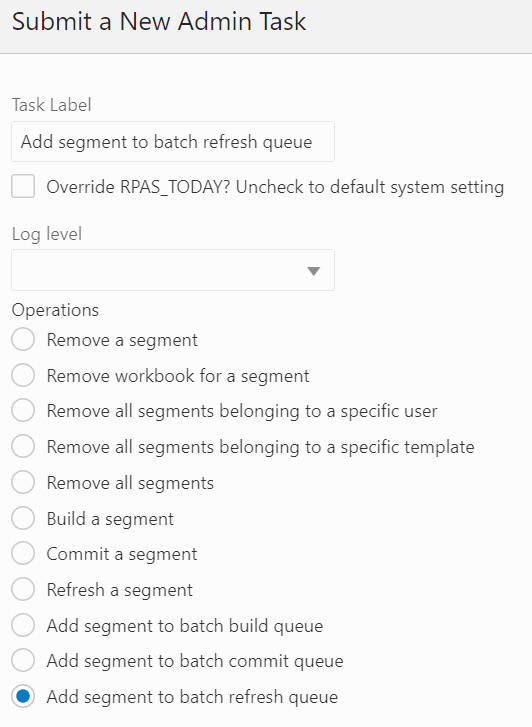
Figure 12-58 Add Segment to Batch Refresh Queue Arguments
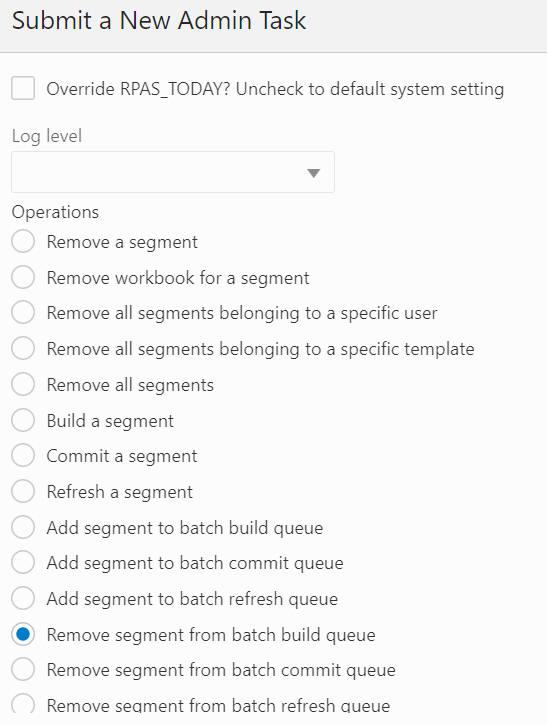
Remove Segment from Batch Build Queue
The Remove Segment from Batch Build Queue option, shown in Figure 12-59 and Figure 12-60, is used to remove the selected segments from the build queue. The segment list includes all the segments in the application, and it supports multiple segment selection operations. If the selected segment is not in the queue, it will provide a warning message in the output log file.
Figure 12-59 Remove Segment from Batch Build Queue
Remove Segment from Batch Commit Queue
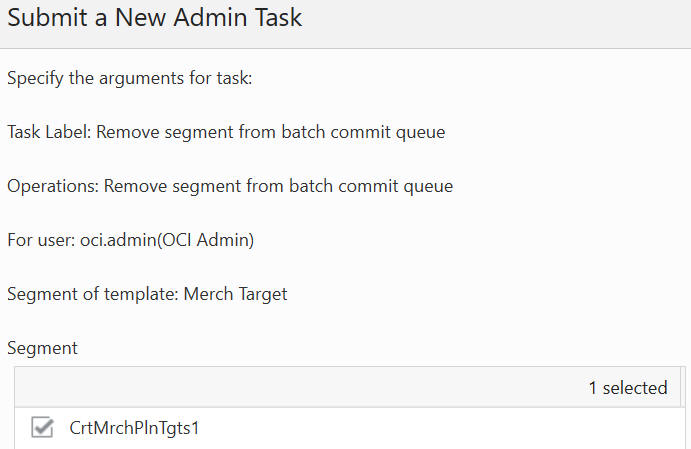
The Remove Segment from Batch Commit Queue option, shown in Figure 12-61, Figure 12-62, and Figure 12-63, is used to remove the selected segments from the commit queue. The segment list includes all the segments that have their associated workbook in the application, and it supports multiple segment selection operations. If the selected segment is not in the queue, it will provide a warning message in the output log file.
Figure 12-61 Remove Segment from Batch Commit Queue
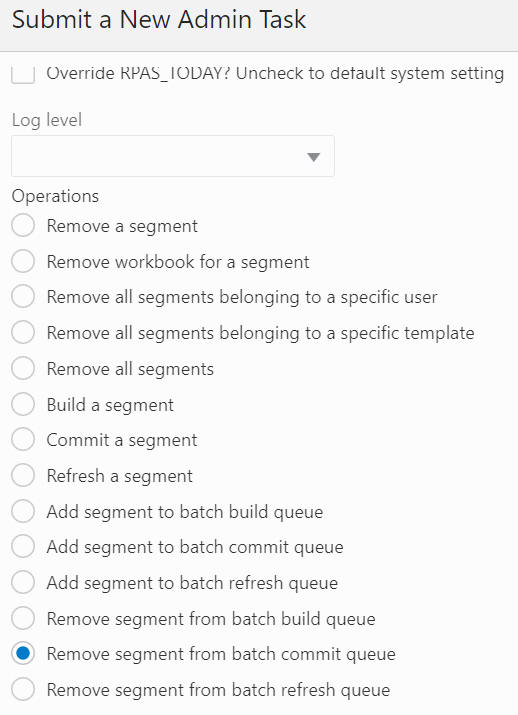
Figure 12-62 Remove Segment from Batch Commit Queue Arguments: Select User and Template
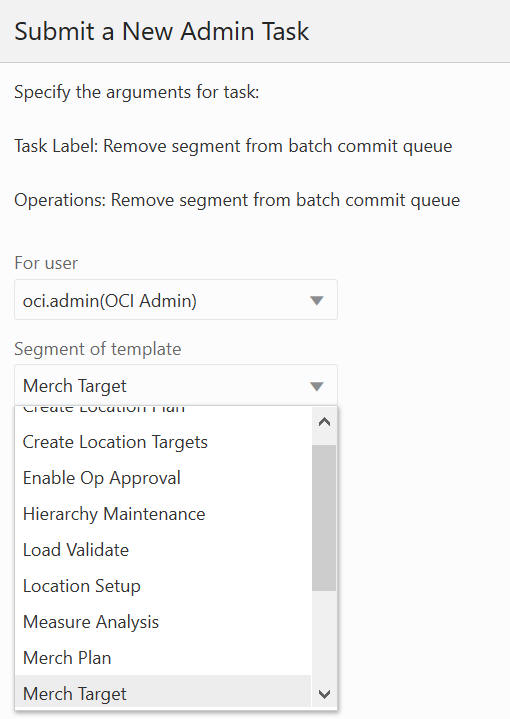
Figure 12-63 Remove Segment form Batch Commit Queue Argument: Select Segment
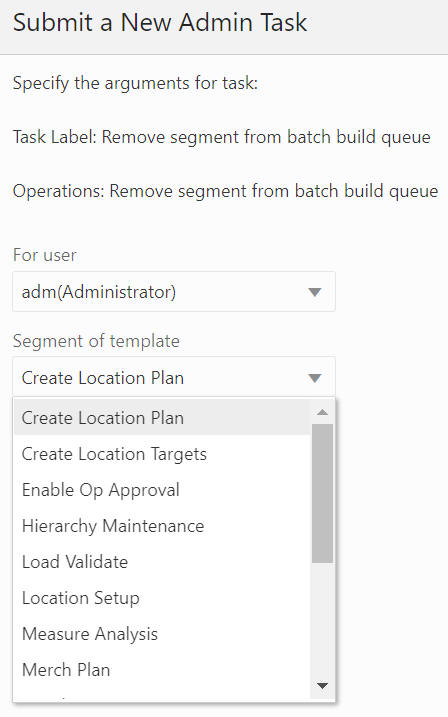
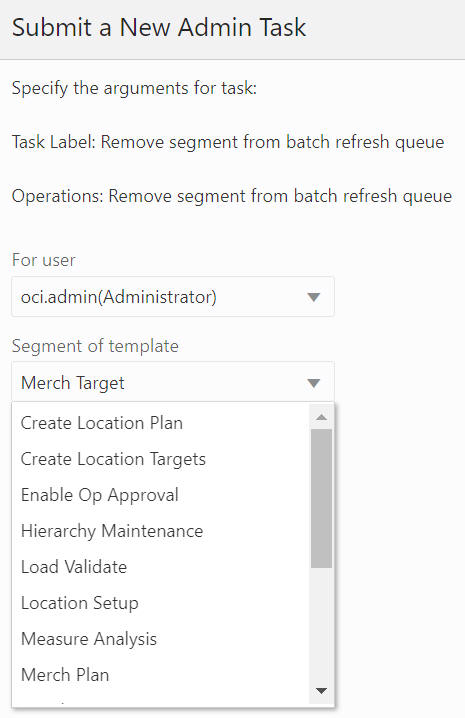
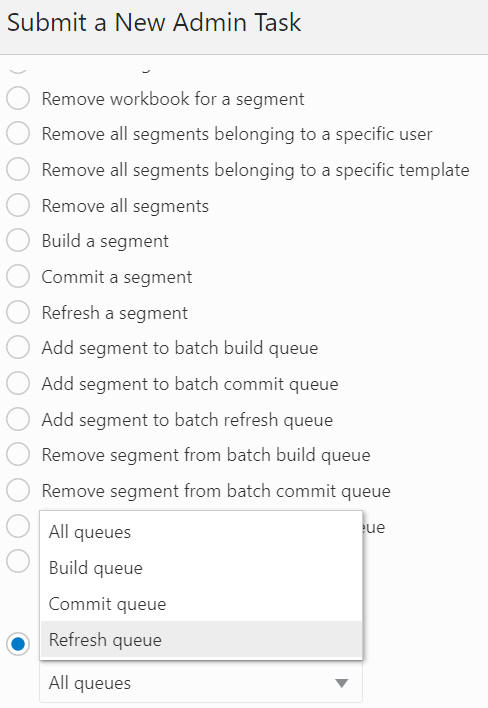
Remove Segment from Batch Refresh Queue
The Remove Segment from Batch Refresh Queue option, shown in Figure 12-64 and Figure 12-65, is used to remove the selected segments from the refresh queue. The segment list includes all the segments that have their associated workbook in the application, and it supports multiple segment selection operations. If the selected segment is not in the queue, it will provide a warning message in the output log file.
Figure 12-64 Remove Segment from Batch Refresh Queue
Start Batch Operation on All/Build/Commit/Refresh Queues
This option is used to batch process all the segments in the all/build/commit/refresh queues.
Print Segment in All/Build/Commit/Refresh Queues
The Print Segment in All/Build/Commit/Refresh Queues option, shown in Figure 12-67, is used to print out the detailed information of the segments in the all/build/commit/refresh queues.
Figure 12-67 Print Segment in All/Build/Commit/Refresh Queues
FAQ
Question: How to build/commit/refresh multiple segments at the same time.
Answer: Add those segments into the build/commit/refresh queue, then start a batch operation on that queue.
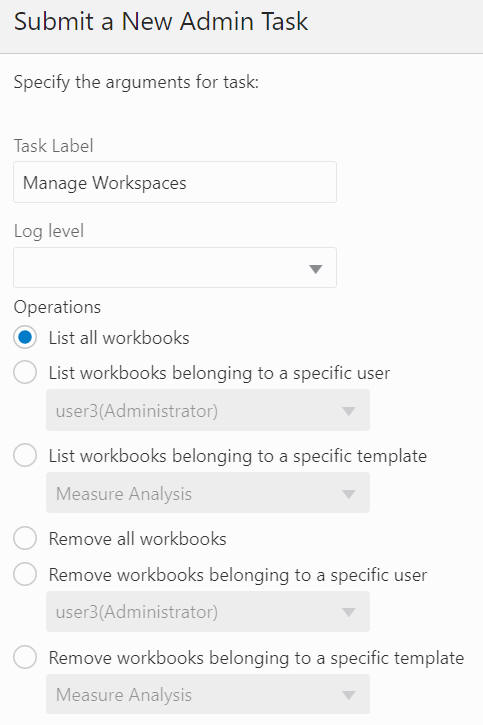
The Workbook Manager Utility, WbMgr, is the administration task that can be used to inspect or remove existing workbooks. It supports workbook application transparency, which means a user can use it to manage all the workbooks throughout the application.
WbMgr provides the following functionality:
List all the workbooks
List workbooks belonging to a specific user
List workbooks belonging to a specific template
Remove all workbooks
Remove workbooks belonging to a specific user
Remove workbooks belonging to a specific template
Remove selected workbooks
Print detailed information about workbooks
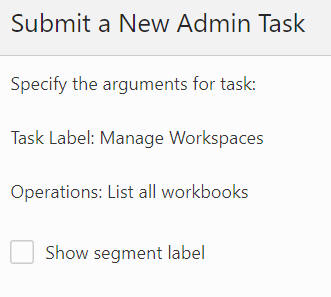
List All Workbooks
The List All Workbooks option, shown in Figure 12-69 and Figure 12-70, is used to list all the workbooks in the application. A wizard page provides an optional argument to display the segment label in the output file.
Figure 12-70 List All Workbooks Arguments
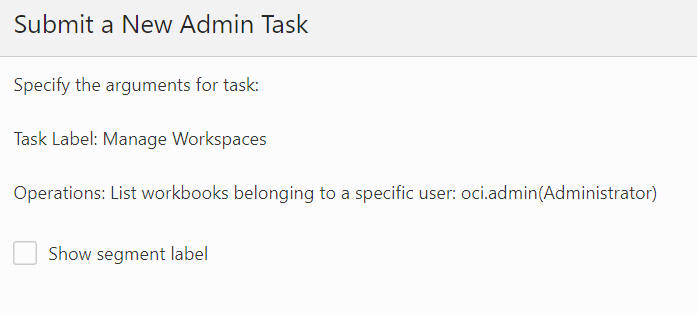
List Workbooks Belonging to a Specific User
The List Workbooks Belonging to a Specific User option, shown in Figure 12-71 and Figure 12-72, is used to list all the workbooks owned by a specific user (from the user drop-down list) in the application. A wizard page provides an optional argument to display the segment label in the output file.
Figure 12-71 Workbooks Belonging to a Specific User
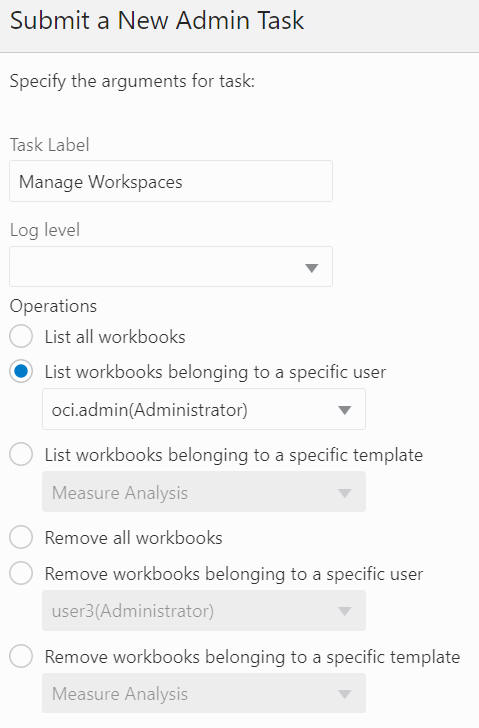
Figure 12-72 Workbooks Belonging to a Specific User Arguments
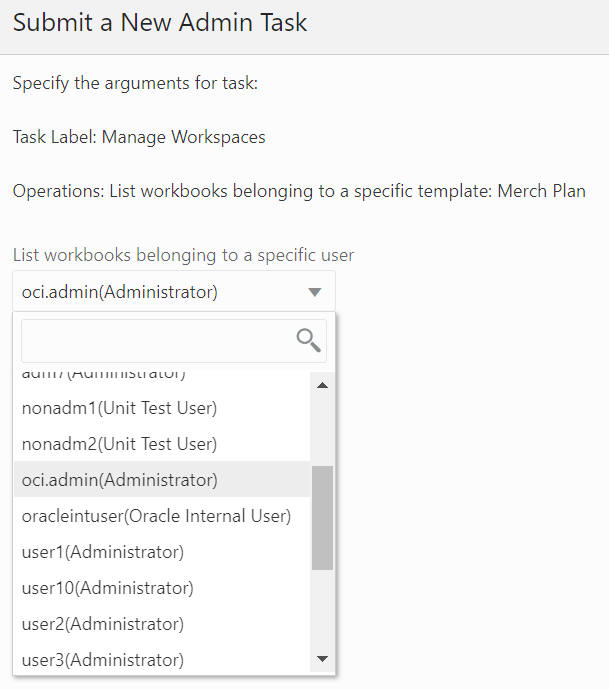
List Workbooks Belonging to a Specific Template
The List Workbooks Belonging to a Specific Template option, shown in Figure 12-73 and Figure 12-74, is used to list all the workbooks built based on the workbook template (from workbook template drop-down list) in the application. A wizard page provides two optional arguments, a segment label to display the segment label in the output file and user filtering by the workbook owner (from the user drop-down list).
Figure 12-73 Workbooks Belonging to a Specific Template
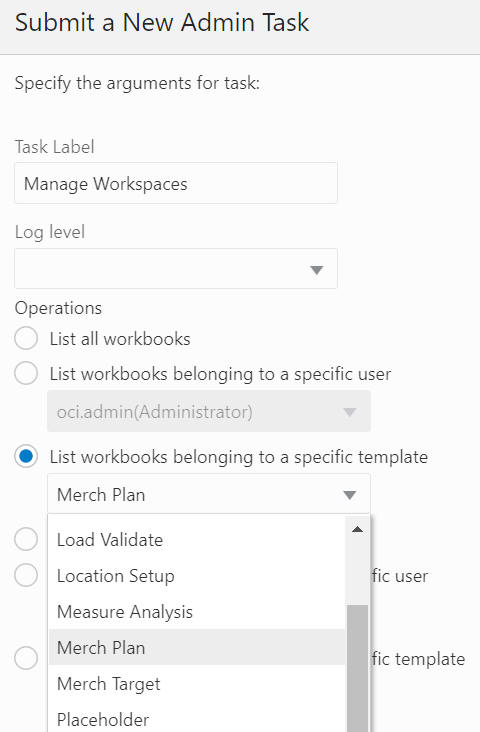
Figure 12-74 Workbooks Belonging to a Specific Template Arguments
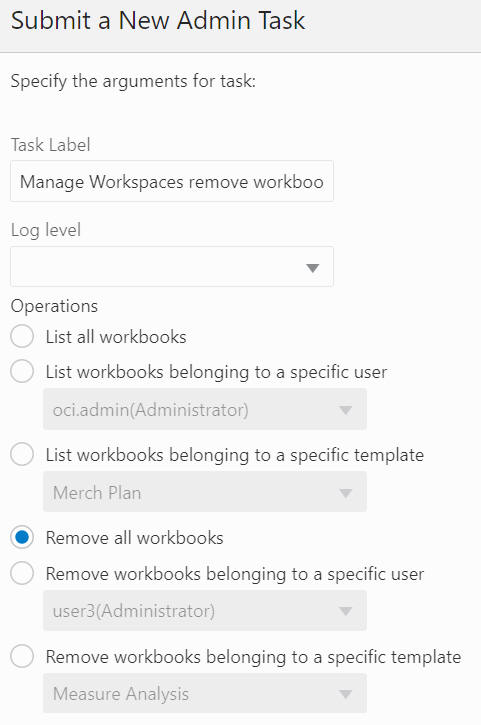
Remove All Workbooks
The Remove All workbooks option, shown in Figure 12-75, is used to delete all the workbooks in the application.
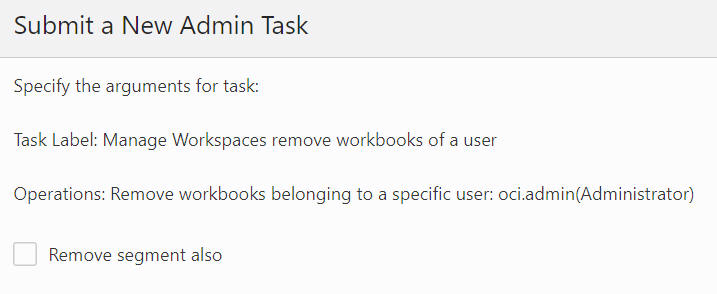
Remove Workbooks Belonging to a Specific User
The Remove Workbooks Belonging to a specific User option, shown in Figure 12-76 and Figure 12-77, is used to delete all the workbooks owned by a specific user (from the user drop-down list) in the application. A wizard page can be used to select multiple workbooks to be deleted.
Figure 12-76 Remove Workbooks Belonging to a Specific User
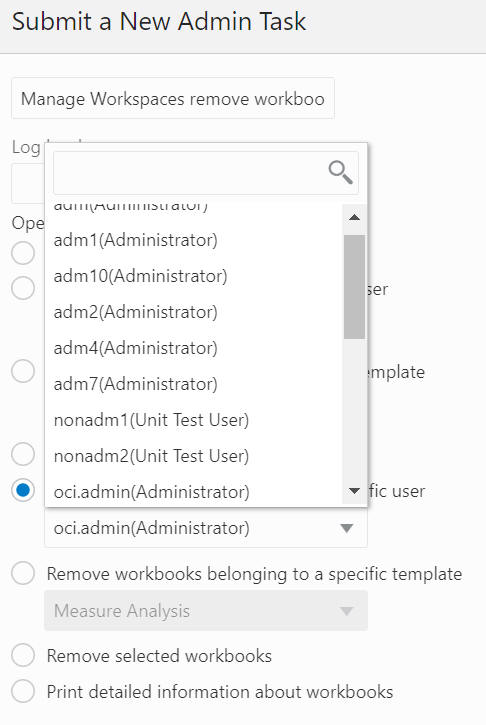
Figure 12-77 Remove Workbooks Belonging to a Specific User Arguments
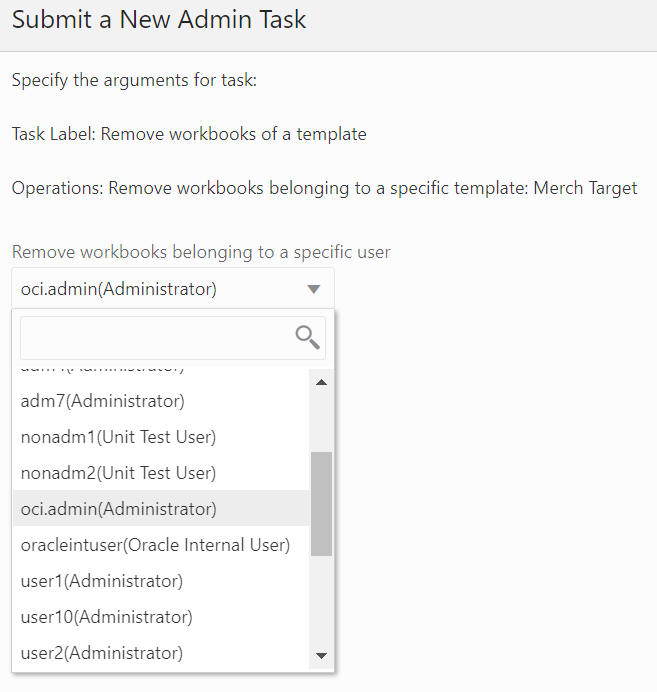
Remove Workbooks Belonging to a Specific Template
The Remove Workbooks Belonging to a Specific Template option, shown in Figure 12-78 and Figure 12-79, is used to delete all the workbooks built based on the workbook template (from the workbook template drop-down list) in the application. A wizard page provides the option to filter the workbook by the workbook owner (from the user drop-down list).
Figure 12-78 Remove Workbooks Belonging to a Specific Template
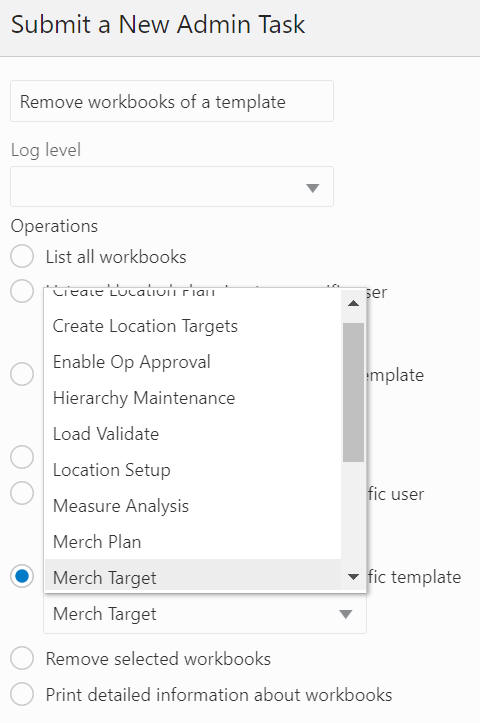
Figure 12-79 Remove Workbooks Belonging to a Specific Template Arguments
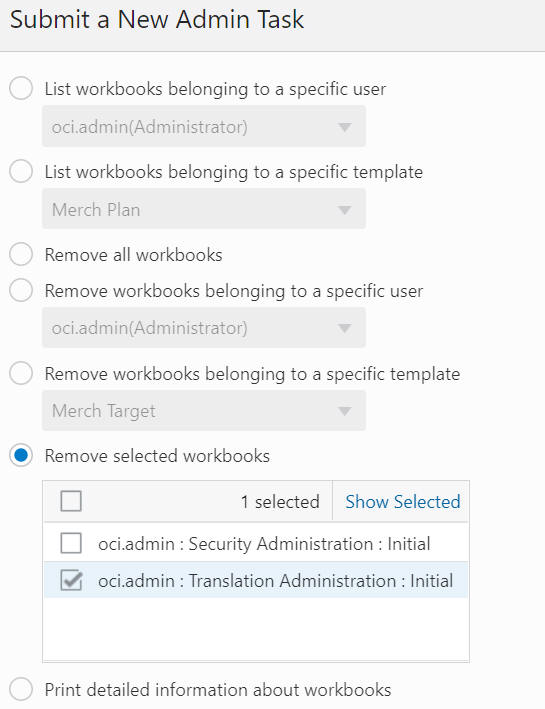
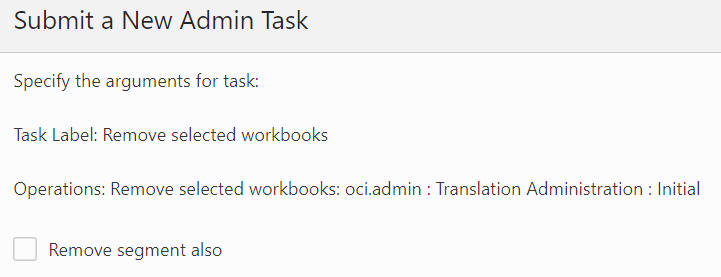
Remove Selected Workbooks
The Remove Selected Workbooks option, shown in Figure 12-80 and Figure 12-81, is used to delete selected workbooks in the application.
Figure 12-81 Remove Selected Workbooks Arguments
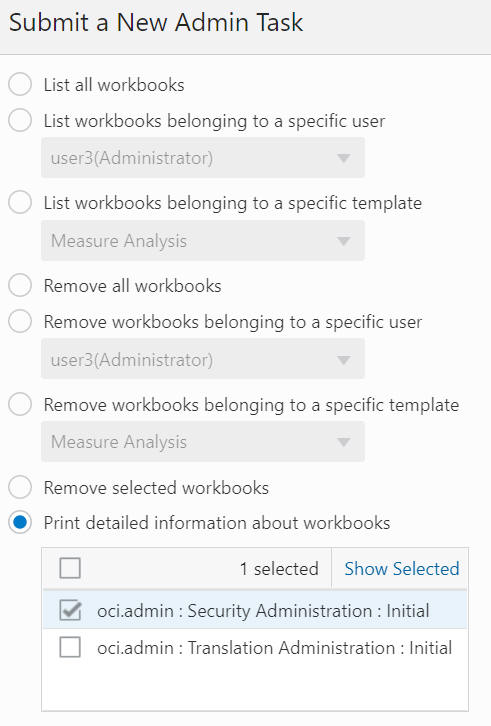
Print Detailed Information About Workbooks
The Print Detailed Information About Workbooks option, shown in Figure 12-82, is used to print out the detailed information about the workbook selected by the user. It supports the selection of multiple workbooks. The detailed information about workbook includes Label, Last opened by, User privilege, Group privilege, World privilege, User ID, User Name, Group, Created, Modified, and Committed.
Figure 12-82 Print Detailed Information About Workbooks