| Oracle® Retail Predictive Application Server Cloud Service Implementation Guide Release 23.1.201.0 F80316-03 |
|

 Previous |
 Next |
| Oracle® Retail Predictive Application Server Cloud Service Implementation Guide Release 23.1.201.0 F80316-03 |
|
Previous |
Next |
RPASCE acts as a platform to create tailored solutions or migrate existing on-premise solutions into the cloud. This guide addresses the process of preparing a custom solution for use in either of these Cloud Service environments.
Because Oracle Retail Cloud Service applications do not support any back-end server access, implementation is different from an RPAS on-premise implementation. The applications provide online tools to cover all the necessary facets of an RPASCE application roll-out and administration. These include:
Deploying and patching applications from your custom configuration
Defining nightly, weekly, or ad hoc batch process sequences
Scheduling recurring batch processes
Since implementations are based on a retailer- or implementer-provided configuration, working knowledge of the RPASCE configuration tools is essential. The RPASCE configuration tools are supported for offline use on a Windows 10 system. They are available in the applicable Starter Kits, and their use is detailed in the Oracle Retail Predictive Application Server Cloud Edition Configuration Tools User Guide.
In addition to supplying an RPASCE configuration, the implementer must also prepare the retailer to provide RPASCE Hierarchy (dimension) and Measure (fact) data load files, as well as to take RPASCE exported Measure (fact) data files for any downstream integration needs. While the implementer does not call the RPASCE command-line utilities directly, knowledge of their usage gained from the Oracle Retail Predictive Application Server Cloud Edition Administration Guide is helpful.
Data files for loading into the applications and exported files for integration with other systems are sent and received from the RPASCE cloud environment via Oracle Object Storage. Knowledge of the use of Object Storage File Transfer Service APIs, including an ability to automate such uploads and downloads, is a necessary prerequisite for routine nightly or weekly batch processing jobs.
RPASCE operations require that the administrative user, who will not have command-line server access, must be able to select, initiate, and schedule RPASCE batch activities.
The RPASCE platform includes an Online Administration Tool (OAT) capability, which allows simple parameterization and scheduling of pre-configured batch tasks. The RPASCE provides an enhancement to the OAT framework that allows a sequence of several batch tasks to be defined. This sequence is built from a list of available batch services, such as Measure (fact) data loading, calculation, segment workspace refresh, and so on. These service tasks run in a defined order, so that you can know, for example, that your daily data updates have been loaded before your workspace refresh tasks are run. The batch tasks are configured to run under the existing OAT framework, so that scheduling them to run once, or on a repeating basis, is the same as for other OAT tasks.
The batch task sequences are defined in a small set of text files, which are specified below, with some examples.
Using the RPASCE batch execution framework, the following are under implementer control:
List of batch operations to be run, with available parameterization
Order in which batch operations are to be run
Scheduling of one or more recurring batch tasks, which can be modified by the administrator, as needed
Due to the operational and security constraints of the Cloud Service environment, the following are not under implementer control:
Parallelization: The applications automatically parallelize any applicable batch tasks with a number of processes set to match the provisioned server environment.
Script file names, file and directory locations: Custom scripting is not supported for this environment, and no knowledge of file system names or locations is necessary in defining and parameterizing the batch task files.
Incoming and outgoing file locations: These details are fixed within the RPASCE Cloud Service environment.
Process Orchestration and Monitoring (POM) is the enterprise batch-scheduling solution for retail applications migrating to the cloud. In POM, the RPASCE schedule contains multiple static jobs for each RPASCE application, namely, three daily jobs (jos_daily_pre, jos_daily, and jos_daily_post) and three weekly jobs (jos_weekly_pre, jos_weekly, and jos_weekly_post).
These jobs must exist in batch_exec_list and can map to other batch control sets for the Batch Exec Service.
For example, the following section in the batch_exec_list defines the mappings for the POM jobs.
# Entries for scheduling in JOS/POM
jos_daily_pre    | exec | *hook_jos_daily_pre
jos_daily        | exec | batch_daily
jos_daily_post   | exec | *hook_jos_daily_post
jos_weekly_pre   | exec | *hook_jos_weekly_pre
jos_weekly_pre   | exec | batch_weekly_pre
jos_weekly       | exec | batch_weekly
jos_weekly_post  | exec | *hook_jos_weekly_post
In this example, the job_weekly is configured to execute the batch_weekly control set, which is a set of tasks within the batch_exec_list that can be configured in the same way as you would if not using POM. The "*" before the control set name indicates that this control set is optional, that is, if it does not exist, the batch execution of the POM job just ignores it without reporting any errors.
For more details about the RPASCE Schedule for POM, refer to the Oracle Retail Predictive Application Server Cloud Edition Administration Guide.
This section describes the batch services that are available to be configured.
The Batch Exec service is the controller for all the other services, specifying groups of tasks to be run, their sequences, and top-level parameters.
The Batch Exec service groups are specified in a text file batch_exec_list.txt. In this file, each active line takes this form:
batch_type | service | service parameter
The first column is an identifier, which may be repeated on several lines to define a grouping of tasks to be run together. The second column indicates which task from the catalogue is being requested. The third column gives parameter details for that task (as necessary). Comments may be placed in the batch_exec_list.txt file by starting a comment line with the hash sign (#).
Here is a sample batch_exec_list.txt file for reference:
# Daily Batch Cyle
daily | waittrigger | daily_upd.txt~3600
daily | unpack      | daily_upd.zip
daily | calc        | exp_set
daily | measexport  | daily_exp_set
daily | measload    | load_oo_list
daily | sendtrigger | batch_load_complete.txt~ftp
daily | calc        | batch_oo
daily | rebuild | rebuild_daily_group

# Batch Cycle to Load OO
load_oo | measload | load_oo_list
load_oo | calc     | batch_oo

# Weekly Batch Cyle
weekly | calc       | exp_calc_set
weekly | measexport | weekly_exp_set
weekly | hierload   | clnd~14~N
weekly | hierload   | prod~14~N
weekly | hierload   | loc~14~N
weekly | measload   | load_act_list
weekly | measload   | load_oo_list
weekly | calc       | batch_week
weekly | calc       | batch_fcst
weekly | refresh    | refresh_weekly
weekly | rebuild    | rebuild_weekly
weekly | autobuild  |
In this sample file, three batch task groups are specified: daily, load_oo, and weekly. Note that these names are implementer-defined identifiers; there is nothing special about the names "daily" or "weekly". Each identifier is thus associated with a sequence of tasks, which will run in the order they are listed in the file.
Note also that no information is provided about times or schedules on which these task groups should be run. Scheduling information must be specified in the RPASCE Online Administration Tool.
The services listed for each batch task group are run in the order specified when that type of batch run is requested through the OAT interface. Details on the individual batch services and what their service parameters mean are described in the following sections.
The Load Measures service allows the loading of one or several measures, the data for which may be found in one or several files. The measload service will check for the required data files in the Object Storage incoming files area. The service will optionally either validate the presence of all data files and treat this as an error condition, or treat the presence of files as optional and continue with no error if the files are not present.
Groups of measures to be loaded are specified in a control file, batch_loadmeas_list.txt, with the columns as follows:
Load set name
Parameter type, which must be one of the following:
H - Fact data file name
V - Validate option, if present, indicates missing data files are to be treated as an error condition. No third-column parameter required.
R - Rejected record threshold (optional). Requires third column parameter; it must be a positive integer. When this parameter is presented, the process will be stopped (error code 37) with a failure trigger when the number of rejected records exceeds the number specified. If this option is not specified, a warning trigger will be created if there are any rejected records in the measure load; however, the process will continue.
C - RPASCE v19 parameter, which is no longer supported.
M - RPASCE v19 parameter, which is no longer supported.
S - RPASCE v19 parameter, which is no longer supported.
Parameter value. Relative to the parameter type specified above.
Fact Data files may contain the data for one or several facts in a comma-separated value format (CSV) with a header line.
Here is an example control file for the Load Measure service:
# Load Forecast Measures
load_fcst|R|200
load_fcst|V|
load_fcst|H|mp_fcst.csv.ovr
load_fcst|H|mt_fcst.csv.ovr
load_fcst|H|lp_fcst.csv.ovr
load_fcst|H|lt_fcst.csv.ovr
In this example, if any files for the listed measures are absent, an error condition will be reported.
The Validate option checks for required data files in the internal input file directory, as well as files that have been placed in Object Storage. This allows the measload task's Validate option to correctly detect files that were previously placed in the internal input location by an unpack batch task.
When fact data files are loaded, some lines in the file may be rejected (possibly due to an incorrectly formatted input file or a position that does not exist in the dimension). The RPASCE measure load process does not, by default, treat these rejected lines as errors and will continue loading any valid lines from the rest of the file. In order to detect when rejected lines were encountered, since the batch framework does not report this as an error, the loadmeas batch task writes the rejected records count into its own log file and also creates a rejected records warning file in the outgoing area of Object Storage.
The warning file has no content, providing all relevant information in the file name itself. The file name indicates the name of the measure, the count of rejected records, and a timestamp to indicate when the task was run.
In the following example, the measure apcpfcstslsu had four rejected records when it was loaded on 26-April-2018 at 7:52am:
warning.eebatch_loadmeas.apcpfcstslsu.rejected.4.20180426075212
If the optional |R| parameter is given in the control file, the numerical value indicates a limit to the number of rejected lines, above which the rejections will be reported as an error rather than a warning. For example, in the load_fcst config shown above, the limit is given as 200. If, while loading any particular measure in this load group, more than 200 rejected record lines are detected, then the task will halt, reporting an error, and the batch sequence that includes this task will also halt. In this way, if a badly formatted or corrupted data file was uploaded, then later batch steps such as calculations or workbook refreshes will be performed.
The Export Measures service allows the flat-file export of one or more measures, using a control file, batch_export_list.txt, to group (and parameterize) the measure lists for particular export operations. The control file allows multiple parameters to specify the details of each export group.
Here are the columns in the export control file:
Export Set Name
Parameter type, which must be one of the following:
M - Measure name, format name (optional), and output file name (optional). Separated by |. The format name is the name of the format directive specified in the measure_format_list.txt file. The output file name option is only supported when the control set is using the I parameter. If the I parameter is not specified, the output file name will be determined by the O parameter.
F - Filter mask measure.
X - Base intersection. F or X is required.
O - Output file name (optional). One single output file for all exported measures. This parameter is ignored if the I parameter is specified. If multiple O parameters are provided, only the first one will be used.
I - Flag to use an individual output file for each measure (optional). The default file name is measure_name.csv.ovr unless it is overridden by the output file name option of the parameter of M.
S - File share destination. Keywords: ftp, temp, cloud:<app>, where <app> is one of: ri, mfp, rdf, ap, rms. (For the rare case where multiple instances of a single RPASCE application are to be deployed, the second instance may be integrated by using the values mfp2, rdf2, or ap2.) The cloud:<app> keyword sends the output file to the indicated Oracle RGBU Cloud Service application, if configured for your environment. The temp keyword sends the output to an internal temporary location, where it will not be accessible externally but can be used by other configured batch tasks such as the transform file service (by specifying temp as the input value for the subsequent task).
C - Compress output. Optional; file (or files) will be compressed into .zip format.
D - Delimiter. Optional character to use in place of a comma; to select the | character as the delimiter, specify the keyword PIPE.
|
Note: D simply replaces all commas with the delimiter. It does not work well with string measure values that include commas. |
U - Uppercase position name (optional). Does not have a third column option. If it is specified, the position name in the output file will be converted to an uppercase name.
P - useDate parameter (optional). Requires either the value start or end for the third column. It is used for a measure that has a high level on the CLND hierarchy (for example, Mnth). When specified, it will replace the measure CLND level position of each data record with the lowest CLND level (for example, Day) position corresponding to that higher level position. The values start or end are used to determine whether the starting day position or the ending day position of the corresponding mnth period will be output.
N - Specifies when to skip NA values in export (optional). Valid options for the third column are never, allna, and anyna.
never - Export the corresponded data point even though the measure's values are all NA values. This option essentially exports all data points in the logical space.
allna - Do not output the corresponded data point if all measure values are NA values (default mode).
anyna - Do not output the corresponded data point if any one measure value is an NA value.
T - Appends a unique identifier as suffix to the file name (optional). This generates a unique name to ensure that the parallel export can proceed. This flag can only be used with default file naming, without using the |O| flag. This flag is specifically designed to work with the intradayexport() expression.
Parameter value. Relative to the parameter type selected above.
Here is an example control file for the Export Measure service:
# Export PoC Plan CP
lpcp|F|lpcpexportb
lpcp|S|ftp
lpcp|M|lpcpbopc
lpcp|M|lpcpbopr
lpcp|M|lpcpbopu
lpcp|M|lpcpeopc
lpcp|M|lpcpeopr
For the lpcp export group, the implementer has provided a Filter Mask measure, has indicated that the file will be published to the Object Storage outgoing file location (the ftp parameter naming is for compatibility with previous RPASCE versions), and has provided a list of several measures to be included in the output.
The Calc service, which indicates that the RPASCE utility mace is to be run, uses a control file called batch_calc_list.txt. The format of this file is as follows:
calc_list | [group or expression] | <group name or expr text>
The first column provides an identifier for each group of calc instructions. These identifiers are used to select calculations to be run either directly, or as part of a Batch Exec run.
The second column must contain the keyword group or expression to indicate whether the calculation to be run is a rule group registered in the application configuration or an individual expression given in the control file itself.
The final column provides either the name of the rule group to be executed or the text of the expression to be run.
As with the other control files, any line starting with # is ignored and can be used to comment or document the file, as needed.
Here is an example file for the calculation service:
# Calc Set for Batch Aggregation Weekly
batch_week | group | Batch_GB
batch_week | group | Batch_AggW
batch_week | group | Batch_InvRoll
batch_week | expression | LTWPNSlsR = DRTYNSls1R+DRTYNSls2R
batch_week | expression | LTWPNSlsU = DRTYSls1U+DRTYSls2U-DRTYRtn1U-DRTYRtn2U

# Calc Set for Generating Forecast
batch_fcst | group | Batch_Fcst_G
batch_fcst | group | Batch_Fcst_L
The Export Hierarchy service allows the flat-file export of one hierarchy (dimension/levels) using a control file, batch_exporthier_list.txt, to specify available options. The format of the control file is similar to the Export Measure control file, with the exception that only one hierarchy may be specified at a time.
The three columns in the control file are:
Export Set Name
Parameter Type, which must be one of these options:
H - Hierarchy name (required)
T - Export type. F - only formal positions, I - only informal positions, A (or omit) - all positions
L - Header line export. Output file includes header line for dimension and label columns.
U - Export positions of user defined dimensions. This implies Header Line export mode; cannot be used with the only formal export type.
O - Output file name. This is optional; defaults to <hier>.dat).
C - Compress result file to .zip (optional)
S - File export destination. Keywords: ftp, cloud:<app>, where <app> is one of: ri, mfp, rdf, ap, or rms. (For the rare case where multiple instances of a single RPASCE application are to be deployed, the second instance may be integrated by using the values mfp2, rdf2, or ap2.) This sends the output file to the indicated Oracle RGBU Cloud Service application, if configured for your environment.
Parameter value. If required, by parameter type.
Here is an example control file for the Export Hier service:
# Export PROD hierarchy, compressed
prod_export|H|prod
prod_export|T|F
prod_export|O|prod_exp.dat
prod_export|C|
prod_export|S|ftp
In this example, the prod_export grouping indicates that only the formal positions in the PROD hierarchy will be written to a compressed file prod_exp.dat.zip and placed in the Object Storage outgoing file location (the ftp parameter naming is for compatibility with previous RPASCE versions).
This service supports the option of loading dimension (hierarchy) data into your application from flat files. This task does not require a separate control file, but can be fully specified inside the Batch Exec (batch_exec_list.txt) control file itself.
The parameter column provided in the Batch Exec file contains two values, separated by the ~ character. The values are: hierarchy to be loaded and purgeAge value.
Here is an example:
weekly | loaddimdata | prod~28weekly | loaddimdata | loc~28
This task, when run, looks for <hier>.csv.dat or <hier>.hdr.csv.dat files in Object Storage in the path planning/incoming/input. The task also checks for planning/incoming/input/dimdata.zip, and if found, will unpack the zip file and use any relevant .dat files located in it. If no incoming data files are found, a log message will indicate this, and then the Batch process will continue without error.
This service supports the option of loading alternate rollup data for the dimension (hierarchy) into your application from flat files. This task does not require a separate control file, but can be fully specified inside the Batch Exec (batch_exec_list.txt) control file itself.The parameter column provided in the Batch Exec file contains one value that is the input file name. This file must have been uploaded into Object Storage in the path planning/<subnamespace>/incoming/input.Here is an example:
weekly | altdimload | scl1.csv.dat
This task, when run, looks for <name>.csv.dat in Object Storage in the path planning/<subnamespace>incoming/input. If no incoming data files are found, a log message will indicate this, and then the batch process will continue without error.
The batch control framework facilitates the calling of new interfaces using the new service interface in the batch_exec_list.txt control file. Customers can update their batch control files to call the new interfaces. The interface service takes the interface name to execute as the main parameter. In addition to the interface name, it also provides two optional parameters, INTF_PROC_PARM and INTF_EXEC_PARM, using a tilde (~) as the separator. INTF_PROC_PARM can be the same <PARAM> if the customer wants to call the same interface for a subset of the parameter. If not passed, it will execute that interface for all configured parameters (PARAM) in a single call. INTF_EXEC_PARM can currently take an optional value as L to re-run the last executed interface using the same dataset. By default, each interface execution internally uses a unique RUN_ID for the dataset in the interface, and it will be marked as processed after the successful completion of the interface execution. If the interface is re-run, it will not fetch any new data unless the source system sends new data, but L as an optional parameter can be used to re-run the interface using the same RUN_ID last used.
Typical control file entries for calling multiple interfaces (both exporters and importers) within a weekly batch are shown in the following example batch_exec_list.txt file.
Example
batch_weekly | interface | MFP_PLAN1_EXPbatch_weekly | interface | W_PDS_CALENDAR_Dbatch_weekly | interface | W_PDS_SLS_IT_LC_WK_A
For a recurring batch task (such as a nightly or weekly batch), you can schedule the batch to run at a particular time, but you must also ensure that it will not start processing until the required input files are available. This requirement is supported by the waittrigger task. The trigger file is a temporary file that is uploaded to Object Storage under the planning/incoming path. Note that this file must be uploaded to the Object Storage last, after all the other required files are present. Note also that this trigger file will be deleted once the waittrigger task sees it, so you must not specify an actual data file as your trigger. For example, if the batch must wait for prod.dat to be present, you must specify a second file name, such as prod_dat_trigger.txt, and the external integration process that sends the latest prod.dat into the Cloud environment must also create prod_dat_trigger.txt after the prod.dat file is available.
By default, the waittrigger task waits for 23 hours for the trigger file to appear before timing out and reporting an error. A shorter timeout may optionally be specified, given in the number of seconds to wait.
The waittrigger task requires only an entry in the batch_exec_list.txt control file; no separate control file is required. Here is an example configuration for a waittrigger task:
daily | waittrigger | daily_upd.txt~3600
This example daily batch task waits up to one hour for the file daily_upd.txt to be present in the Object Storage location. The third column uses the tilde (~) character as a separator and gives two parameters values:
the trigger file name. Simple file names only, no paths.
(optional) number of seconds to wait before timing out
In order to notify other processes, either internal or external to the Oracle RGBU Cloud environment, of the progress of a batch task sequence, the sendtrigger task may be configured. This task takes a two parameter values, separated by the tilde (~) character. The first parameter specifies the trigger file name.
The second portion specifies the destination in which the trigger file will be created:
ftp - writes to the Object Storage outgoing location for this application (ftp designation is for legacy compatibility with earlier RPASCE versions).
cloud:<app> - sends the file to the Oracle RGBU Cloud Service indicated by <app>, with valid values ri, mfp, rdf, ap, or rms. (For the rare case where multiple instances of a single RPASCE application are to be deployed, the second instance may be integrated by using the values mfp2, rdf2, or ap2.)
input - writes the file into the input directory of the current application.
The sendtrigger task requires only an entry in the batch_exec_list.txt control file; no separate control file is required. Here is an example entry for a sendtrigger task:
daily | sendtrigger | batch_load_complete.txt~ftp
This control line indicates that the file batch_load_complete.txt will be created in the Object Storage outgoing file area once batch execution successfully reaches this point in the daily batch sequence.
Note that no automatic clean-up of the trigger file is performed, so other processes that look for the presence of this trigger file must remove it. If a trigger file from the previous batch run is still in place during a subsequent batch run, the file will remain in place and the file's timestamp will be updated.
Batch tasks such as dimdataload or measload expect to find their individual .dat or .ovr files in the incoming file areas. For some integration needs, it may be preferable to send these files together in a compressed archive for faster upload and to ensure that all matching files arrive together. This integration scenario is supported by the unpack task. The unpack task may specify files with the .zip extension to be found in the incoming file area and unpacked into the application input directory. The archive must contain only simple file names and not any subdirectory structure, as this structure would then prevent the files from being found in the <application>/input directory, where later batch tasks expect them.
The daily batch example above contains this usage for the unpack task:
daily | unpack | daily_upd.zip
The task specifies that the archive file daily_upd.zip is expected to be in the incoming file area, and it will be unpacked into the application's input directory before any subsequent batch tasks are performed.
The Transform file service is used for simple integration capabilities for file transformations before hierarchy or measure file loads such as splitting a file, renaming file, swapping columns in the files, and so on. It also provides an option to filter file records based on particular data values. It does not call any RPASCE utilities, but instead uses some pre-defined functions that can be called and controlled by control file setting changes. It provides some powerful integration capabilities in which the user does not need to create any external process to format the files so it can readily fit into the regular batch framework. For example, a source system might send multiple measure data in a single file but the configured RPASCE solution expects individual measures per file. In such cases, users can call this service to split those files. This process can also be used to transform the exported output files into required formats that can be copied to other locations.
The parameters for this service are provided in a control file batch_xform_list.txt. This service can be invoked from batch_exec_list.txt (Batch Exec Control file) as follows:
<batch_set_name> | transform | <transform_set_name>
Here are the columns in the batch transform control file separated by the PIPE symbol ("|") for the different functions that can be used.
Transform Set Name
Parameter Type, which must be one of the following:
Table 1-1 Transform Parameters
| Parameter Type | Value |
|---|---|
|
I |
Input file path and valid parameter values are cloud for cloud share location (files coming in from other Oracle RGBU Cloud Services), ftp_in for SFTP input, ftp_out for SFTP output, dom_in for Dapplication input (default), dom_out (application output), temp for internal temporary ftp_dim_in for <SFTP> /rdm_input/dimdata, ftp_fact_in for <SFTP>/rdm_input/factdatadirectory, rdm_dim_in for <RDM_ROOT>/dimdata, rdm_fact_in for <RDM_ROOT>/factdata to transform interim export files. |
|
O |
Output file path, valid parameter values are: dom_in (application input directory; this is the default), dom_out (application output directory), ftp_in (SFTP input directory, ftp_out (SFTP output directory), rdm_dim_in (PDS dimension data directory), rdm_fact_in (PDS fact data directory), cloud:<app> (sends file to another Oracle RGBU Cloud Service's SFTP input directory; valid values for <app> are: ri, mfp, rdf, ap, rms; for the rare case where multiple instances of a single RPASCE application are deployed, the second instance may be integrated by using the values mfp2, rdf2, or ap2. |
|
D |
Field delimiter (default: comma), for pipe use PIPE. |
|
E |
Output file delimiter (default: comma), for pipe use PIPE. |
|
F |
Input file name (required). Can have multiple F entries, in order to merge multiple files, but at least one F entry is required. |
|
X |
Transformed file name and field numbers (in order) as parameter value. It can also use Linux Cut command format. One entry for each separate file must be created. It can also take one additional argument. If provided, used as headers for the transformed files. |
|
V |
Validate for files to be present. |
|
Q |
To add quotes; required if data can contain commas and the input delim is not a comma. |
|
L |
Filter file based on where filter column and filter value as parameters. By default, it equates the value; however, to use filter value as not equal to, use additional parameter as N after filter value. |
|
U |
Create unique record output files. |
|
C |
Copy a column to the end of file (copy column number). |
|
W |
Swap column from input file (column numbers to swap). |
|
S |
Sort file columns based on key columns. |
|
A |
Add a constant value at end of file. |
|
J |
Join two columns using a separator and add to the end of the file. |
|
G |
To create a complete trigger output file, if needed at the end. |
|
Z |
To compress output files of a particular pattern as a zip file. It requires the following four parameters delimited by |
|
|
M |
Move or copy files of a particular pattern of files from input to output location. If M is used, only files will be moved or copied. It will not do any further processing to those files. It requires two parameters delimited by |
If the delete_file_flag is Y, the source is removed and the operation is a true move. If the delete_file_flag is N, it is a copy instead of a move and the source is not removed. |
|
N |
Do not push output files to cloud:<app> location at the end and still hold the files in a temporary location for further processing to compress the files before pushing the file to cloud:<app> location. |
|
H |
Add headers to transformed output file if option X is not used to transform the output file. Parameter must be the complete header for that file and is added as the first record for the output file. |
|
Y |
To delete the input files from the input directory after the transform; if not, the used input file will not be detected. |
|
B |
Do not merge input files by file name pattern. By default, this task takes all input files with same pattern and merges them. For example, if the input file name is given as sls.csv.ovr, it will merge all files matching sls.csv.ovr*. This option indicates that only the single input file by the exact name must be used. |
Parameter Values - Relative to the parameter type selected above.
Example 1: To split a single file into multiple files based on column IDs.
rms_oo|F|rms_oo.csv.ovr
rms_oo|I|cloud
rms_oo|V|
rms_oo|X|drtyoou.csv.rpl|1,2,3,6
rms_oo|X|drtyooc.csv.rpl|1,2,3,7
rms_oo|X|drtyoor.csv.rpl|1,2,3,8
This example shows an input file split into multiple files using the multiple X option based on column numbers. In the above example, the output files are created in the application input directory.
Example 2: To split a single file into multiple files based on column IDs and also to filter records based on a column value.
rms_inv1|F|rms_inv.csv.ovr
rms_inv1|I|cloud
rms_inv1|V| rms_inv1|L|5|N
rms_inv1|X|drtyeop1u.csv.ovr|1,2,3,6
rms_inv1|X|drtyeop1c.csv.ovr|1,2,3,7
rms_inv1|X|drtyeop1r.csv.ovr|1,2,3,8
In this example, the first only records with fifth column value as N in the csv file and then those will split into multiple files.
Example 3: To copy columns and swap columns before writing the output file.
rms_curh|F|rms_curr.csv.ovr
rms_curh|I|cloud
rms_curh|C|3
rms_curh|W|2|6
rms_curh|U|
rms_curh|X|curh.csv.dat|2,3
In this example, the original file only contains five columns. The third column is copied to the end of the file as the sixth column due to the use of option C. Then, columns 2 and 6 are swapped due to the use of option W. Then it writes out column 2,3 after removing duplicates due to use of option U.
Example 4: To add a constant value to a file and to join two columns based on a separator.
rms_patt3|F|rms_prod.csv.dat
rms_patt3|I|cloud
rms_patt3|L|22|NA|N
rms_patt3|A|BRAND
rms_patt3|J|34|22|_
rms_patt3|X|drdvprdattt.csv.ovr.3|1,34,35
It is necessary to add a constant value BRAND and also concatenate it with another column and export both the columns.
In this example, the original file only contains 33 columns. It is first filtered for records not equal to NA in column 22. Then it adds a constant value BRAND in column 34. Then, columns 34 and 22 are joined, using the separator _ (underscore) that is added as column 35. Finally, the newly added columns 34 and 35 are extracted into an output file.
Example 5: The following sample shows the use of E to create different delimited output file and Z option to compress the output file.
mfp_exp_ri|F|ri_mpop_plan.dat
mfp_exp_ri|F|ri_mpcp_plan.dat
mfp_exp_ri|I|temp mfp_exp_ri|V|
mfp_exp_ri|X|W_RTL_PLAN1_PROD1_LC1_T1_FS.dat|4-
mfp_exp_ri|O|cloud:ri mfp_exp_ri|E|PIPE
mfp_exp_ri|Z|RI_MFP_DATA|W_RTL_PLAN|dat|Y
In this example, use of multiple F options merges two output files and creates one output file with only from column 4 delimited by comma. However, the final output file is created with delimiter as PIPE due to use of option E.
In addition, the use of the Z option compresses the output files of pattern W_RTL_PLAN*.dat created at cloud:ri location into a compressed file as RI_MFP_DATA.zip and deletes the generated file after compressing.
Example 6: The following option shows the use of the M option to copy a set of files from one location to another location.
copy_dom_in|I|dom_in
copy_dom_in|O|ftp_out
copy_dom_in|M|*.dat|N
This example copies all files of the pattern *.dat from the application.input location to the Object Storage outgoing file area. Due to use of option N to not delete the input files, it only copies the file. To move the files, option Y should be used.
This feature allows product attributes to be assigned during item creation if the product attributes are defined as dimension attributes. For this functionality, th product attribute hierarchy (for example, PATR) must be defined with two dimensions (product attribute value and product attribute). The mapping of the product attribute values to items must be defined in the measure at the item/product attribute intersection level (for example, addvprdattt). This custom function can be called in a customer's batch control framework to register the loaded product attributes as dimension attributes.
This application-level function registers all the loaded product attributes as dimension attributes that can take two parameters, product attribute measure and product attribute hierarchy name. It must be called each time a new set of product attributes is loaded.
The following example illustrates calling this custom function to register dimension attributes. The product attribute measure name is addvprdattt and the product attribute hierarchy used by customer is patr. The ra_custom is the service name to be used to call the custom functions in batch_exec_list.txt and the custom function name is ap_set_datr. The two parameters for the function must be separated with ~.
Example:
batch_datr | ra_custom | ap_set_datr~addvprdattt~patr
The formalize service allows the modifying of current informal positions (which were created on a given hierarchy and dimension having Dynamic Position Maintenance, or DPM, enabled) to make them formal positions. One or more files matching the pattern <hier>.formalize[.extension] must be uploaded via Object Storage to the planning/incoming/input location. This file (or files) specifies which informal positions to formalize. An option is also available to allow the formalization of all current informal positions on a dimension. Parameters are specified via the batch_formalizepositions_list.txt batch control file.
The batch_formalizepositions_list.txt control file contains multiple lines to specify each formalize task, each with three required columns, as follows:
Formalization Set Name.
Parameter Type, from these values.
C - Column index (starting from 1) of the dimension position name in the hierarchy file (as generated by exportHier) [required].
D - Dimension to formalize [required].
H - Hierarchy of the dimension [required].
A - Formalize all informal positions on Dim (no value needed) [optional; omit if sending a <hier>.formalize.dat file].
Parameter Value (varies by parameter type).
If the (A)ll option is not provided, then at least one <hier>.formalize[.extension] file is expected to be available in Object Storage. If no formalize files are present, the batch task will report an error. File format details are available in the Oracle Retail Predictive Application Server Cloud Edition Administration Guide.
Here is an example specifying a formalization task called prod_sku, which operates on positions of the SKU dimension in the PROD hierarchy:
prod_sku|H|prod|
prod_sku|D|sku|
prod_sku|C|1|
The Rename Positions service enables the renaming of existing positions in a hierarchy. The task is configured by specifying the hierarchy on which positions are to be renamed and looks for a file with the name [hier].rn.dat in Object Storage. If the rename data file is not present, the rename task will exit without error so that the following batch sequence steps may continue.
The format of the rename data file is as specified in the Oracle Retail Predictive Application Server Cloud Edition Administration Guide.
The rename positions batch task does not require a separate control file, but may be specified as an entry in the batch_exec_list.txt file, for example:
weekly | renamepositions | prod
This control line indicates that the weekly batch task will look for a rename positions data file for the PROD hierarchy, prod.rn.dat, and will carry out the renamings specified.
The Workspace Refresh service enables the refresh of particular workspaces with current application data. This allows the selection of all workspaces built from a particular template, including the ability to match on partial template names.
The batch_refresh_list.txt contains only two columns: a refresh group identifier and a template name pattern to match. Here is an example of this file:
refresh_weekly | mt_wb
refresh_weekly | mp_wb
refresh_weekly | lt_wb
refresh_weekly | lp_wb
The example contains one refresh group, with four template pattern names to match. All workspaces that are built from templates matching those patterns will be refreshed.
The Workspace Rebuild service is similar to Workspace Refresh task; however, it allows for the workspaces to be completely rebuilt rather than just having their data refreshed. This covers the case where new positions have been added and must be reflected in the workspaces.
The batch_rebuild_list.txt contains only two columns: a rebuild group identifier and a template name pattern to match. Here is an example of this file:
rebuild_weekly | mt_wb
rebuild_weekly | mp_wb
The example contains one rebuild group, with two template pattern names to match. All workspaces that are built from templates matching those patterns will be rebuilt.
The Workspace Delete service enables the bulk deletion of all workspaces built from a particular template. This service does not require a separate control file but can be fully specified within the batch_exec_list.txt file. All workspaces built from the given template will be removed. To remove workspaces from several template types, specify one delete task for each template.
Here is an example of an entry in the batch_exec_list.txt file for this task:
weekly | delete | AD_POC
The autobuild service is the simplest to configure in the RPASCE batch framework, as it requires no parameters to be specified. When the autobuild service is included in a batch task group, the wbbatch utility is run to invoke the -startQueue build option. Any segments that have been previously queued for automatic build will be created by this call. Since no further parameters are needed, there is no third column for the autobuild service line.
Here is an example of an entry in the batch_exec_list.txt file for this task:
batch_weekly | autobuild |
Note that nothing is required after the second pipe (|) character.
This is the first of two batch tasks that work together to provide automated test capabilities. See the full explanation of RPAC test automation capabilities in Automated Testing with RPAC; the specific activities carried out by the batch tasks are described briefly here.
The initrpac task serves two purposes related to setting up the environment to be ready to run your automated test cases. First, it checks for new or updated test collateral files in Object Storage. Note that there are three archives of test collateral files that can be sent: tests.zip, input.zip, and compare.zip. If any of these collateral file archives are present in Object Storage under the planning/incoming/rpac subdirectory, then they will be moved into the internal holding area, ready to be used by the next step in the process; if no new files are present, then the previously sent files will continue to be used.
|
Note: Incrementally adding test collateral files are not supported; previous file sets of each type are removed before unpacking the new archive, so any updated archive must contain all collateral files of that type. This prevents stale test scripts or data files from being left in the testing environment, which could otherwise cause unexpected test failures. |
The second task carried out by initrpac is to stage the contents of the input.zip into the internal input directory. This will be used to place any hierarchy load (.dat) or measure load (.ovr, .clr, .rpl) files into position so that subsequent batch tasks may set the application into a known state, ready for automated tests to run and verify the expected result values.
The initrpac task entry in the batch_exec_list.txt control file does not require any parameters. It would normally be placed as the first entry in a test-enabled alternate version of a daily or weekly batch execution sequence. See full example in Automated Testing with RPAC.
rpac_validate | initrpac |
This is the second of the two batch tasks that work together to support automated testing capabilities. The runrpac task executes all automated tests in a single test .XML file. (See further information about the RPAC automation testing framework in Automated Testing with RPAC.) While the preceding initrpac task must only be run once, you may specify as many runrpac tasks as needed to execute all configured automation tests, possibly at several different points in an overall batch execution sequence.
The runrpac task entry in the batch_exec_list.txt control file takes one parameter that combines an identifier for the test, along with the filename of the test .XML file to be executed (separated by ~ character):
rpac_validate | runrpac | MFPCS_Sample_Test_1~RT01_MT_WB.xml
In this case, the test file RT01_MT_WB.xml will be executed under an identifying title "MFPCS_Sample_Test1". See Automated Testing with RPAC for a full example of a test-enabled batch execution sequence.
Summary test results will be visible in the output log for the batch execution (visible in the Online Administration dashboard), and full test result details will be available in the log file archive that is sent to Object Storage under planning/outgoing after the batch execution completes.
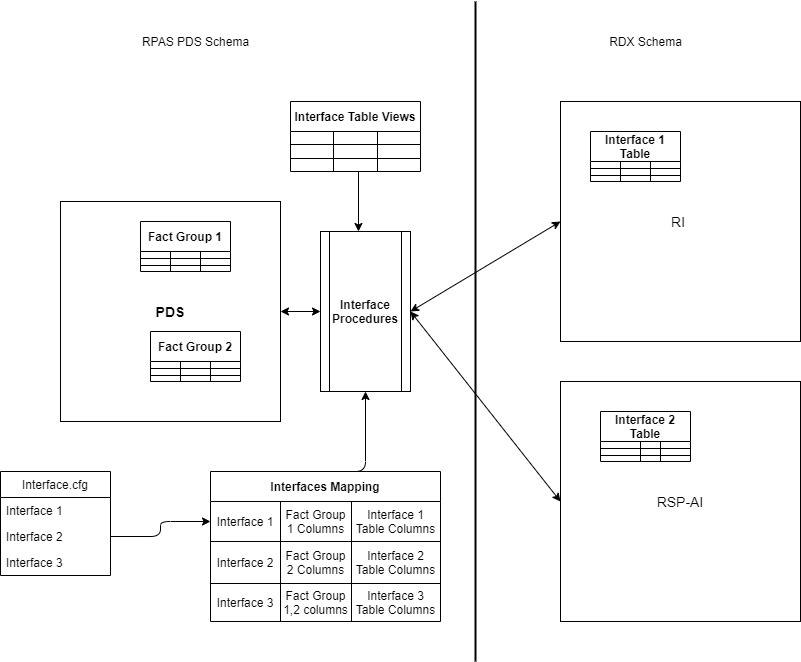
In RAP Integration, data from all pre-defined planning interfaces to external systems such as RMF CS or internal systems such as RI/Science must be pulled via importers from the RDX schema. Any data that is going from Planning to external systems can also be exported via exporters to the RDX schema. Although interface tables in the RDX schema are fixed or do not change very frequently, as defined by the interface contracts between respective applications, the planning/forecast application that is implemented on PDS supports extensibility and EE configuration. Because of this, it should have configurable/flexible importers and exporters to configure for all available metrics from the RDX schema tables since dimensions/fact names can be different for an EE customer. This is handled through the use of the interface.cfg file (interface configuration file). It is a free-form text file similar to the batch control file, and contains the mapping of dimension/facts in PDS to columns mapped to external tables for each interface.
Both importers/exporters can be commonly referred as interfaces within PDS, with an unique interface ID for each interface. Interfaces are classified as follows: dimension importers (H), data importers (I), and data exporters (E). Table 1-2 shows the pre-defined list of interfaces that are available for the customers in a RAP integration; there may be more application-specific interfaces. Customers can create or modify entries only for the available list of interfaces. They can configure the interface to match and import the required dimension/fact data based on the dimension/fact names configured within their application when those interfaces are executed in batch. For GA applications, a pre-configured interface.cfg file is available and the customer can customize it for any further extensibility changes, similar to an EE customer.
For most of the interfaces, the external interface table name is the same as the interface name; however, for few interfaces that require derived data from other interface tables, pre-defined views are created and columns from those views are used to obtain the data. Interfaces can be defined to only import/export to one external interface table/view. In Table 1-3, the External View Name column is populated only for interfaces that use internal views. Source tables used to define the view are specified within brackets if it is different than the interface name. The incremental flag Y indicates that the interface is incremental in nature; that is, for each interface run it obtains only the changed data, compared to the previous run of the interface. However, if the incremental flag is N, the interface always obtains a full set of data for each run. All hierarchy interfaces are complete-extract interfaces in order to obtain the latest data available in other applications and so keep all integrating applications synchronized. Refer to the application-specific Implementation Guides for more details about the list of columns available and used for the import or export for each interface.
Table 1-2 List of Pre-Defined Interfaces
| Interface Name | Interface Description | Importer Type | Interface Source/Destination | External View Name | Incremental |
|---|---|---|---|---|---|
|
RSE_FCST_DMD_EXP |
Forecast Interface from Science |
I |
RSP |
Y |
|
|
W_PDS_SLS_IT_LC_WK_A |
Sales Interface |
I |
RI |
Y |
|
|
W_PDS_INV_IT_LC_WK_A |
Inventory Interface |
I |
RI |
Y |
|
|
W_PDS_MKDN_IT_LC_WK_A |
Markdown Interface |
I |
RI |
Y |
|
|
W_PDS_PO_ONORD_IT_LC_WK_A |
On Order Interface |
I |
RI |
Y |
|
|
W_PDS_INVRC_IT_LC_WK_A |
Receipts Interface |
I |
RI |
Y |
|
|
W_PDS_INVADJ_IT_LC_WK_A |
Inventory Adjustments |
I |
RI |
Y |
|
|
W_PDS_INVTSF_IT_LC_WK_A |
Inventory Transfers |
I |
RI |
Y |
|
|
W_PDS_DEALINC_IT_LC_WK_A |
Deal Incomes |
I |
RI |
Y |
|
|
W_PDS_SLSWF_IT_LC_WK_A |
Wholesale/Franchise |
I |
RI |
Y |
|
|
W_PDS_EXCH_RATE_D |
Currency Conversion Rates |
I |
RI |
VW_CURR_RATE |
N |
|
VW_LOC_DATA |
Location Data |
I |
RI |
VW_LOC_DATA |
N |
|
W_PDS_PRODUCT_D |
Product Hierarchy |
H |
RI |
N |
|
|
W_PDS_ORGANIZATION_D |
Location Hierarchy |
H |
RI |
N |
|
|
W_PDS_CALENDAR_D |
Calendar Hierarchy |
H |
RI |
VW_CLND_HIER |
N |
|
VW_CURR_HIER |
Currency Hierarchy |
H |
VW_CURR_HIER(W_PDS_EXCH_RATE_D) |
N |
|
|
MFP_PLAN1_EXP |
Merch Plan Export from MFP to RI |
E |
N |
||
|
MFP_PLAN2_EXP |
Merch Target Plan Export from MFP to RI |
E |
N |
||
|
MFP_PLAN3_EXP |
Location Plan Export to from MFP to RI |
E |
N |
||
|
MFP_PLAN4_EXP |
Location Target Plan Export from MFP to RI |
E |
N |
Each interface can have a configuration specification defined as the interface mapping that provides details about the mapping of the source table columns and the destination. It can be provided by the customer as the configuration file interface.cfg, which is loaded into an internal interface mapping table. It can be used by generic importer/exporter packages to transfer data when those interfaces are executed in the batch. Table 1-3 provides a list of entries in the interface mapping table (RP_G_INTF_MAPPING_MD).
Table 1-3 Interface Mappings
| Column | Description | Purpose | Example |
|---|---|---|---|
|
INTF_MAP_NAME<INTERFACE_NAME> |
Interface name |
Actual interface name for which the mapping is defined |
W_PDS_SLS_IT_LC_WK_A |
|
INTF_MAP_PARAM<PARAM> |
Interface parameter name |
Grouping within that interface. Can be App Name or, within an application, a different set of data to process for that interface, based on this parameter. |
MFP |
|
INTF_MAP_TYPE<TYPE> |
Interface parameter type |
Type of mapping. Can be dimension mapping or data mapping or filter criteria for the mapping. Valid Interface Mapping types vary, based on the type of interface. |
DIM01 / DATA |
|
INTF_MAP_RPAS<INTERNAL_NAME> |
Interface mapping column from PDS (RPASCE) |
Dimension or fact name from PDS, based on the mapping type. |
WEEK / DRTYSLSREGU |
|
INTF_MAP_EXTERNAL<EXTERNAL_NAME> |
Interface mapping column from external table (source or destination table) |
Column name from external interface table. |
NET_SALES_REG_UNITS |
|
INTF_MAP_VALUE<VALUE> |
Interface mapping value or constant |
Can be a hard-coded constant value to use if mapping is not provided. It can be used for FILTER Type entries. It can also be a scalar measure specified with prefix @. |
This section provides the syntax for interface mappings in the interface.cfg file.
<INTERFACE_NAME> : <PARAM> : <TYPE> : <INTERNAL_NAME> : <EXTERNAL_NAME> : <VALUE>
Here are the details for the entries.
<INTERFACE_NAME> - The name of interface
<PARAM> - Parameter grouping can be App Name or any internal grouping name. It must have a different value only if the same interface is used to import/export different levels of data, based on different criteria.
<TYPE> - For data importers/exporters, DIMxx (xx 01,02,03) for dimension mapping. DIM01 is reserved for the Calendar dimension. DATA for data mapping. FILTER for optional filter criteria. FILTER or FILTER_EQ used for equal (=) operator. It also allows FILTER_NE (<>) ,FILTER_GT (>), FILTER_GE (>=), FILTER_LT (<), FILTER_LE (<=)(<=),FILTER_LK (Like), FILTER_NL (Not Like) as different filter types. More than one filter entries can be used, but they all use the AND operation of the filter.
<TYPE> - For hierarchy/dimension importers, HDMxx (xx 01,02,03) for dimension mapping for all dimensions from a single hierarchy, HDLxx for dimension label mappings, FILTER* for optional filter criteria.
<INTERNAL_NAME> - For data importers/exporters, internal dimension/fact name. It must be dimension name for DIMxx type and fact name for DATA type entries.
<INTERNAL_NAME> - For hierarchy/dimension importers, hierarchy dimension column from a single hierarchy,it is required only for HDMxx type entries.
<EXTERNAL_NAME> - Mapping column from external interface table for dimension, data, or filter types.
<VALUE> - Constant value to use for mapping if column mapping not present. Also constant value to use for FILTER criteria. It can also be a scalar measure specified with prefix @. If this value is provided for hierarchy importer types, it will be used as the prefix for dimension or labels
Multiple entries for same interface are required to completely define all the required mappings for an interface.
Entries for data importer interfaces are displayed as follows:
<INTERFACE_NAME : <PARAM> : DIMxx : <DIM_NAME> : <EXTERNAL_COLUMN> :
<INTERFACE_NAME> : <PARAM> : DATA : <FACT_NAME> : <EXTERNAL_COLUMN> :
<INTEFACE_NAME> : <PARAM> : FILTER : : <EXTERNAL_COLUMN> : <FILTER_VALUE>
Example:
W_PDS_SLS_IT_LC_WK_A: MFP: DIM01 : WEEK : EOW_DATE
W_PDS_SLS_IT_LC_WK_A: MFP: DIM02 : SKU : ITEM_ID
W_PDS_SLS_IT_LC_WK_A: MFP: DIM03 : STOR : LOCATION_ID
W_PDS_SLS_IT_LC_WK_A: MFP: DATA : DRTYNSLSREGU : NET_SALES_REG_UNITS
W_PDS_SLS_IT_LC_WK_A: MFP: DATA : DRTYNSLSREGC : NET_SALES_REG_COST
W_PDS_SLS_IT_LC_WK_A: MFP: DATA : DRTYNSLSREGR : NET_SALES_REG_RETAIL
W_PDS_SLS_IT_LC_WK_A: MFP: DATA : DRTYRTNREGU : RETURNS_REG_UNITS
W_PDS_SLS_IT_LC_WK_A: MFP: DATA : DRTYRTNREGC : RETURNS_REG_COST
W_PDS_SLS_IT_LC_WK_A: MFP: DATA : DRTYRTNREGR : RETURNS_REG_RETAIL
W_PDS_SLS_IT_LC_WK_A: MFP: DATA : DRTYNSLSCLRU : NET_SALES_CLEAR_UNITS
W_PDS_SLS_IT_LC_WK_A: MFP: DATA : DRTYNSLSCLRC : NET_SALES_CLEAR_COST
W_PDS_SLS_IT_LC_WK_A: MFP: DATA : DRTYNSLSCLRR : NET_SALES_CLEAR_RETAIL
W_PDS_SLS_IT_LC_WK_A: MFP: DATA : DRTYRTNCLRU : RETURNS_CLEAR_UNITS
W_PDS_SLS_IT_LC_WK_A: MFP: DATA : DRTYRTNCLRC : RETURNS_CLEAR_COST
W_PDS_SLS_IT_LC_WK_A: MFP: DATA : DRTYRTNCLRR : RETURNS_CLEAR_RETAIL
Entries for data exporter interfaces are displayed as follows:<INTERFACE_NAME> : <PARAM> : DIMxx : <DIM_NAME> : <EXTERNAL_COLUMN> :
<INTERFACE_NAME> : <PARAM> : DATA : <FACT_NAME> : <EXTERNAL_COLUMN> :
<INTEFACE_NAME> : <PARAM> : FILTER : <FACT_NAME> : :<FILTER_VALUE>
The following example shows a sample generic exporter that obtains data from different facts of same base intersection and imports data into same table for different versions (MPCP and MPOP) of the plan. This is controlled by using a different PARAM for each different version of the data.
MFP_PLAN1_EXP:MPOP:DIM01:WEEK:CLND_KEY:
MFP_PLAN1_EXP:MPOP:DIM02:SCLS:PROD_KEY:
MFP_PLAN1_EXP:MPOP:DIM03:CHNL:LOC_KEY:
MFP_PLAN1_EXP:MPOP:DATA::PROD_DH_ATTR:@MFP_DRDVDPOST
MFP_PLAN1_EXP:MPOP:DATA::SUPPLIER_NUM:@MFP_DRDVDPOST
MFP_PLAN1_EXP:MPOP:DATA::VERSION_NUM:0
MFP_PLAN1_EXP:MPOP:DATA:MPOPLDOWD:CAL_DATE:
MFP_PLAN1_EXP:MPOP:DATA:MPOPSLSU:SLS_QTY:
MFP_PLAN1_EXP:MPOP:DATA:MPOPSLSR:SLS_RTL_AMT:
MFP_PLAN1_EXP:MPOP:FILTER:MPOPEXPORTB::TMFP_PLAN1_EXP:MPCP:DIM01:WEEK:CLND_KEY:MFP_PLAN1_EXP:MPCP:DIM02:SCLS:PROD_KEY:MFP_PLAN1_EXP:MPCP:DIM03:CHNL:LOC_KEY:MFP_PLAN1_EXP:MPCP:DATA::PROD_DH_ATTR:@MFP_DRDVDPOSTMFP_PLAN1_EXP:MPCP:DATA::SUPPLIER_NUM:@MFP_DRDVDPOSTMFP_PLAN1_EXP:MPCP:DATA::VERSION_NUM:1MFP_PLAN1_EXP:MPCP:DATA:MPCPLDOWD:CAL_DATE:MFP_PLAN1_EXP:MPCP:DATA:MPCPSLSU:SLS_QTY:MFP_PLAN1_EXP:MPCP:DATA:MPCPSLSR:SLS_RTL_AMT:MFP_PLAN1_EXP:MPCP:FILTER:MPCPEXPORTB::T
Hierarchy importers are similar to importers. However, the dimension mapped belong to the same hierarchy. Each hierarchy dimension can also contain the corresponding mapping for labels. The new mapping type entries differentiate an interface as a hierarchy importer interface.
|
Note: If the mapping is for an alternate level that is loaded via flat file and there is no mapping available inthe External Interface table for the alternate level, then default value can provided as NA or na. In this scenario, the current position name, if it already exists, is not overwritten. However, for a new value, the position name will be added as <level>_<number>, where <level> is the level name that is the alternate level here and <number> is an integer starting with 0. If the default value provided is not NA or na, then the position name will be saved as the default value provided. |
The following two mappings are used instead of DIMxx and DATA type mappings.
<INTERFACE_NAME> : <PARAM> : HDMxx : <DIM_NAME> : <EXTERNAL_DIM_COLUMN> : <OPTIONAL_PREFIX_VALUE>
<INTERFACE_NAME> : <PARAM> : HDLxx : : <EXTERNAL_LABEL_COLUMN> : <OPTIONAL_PREFIX_VALUE>
<INTEFACE_NAME> : <PARAM> : FILTER : : <FILTER_SOURCE_COLUMN> : <FILTER_VALUE>
The following is an example entry for hierarchy importers.
W_PDS_CALENDAR_D:PDS:HDM01:DAY:DAY:
W_PDS_CALENDAR_D:PDS:HDM02:WEEK:WEEK:
W_PDS_CALENDAR_D:PDS:HDM03:MNTH:MNTH:
W_PDS_CALENDAR_D:PDS:HDM04:QRTR:QRTR:
W_PDS_CALENDAR_D:PDS:HDM05:HALF:HALF:
W_PDS_CALENDAR_D:PDS:HDM06:YEAR:YEAR:
W_PDS_CALENDAR_D:PDS:HDM07:WOYR:WOYR:
W_PDS_CALENDAR_D:PDS:HDM08:HLDY::NA
W_PDS_CALENDAR_D:PDS:HDM09:EVNT::NA
W_PDS_CALENDAR_D:PDS:HDM10:STDB:STDB:
W_PDS_CALENDAR_D:PDS:HDL01::DAY_LABEL:
W_PDS_CALENDAR_D:PDS:HDL02::WEEK_LABEL:
W_PDS_CALENDAR_D:PDS:HDL03::MNTH_LABEL:
W_PDS_CALENDAR_D:PDS:HDL04::QRTR_LABEL:
W_PDS_CALENDAR_D:PDS:HDL05::HALF_LABEL:
W_PDS_CALENDAR_D:PDS:HDL06::YEAR_LABEL:
W_PDS_CALENDAR_D:PDS:HDL07::WOYR_LABEL:
W_PDS_CALENDAR_D:PDS:HDL08:::Unassigned
W_PDS_CALENDAR_D:PDS:HDL09:::Unassigned
W_PDS_CALENDAR_D:PDS:HDL10::STDB_LABEL:
A customer can upload a new interface.cfg file using the OAT task Load Interface Mappings. Before executing this task, the customer must upload the interface.cfg file to the object store using the naming convention incoming/config/interface.cfg and then execute that task.
The upload process does basic validation for entries in interface.cfg, verifying that the correct parameters are used and the interface column mappings are valid both in the application and in the external table sources. If the validation fails, it will provide details about the errors in the log and restore the previous interface.cfg file. If the validation is successful, it will upload the new interface.cfg configuration file and subsequent interface execution calls will use the new interface.cfg file.
The RPASCE Pluggable Automation Component (RPAC) utility is supported for use with RPASCE cloud application deployments. RPAC tests are specified in XML-format text files and cover a range of RPASCE application and segment activities. Note that RPAC does not support the testing of GUI functions and is not a performance testing tool. In order to support the validation of a newly installed or patched environment, in the context of configured daily or weekly batch operations, RPAC for Cloud deployments is supported through new entries in the RPASCE Batch task catalog. These tasks allow a pre-production application to be set to a known state through a combination of hierarchy load and measure load files, and then can compare both application and segment workspace measures to known values represented either directly in the test xml files or in data comparison files. This is similar to a measure data load file, but used only for comparison rather than for loading.
Three types of collateral files are involved in the RPAC testing process:
Input data file set: a group of hierarchy (.dat) and measure (.ovr, .clr, or .rpl) data files that must be loaded into the application before any RPAC tests are run. Uploaded to Object Storage in the planning/incoming/rpac directory as input.zip.
Test file set: one or more .xml files where tests and test suites are defined using the available set of RPAC tags and attributes. Uploaded to Object Storage in the planning/incoming/rpac directory as tests.zip.
Comparison data file set: an optional way to efficiently validate that one or more measures currently contain an expected set of values. Uploaded to the Object Storage planning/incoming/rpac directory as compare.zip.
Each of these collateral file archives, once sent through the Object Storage interface, will be kept internally to be used every time an RPAC-enabled batch execution sequence is run. Updates to the collateral files can be sent to the Object Storage site before the next call of the initrpac batch task and will be brought into the active environment at that time. Note that when any of the collateral file archives is updated, the previous contents are entirely removed from the internal storage area, so the replacement archive file must be a complete set of files of that type. This prevents stale test scripts or data files from being left in the environment.
The two RPASCE Batch tasks, initrpac and runrpac, are detailed in the batch task catalog in "Initialize Testing Environment: initrpac" and "Execute Automated Tests: runrpac". The initrpac task is expected to be run once, at the start of the RPAC-enabled batch exec sequence; the runrpac task can be called multiple times, including at separate points during the batch exec sequence, if needed. Here is an example batch execution sequence that shows how an existing weekly batch specification might be augmented with RPAC tests:
# Standard Weekly Batch Cycle
weekly | unpack    | weekly_sales.zip~ftp
weekly | hierload  | prod~14~N
weekly | hierload  | loc~14~N
weekly | measload  | load_oo_list
weekly | calc      | batch_fcst
weekly | autobuild |

# RPAC-enhanced Batch Cyle
validate | initrpac  |
validate | hierload  | prod~14~N
validate | hierload  | loc~14~N
validate | measload  | load_oo_list
validate | runrpac   | RPAC_Domain_Tests~DomainTests.xml
validate | calc      | batch_fcst
validate | runrpac   | RPAC_Segment_Tests~SegmentTests.xml
The first section, labeled "weekly", represents a weekly batch sequence that might run at midnight every Saturday. Note that updated hierarchy and measure data files for the week are sent through Object Storage in an archive file named "weekly_sales.zip" using the unpack task.
The second section shows how the weekly batch sequence has been augmented with RPAC tests and named "validate". Note that the unpack task from the weekly sequence has been left out, and in its place initrpac is called to place the test data input files into the application. If new or updated RPAC test collateral files have been placed on the Object Storage server, they will be brought in at this point and used.
There are two sets of RPAC tests in this sequence, specified by the runrpac task entries. The first runs immediately after the hierarchy and measure files are loaded, and validates expected values in the application. The second test set is executed after some further calculations have been run, and builds one or more segments, then validates values within them as well.
When RPAC-enabled batch sequences are run, the primary log file, which is available through the Online Administration dashboard as well as through the Object Storage log archive package, will show a brief summary of test results. Full test details and log files are available in the complete log archive package from the batch exec run, available in the Object Storage area once the execution has completed.
For full details on the contents of an RPAC test .xml file, and all the tags and attributes that are available for specifying RPAC tests, see "RPASCE Test Automation" in Oracle Retail Predictive Application Server Cloud Edition Administration Guide. Note that the latest version of this guide specifies which RPAC features are available for Cloud deployments. Due to Cloud security constraints, some RPAC features, primarily the <SHELL> tag, have been disabled; however, inclusion of RPAC tests as a step in existing batch execution sequences should fully compensate for this restriction.
This section describes the process for deploying an application in an RPASCE Cloud Service environment.
Oracle RGBU cloud services include an Object Storage site for incoming and outgoing file transfers. See "Uploading and Downloading Files" for details on the Object Storage interface.
For the purposes of building the application, four paths within the Object Storage site are used:
For uploading the application configuration into the cloud environment, create a .zip archive containing the contents of the config directory (without the top level config folder). This archive file must be named as <config_name>config.zip. This archive file must be placed in the planning/incoming/config path on the Object Storage service. It may be updated as often as necessary in support of application build or patch activities.
Example
The ascs_config.zip may contain the following contents:
ascs folder - this is the folder with configuration for an application called ASCS (required).
ascsDashboardSettings.json - custom settings for the ASCS dashboard (optional).
ascsHelpConfig.json - custom settings for ASCS Online Help (optional).
The set of batch process control files, as detailed in the previous section, must be uploaded as planning/incoming/batch_control.zip (or alternatively as individual files in the planning/incoming/batch_control path) within the Object Storage service. These files are loaded into the application's data store during deployment, and can be updated later as part of the Patch Application task or by running the Manage Batch Control task.
A newly provisioned RPASCE cloud environment is set up with a bootstrap configuration that allows the implementer to log into the RPASCE Client and access the Online Administration Tool (OAT) interface before an application has been deployed. The bootstrap OAT configuration allows only tasks required to deploy your application. Once the application has been deployed, both the application-specific tasks and activities as well as the deploy activities will be available. This allows the application to be re-deployed from scratch multiple times, should this be required during the implementation phase. (Note that this would trigger a complete loss of any data, so would only be applicable in early phases of implementation testing.)
A few parameters must be specified when initiating an Application Deploy process through OAT. The implementer must supply these values:
The name under which the configuration has been saved. For those familiar with the RPASCE application construction process, this is the name that is internally passed as the -cn parameter to rpasInstall. A drop-down list offers choices based on the available application config archive files in the incoming FTP area.
The dimension on which the application will be partitioned. The application is constructed with one sub-application for each position in the given dimension. This must be a level of separation that fits with the intended workflow for individual users so that, when possible, most users' daily tasks relate to only one sub-application. This lessens contention when many users are active in the system.
Once a application has been built successfully, a named group of batch operations may be specified (typically including measure data loads and mace calculations). This operation sequence must be one batch_type entry in the Batch Exec control file, batch_exec_list.txt (described in "Batch Exec Service").
In the case where the application has already been built once, and the implementer must rebuild the application from scratch, which might occur because a non-patchable change has been made to the configuration, this option must be selected. If it is left in the default unselected state, then the application build process will halt and report an error, rather than overwrite the existing application.
The application build process automatically carries out the following steps:
Basic validation of the given config name and partition dimension.
Ensure that a configuration with the given config name has been uploaded.
If the overwrite flag is false, ensure that there is no existing application. It reports an error if the application exists.
If the overwrite flag is true, remove the existing application.
Build the application using the config name and the partition dimension as specified in the OAT parameter screen.
Copy any users and user groups from the bootstrap application environment into the application environment.
Copy the uploaded batch control text files into the application from the SFTP location.
Run post-application-build batch group.
Add the application details into the provisioned RPASCE Client configuration.
Once the Bootstrap Application task has completed, you only need to log out of the RPASCE Client and then log back in again to see the tasks and menus associated with your newly built application. (It is no longer required to restart the RPASCE Client, and this option has been removed from the OAT menus.)