| Oracle® Retail Demand Forecasting Cloud Service User Guide Release 18.0 F16498-15 |
|

 Previous |
 Next |
| Oracle® Retail Demand Forecasting Cloud Service User Guide Release 18.0 F16498-15 |
|
Previous |
Next |
This chapter describes these two features:
Item attributes — which are used to make automatic like item recommendations for new items.
New items — including:
workflow around handling
reviewing and approving their automatic like item recommendation
the manual process for like stores selection with new stores
In general, an item is eligible to be considered new if it satisfies the following condition:
Forecast start date override is in the future or Sales history length is less than the time series duration parameter
In general, an item is eligible to be considered a like-item if its recent sales density is acceptable.
These workspaces help you achieve this task:
The following table lists the workspaces, steps, and views for the New Item & Locations task.
|
Note: The full functionality of the New Item Maintenance workspace is available only when item attributes are loaded and thus the like item recommendation is automated.When item attributes are not available the like item has to be selected manually. However, the workspace is the same for both attribute and non-attribute cases. If at a later point in time, attributes become available, the automated like item recommendation can be used, without the need to patch the environment. |
To build the New Item Maintenance workspace, perform these steps:
From the left sidebar menu, click the Task Module to view the available tasks.
Click the New Item/Location activity to access the available workspaces.
Click New Item Maintenance. The New Item Maintenance wizard opens.
You can open an existing workspace, but to create a new workspace, click Create New Workspace.
Enter a name for your new workspace in the label text box and click OK.
The Workspace wizard opens. Select the products you want to work with and click Next.
Select the locations you want to work with and click Finish.
The wizard notifies you that your workspace is being prepared. Successful workspaces are available from the Dashboard.
This step contains views that allow you to review and approve like item recommendations, when item attributes are available. If attributes are not available, the like item selection is done manually. You also have visibility to which items are eligible to serve as like items for the new items by location.
The available view is:
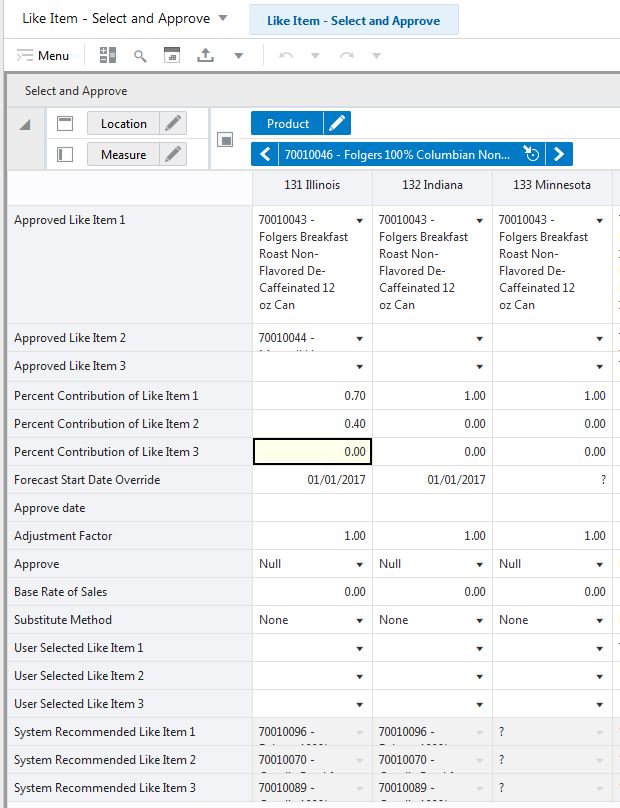
The Select and Approve view is used to review the system generated like item recommendations if attributes are available. You can overwrite the recommendations, and/or trigger the approval, at the granular item / store intersection. This view has a custom menu, Approve New Items, and it approves the like items recommendations for new items. The recommendations are the system recommended or overrides, depending on the approve settings.
The Select and Approve view contains the following measures:
Approve Date
This measure displays the date when the like item recommendation was approved by running the custom menu.
Approve
This measure determines which recommendations are approved the next time the custom menu is run. The options are:
Null— no like item is recommended.
Approve System — the system recommended like item is approved.
Approve Override — your selected like item is approved. Note that if no user selections are available, then no like item is approved.
Substitute Method
This measure displays a list where you can select the substitute method. When a Substitute Method is used to forecast, the method set for an intersection is cleared once the Default Forecast Start Date is greater than the Forecast Start Date Override plus the Like TS Duration for the intersection. Valid options are:
| Substitute Method | Description |
|---|---|
| None | No forecast is created for the time series. |
| Like Item | The forecast is created based on the forecast of up to three like items. The three like items can be selected manually, and the choices are entered in the User Selected Like items measures. The task can also be automated if attributes are available. RDF CS then suggests three like items in the system recommended like item measures.
The forecast for the new item will be a combination of the forecasts of the like items, given by: Forecast new item = (forecast like item1*percentage contribution of like item1 + forecast like item2*percentage contribution of like item2 + forecast like item3*percentage contribution of like item3) * Adjustment Factor |
| Base Rate of Demand | RDF CS calculates a base rate of demand based on items in the same class (dimension is configurable). The forecast for the new item calculates as:
Forecast at time t = base rate of demand * seasonality at time t (coming from escalation level) * promo and price effects (coming from pooling level) |
| User Input | This method is very similar to Base Rate of Demand, with the difference that you have to manually specify a base rate of demand. The forecast is then generated using the same formula as for Base Rate of Demand. |
Percent Contribution of Like Item 1
This measure determines the percentage of Like item 1's forecast that is going to be applied towards the forecast of the new item.
Percent Contribution of Like Item 2
This measure determines the percentage of Like item 2's forecast that is going to be applied towards the forecast of the new item.
Percent Contribution of Like Item 3
This measure determines the percentage of Like item 3's forecast that is going to be applied towards the forecast of the new item.
Adjustment Factor
This measure determines how much the combined forecasts are scaled up or down to create the forecast of the new item.
System Recommended Like Item 1
This measure displays the top like item for a given store.
System Recommended Like Item 2
This measure displays the second like item for a given store.
System Recommended Like Item 3
This measure displays the third like item for a given store.
User Selected Like-Item 1
This measure allows you to override the top like item for a given store.
User Selected Like-Item 2
This measure allows you to override the second like item for a given store.
User Selected Like-Item 3
This measure allows you to override the third like item for a given store.
Base Rate of Sales
This measure represents the average sales of a new item/store combination. It is used when specifying Base Rate of Sales New SKU as the Substitution Method to create a forecast for the new item/store combination. The measure can be generated in another application and loaded into RDF, or it can be manually entered by a user.
Forecast Start Date Override
This measure represents the date to start forecasting for an item/location combination. This measure can be set in the future if using like-item or Sister-Store functionality, and, upon reaching that time, the forecast is generated. If this date is set to the past, it is ignored in favor of the Forecast Start Date from the Forecast Setup Workspace. This means that the Forecast Start Date for this intersection needs to be edited once it is no longer in the future. For like-item or sister store, the Forecast Start Date and the History Start Date should be set to the same date. It is important to understand how Forecast Start Date should be used in conjunction with Forecast End Date. No value is in this measure if the system default set in the Forecast Setup Workspace is to be used.
|
Note: This measure can also be set in the Forecast Setup Workspace. Changes to this measure can be seen in the Forecast Setup task. The most recent commit (between either of the tasks) is the value used by the system. |
The available views are:
The New Item Basic Parameters view is used to set default values for some parameters related to the new item functionality.
The New Item Basic Parameters view contains the following measures:
Percent Contributions
Percent Contribution1, Percent Contribution2, Percent Contribution3
If the like item substitution method is selected, the contribution methods specify what percent of a like item's forecast will be copied to the new item.
Adjustment Factor
If the forecast for the new item is generated using the like item substitution method, the value of the adjustment factor is multiplied to the like items forecast, to allow the flexibility to adjust up or down.
Auto-approve
You decide if automatic like item recommendations are automatically approved by selecting this measure. If the automatic like item recommendations are not automatically approved, the system suggested like items are still displayed, but not used in forecast generation.
Substitute Method
This measure displays a list where you can select the substitute method. When a Substitute Method is used to forecast, the method set for an intersection is cleared once the Default Forecast Start Date is greater than the Forecast Start Date Override plus the Like TS Duration for the intersection. Valid options are:
| Substitute Method | Description |
|---|---|
| None | No forecast is created for the time series. |
| Like Item | The forecast is created based on the forecast of up to three like items. The three like items can be selected manually, and the choices are entered in the User Selected Like items measures. The task can also be automated if attributes are available. RDF CS then suggests three like items in the system recommended like item measures.
The forecast for the new item will be a combination of the forecasts of the like items, given by: Forecast new item = (forecast like item1*percentage contribution of like item1 + forecast like item2*percentage contribution of like item2 + forecast like item3*percentage contribution of like item3) * Adjustment Factor |
| Base Rate of Demand | RDF CS calculates a base rate of demand based on items in the same class (dimension is configurable). The forecast for the new item calculates as:
Forecast at time t = base rate of demand * seasonality at time t (coming from escalation level) * promo and price effects (coming from pooling level) |
| User Input | This method is very similar to Base Rate of Demand, with the difference that you have to manually specify a base rate of demand. The forecast is then generated using the same formula as for Base Rate of Demand. |
Threshold Recent Sales Density
In this measure, you enter the threshold for the data density. If the actual density is larger than the threshold, the time series qualifies to serve as like item/location for a new/item/location. The data density is calculated as:
data density = number of periods with demand larger than zero / total length of demand
For a time series with the following demand values:
0,1,0,1,0,today
The data density is 2/4 = 50%
History Time Series Duration
In this measure you can enter the threshold for the historical demand duration to determine if a time series is considered. If the demand history is less than the threshold, the forecast of the new time series is generated using the new item/store functionality. If the demand length is larger than the threshold, the time series is not considered new anymore, and its own demand is used to generate the forecast.
|
Tip: Consider the threshold is set to five periods, and the first week of sales is 10 weeks ago, In this case, the item is not considered new anymore. Whatever like item strategy was selected for the item is not applied anymore and the forecast is generated based on its own demand. |
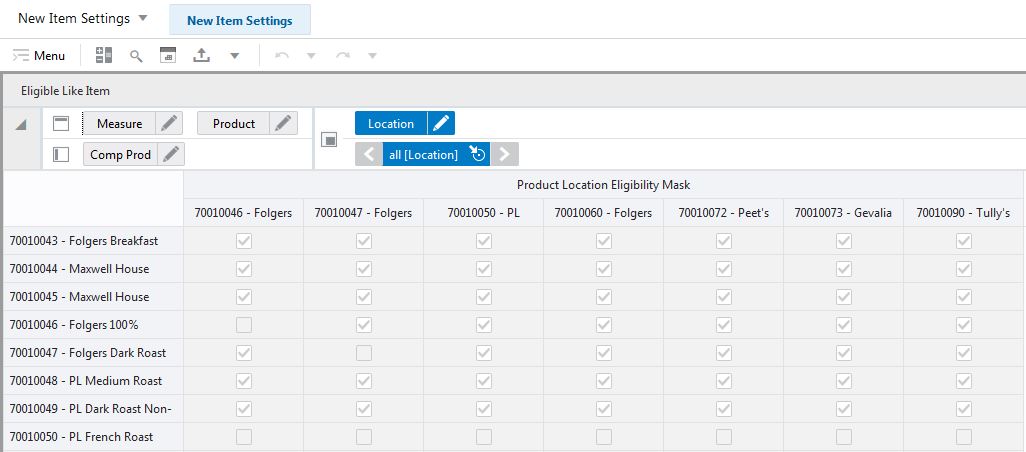
The Eligible Like Item view is used to display what items are eligible to be like items for each new item included in the view.
Use this workspace to assign like stores to handle forecasting for new stores. The like store assignment is manual and there is a good reason for it. New stores have a large financial impact, so it makes sense having a business person making the like store selection.
It is probably more appropriate than going with an automatic selection based on something like store attributes. Also, new store introductions are infrequent compared to new item introductions, so manually handling new stores is not a significant overhead activity.
To build the New Store Maintenance workspace, perform these steps:
From the left sidebar menu, click the Task Module to view the available tasks.
Click the New Item/Location activity to access the available workspaces.
Click New Store Maintenance. The New Store Maintenance wizard opens.
You can open an existing workspace, but to create a new workspace, click Create New Workspace.
Enter a name for your new workspace in the label text box and click OK.
Select the locations you want to work with and click Finish.
The wizard notifies you that your workspace is being prepared. Successful workspaces are available from the Dashboard.
The Product Like Store Assignment view is at the intersection of prod/location, so all parameters can vary by product. For example, a new store opening in the Midwest can have a Like Store from Alaska for items in the Shovels department. However, for summer items, the Like Store is picked from the Northeast region.
The Product Like Store Assignment view contains the following measures:
Like Store 1
In this measure, you can specify the first like store. Note how the like store can be different by product. In RDF, a different first like store selection can be made for every subclass.
Like Store 2
In this measure, you can specify the second like store. Note how the like store can be different by product. In RDF, a different second like store selection can be made for every subclass.
Like Store 3
In this measure, you can specify the third like store. Note how the like store can be different by product. In RDF, a different third like store selection can be made for every subclass.
Adjustment Factor
This measure determines how much the combined forecasts are scaled up or down to create the forecast of the new item.
Substitute Method
This measure displays a list where you can select the substitute method. When a Substitute Method is used to forecast, the method set for an intersection is cleared once the Default Forecast Start Date is greater than the Forecast Start Date Override plus the Like TS Duration for the intersection. Valid options are:
| Substitute Method | Description |
|---|---|
| None | No forecast is created for the time series. |
| Like Store | You can provide up to three stores with similar seasonality patterns. The forecast for the new store will be a combination of the forecasts of the like stores that you selected.
Forecast new store = (forecast like store1*percentage contribution of like store1 + forecast like store2*percentage contribution of like store2 + forecast like store3*percentage contribution of like store3) * Adjustment Factor |
| Base Rate of Demand | RDF CS calculates a base rate of demand based on the stores in a similar region (dimension is configurable). The forecast for the new store is then calculated as:
Forecast at time t = base rate of demand * seasonality at time t (coming from escalation level) * promo and price effects (coming from pooling level) |
| User Input | This method is very similar to Base Rate of Demand, with the difference that you have to manually specify a base rate of demand. The forecast is then generated using the same formula as Base Rate of Demand. |
Percent Contribution of Like Store 1
This measure determines the percentage of Like Store 1's forecast that is going to be applied towards the forecast of the new store.
Percent Contribution of Like Store 2
This measure determines the percentage of Like Store 2's forecast that is going to be applied towards the forecast of the new store.
Percent Contribution of Like Store 3
This measure determines the percentage of Like Store 3's forecast that is going to be applied towards the forecast of the new store.
Forecast Start
This measure specifies the first date for which forecast is generated for the new store.
This workspace is intended to review like item recommendations, as well as metrics that support the recommendations. The recommendations are driven by similarity among items, which in turns is based on how close a new item's attributes are compared to all existing items' attributes. Note that attributes and attribute weights need to be provided to make full use of the attribute-based like item recommendation functionality. If they are not provided this results in similarity scores to be zero. However, it does not prevent the workbook being built.
The product wizard has a pre-range mask applied; it filters the products such that only items that were identified as new by the system are displayed.
If the system has not identified any new items, then the pre-range mask is empty and the workbook will not build.
For an item to be considered new, one of these two conditions needs to be true:
The New Item Forecast Start Date measure stores a date that is in the future (past RPAS_TODAY). The measure is available in the New Item Maintenance workbook, and the dates can be loaded - if interfaced from a legacy system such as RMS - or the user can manually set them.
The item has been selling but only for a short period of time. The length is defined by the History Time Series Duration. So an item is still considered new if the date it started selling plus the number stored in the History TS Duration is larger than RPAS_TODAY. The History Time Series Duration is also available in the New Item Maintenance workbook.
|
Note: If either of these two measures are updated in the New Item Maintenance workspace, some measures are calculated. Specifically, thenitfcststovr measure, which is fed into the calculation of the prerange mask for the Attribute Maintenance workspace. |
In the views, the product hierarchy positions represent the new items. The Comp Prod hierarchy positions represent existing items. The new items dictate which existing items are automatically brought in the workbook. For instance, if all new items belong to the coffee class, only the existing items from the coffee class are brought in the workbook as Comp Prod positions.
If there are two new items, a soda and a new coffee brand, then the existing items brought in the workbook are only items from the coffee and the soda classes.The definition for an existing item is that it has been selling for a period longer than defined in the History TS Duration measure.
To build the Attribute Maintenance workspace, perform these steps:
From the left sidebar menu, click the Task Module to view the available tasks.
Click the New Item/Location activity to access the available workspaces.
Click Attribute Maintenance. The Attribute Maintenance wizard opens.
You can open an existing workspace, but to create a new workspace, click Create New Workspace.
Enter a name for your new workspace in the label text box and click OK.
Select the products you want to work with and click Next.
Select the locations you want to work with and click Finish.
The wizard notifies you that your workspace is being prepared. Successful workspaces are available from the Dashboard.
The Attribute Maintenance workspace is built.
This step contains views that allow you to review attributes for new and existing items. Also, they show how much alike items are and the best choices for like items.
The available views are:
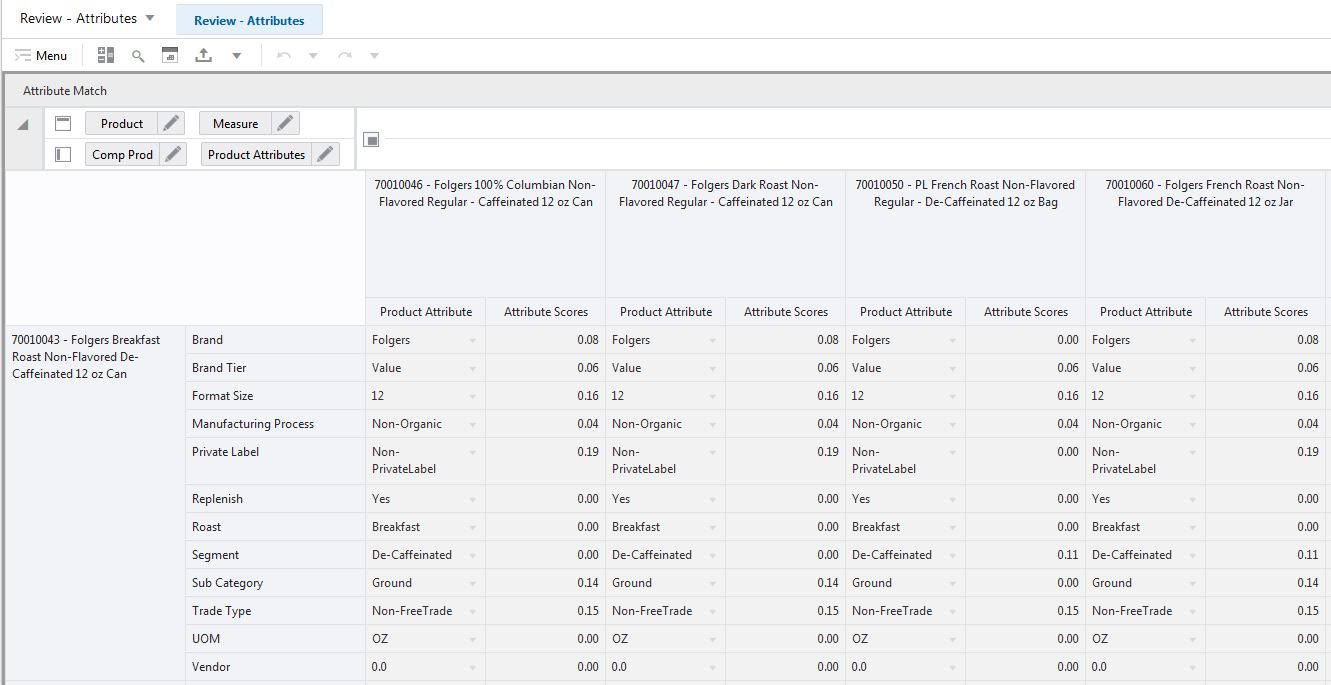
The Attribute Match view is used to review the attributes of new and existing items and how well they match.
The Attribute Match view contains the following measures:
Product Attribute Label
This measure displays the label of the product attribute. For instance for the brand attribute the label can be 'private label'. Or for size, it can be 12oz.
Attribute Scores
This measure displays the quantitative fit of the attribute values between new and existing items. For instance we can compare the UOM attribute between a coffee pack and a pair of jeans. The relevance of matching ounces and inches may not be very high, and the attribute score is likely zero. However, if we compare the color attribute of a shirt and a t-shirt, the match be more relevant and the score is larger than zero.
This measure incorporates the goodness of the fit in attributes between new and existing items, as well as how important an attribute is for the new item. If the new item is a carbonated drink, the brand attribute may be much more relevant than the price tier, because the consumer is prepared to pay a higher price for a brand item.
The New Item Attributes view displays attribute information about new items.
The New Item Attributes view contains the following measures:
Attribute Weight
This measure displays the relative importance of the attributes for a given new item. While the flavor family may not be important for a t-shirt, and the attribute has a weight of zero, the brand and color attributes definitely are. Their relative importance may be 0.2 for the color and 0.3 for the brand.
|
Note: That the sum of all attribute weights does not need to be 1 for every item. The automatic like item recommendation algorithm is taking care of it. The most likely scenario is that this measure is calculated in a data mining application and loaded into RDF CS. |
Product Attribute Label
This measure displays the label of the product attribute. For instance for the brand attribute the label can be private label. Or for size, it can be 12oz.
The Existing Item Thresholds Maintenance view is used to adjust the parameter that decides if an item is eligible to be selected as like item for a new item.
The Existing Item Threshold view contains the following measure:
Threshold Recent Sales Density
The value of this measure decides if an item can be recommended as like item for new items. The idea behind determining the eligibility is that an item needs to be actively selling to be eligible. We don't want a stale item, or item with no sales to be selected as like item even if item attributes match very well. To determine the eligibility we first calculate the count of non-zero sales in the most recent periods given by the TS duration. Then we divide the count by the TS duration to get the sales density. Finally, the density is compared with the value of the threshold. If it is larger, then the item can be assigned as like item.
The Similarity Score view is at the item/item RHS/attribute intersection. The item dimension contains new item which are manually selected during the wizard process. The new item alert can also be used to range down the items to a relevant selection. The item RHS dimension is ranged to only relevant existing items that are eligible to be like items. The measure shows the calculated similarity between new and existing items.
The Similarity Score view contains the following measure:
Similarity Scores
The Similarity Score is a measure of how well a new item's demand behavior can be modeled after a certain existing item's. The higher the score, the better the fit, and the better the chance that the existing item is going to be the like item
This step contains views that allow you to review the top choices for like items for the new items, based on similarity among items.
The available views are:
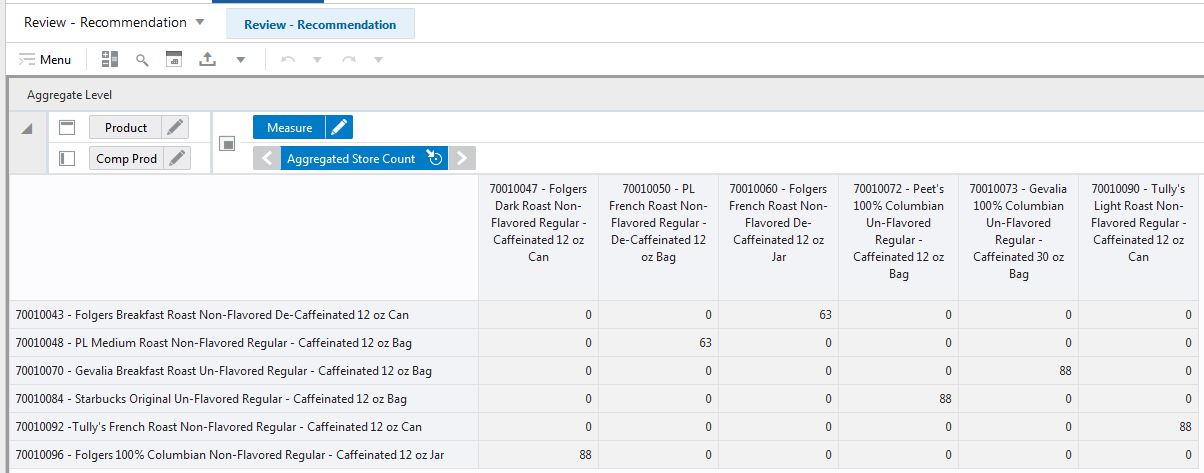
The Aggregate Level view is at the item/item RHS intersection. The item represents the new items, while the item RHS represents the like items. The item RHS dimension has only positions that were identified as like items for new items.
The Aggregate Level view contains the following measure:
Aggregated Store Count
This measure displays the number of stores at which an item RHS position was identified as the most suitable like item for a new item. For instance, for new item A, item BA was identified to be the like item for 20 stores. For the rest of 42 stores, it was item CA. This can happen simply because the best fit - in this case item BA - is not sold in all stores. Item CA is the second best fit, but it's sold in more stores, and thus the subjective better fit.
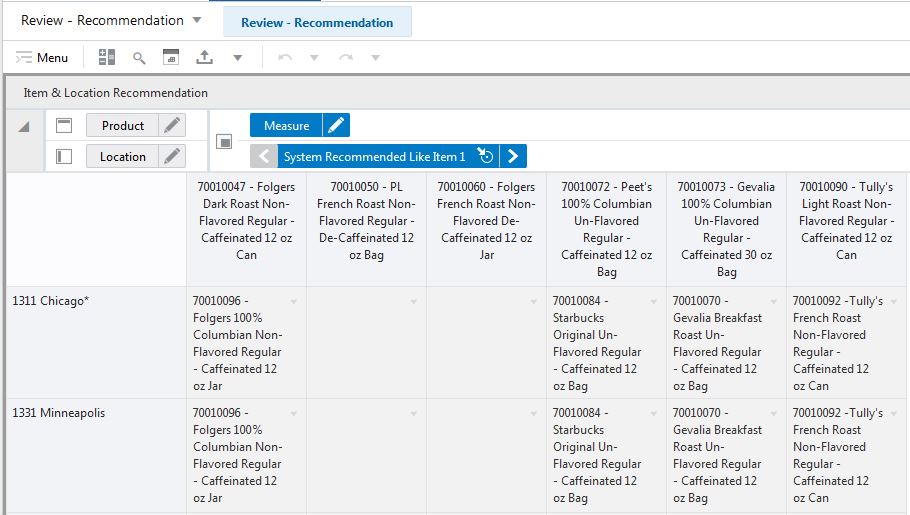
The Item & Location Recommendation view is at the item / store intersection. For new items it displays the top three matching items for a certain store.
The Item & Location Recommendation view contains the following measures:
System Recommended Like Item 1, 2, 3
This measure displays the top three like items (based on similarity and store ranging) for every store. For a given new item, the like items may be different by store. The reason is that for some stores, the existing item with the highest similarity is not available for sale. Then, the algorithm is picking the existing item with the highest score for that store.