| Oracle® Retail Assortment Planning User Guide for the RPAS Fusion Client Release 15.0 E64557-01 |
|

 Previous |
 Next |
| Oracle® Retail Assortment Planning User Guide for the RPAS Fusion Client Release 15.0 E64557-01 |
|
Previous |
Next |
Size/pack allocation is the seventh step in the AP business process. There are two different approaches to managing size and prepack Profiles in AP and they follow very similar processes. The only difference is that in the Optimize AP version, the Buyer is selecting the size and prepack profiles to be used while in the Optimize SPO version, the size and prepack selections were made using an external solution such as Oracle Retail Size Profile Optimization (SPO) and loaded into AP. Both approaches finish with allocating the Buy Plan down to the size or prepack and store/site/application (Point of Commerce) level.
This process step includes the following task:
The choice of Optimize AP or Optimize SPO depends on whether the Buyer must select the size and prepack profiles or use the profiles loaded from an external source.
Table 8-1 Business Role in Optimization Size/Pack Allocations
|
|
The Buyer Analyst makes size and pack decisions. |
|
|
The Allocator allocates the Buy Plan down to the size/pack and store/site/app (Point of Commerce) level. |
In the Optimize AP version of this task, the Buyer selects size and prepack profiles for the style-colors added to the assortment. Then, the Allocator (or the Buyer, if desired) runs the Allocation algorithm to spread the Receipt Plan from the Buying Plan down to the size and then the prepack algorithm generates the receipt in packs at the store/site/application (Point of Commerce) level (referred to as PoC level in this chapter).
These allocations can then be exported and shared with an allocation execution solution.
This task has the following steps:
To create the Optimize AP Size & Pack Allocations workbook:
Select the New Workbook icon in the Optimize AP Size & Pack Allocations task.
The workbook wizard opens.
In the Select Looks page, select the looks to be loaded into the workbook. Click Finish.
The workbook is created.
There is one view in this step.
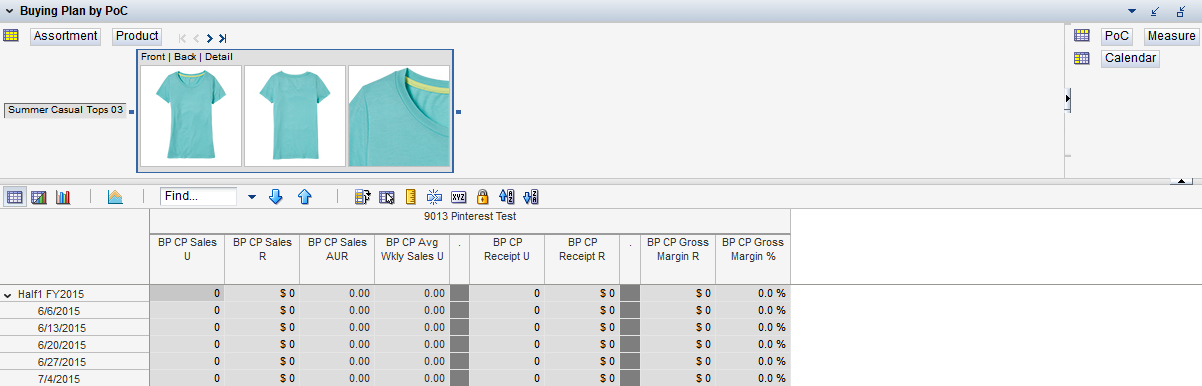
In this view, the Buyer can review the Buying Plan that was created for this Look in the Buying Plan Task. It is included here at the PoC level to refresh the Buyer's memory and ensure the allocations created in this workbook align with the Buying Plan. The allocation algorithm uses the Buying Plan.
Note that the receipt and sales that are created in the Buying Plan are at the cluster level. They will then spread down to the PoC level using the PoC CP plan curve. The user can review or plan PoC CP data in the Create PoC Targets workbook. If there is no PoC CP plan data defined, the spread will not happen. Given that stores sales can vary a lot, it does not make sense to spread the receipt and sales evenly from the cluster level to the PoC level.
Table 8-2 lists the measures available in this view.
Table 8-2 Buying Plan by PoC View Measures
| Label | Description |
|---|---|
|
BP CP Sales U |
Buy Plan approved Sales Unit. |
|
BP CP Sales R |
Buy Plan approved Sales Retail. |
|
BP CP Sales AUR |
Buy Plan approved Sales AUR. |
|
BP CP Avg Wkly Sales U |
Buy Plan approved Average Weekly Sales Unit. |
|
BP CP Receipt U |
Buy Plan approved Receipt Unit. The rest of the receipt plan by size will be calculated based on this measure. |
|
BP CP Receipt R |
Buy Plan approved Receipt Retail. |
|
BP CP Gross Margin R |
Buy Plan approved Gross Margin Retail. |
|
BP CP Gross Margin % |
Buy Plan approved Gross Margin Percentage. |
In this step, the Buyer can create allocations of the initial receipt down to the style-color-size level for each store, site, and application.
This step has one custom menu option.
There is one view on this tab.
In this view, the Buyer is able to review the pool of size profiles that can be assigned to style-colors in this Look. The profiles are defined at the subclass and attribute code level. They will be mapped to each style-color based on the selection of attribute code and size range selected for each style-color in the Review Attribute Code & Size Range view. The profiles were either loaded from an external solution or were created in the Define Size Profiles and Pack Task.
Table 8-3 lists the measures available in this view.
Table 8-3 Review Size Profiles View Measures
| Label | Description |
|---|---|
|
Size Profile % |
Size Profile % is defined in the Size and Pack Maintenance workbook, or loaded from external system such as SPO. Size Profile % is defined at the subclass, attribute code, and PoC level. Based on the attribute code and size range selected in the Review Attribute Code & Size Ranges view at the skup level, the Size Profile % will be picked for the skup within the subclass. |
There is one view on this tab.
In this view, the Buyer can select the attribute code and size range to be used for each style-color. If the Buyer is using a solution such as SPO to optimize Size Profile assignment, this step will be completed in that solution and the results are just reviewed here.
Table 8-4 lists the measures available in this view.
Table 8-4 Review Attribute Codes & Size Ranges View Measures
| Label | Description |
|---|---|
|
WP Attribute Code |
The Attributes Code defined for the style-color. The attribute code is used to copy the size profile % integrated from the subclass/class level to the style-color level. This field is blank for placeholder items. For placeholder items, you must enter the attribute code manually so that it picks up the accurate size profile. |
|
WP Size Range |
The size range to which the item belongs. This is information can be loaded or can be overridden at the skup level. The size range is used to copy the size profile % from the subclass level to the skup level. |
There is one view on this tab.
After running the Apply Size Profiles custom menu, the Buyer is able to review the allocations by style-color-size at the PoC level. The Buyer can choose to change the Size Profile assignment (by changing Attribute Code or Size Range assignment) and rerun the custom menu.
Table 8-5 lists the measures available in this view.
Table 8-5 Review Receipts by Size View Measures
| Label | Description |
|---|---|
|
WP Receipt U |
The receipt unit at size level. It is populated by executing the Apply Size Profiles custom menu. This custom menu applies the Size Profile to break down the Receipt Units from the skup level to the skup/size level. The result will be rounded to the most reasonable units for each size. |
In this step, the Buyer can create allocations of the initial round of receipts by prepack down to the store, site, or application level.
This step has the following tabs and views:
This step has one custom menu option.
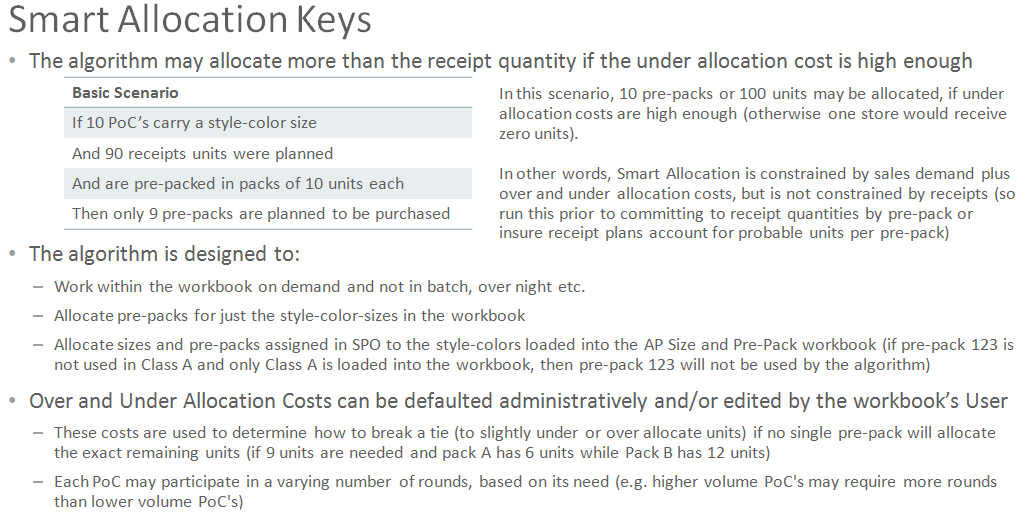
In this custom menu option, the prepack optimization algorithm, also known as the Smart Allocation Algorithm, applies the pack definition (defined or seeded) to the previously calculated receipt by size. The output of the custom menu is the allocated receipt by prepack at the PoC and week level.
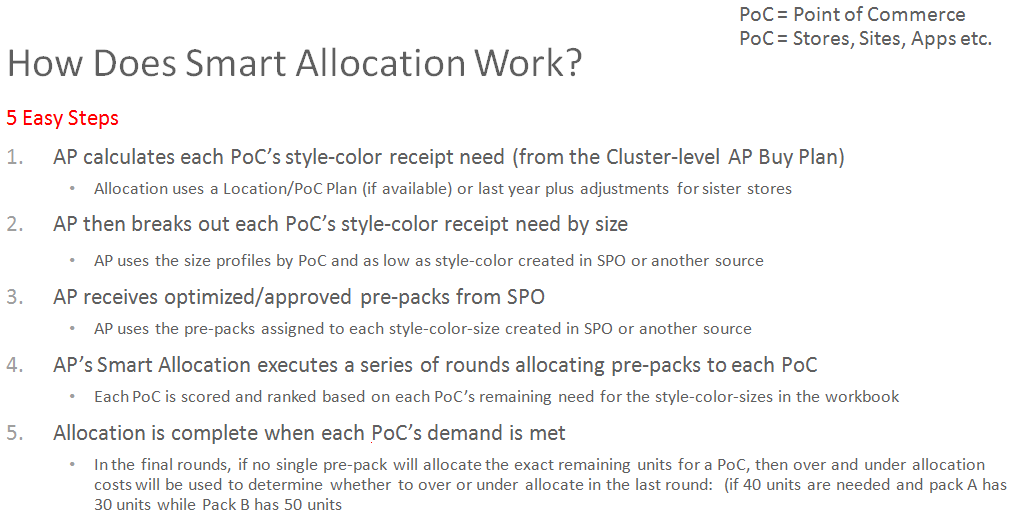
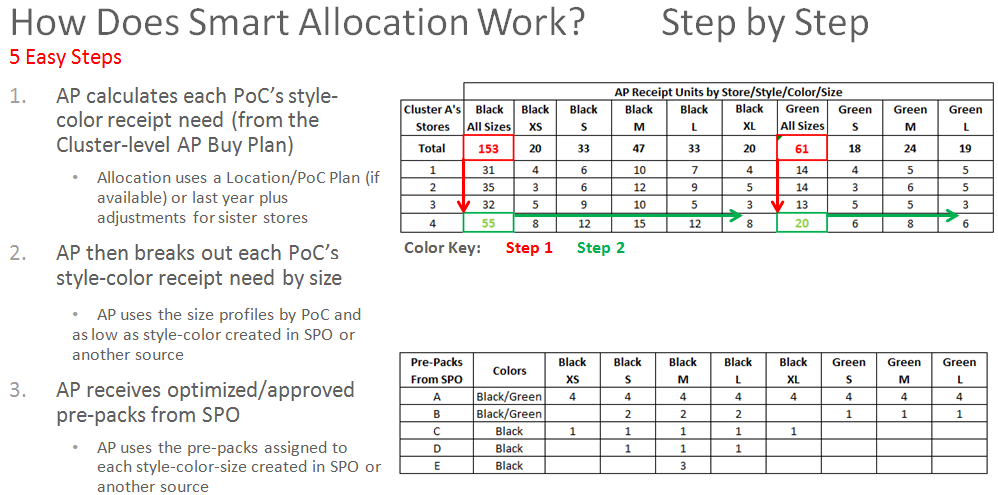
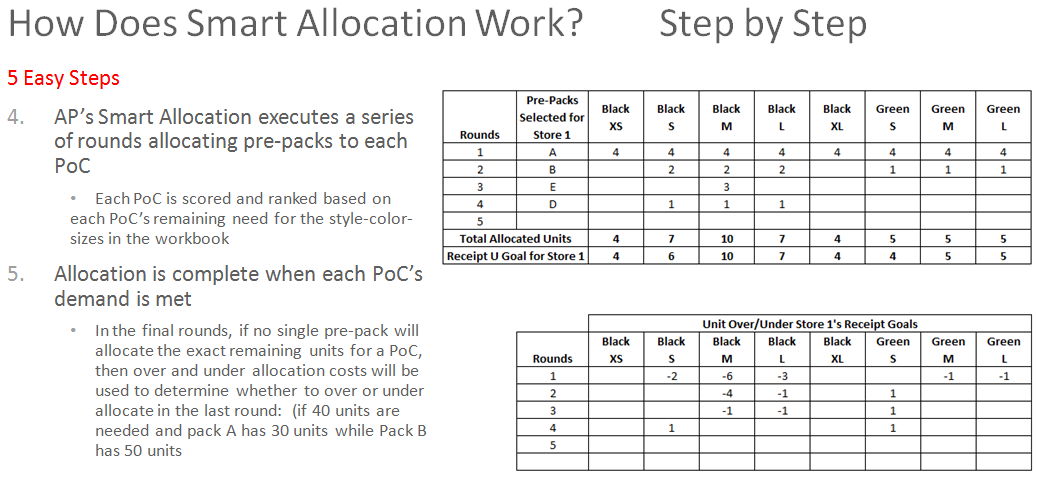
The following figures explain the five steps taken by the Smart Allocation Algorithm.
On this tab, the merchant is able to view the prepacks (and their composition) that can be used in the assortment. They were created in an external solution and loaded into AP or they were created in the Administrative section.
In this view, the merchant is able to review the prepacks that are active for each style-color. They may have been assigned in the Define Size Profiles and Packs task and loaded from an external solution.
Table 8-6 lists the measures available in this view.
Table 8-6 Review Prepack Eligibility View Measures
| Label | Description |
|---|---|
|
Prepack / Style-Color Eligibility |
The eligibility is defined in the Size and Pack Maintenance workbook, or integrated from an external source such as SPO. It describes the mapping from the pack to the style-colors. Only the eligible packs will be considered as candidates to be assigned receipts. |
In this view, you can view the number of each style-color size that are available in a prepack. For example, prepack xyz may contain 12 total units:
2 units of 1100315 Solid Crew Tees Sea Foam Green size Small
4 units of 1100315 Solid Crew Tees Sea Foam Green size Medium
4 units of 1100315 Solid Crew Tees Sea Foam Green size Large
2 units of 1100315 Solid Crew Tees Sea Foam Green size X-Large
Table 8-7 lists the measures available in this view.
There is one view on this tab.
In this view, the merchant completes two actions:
Select, by checking a Boolean/check-box, the subclass and PoC combinations where prepack allocations should be created.
Run the Perform Optimization custom menu.
Table 8-8 lists the measures available in this view.
Table 8-8 Perform Prepack Optimization View Measures
| Label | Description |
|---|---|
|
WP Perform Prepack Optimization |
This Boolean measure indicates whether the given Subclass/PoC combination should be part of the pre-pack optimization call. Only the enabled subclasses and PoC combinations will get an automatically suggested optimized pack results. Enabling this measure will avoid massive and unnecessary calculation efforts, and therefore help save calculation time and improve performance. |
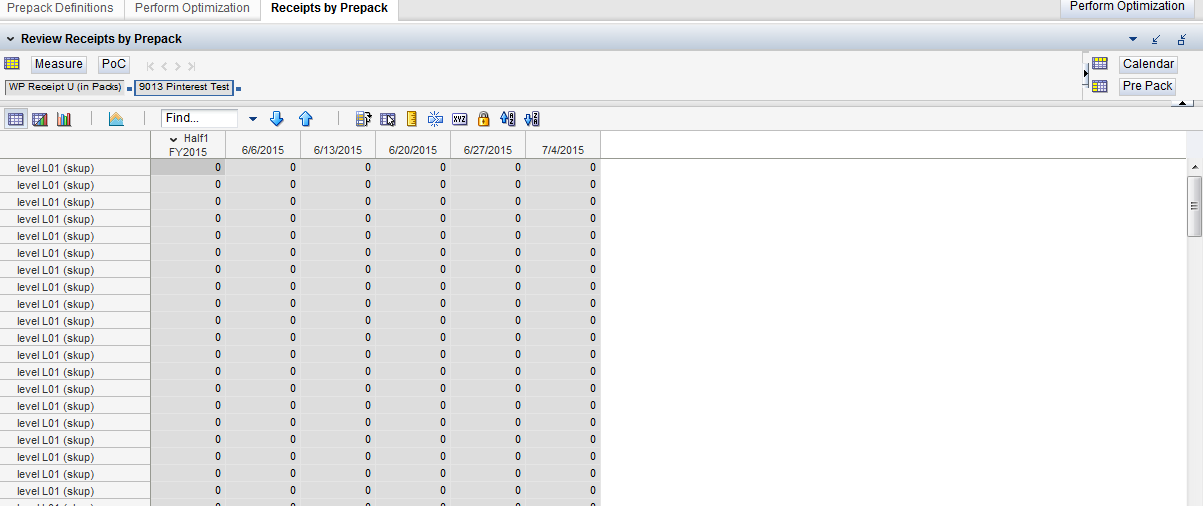
On this tab, the Buyer is able to review the results of the optimization of the initial round of receipts (in packs) created at the PoC and week level.
In this view, you review the total allocated receipt units by prepack to each PoC.
Table 8-9 lists the measures available in this view.
Table 8-9 Review Receipts by Prepack View Measures
| Label | Description |
|---|---|
|
WP Receipt U (in Packs) |
The number of units that are included in packs. The algorithm uses the WP Receipt U as the target, and tries to get as close to it as possible. But it is very rare that the units that are included in the Pack will be exactly the same as the calculated units. This measure is populated by executing the Perform Optimization custom menu. |
In this view, the user is able to review the remaining receipt units that were not allocated as prepacks. This occurs when the prepacks contain a quantity into which the buy quantity in units cannot be divided without a remainder.
For example, if the prepack contains 12 units and the receipt in units is 148, the allocation algorithm is able to allocate 12 prepacks of 12 units and 4 units (as 12 multiplied by 12 equals 144) that are considered loose receipt units that will be visible in this view.
Table 8-10 lists the measures available in this view.
In this view, you compare the total allocated receipts by prepack to the receipt plan in units from the Buying Plan. Some variance measures are included.
Table 8-11 lists the measures available in this view.
Table 8-11 Comparison to Expected Receipts View Measures
| Label | Description |
|---|---|
|
BP CP Receipts U |
Current Plan (Approved Plan) Receipt Units before applying Size Profile %. |
|
Size Profile % |
Size Profile percentage. |
|
WP Receipt U |
The number of receipt units that are calculated after the Size Profile percentages are applied. This is the target of the optimization. |
|
WP Receipt U (in Packs) |
The number of units that are included in packs. The algorithm uses the WP Receipt U as the target, and tries to get as close to it as possible. But it is very rare that the units that are included in the Pack will be exactly the same as the calculated units. |
|
WP Fit % |
Since the receipt units in packs are usually not the same as the target receipt units, this measure is calculated as the percentage of WP Receipt U (in Packs) to the WP Receipt U. |
|
WP Under % |
This measure is the ratio of the packed receipt units that are below the target receipt units to the target receipt unit. When WP Receipt U is greater than WP Receipt U (in Packs), the value is calculated as the difference between WP Receipt U and WP Receipt U (in Packs) divided by WP Receipt U, otherwise it is zero. |
|
WP Over % |
This measure is the ratio of the packed receipt units that are above the target receipt units to the target receipt unit. When WP Receipt U is less than WP Receipt U (in Packs), the value is calculated as the difference between WP Receipt U (in Packs) and WP Receipt U (in Packs) divided by WP Receipt U, otherwise it is zero. |
In this step, the Buyer approves the settings and allocations, copying them from Working Plan versions to Current Plan versions. The Current Plan versions should be made available for reporting and execution of the allocations.
In this view, the Buyer selects the Looks to be approved and enters any relevant notes prior to running the Approve custom menu.
Table 8-12 lists the measures available in this view.
Table 8-12 Approve Allocations View Measures
| Label | Description |
|---|---|
|
Approve Allocations |
Boolean measure to indicate which Look and PoC to approve. The checked Look/PoC will be approved after executing the Approve Plan custom menu. |
|
Approved By |
The user who approved. |
|
Approval Date |
Date of the approval. |
|
Notes |
Note to attach to the approved Size & Pack workbook. |