| Oracle® Retail Merchandise Financial Planning Retail Cloud Service User Guide Release 18.0 F10757-01 |
|

 Previous |
 Next |
| Oracle® Retail Merchandise Financial Planning Retail Cloud Service User Guide Release 18.0 F10757-01 |
|
Previous |
Next |
The Planner role is usually associated with the merchandise planner in the merchandise planning organization. During the pre-season, the Planner receives department targets from the Planning Manager. The Planner references those targets when creating the subclass merch plans.
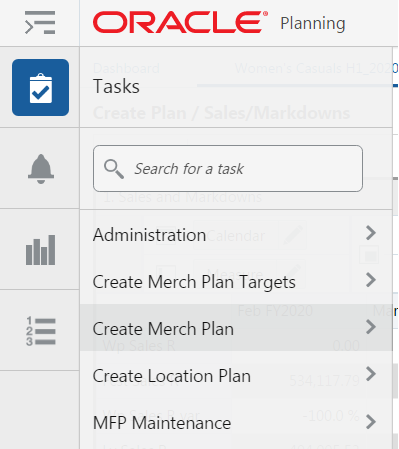
The Planner will start pre-season activity with the Create Merch Plan task. This task belongs only to the merch Planner role. It includes the following steps:
The Planner must complete the first three steps in the Create Merch Plan task for all subclasses in the department in order to create plans and submit them for approval to the Planning Manager. The fourth and fifth steps are used during in-season planning.
The available tasks depend on your user role.
To create the plan, the basic approach is to complete the following steps within the views provided in the Create Plan step:
The first time you begin the Create Plan step for a particular season, department, and channel, you will want to first review the Targets to understand the department totals you need to produce. The Targets are easily reviewed in the Review and Reconcile step > Review with Target sub-step.
Because you have not seeded any plans, the Wp versions of the plan will be irrelevant in the Target review. Another option you may prefer is to initially seed the entire department to generate the base Wp version for initial comparison against Targets.
Select the VAT rate and/or local currency rate for planning.
In Sales/Markdowns, plan the sales, markdowns, returns, and so on, you are projecting. Use forecasted sales and Ly as a guide.
Plan the required inventory and receipts.
Review the Gross Margin results.
|
Tip: As you build your plan, click the Commit button when you are happy with the intermediate state. This creates a permanent snapshot of the as-is state. This creates a restore point you can revert back to if you go down a path that is unsatisfactory. |
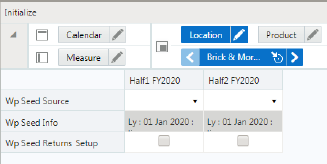
The first action that the Merch Plan users complete when creating a new plan is to seed the plan with the Initialize view. This view is found in the Create Plans Step: Seed Plan.
With this view, you can choose to seed your plan with Last Year (Ly) or Forecast (Fcst) data to create a demand curve on which to spread the new plan's initial targets. Or, you can instead choose to not seed the plan, which allows you to create a plan that is not influenced by last year's performance or forecast (plus last year's performance).
When seeding the plan, you can choose which information is seeded. For instance, you can seed just one half or all halves in the task. You can also choose what locations and products to seed.
Table 9-1 Merch Plan Measures
| Measure | Description |
|---|---|
|
Seed Source |
The seed source used to seed the working plan. Use this option to seed or not seed the working plan. You can seed with Last Year's (Ly) or Forecast (Fcst) data. Alternatively, choose the Blank option if you do not want to seed the working plan. |
|
Seed Info |
Includes a few pertinent facts about the last time that the Seed custom menu was executed: last seed source concatenated with last seeded date and the last user to seed. If blank, then the given intersection has never been seeded. |
There are two ways you can seed. You can seed each level individually, or you can seed several levels at once by changing the dimension level shown in the view.
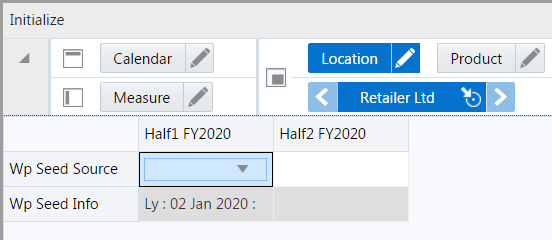
To seed one target at a time, you set the seed source information. Then, to seed the next deipartment in the Product dimension within the Brick & Mortar channel, complete the following steps:
Click the Dimension whose value (position) you want to change, as shown in Figure 9-3.
Click the Next or Previous arrow, as shown in Figure 9-3.
The page refreshes and the next position in the department dimension is displayed in the page edge. Note that the Seed Source measure is not populated for this department.
Select the half that you want to seed with Ly or Forecast data.
Click the Next arrow to view and seed the next department.
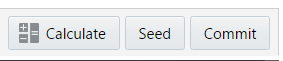
When you have selected all the data you want to seed, click Seed in the bottom right corner.
A confirmation message is displayed, stating that the data has been successfully seeded. Click OK.
After you have seeded, the view refreshes and the Last Seed Source and Last Seed Date measures contain the source and date of the last seed.
The default setting of the Initialize Plan view is set to show the Half level of the Calendar, the Channel level of the Location dimension, and the Subclass level of the Product dimension.
To change the dimension level shown in the page edge or grid, complete the following steps:
Click the Edit View button of the dimension level you want to change.
The Edit View window is displayed. Select the level of the dimension that you want to appear in the page edge. If you want to view more than one level at a time in the page edge or grid, select multiple levels.
Click OK when finished.
Repeat Steps 1 through 3 for other dimensions if necessary.
After the dimensions are at the level you want, select the halves that you want to seed.
In Figure 9-6, both the Location and Product dimensions are at the highest level, Company, and the half Half1 FY2020 are set to seed from last year.
When you have selected all the data you want to seed, click Seed in the bottom right corner.
Remember that regardless of the dimension selected for viewing and seeding, the actions in a workspace are ultimately limited by the positions you have selected for the workspace, that is, the Subclasses, Channels, and Halves.
The view refreshes. The Seed Info measure contains the last seed source concatenated with last seeded date and the last user to seed. A confirmation message is displayed, stating that the data has been successfully seeded. Click OK.
After you have seeded the divisions, continue to the next sub-step: "Sales/Markdowns Sub-Step".
The local currency chosen will be applied to the views of local currency found throughout the Create Merch Plan task.
After selecting a currency, you can click Calculate to apply the rate. If you have not yet performed a seeding action, the rate will be applied at the time of seeding.
The VAT Rate chosen will be applied as the VAT rate throughout the Create Merch Plan task. Ly actuals include VAT therefore the VAT rate is used to calculate values excluding VAT.
After selecting a VAT rate, you can click Calculate to apply the rate. If you have not yet performed a seeding action, the rate will be applied at the time of seeding.
In this view, you set the threshold minimums (mins) and maximums (maxs) that will trigger alert formatting and alerts in the MP: Exceptions dashboard. The following table lists the conditions under which an alert is triggered. Thresholds must be non-zero to trigger alerts.
| Threshold | Condition |
|---|---|
| Wp GM R % Max Threshold | Alert is green when Wp GM R % is greater than the threshold |
| Wp GM R % Min Threshold | Alert is red when Wp GM R % is less than the threshold |
| Wp Markdown R % Max Threshold | Alert is red when Markdown R % is greater than the threshold |
| Wp Markdown R % Min Threshold | Alert is green when Markdown R % is less than the threshold |
| Wp Net Sales R Max Threshold | Alert is green when Net Sales R is greater than the threshold |
| Wp Net Sales R Min Threshold | Alert is red when Net Sales R is less than the threshold |
| Wp Returns R % Max Threshold | Alert is red when Returns R % is greater than the threshold |
| Wp Returns R % Min Threshold | Alert is green when Returns R % is less than the threshold |
| Wp Sell Thru R % Max Threshold | Alert is green when higher than the threshold |
| Wp Sell Thru R % Min Threshold | Alert is yellow when less than the threshold |
| Wp Do Not Alert | Prevents alerting of the subclass/channels that are checked |
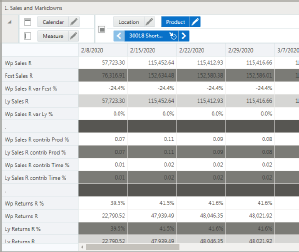
After you have seeded, develop the sales and markdown plan for those departments. The second tab within the Create Plan step, Sales and Markdowns, has one default view: Sales and Markdowns.
In the Sales and Markdowns view, you plan net sales, promotions, and markdowns. Sales are the revenue generated by selling goods or services. Regular priced sales yield the greatest margin, however successful promotions drive more traffic and completion of sales. Though the promotional sale likely includes markdown, the overall increase in sales should outweigh the markdown and drive at good margins.
There are several measure profiles available to logically guide you through the plan variables.
A measure profile is selected by clicking on the Edit View button next to the Measure tile.
A measure profile is selected by clicking on the Edit View button next to the Measure tile.
Sales and Markdowns (Default)
The measures in this profile represent totals which are not broken down by type of sale such as Promo, Clearance, and so on. This view also incorporates the forecast for viewing on top of all Ly actuals.
Sales by Type
The measures in this profile display and capture sales and returns figures by type of sale: Regular + Promotional, and clearance. Regular + Promo, and Clearance added together equate to the total sale or total return.
The planned figures for these sales types populates the Wp Sales R measure.
Markdowns by Type
Markdown is the difference between the original retail price and the actual selling price. The measures in this profile display and capture markdown figures as a total as well as by sales type: Regular + Promotional, and Clearance. The markdown types added together equate to the markdown (Wp Markdown R).
Direct
This measure profile contains the KPIs for direct to consumer channels.
Units
Some lines of businesses may prefer to build the plan, or at least closely couple the financial plan, by sales in terms of units. You also use this view to review the Average Unit Retail (AUR) to ensure it aligns with your strategic plans for the department.
Fulfillment Planning
This measure profile is focused on planning returns which result from Online purchases which are returned to the store. Often a significant portion of those returns are then sent back to the Online Fulfillment warehouses. These returns are rightfully attributed to the Direct channel and impact the net sales.
The restocking costs associated with such returns are reflected in the net gross margin of the Direct channel.
Fulfillment Ly
This measure profile is used to review last year's financials for sales returns and returns back to online.
Follow these steps to basic sales and markdown generation:
Using the default measure profile, which is Sales and Markdowns, review and compare the total sales to the forecast.
If you are planning a Wholesale/Franchise channel, use this view to plan Net Sales. Then go to the W/F Sales and Markdowns view to complete planning.
Change the measure profile to Sales by Type.
In the Sales by Type measure profile, plan your sales by type. The sales types are Total Sales, Regular + Promo Sales, and Clearance Sales.
Start by planning the regular sales. Then, using your marketing calendar as a guide, align the promotional sales to the calendar. Refer to the calendar again for the exit weeks for the products, and plan the clearance sales for those weeks.
The planned figures for these sales types populates the Wp Sales R measure.
Return to the Sales and Markdowns measure profile.
With the total Wp Sales R populated, you can adjust the total to your target while still maintaining the relationships between the different sales types.
Change the measure profile to Markdown by Type. In the Markdown by Type profile, edit the Wp Markdown Reg+Promo R% to adjust the Wp Markdown Reg+Promo Rate.
|
Note: Since sales and markdowns are both planned at the type level, you must first complete the sales by type planning before you can plan the markdowns by type. |
With Direct-to-Consumer returns representing a significant, and increasing portion of returns it is increasingly important to plan the impact on your business.
This view is used to setup return rates for Buy Online, Return in Store (BORIS) versus Buy Online, Return Online. These values along with BORIS back to Warehouse enable planning the cross channel impacts of returns and ultimately drive at more accurate Open to Buy figures.
Returns consume employee time processing the return, and restocking or sending returned inventory back to the warehouse. Setting the Restocking Cost per unit will show you how Net Gross Margin is impacted by the returns to Brick and Mortar and Direct (online) channels.
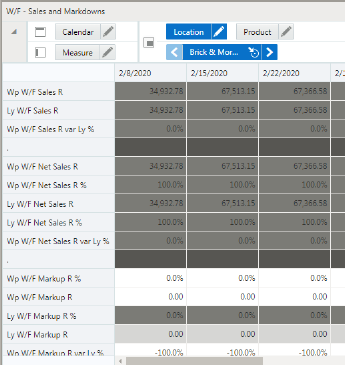
If the Wholesale/Franchise option is provisioned, you plan sales here. Wholesale/Franchise sales are typically tracked and managed as a separate channel of a retail business. Use the Wholesale/Franchise Sales and Markdowns view to build your target sales, markup, and markdowns that you will make as wholesaler or franchisor.
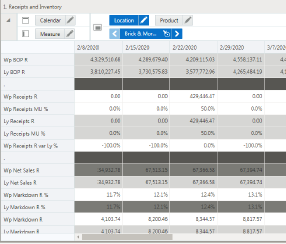
After you have developed the sales and markdown target, develop a receipts and inventory target that can support the planned sales and markdown. The purpose of this step is to ensure that you have a receipt and inventory plan that supports the sales that you are projecting.
Receipts and Inventory is where you will plan Beginning-of-period (BOP)/End-of-period (EOP) inventory, receipts, turn, and so on.
Inventory turn is an important indicator of the effectiveness of the planned inventory. It tells you how many times stock is being sold and repurchased over a given period of time. Turn is reviewed in this workspace view.
|
Note: This sub-step is not performed for W/F channels. |
|
Note: The adjustments you made to the Sales and Markdowns view are visible in this view if you have clicked Calculate. |
There are several measure profiles available to guide you through various approaches to planning inventory and receipts:
Retail
The Retail profile is the default profile. The planning is focused on total retail rather than units, and sale type. This profile is the most comprehensive view of variables impacting inventory.
Inventory by Type
In this profile, you can review and maintain a breakdown of inventory by sales type: Regular + Promo, and Clearance.
Units
The most important asset metrics are inventory units and inventory cost because these metrics impacts cash flow. In this view, you can directly maintain EOP inventory, Average Unit Retail, plus shrink, Mark Out of Stock (MOS), and Move to Clearance (MOC) in terms of units.
Fulfillment Planning
This measure profile focuses on planning the impacts of Buy Online, Pickup in Store and Buy in Store, Ship to Customer. These fulfillment methods are relevant because inventory is planned for a channel based on its projected sales. When the sales are attributed to one channel but fulfilled by another, the fulfillment channel's inventory must reflect the increased inventory need (increased OTB).
Fulfillment Ly
This measure profile is used to review last year's fulfillment metrics in relation to planning the correct placement of inventory by channel.
Use the following best practices to plan the receipts and inventory:
Plan the receipt flow and then evaluate the average inventory and turn.
Review the Receipts Markup (MU) for accuracy. Often this will follow the keystone 50%, but many variables can impact the decision on markup: from competitor pricing to freight costs, and overhead operating expense.
Review the Wp CMU % measure. Cumulative markup rate (CMU %) is a blend of the beginning of period (BOP) inventory retail and cost with the future receipt retail and receipt cost. The Wp CMU % directly affects the cost of goods sold (COGS), which then affects the gross margin.
Review the Wp Stock to Sales R ratio. Make adjustments to Sales and other inventory measures (Receipts, Move out of Stock, Move to Clr, and so on) to achieve the desired stock to sales ratio.
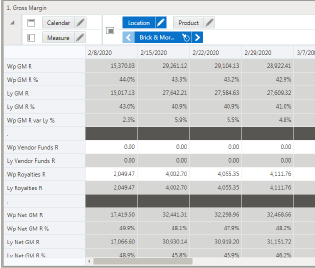
You build your plan with a close eye on gross margins and net gross margin. Gross Margin is a percentage (or ratio) of gross profit to net sales. Gross profit (expressed as Wp GM R) is the difference between net sales and Cost of Goods Sold (COGS). Gross margin and gross profit are very important measures of the profitability and financial performance of a company.
Use the Gross Margin view to evaluate the gross margin created from your sales and markdown plan and receipts and inventory plan. Determine whether the planned gross margin meets your gross margin goal. If it does not, return to the Develop Sales and Markdown Plan and Develop Inventory and Receipt Plan steps to adjust your receipt markups and receipt flow. Finally, return to the Gross Margin view to adjust additional contributors to net gross margin such as vendor funds and royalties.
If the Wholesale Franchise option is provisioned, you plan W/F channels in this view.
Wholesale/Franchise sales are typically tracked and managed as a separate channel of a retail business. In the Wholesale/Franchise Gross Margin, you review the planned gross margin on your wholesale/franchise sales.
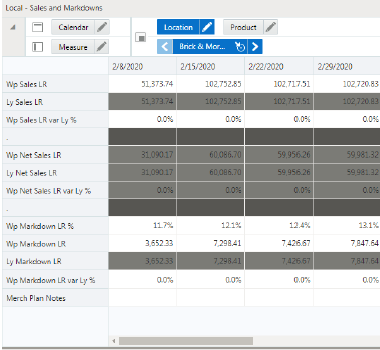
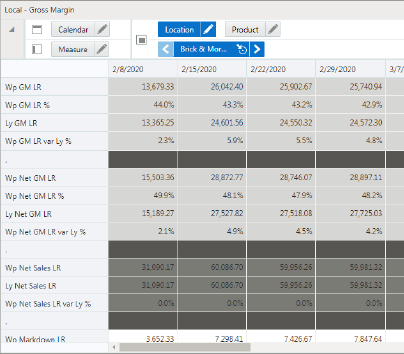
If the Local Currency option is provisioned, then there is an additional view to support planning Gross Margin.
The key planning KPIs contributing to gross margin are available in local currency for cross-referencing and high-level planning.
The Review and Reconcile step is performed after you have completed the Create Plan step for all subclass in a department.
If at any time during the pre-season you need to revise your plans to better align with the targets, you can follow the same procedures described in this chapter. Since you have already created a working plan, there is no need to seed the task again, unless you want to start over with Ly (Last Year) or Fcst (Forecast) data.
In this step, you can review your created or adjusted plan against department targets and location plans.
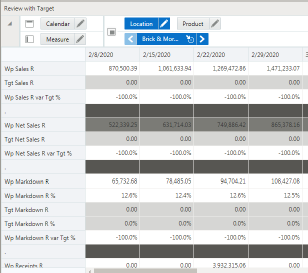
This sub-step can be performed at any point in the planning process when you wish to get a gauge of how the plans thus far measure up to the targets. This sub-step must be completed before submitting your proposed plan to the Planning Manager.
The Review with Target view contains the Planning Manager's Target (Tgt) measures as well as planning (Wp) measures. Use this view to compare the Tgt measures to the corresponding Wp measures. By comparing the targets to the planning metrics, you can better understand what your plan needs to achieve. The are several Tgt-to-Wp variance measures that quickly guide you to areas of difference.
In the Review Plan sub-step, you directly compare the Planners Wa plan to the targets. The are several Tgt-to-Wa variance measures that quickly guide you to areas of difference.
|
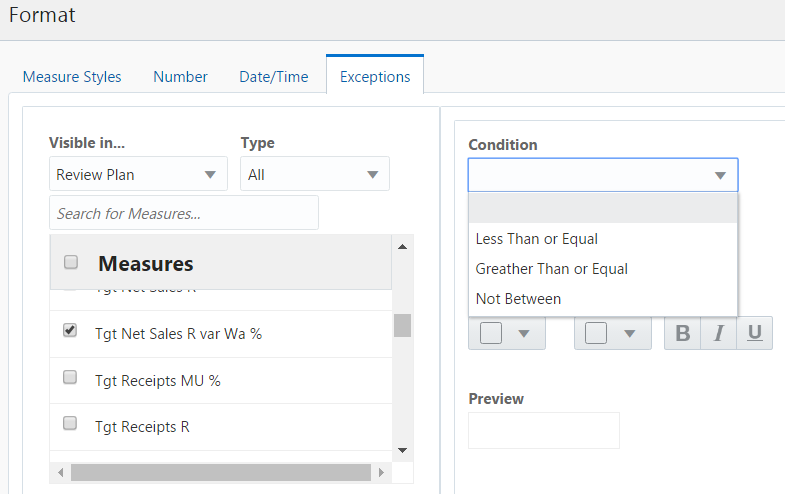
Tip: Use exception formatting on the variance measures to highlight variances. To reach the formatting dialog, right click the measure label and choose Format from the popup menu. Click the Exceptions tab and set the conditions where you want the exception formatting to show. |
If targets are not published yet, the Tgt measures have no values. If targets have been published or republished by the Planning Manager since you last reviewed them, click the Refresh menu option to reload the latest values. A refresh will reload all data in the workspace to the last committed version, so you must commit all of your plan work first, or it will be reverted to the last point of commit.
Next Steps
If you are reviewing your plans completed thus far but have not completed all subclasses in the department, you must repeat the Create Plan step until the plans for all subclasses in the department/channel are fully built out.
If you have just completed a pre-season plan for the first time:
No Location Plans exist yet, so you skip the Review with Location Plan sub-step.
Expand the list of steps and select Review and Submit Plan, then choose the sub-step: Submit and Copy Approved Plan.
Follow the necessary actions to submit your plan to the Planning Manager for approval. You may wish to now get started on Location Plan creation however, if the Planning Manager requires the plan to be adjusted, this may impact the work you started on your Location Plans.
If you are adjusting a pre-season plan that has already been submitted for approval:
If location plans are created, perform the Review with Location Plan sub-step to understand the implications to Location Plans.
Expand the list of steps and select Review and Submit Plan, then choose the sub-step: Submit and Copy Approved Plan.
Follow the necessary actions to submit your plan to the Planning Manager for approval.
Perform the Create Location Plan task to make adjustments to any Location Plans that have been started.
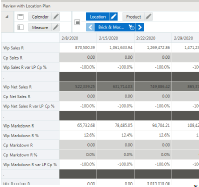
This sub-step is performed anytime you make adjustments to the merch Plan after location plans have been created.
In the Review with Location Plan view, you directly compare Wp (working merch plan) to the current location plan. By comparing the merch plan to the location plan metrics, you can better understand where there are misalignments that need to be corrected. There are several variance measures that quickly guide you to areas of difference.
|
Tip: Use exception formatting on the variance measures to highlight variances. To reach the formatting dialog, right click the measure label and choose Format from the popup menu. Click the Exceptions tab and set the conditions where you want the exception formatting to show. |
There are several measure profiles in this view to quickly guide you to the plans you wish to review.
Wp/LPCp
This measure profile shows the key Working Plan metrics for comparison with Location Plan, Current Plan metrics. Current Plan is a version of the plan that is approved in-season (and is actualized for elapsed/historical periods).
Wp/LPOp
This measure profile shows the key Working Plan metrics for comparison with Location Plan, Original Plan metrics. Original Plan is the plan as it was initially approved-typically it got approved pre-season and stays fixed when the period becomes in-season.
This step is performed when you are ready to submit your working plan to the Planning Manager for approval.
When you believe you are ready to submit your working plan to the Planning Manager for approval, first use the Review Plan view to make sure the plan meets expectations.
There are several measure profiles in this view to quickly guide you to the plans you wish to review:
Wp with Ly (Default)
This measure profile shows the main Working Plan metrics for comparison with last year metrics. This is the profile you will use after initially performing the Create Plan step.
Wp with Cp
This measure profile shows the main Working Plan metrics for comparison with Current Plan metrics. Current Plan is a version of the plan that is approved in-season (and is actualized for elapsed/historical periods).
Wp with Op
This measure profile shows the main Working Plan metrics for comparison with Original Plan metrics. Original Plan is the plan as it was initially approved. Typically, it got approved pre-season and stays fixed when the period becomes in-season.
This sub-step is performed when you have built a pre-season merch plan for all subclasses in a department for a given channel and period.
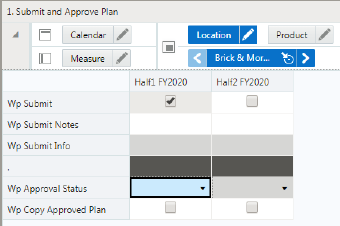
Submitting a plan copies the merch plans you built in the Wp measures to the Waiting Approval (Wa) measures, and then commits then to the database. Once committed, the Planning Manager can retrieve those plans and take action reviewing and approving them in the Create Merch Plan Targets task.
The Wa measures are shown in the Submitted and Approved view. These measures initially have zero values. After the merch plans are submitted in this step, those measures are populated with the Wa information.
In this view, you can submit the completed merch plans for approval by the Planning Manager. You can also view the approval status of a submitted plan in the Wp Approval measure. If the status is rejected, you need to go back the Create Merch Plan steps to make adjustments. Since you have already created a working plan, there is no need to seed the task again unless you want to start again with Ly (Last Year) data. After you have completed the adjustments, you will have to resubmit the plan. The submit action will copy the adjusted Wp into Wa for the Planning Manager to approve.
Once approved, follow the steps described below to copy the approved plan into the Original Plan (Op) version.
Submit a Plan
To submit a plan for approval by the Planning Manager:
Select a check mark in the Wp Submit measure.
Optional: Enter information about the working plan in the Wp Submit Notes field.
Click the Submit Plan button at the top right of the view.
A success message is displayed. Click OK to close it.
|
Note: The planning manager will determine the point when the pre-season planning process has been finalized and will lock down Op. When locked, you will be unable to submit a plan for approval and promotion to Op. However, you can submit a plan for approval and promotion to Cp.In rare circumstances the planning manager, working with the system administrator, may chose to unlock the plan and enable submission and approval of a modified Op. |
As a result of completing submission of the plan, the Wp Submit and Wp Submit Info measures are cleared, the Wp Approval Status is set to Submitted, and the Wa Submit Info measure is populated. In addition, your working plan is copied into a Waiting for Approval (Wa) plan.
Promote an Approved Plan to Op and/or Cp
Once a plan is approved by the Planning Manager, it must be promoted to the Original Plan and/or the Cp version by the Planner:
Place a check mark in the Wp Copy Approved Plan measure.
Click Copy Approved Plan in the top right corner.
A success message is displayed. Click OK to close it.
When the Op is locked down (typically during in-season), this action only promotes the approved plan to Cp. Otherwise, this action promotes the plan to both Op and Cp.
In this view, you can verify the plan that is awaiting approval.
The Planner uses the Create Merch Plan task during the in-season to review plans and compare those plans to the season actuals. Planners can also adjust the plans.
One of the key steps of in-season management is reviewing Open to Buy (OTB). OTB is the amount of money budgeted during the in-season to purchase goods that have not yet been received or ordered. The Planner will decide in-season how to spend this money to reach strategic targets.
In Season Review and Re-project Plan has the following sub-steps:
Use the Review Plan sub-step to review your core plan metrics with the current plan, the original plan, and last year's actuals.
There are several measure profiles in this view to quickly guide you to the plans you wish to review:
Wp with Ly (Default)
This measure profile shows the main Working Plan metrics for comparison with last year metrics.
Wp with Cp
This measure profile shows the main Working Plan metrics for comparison with Current Plan metrics. Current Plan is a version of the plan that is approved in-season (and is actualized for elapsed/historical periods).
Wp with Op
This measure profile shows the main Working Plan metrics for comparison with Original Plan metrics. Original Plan is the plan as it was initially approved. Typically, it got approved pre-season and stays fixed when the period becomes in-season.
This sub-step can be performed at any point in the planning process when you wish to get a gauge of how the plans thus far measure up to the targets. This sub-step must be completed before submitting your proposed plan to the Planning Manager.
The Review with Target view contains the Planning Manager's Target (Tgt) measures as well as planning (Wp) measures. Use this view to compare the Tgt measures to the corresponding Wp measures. By comparing the targets to the planning metrics, you can better understand what your plan needs to achieve. The are several Tgt-to-Wp variance measures that quickly guide you to areas of difference.
This sub-step is performed anytime you make adjustments to the merch Plan after location plans have been created.
In the Review with Location Plan view, you directly compare Wp (working merch plan) to a location plan. By comparing the merch plan to the location plan metrics, you can better understand where there are misalignments that need to be corrected. There are several variance measures that quickly guide you to areas of difference.
There are several measure profiles in this view to quickly guide you to the plans you wish to review:
Wp/LPCp (Default)
This measure profile shows the key Working Plan metrics for comparison with Location Plan, Current Plan metrics. Current Plan is a version of the plan that is approved in-season (and is actualized for elapsed/historical periods).
Wp/LPOp
This measure profile shows the key Working Plan metrics for comparison with Location Plan, Original Plan metrics. Original Plan is the plan as it was initially approved. Typically, it got approved pre-season and stays fixed when the period becomes in-season.
Managing Open to Buy (OTB) is the primary in-season task for the Planner. Each week, you will review last week's sales and its impact on your BOP/EOP inventory for the current and future weeks.
OTB helps identify out how much inventory you need to buy to make your sales projections. It represents the amount of money you have available to spend on merchandise. Simply put, OTB is the difference between how much inventory is needed and how much is actually available. This includes on hand, and on-order (including in-transit).
You will look to increase receipts if you have available open to buy and decrease receipts if not. You may have some flexibility to go over your OTB for a week as long as the month is on target. Consider the month as a whole and whether you want to withhold some OTB for opportunity buys that may come up.
Use OTB to understand the variance between the planned and projected inventory levels. This variance is shown in the Wp OTB R measure. OTB indicate how many additional receipts can be purchased. Users should understand if their planned receipts keep them on the overall Cp EOP inventory plan. To understand the variance between the Cp EOP inventory plan and the Wp EOP inventory plan, reference the measure Wp EOP R var Cp%. Use this view to validate what OTB you have available and then start adjusting your plan. Then, confirm that your updates can be obtained given the OTB constraints you may have.
The following profiles are available:
Default
This measure profile focuses on key metrics of total sales, markdowns, receipts, and on order to summarize open to buy.
Units
This measure profile focuses on unit and average unit cost key metrics for sales, receipt, and on order.
This view contains three measure profiles for analysis:
Default
This measure profile displays Reg+Promo, Clearance, and Net Sales and Markdowns and the corresponding inventory.
Direct
Key metrics for e-commerce are displayed including traffic, transactions, and returns.
Local Currency
If the Local Currency option is enabled, key metrics are viewed in local currency.
In this view, you can submit the completed merch plans for approval by the Planning Manager. You can also view the approval status of a submitted plan in the Wp Approval measure. If the status is rejected, you need to go back to In Season Review and Re-project to make adjustments. After you have completed your adjustments, you will have to resubmit the plan. This will copy the adjusted Wp to Wa for the Planning Manager to approve.
Once approved, follow the steps described below to copy the approved plan.
Submit a Plan
To submit a plan for approval by the Planning Manager:
Select a check mark in the Wp Submit measure.
Optional: Enter information about the working plan in the Wp Submit Notes field.
Click the Submit Plan button at the top right of the view.
A success message is displayed. Click OK to close it.
|
Note: The planning manager will determine the point when the pre-season planning process has been finalized and will lock down Op. When locked, you will only be able to submit for approval and promotion to Cp. |
As a result of completing submission of the plan, the Wp Submit and Wp Submit Info measures are cleared, the Wp Approval Status is set to Submitted, and the Wa Submit Info measure is populated. In addition, your working plan is copied into a Waiting for Approval (Wa) plan.
Promote an Approved Plan to Cp
Once a plan is approved, it must be promoted to the Current Plan version by the Planner:
Place a check mark in the Wp Copy Approved Plan measure.
Click Copy Approved Plan in the top right corner.
A success message is displayed. Click OK to close it.
In this view, you can verify the plan that is awaiting approval.